Install the Infisical Microsoft Teams App in Microsoft Teams tenant
Currently, Infisical requires you to install a custom Microsoft Teams app into your Microsoft Teams tenant.You can download the Infisical Microsoft Teams app package here:
Important for self-hosted users:If you’re self-hosting Infisical, you can skip the download step. Instead you should use the app package file you downloaded from the Microsoft Teams Developer Portal when you followed the Self-hosted guide.
Once you’ve downloaded the app package, you can install the app in your Microsoft Teams tenant by navigating to the Apps > Upload a custom app page, and selecting the “Upload an app” button.Once the app has been submitted, your Microsoft Teams tenant admin will need to approve the app in the Microsoft Teams Admin Center.
After the app has been approved, it can take a few hours (up to 24 hours in some cases) for Microsoft Teams to reflect the new app. During this period, the Infisical app will not be visible in Microsoft Teams, and won’t be usable.
Once the app has been approved, you will be able to use the Infisical Microsoft Teams integration in your projects.
2
Add the Infisical Microsoft Teams app to your Microsoft Teams teams
Once the app has been approved and installed in your Microsoft Teams tenant, you can add the app to your Microsoft Teams teams.Navigate to Apps > Built for your org, select the “Infisical” app, and press the “Add” button to select the teams and channels you wish to add the app to.
This can also be done later through the Microsoft Teams Admin Center, or through the Microsoft Teams client itself by navigating to the individual team’s app settings.
Once the app has been added to the team, you will be able to use the Infisical Microsoft Teams integration in the team.
3
Navigate to the Workflow Integrations tab in your organization settings
After installing the Microsoft Teams app, you are now ready to configure the Microsoft Teams integration within Infisical.Navigate to the Workflow Integrations tab in your organization settings, and press the “Add” button.
4
Create a Microsoft Teams workflow integration
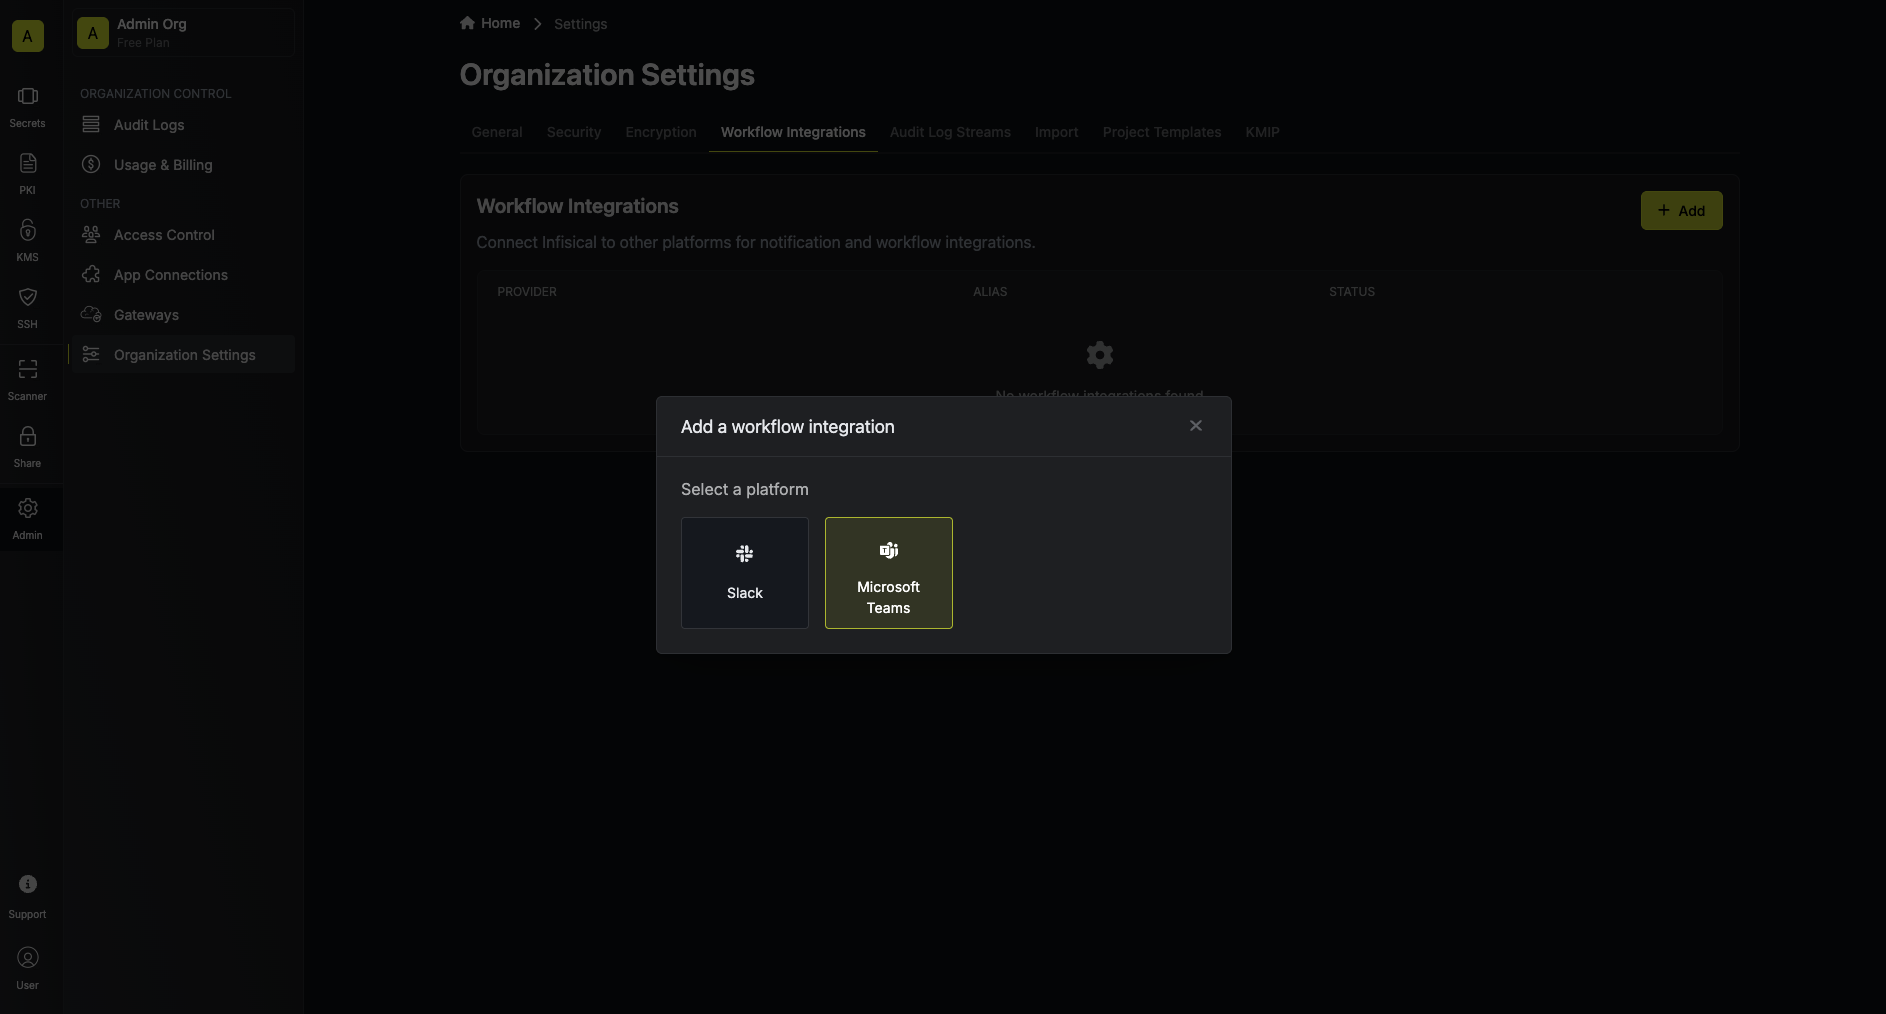
In order to use the Infisical Microsoft Teams integration, you will need to grant admin consent to the app. Once the consent is granted, the Microsoft Teams workflow integration will be created in your Infisical organization.Press the “Add” button and select the “Microsoft Teams” platform option.Select the Microsoft Teams integration you wish to configure, and press the “Configure” button.Here you will be prompted to enter an alias, tenant ID, and an optional description for your workflow integration.
The tenant ID is the ID of the Microsoft 365 / Azure AD tenant that you installed the Infisical Microsoft Teams app in, in the previous steps.Press the “Create Microsoft Teams Integration” button, and you’ll be navigated to the Azure AD consent page.
Please note that you must be a privileged administrator user of your Microsoft 365 / Azure AD tenant in order to grant admin consent to the app.
Once you’ve granted admin consent, you’ll be navigated back to the Infisical organization settings, where you can now select the Microsoft Teams integration you just created.
Configure project to use Microsoft Teams workflow integration
1
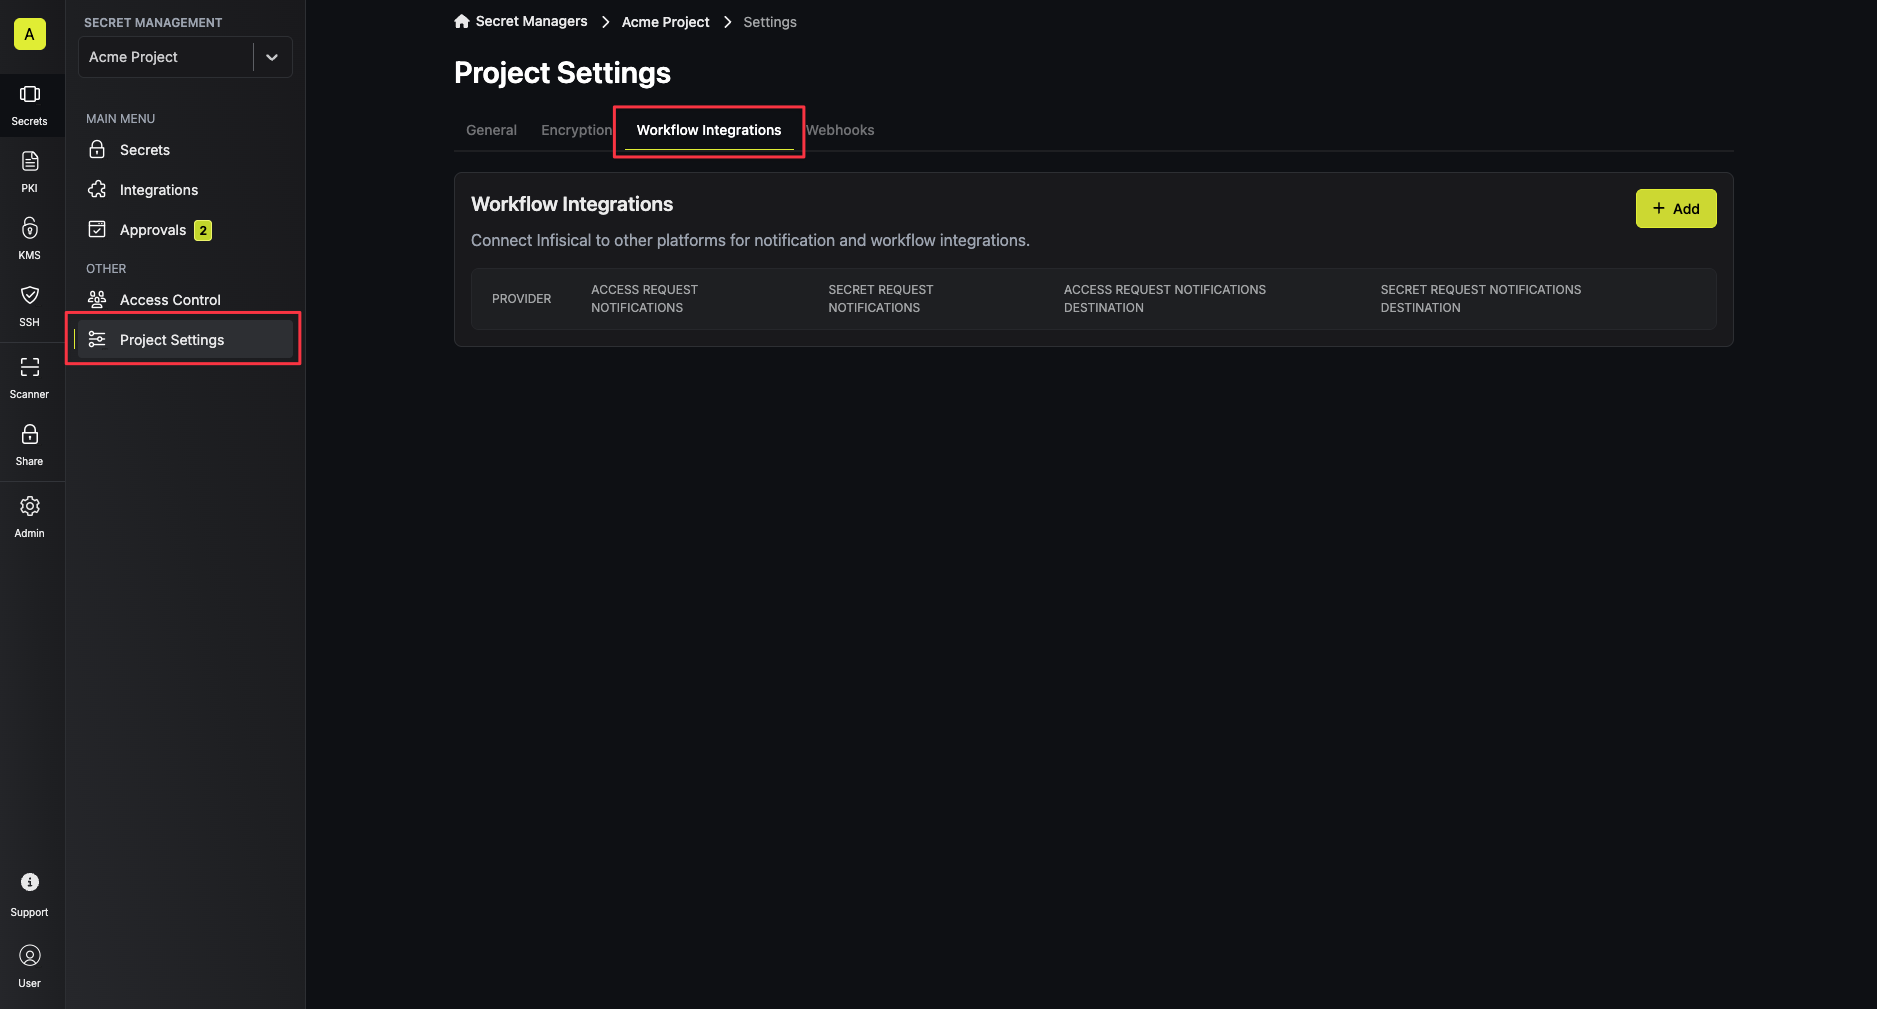
Navigate to the Workflow Integrations tab in the project settings
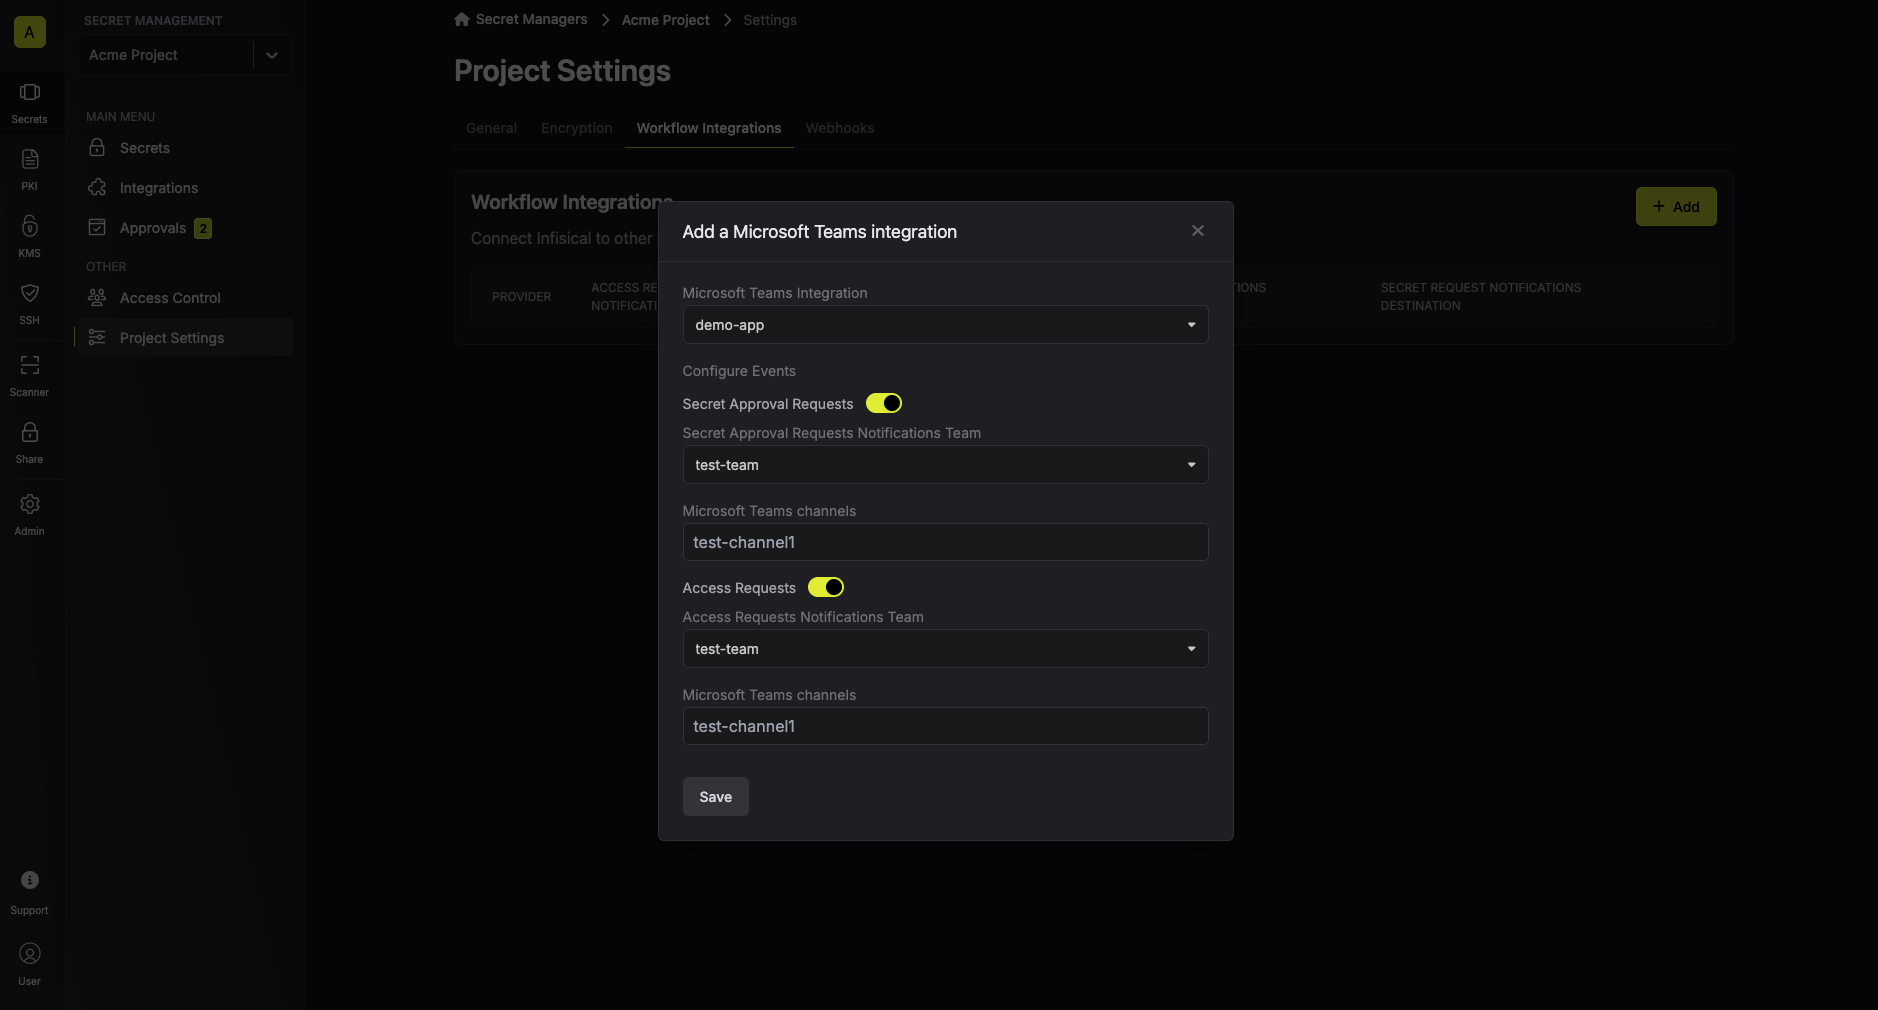
To add a new Microsoft Teams workflow integration, navigate to Project Settings > Workflow Integrations and press the “Add”.Select the “Microsoft Teams” option from the list of available workflow integrations.
2
Configure the Microsoft Teams workflow integration
Your project will send notifications to the connected Microsoft Teams team of the
selected Microsoft Teams integration when the configured events are triggered.Press the “Save” button to save your Microsoft Teams workflow integration.
Once you’ve created the project Microsoft Teams workflow integration, you will now receive Access Requests and Secret Approval Requests notifications in Microsoft Teams according to your configuration.
To create a Microsoft Teams bot, you must first create an Azure Bot from the Azure Marketplace, an app registration, and a Microsoft Teams app. The steps below document in detail how to create and configure these resources.
1
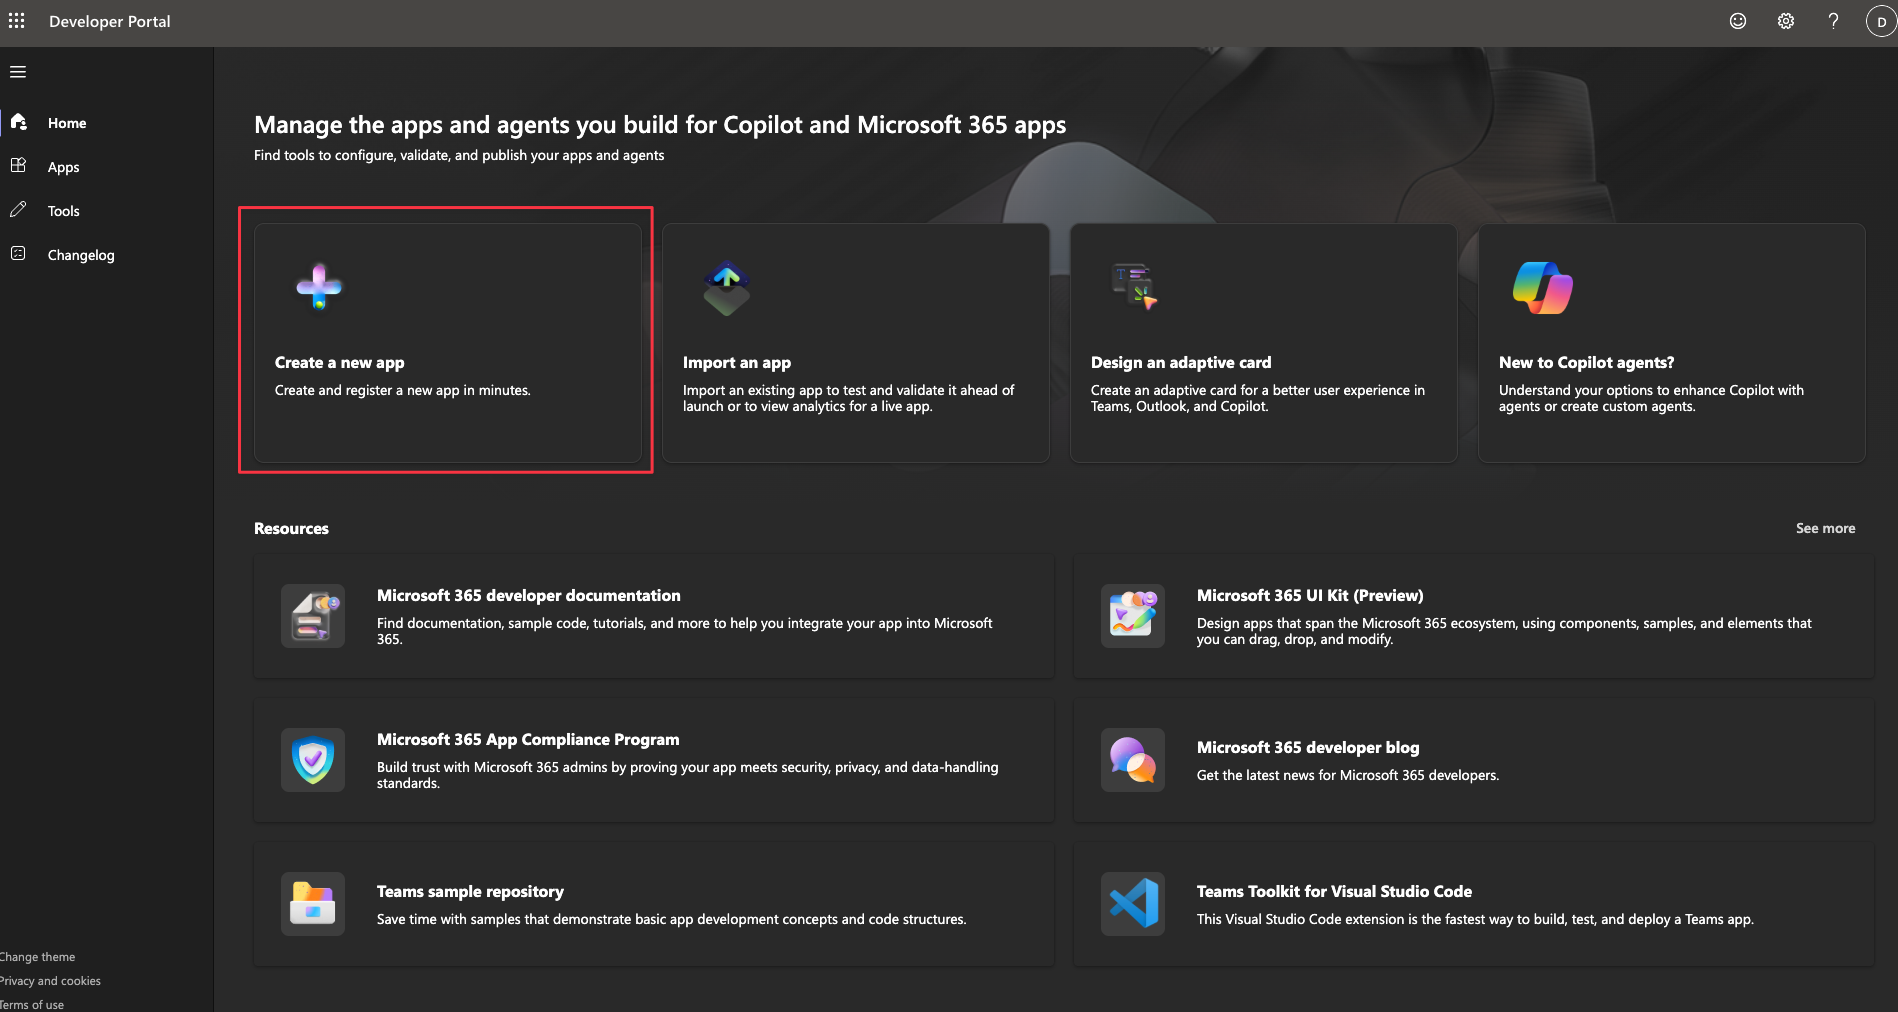
Create Microsoft Teams app
Navigate to the Microsoft Teams Developer Portal.Once you’re on the Microsoft Teams Developer Portal, press the “Create a new app” button on the overview page. Give the bot a name and press the “Add” button.
2
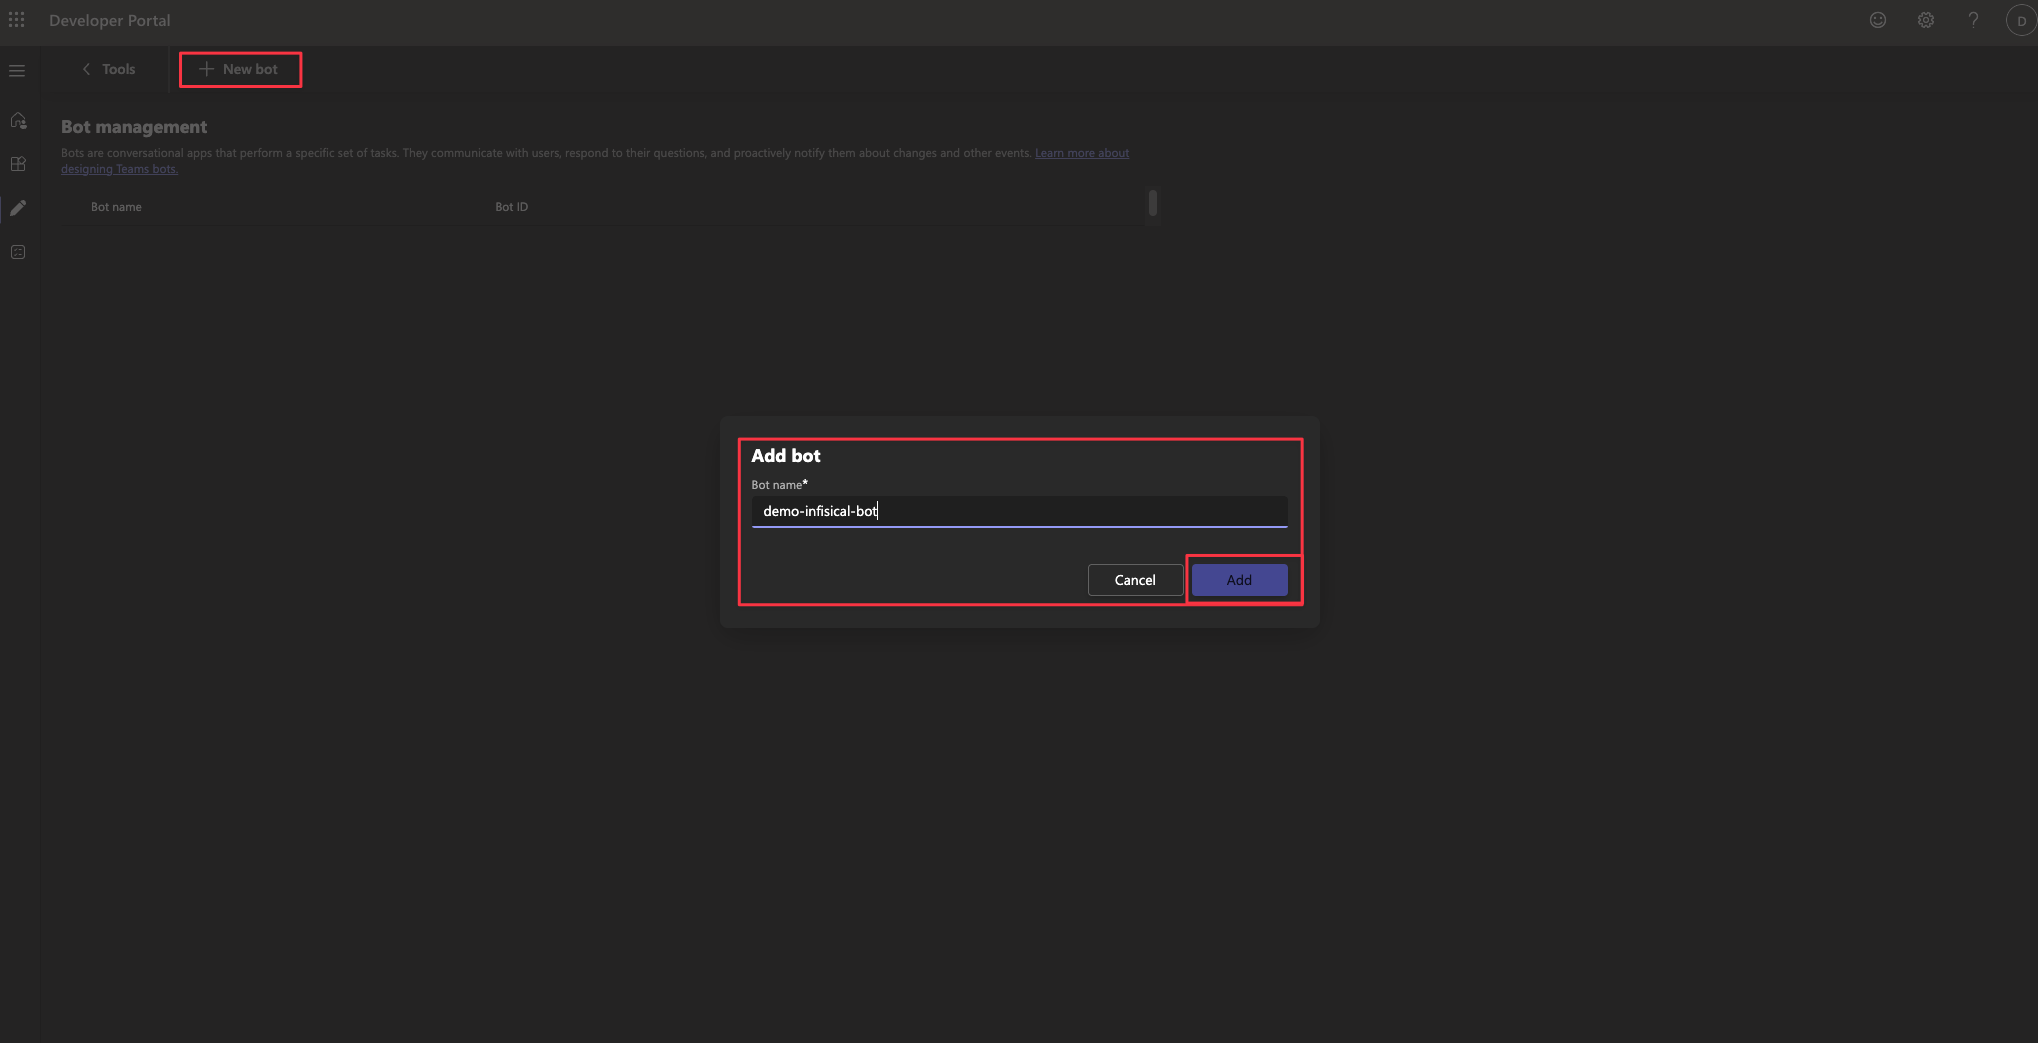
Create a Microsoft Teams bot
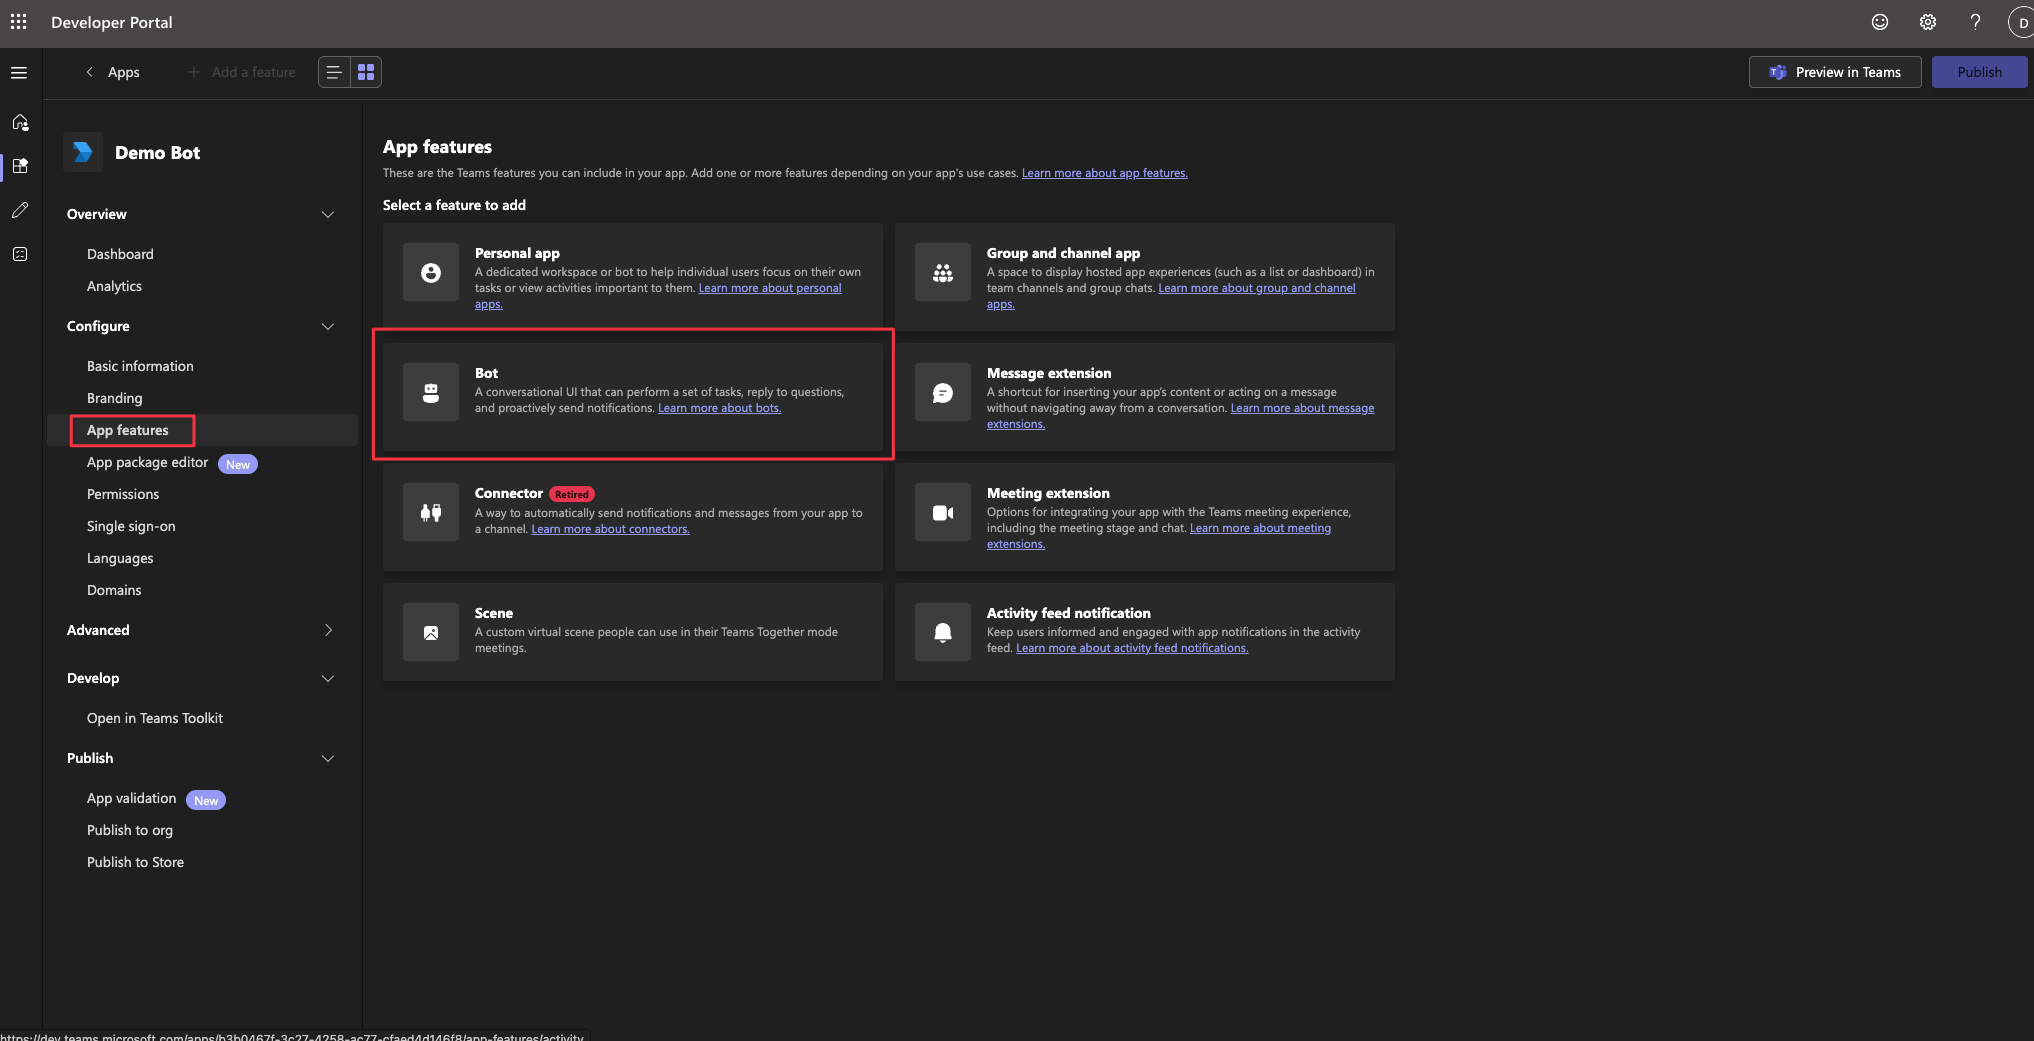
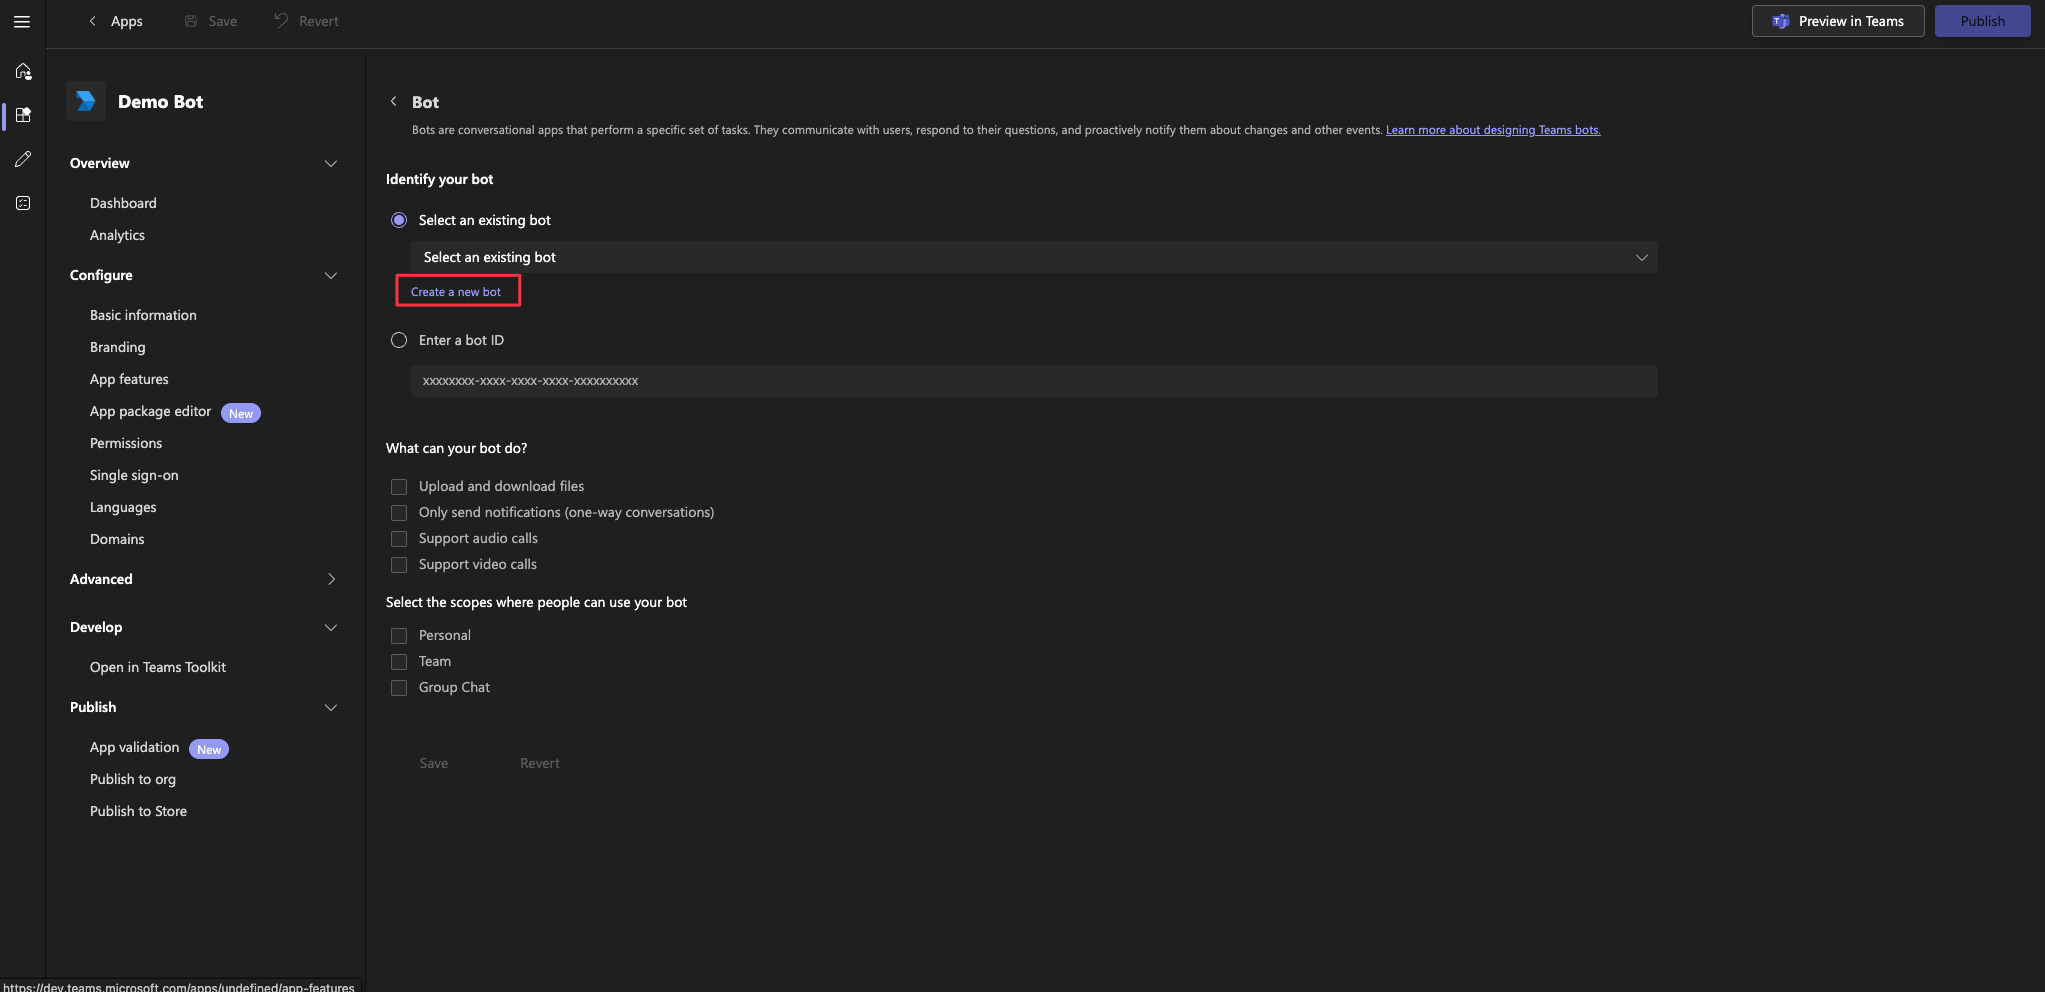
After creating the Microsoft Teams app, you’ll need to create a Microsoft Teams bot.Navigate to the app’s bot settings page and click “Create a new bot”.After clicking the “Create a new bot” button, you’ll be navigated to the Teams Developer Portal for bot management. Press the “New bot” button, and enter the name of the bot.
Please keep in mind that the name of the bot can only contain alphanumeric characters, dashes, and underscores.
3
Add a message endpoint to the bot
After creating the bot, you’ll need to add a message endpoint to the bot. Navigate to the “Configure” tab, and input the following endpoint under “Endpoint address”:
https://<your-infisical-instance-url>/api/v1/workflow-integrations/microsoft-teams/message-endpoint
Replace <your-infisical-instance-url> with the URL of your Infisical instance.Press the “Save” button to save the changes.
4
Find the bot in Azure App Registrations
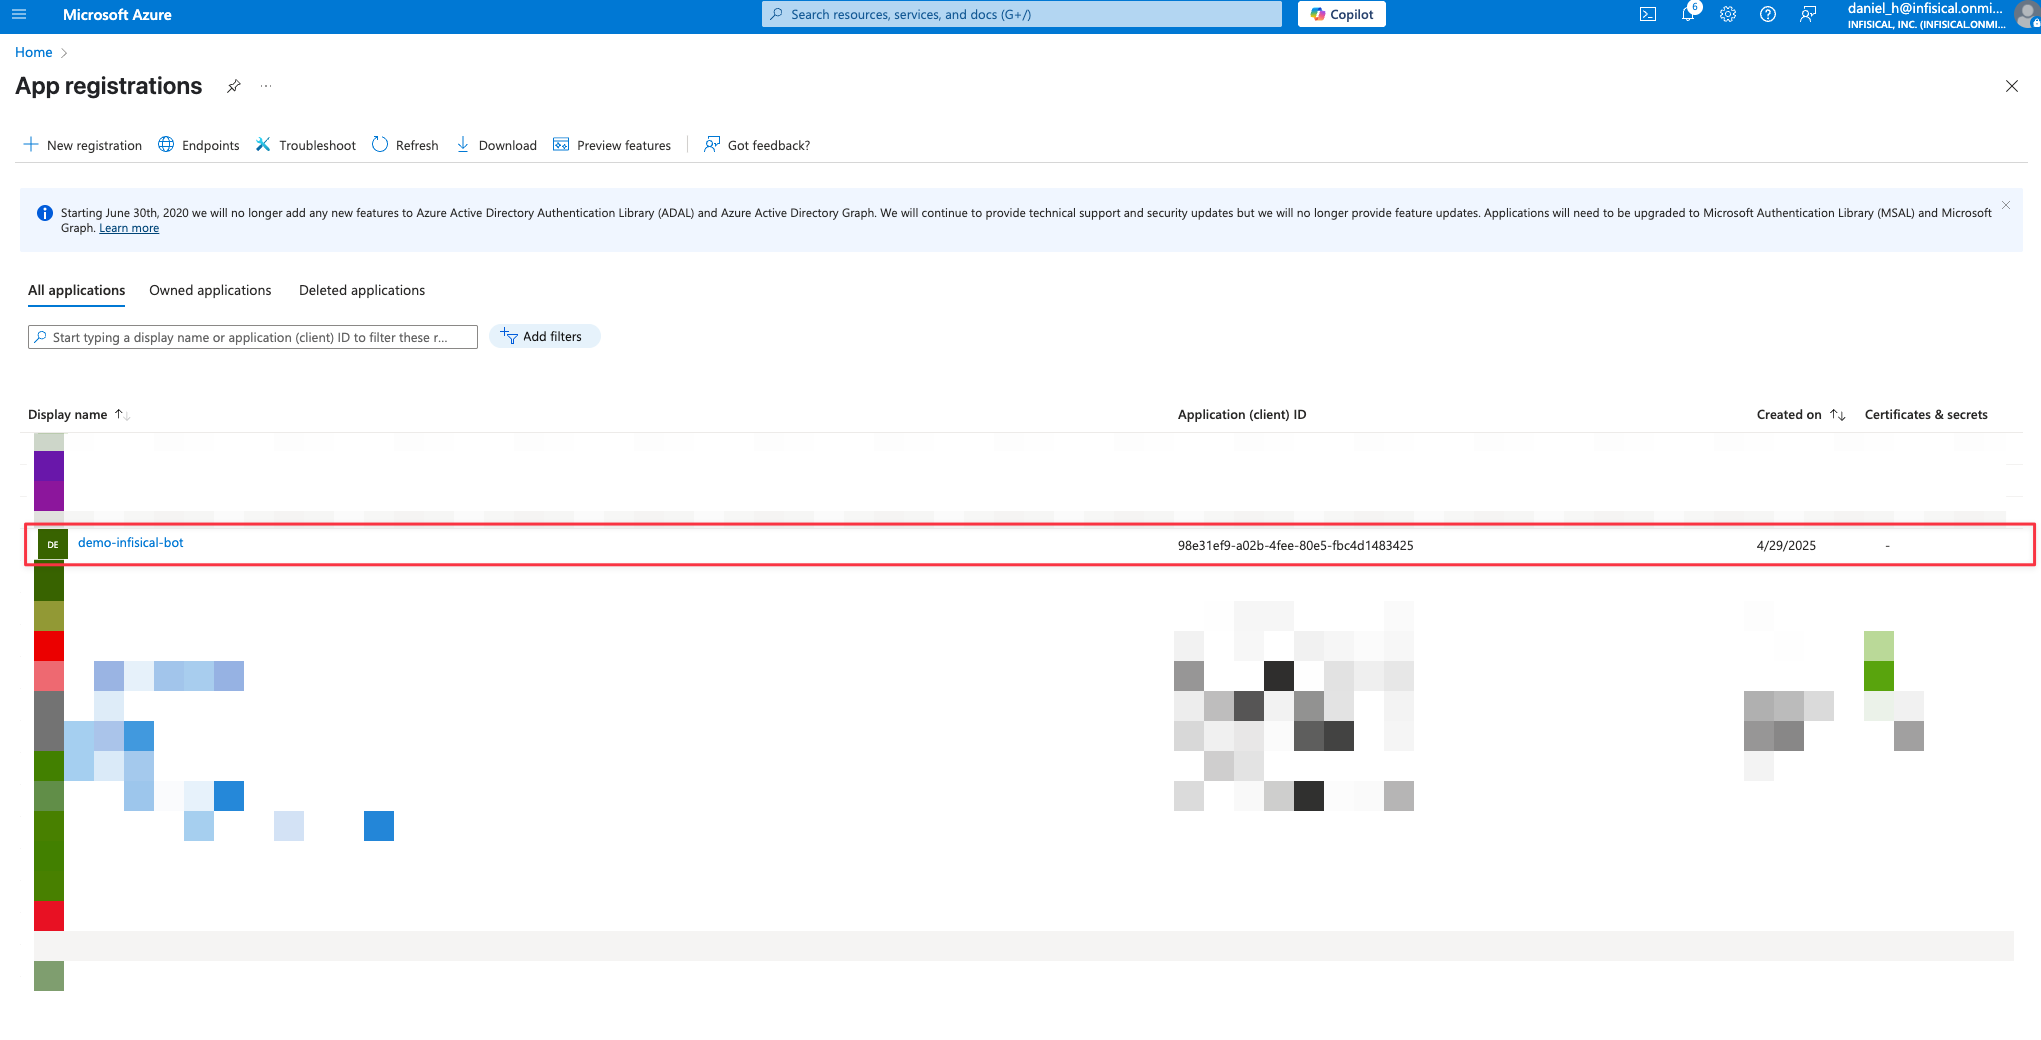
When you create a bot through the Teams Developer Portal, an Azure App Registration is also created.Open your Azure Portal and navigate to the “App Registrations” section to find the newly created app registration.
The name of the app registration will be the same as the name of the bot you created in the previous step.Press the app registration to open the app registration overview page.
5
Add API Permissions to the App Registration
Navigate to the “API Permissions” section of the app registration, and add the following permissions:
AppCatalog.Read.All
ChannelSettings.Read.All
MultiTenantOrganization.Read.All
Organization.Read.All
Team.ReadBasic.All
TeamsAppInstallation.Read.All
After adding the API permissions, press the “Grant admin consent” button to grant the permissions.
6
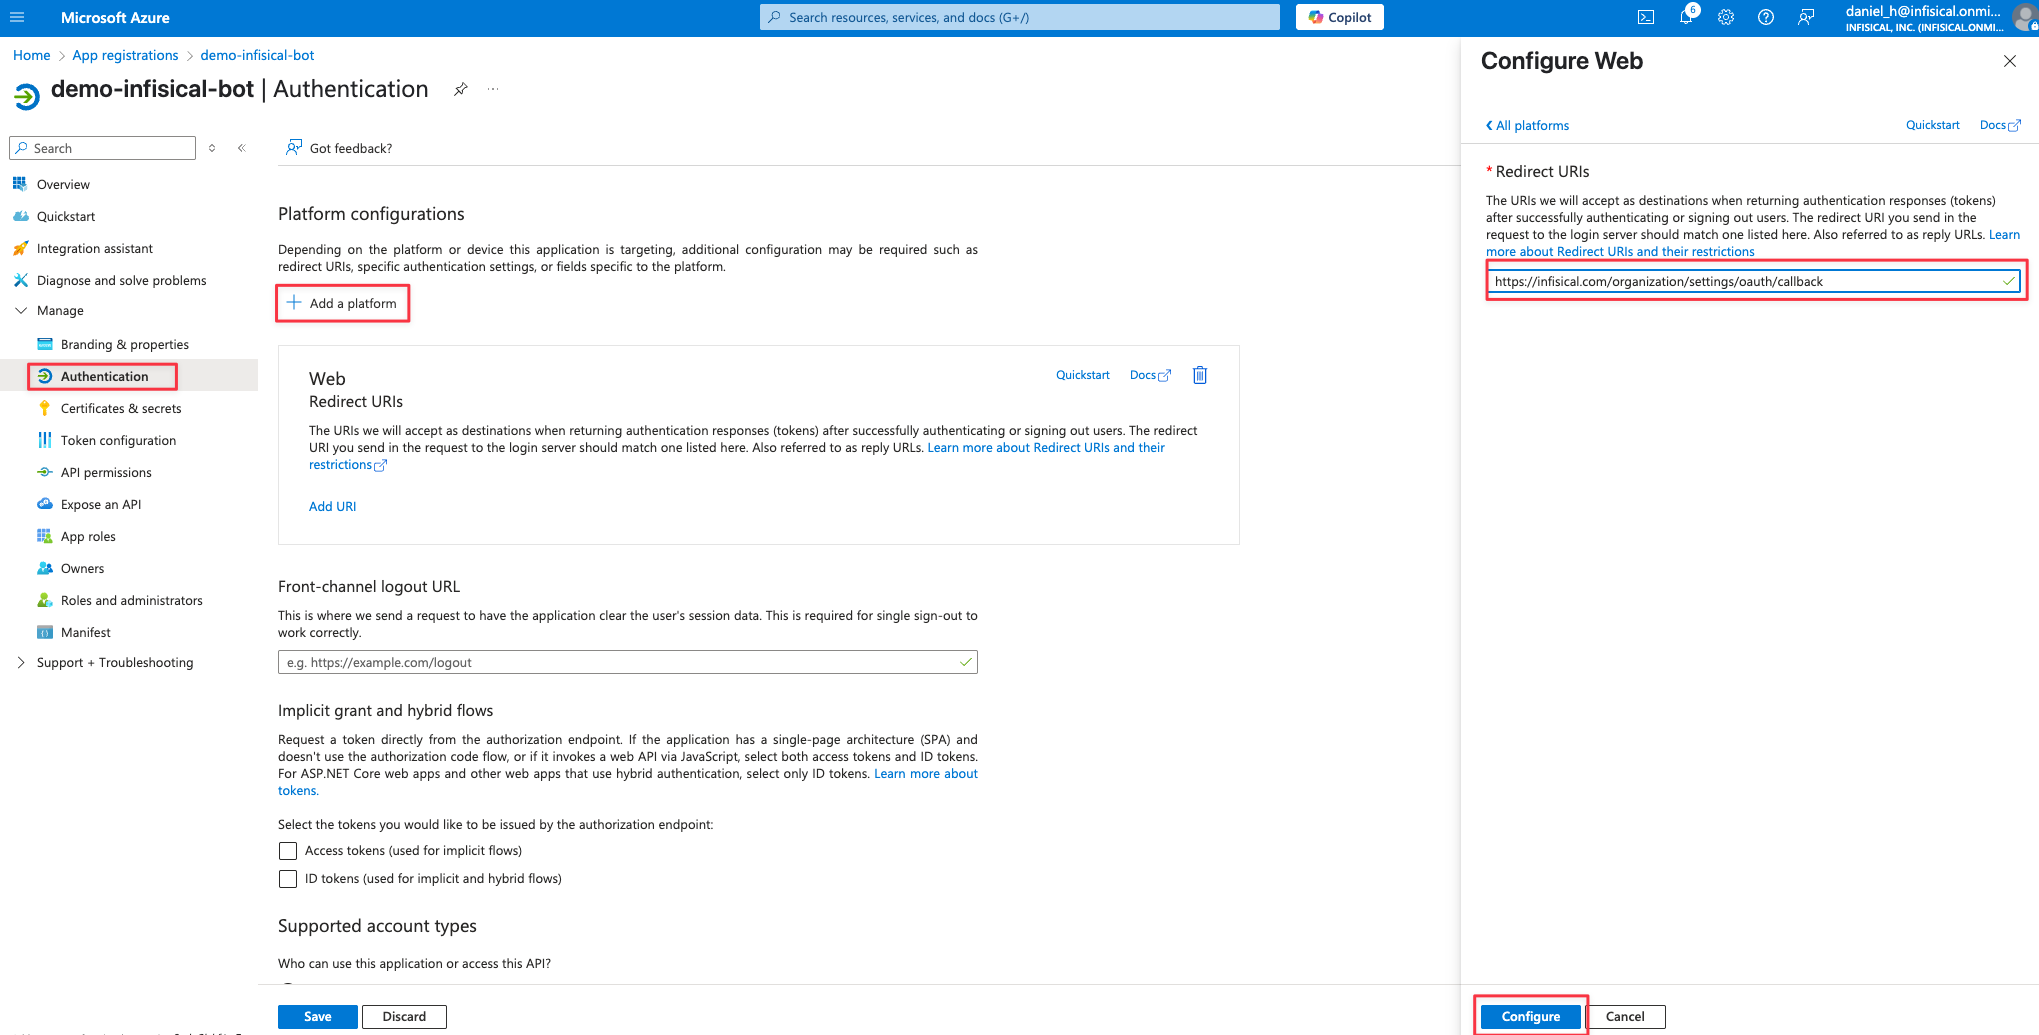
Add a new web application to the App Registration
Navigate to the “Authentication” section of the App Registration, and press the “Add a platform” button. Select the “Web” platform and enter the following redirect URI:
https://<your-infisical-instance-url>/organization/settings/oauth/callback. Replace <your-infisical-instance-url> with the URL of your Infisical instance.
7
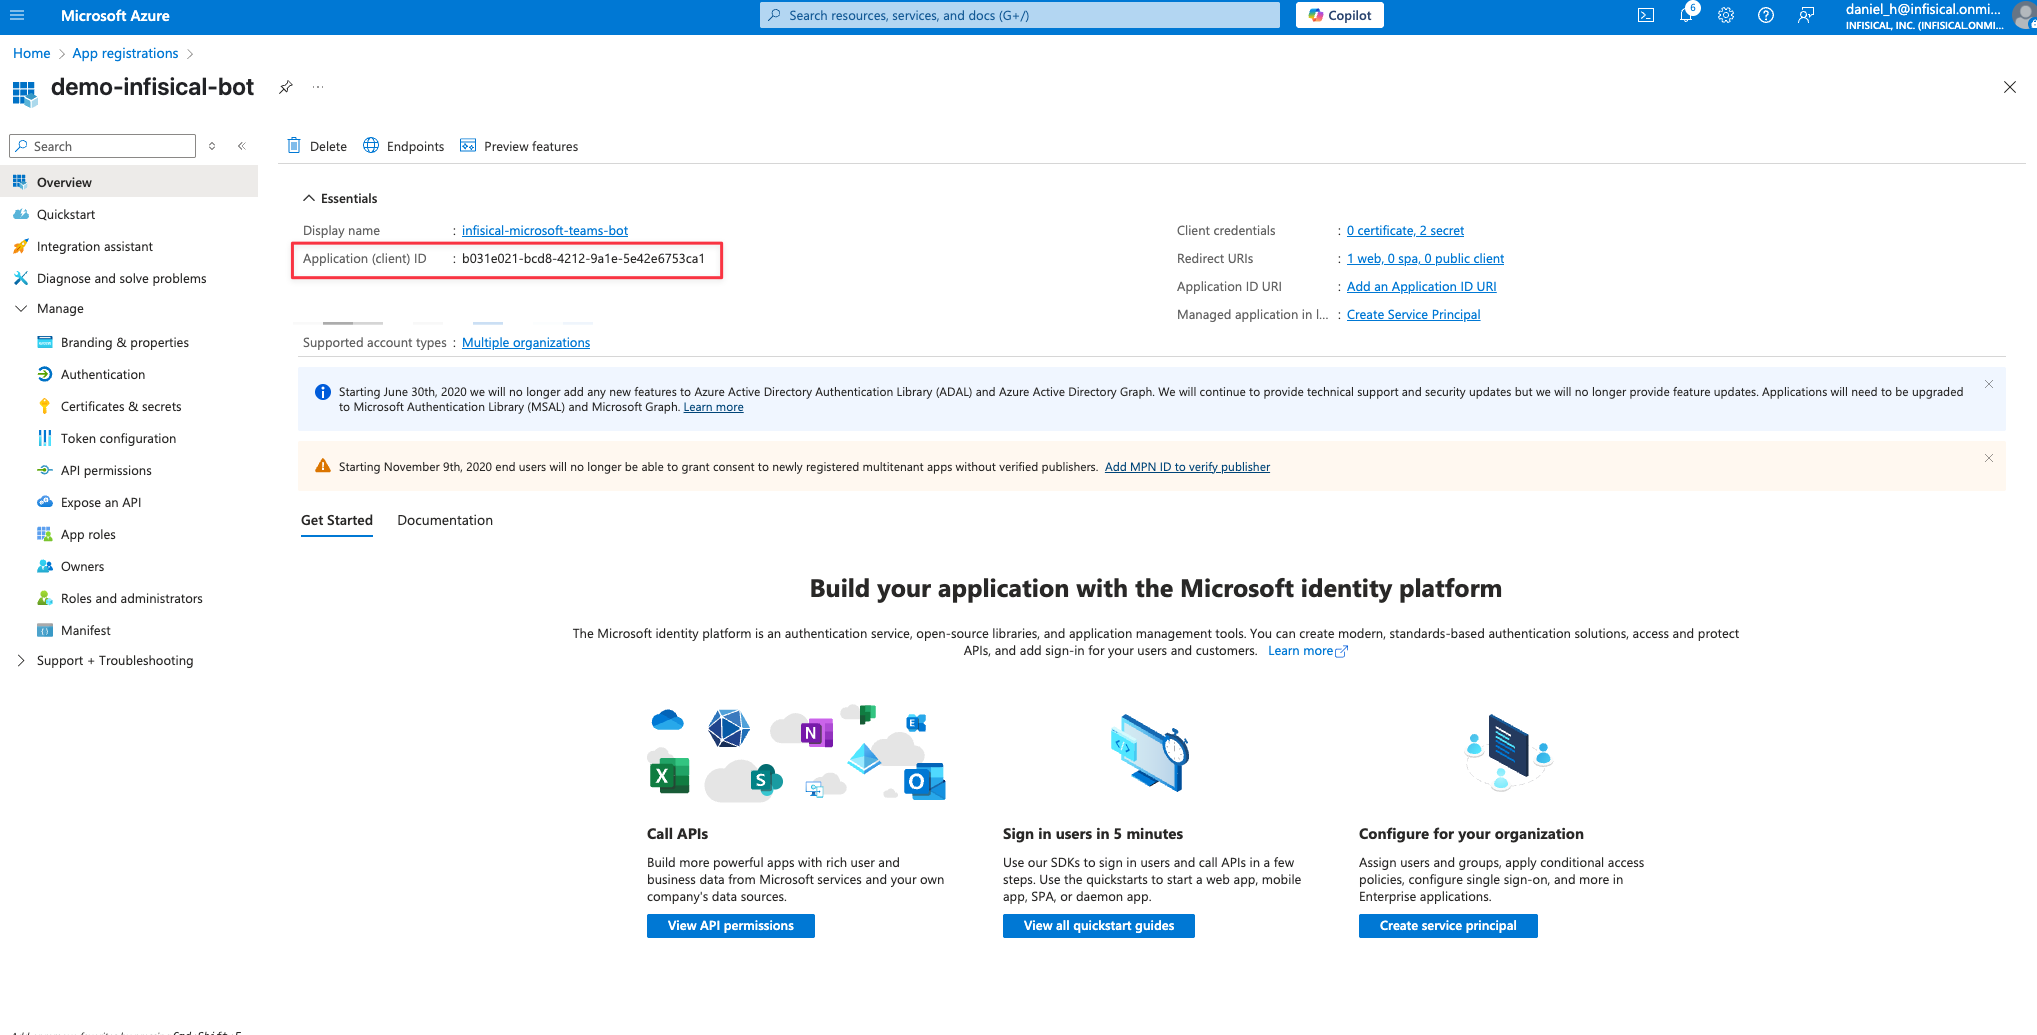
Get App Registration Client ID and Client Secret
Next we need to get the application client ID and create a new client secret. Save these values for later, as they’re required to configure the Microsoft Teams integration in Infisical.Get the Application (Client) IDTo get the Application (Client) ID, press the “Copy” button next to the “Application (client) ID” field.Create a new client secretCreate a new client secret within the app registration. Navigate to the “Certificates & Secrets” section of the app registration, and press the “New client secret” button.
Remember to rotate your client secret before it expires. Consider setting up a reminder or automated process to replace the secret and update your Infisical configuration before expiration.
8
Get the Microsoft Teams App ID
Navigate back to the Microsoft Teams Developer Portal, and press the “Apps” tab and select the app you created earlier.
Here you can find the Microsoft Teams App ID in the overview page, which you need to copy and save for later.
9
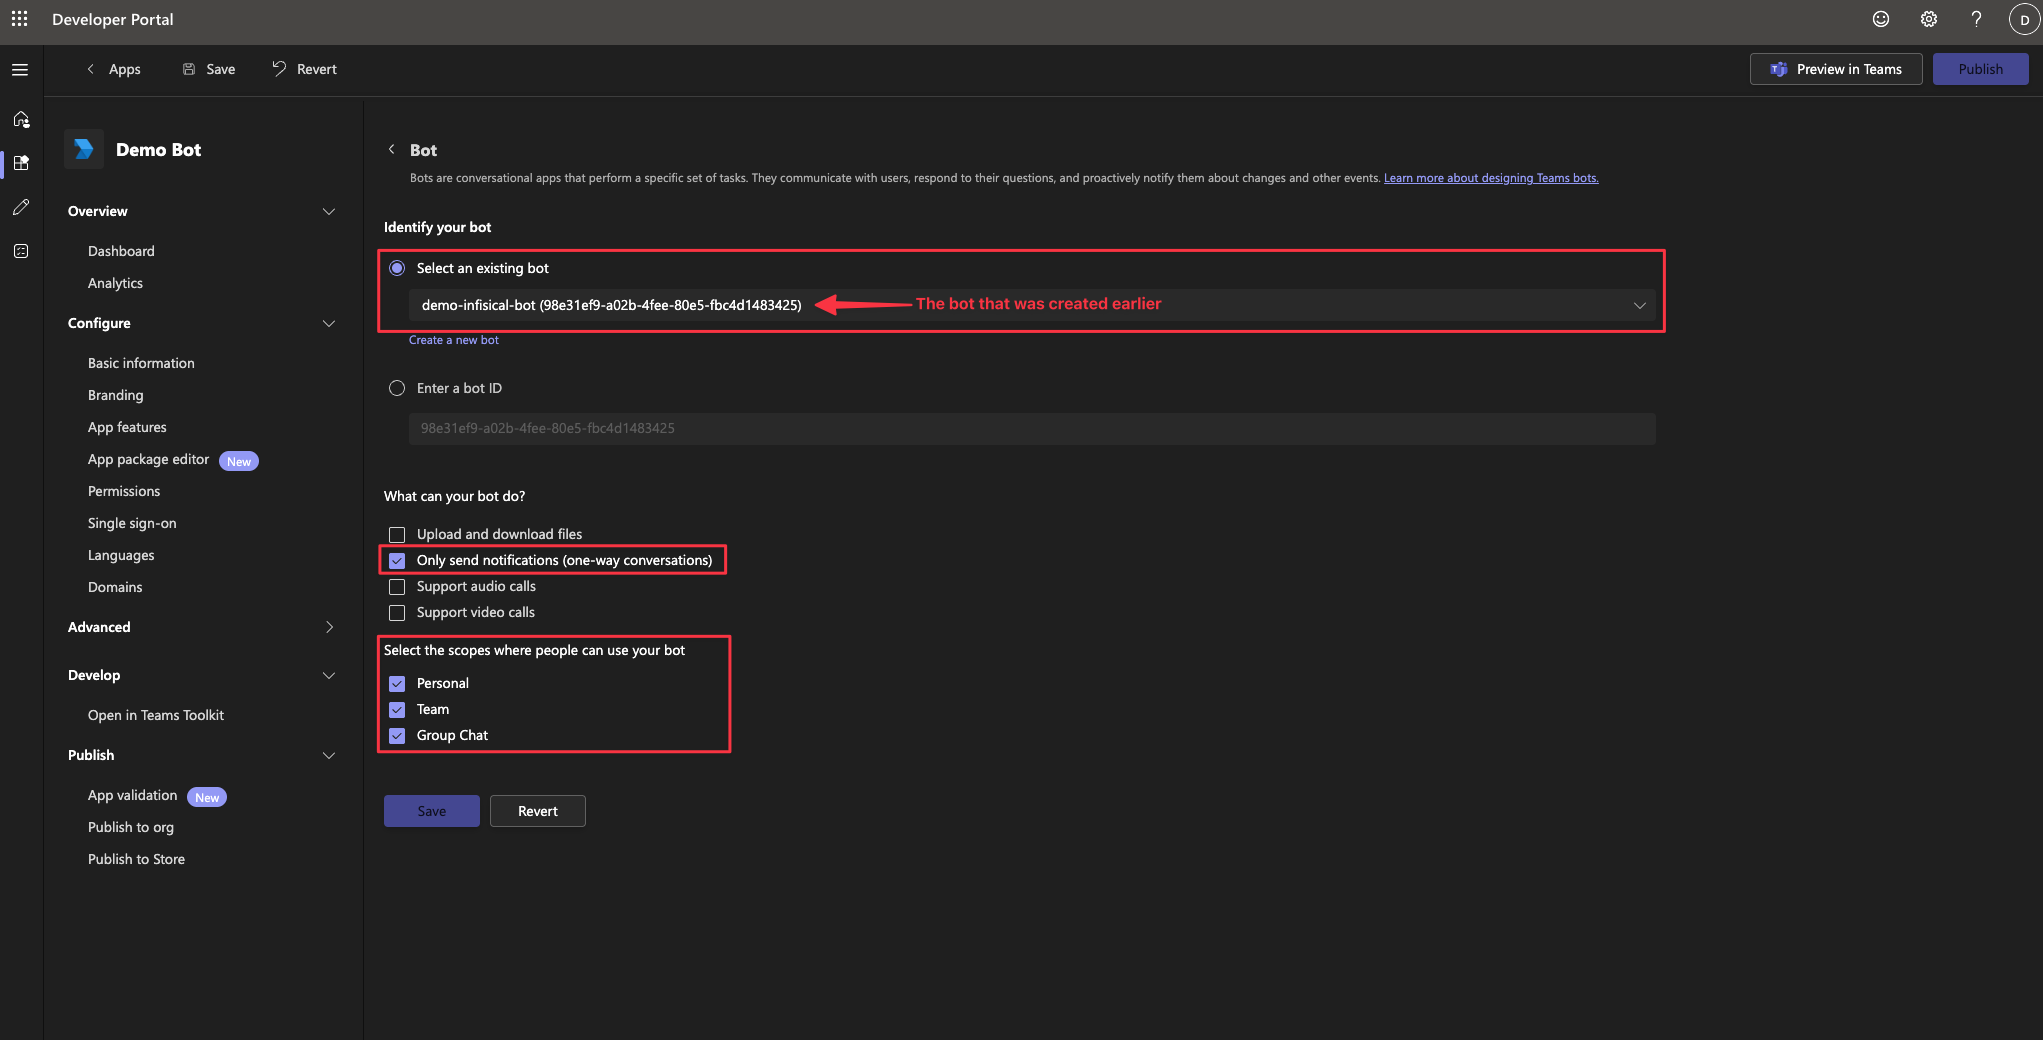
Link the Microsoft Teams App to the bot
You need to link the Microsoft Teams App with the bot/app registration you created earlier.
Inside the Microsoft Teams Developer Portal, navigate to the “Bot” tab and select the bot you created earlier. Navigate to the “App Features” section, and press the “Bot” button.Under the “What can your bot do?” section, enable Only send notifications (one-way conversations).Under the “Select the scopes where people can use your bot” section, select Personal, Team, and Group Chat.Finally, press the “Save” button to save the changes.
10
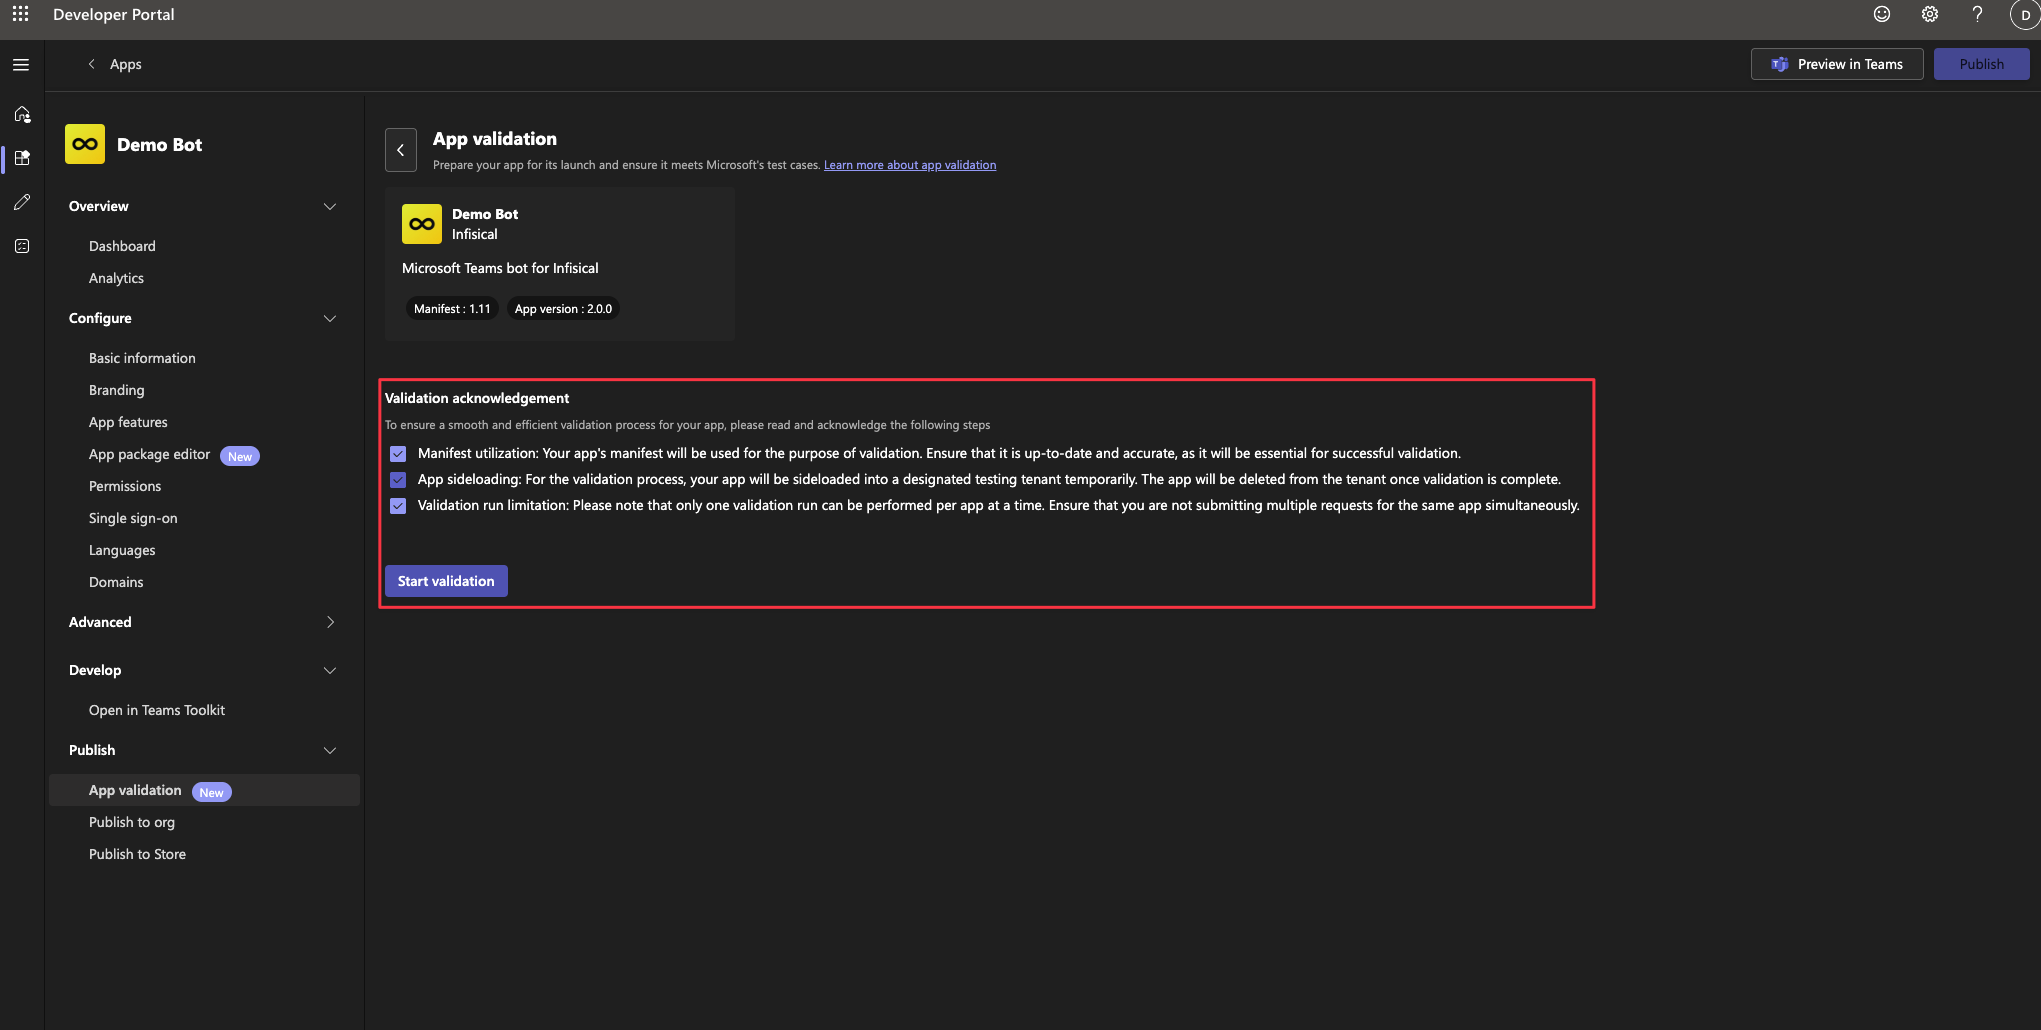
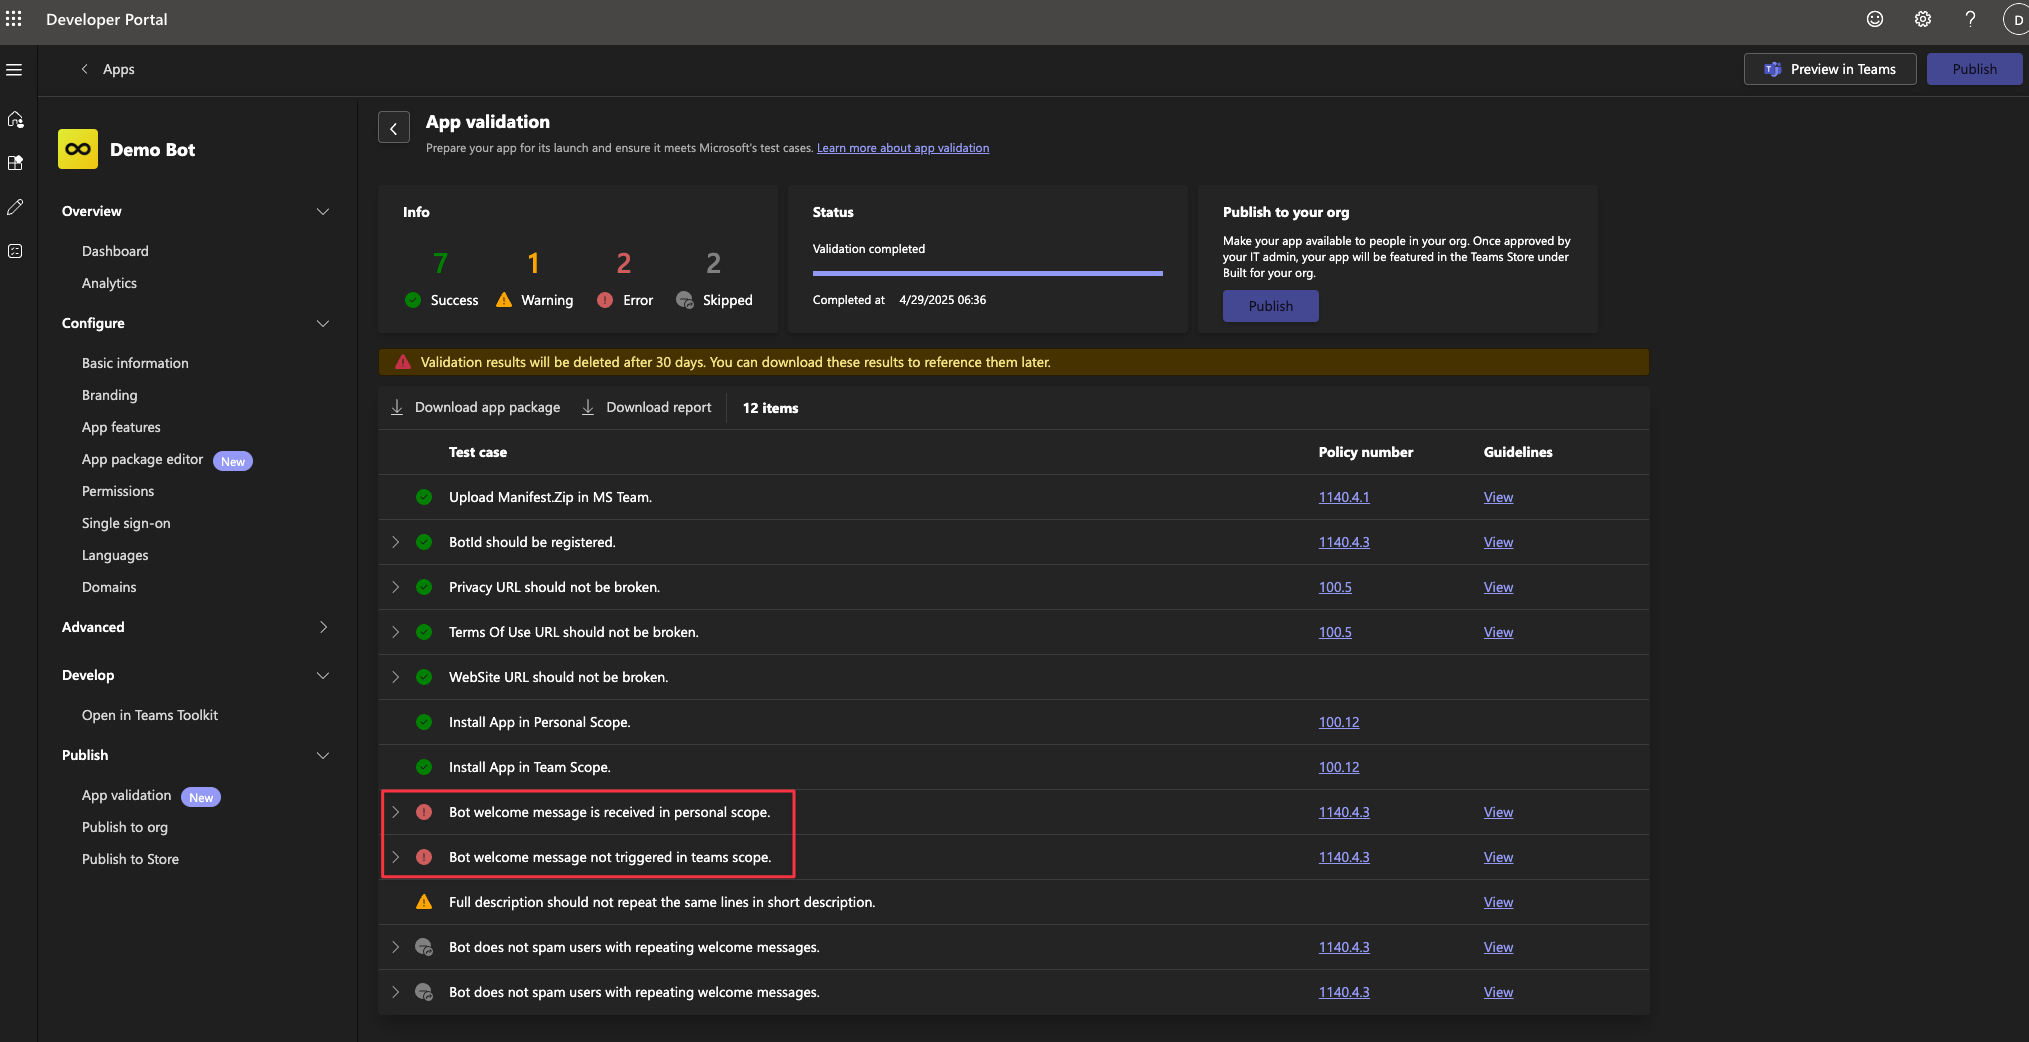
Run an app validation test (Recommended)
To ensure that the Microsoft Teams App is working correctly, you can run an app validation test. This step is optional, but recommended to ensure the app is working correctly.You should expect to see two errors related to sending welcome messages, because we haven’t configured the Microsoft Teams App inside Infisical yet, which is required for proactive messages.
You may see manifest validation errors. Before running an app validation test, you must ensure that your app has all errors resolved, such as having a description and a valid name.
If you see two errors for bot welcome messages, you can ignore them. This is expected until you configure the Microsoft Teams App inside Infisical.
11
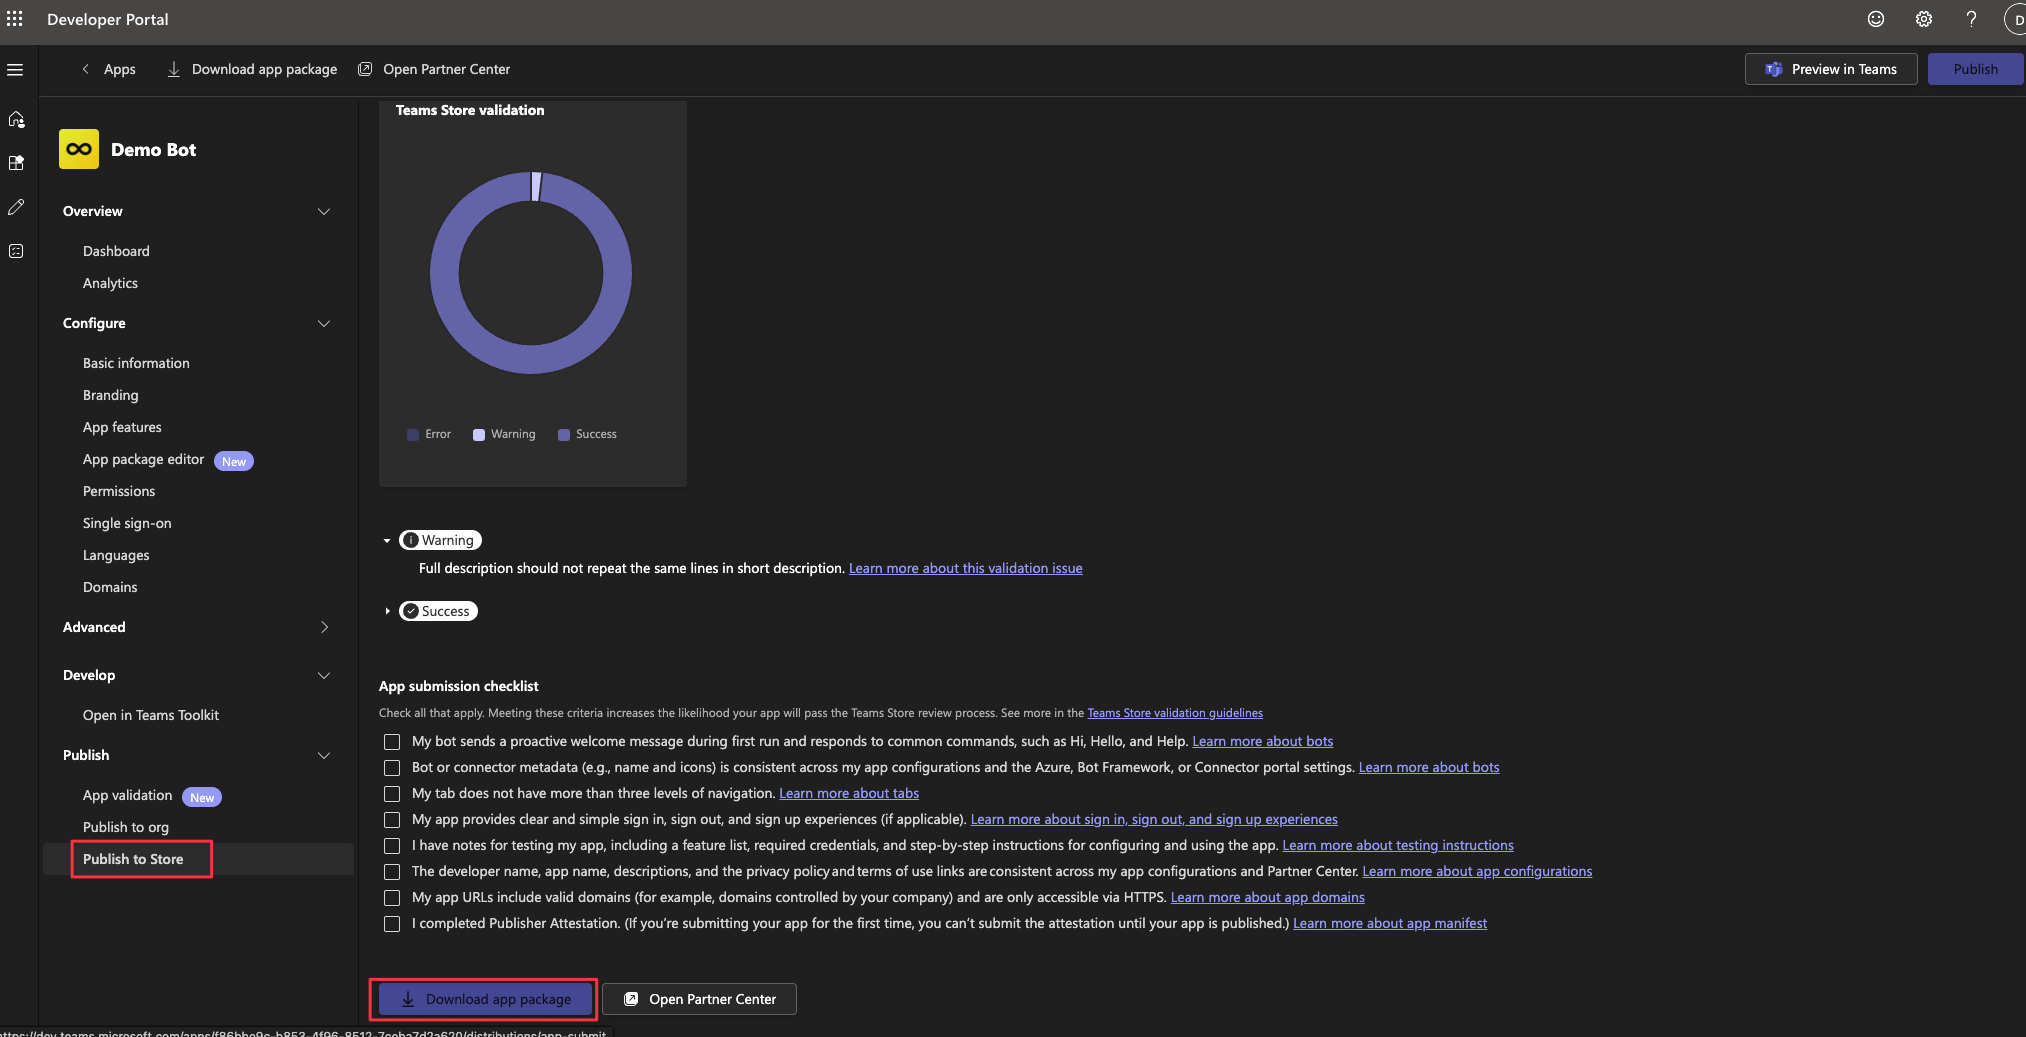
Download the App Package
Once the Microsoft Teams App is working correctly, you can download the app package by navigating to the “Publish to Store” page, and pressing the “Download app package” button.
After creating the Microsoft Teams App and Bot, you are ready to configure the Microsoft Teams integration in Infisical.
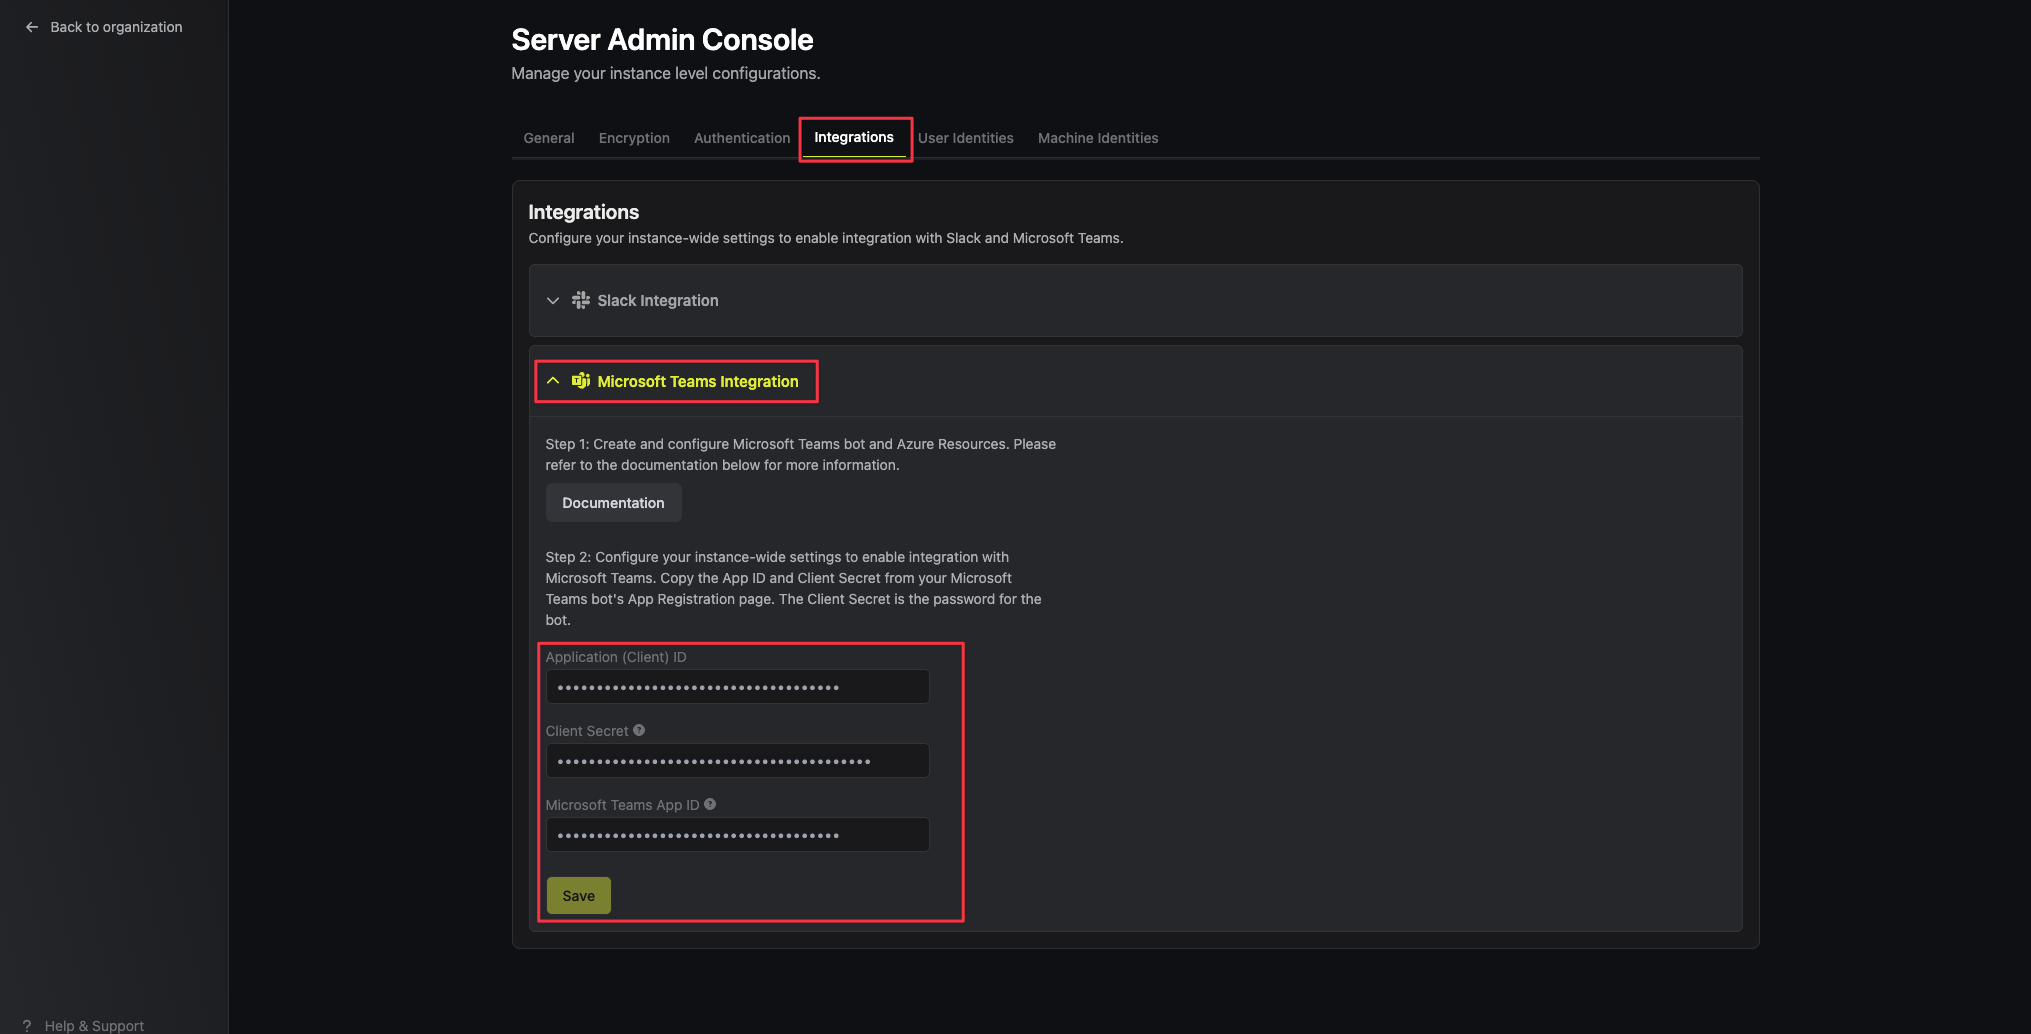
Please note that you must be an instance admin in order to configure the Microsoft Teams instance-wide settings.
1
Navigate to the Integrations tab in your Server Admin Console settings
Enter the values you saved from the earlier steps into the respective fields.
Application (Client) ID: The Client ID of the App Registration from the previous steps.
Client Secret: The Client Secret of the App Registration from the previous steps.
Microsoft Teams App ID: The App ID of the Microsoft Teams App from the previous steps.
Once completed, press the “Save” button to save your changes.
Install the Infisical Microsoft Teams App in Microsoft Teams tenant
Currently, Infisical requires you to install a custom Microsoft Teams app into your Microsoft Teams tenant.You can download the Infisical Microsoft Teams app package here:
Important for self-hosted users:If you’re self-hosting Infisical, you can skip the download step. Instead you should use the app package file you downloaded from the Microsoft Teams Developer Portal when you followed the Self-hosted guide.
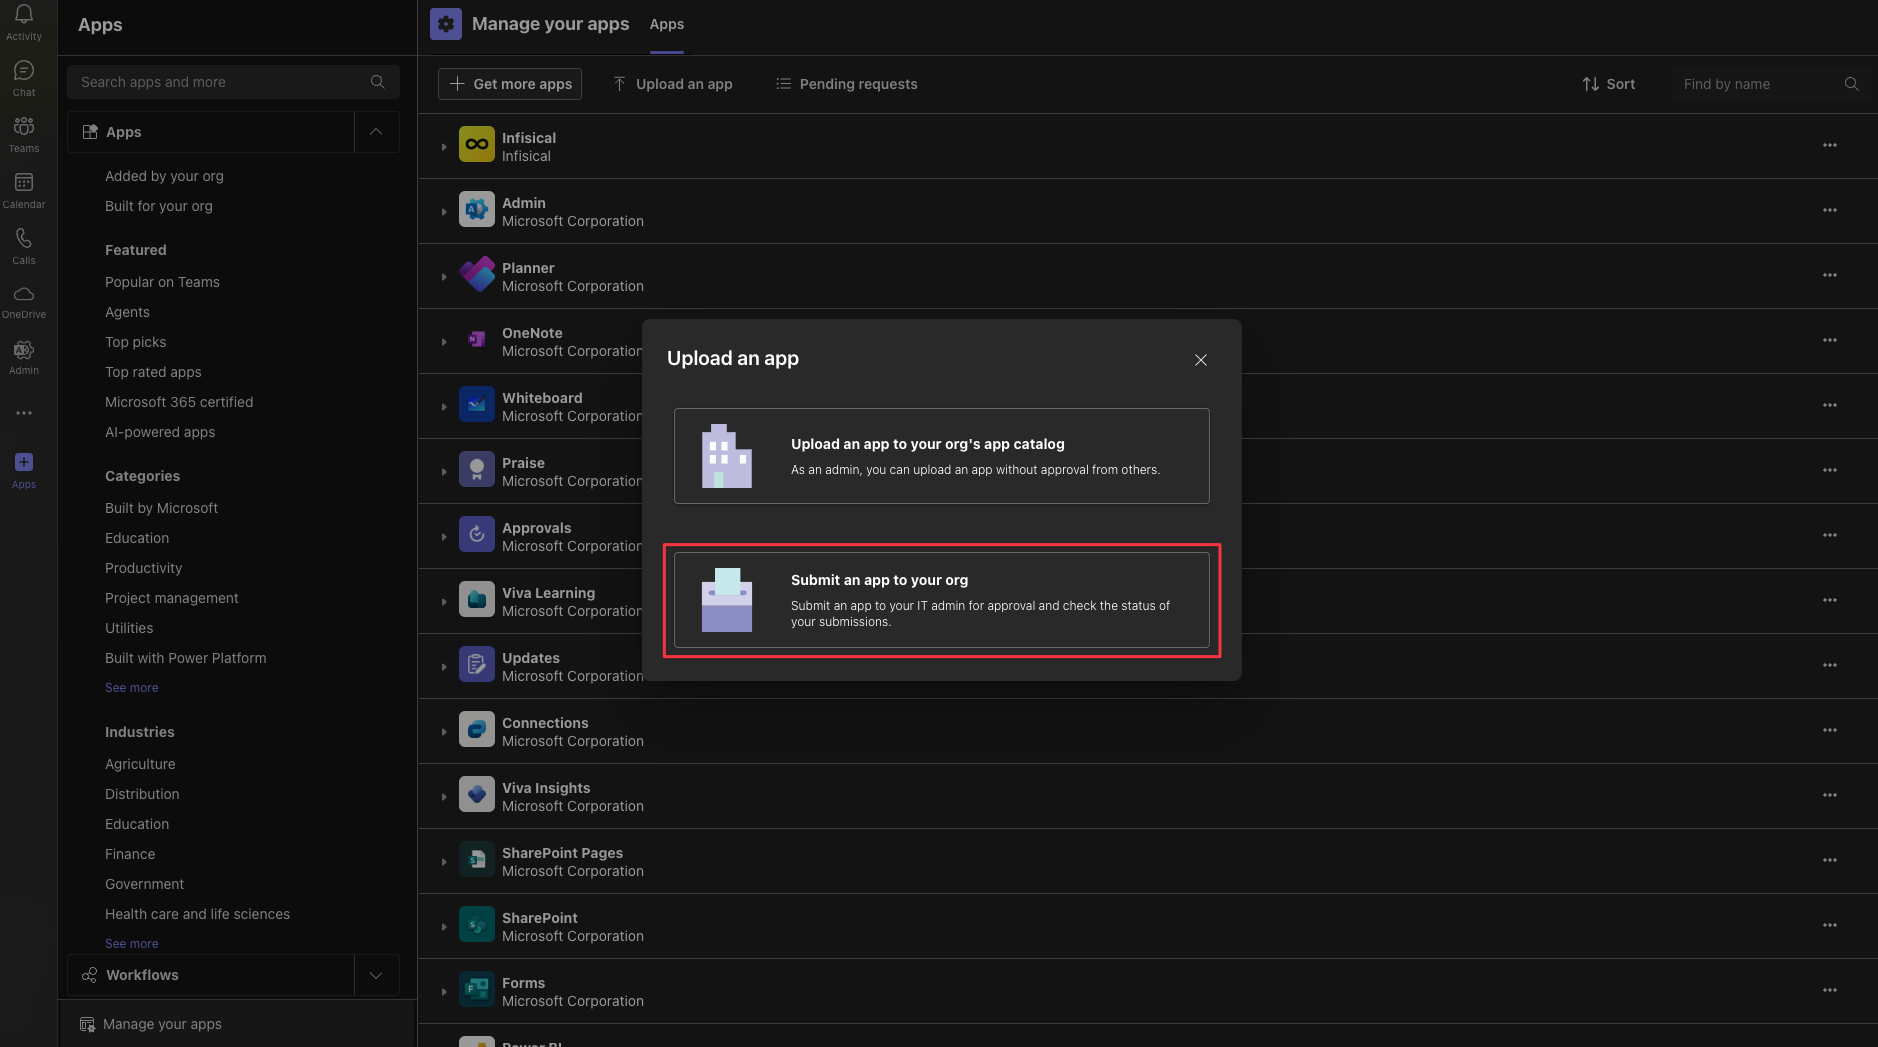
Once you’ve downloaded the app package, you can install the app in your Microsoft Teams tenant by navigating to the Apps > Upload a custom app page, and selecting the “Upload an app” button.Once the app has been submitted, your Microsoft Teams tenant admin will need to approve the app in the Microsoft Teams Admin Center.
After the app has been approved, it can take a few hours (up to 24 hours in some cases) for Microsoft Teams to reflect the new app. During this period, the Infisical app will not be visible in Microsoft Teams, and won’t be usable.
Once the app has been approved, you will be able to use the Infisical Microsoft Teams integration in your projects.
2
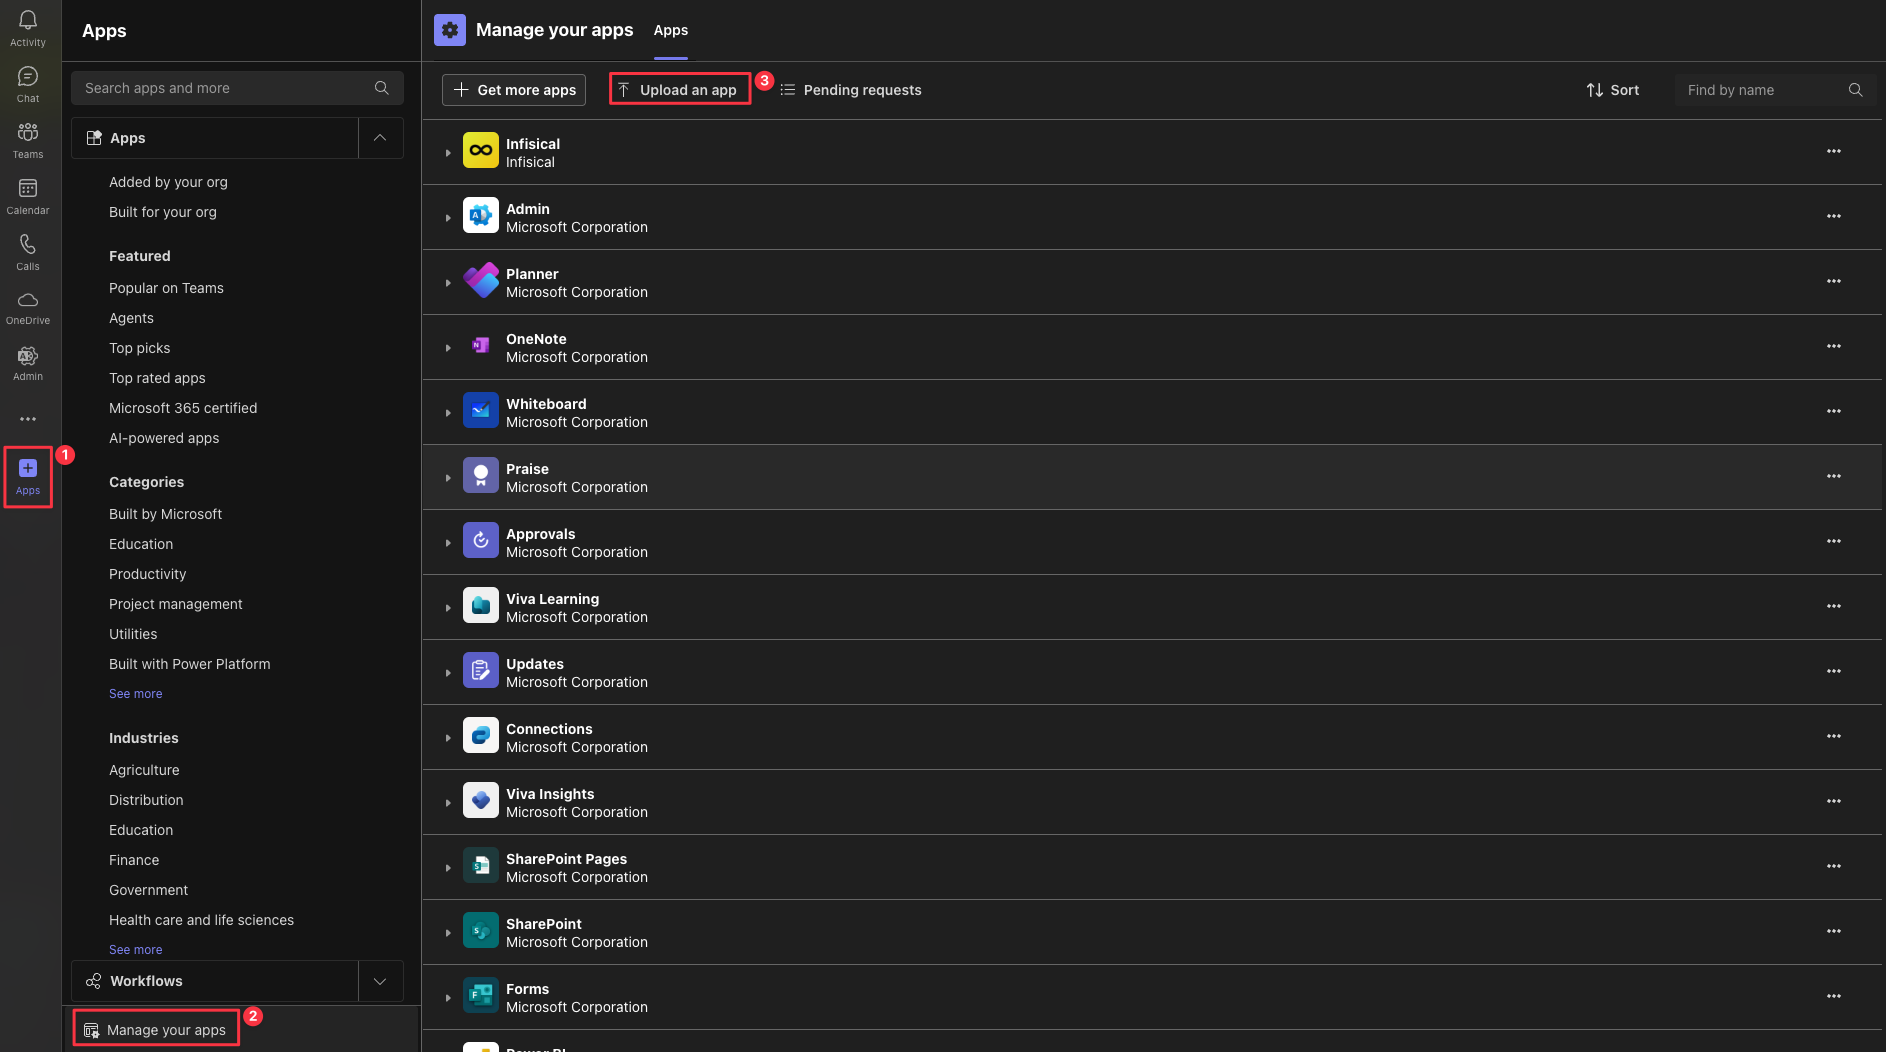
Add the Infisical Microsoft Teams app to your Microsoft Teams teams
Once the app has been approved and installed in your Microsoft Teams tenant, you can add the app to your Microsoft Teams teams.Navigate to Apps > Built for your org, select the “Infisical” app, and press the “Add” button to select the teams and channels you wish to add the app to.
This can also be done later through the Microsoft Teams Admin Center, or through the Microsoft Teams client itself by navigating to the individual team’s app settings.
Once the app has been added to the team, you will be able to use the Infisical Microsoft Teams integration in the team.
3
Navigate to the Workflow Integrations tab in your organization settings
After installing the Microsoft Teams app, you are now ready to configure the Microsoft Teams integration within Infisical.Navigate to the Workflow Integrations tab in your organization settings, and press the “Add” button.
4
Create a Microsoft Teams workflow integration
In order to use the Infisical Microsoft Teams integration, you will need to grant admin consent to the app. Once the consent is granted, the Microsoft Teams workflow integration will be created in your Infisical organization.Press the “Add” button and select the “Microsoft Teams” platform option.Select the Microsoft Teams integration you wish to configure, and press the “Configure” button.Here you will be prompted to enter an alias, tenant ID, and an optional description for your workflow integration.
The tenant ID is the ID of the Microsoft 365 / Azure AD tenant that you installed the Infisical Microsoft Teams app in, in the previous steps.Press the “Create Microsoft Teams Integration” button, and you’ll be navigated to the Azure AD consent page.
Please note that you must be a privileged administrator user of your Microsoft 365 / Azure AD tenant in order to grant admin consent to the app.
Once you’ve granted admin consent, you’ll be navigated back to the Infisical organization settings, where you can now select the Microsoft Teams integration you just created.
Configure project to use Microsoft Teams workflow integration
1
Navigate to the Workflow Integrations tab in the project settings
To add a new Microsoft Teams workflow integration, navigate to Project Settings > Workflow Integrations and press the “Add”.Select the “Microsoft Teams” option from the list of available workflow integrations.
2
Configure the Microsoft Teams workflow integration
Your project will send notifications to the connected Microsoft Teams team of the
selected Microsoft Teams integration when the configured events are triggered.Press the “Save” button to save your Microsoft Teams workflow integration.
Once you’ve created the project Microsoft Teams workflow integration, you will now receive Access Requests and Secret Approval Requests notifications in Microsoft Teams according to your configuration.
Notifications are not being sent to Microsoft Teams even though the integration is configured
If you recently added the Microsoft Teams app to your tenant, it may take up to 24 hours for Microsoft Teams to propagate the changes.
A common indication of propagation issues is that the workflow integration is shown as “Installed”, and you’re able to view the teams and channels when configuring the workflow integration on your project, but no notification is being sent.
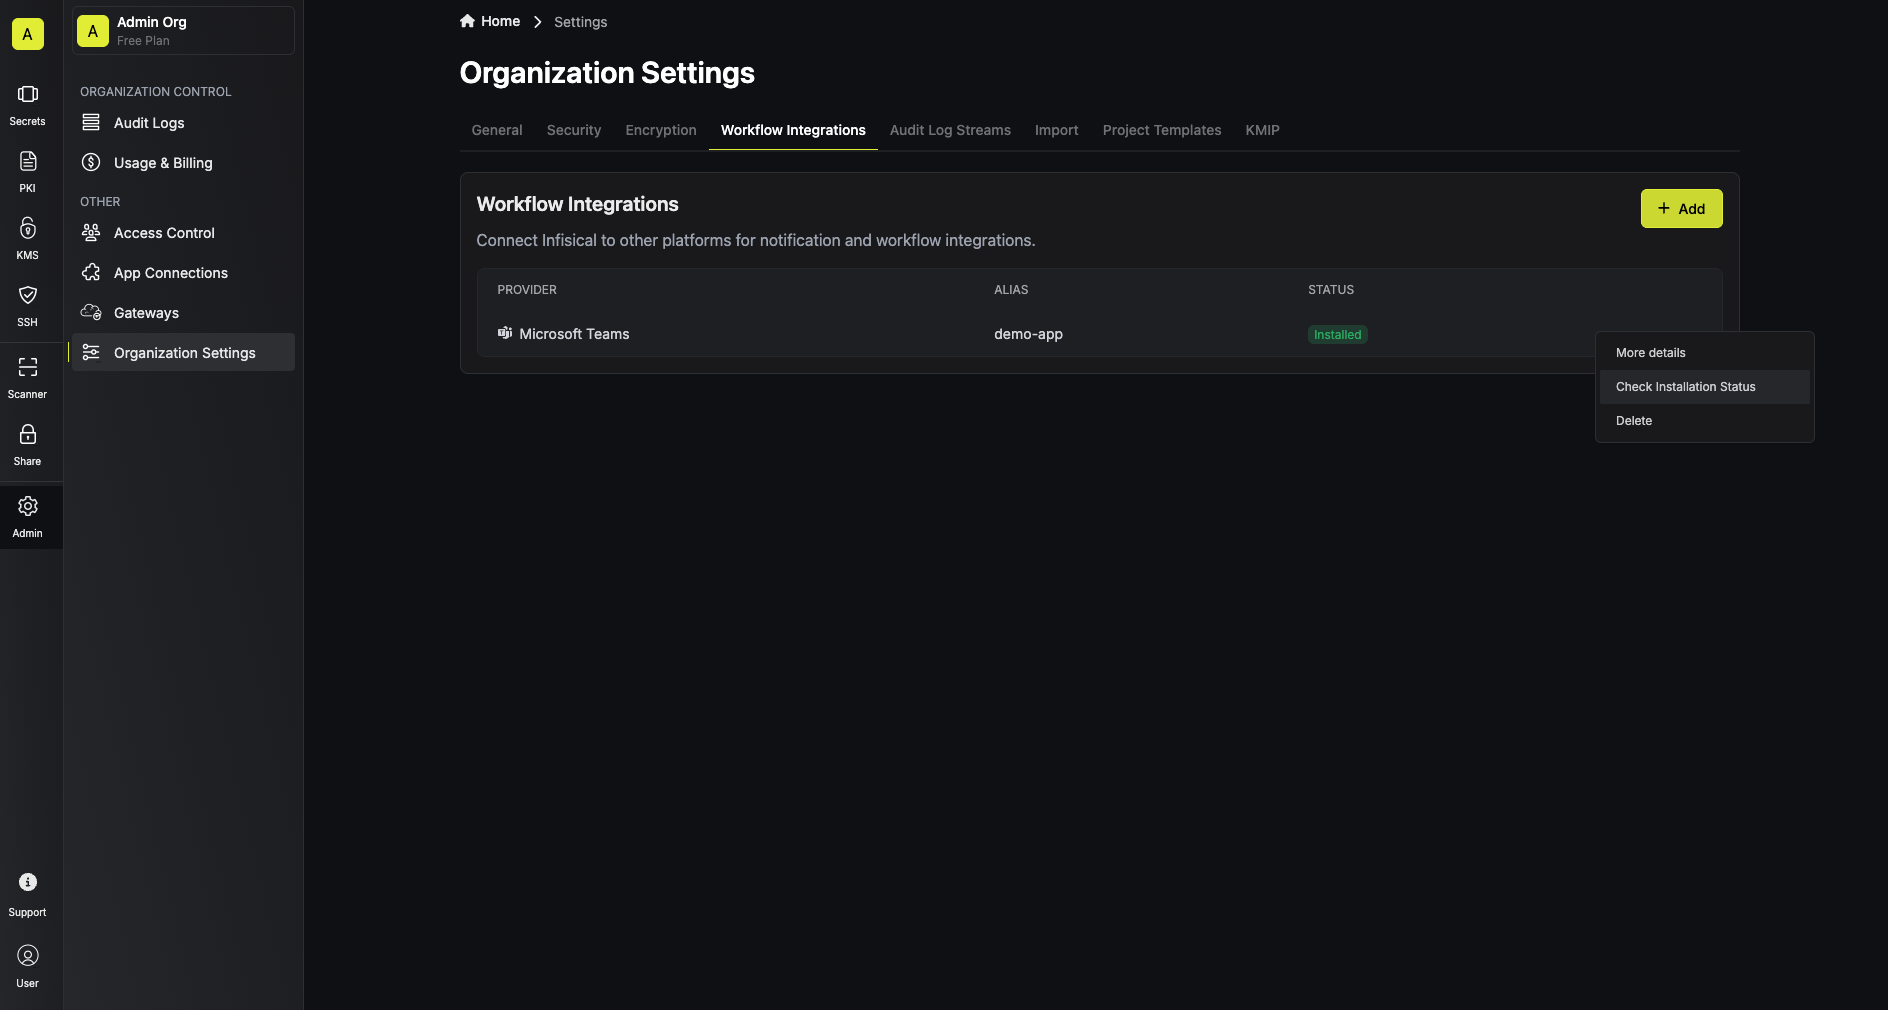
Workflow Integration is stuck on 'Pending' status
The workflow integration can get stuck on Pending if you created the workflow integration before the Infisical Microsoft Teams bot was installed in the tenant.
To resolve this, make sure you have installed the Infisical Microsoft Teams app in your tenant.You can manually recheck the installation status by pressing the “Check Installation Status” button in the workflow organization settings.
 Once the app has been submitted, your Microsoft Teams tenant admin will need to approve the app in the Microsoft Teams Admin Center.Once the app has been approved, you will be able to use the Infisical Microsoft Teams integration in your projects.
 Navigate to Apps > Built for your org, select the “Infisical” app, and press the “Add” button to select the teams and channels you wish to add the app to.Once the app has been added to the team, you will be able to use the Infisical Microsoft Teams integration in the team.
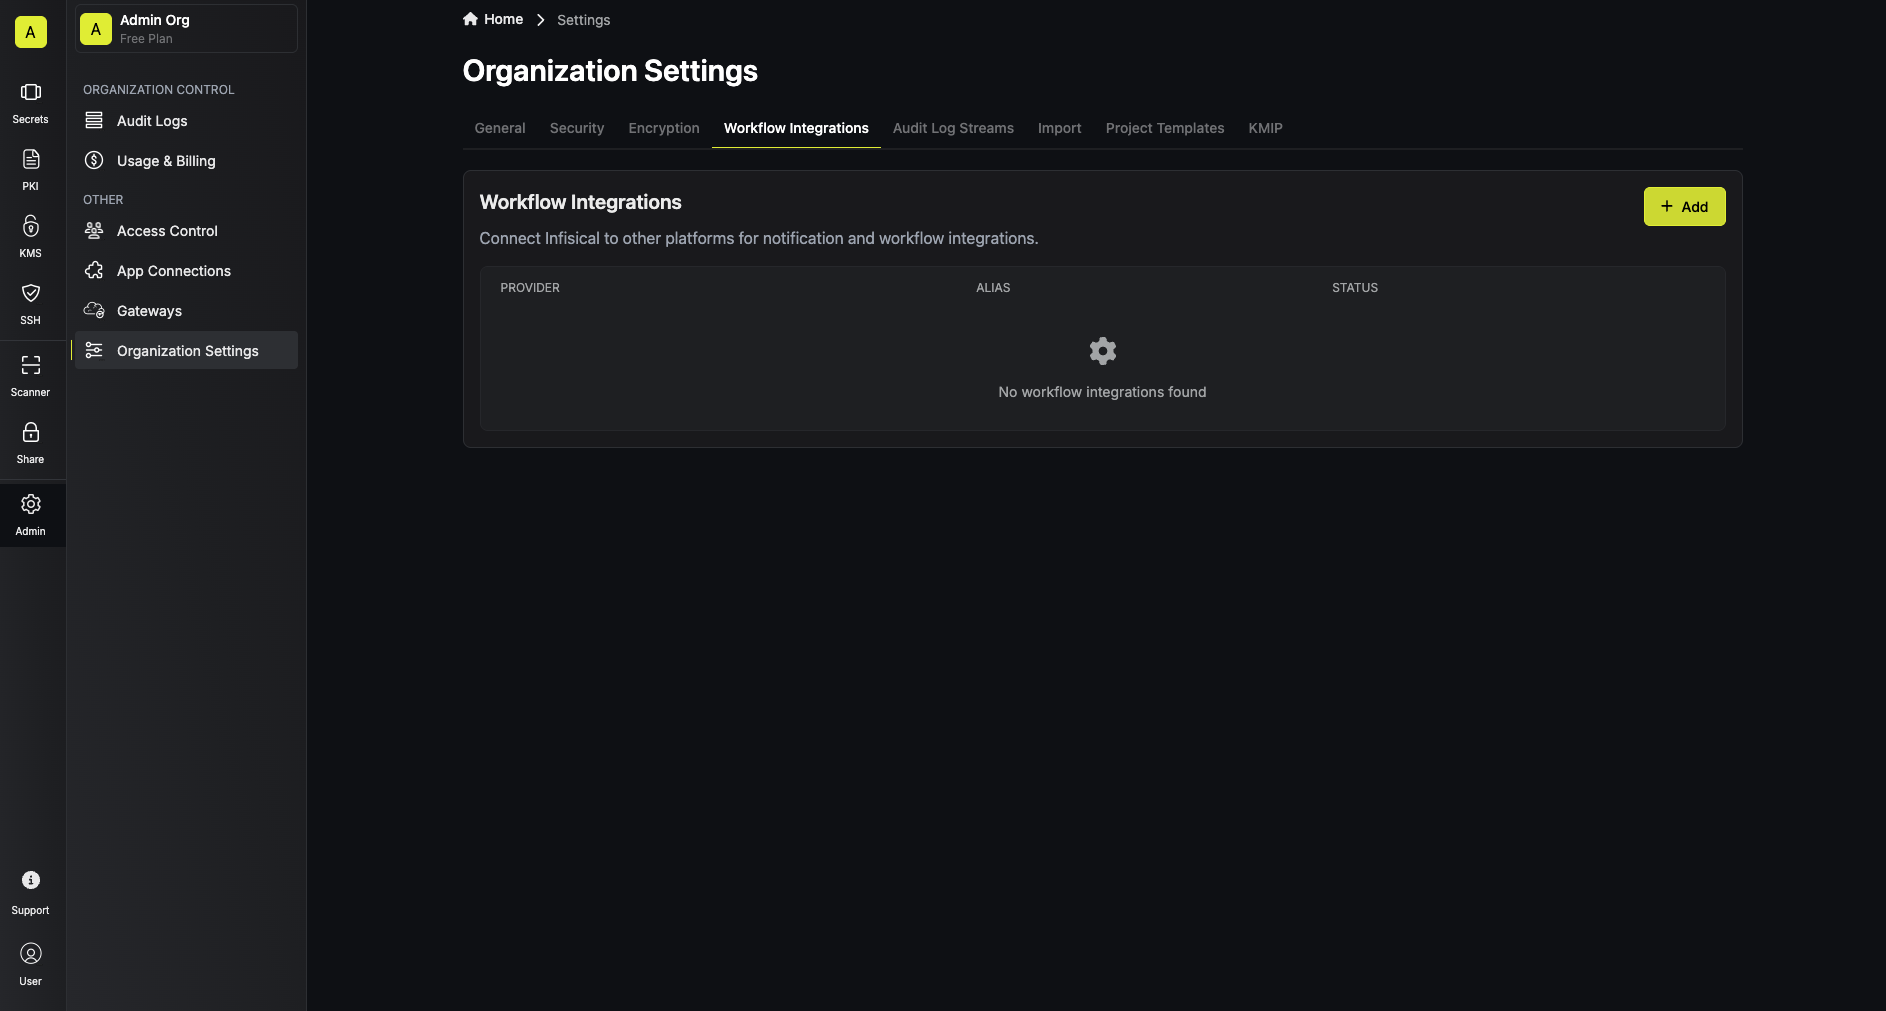
 Select the Microsoft Teams integration you wish to configure, and press the “Configure” button.Here you will be prompted to enter an alias, tenant ID, and an optional description for your workflow integration.
The tenant ID is the ID of the Microsoft 365 / Azure AD tenant that you installed the Infisical Microsoft Teams app in, in the previous steps.
Select the Microsoft Teams integration you wish to configure, and press the “Configure” button.Here you will be prompted to enter an alias, tenant ID, and an optional description for your workflow integration.
The tenant ID is the ID of the Microsoft 365 / Azure AD tenant that you installed the Infisical Microsoft Teams app in, in the previous steps.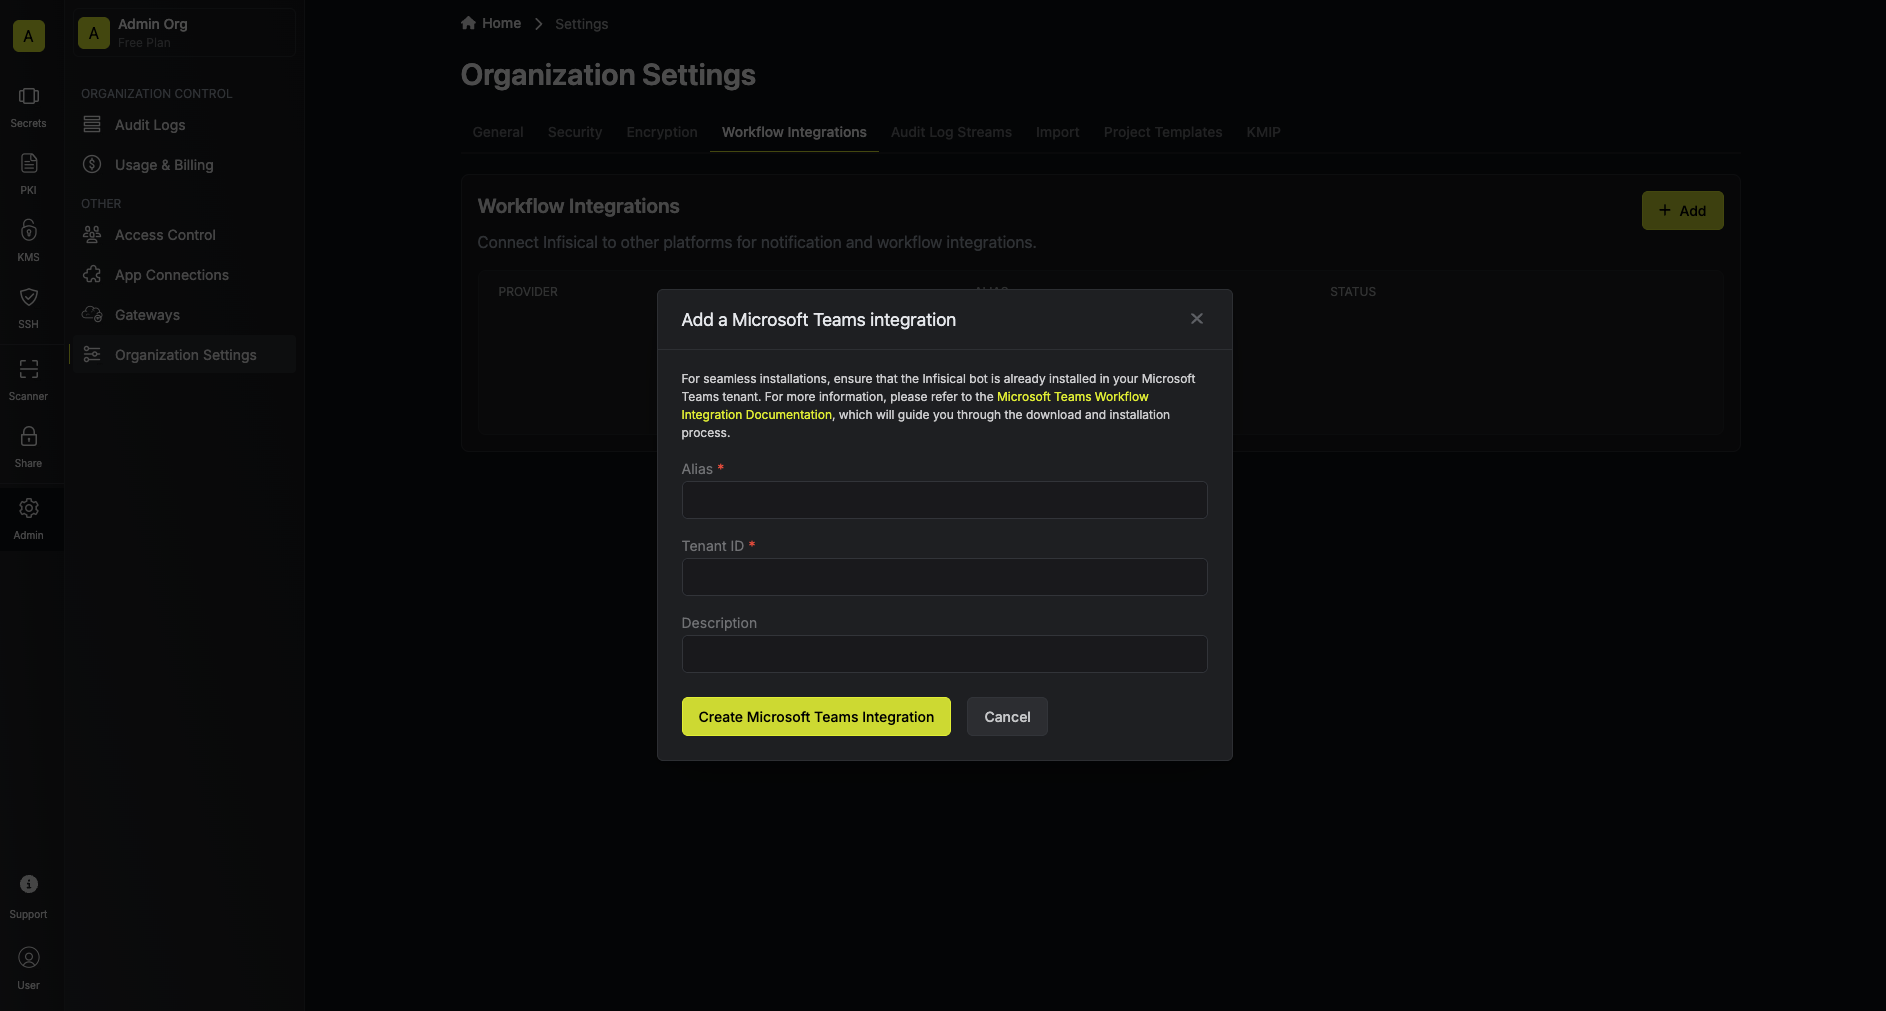 Press the “Create Microsoft Teams Integration” button, and you’ll be navigated to the Azure AD consent page.
 Once you’ve granted admin consent, you’ll be navigated back to the Infisical organization settings, where you can now select the Microsoft Teams integration you just created.
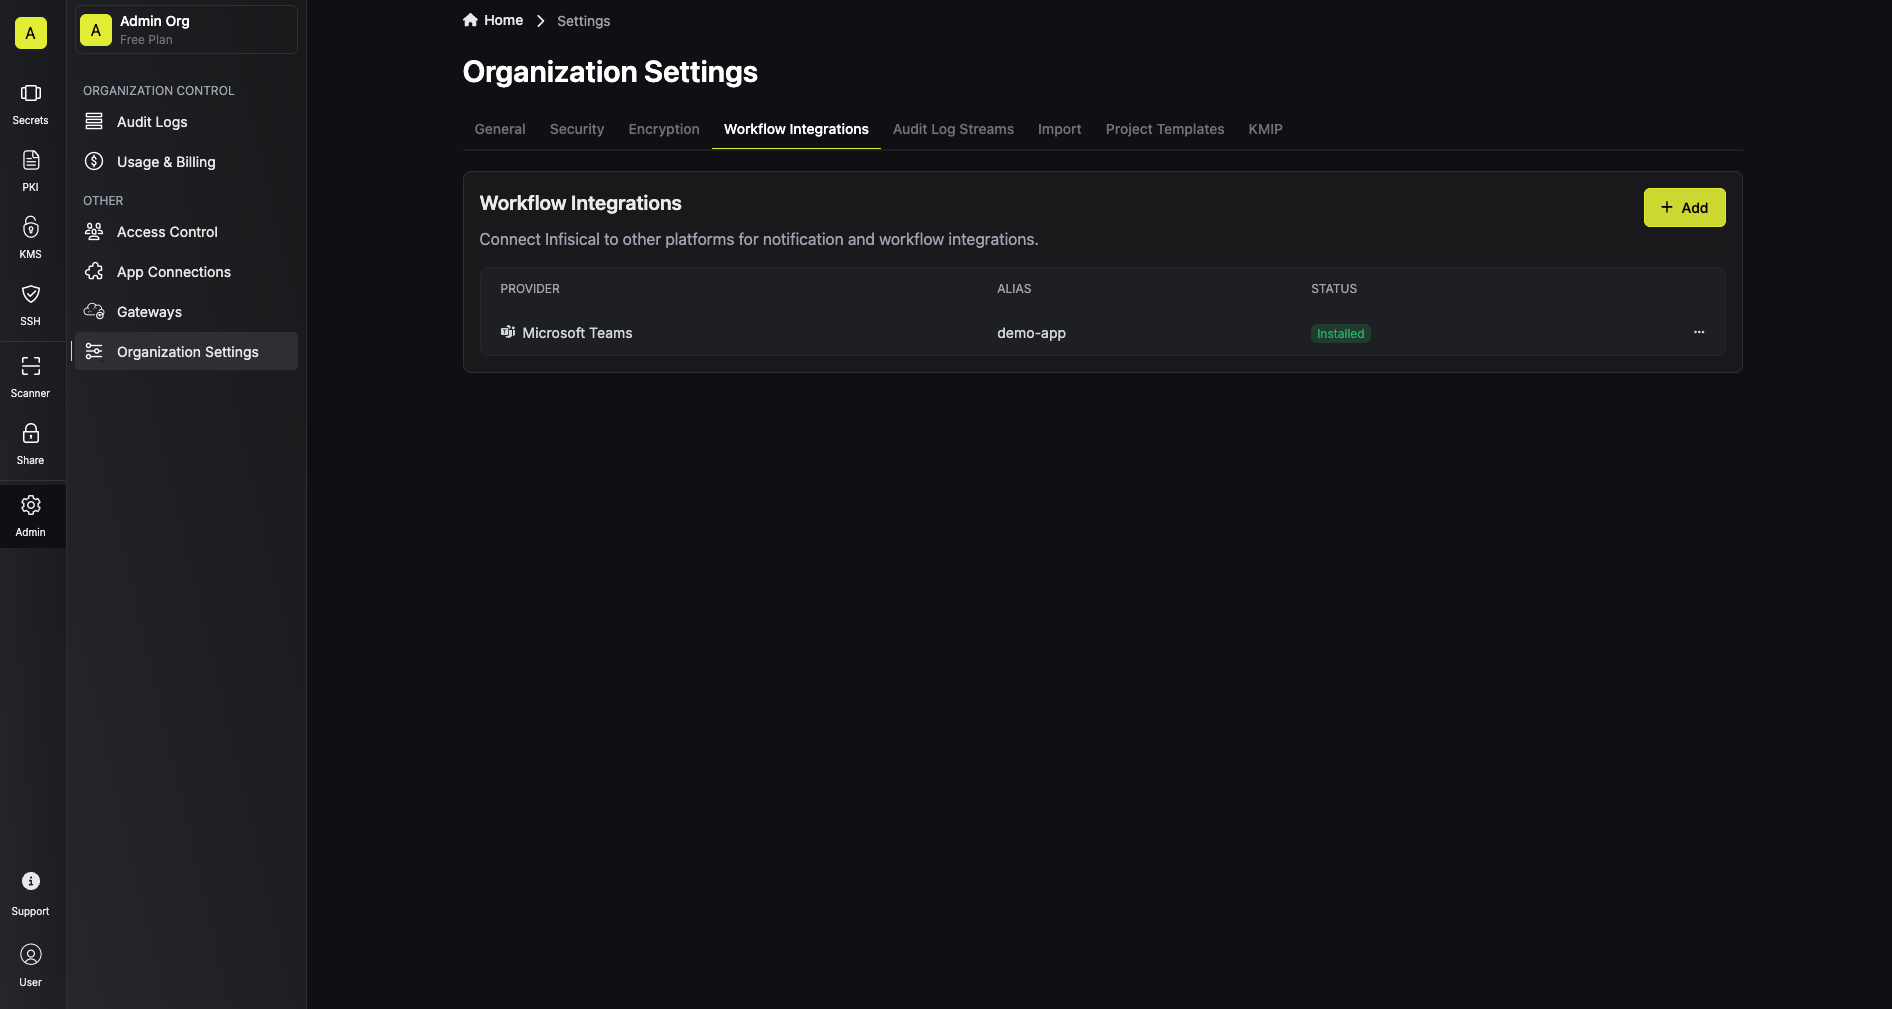
 Select the “Microsoft Teams” option from the list of available workflow integrations.