ENCRYPTION_KEY, AUTH_SECRET, DB_CONNECTION_URI, and REDIS_URL must be defined.
However, you can configure additional settings to activate more features as needed.
General platform
Used to configure platform-specific security and operational settings.string
default:"none"
required
Must be a random 16-byte hex string. Can be generated with
openssl rand -hex 16.string
default:"none"
required
Must be a random 32-byte base64 string. Can be generated with
openssl rand -base64 32.string
default:"generated per instance"
Signs the session cookies used by the OAuth SSO, SAML, OIDC, and LDAP login flows. Left unset,
Infisical derives a deterministic key from the KMS root key persisted for the deployment. All
replicas for that deployment use the same key. Set it to a random
32-byte base64 string, generated with
openssl rand -base64 32, to manage the key yourself.
Changing the value ends every login already in progress.string
default:"none"
required
Must be an absolute URL including the protocol (e.g.
https://app.infisical.com).
int
default:"8080"
Specifies the internal port on which the application listens.
string
default:"localhost"
Specifies the network interface Infisical will bind to when accepting incoming connections.By default, Infisical binds to
localhost, which restricts access to connections from the same machine.To make the application accessible externally (e.g., for self-hosted deployments), set this to 0.0.0.0, which tells the server to listen on all network interfaces.Example values:localhost(default, same as127.0.0.1)0.0.0.0(all interfaces, accessible externally)192.168.1.100(specific interface IP)
string
default:"true"
Telemetry helps us improve Infisical, but if you want to disable it, you may set
this to
false.bool
default:"false"
Self-hosted instances check GitHub for the latest Infisical release once a week
(and once at startup) and show a subtle indicator in the UI when a newer version
is available. Set this to
true to disable the check; no request is made to
GitHub when disabled.Air-gapped deployments should set this to true to suppress the outbound
request entirely. Instances configured with an offline license disable the
check automatically.bool
default:"false"
Global escape hatch that permits App Connections, Dynamic Secrets, and PKI
Certificate Discovery jobs to connect to internal/private IP addresses on the
direct egress path.For reaching private resources, prefer the Gateway,
which tunnels traffic through an agent inside your network and doesn’t require
opening any internal IP range on the Infisical instance. Use this flag (or the
more targeted
DYNAMIC_SECRET_ALLOW_INTERNAL_IP / AUDIT_LOG_STREAM_ALLOW_INTERNAL_IP /
S3_COMPATIBLE_STORAGE_ALLOW_INTERNAL_IP flags) only for the features that egress directly,
without a Gateway.bool
default:"false"
Narrower, per-feature variant of
ALLOW_INTERNAL_IP_CONNECTIONS that permits
only Dynamic Secrets to connect to internal/private IP addresses. Prefer this
over the global flag when only Dynamic Secrets need internal access.bool
default:"false"
Forces outbound requests made through Infisical’s SSRF-safe HTTP client (App
Connections, Webhooks, Audit Log Streams, and similar direct-egress features)
to bypass any ambient forward proxy (sets axios
proxy: false). This guarantees
the request connects to the exact IP that passed SSRF validation, closing a gap
where an HTTP_PROXY / HTTPS_PROXY would re-resolve the target and defeat the
IP pin.Defaults to false so an operator-configured forward proxy keeps working.Enable this only if your instance doesn’t rely on an outbound
HTTP_PROXY / HTTPS_PROXY for egress. When a proxy is in use, the IP pin
can’t extend past the proxy (the proxy resolves the target itself), so
leaving this off is the correct choice for proxied deployments.bool
default:"false"
Determines whether your Infisical instance can automatically read the service
account token of the pod it’s running on. Used for features such as the IRSA
auth method.
string
Comma-separated list of trusted reverse-proxy CIDRs or named ranges whose forwarded-IP headers (e.g. When set, only requests arriving from a socket address within this list will have their forwarded-IP headers respected. Requests from any other source fall back to using the raw socket IP. This prevents IP allowlist bypass via spoofed proxy headers.When unset, Infisical trusts all forwarded-IP headers (legacy behavior, preserved for backwards compatibility with existing self-hosted deployments).
X-Forwarded-For) Infisical will honor.Accepted values are IPv4/IPv6 CIDR notation or the named aliases loopback, linklocal, and uniquelocal.CORS
Cross-Origin Resource Sharing (CORS) is a security feature that allows web applications running on one domain to access resources from another domain. The following environment variables can be used to configure the Infisical REST API to allow or restrict access to resources from different origins.string
Specify a list of origins that are allowed to access the Infisical API.An example value would be
CORS_ALLOWED_ORIGINS=["https://example.com"].Defaults to the same value as your SITE_URL environment variable.string
Array of HTTP methods allowed for CORS requests.Defaults to reflecting the headers specified in the request’s Access-Control-Request-Headers header.
Data layer
The platform uses PostgreSQL to persist all of its data and Redis for caching and background tasks.PostgreSQL
Please note that the database user you create must be granted all privileges
on the Infisical database. This includes the ability to create new schemas,
create, update, delete, modify tables and indexes, etc.
string
default:""
required
PostgreSQL database connection string.
string
default:""
Configure the SSL certificate for securing a PostgreSQL connection by first encoding it in base64.
Use the following command to encode your certificate:
echo "<certificate>" | base64Many cloud providers provide a CA certificate for their data regions that you can use to secure your connection with SSL.AWS RDS
AWS RDS
If you’re hosting your database on AWS RDS, you can use their publicly available CA certificate as the database root certificate.You can find all the available CA certificates for AWS RDS on the official AWS RDS documentation.As an example, if your RDS cluster is hosted in
us-east-1 (US East, N. Virginia), you can use the following root certificate: https://truststore.pki.rds.amazonaws.com/us-east-1/us-east-1-bundle.pem.All the available CA certificates can be found in the AWS RDS documentation linked above.Remember to base64 encode the certificate before setting it as the DB_ROOT_CERT environment variable. cat /path/to/certificate.pem | base64.string
default:""
PostgreSQL database read replica connection strings. It accepts a JSON string.
Connection pool sizing (optional)
Each Infisical instance keeps its own pool of PostgreSQL connections. The defaults suit a small deployment and most self-hosters never need to change them, but they become relevant once you run many instances: pools are per instance, so the total number of connections your database sees grows with your instance count. Work out your total like this:max_connections (SHOW max_connections;). Two things are
easy to miss:
- Rolling deploys briefly double the total. Old and new instances both hold pools while the rollout completes, so size against roughly twice your steady-state number.
- Autoscaling sets the ceiling, not your current instance count. If you autoscale, do the math with the maximum replica count, not today’s.
max_connections, leaving headroom for migrations, admin tools, and
your own psql sessions. If you’re close to the limit, lower DB_POOL_MAX rather than raising
max_connections: each PostgreSQL connection costs memory on the server, and a large number of mostly-idle
connections wastes it. If instead you see queries queueing while your database is idle, the pool is too small
and raising it is the right move.
int
default:"0"
Minimum connections kept open in the primary database pool.
0 lets idle connections close, which is
usually what you want. Raise it only to avoid connection-setup latency on bursty traffic, and be aware that
a non-zero value holds connections open on the server even while the instance is idle.int
default:"10"
Maximum connections in the primary database pool. Must be at least
1 and greater than or equal to
DB_POOL_MIN.int
default:"0"
Minimum connections kept open per read replica pool. Applies to each replica in
DB_READ_REPLICAS
individually.int
default:"10"
Maximum connections per read replica. With three replicas and the default of
10, each instance can
open up to 30 replica connections in addition to its primary pool.Audit log PostgreSQL (optional)
string
Separate PostgreSQL connection string for audit log storage. If not set, audit logs are stored in the main database.
string
Base64-encoded CA certificate for the audit log PostgreSQL database connection. Only needed if
AUDIT_LOGS_DB_CONNECTION_URI is set.int
default:"0"
Minimum connections kept open in the audit log database pool. Only used when
AUDIT_LOGS_DB_CONNECTION_URI is set.int
default:"10"
Maximum connections in the audit log database pool. Only used when
AUDIT_LOGS_DB_CONNECTION_URI is set.
This pool is separate from the primary pool, so it adds to your per-instance total.ClickHouse (optional)
ClickHouse can be used as an alternative audit log storage backend for high-volume deployments. See the ClickHouse Setup Guide for more details.string
ClickHouse connection URL. Example:
http://user:password@host:8123/databasestring
default:"true"
Enable inserting audit logs into ClickHouse. Defaults to
true when CLICKHOUSE_URL is set.string
default:"audit_logs"
ClickHouse table name for audit logs.
string
default:"ReplacingMergeTree"
ClickHouse engine for the audit logs table, used during table creation. Example:
ReplacingMergeTree or SharedReplacingMergeTree('/clickhouse/tables/{uuid}/{shard}', '{replica}').string
ClickHouse insert settings as a JSON string. Applied when inserting audit logs.Default:
{"async_insert":1,"wait_for_async_insert":0,"date_time_input_format":"best_effort"}Audit log behavior
string
default:"false"
Disable storing audit logs in PostgreSQL. When set to
true, audit logs aren’t written to PostgreSQL but are still sent to ClickHouse (if configured) and any configured audit log streams.string
default:"true"
Enable sending audit logs to external audit log streams. When set to
false, no events are sent to configured stream destinations, but PostgreSQL and ClickHouse storage are unaffected.string
default:"false"
Disable audit log generation entirely. When set to
true, no audit log events are produced, so neither PostgreSQL, ClickHouse, nor audit log streams will receive events.bool
default:"false"
Determines whether Audit Log Streams are permitted to connect with internal/private IP addresses.
bool
default:"false"
Determines whether S3-Compatible Storage connections can reach an allowed storage hostname that resolves to an internal/private IP address, such as a MinIO server on your network.
Redis
Redis is used for caching and background tasks. You can use either a standalone Redis instance, Redis Sentinel, or Redis Cluster setup. Redis is required: the instance won’t start unless one ofREDIS_URL, REDIS_SENTINEL_HOSTS, or
REDIS_CLUSTER_HOSTS is set.
An active-passive setup is recommended for Redis. Infisical hasn’t been tested with an active-active Redis setup, which may result in undocumented behavior.
- Redis Standalone
- Redis Sentinel
- Redis Cluster
- Redis Read Replica
string
default:"none"
required
Redis connection string. For SSL/TLS connections, use the
rediss:// protocol (note the double ‘s’).Examples:- Without SSL:
redis://localhost:6379 - With SSL:
rediss://localhost:6379 - With authentication:
redis://:password@localhost:6379 - With SSL and authentication:
rediss://:password@localhost:6379
Redis with SSL/TLS
To connect to Redis with SSL/TLS, use therediss:// protocol (note the double ‘s’) in your connection string.
If your Redis server uses a certificate signed by a private CA or a self-signed certificate, set the NODE_EXTRA_CA_CERTS environment variable to the path of your CA certificate file:
REDIS_SENTINEL_ENABLE_TLS or REDIS_CLUSTER_ENABLE_TLS environment variables respectively.
Email service
Without email configuration, Infisical’s core functions like sign-up/login and secret operations work, but this disables multi-factor authentication, email invites for projects, alerts for suspicious logins, and all other email-dependent features.Generic Configuration
Generic Configuration
string
default:"none"
Hostname to connect to for establishing SMTP connections
string
default:"587"
Port to connect to for establishing SMTP connections
string
default:"none"
Credential to connect to host (e.g. [email protected])
string
default:"none"
Credential to connect to host
string
default:"none"
Email address to be used for sending emails
string
default:"none"
Name label to be used in From field (e.g. Team)
string
default:"none"
Hostname that Infisical announces in the SMTP
EHLO/HELO greeting. When
unset, the underlying mailer falls back to the operating system hostname.
Inside containers (e.g. Cloud Run, Kubernetes) the OS hostname is typically a
random container ID, which can be rejected by SMTP relays that validate the
sender hostname (such as Gmail SMTP relay with sender-hostname checks). Set
this to a valid FQDN that the relay accepts.bool
default:"false"
If this is
true and SMTP_PORT isn’t 465 then TLS isn’t used even if the
server supports STARTTLS extension.bool
default:"true"
If this is
true and SMTP_PORT isn’t 465 then Infisical tries to use
STARTTLS even if the server doesn’t advertise support for it. If the
connection can’t be encrypted, then the message isn’t sent.bool
default:"true"
If this is
true, Infisical will validate the server’s SSL/TLS certificate
and reject the connection if the certificate is invalid or not trusted. If set
to false, the client will accept the server’s certificate regardless of its
validity, which can be useful in development or testing environments but is
not recommended for production use.string
default:"none"
If your SMTP server uses a certificate signed by a custom Certificate Authority, you should set this variable so that Infisical can trust the custom CA.This variable must be a base64-encoded PEM certificate. Use the following command to encode your certificate:
echo "<certificate>" | base64Infisical strongly recommends using the following variables alongside this one for maximum security:SMTP_REQUIRE_TLS=trueSMTP_TLS_REJECT_UNAUTHORIZED=true
Twilio SendGrid
Twilio SendGrid
- Create an account and configure SendGrid to send emails.
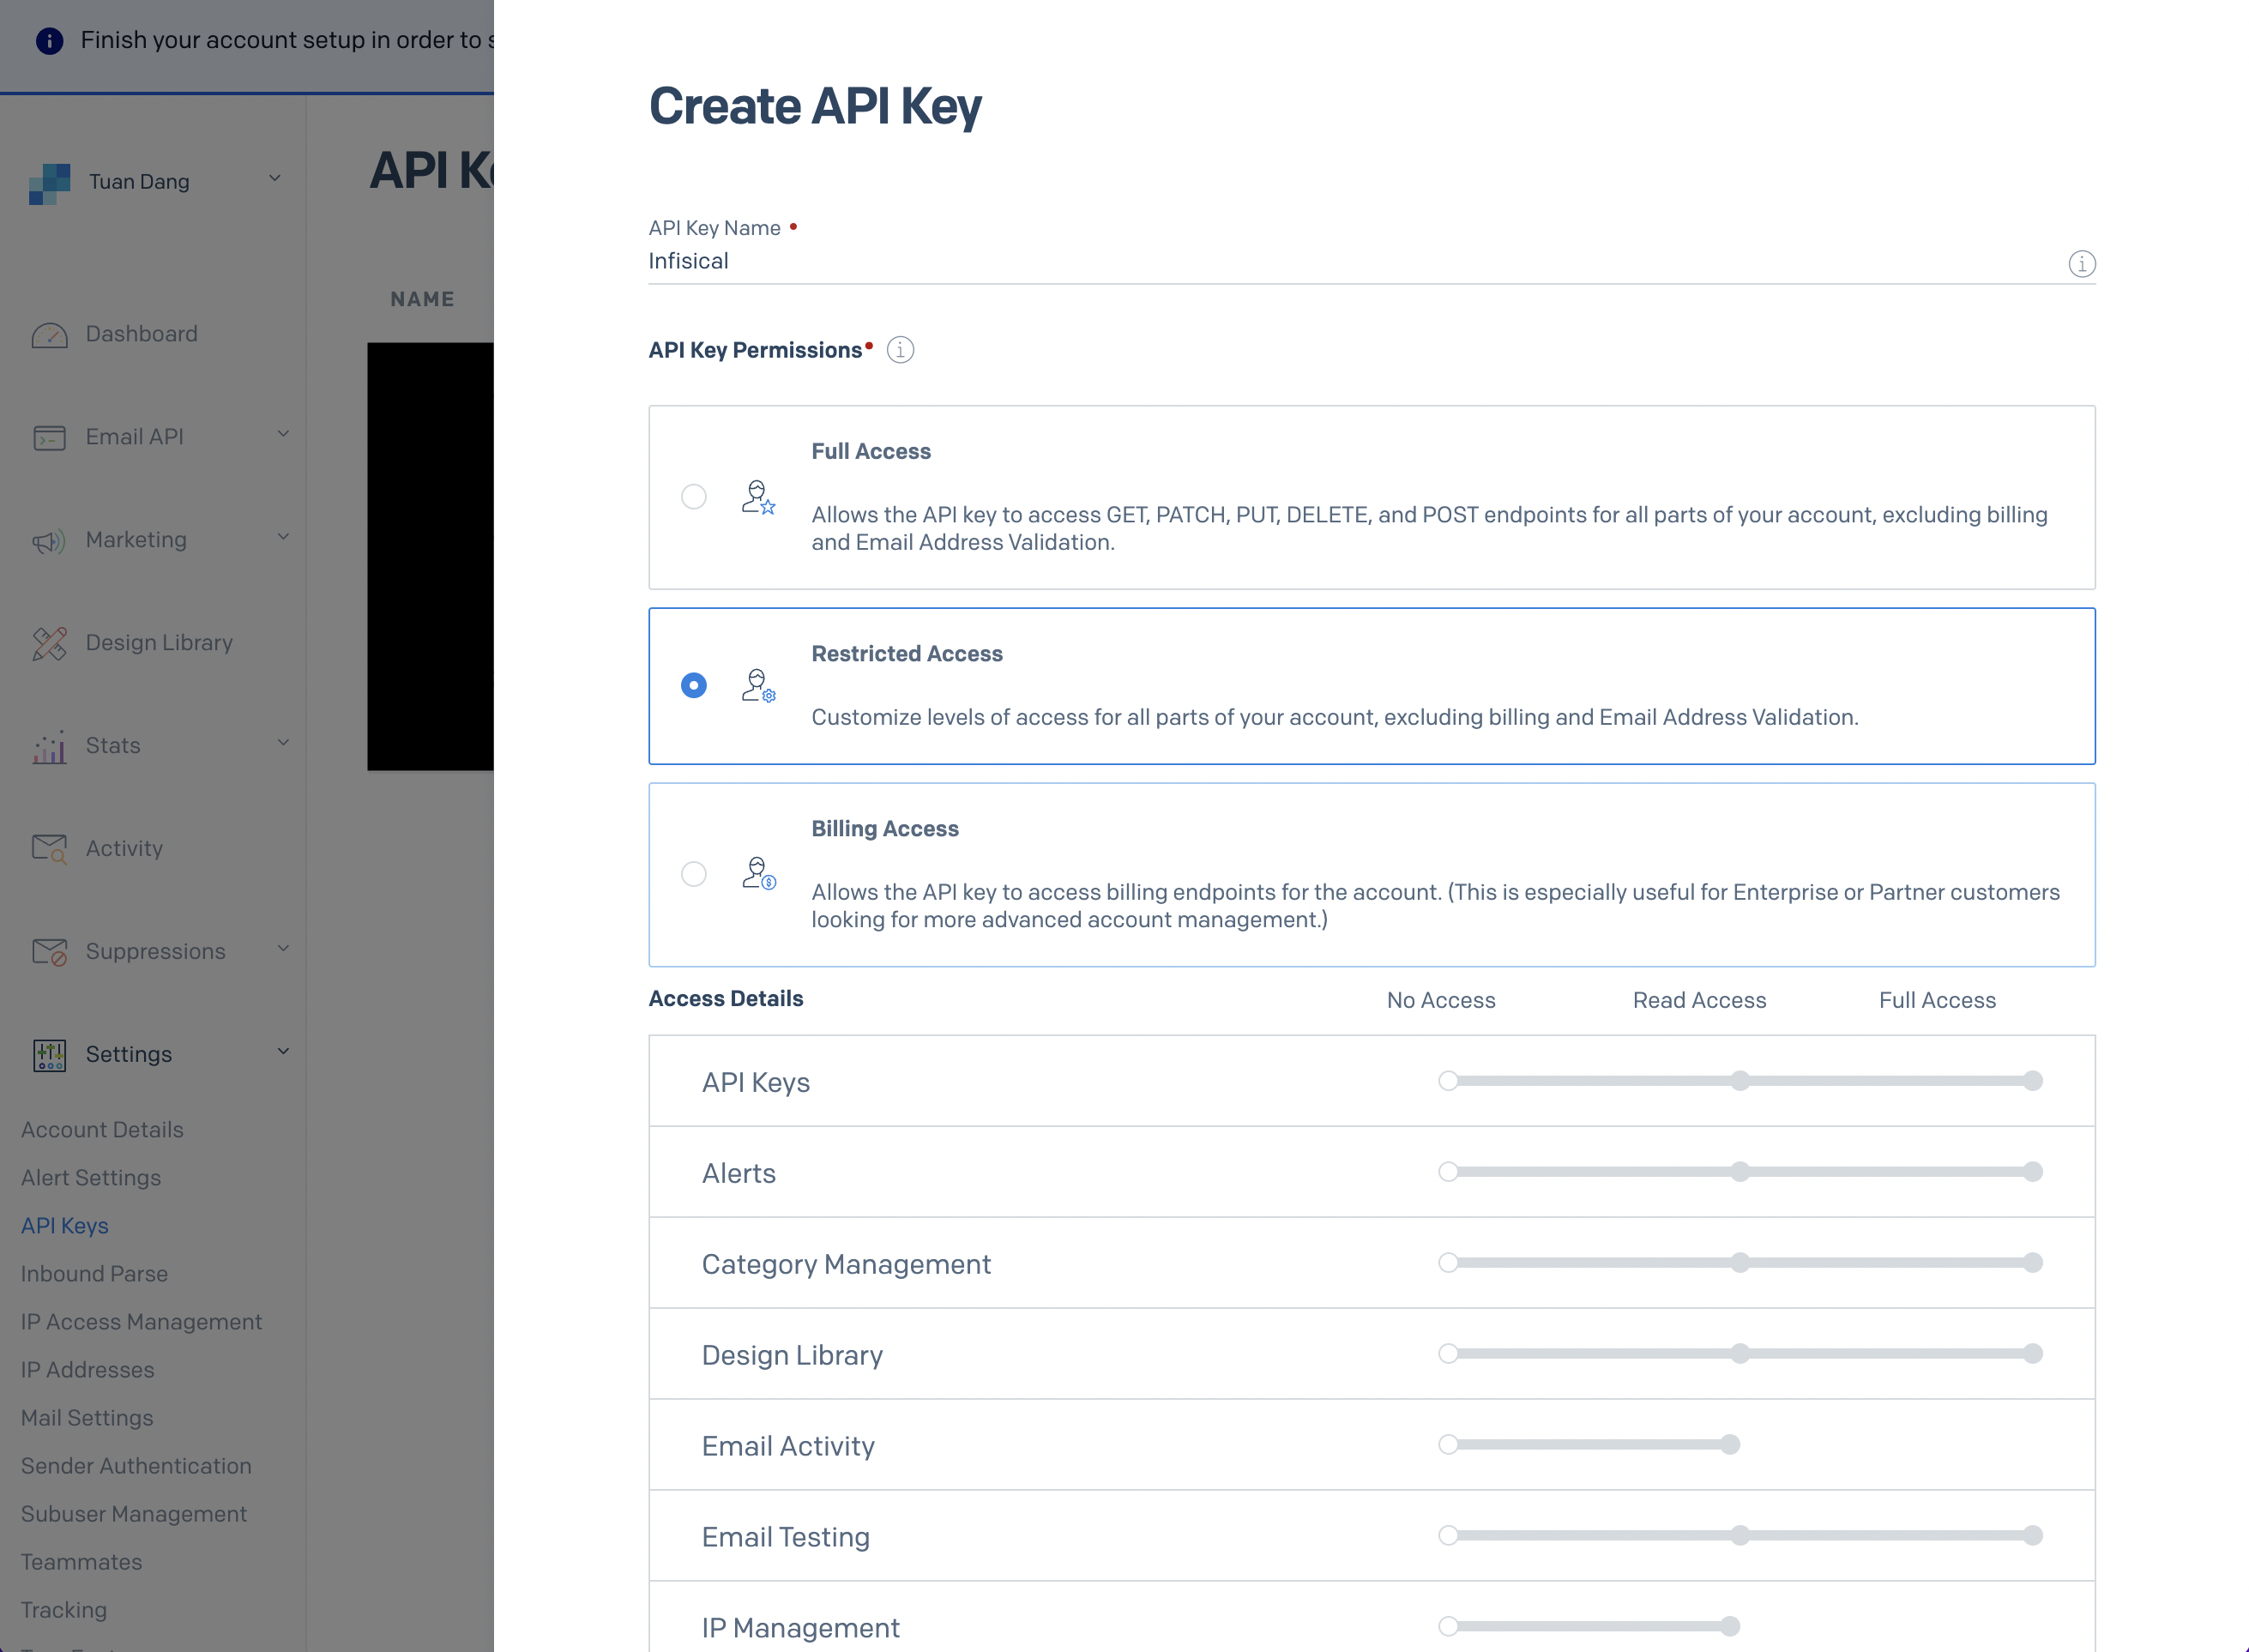
- Create a SendGrid API Key under Settings > API Keys
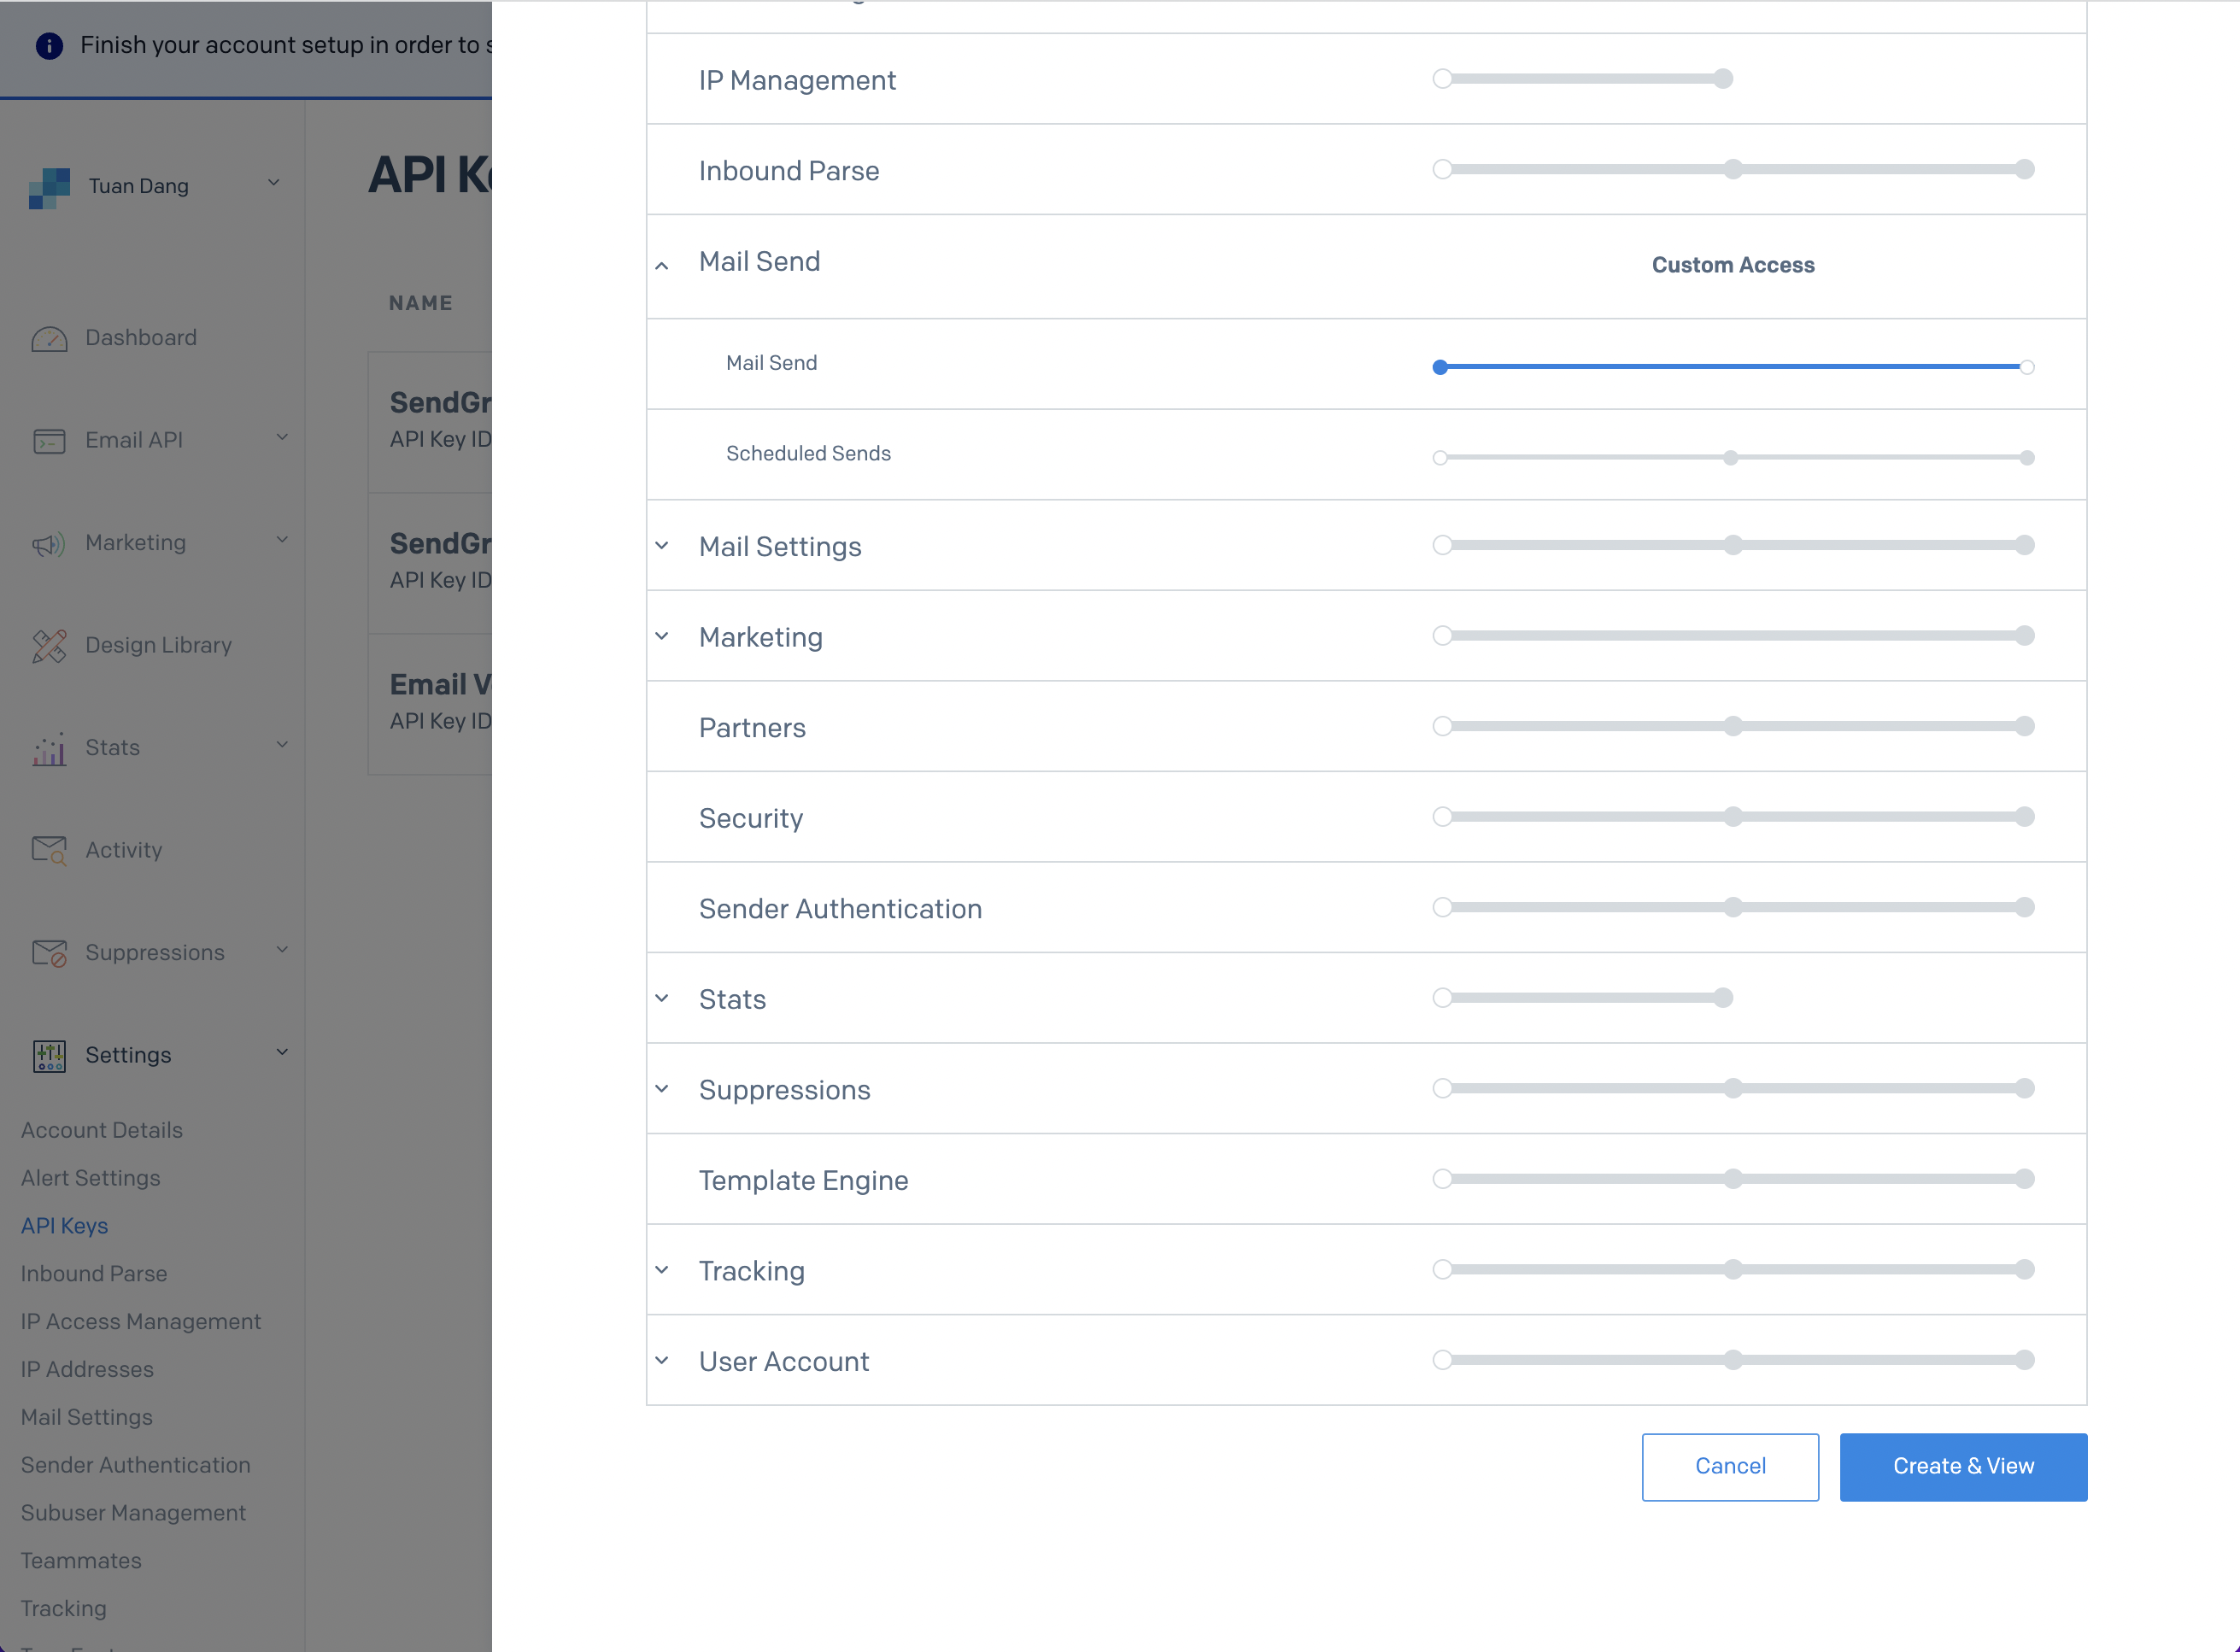
- Set a name for your API Key, we recommend using “Infisical,” and select the “Restricted Key” option. You’ll need to enable the “Mail Send” permission as shown below:
- With the API Key, you can now set your SMTP environment variables:
Remember that you’ll need to restart Infisical for this to work properly.
Mailgun
Mailgun
- Create an account and configure Mailgun to send emails.
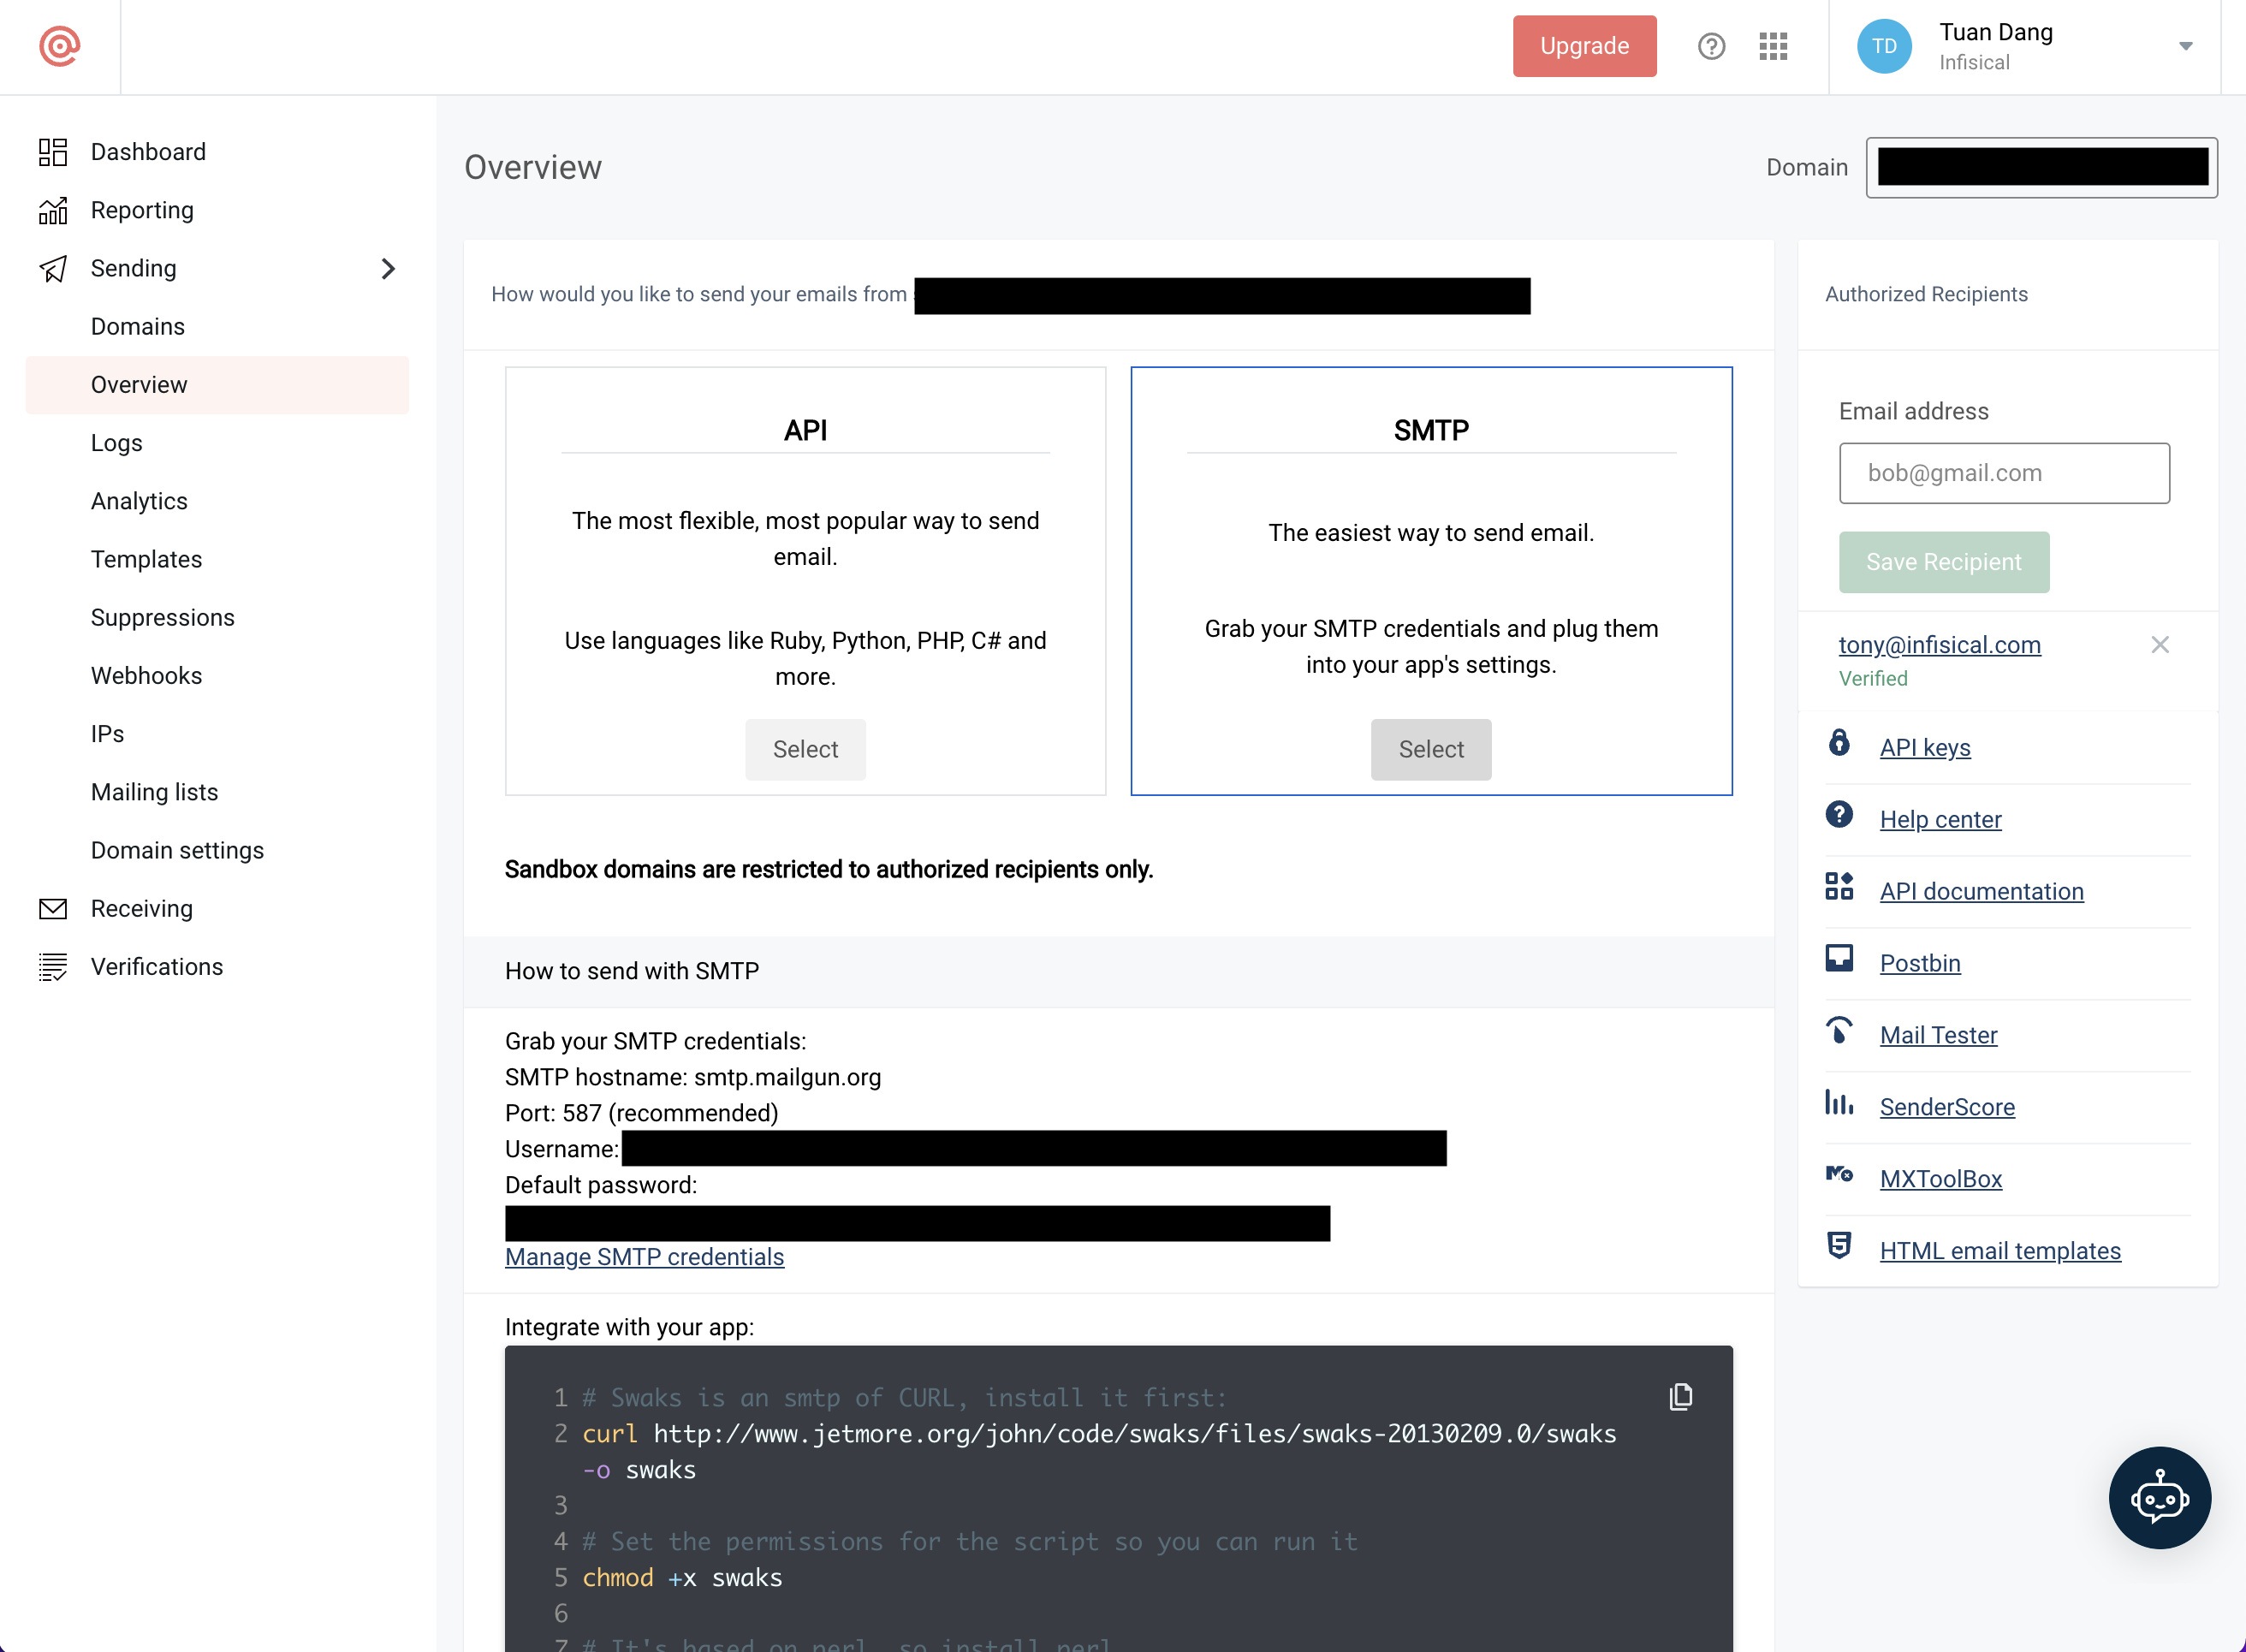
- Obtain your Mailgun credentials in Sending > Overview > SMTP
- With your Mailgun credentials, you can now set up your SMTP environment variables:
AWS SES
AWS SES
1
Create a verified identity
This will be used to verify the email you’re sending from.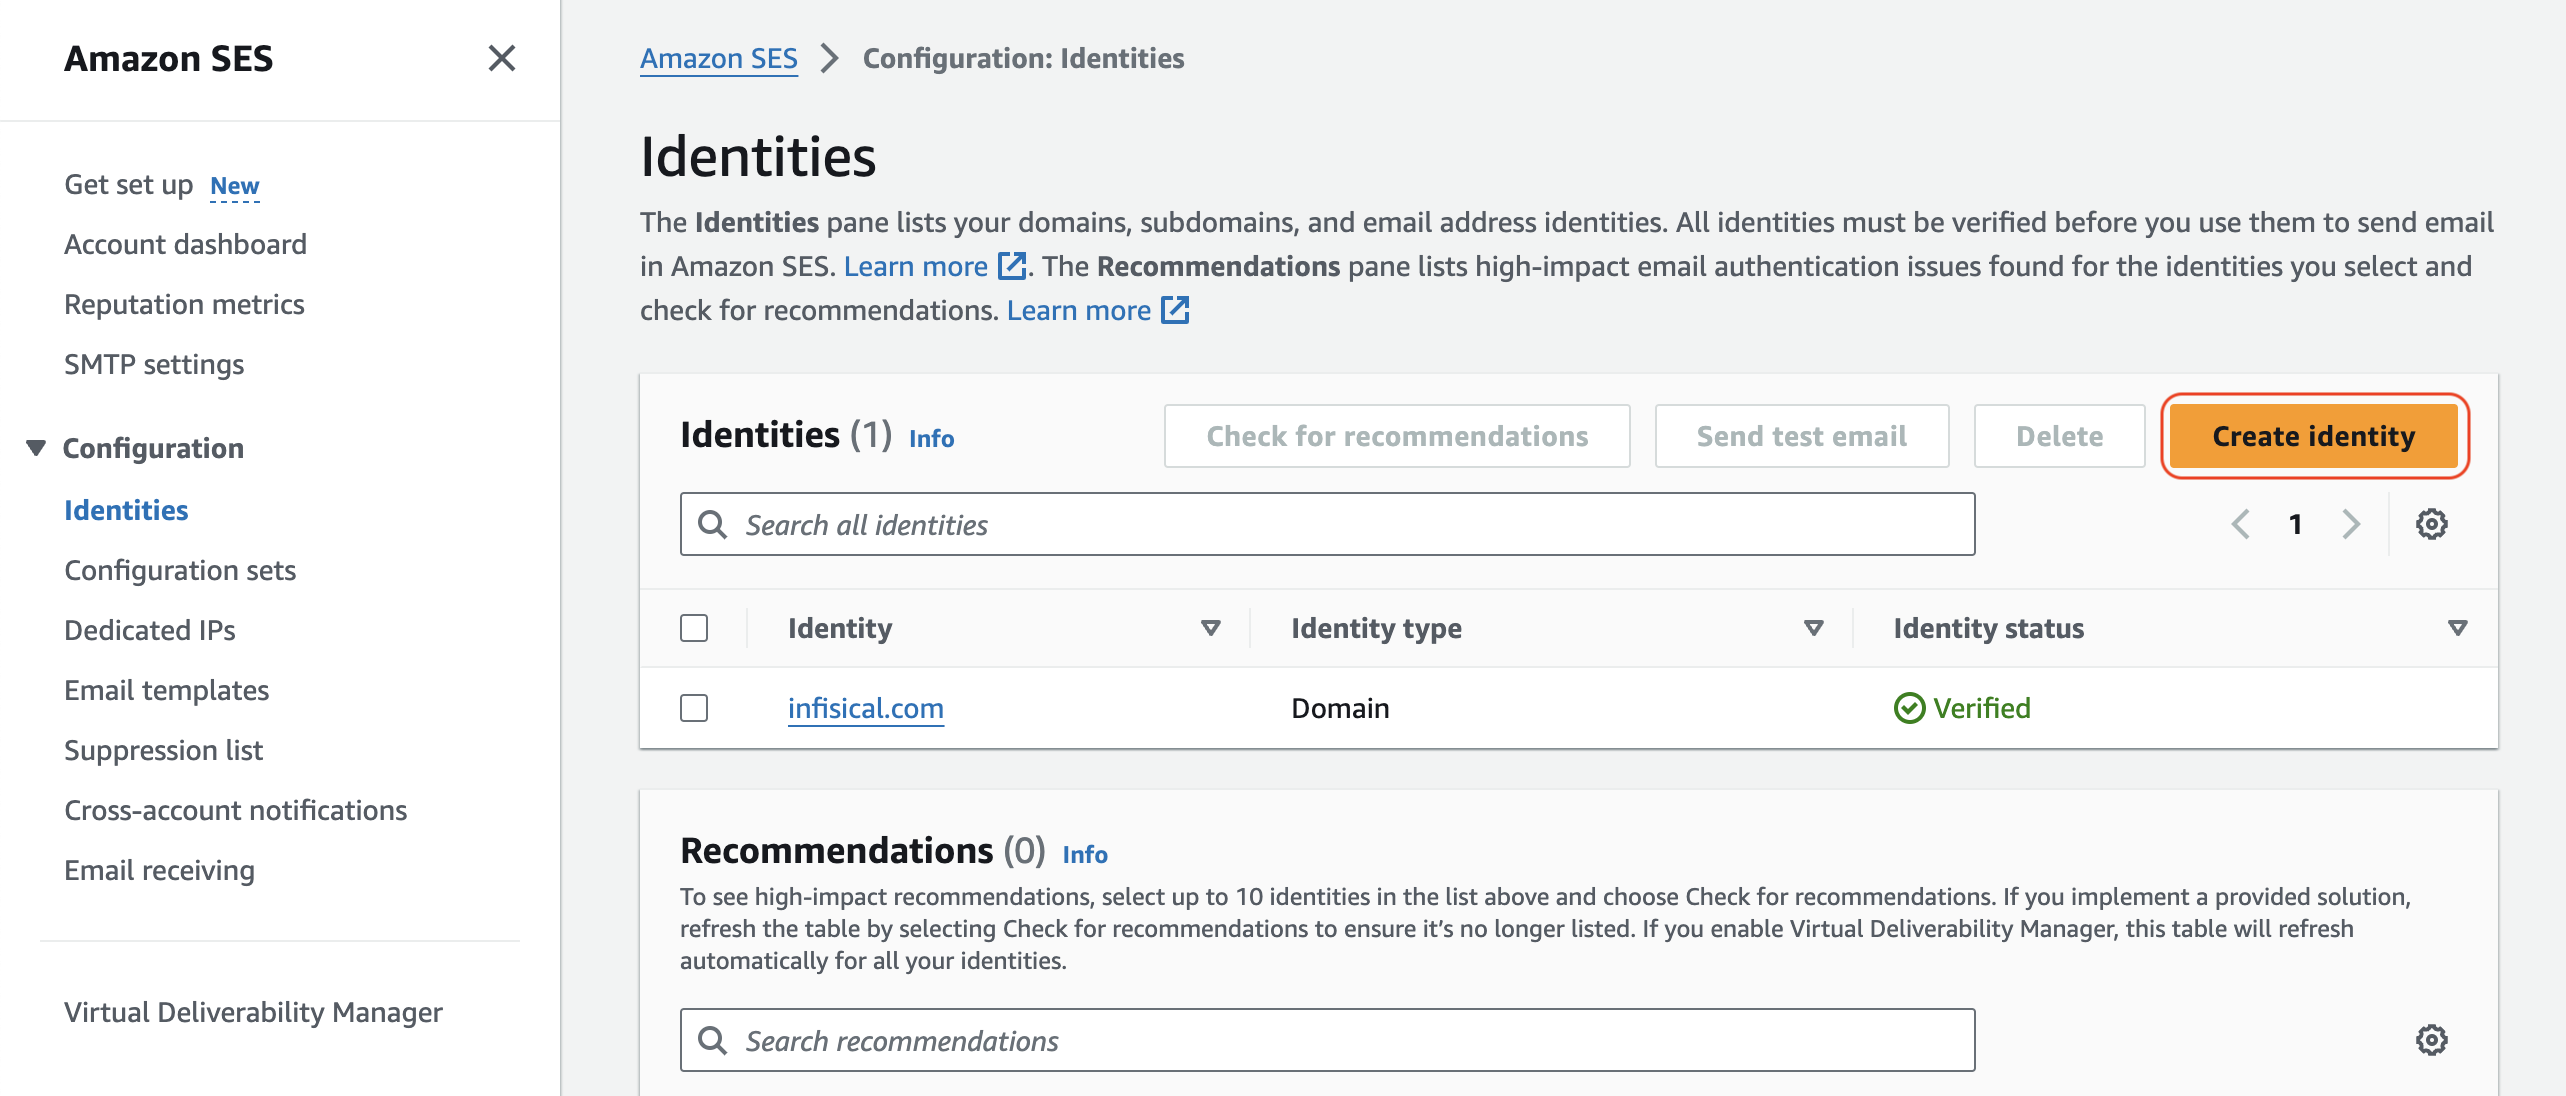
If AWS SES is in sandbox mode, you’ll only be able to send emails to verified identities.
2
Create an account and configure AWS SES
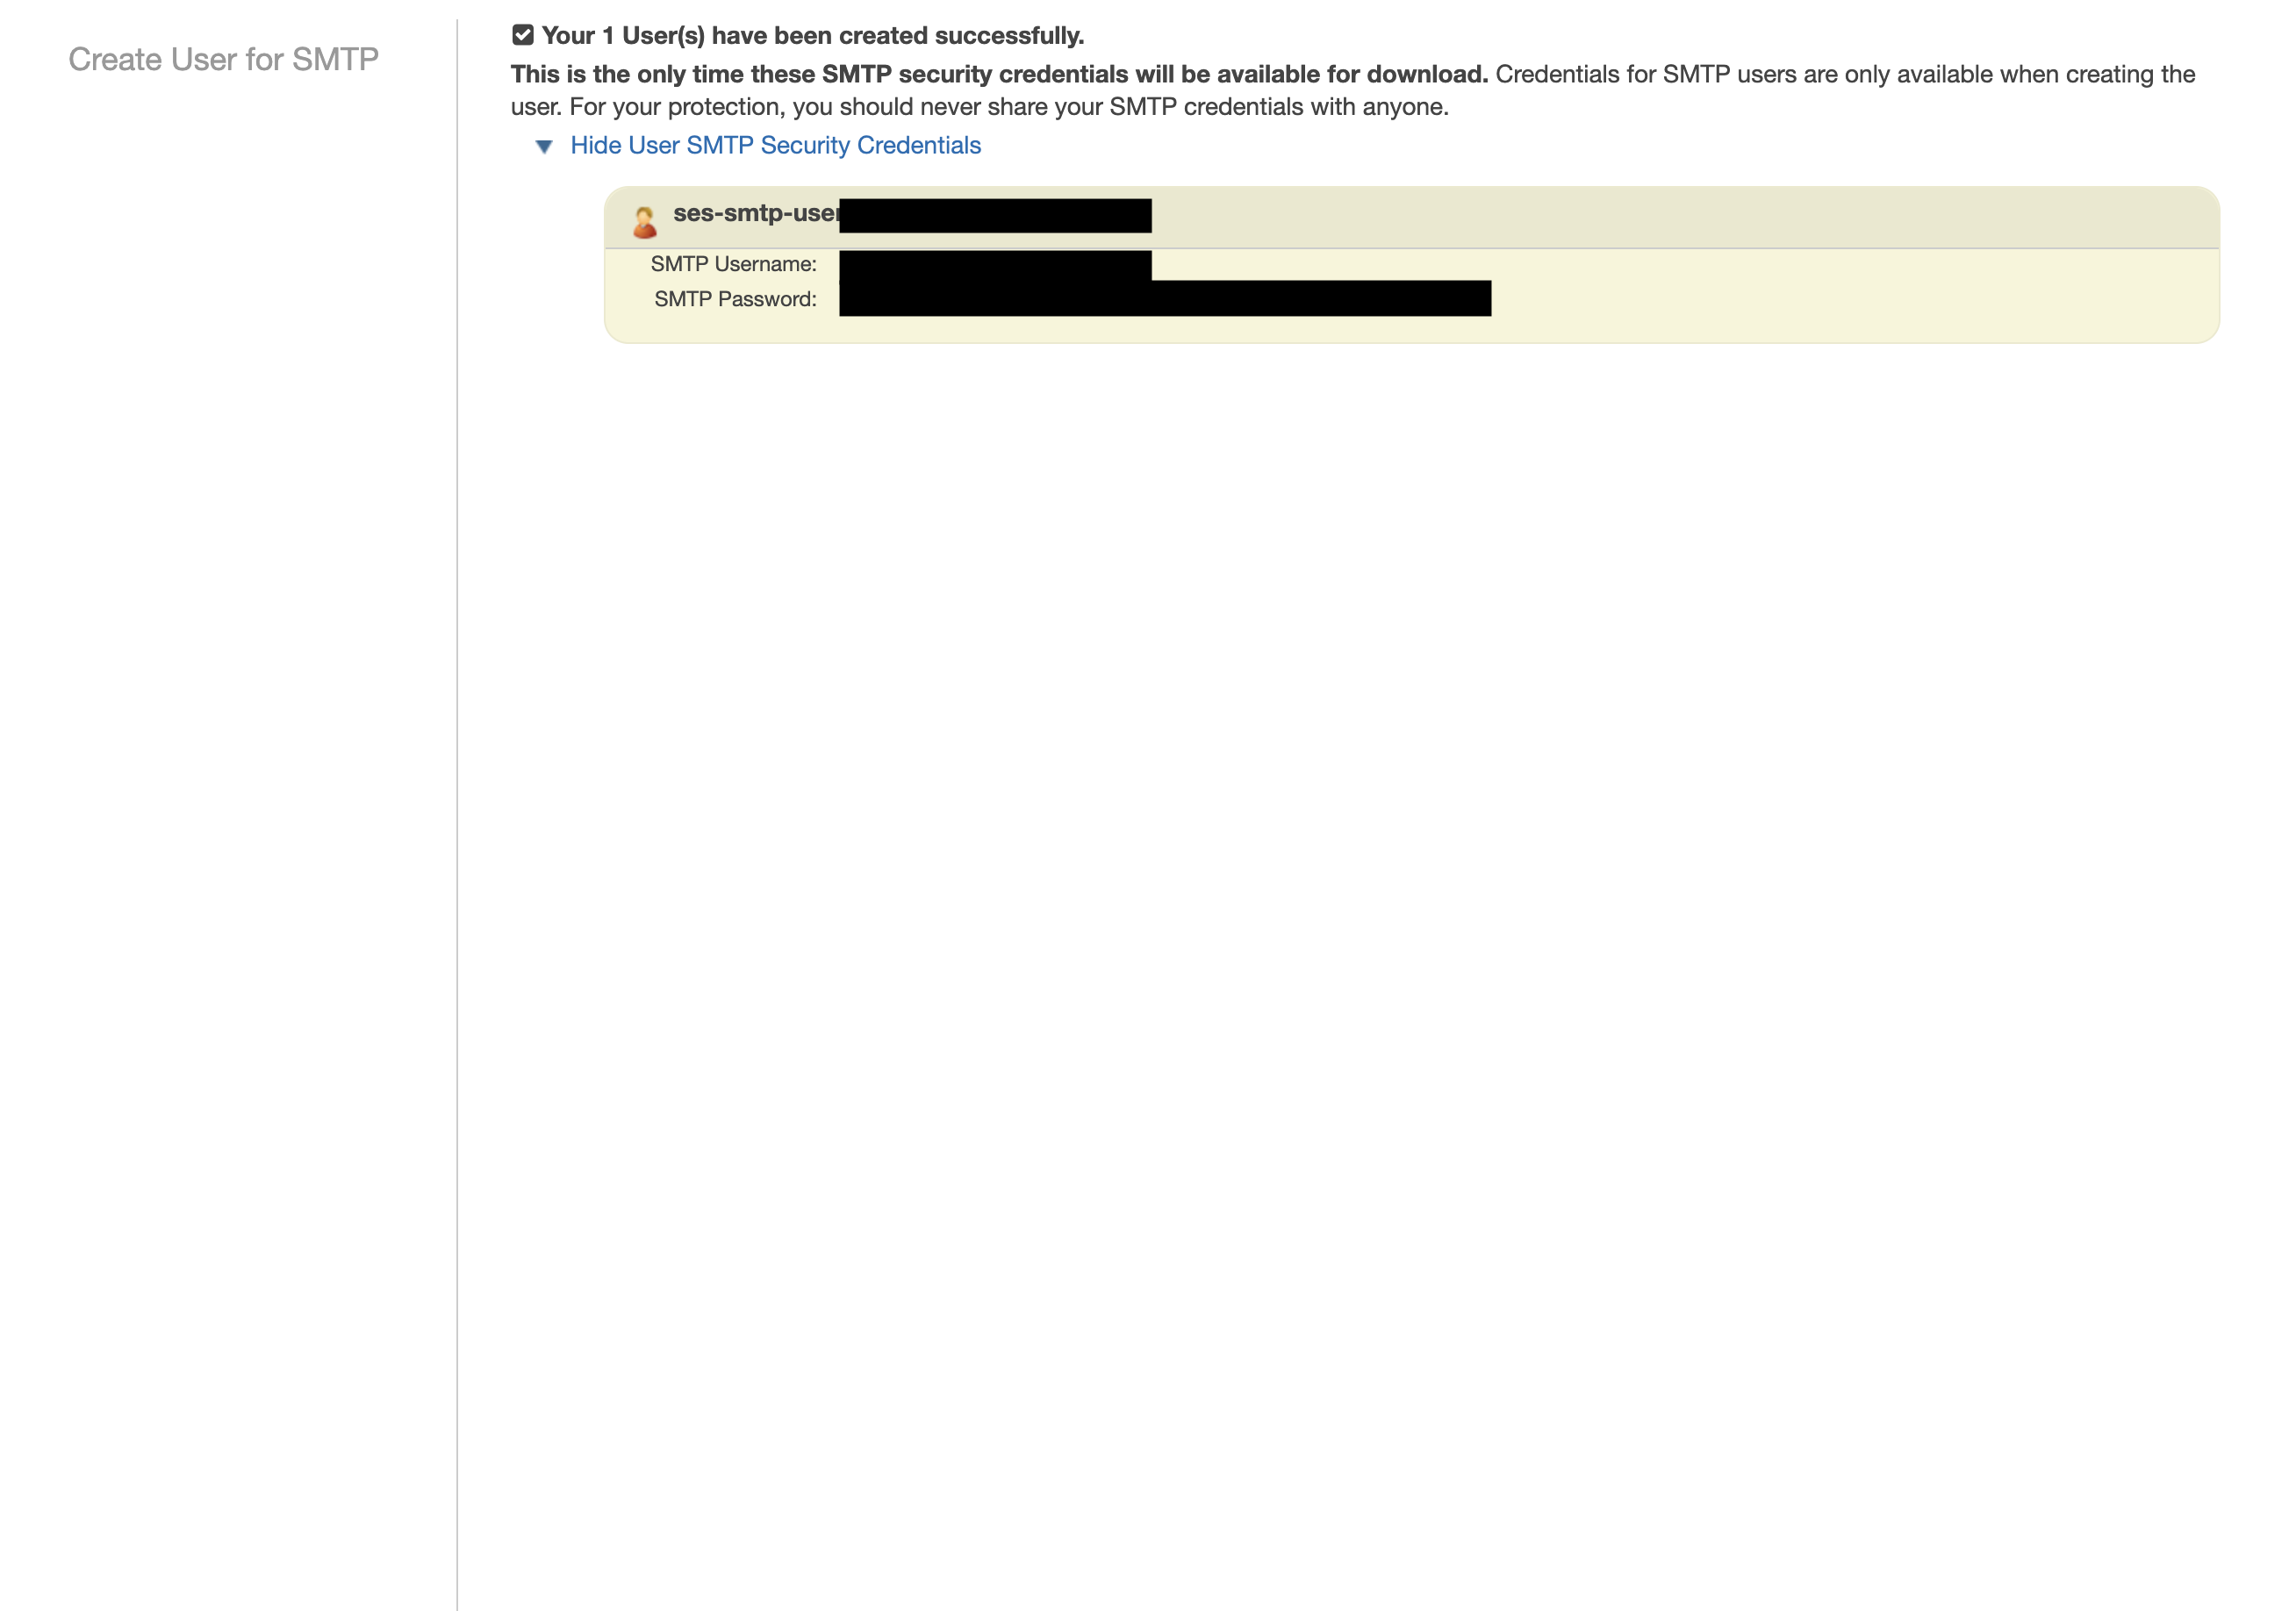
Create an IAM user for SMTP authentication and obtain SMTP credentials in SMTP settings > Create SMTP credentials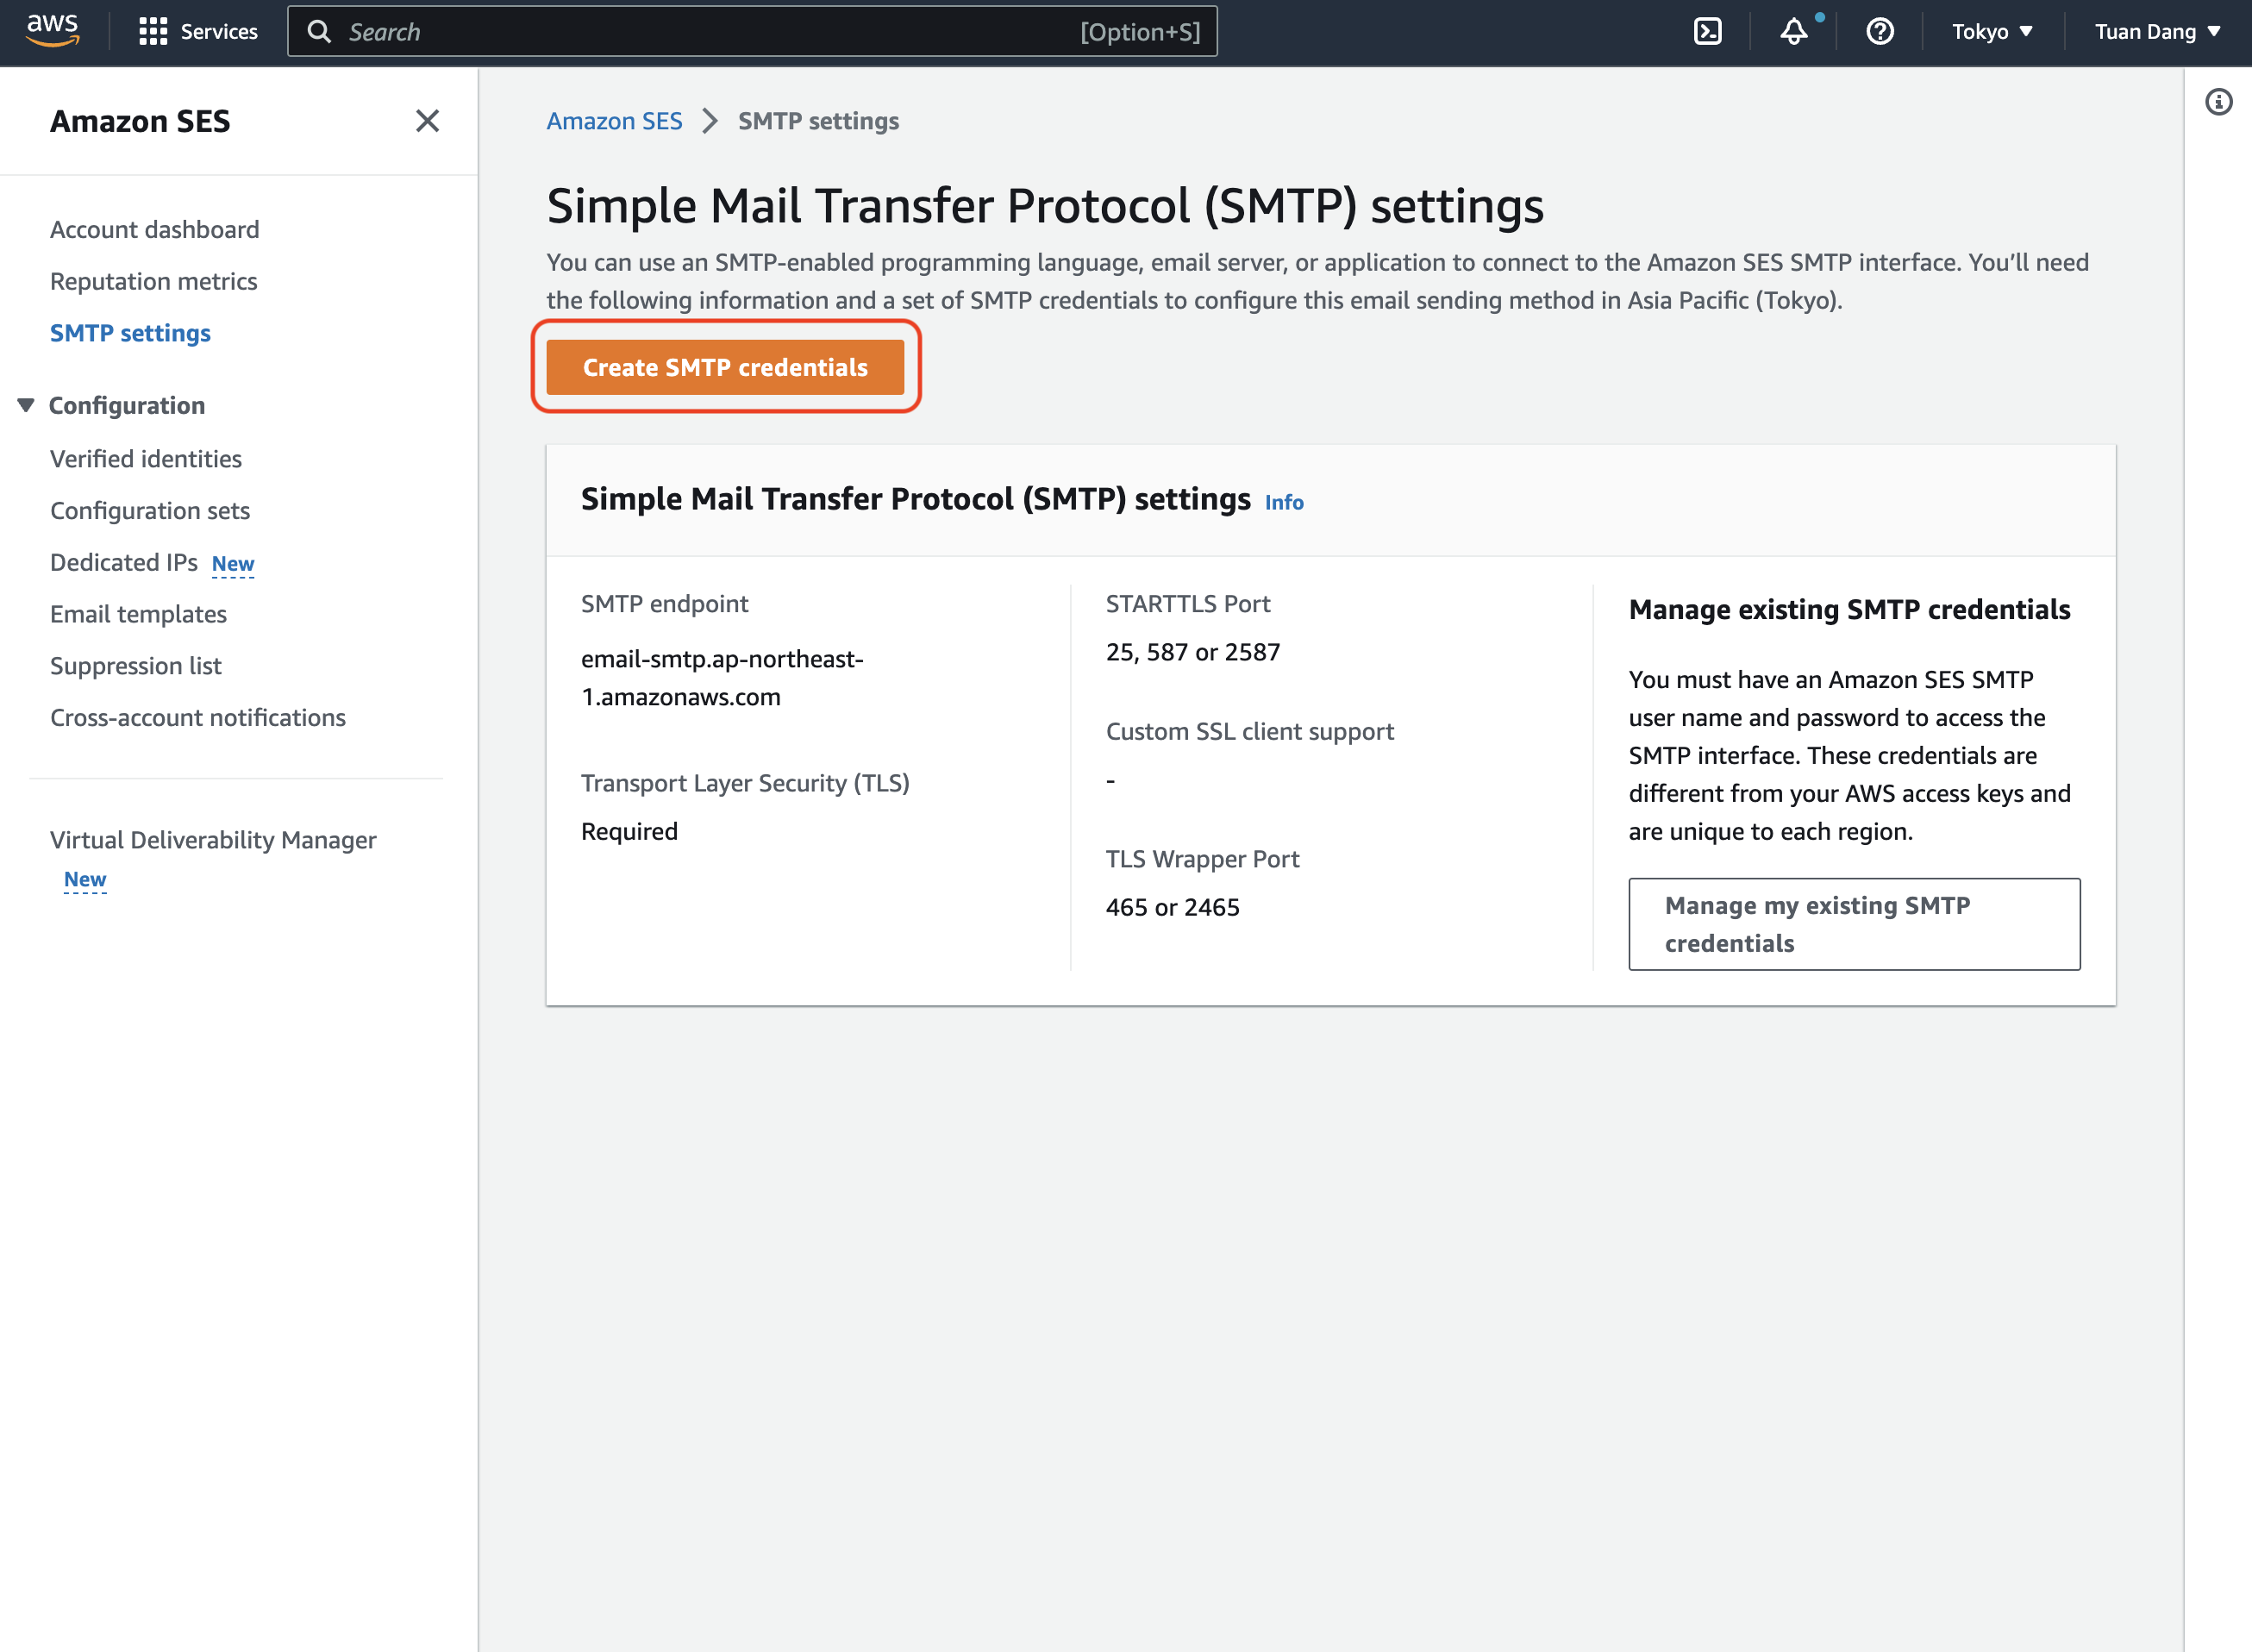
3
Set up your SMTP environment variables
With your AWS SES SMTP credentials, you can now set up your SMTP environment variables for your Infisical instance.
Remember that you will need to restart Infisical for this to work properly.
SocketLabs
SocketLabs
- Create an account and configure SocketLabs to send emails.
- From the dashboard, navigate to SMTP Credentials > SMTP & APIs > SMTP Credentials to obtain your SocketLabs SMTP credentials.
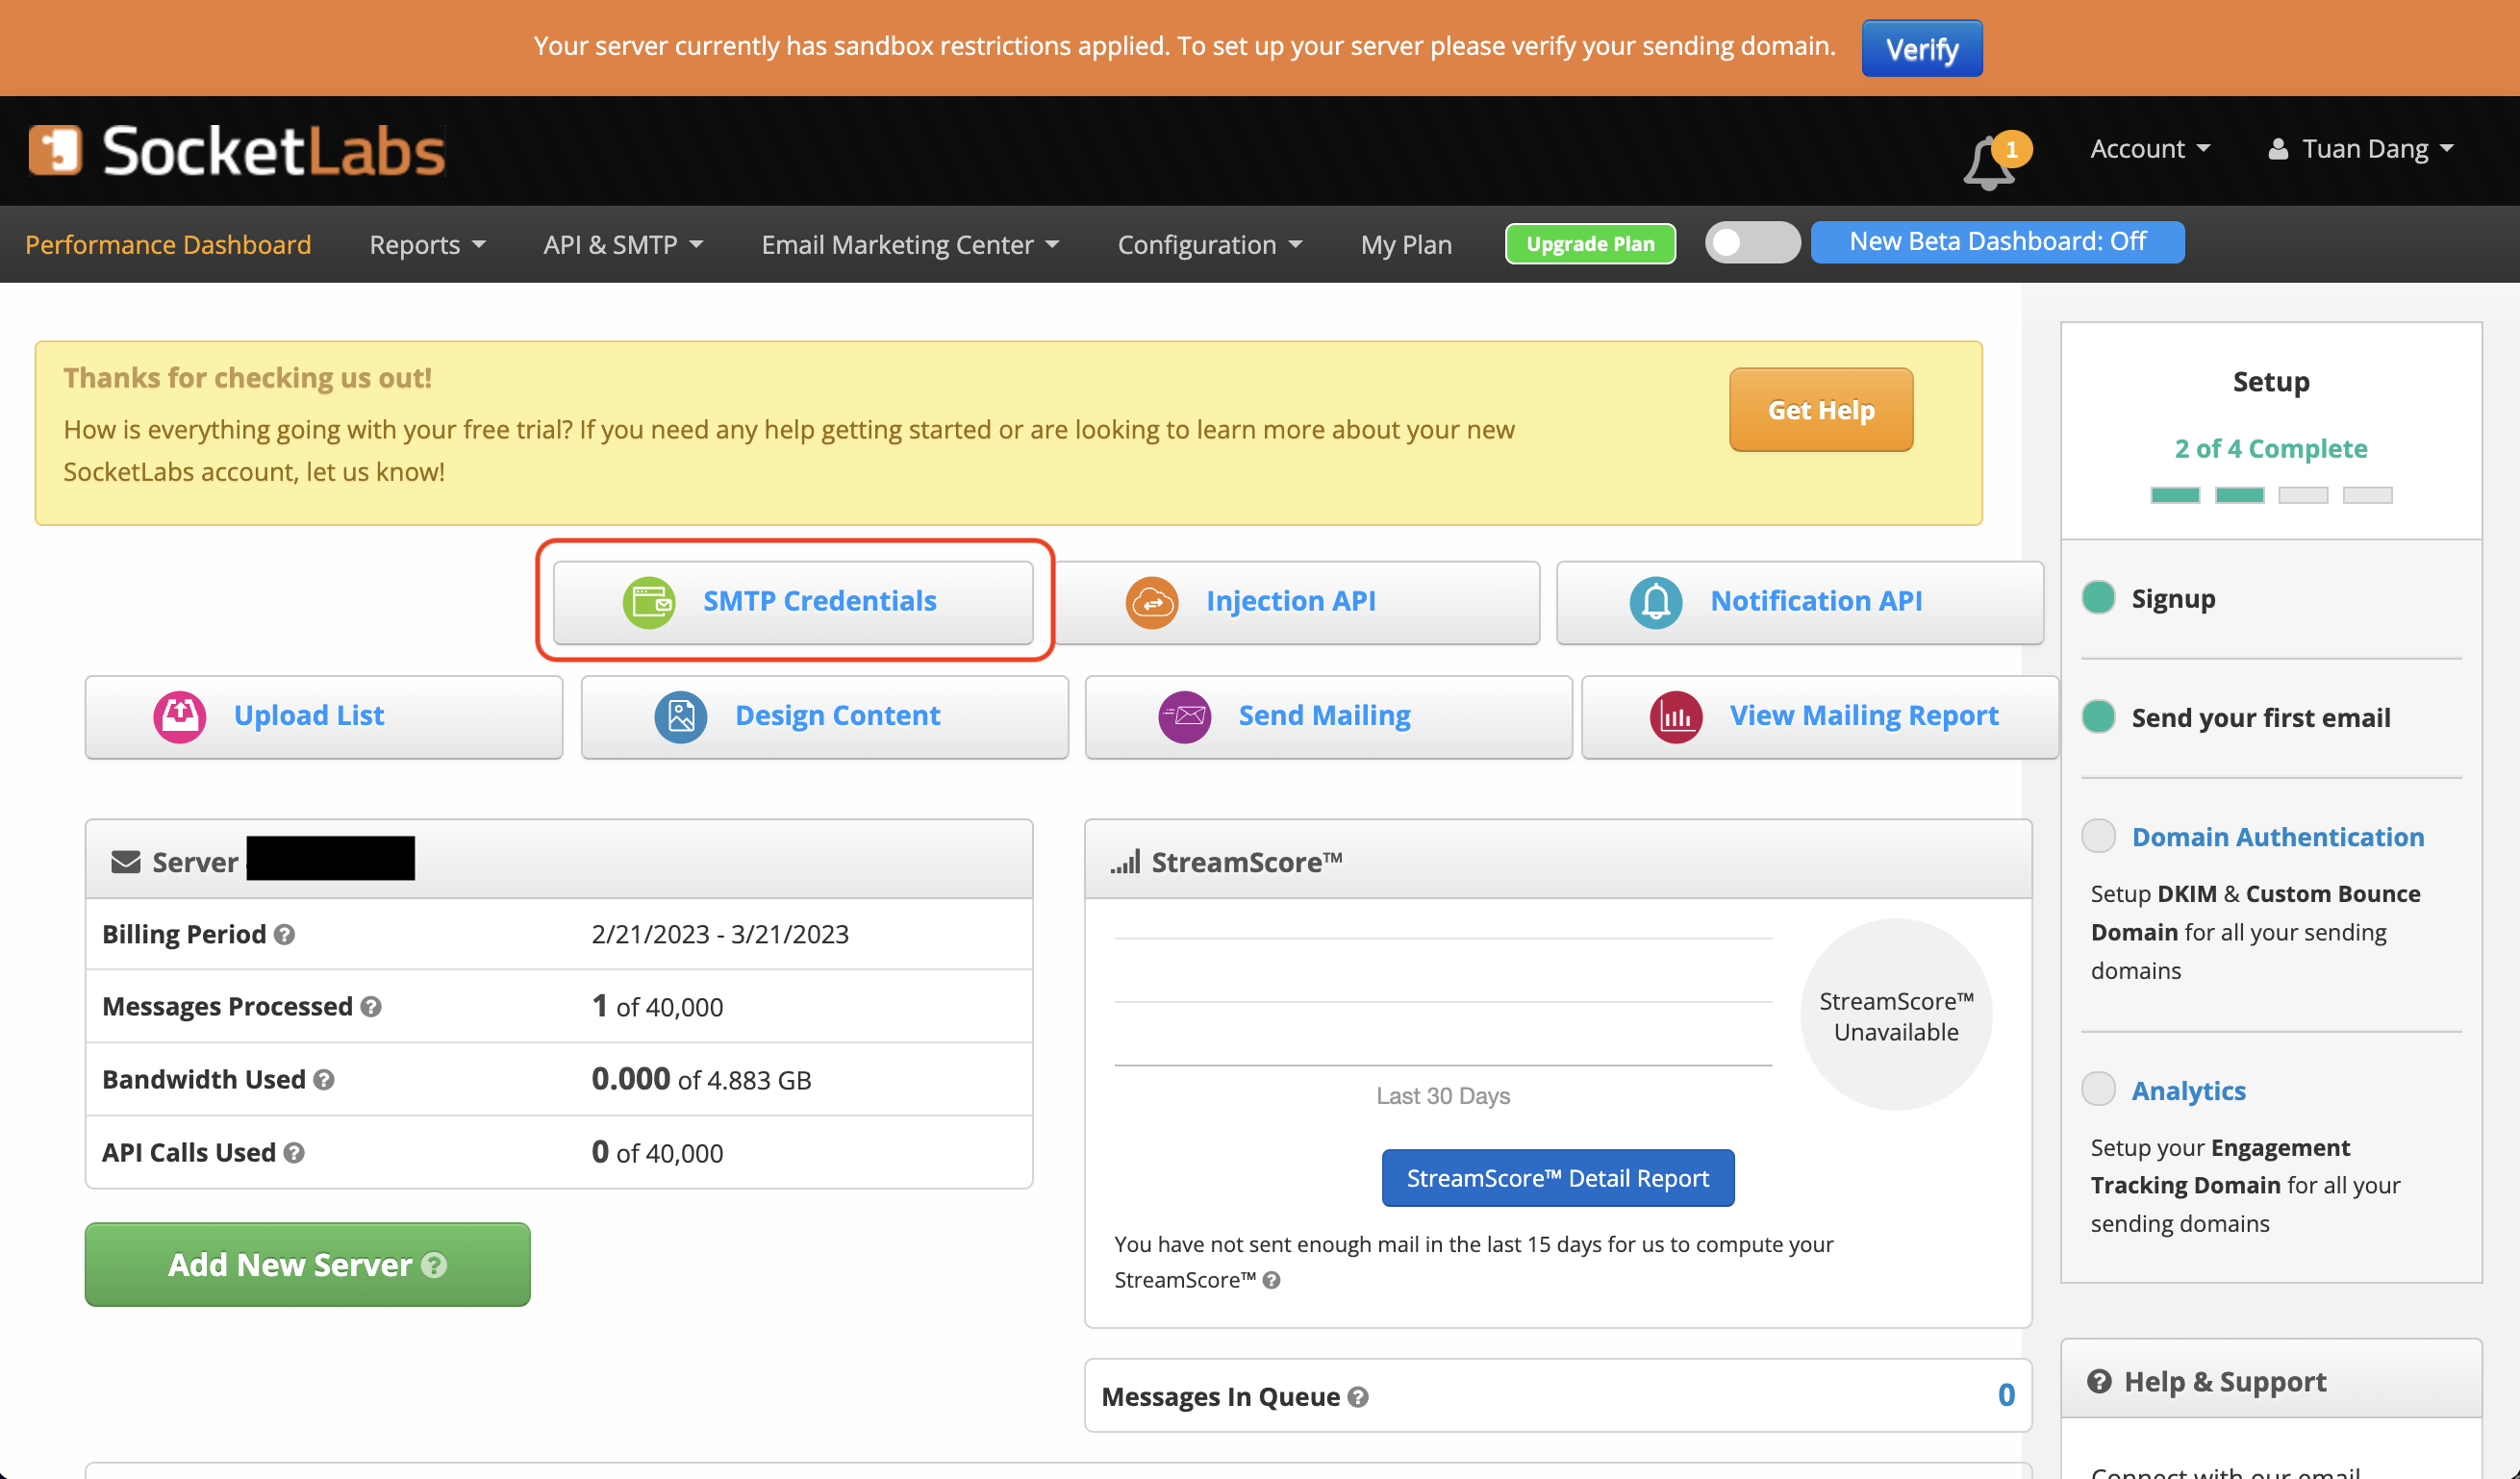
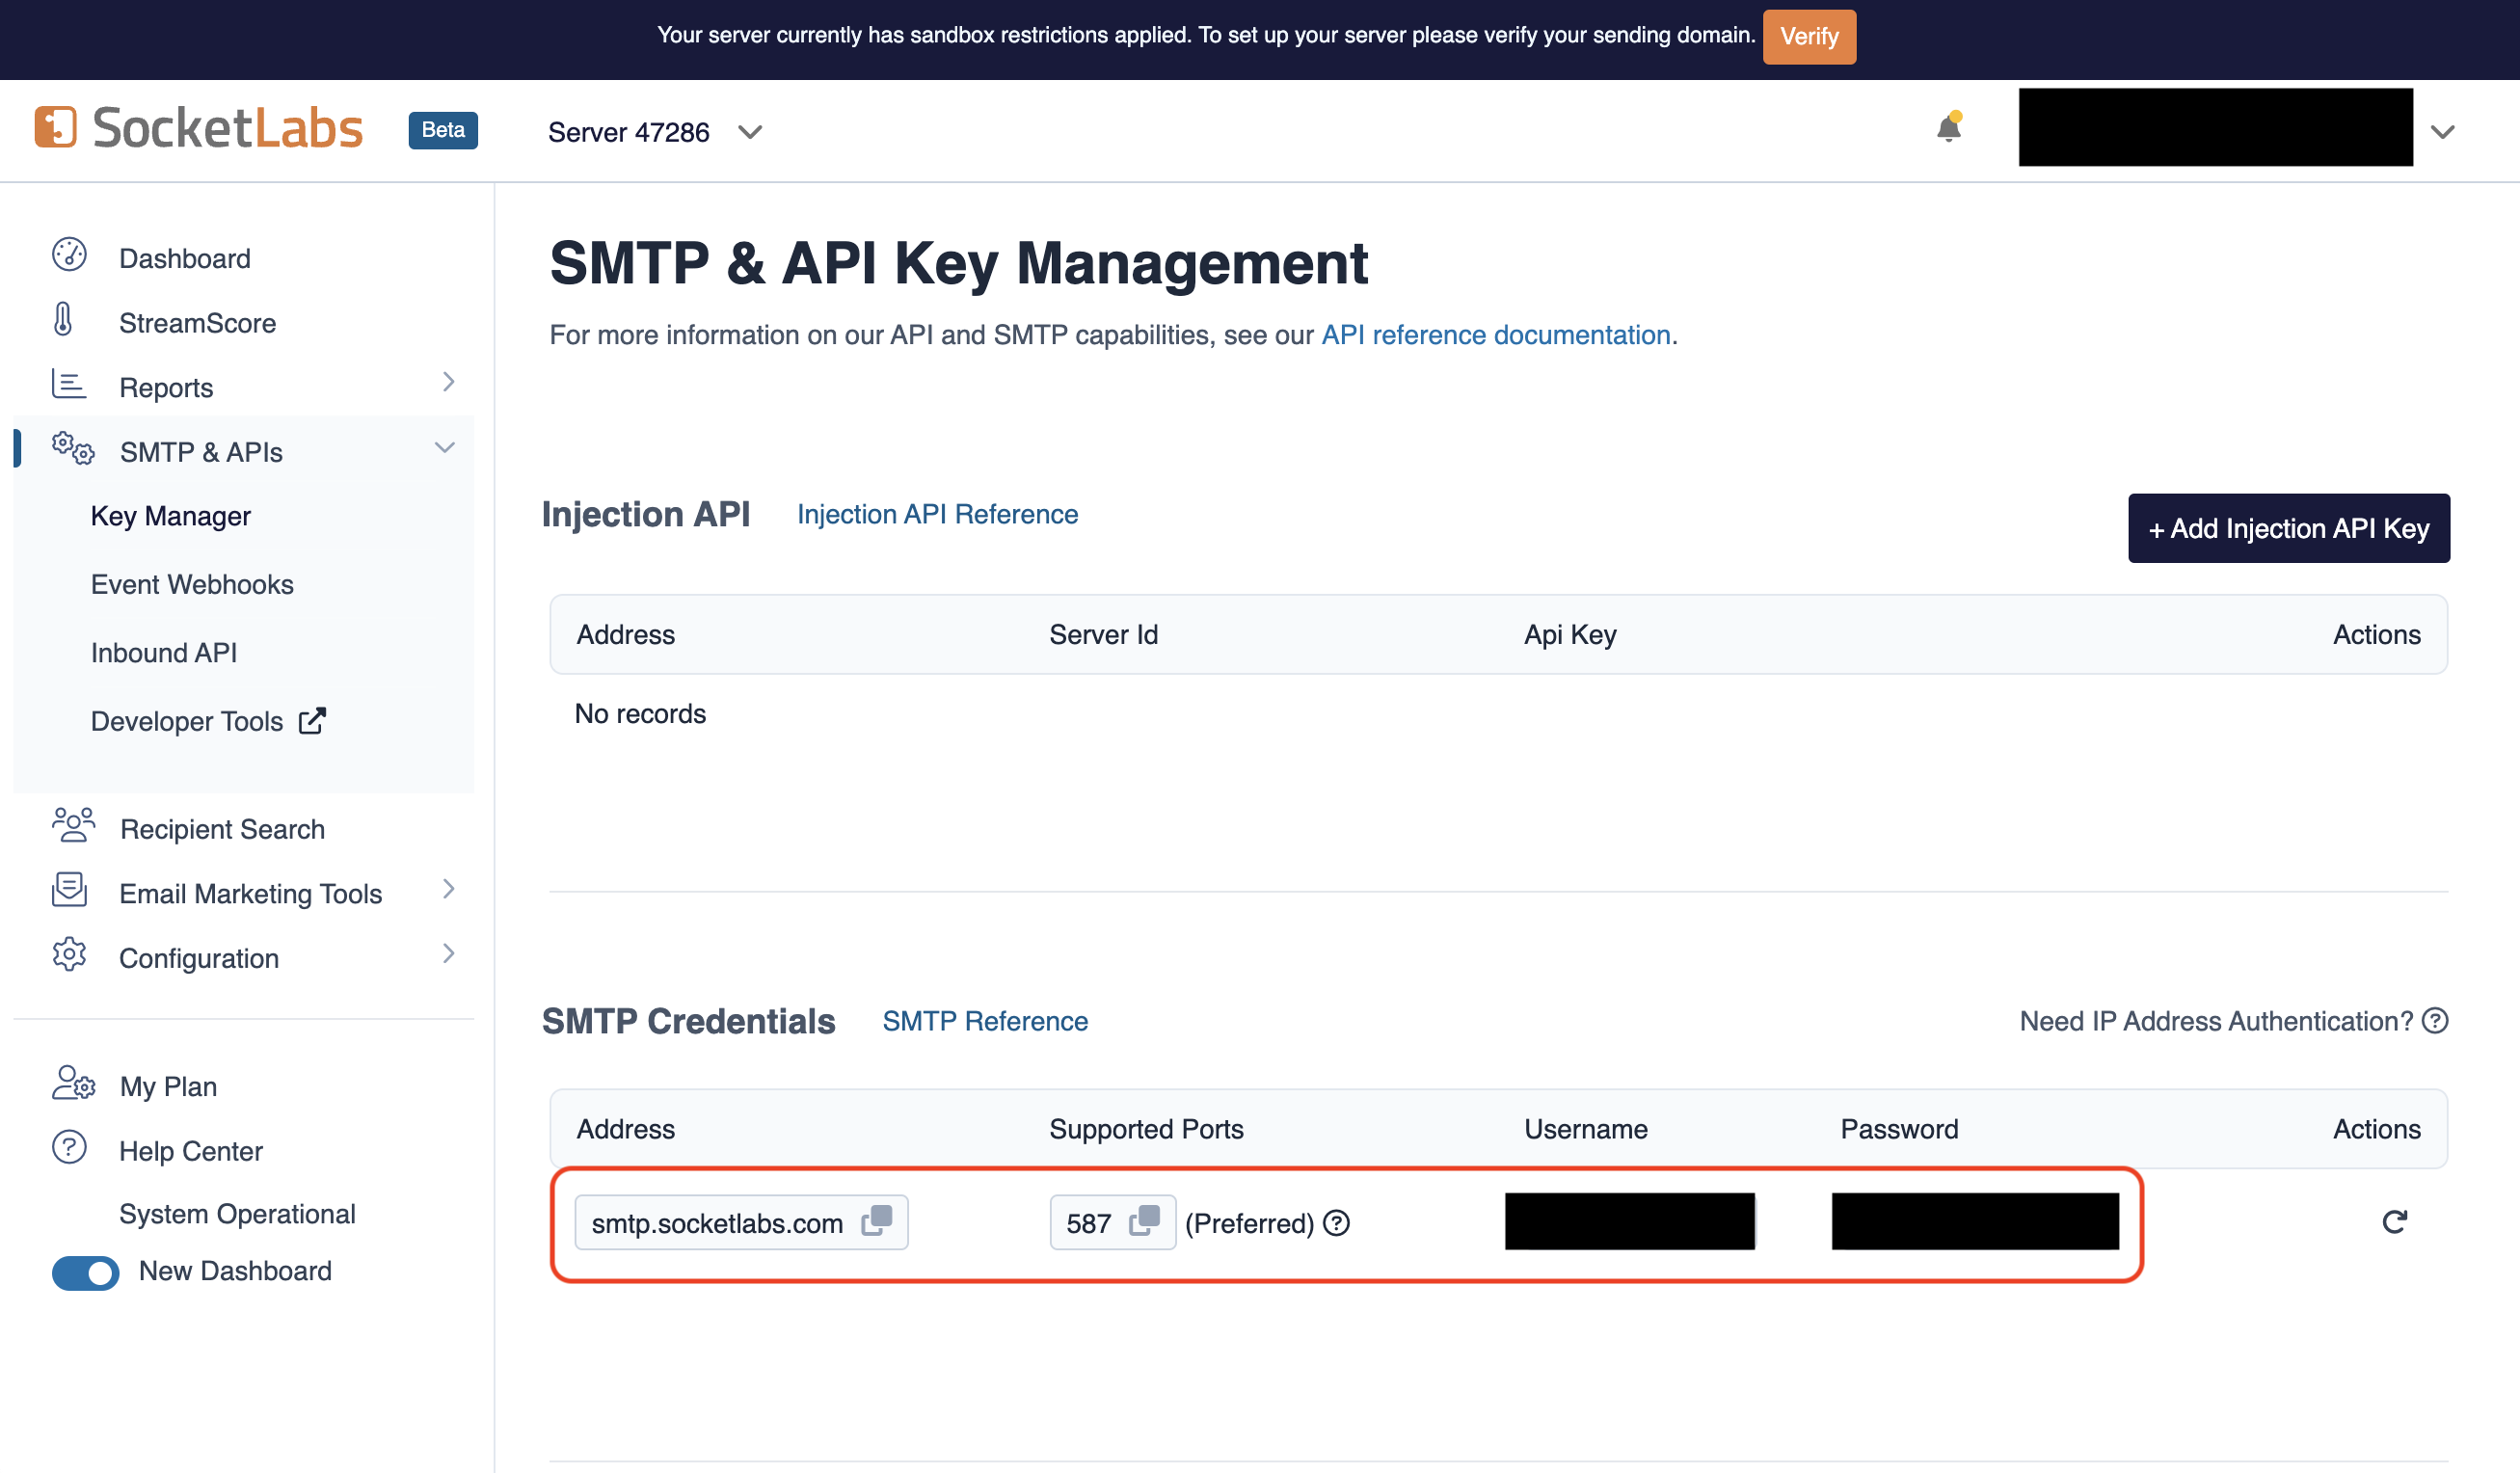
- With your SocketLabs SMTP credentials, you can now set up your SMTP environment variables:
The
SMTP_FROM_ADDRESS environment variable should be an email for an
authenticated domain under Configuration > Domain Management in SocketLabs.
For example, if you’re using SocketLabs in sandbox mode, then you may use an
email like [email protected].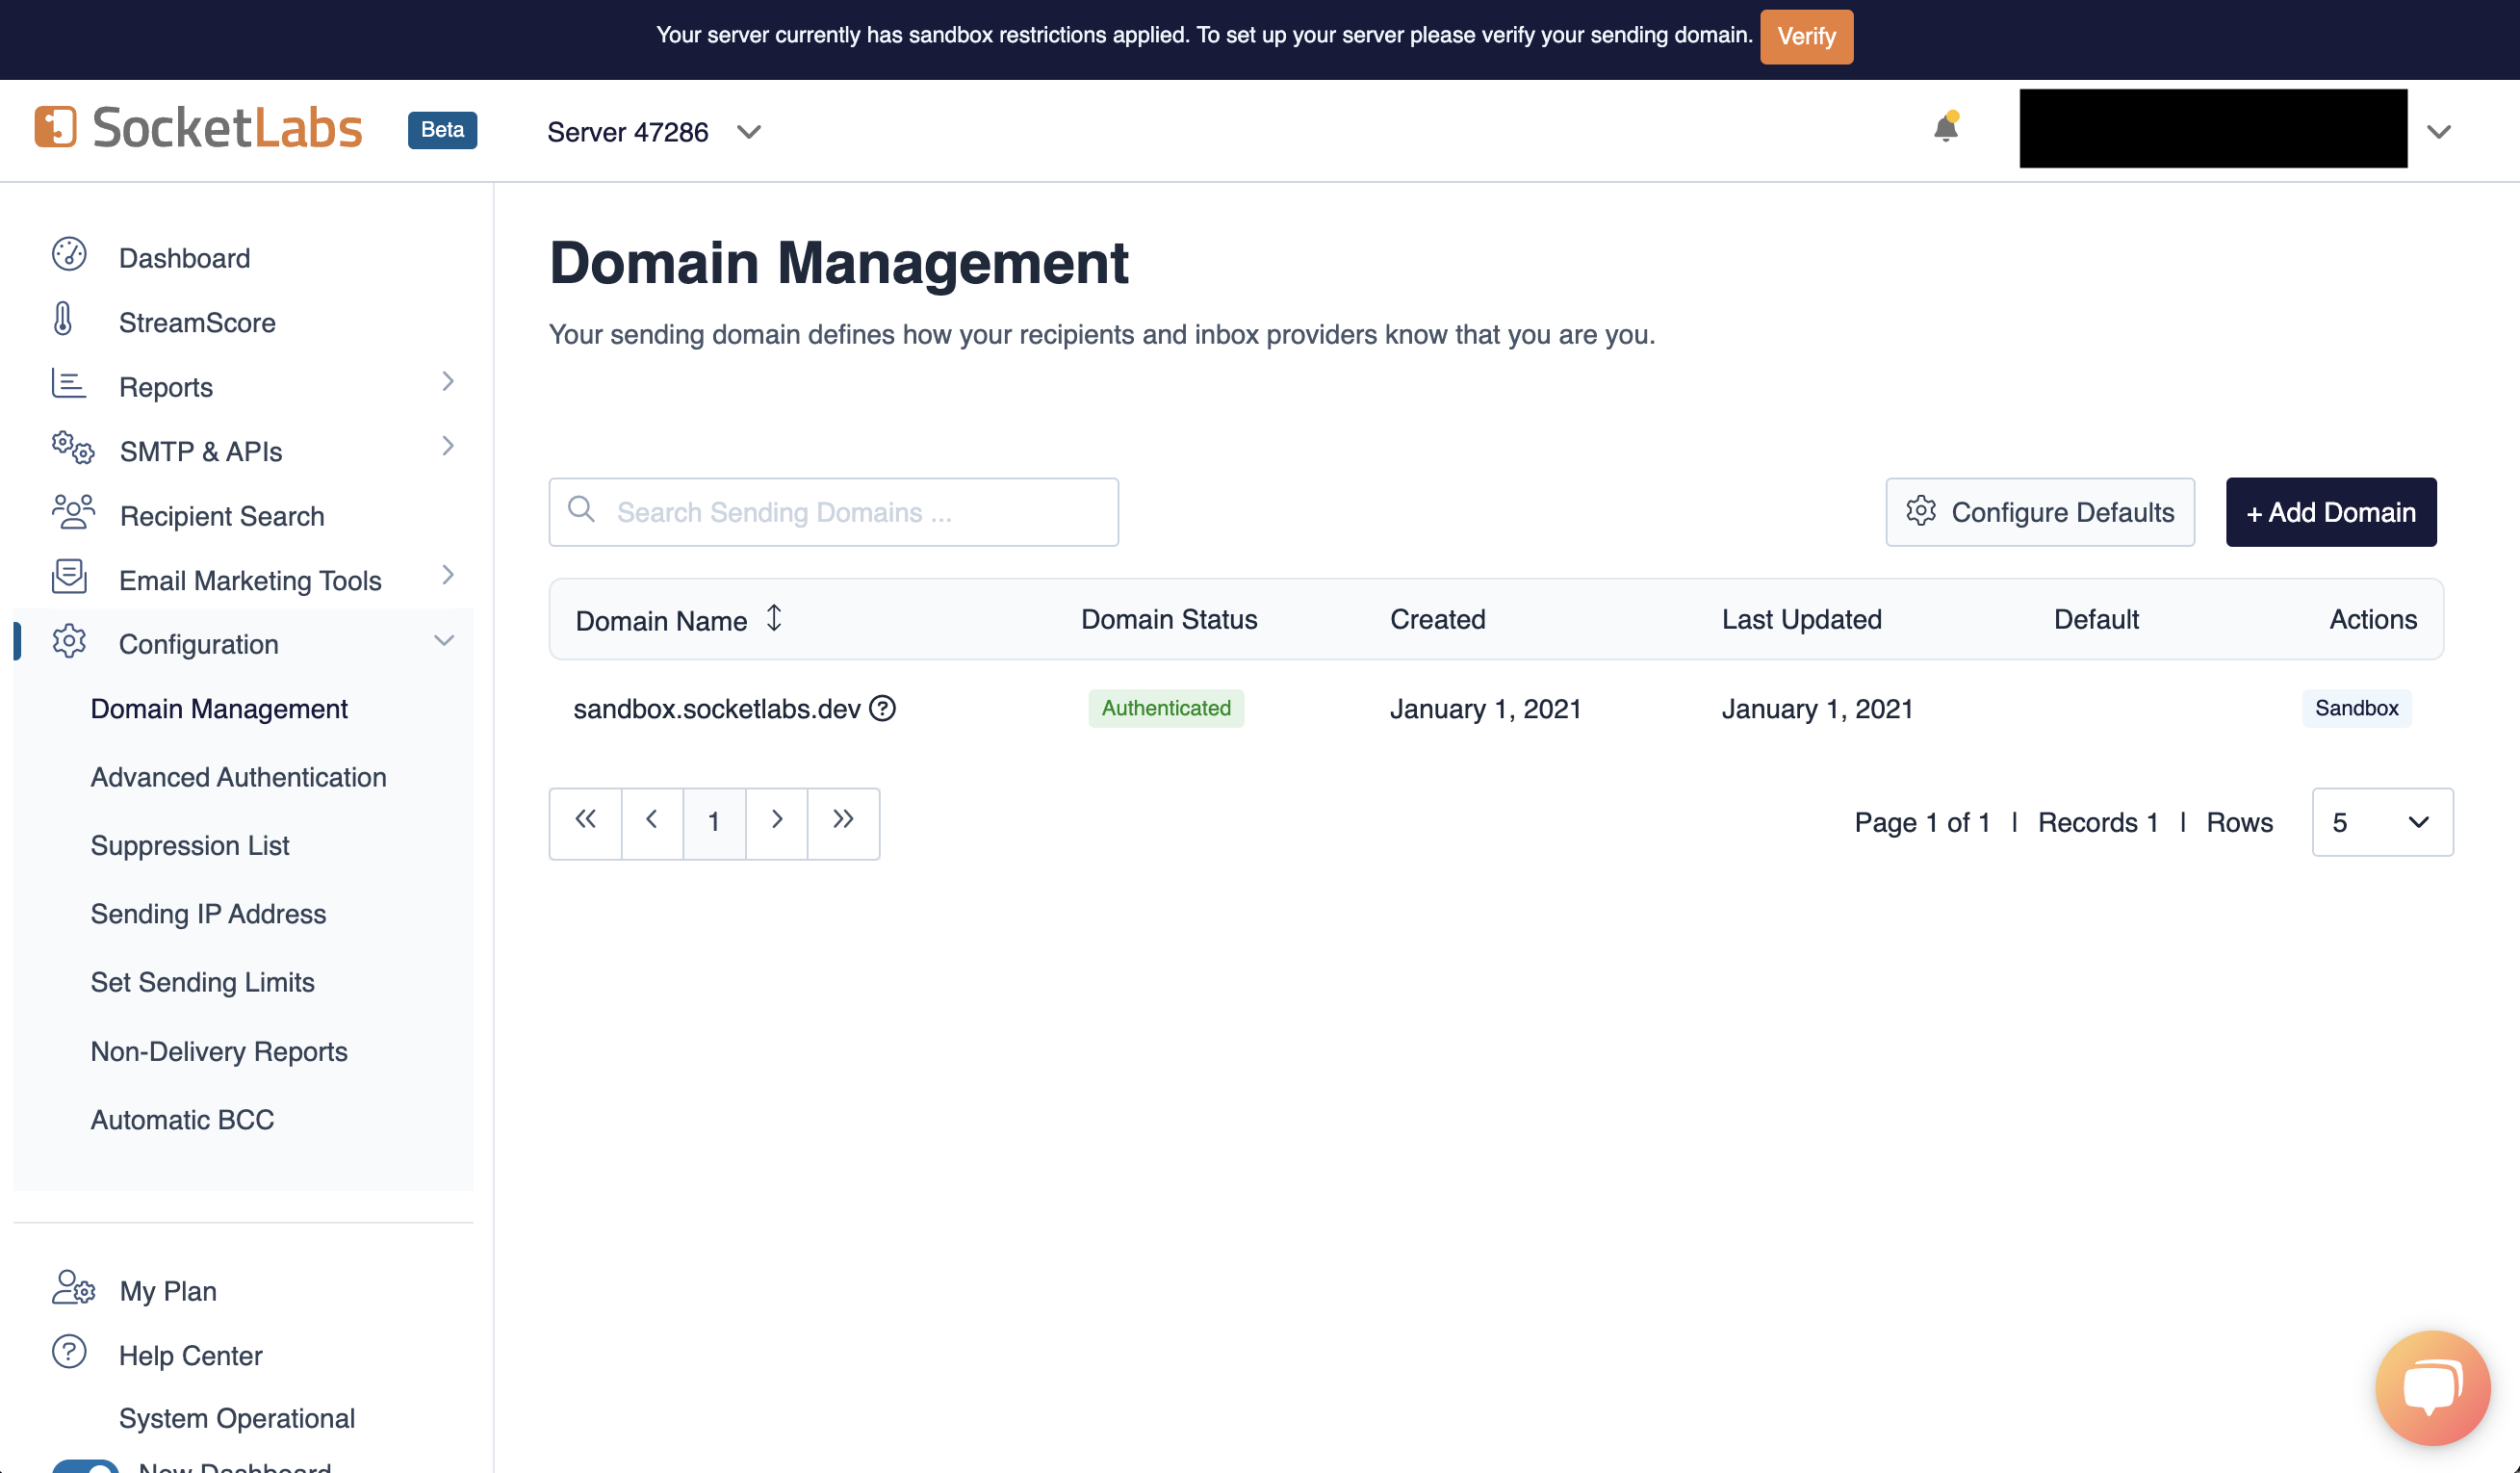
Remember that you will need to restart Infisical for this to work properly.
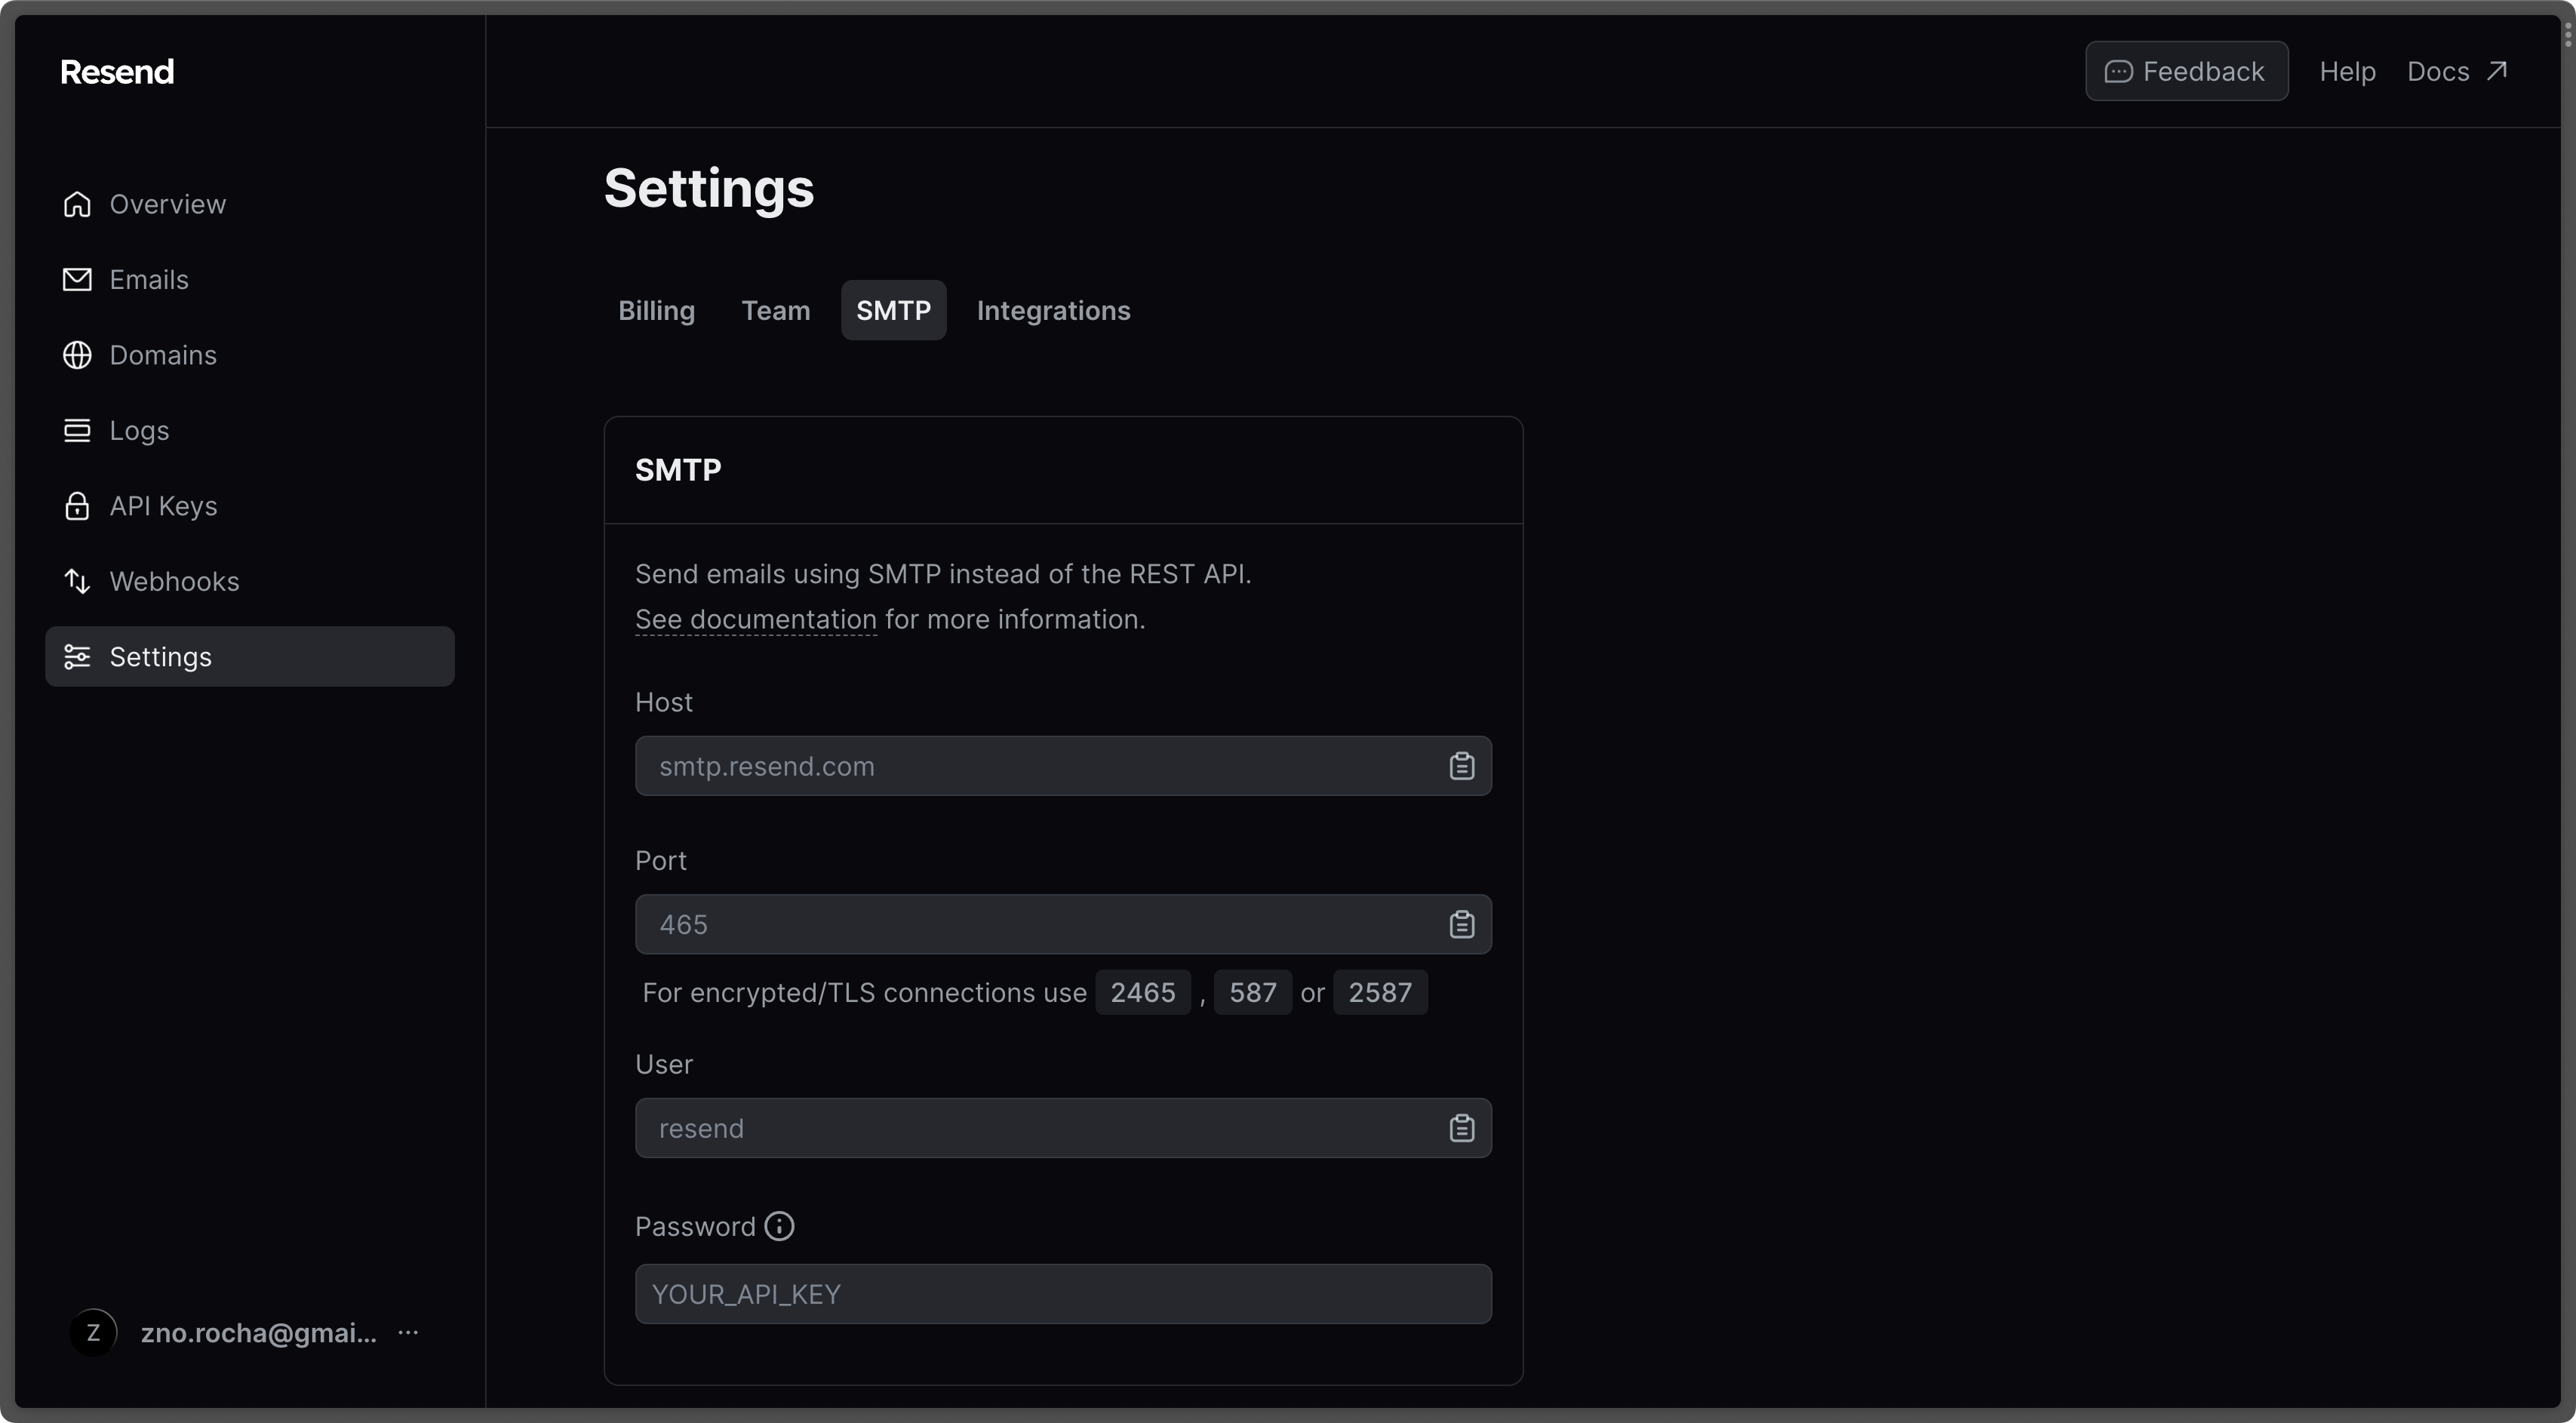
Resend
Resend
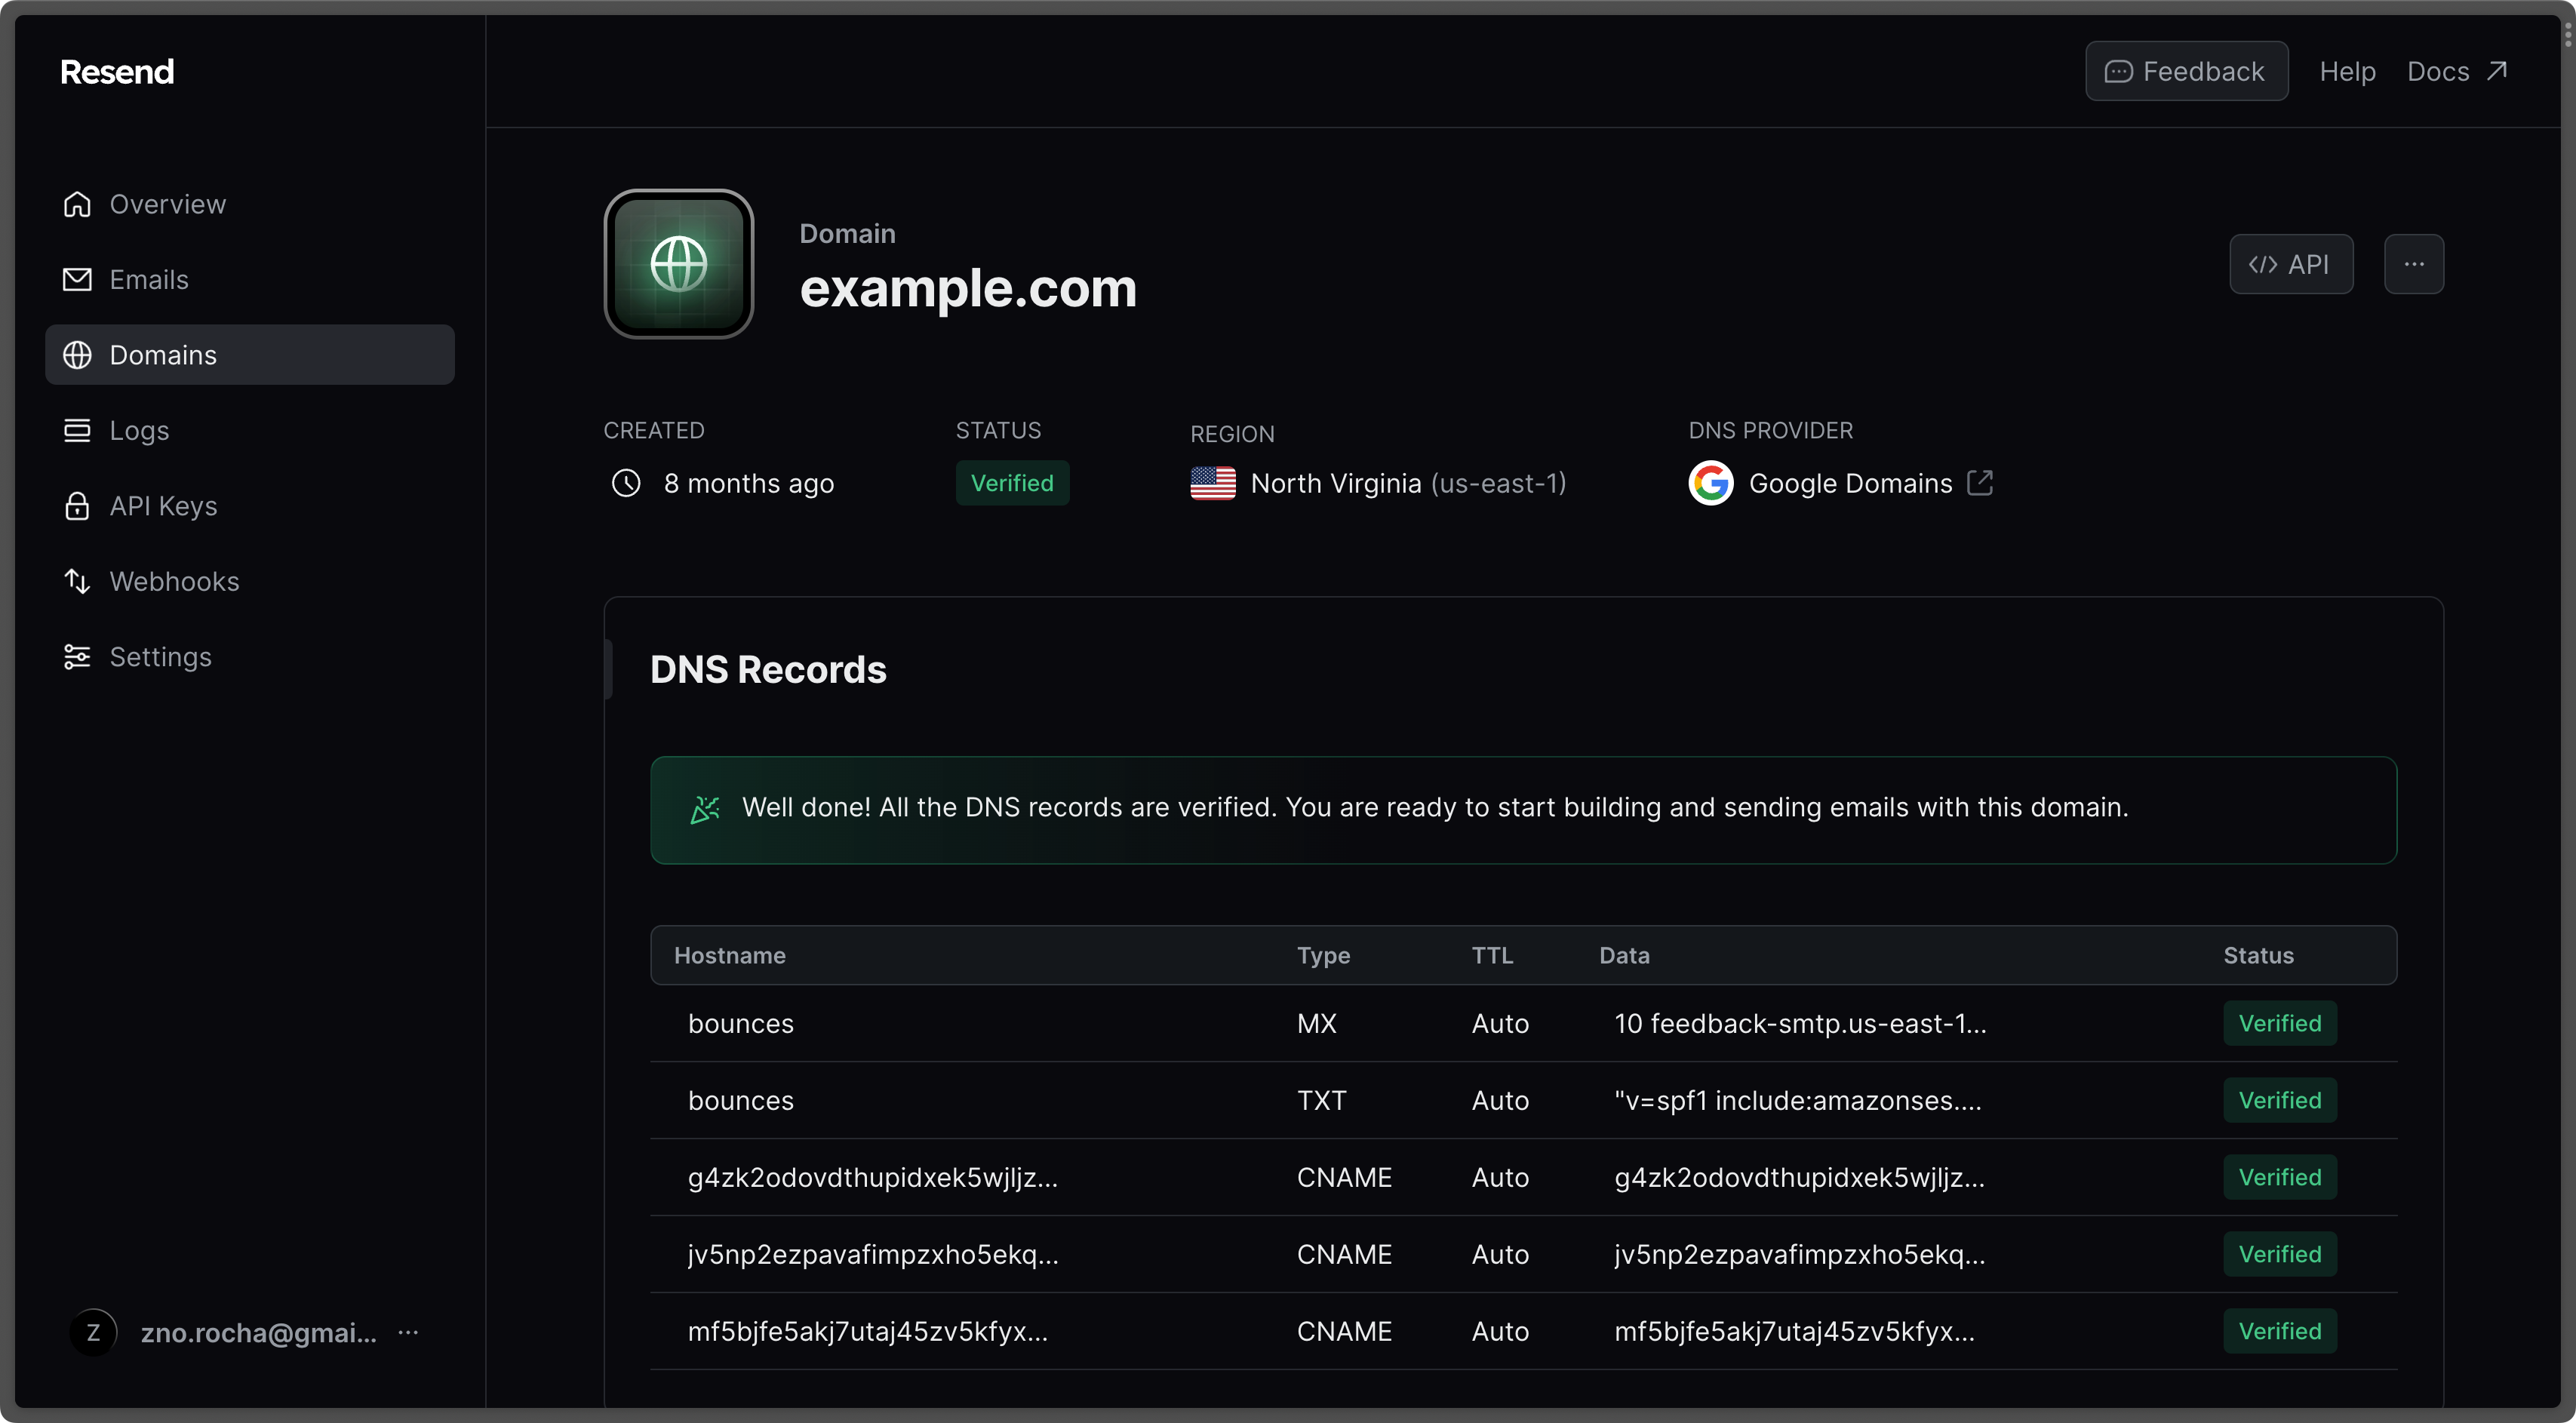
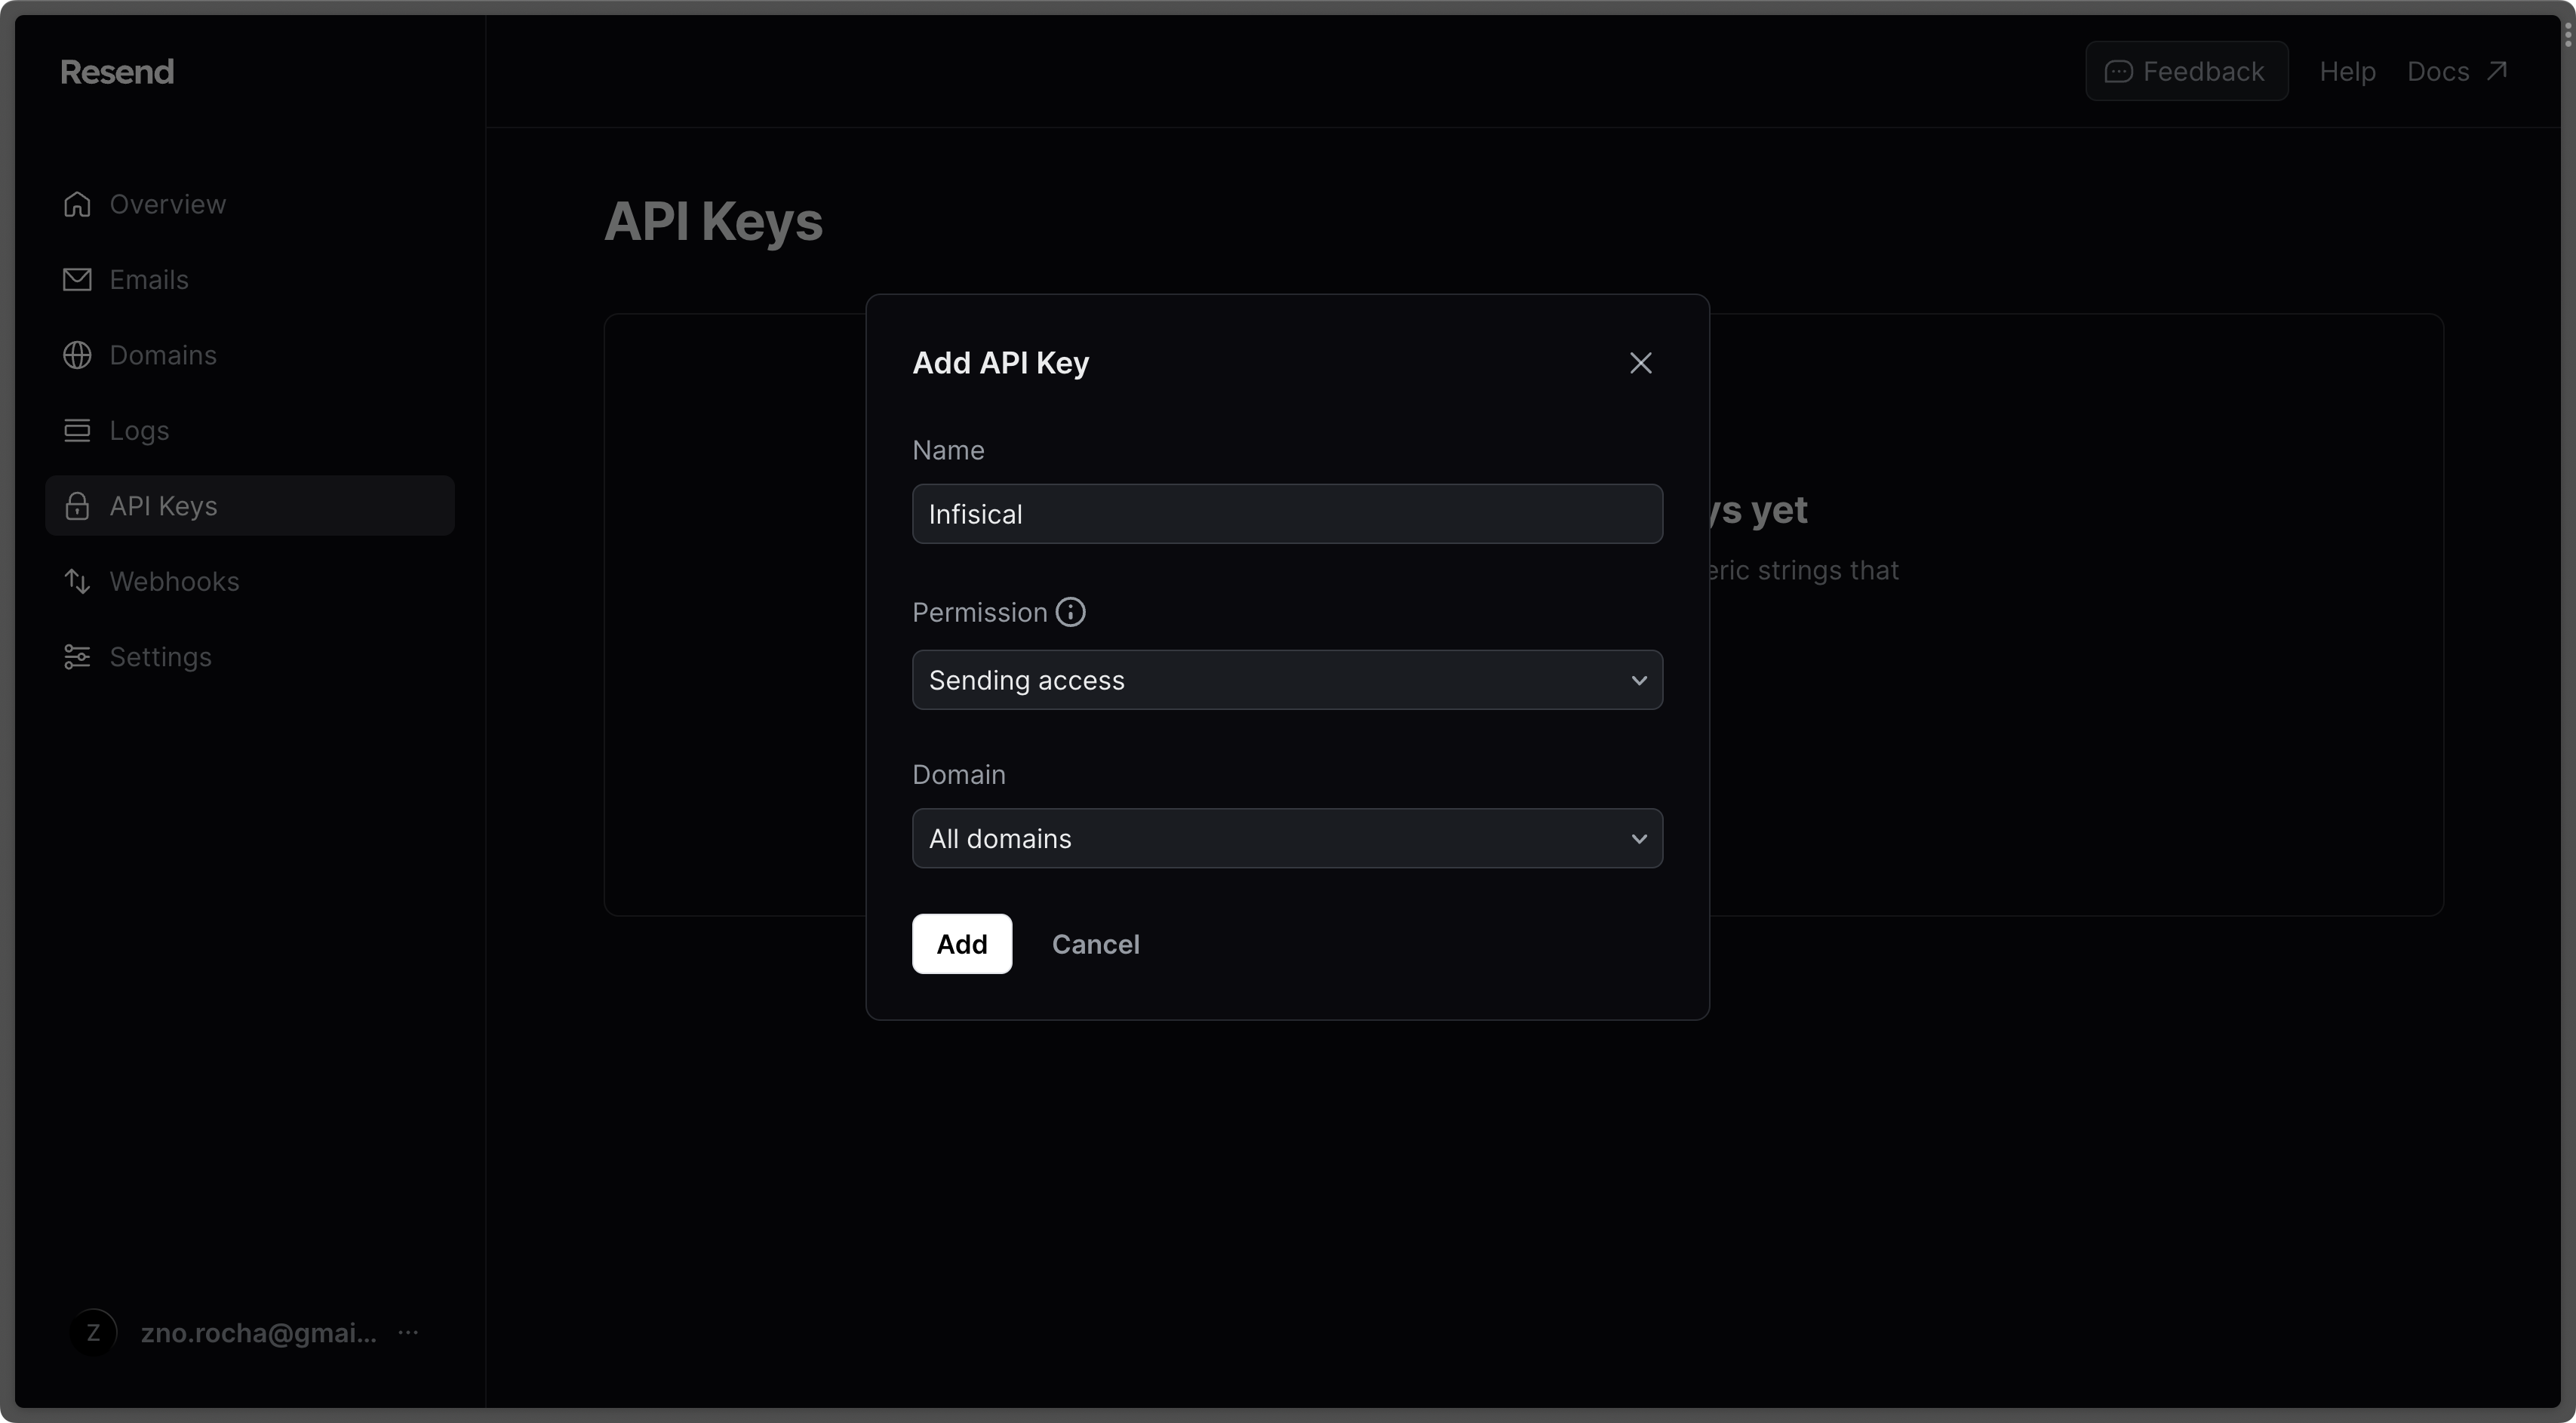
Gmail
Gmail
Create an account and enable “less secure app access” in Gmail Account Settings > Security. This will allow
applications like Infisical to authenticate with Gmail via your username and password.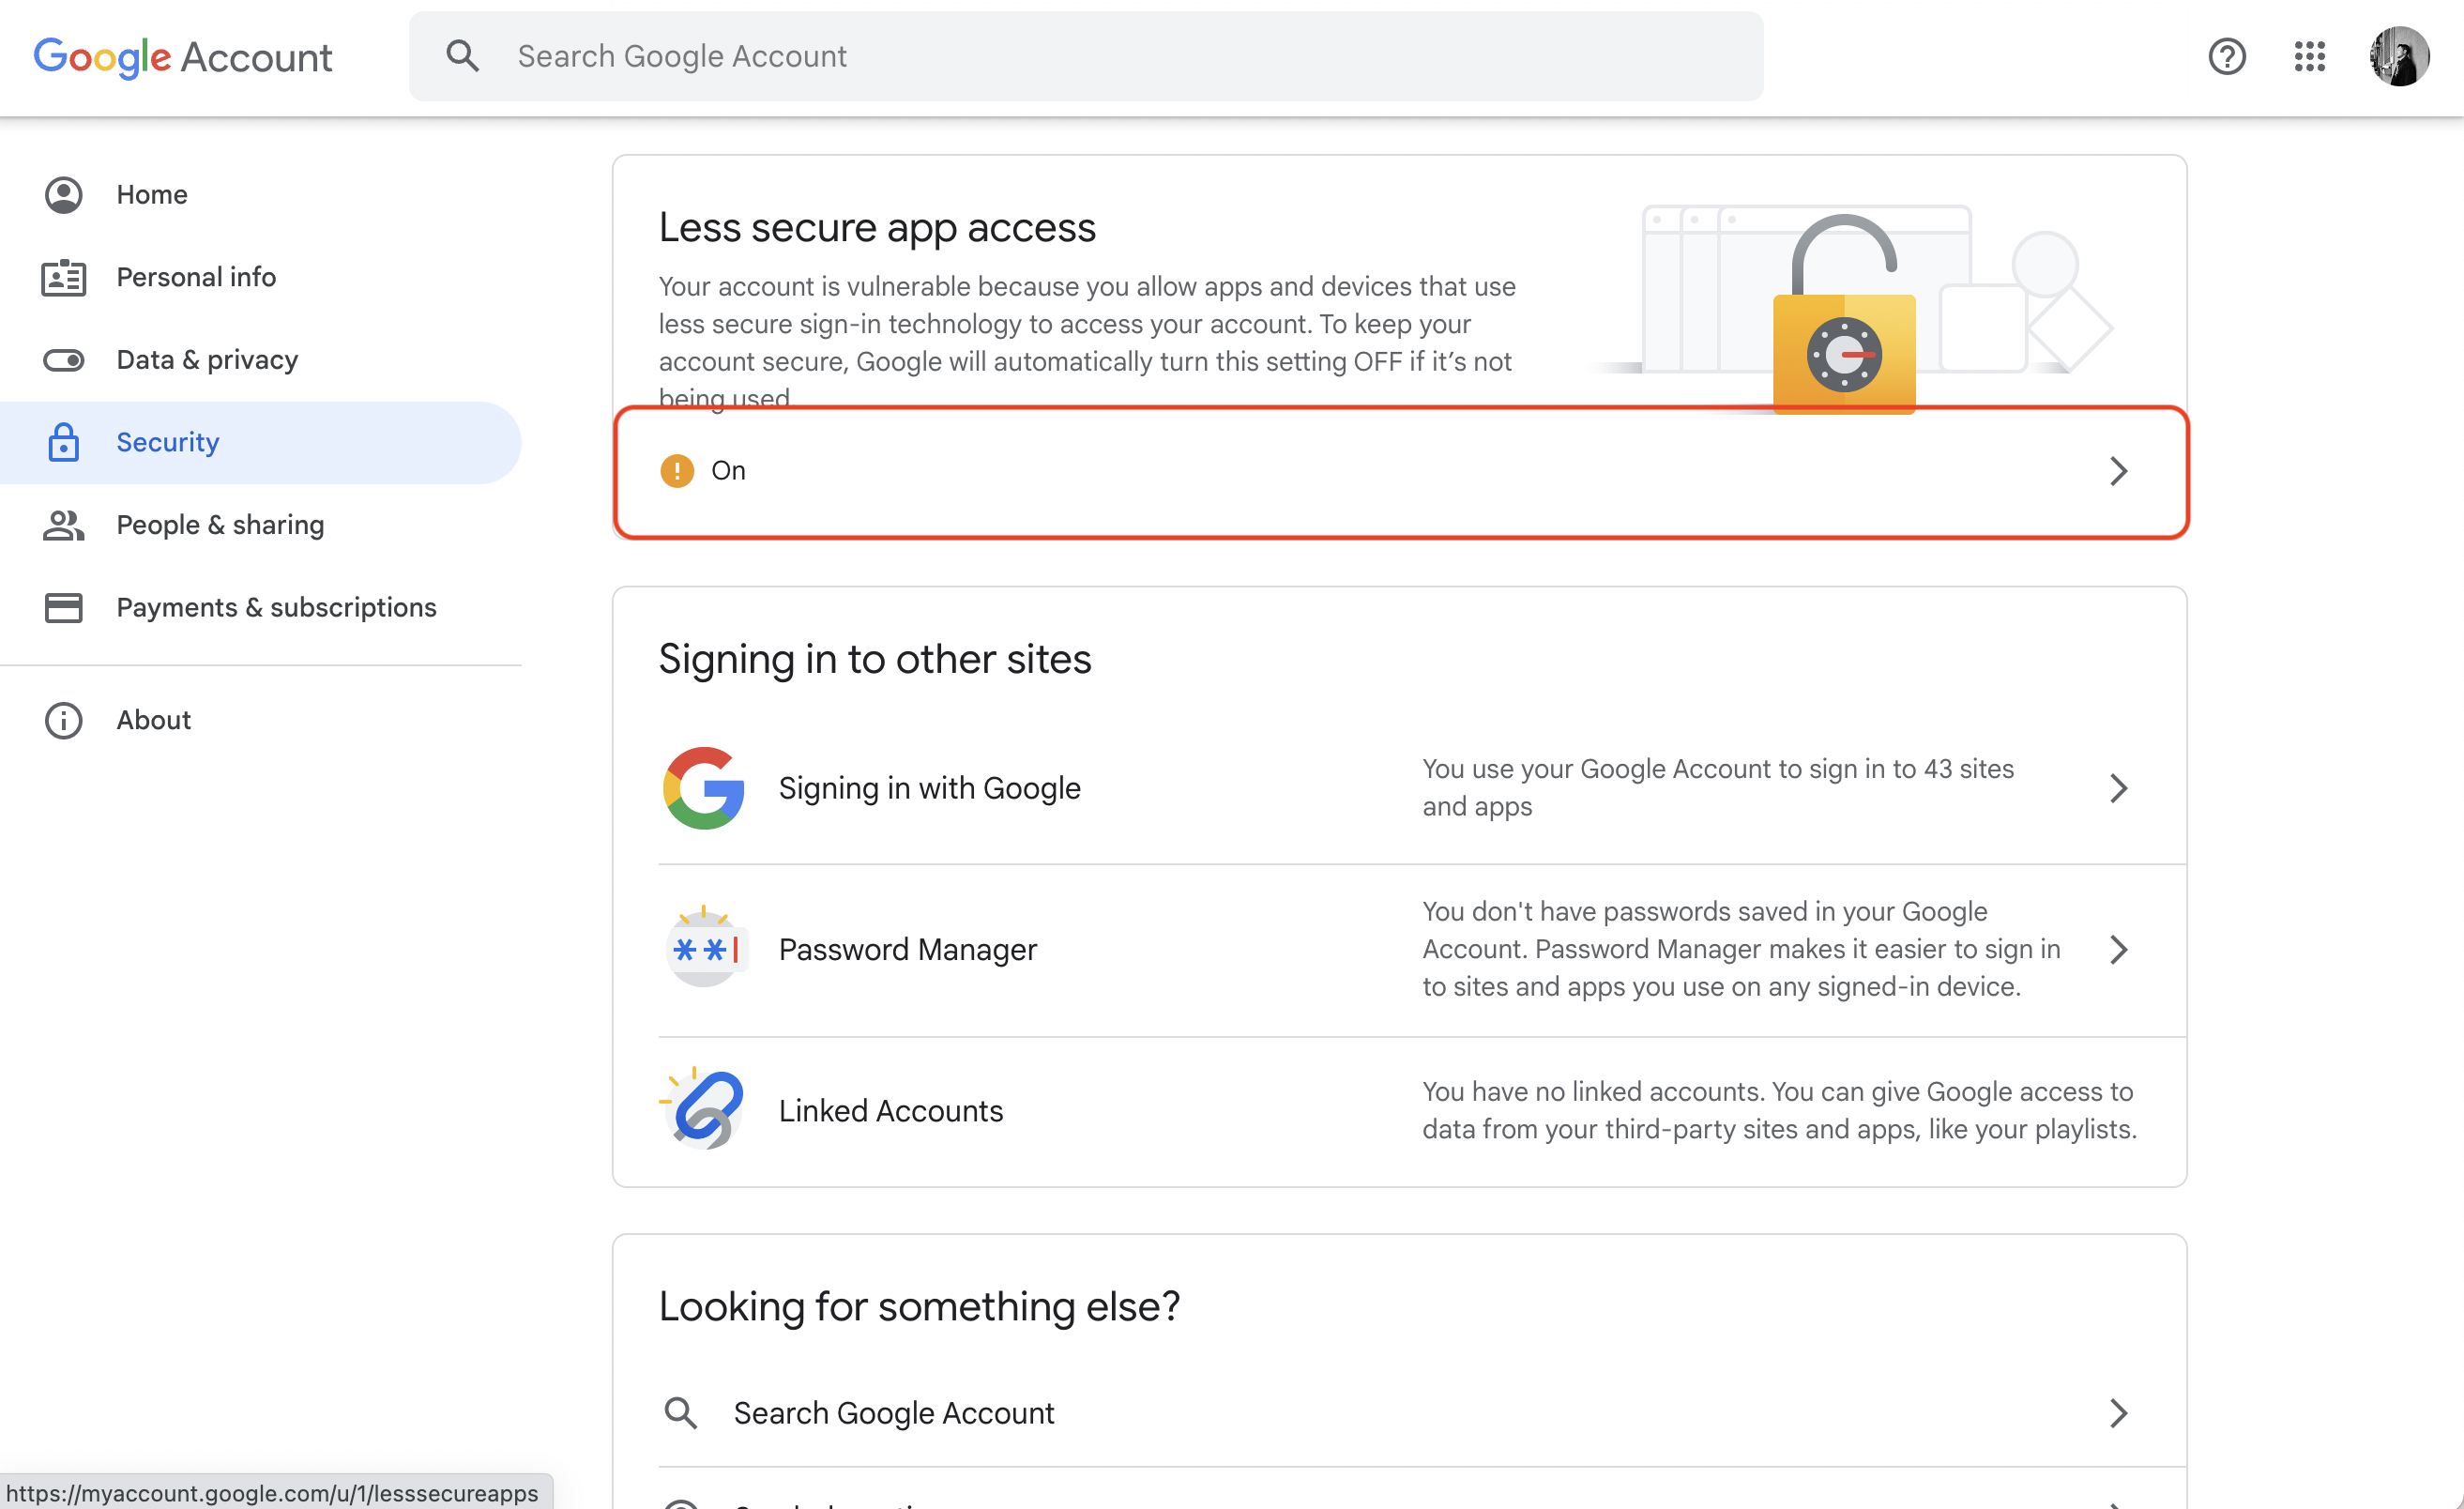 With your Gmail username and password, you can set your SMTP environment variables:
With your Gmail username and password, you can set your SMTP environment variables:Office365
Office365
- Create an account and configure Office365 to send emails.
- With your login credentials, you can now set up your SMTP environment variables:
Zoho Mail
Zoho Mail
- Create an account and configure Zoho Mail to send emails.
- With your email credentials, you can now set up your SMTP environment variables:
You can use either your personal Zoho email address like
[email protected] or
a domain-based email address like [email protected]. If using a
domain-based email address, then please make sure that you’ve configured and
verified it with Zoho Mail.Remember that you will need to restart Infisical for this to work properly.
SMTP2Go
SMTP2Go
- Create an account and configure SMTP2Go to send emails.
- Turn on SMTP authentication
Optional (for TLS/SSL):TLS: Available on the same ports (2525, 80, 25, 8025, or 587)
SSL: Available on ports 465, 8465, and 443
Authentication
By default, users can only log in via the email/password-based login method. To log in to Infisical with OAuth providers such as Google, configure the associated variables.string
When set, all visits to the Infisical login page will automatically redirect users of your Infisical instance to the SAML identity provider associated with the specified organization slug.
Google
Follow the detailed guide to configure Google SSO.
string
default:"none"
OAuth2 client ID for Google login
string
default:"none"
OAuth2 client secret for Google login
GitHub
GitHub
Follow the detailed guide to configure GitHub SSO.
string
default:"none"
OAuth2 client ID for GitHub login
string
default:"none"
OAuth2 client secret for GitHub login
GitLab
GitLab
Follow the detailed guide to configure GitLab SSO.
string
default:"none"
OAuth2 client ID for GitLab login
string
default:"none"
OAuth2 client secret for GitLab login
string
default:"https://gitlab.com"
URL of your self-hosted instance of GitLab where the OAuth application is registered
Okta SAML
Okta SAML
Requires enterprise license. Please contact [email protected] to get more
information.
Azure SAML
Azure SAML
Requires enterprise license. Please contact [email protected] to get more
information.
JumpCloud SAML
JumpCloud SAML
Requires enterprise license. Please contact [email protected] to get more
information.
App connections
You can configure third-party app connections for re-use across Infisical Projects.AWS Assume Role Connection
AWS Assume Role Connection
GitHub App Connection
GitHub App Connection
string
default:"none"
The ID of the GitHub App
string
default:"none"
The slug of the GitHub App
string
default:"none"
The client ID for the GitHub App
string
default:"none"
The client secret for the GitHub App
string
default:"none"
The private key for the GitHub App
string
default:"github.com"
The hostname of the GitHub instance where the shared GitHub App is registered. Only required when the shared GitHub App is registered on a GitHub Enterprise Server (GHES) instance rather than github.com (e.g.
github.mycompany.com). Defaults to github.com when not set.GitHub Radar App Connection
GitHub Radar App Connection
string
default:"none"
The ID of the GitHub Radar App
string
default:"none"
The slug of the GitHub Radar App
string
default:"none"
The client ID for the GitHub Radar App
string
default:"none"
The client secret for the GitHub Radar App
string
default:"none"
The private key for the GitHub Radar App
string
default:"none"
The webhook secret configured for payload verification in the GitHub Radar App
GitHub OAuth Connection
GitHub OAuth Connection
GitLab OAuth Connection
GitLab OAuth Connection
Heroku OAuth Connection
Heroku OAuth Connection
Secret scanning
GitHub
GitHub
Scan limits
Scan limits
These bound the resources a single scan can consume. The defaults only trip on outliers, such as
a repository large enough to exhaust a worker, so most deployments never need to change them.
The limits apply from the release that introduces them, on existing instances too. A repository
above
SECRET_SCANNING_MAX_REPO_SIZE_MB that scanned before the upgrade is now rejected: before
cloning when the provider reports a size, otherwise once the clone is measured on disk. The
scanner also runs under a memory ceiling it previously did not have. If you scan repositories
larger than the defaults, raise both values or set them to 0 for the previous unbounded
behaviour.string
default:"10m"
How long a single scan may run before it is cancelled and the scan is marked
failed. Takes a duration string such as
90s, 10m, or 2h. Defaults to
10m.string
default:"10m"
How long cloning a repository may take before it is cancelled and the scan is
marked failed. Takes a duration string such as
90s, 10m, or 2h. Defaults
to 10m.number
default:"2048"
Soft memory ceiling for the scanner process, in MB. It collects garbage more
aggressively as it approaches this limit rather than growing. Defaults to
2048 (2 GB). Set to 0 to disable.number
default:"1"
Maximum CPU threads a scan may use, applied to both the scanner process and
the repository clone. Scans share the instance with the API, so raising this
makes scans faster at the cost of API responsiveness during a scan. Defaults
to
1. Set to 0 to remove the cap.number
default:"5120"
Repositories larger than this many MB are rejected instead of scanned.
Defaults to
5120 (5 GB). Set to 0 to disable.Observability
You can configure Infisical to collect and expose telemetry data for analytics and monitoring.string
default:"false"
Whether to collect and expose telemetry data.
enum
Supported types are
prometheus and otlp.If the export type is set to prometheus, metric data will be exposed on port 9464 at the /metrics path.If the export type is set to otlp, you will have to configure a value for OTEL_EXPORT_OTLP_ENDPOINT.string
Where telemetry data is pushed for collection. This is only
applicable when
OTEL_EXPORT_TYPE is set to otlp.string
The username for authenticating with the telemetry collector.
string
The password for authenticating with the telemetry collector.
string
default:"false"
When set to
true, Infisical stops recording the high-cardinality, per-actor Infisical, API, SecretSyncs, PkiSyncs, and Integrations meters. Nothing is measured, exported, or held in memory for them. Only bounded-cardinality InfisicalCore metrics are emitted. Recommended when those meters are enabled with OTEL_EXPORT_TYPE=prometheus and label combinations turn over often (many secret paths, source IPs, or clients), because memory then grows with uptime until the process restarts. See Monitoring & Telemetry for details.string
default:"http"
Which OpenTelemetry semantic conventions the HTTP metrics follow. Leave it unset and Infisical applies
http, the stable conventions, and logs that it did so at startup.Set it to http/dup to emit the old metric names alongside the stable ones while you move dashboards across. Both name sets are exported for as long as it’s set, so the volume of those metrics roughly doubles. See Monitoring & Telemetry for the old and new names.Tokens for other namespaces, such as database, are left alone.Identity auth method
string
default:"x-identity-tls-cert-auth-client-cert"
The TLS header used to propagate the client certificate from the load balancer
to the server.
Environment variable overrides
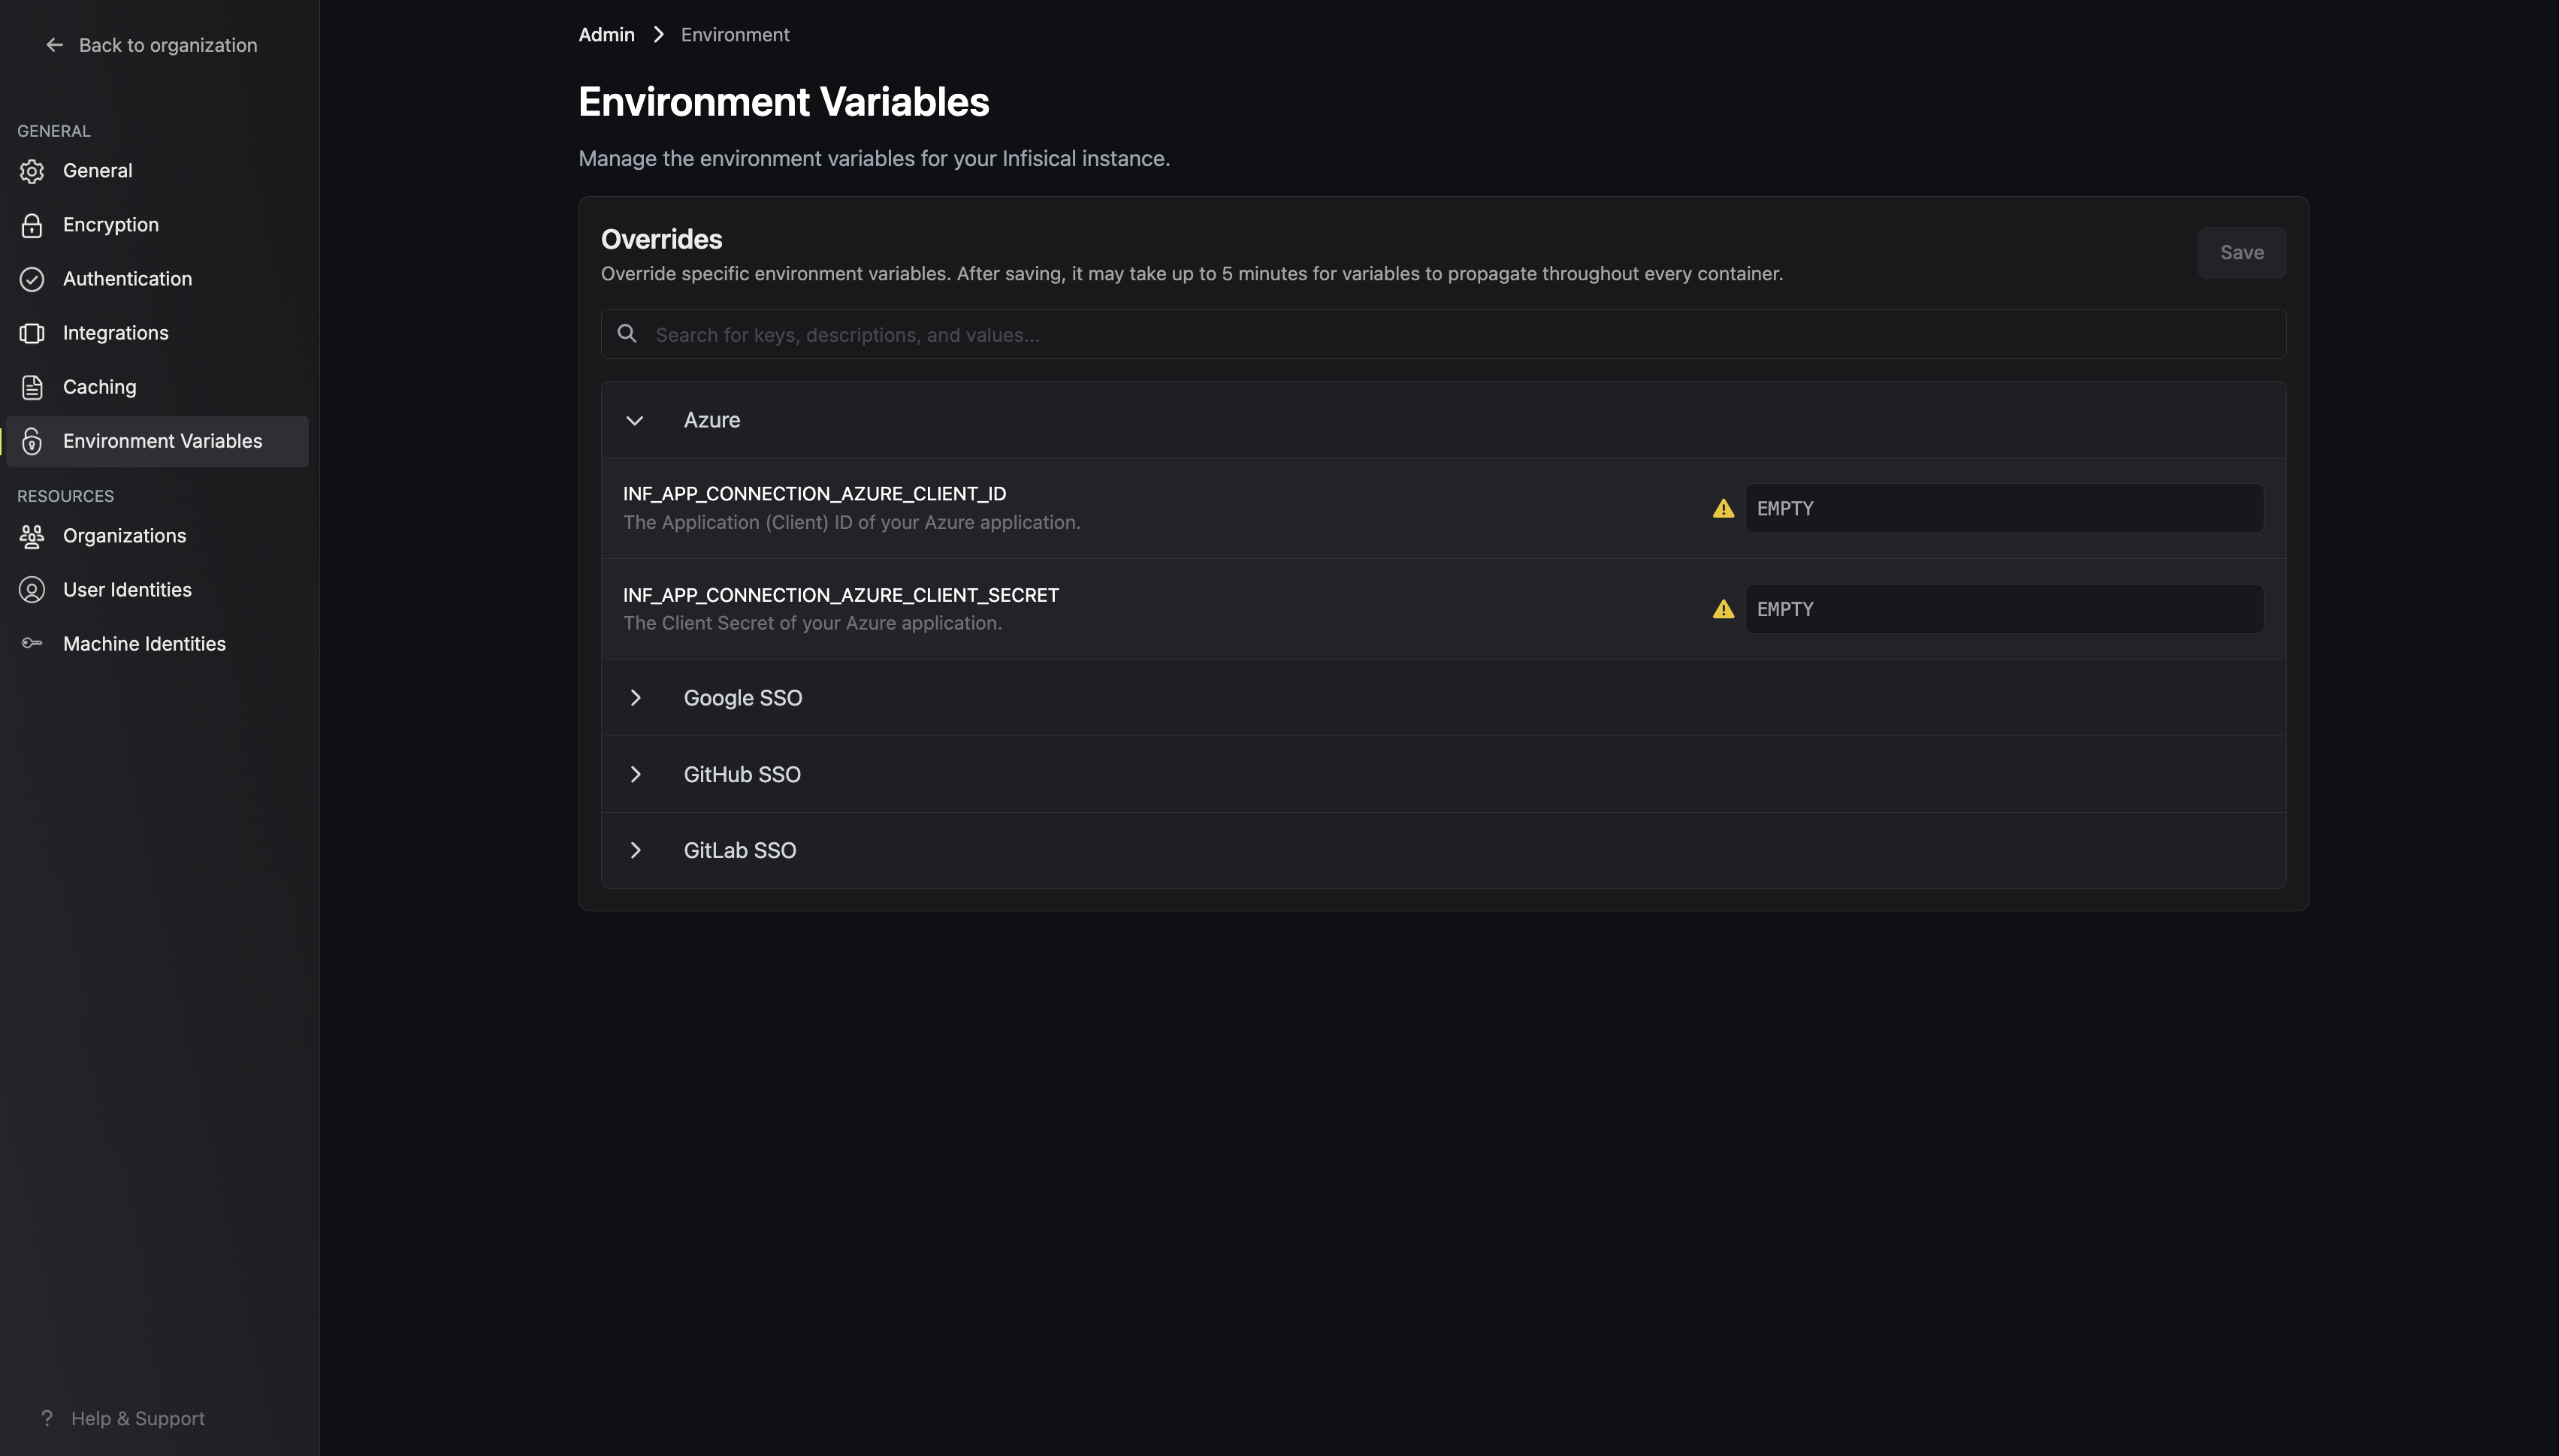
If you can’t reach the environment variables of your deployment directly, override them from Environment Variables in the Server Console. A saved value takes up to five minutes to reach every container.