PingFederate SCIM provisioning is a paid feature.If you’re using Infisical Cloud, then it is available under the Enterprise Tier. If you’re self-hosting Infisical,
then you should contact sales@infisical.com to purchase a self-hosted license to use it.
Unlike PingOne, PingFederate is a self-hosted product. The setup below assumes you already have a running PingFederate
instance reachable from the server that hosts your Infisical deployment. This guide covers PingFederate 13.x; earlier
versions use the same conceptual steps but the menu labels may differ slightly.
- A running PingFederate 11.x or later installation with the Outbound Provisioning role licensed.
- An external RDBMS (PostgreSQL, MySQL, Oracle, or SQL Server) to back the PingFederate Provisioner Data Store. Required for any non-trivial install — the embedded H2 store should only be used for local testing.
- An Active Directory (or other LDAP) directory containing the users you want to provision, reachable from PingFederate over LDAP/LDAPS. A read-only service account with permission to query the user subtree is sufficient.
- PingFederate’s runtime must be able to reach your Infisical deployment over HTTPS at the SCIM URL Infisical issues. If PingFederate runs in a different network zone than Infisical, ensure firewall rules and DNS resolution are in place before continuing.
- On the Infisical side, the organization must already have SAML or OIDC SSO configured and at least one verified email domain (Settings → Organization → Email Domains).
1
Install the PingFederate SCIM Connector Add-on
Infisical requires SCIM 2.0. PingFederate’s bundled template is SCIM 1.1 only — install the SCIM Connector Add-on to add SCIM 2.0 support.1. Download the connectorSign in at pingidentity.com with the email tied to your PingFederate license, then
open the PingFederate downloads page.
Click the Add-ons tab. Under SaaS Connectors, download the SCIM Connector 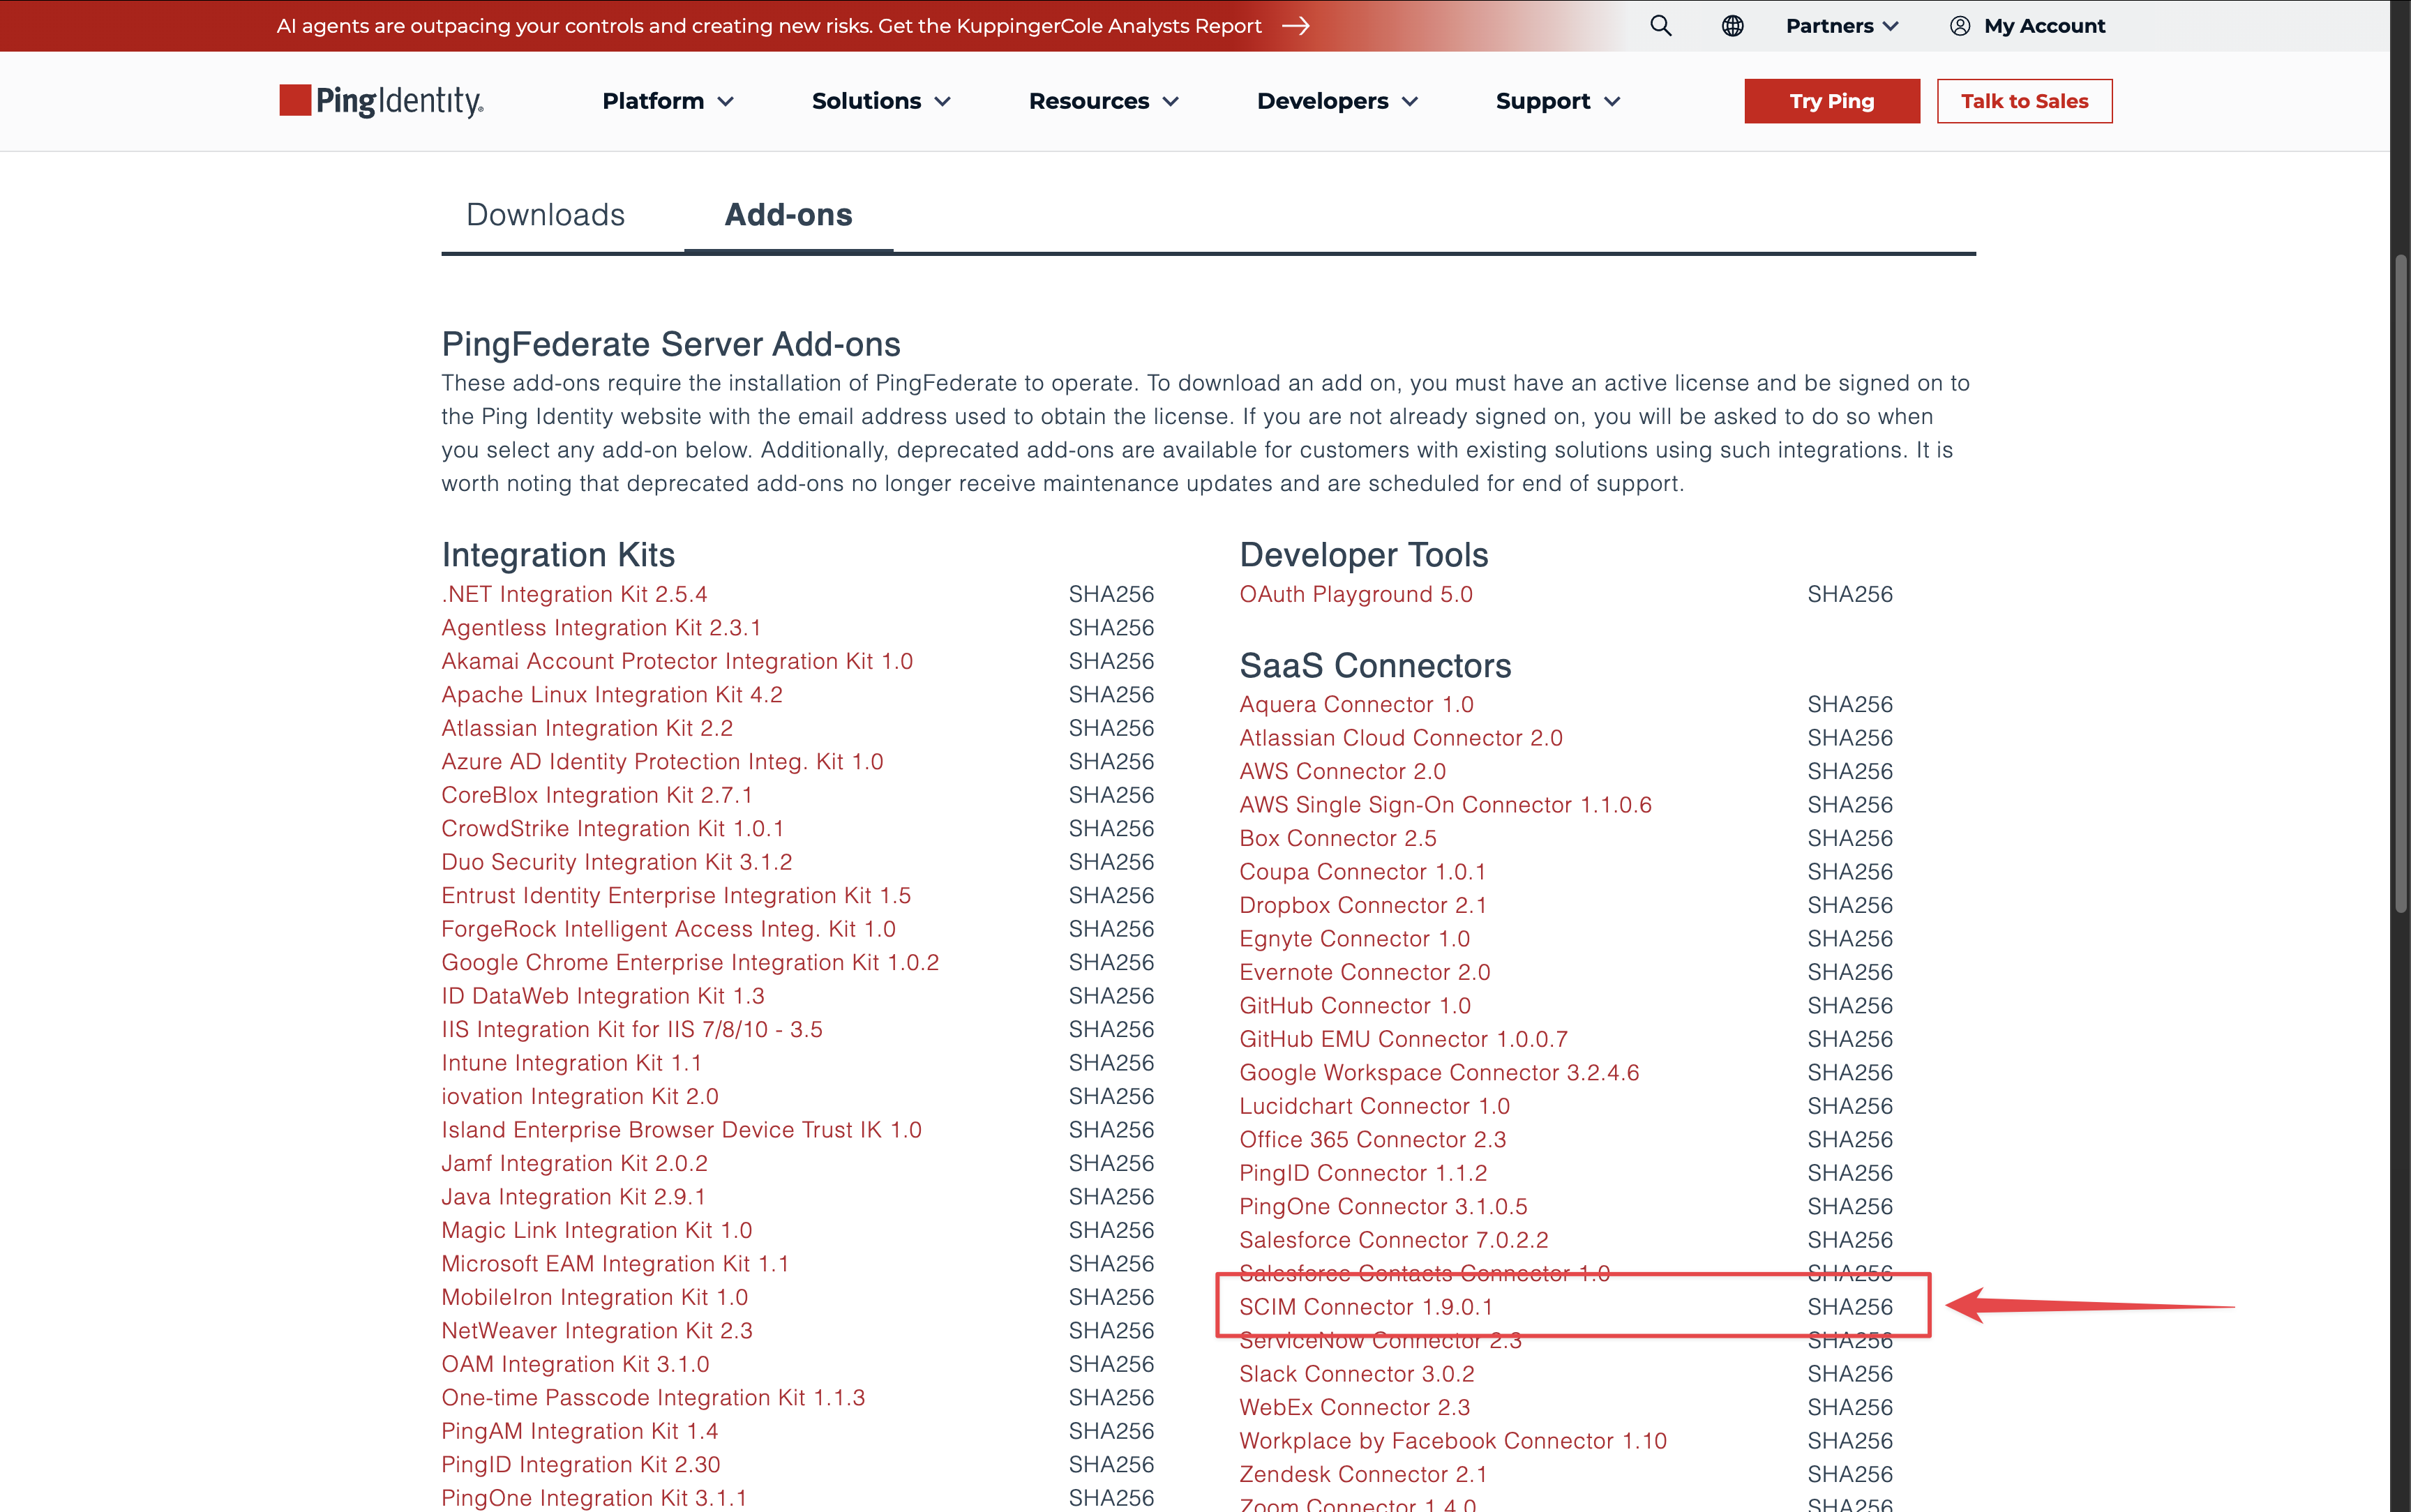 2. Install the connectorExtract the
.zip.2. Install the connectorExtract the .zip. Inside you’ll find a dist/ directory containing a single jar named
pf-scim-quickconnection-<version>.jar.Stop PingFederate and copy that jar into <pf-install>/server/default/deploy/. Leave PingFederate stopped — the next step edits another config file.2
Enable the Outbound Provisioning runtime in PingFederate
PingFederate ships with the provisioning runtime disabled by default. You must enable it before any SCIM channel
will run.Edit to:Use
<pf-install>/bin/run.properties and change:STANDALONE for a single-node install. For high availability, see Ping’s Deploying provisioning failover guide.Start PingFederate.To verify the SCIM Connector is now available, go to Applications → Integration → SP Connections → Create Connection → Connection Type tab, check Outbound Provisioning, and open the Type dropdown — you should see SCIM 2.0 Service Provider alongside the bundled SCIM 1.1 entry. If you only see SCIM 1.1, check PingFederate’s 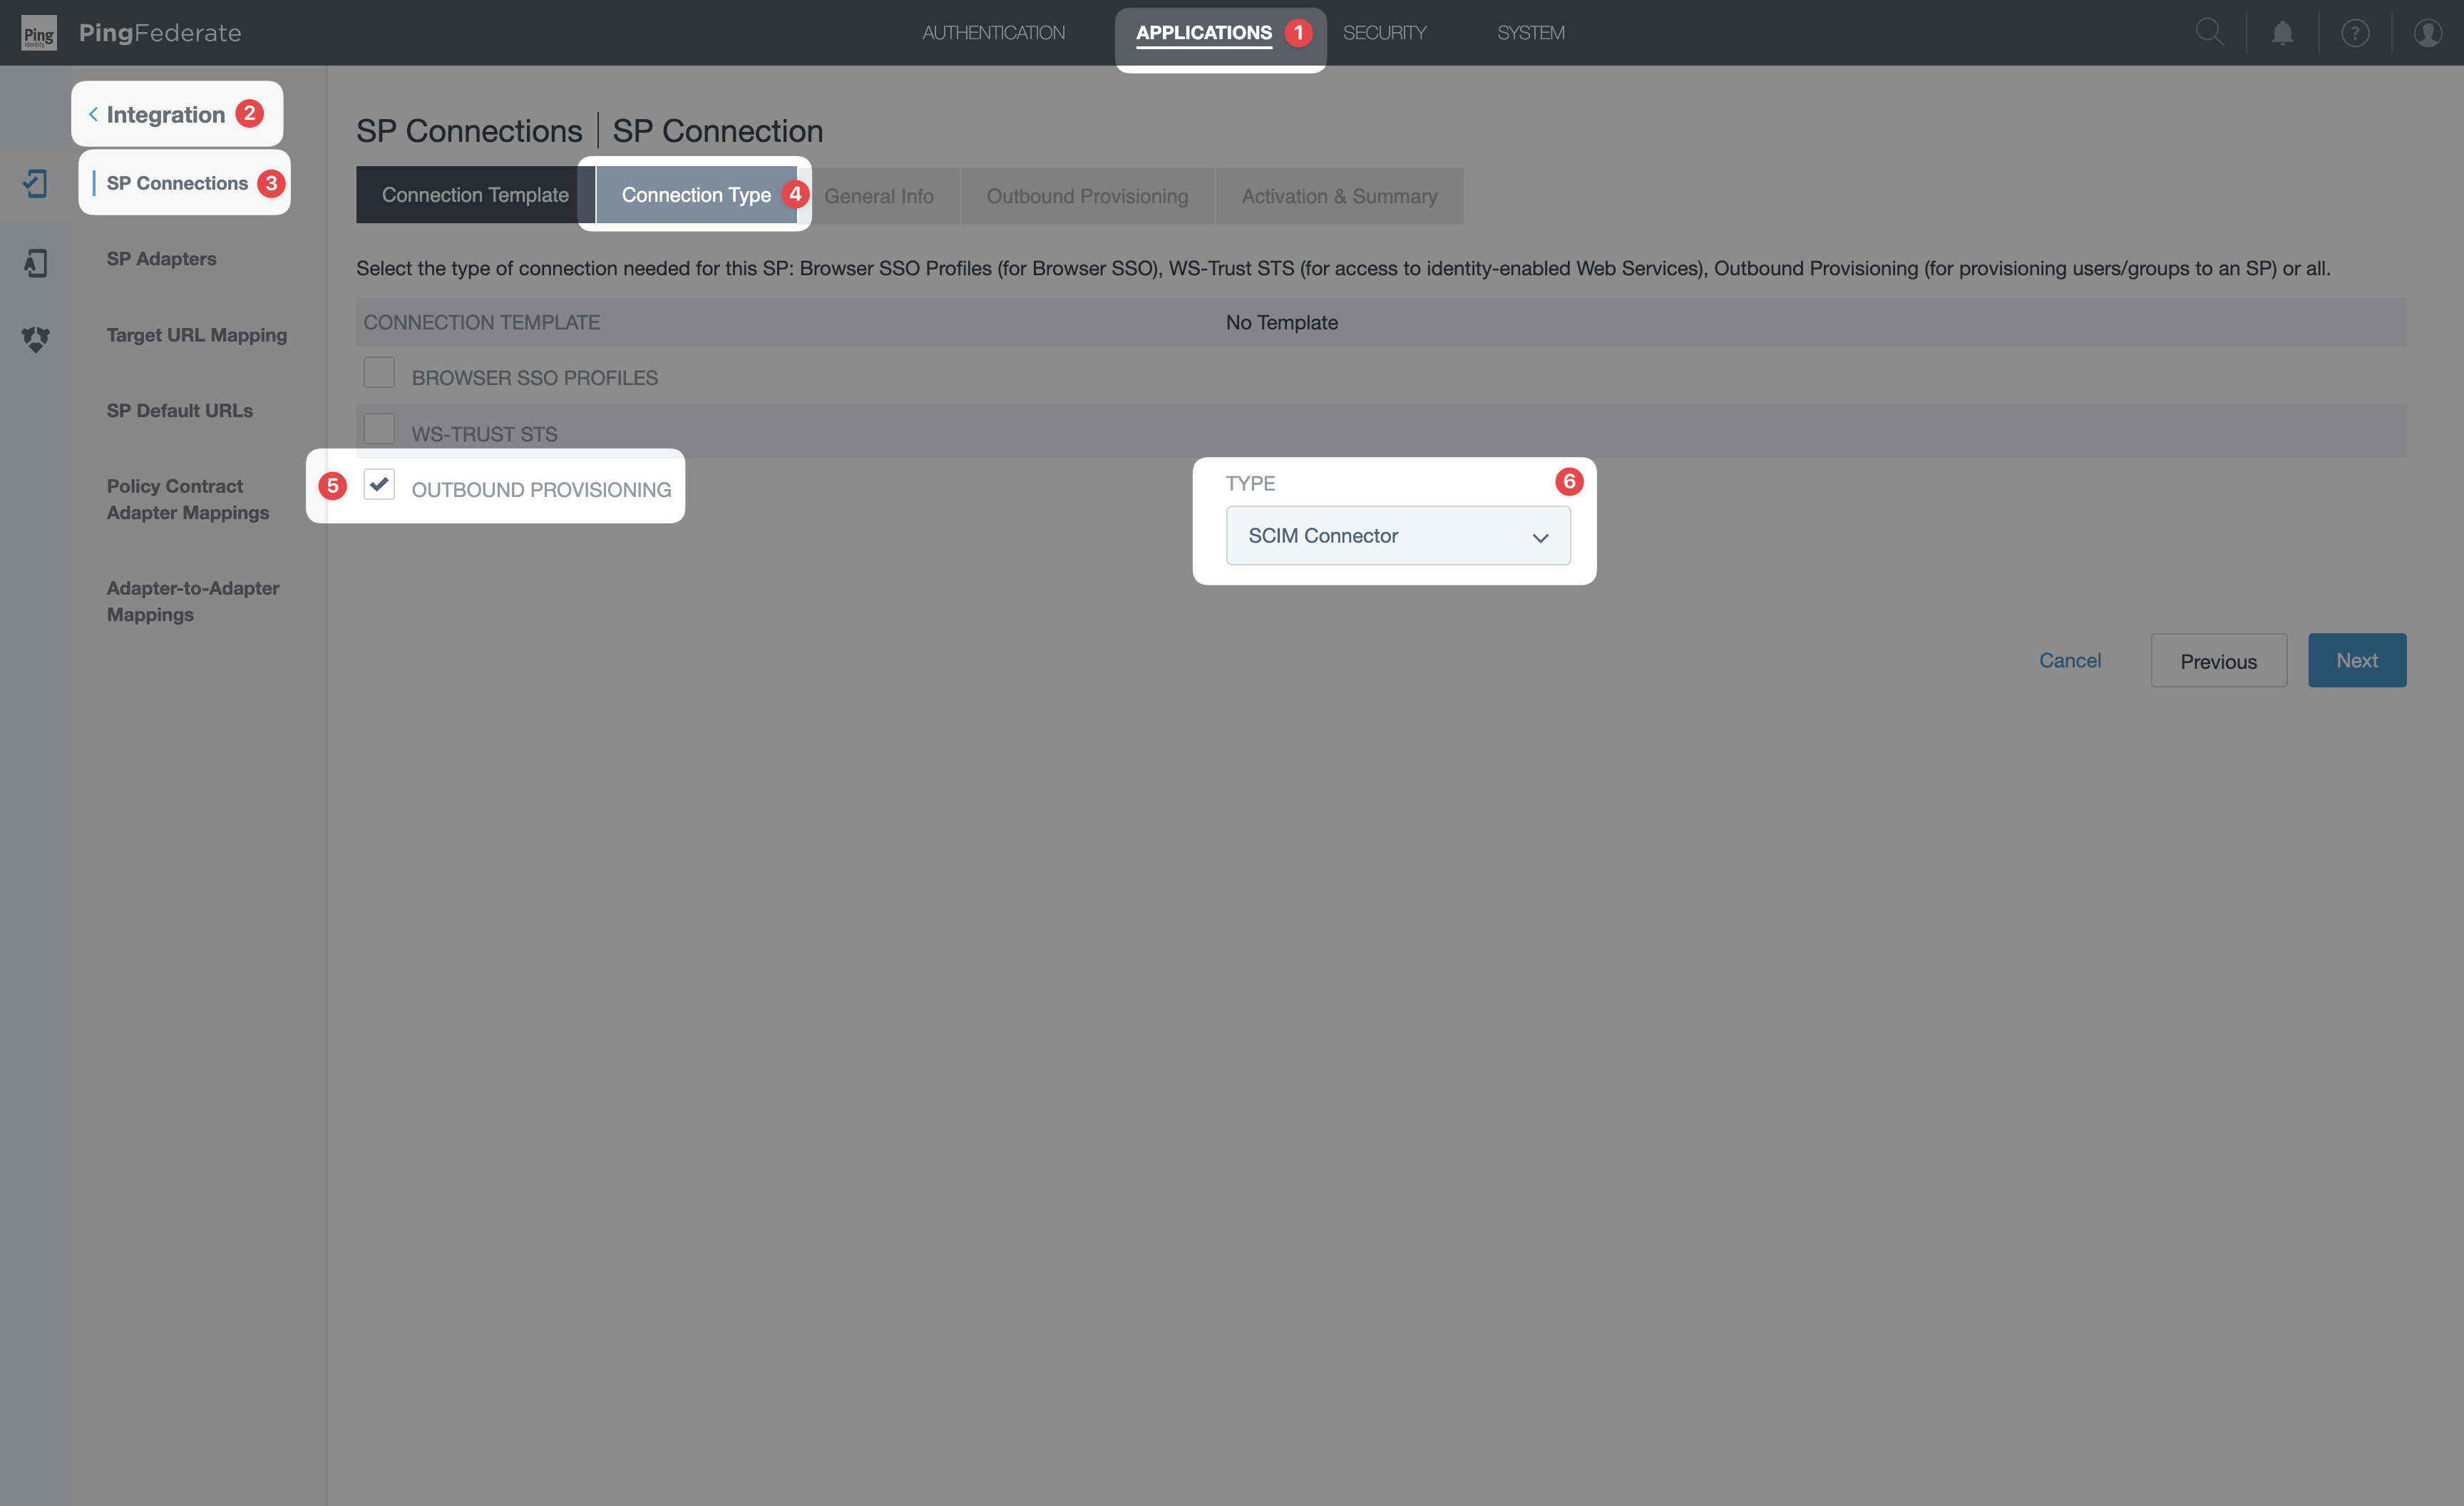
server.log for connector load errors. Cancel out of the wizard once you’ve confirmed; you’ll return to it in a later step.3
Configure the Provisioner Data Store
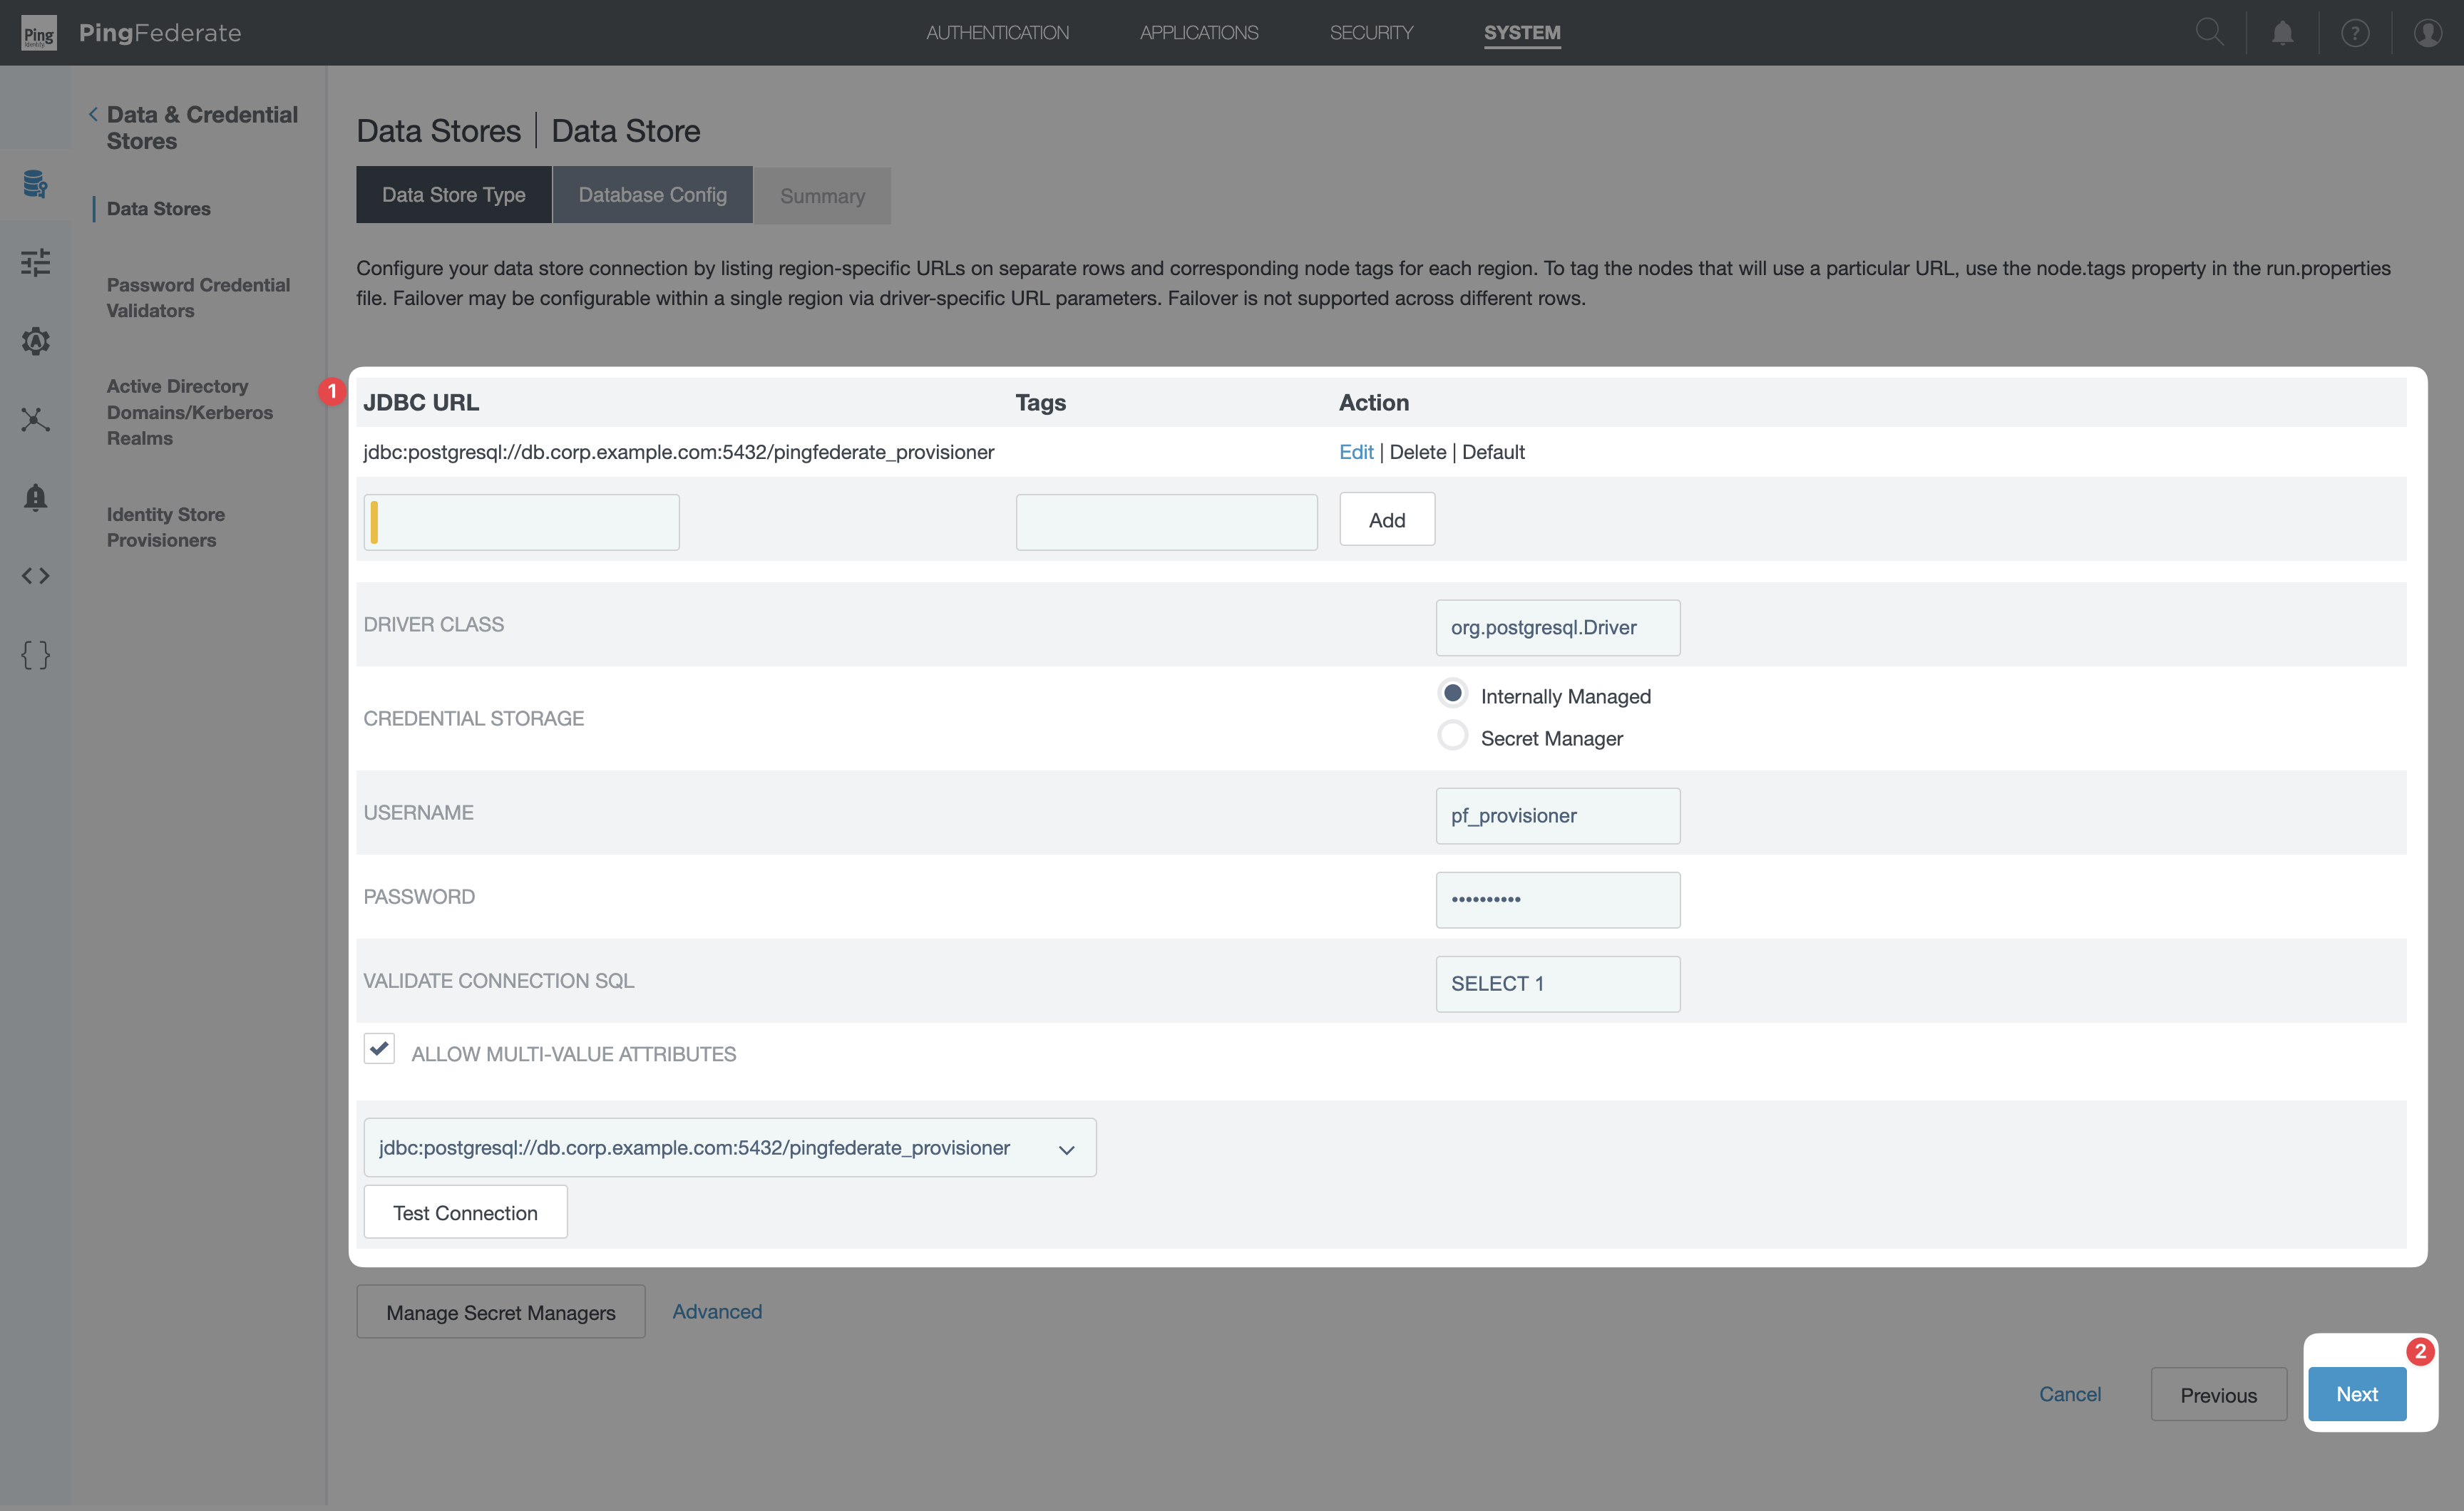
PingFederate persists provisioning state (last-sync timestamps, externalId mappings, etc.) in a dedicated database.
This is separate from your user source — it’s PingFederate’s internal bookkeeping. The provisioner data store
must be a JDBC database; LDAP data stores cannot be used for this purpose.
- Create an empty schema in your RDBMS for PingFederate’s provisioner state.
-
Run the schema script that matches your RDBMS against that schema. The scripts ship with PingFederate and live at
<pf-install>/server/default/conf/provisioner/sql-scripts/:provisioner-mssql.sql— SQL Serverprovisioner-mysql.sql— MySQLprovisioner-oracle.sql— Oracleprovisioner-postgresql.sql— PostgreSQL
-
Install the JDBC driver for your database. PingFederate only bundles the H2 driver — other databases require you to download the driver
.jarfrom the vendor and copy it into<pf-install>/server/default/lib/, then restart PingFederate. If you skip this step, the Add Data Store step will fail with “You must provide a valid driver class name” even when the class name is correct. -
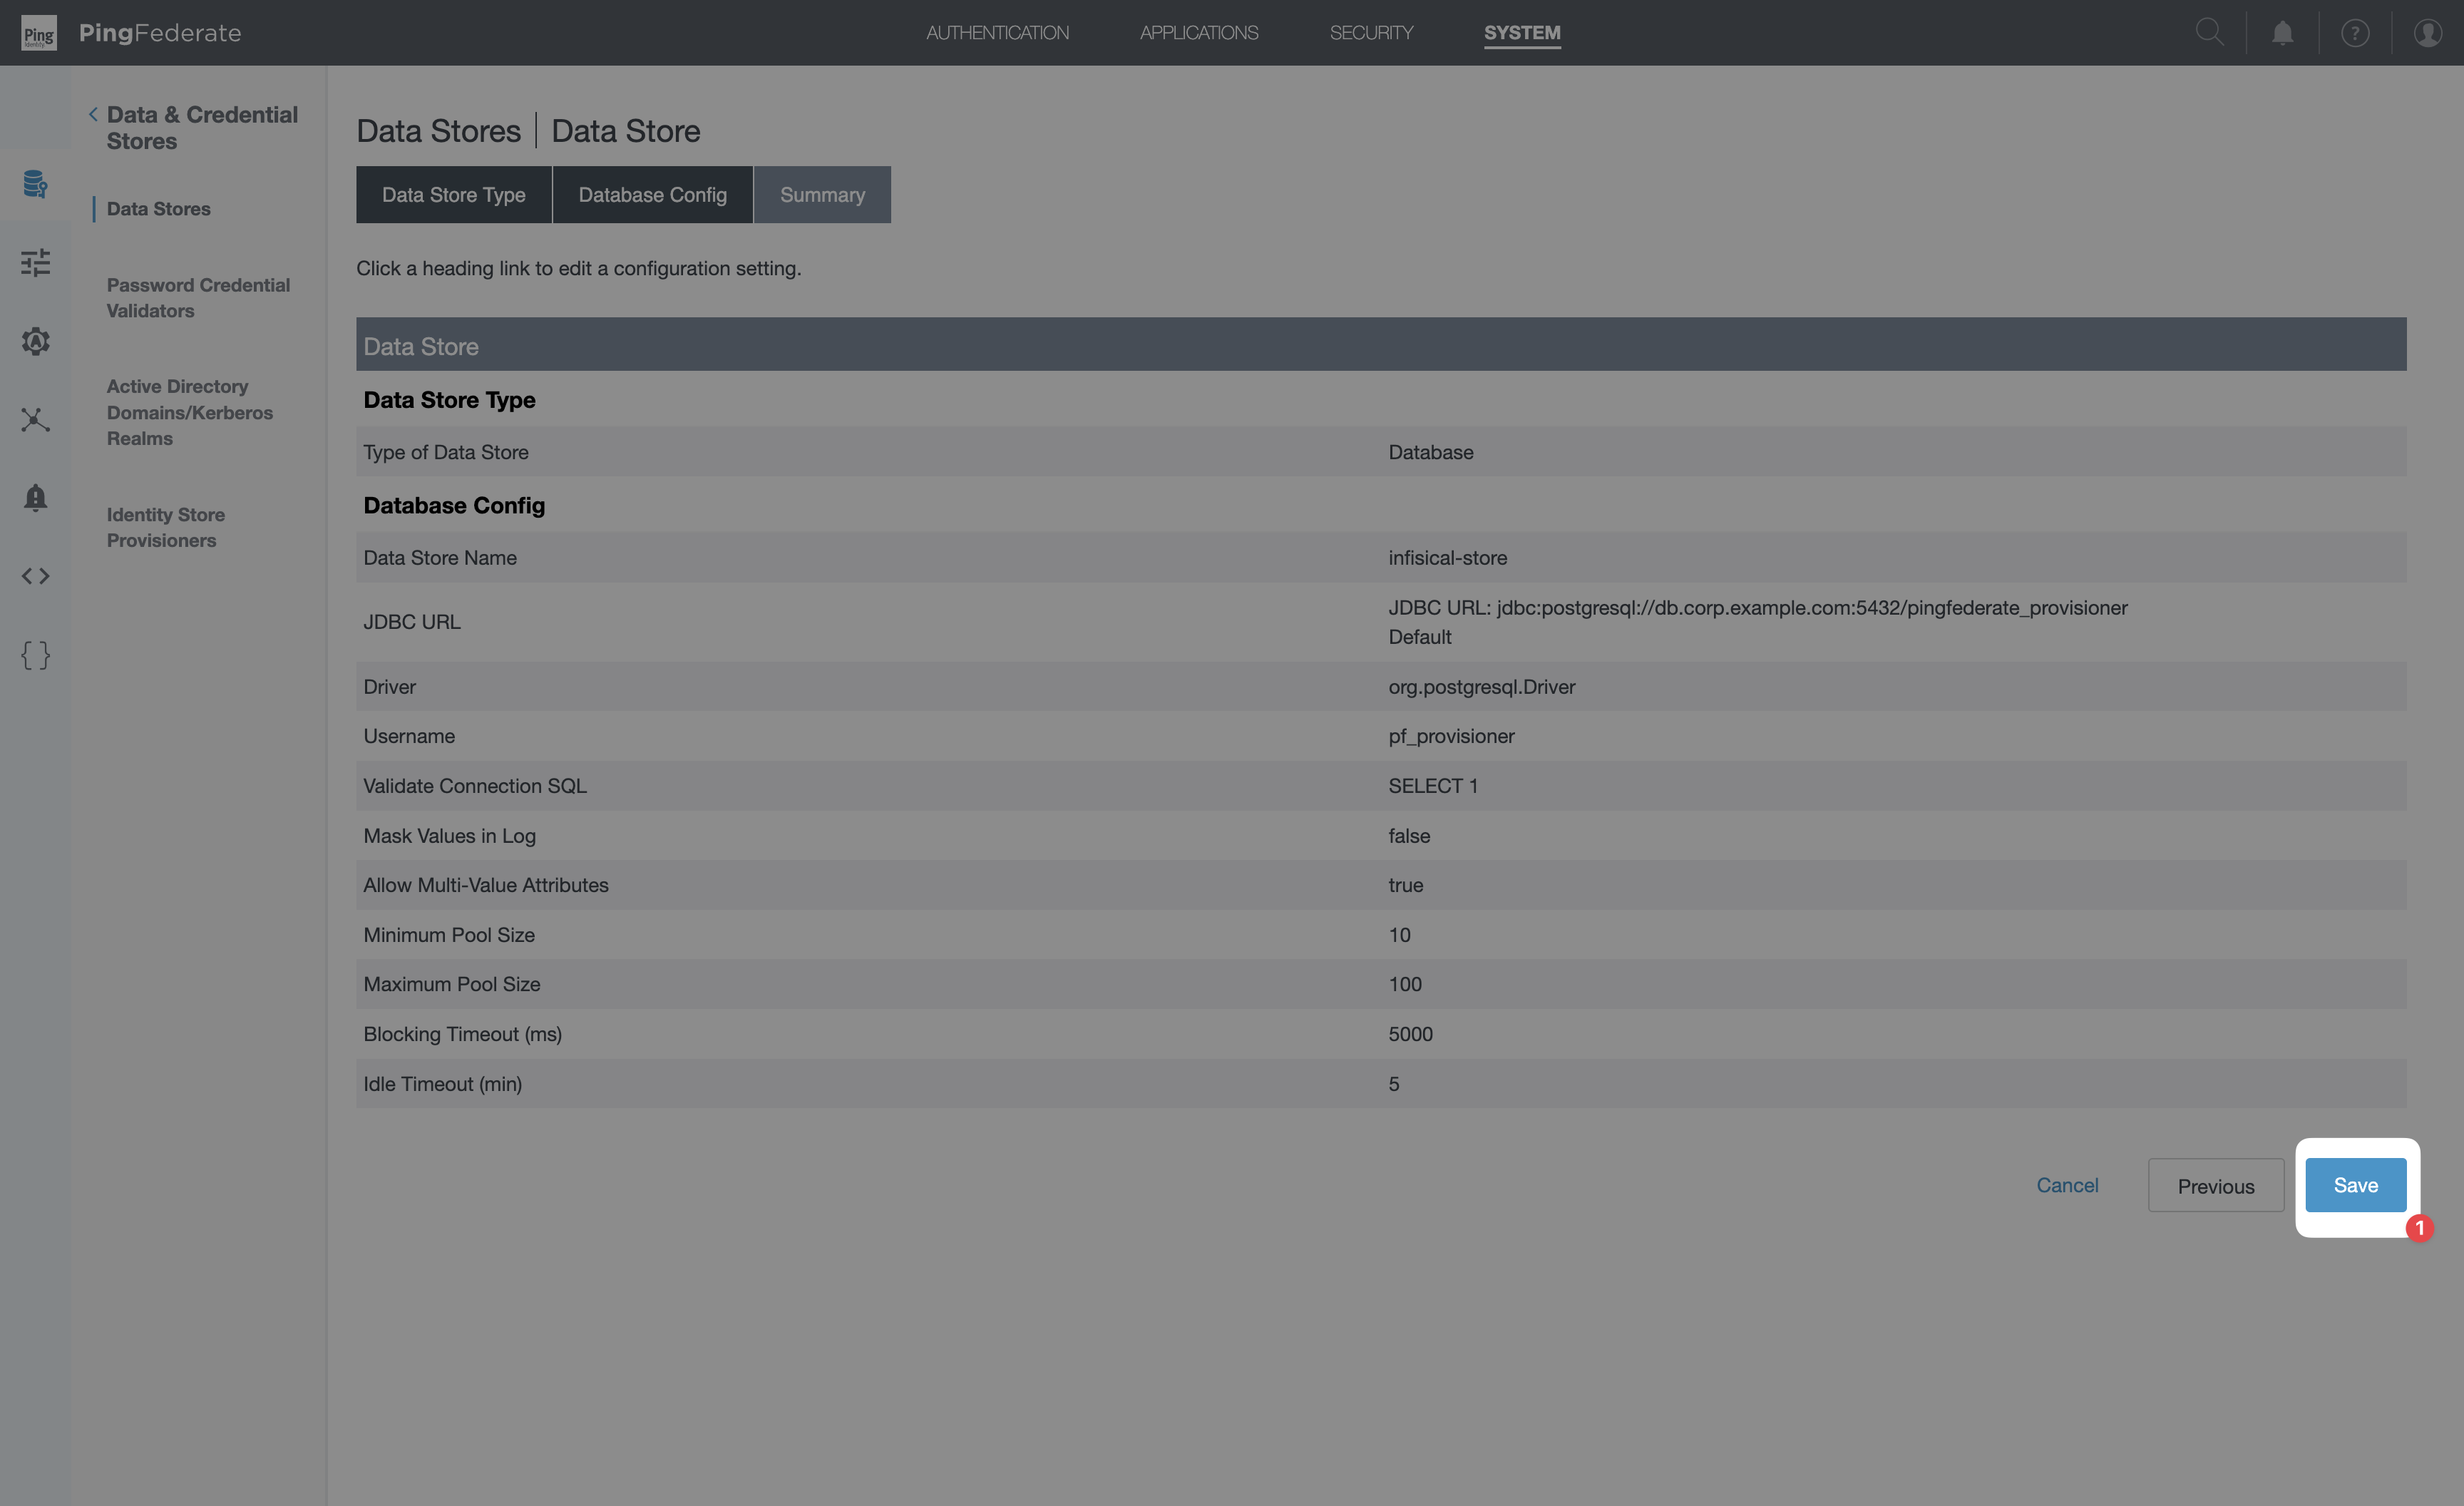
In the PingFederate admin console: System → Data Stores → Add Data Store → JDBC. Configure the connection and save.


-
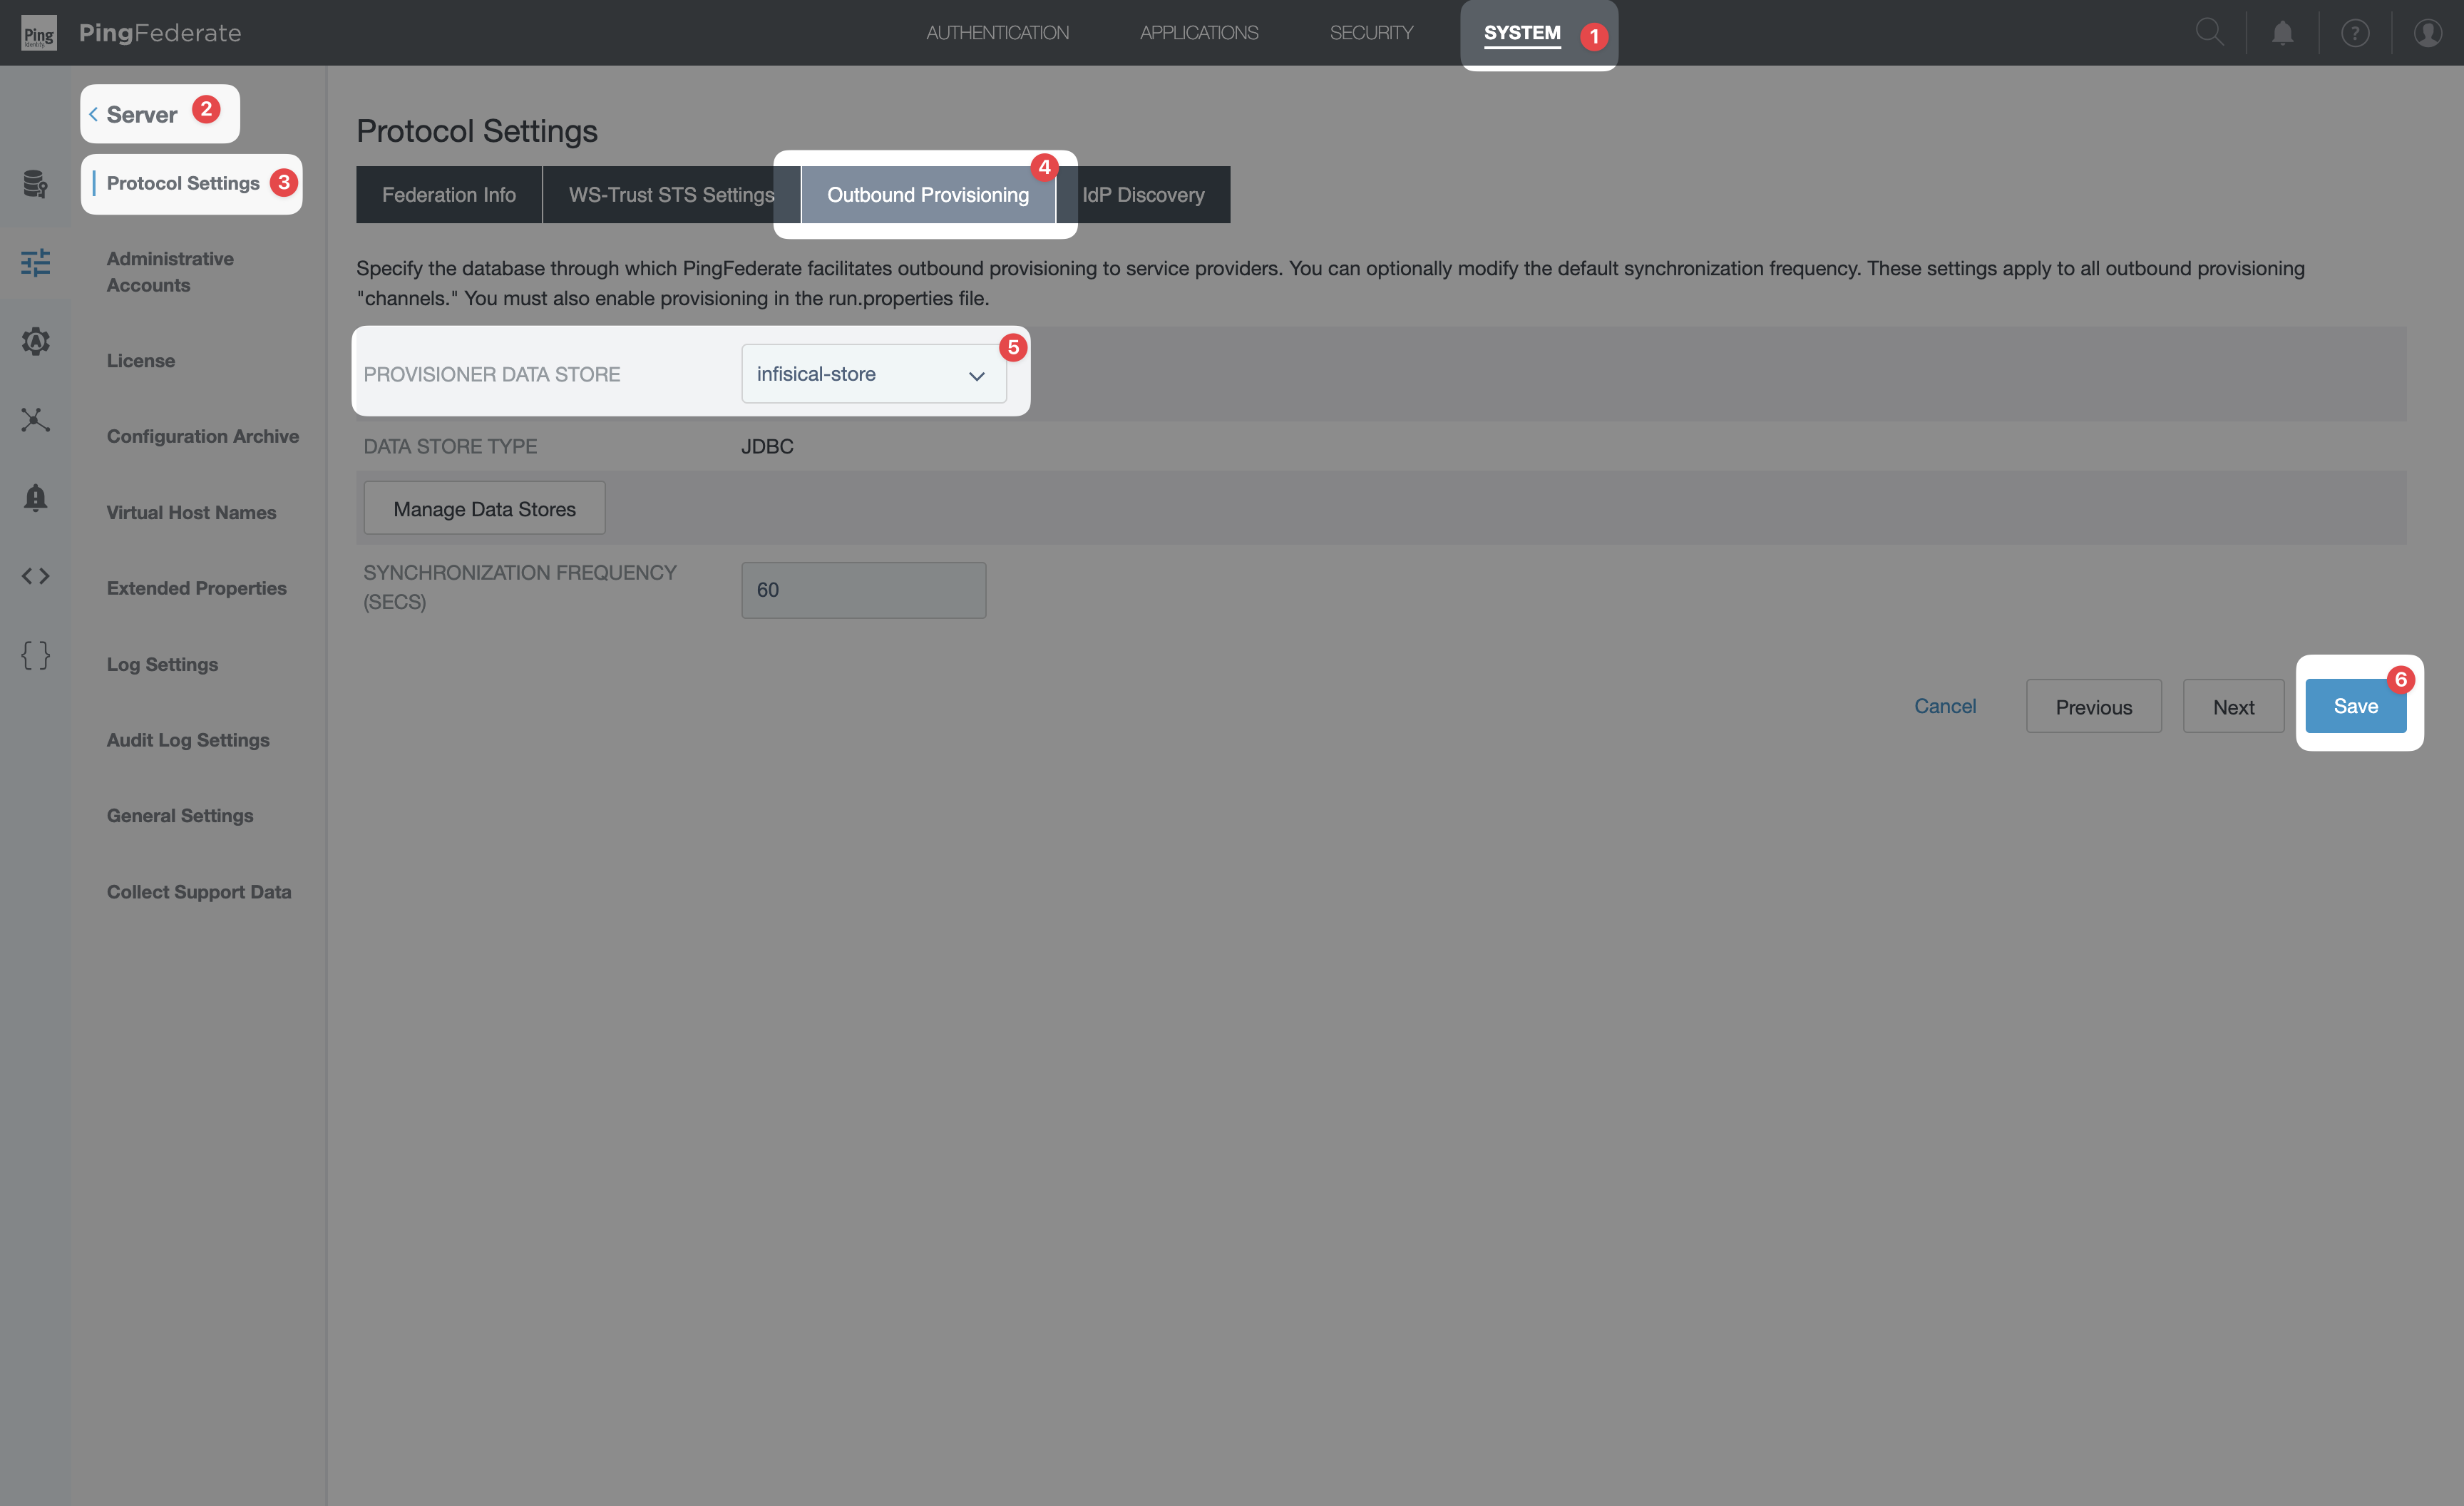
Go to System → Server → Protocol Settings → Outbound Provisioning and select the JDBC data store you just created as the Provisioner Data Store. Save.
4
Add your LDAP directory as a Data Store
PingFederate’s SCIM channel pulls users from a source Data Store and provisions them outbound to Infisical.
Most deployments use Active Directory as the source — these steps assume AD or another LDAP directory. If you
provision users from a relational database instead, see the JDBC note at the end of this step.In the PingFederate admin console: System → Data Stores → Add New Data Store → select LDAP.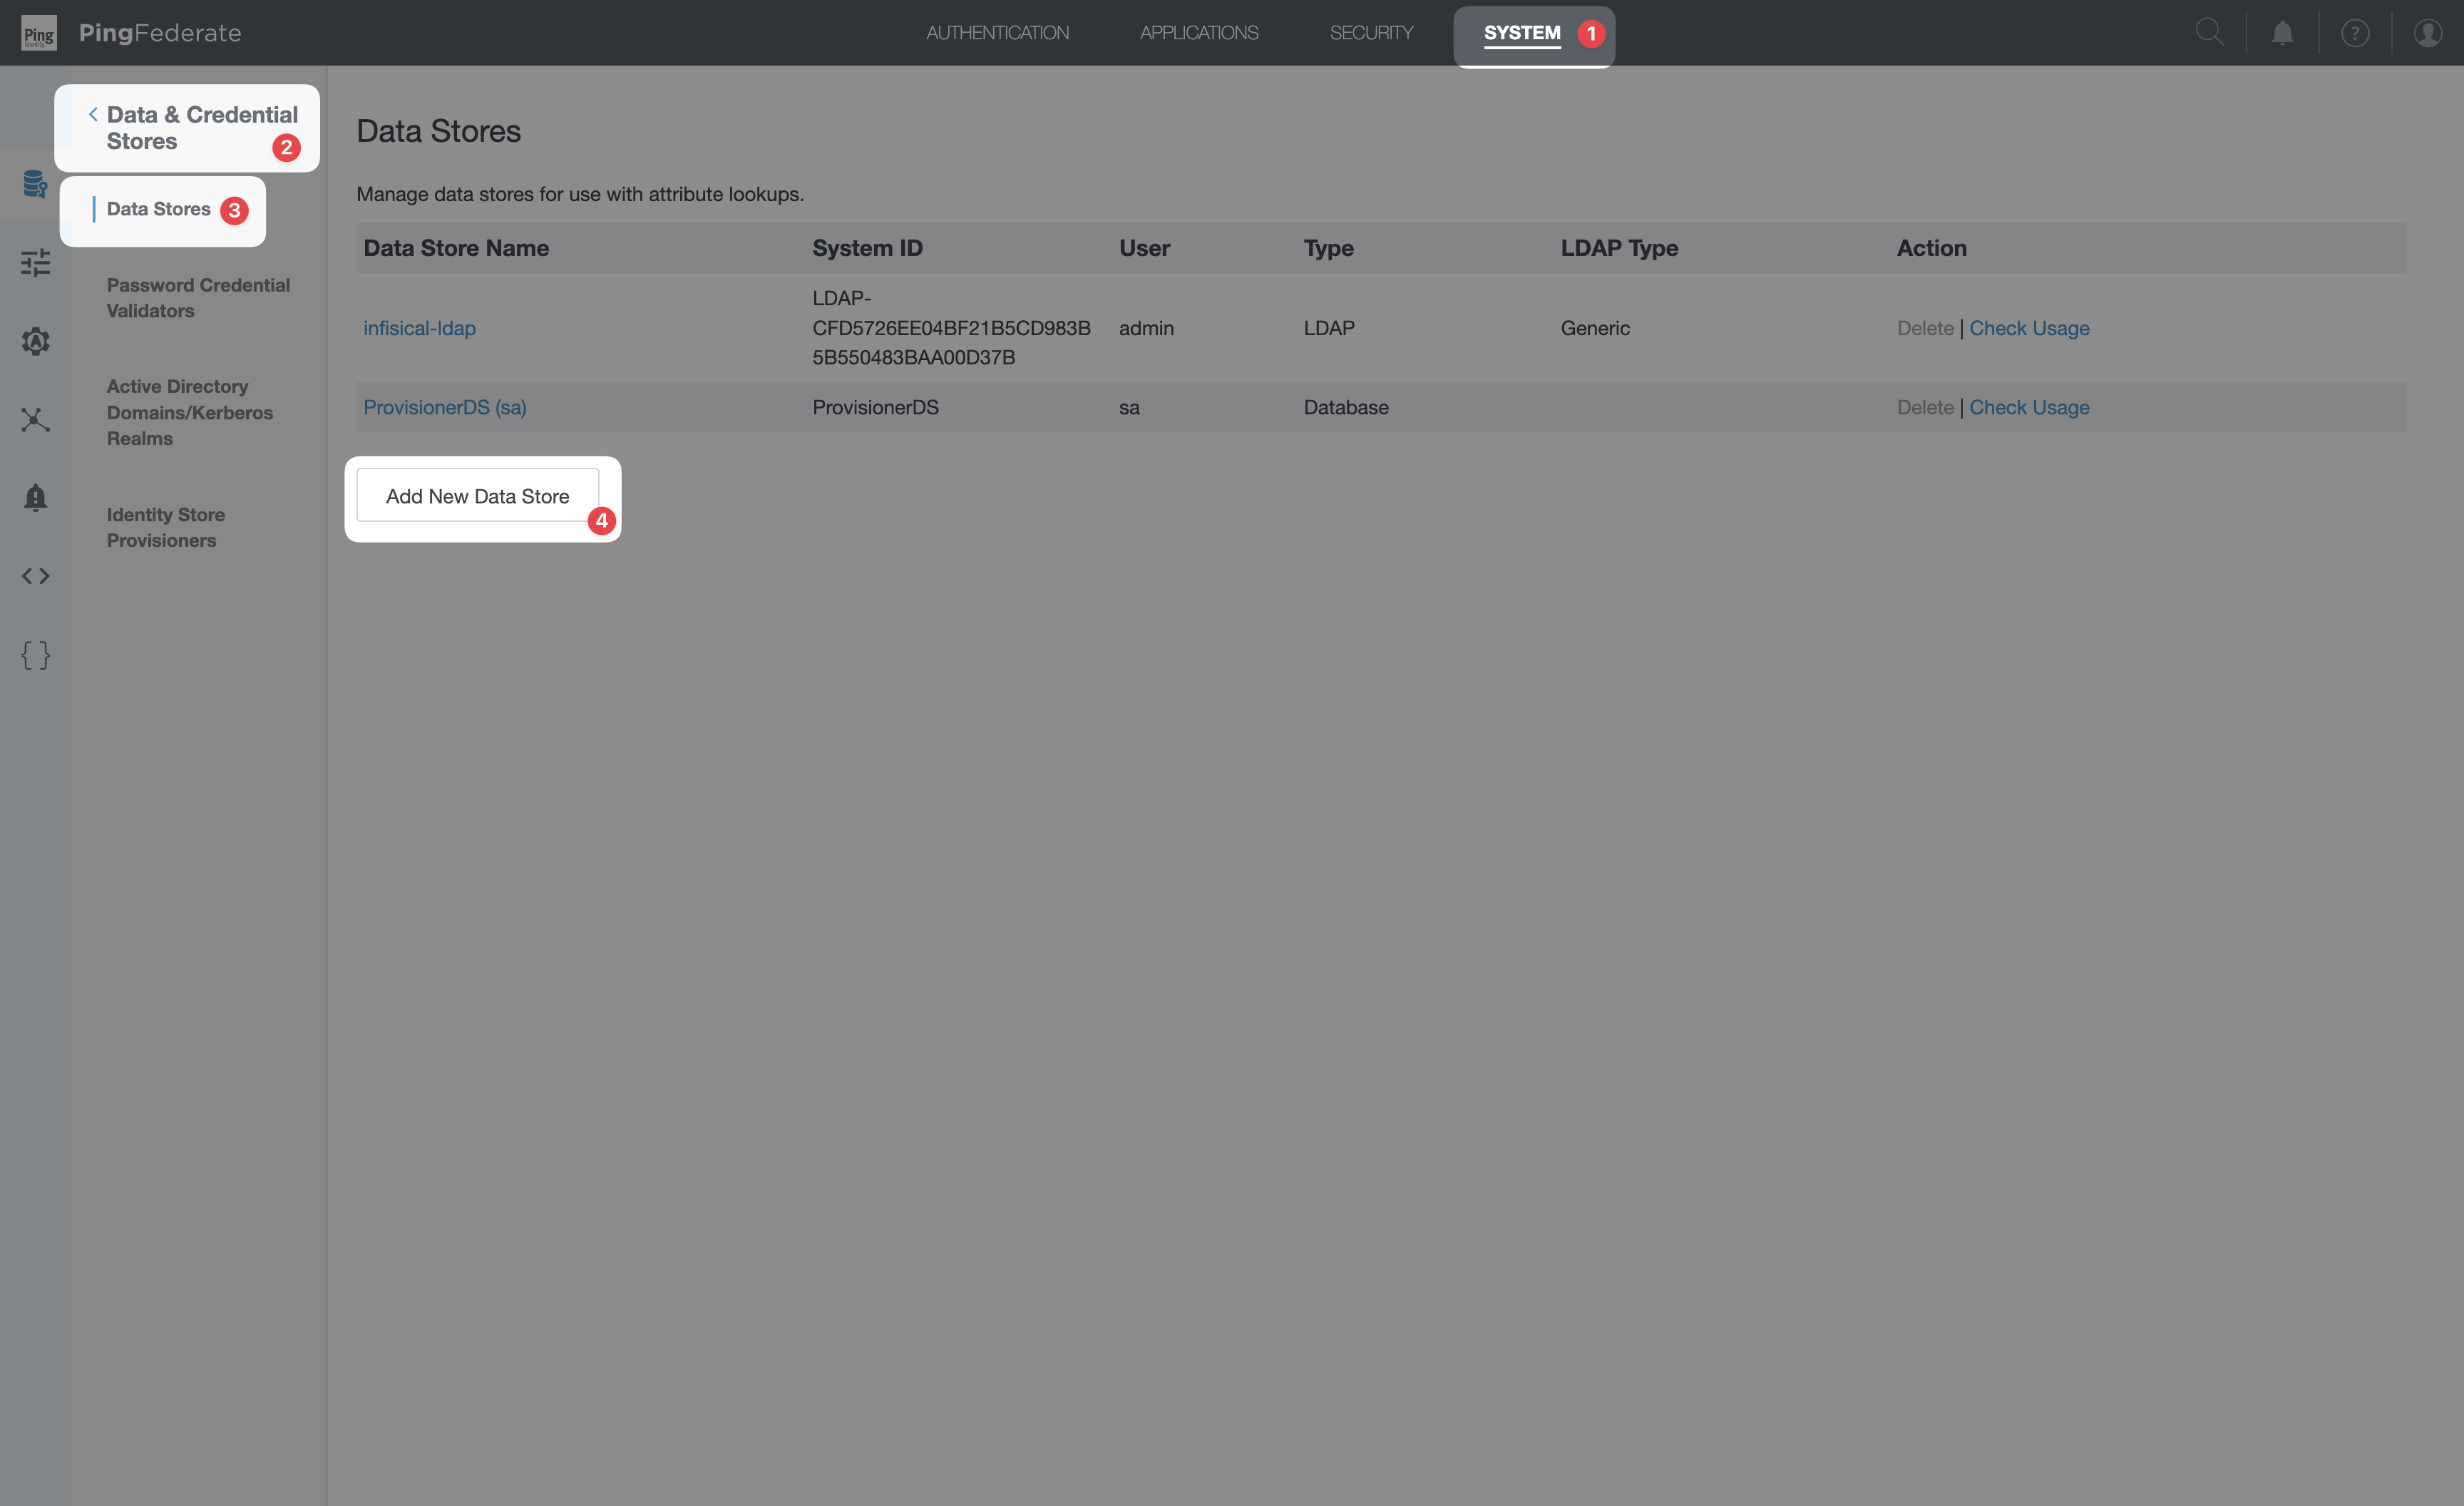
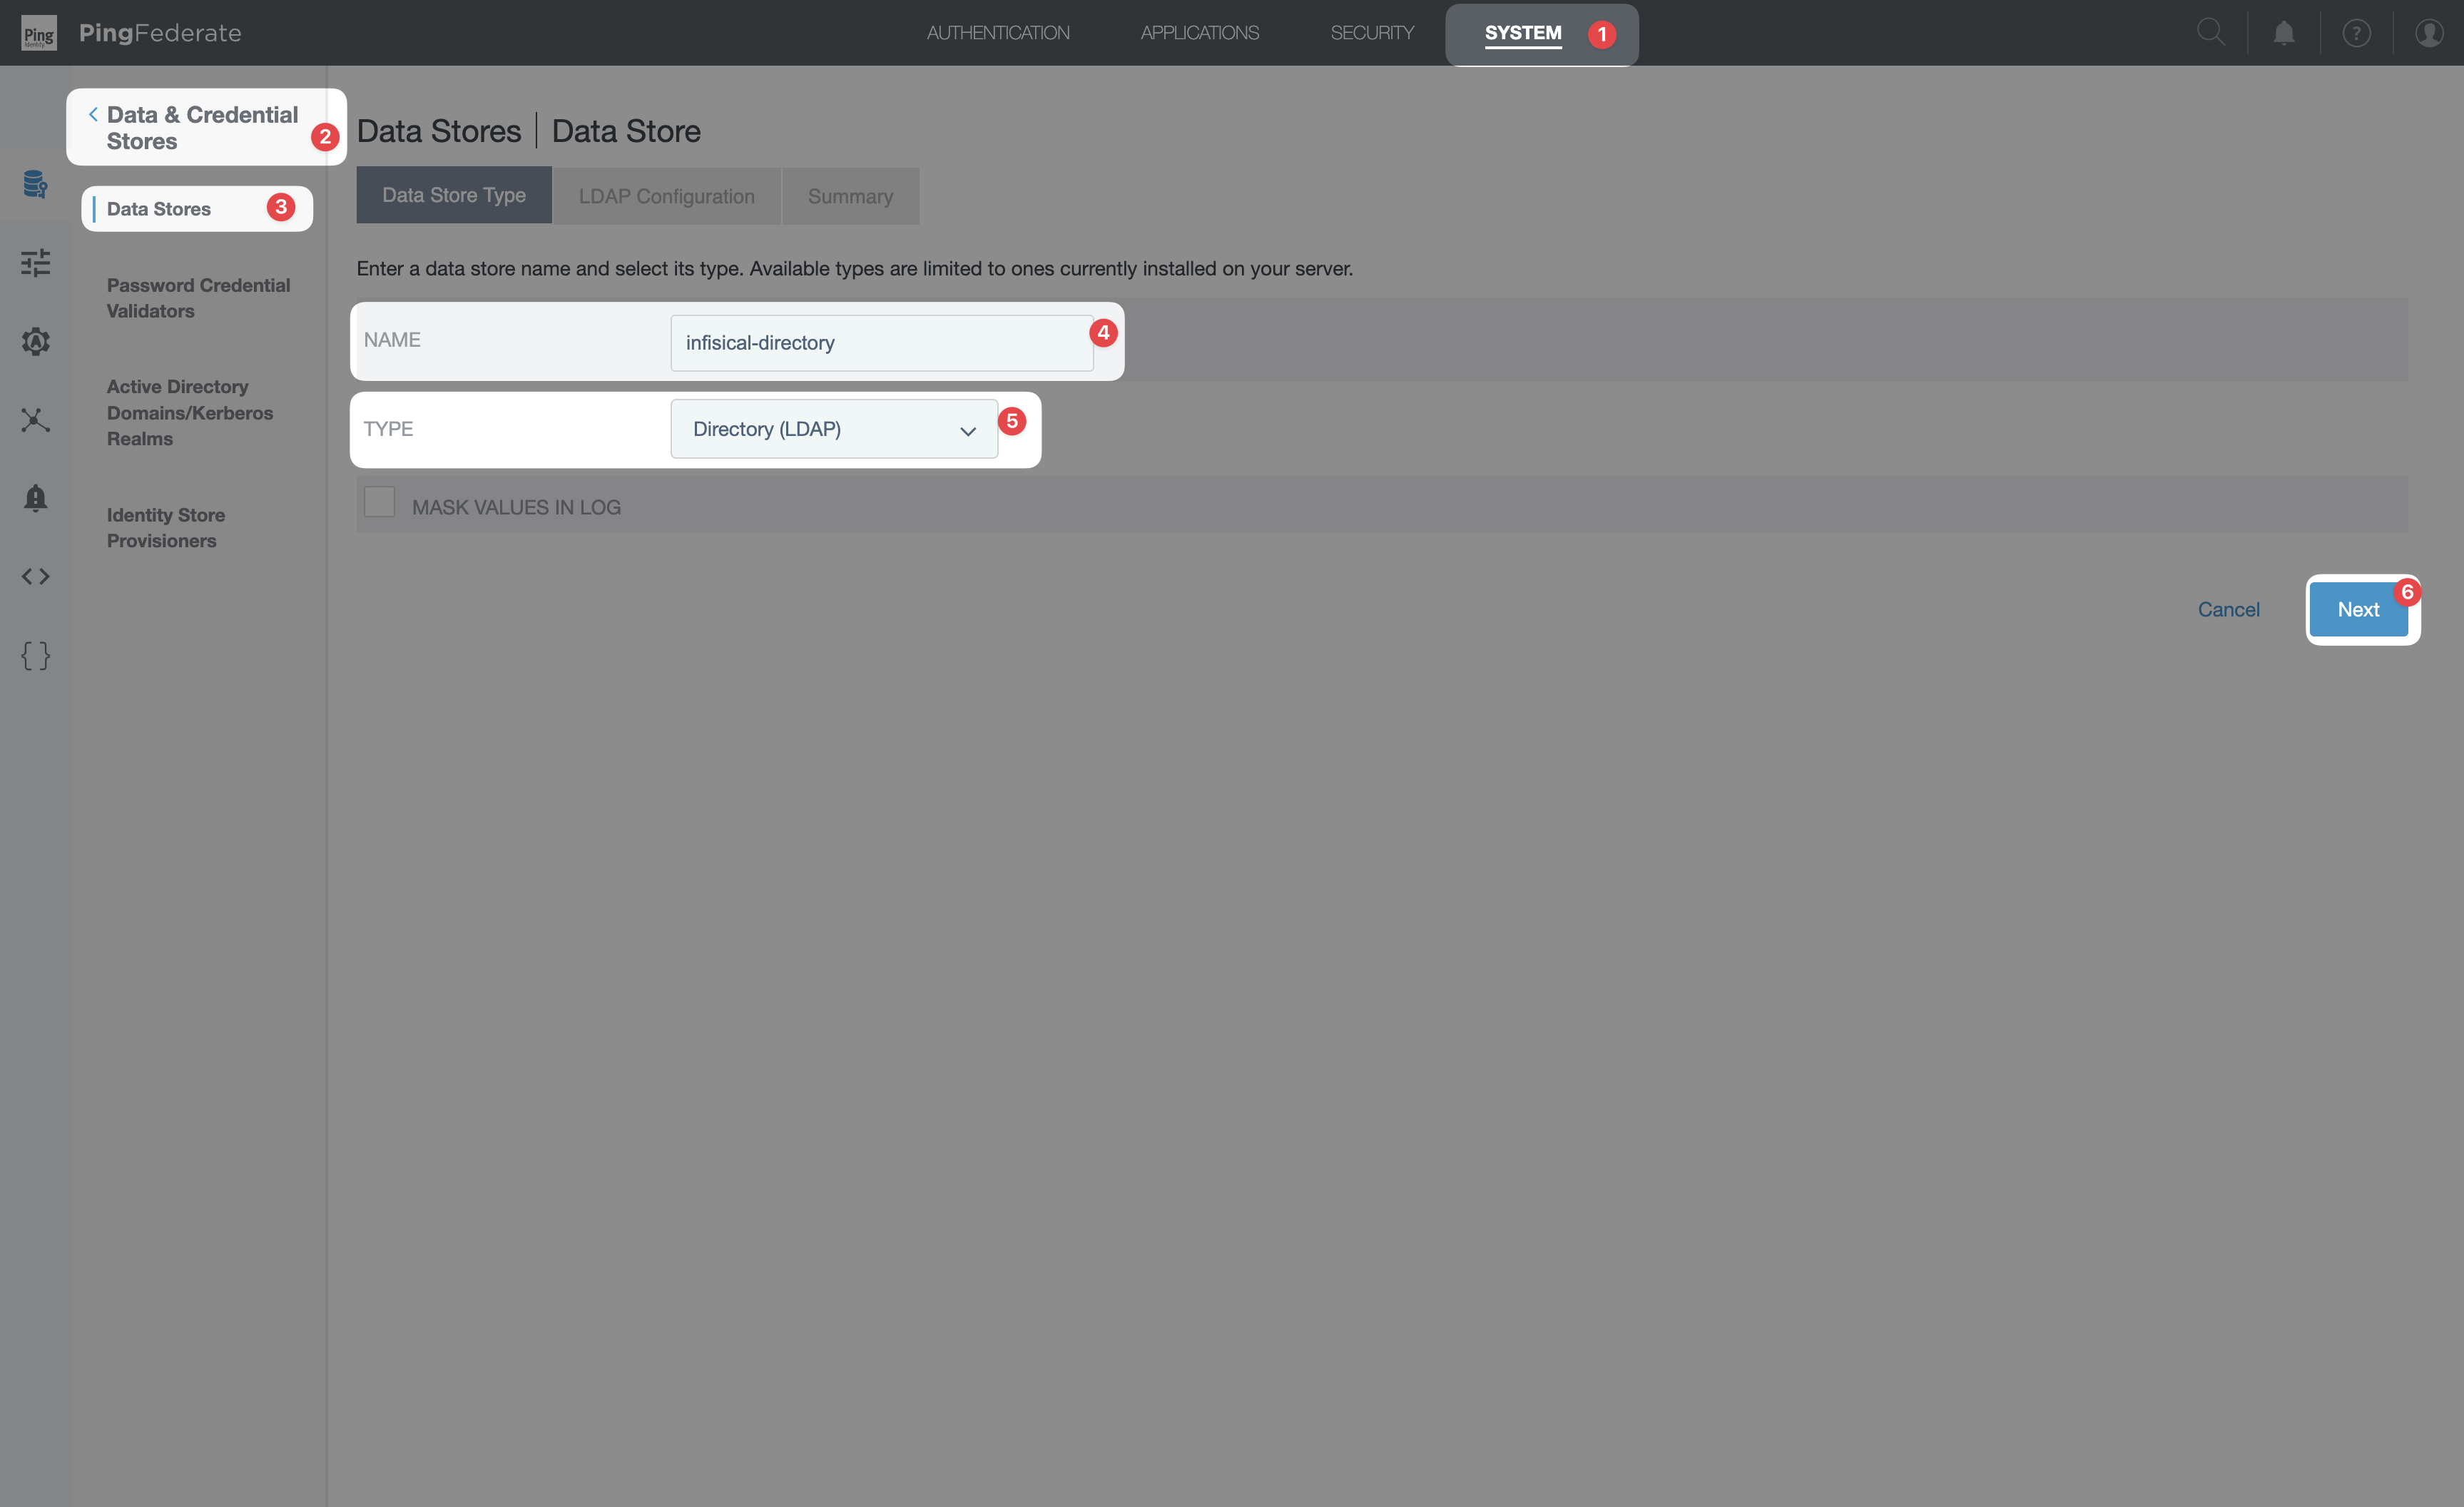

- LDAP Type: select Active Directory (or Generic / Oracle Directory Server / etc. for non-AD directories). The LDAP Type affects which attribute behaviors PingFederate assumes (binary handling for AD’s
objectGUID, etc.) — picking the wrong one will silently produce incorrect change detection.
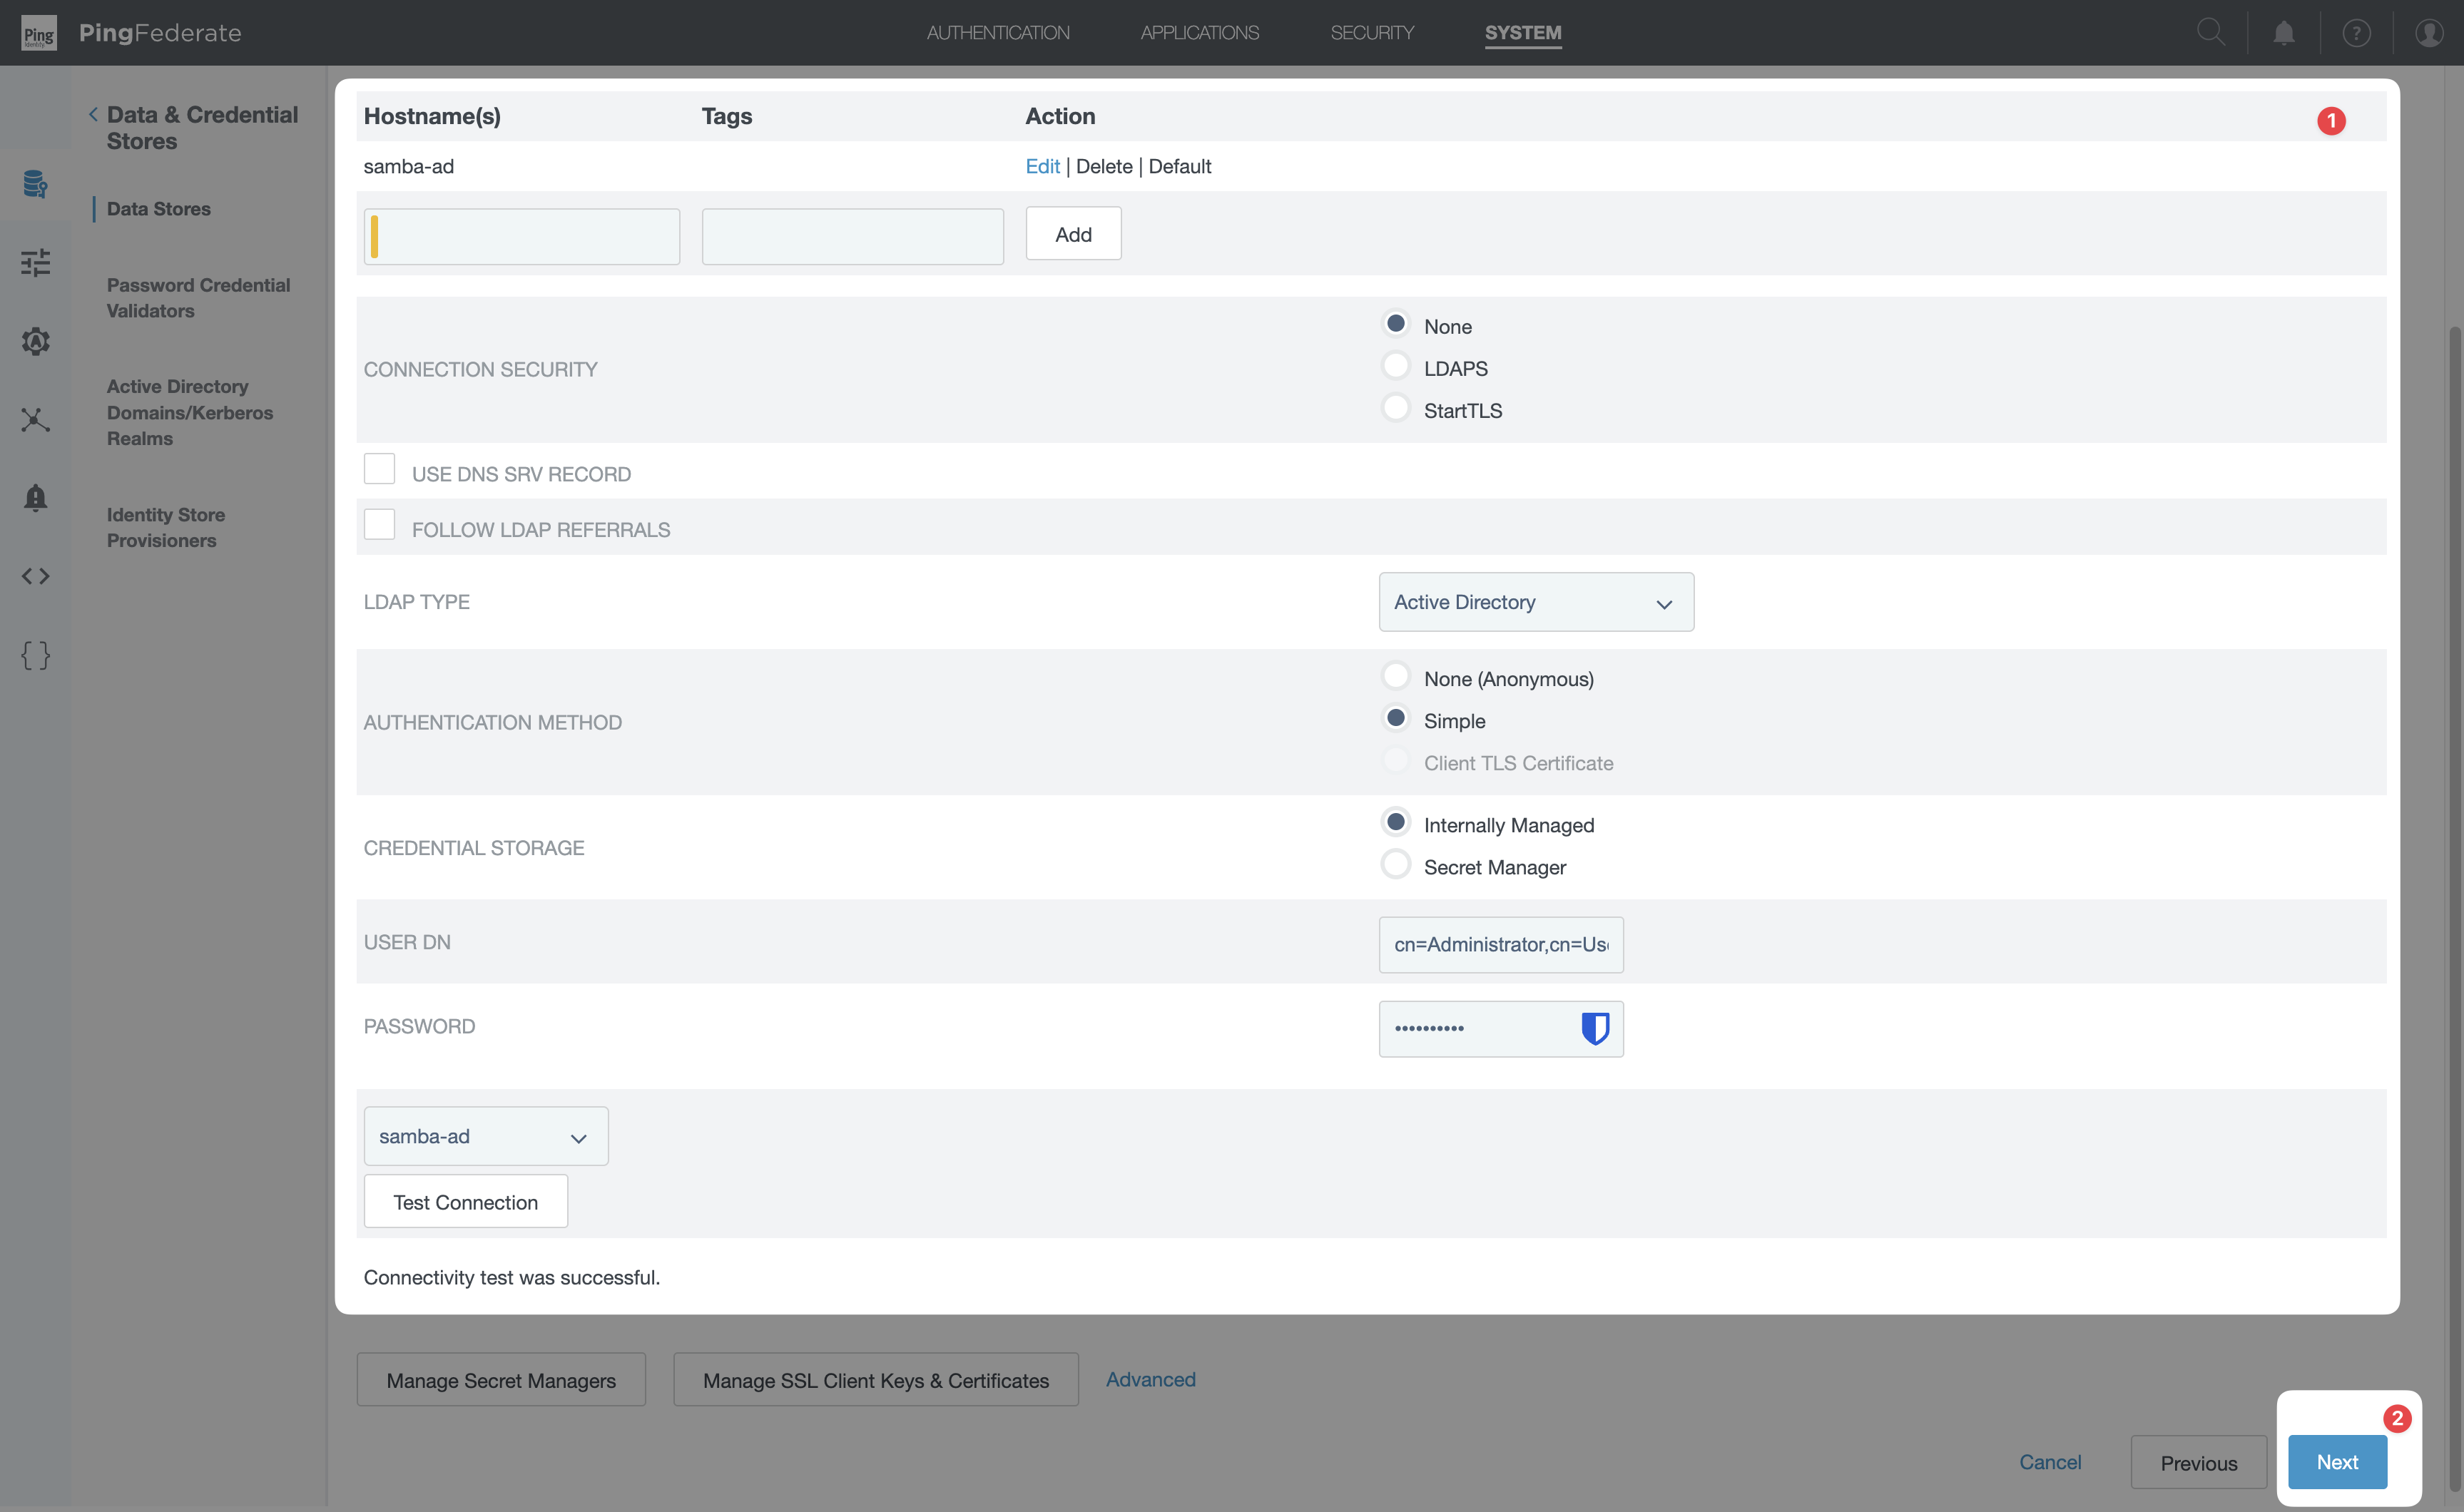
- Hostname: your AD / LDAP server (e.g.
ad.corp.example.com). For HA, add multiple hosts. Click Add to commit each hostname into the list. - Use LDAPS (recommended) or Use StartTLS: enable one if your directory supports TLS. If using LDAPS, ensure the directory’s CA certificate is trusted by PingFederate (Security → Certificate & Key Management → Trusted CAs).
- Authentication Method: Simple.
- User DN: a service account DN with read access to the user subtree, e.g.
CN=pf-svc,OU=Service Accounts,DC=corp,DC=example,DC=com. - Password: the service account password.
Using JDBC instead? Choose Database rather than LDAP at the Add Data Store step and configure the
JDBC URL, driver, and credentials for your user table. The rest of this guide is otherwise identical, except
the source attribute names in the channel mapping table (Step 8) will be your column names instead of
LDAP attribute names.
5
Generate a SCIM token in Infisical
In Infisical, head to the Organization Settings page and select the Provisioning tab. Under SCIM Configuration,
press the Enable SCIM provisioning toggle to allow PingFederate to provision/deprovision users for your organization.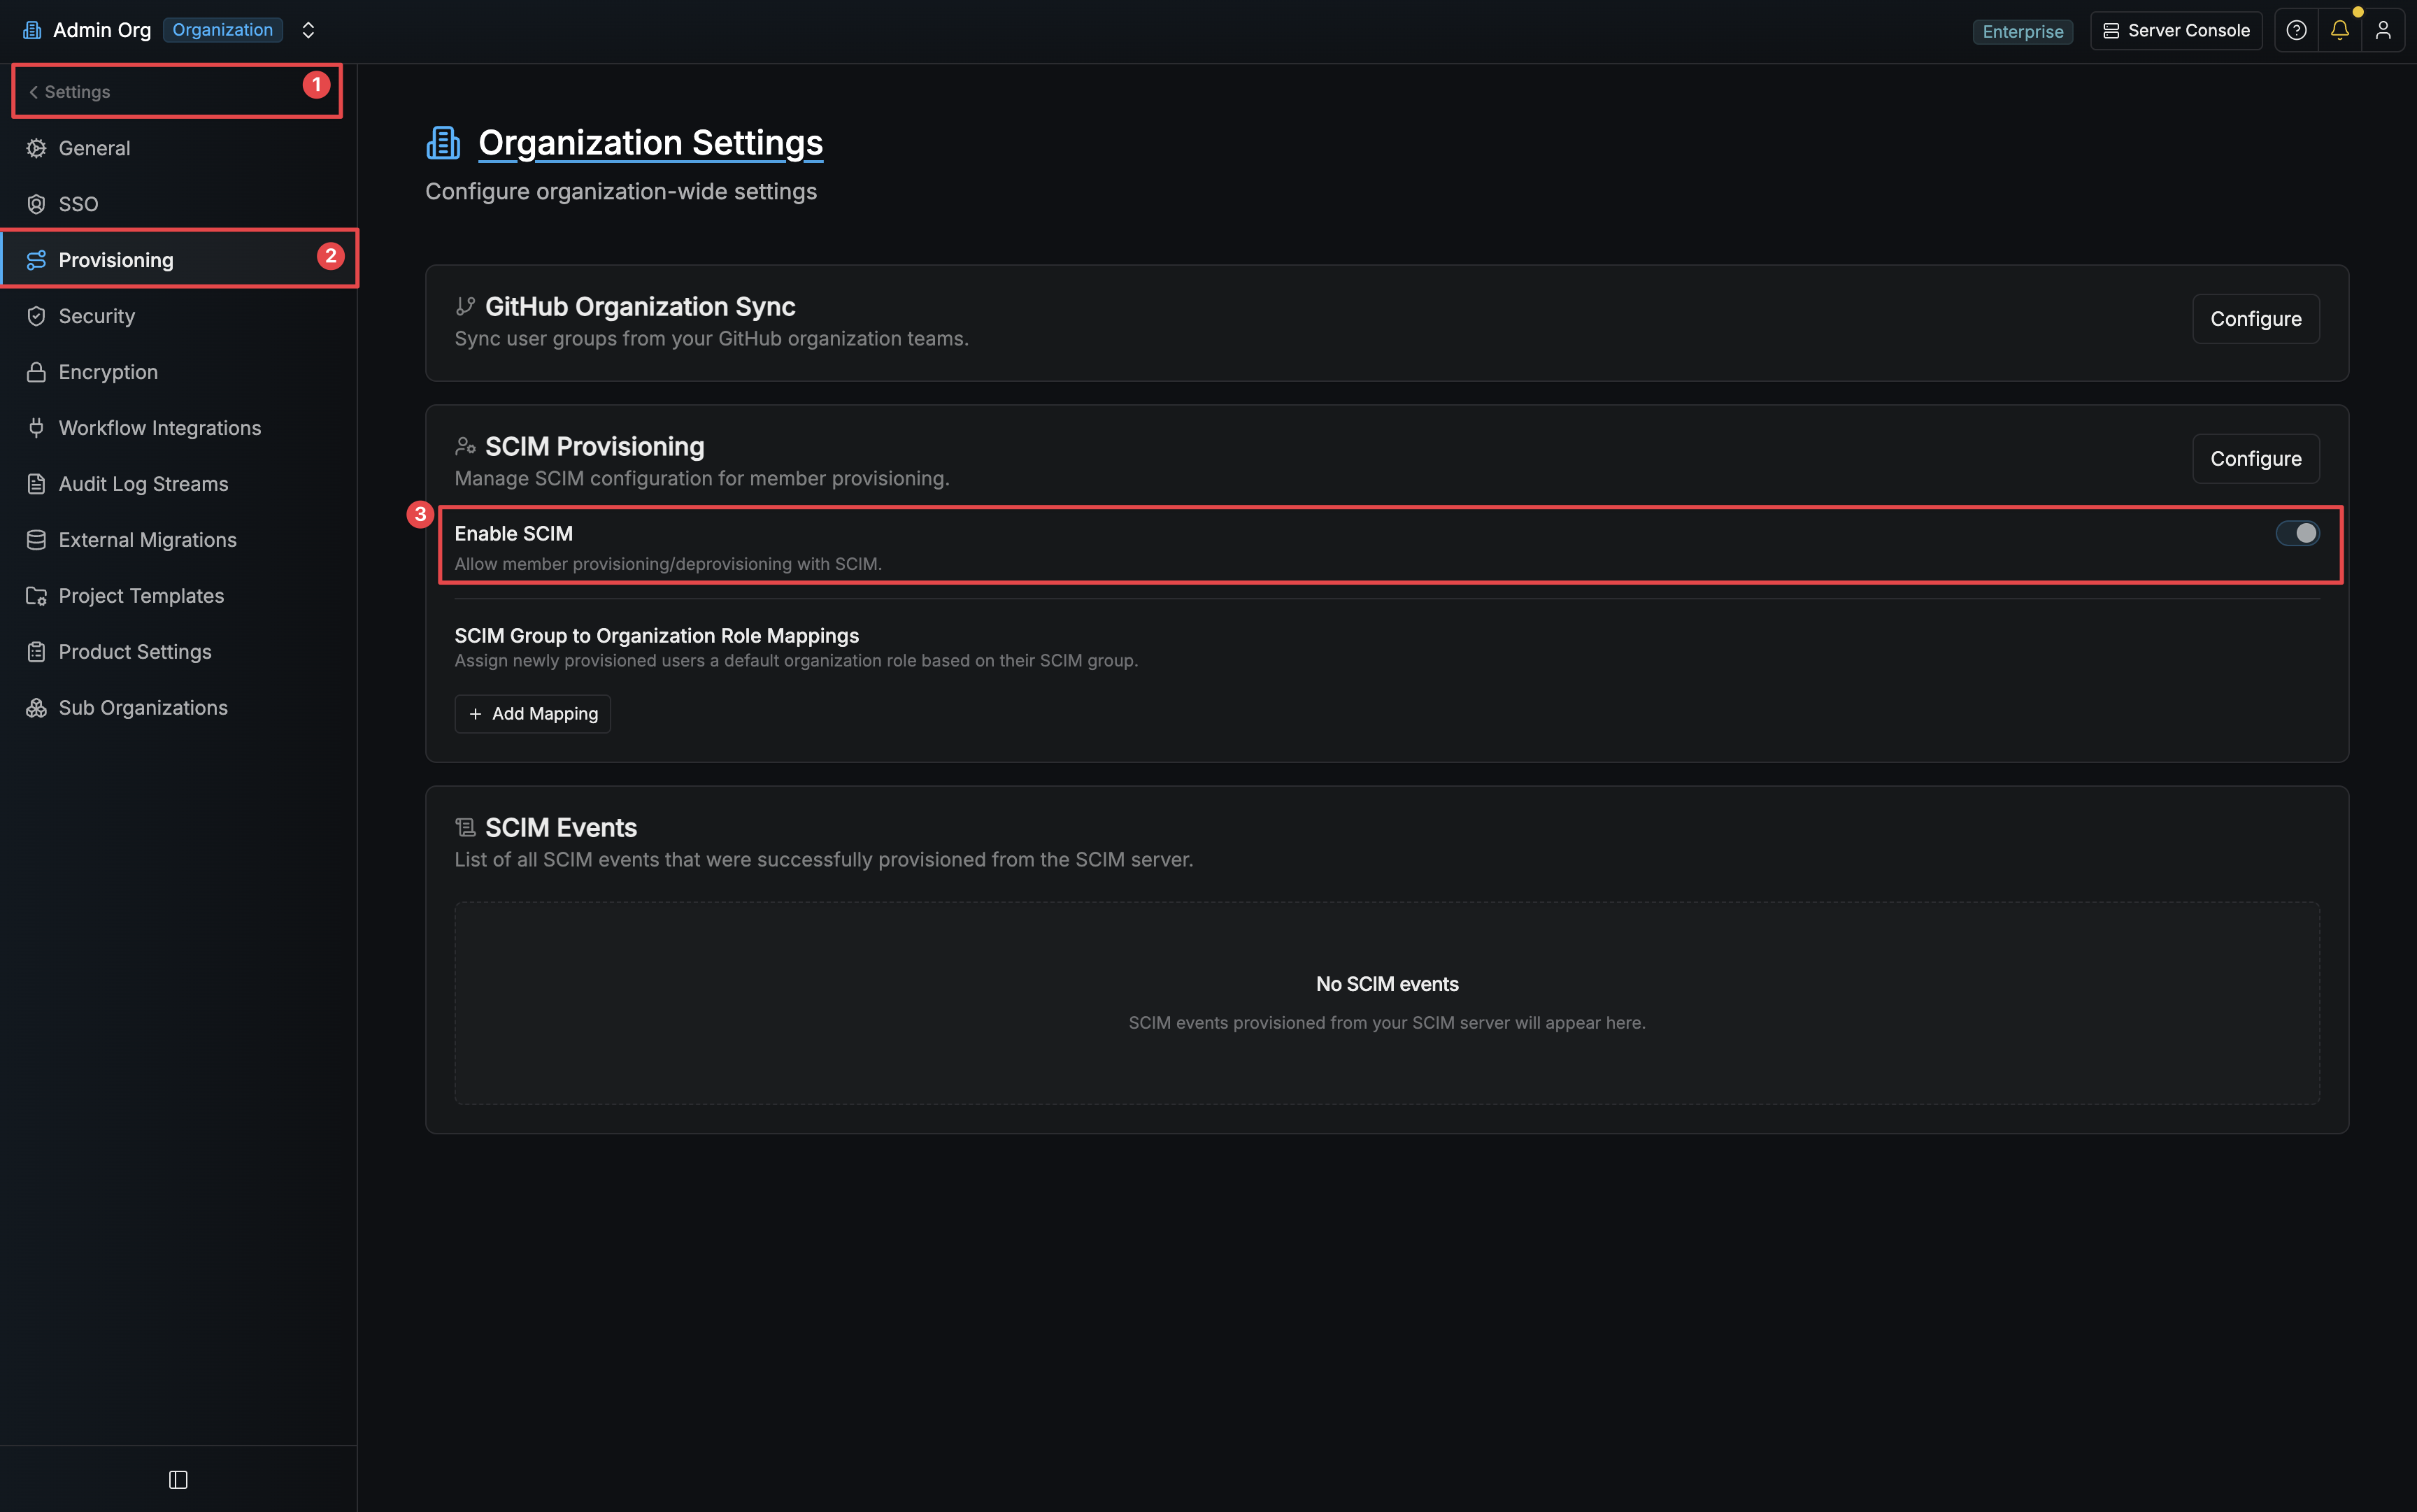 Press Configure and then Create to generate a SCIM token for PingFederate.
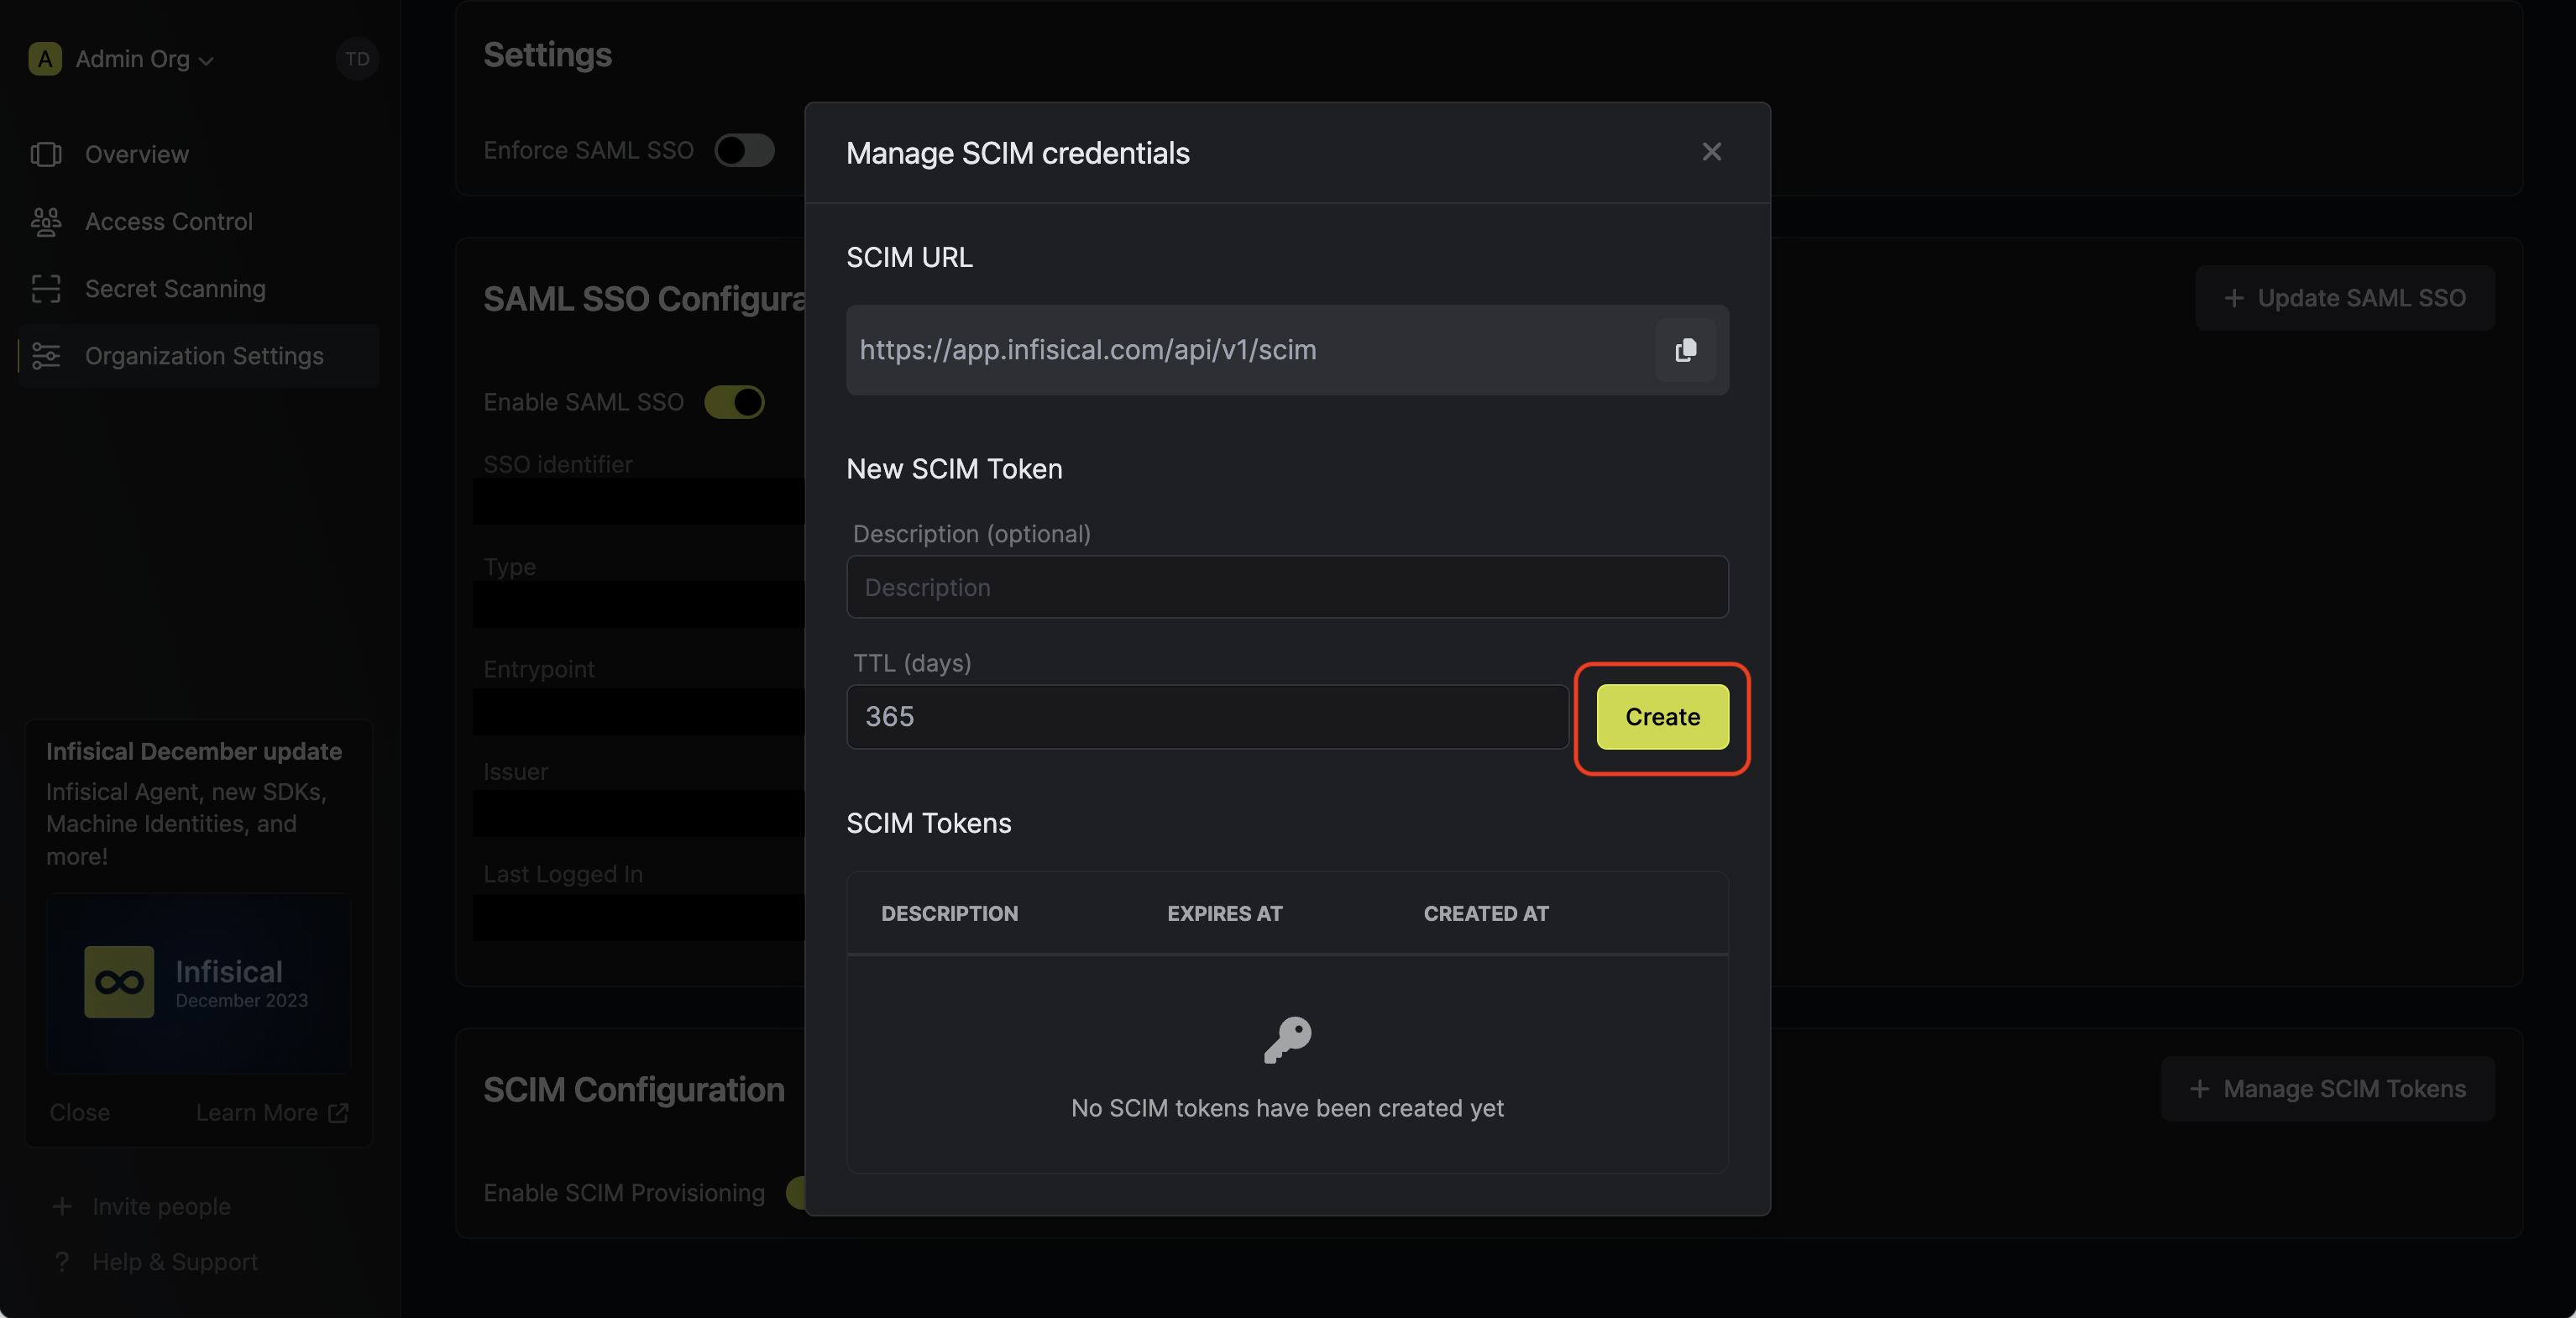 Copy the SCIM URL and New SCIM Token — you’ll paste them into PingFederate’s SP Connection in a later step.
The token is shown once and cannot be retrieved again.
Copy the SCIM URL and New SCIM Token — you’ll paste them into PingFederate’s SP Connection in a later step.
The token is shown once and cannot be retrieved again.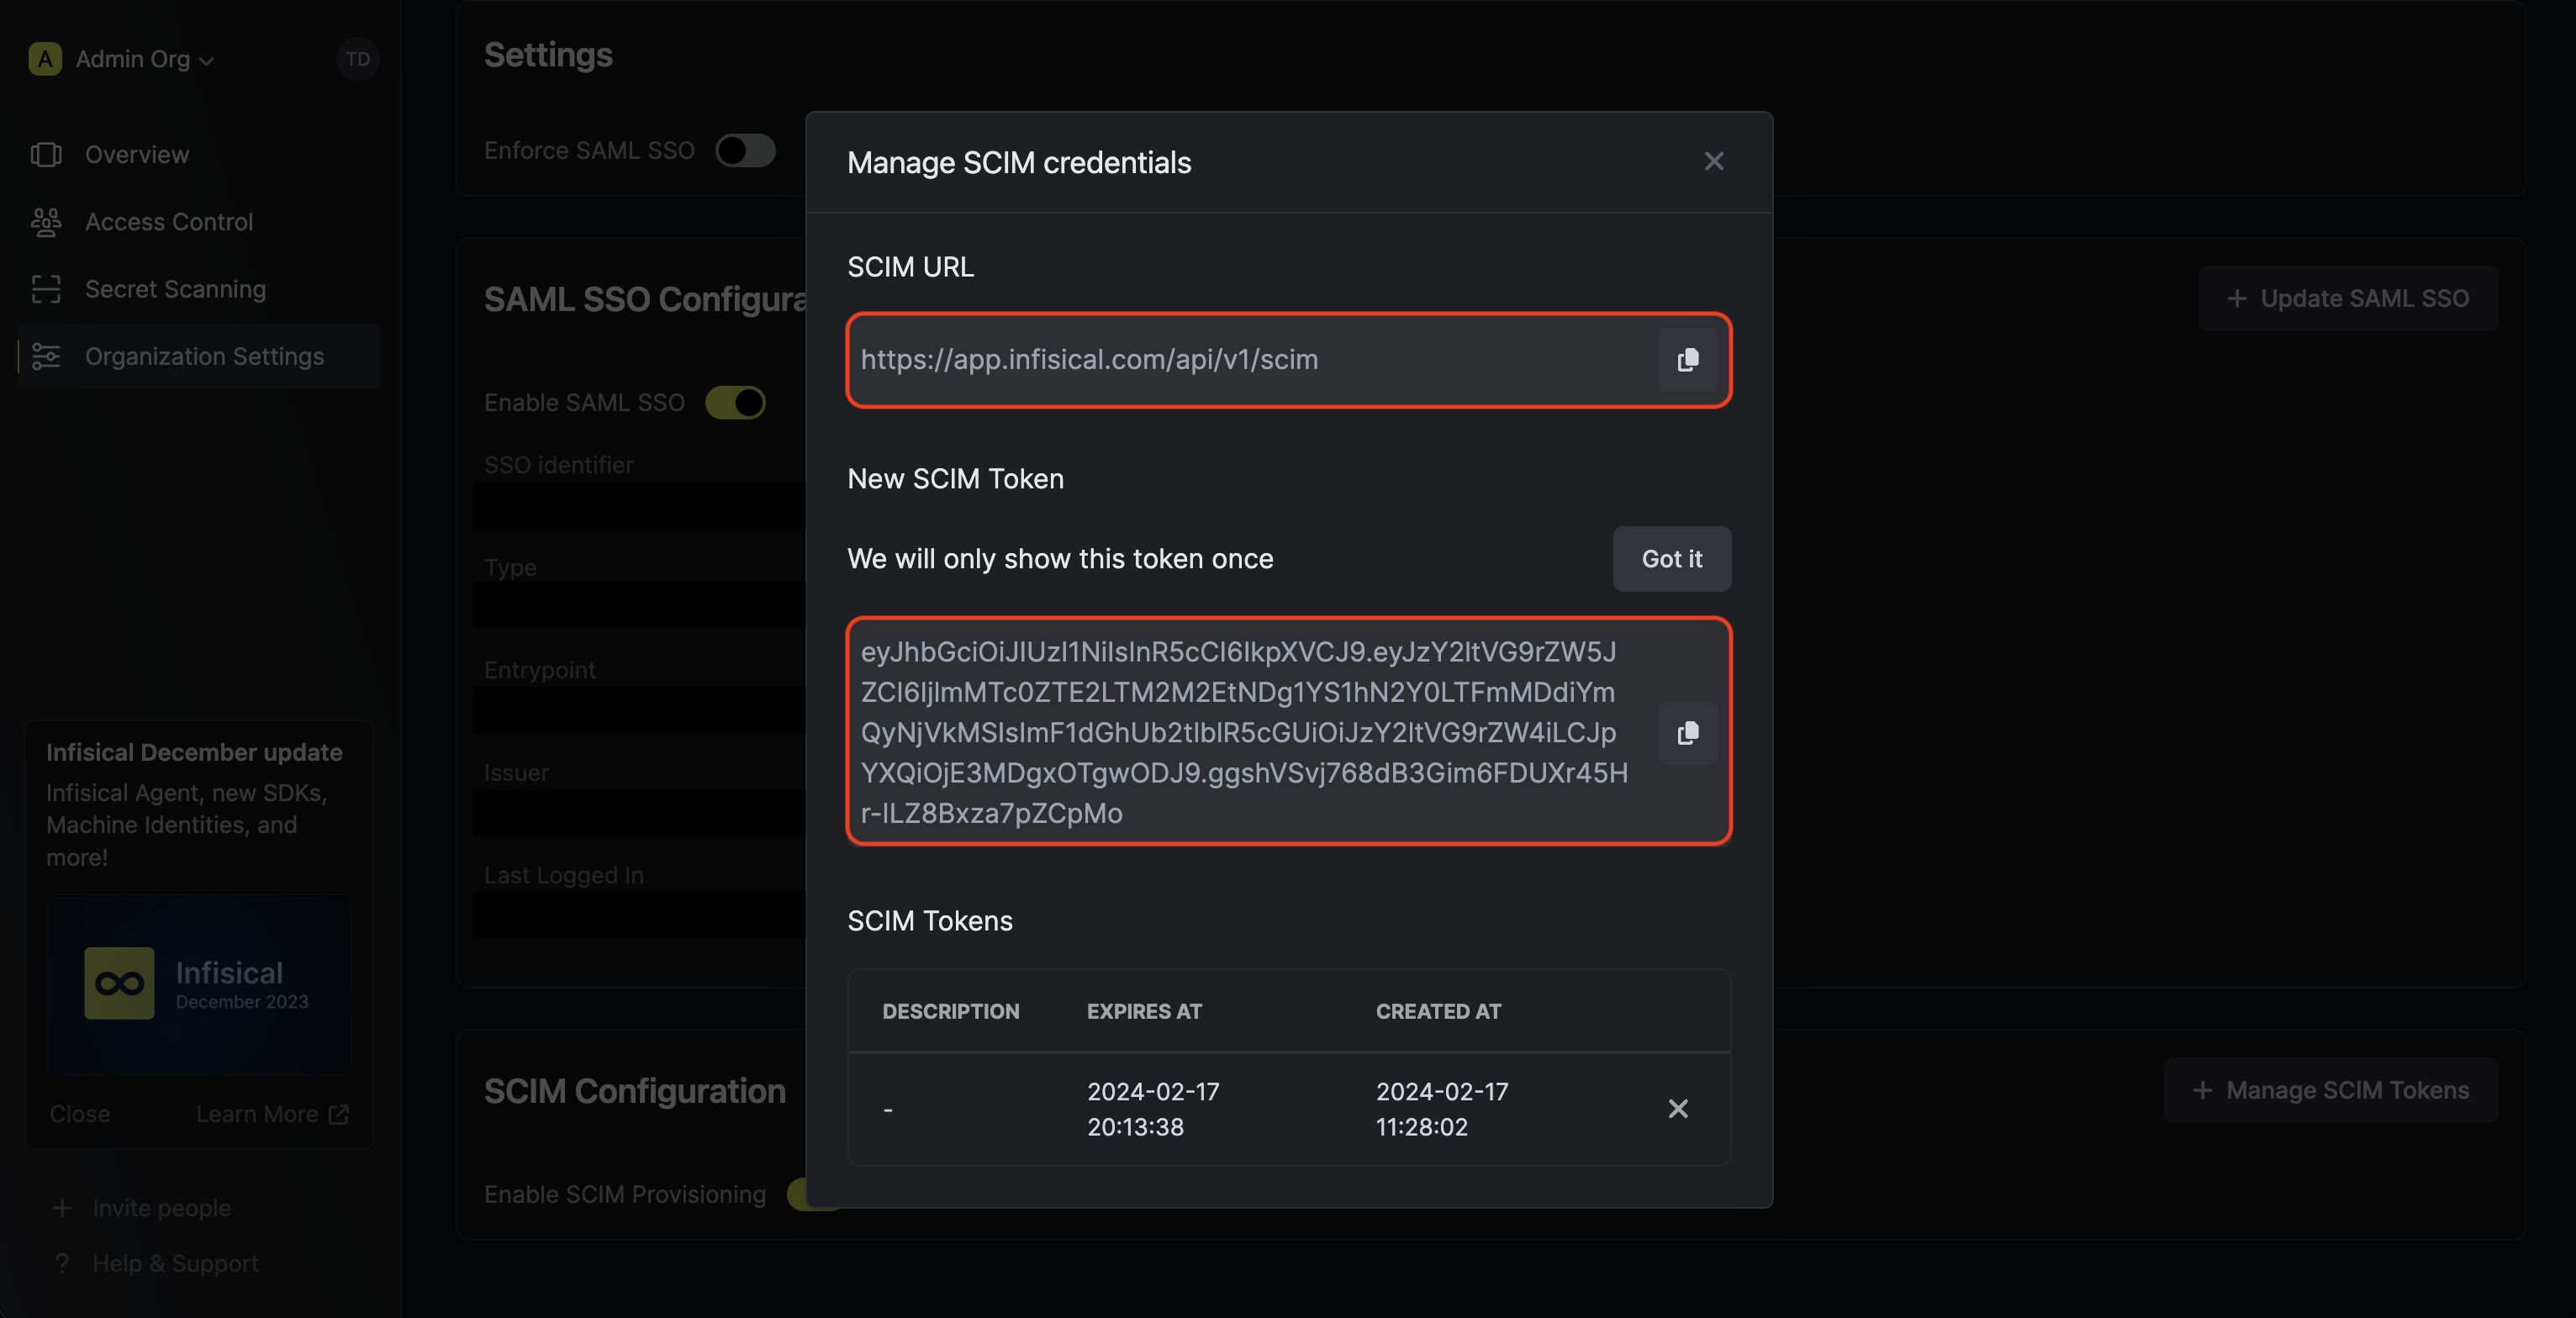
Press Configure and then Create to generate a SCIM token for PingFederate.Copy the SCIM URL and New SCIM Token — you’ll paste them into PingFederate’s SP Connection in a later step.
The token is shown once and cannot be retrieved again.6
Create the SP Connection
Navigate to Applications → Integration → SP Connections and click Create Connection.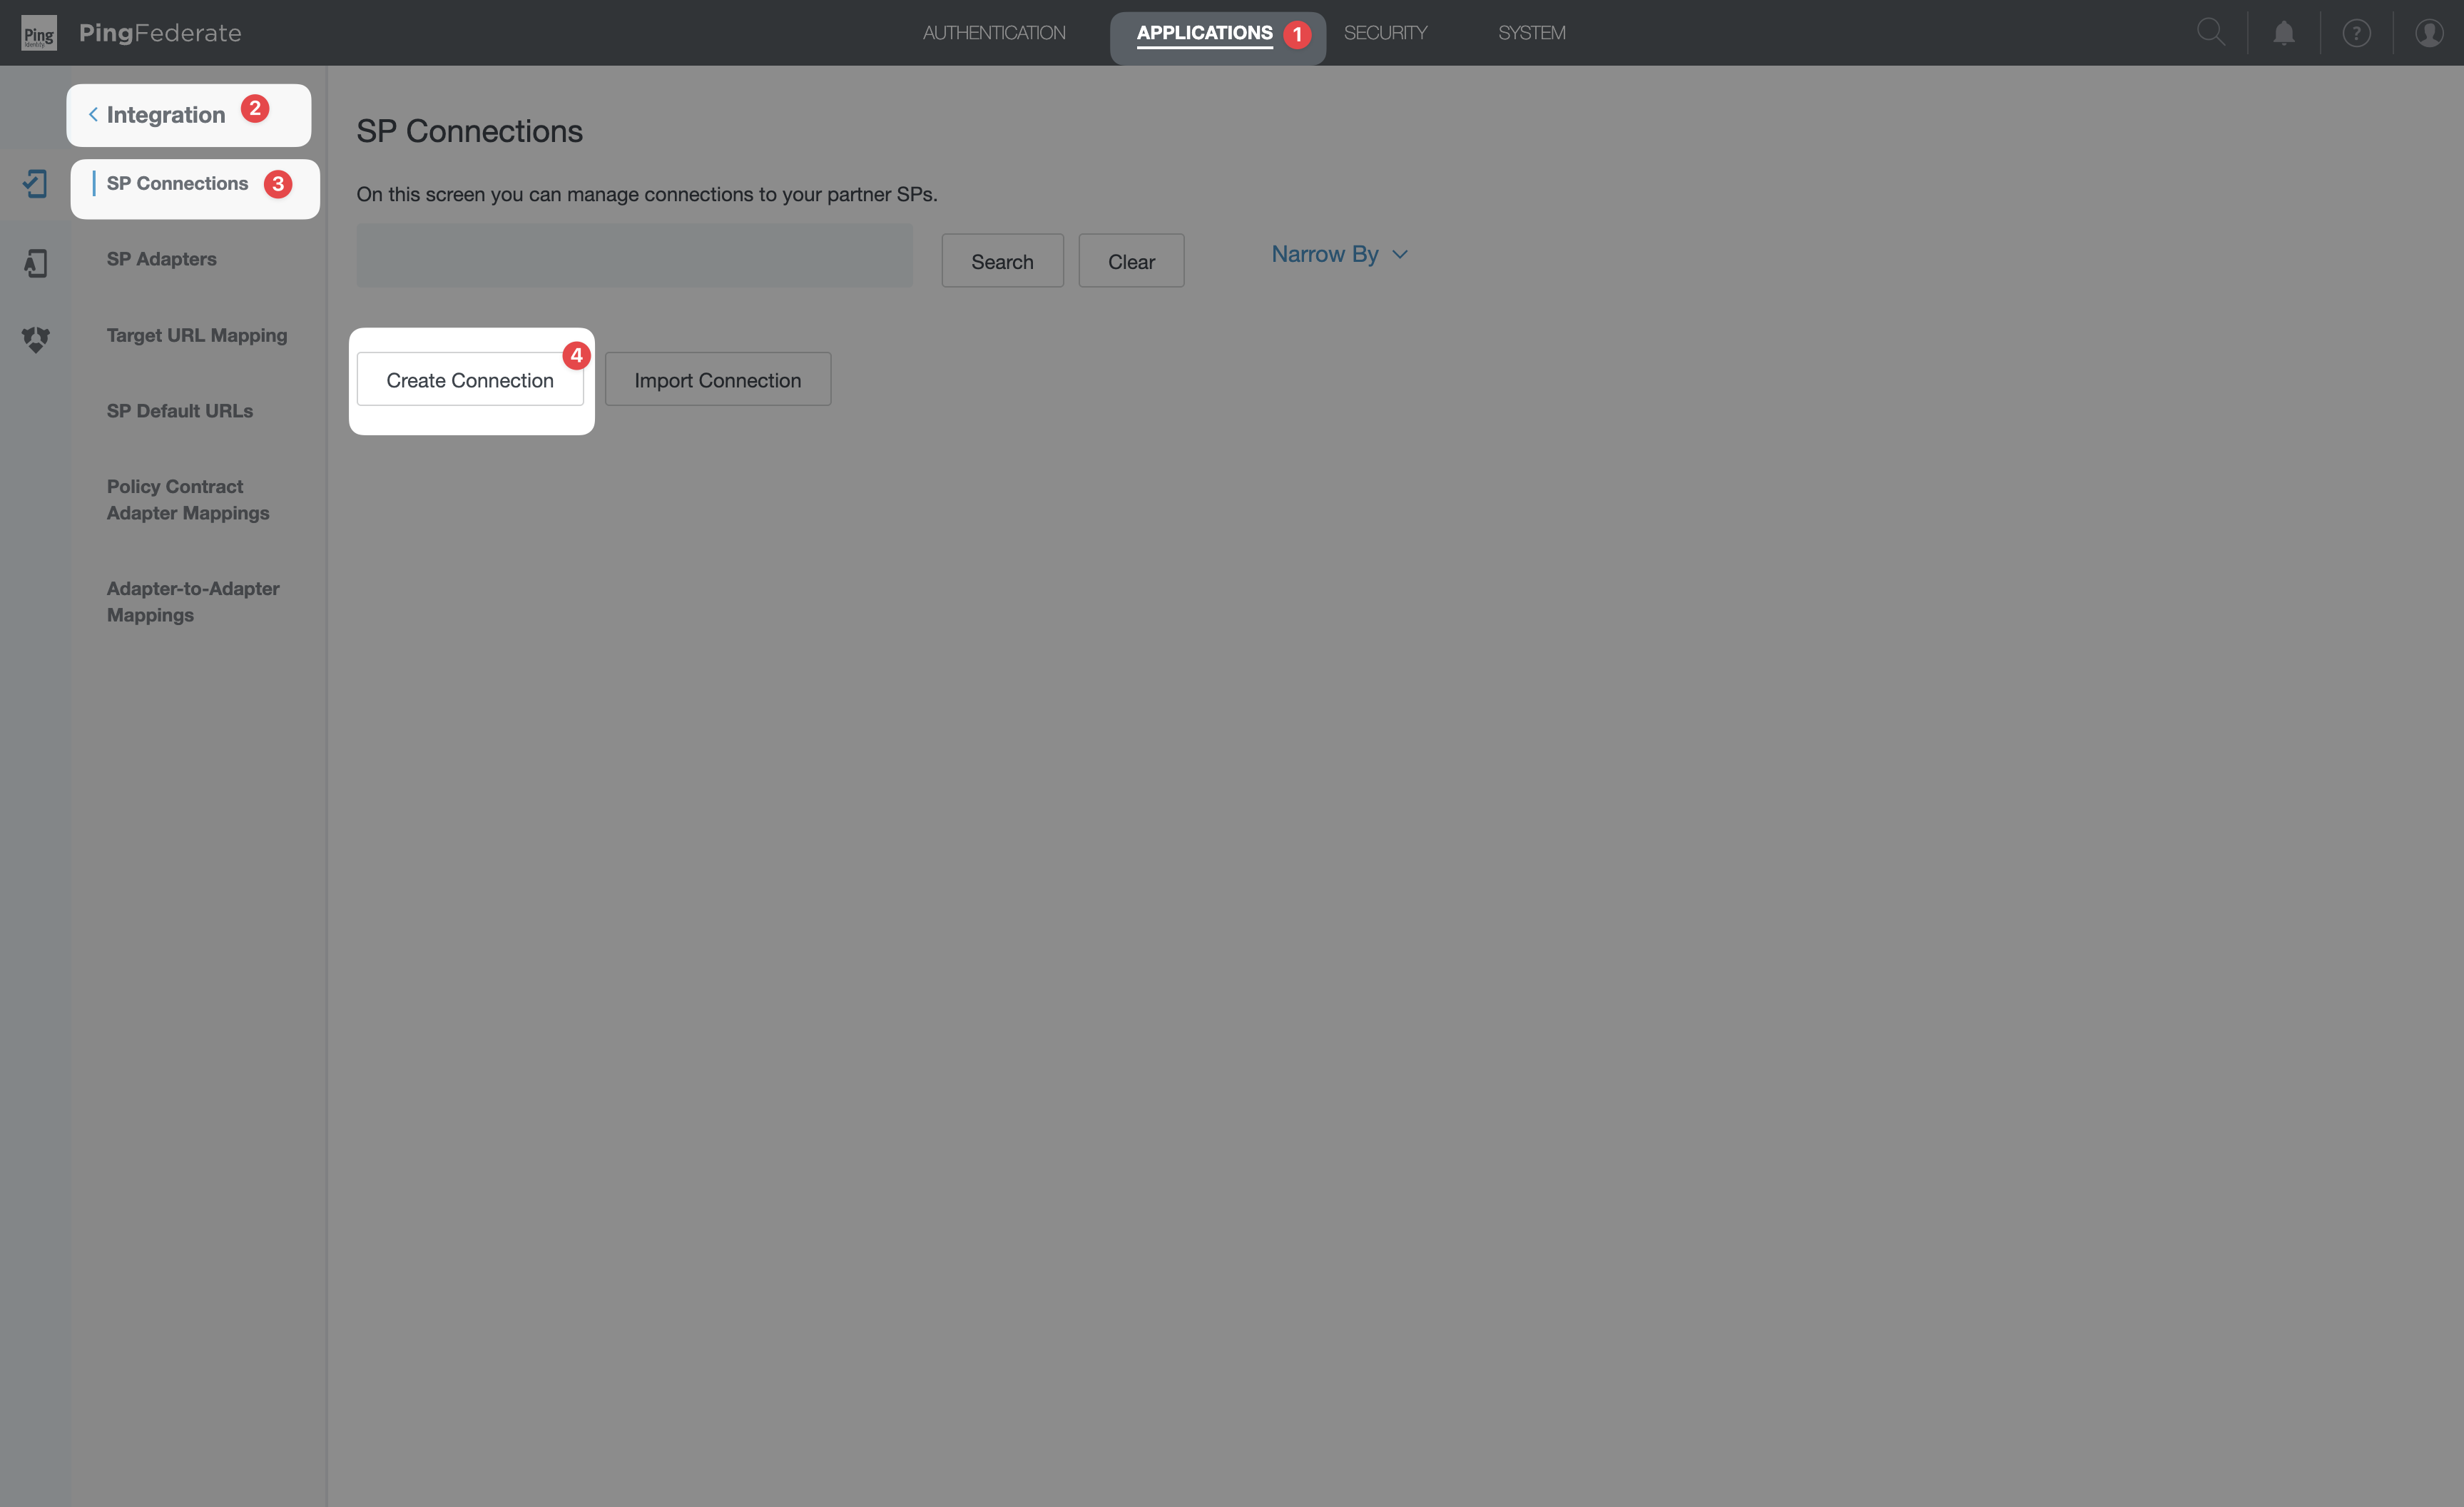 1. Connection Template tabSelect USE A TEMPLATE FOR THIS CONNECTION → from the dropdown, pick SCIM Connector → Next.
 2. Connection Type tab
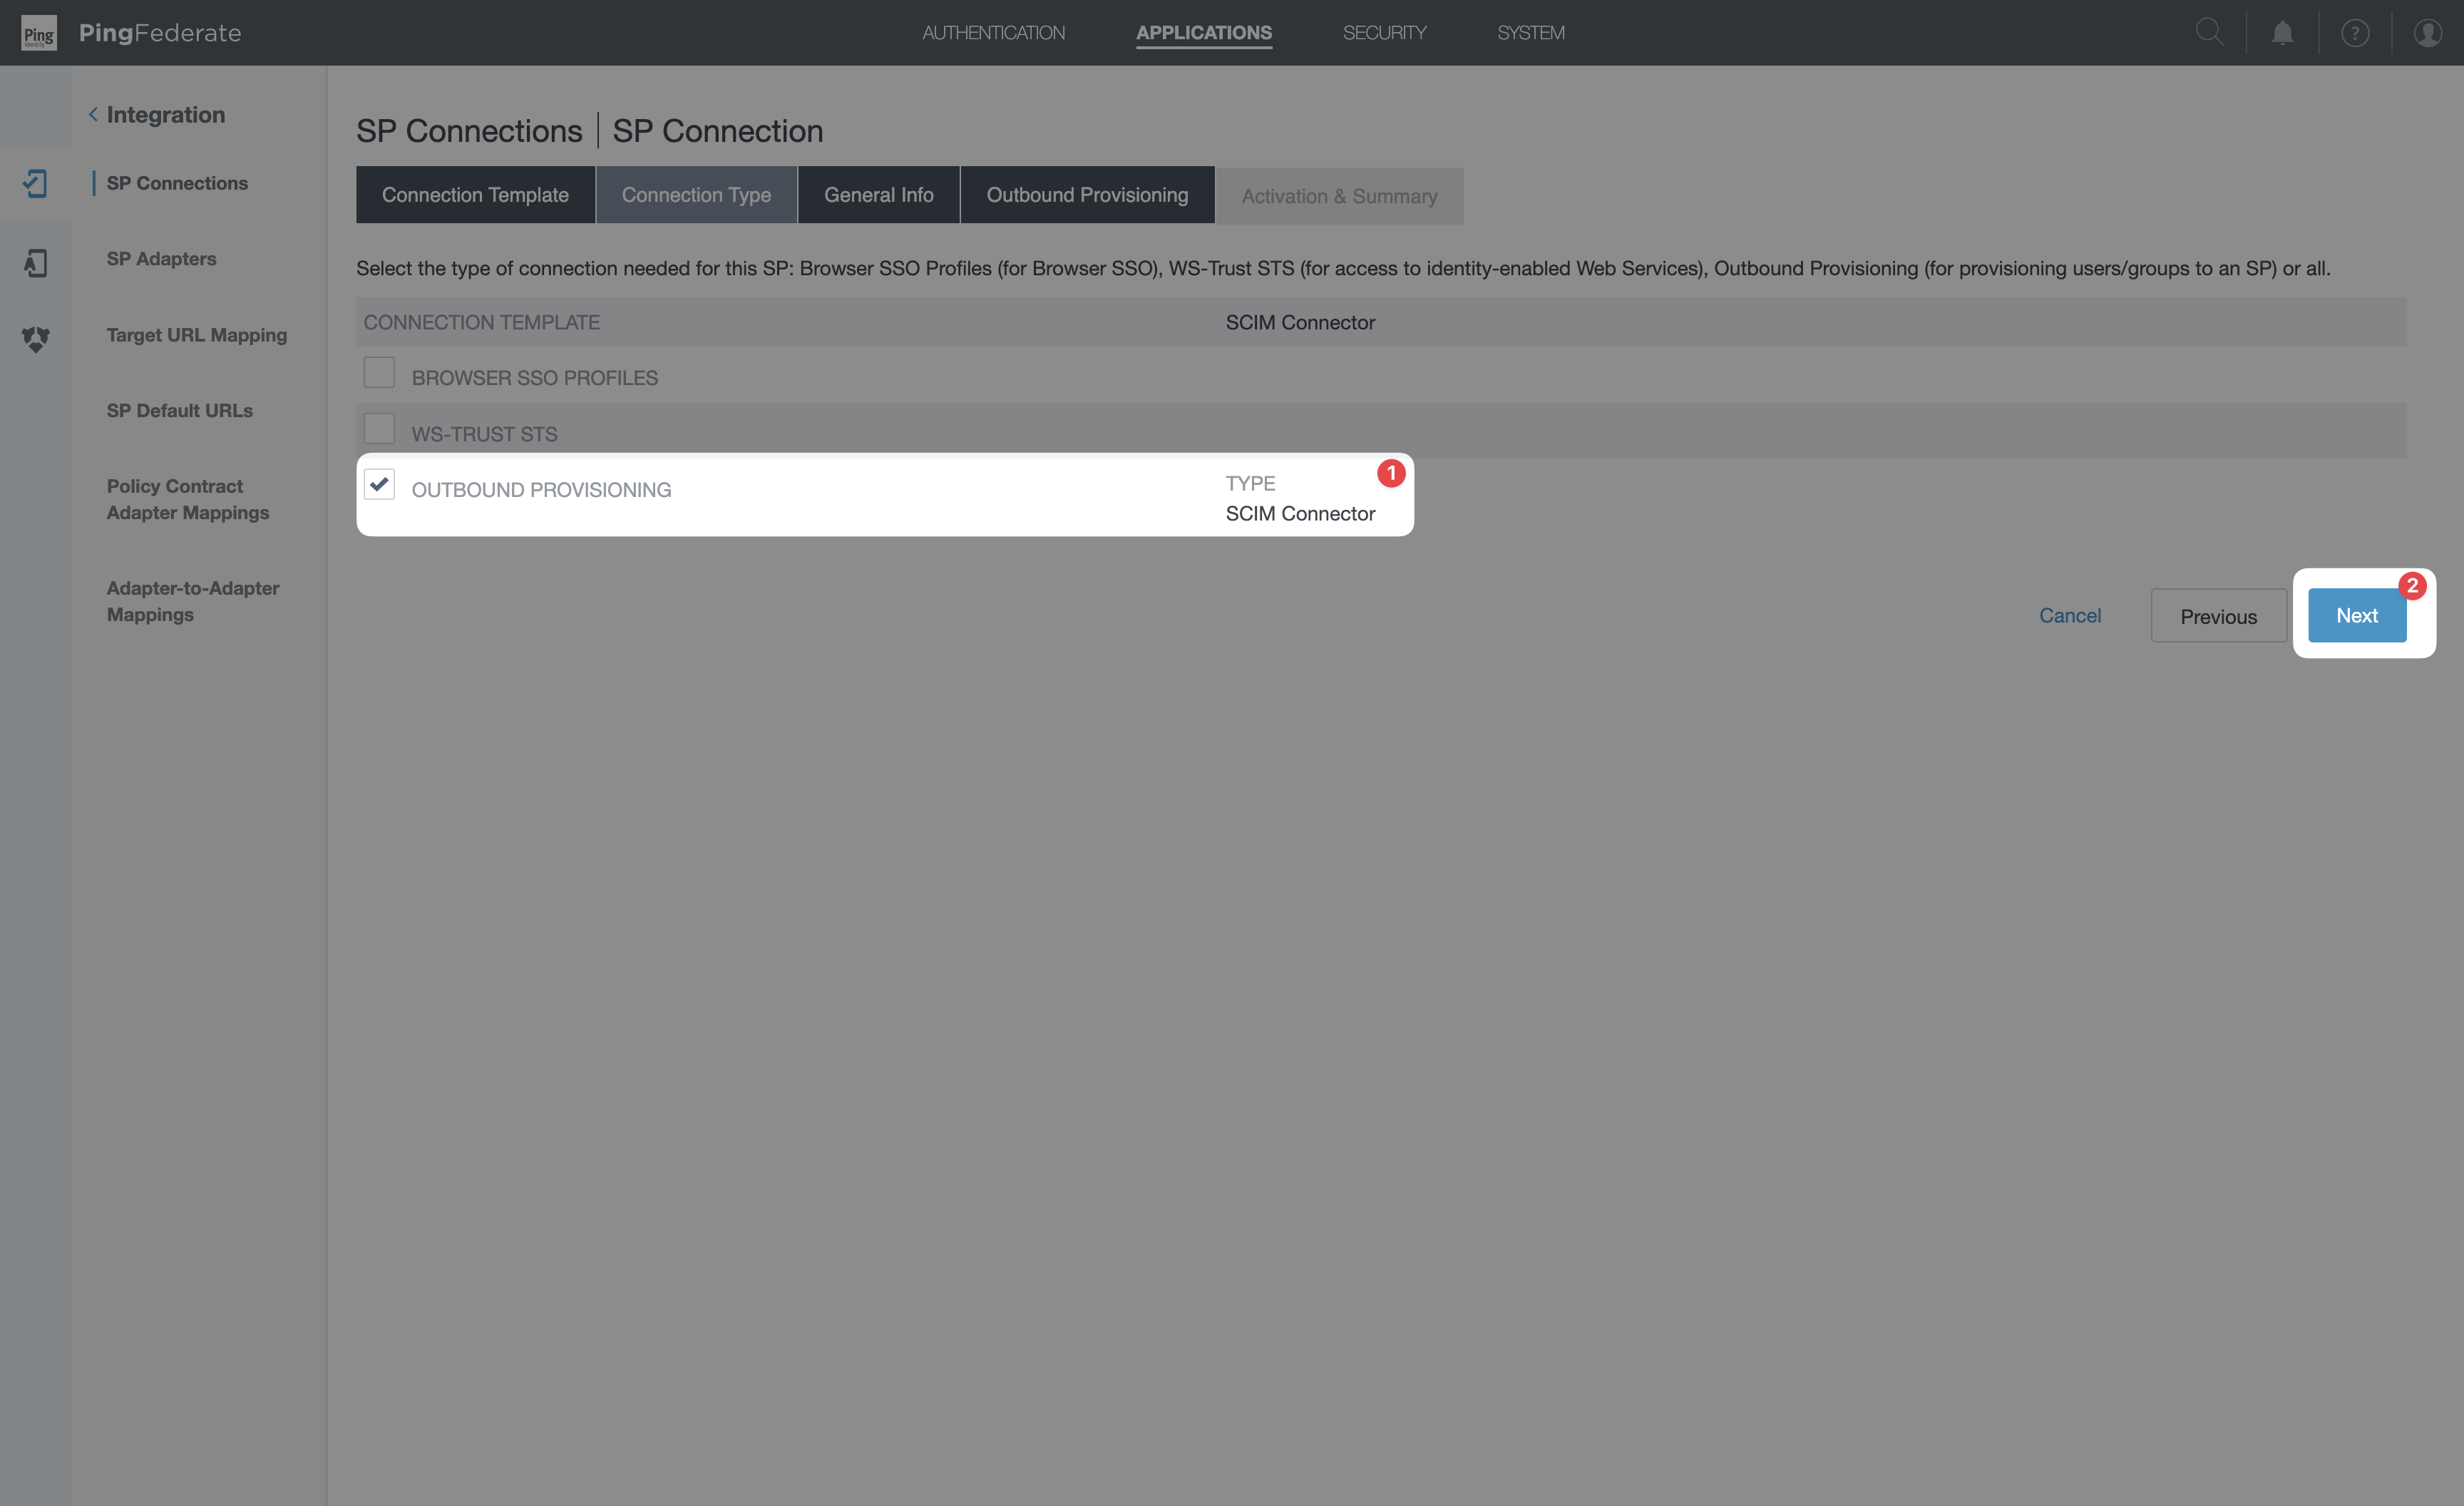
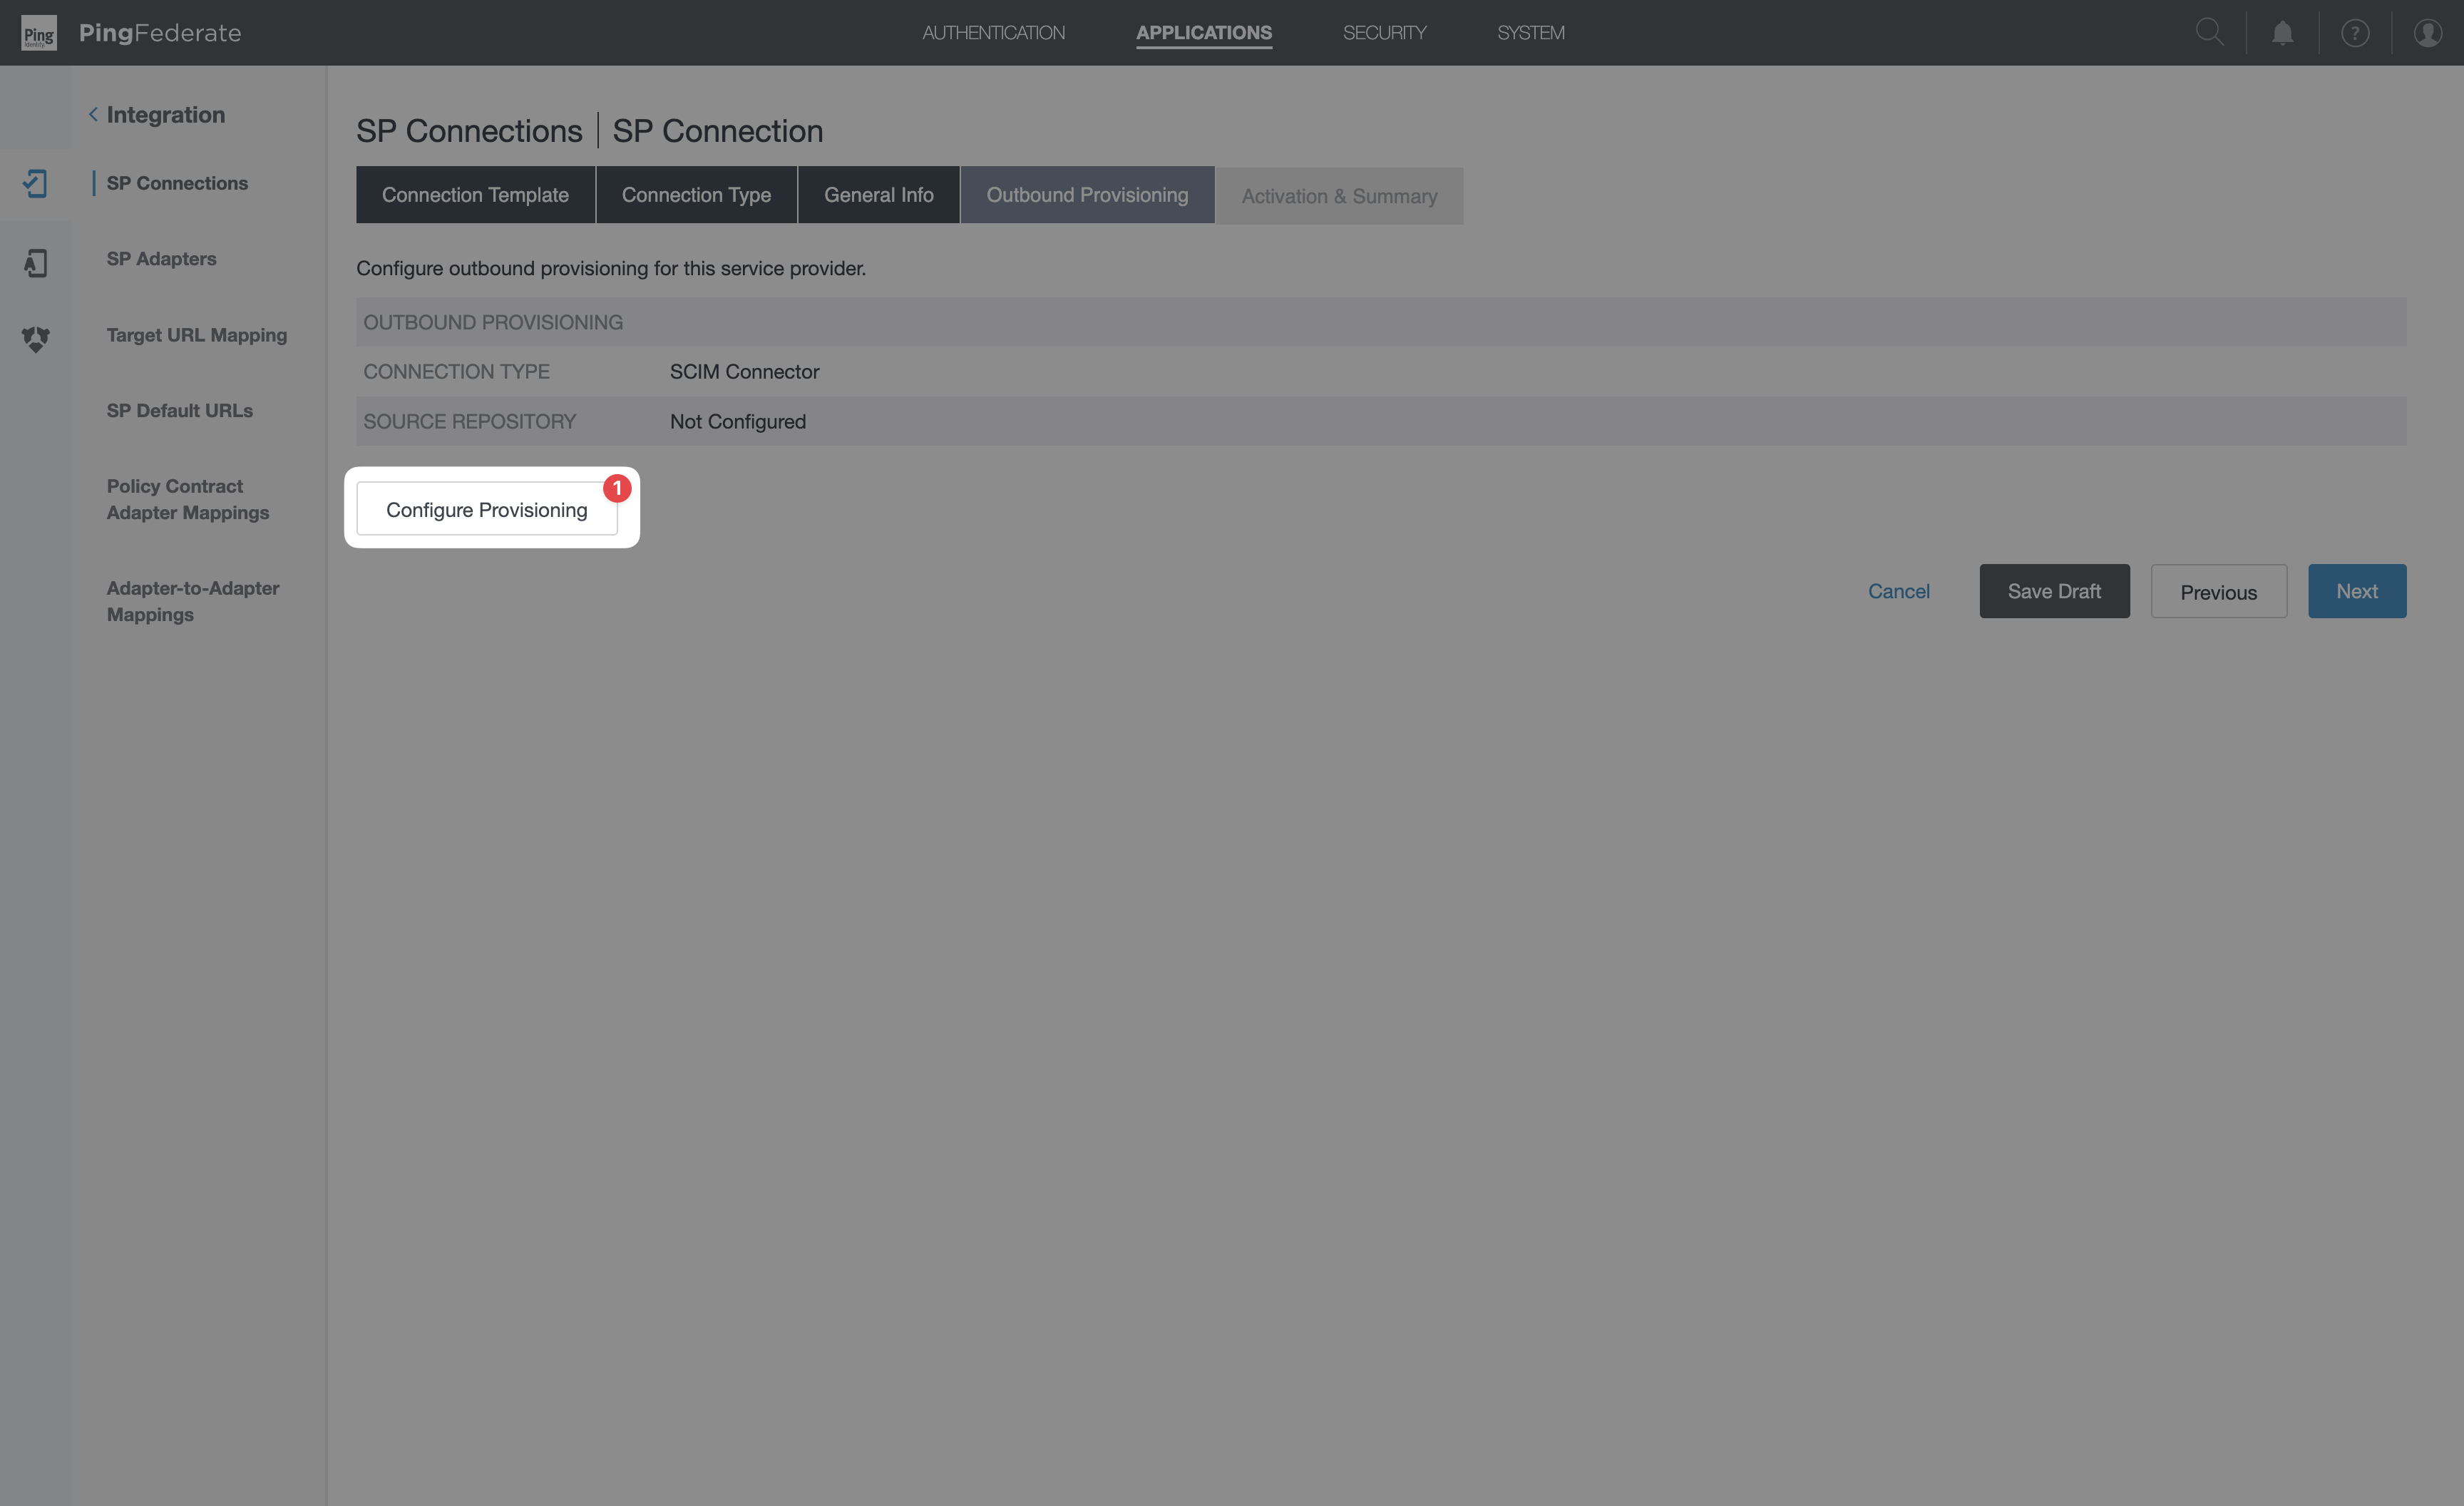
1. Connection Template tabSelect USE A TEMPLATE FOR THIS CONNECTION → from the dropdown, pick SCIM Connector → Next.2. Connection Type tab- Check Outbound Provisioning.
- The Type dropdown that appears next to Outbound Provisioning should say SCIM Connector.
-
Click Next.
-
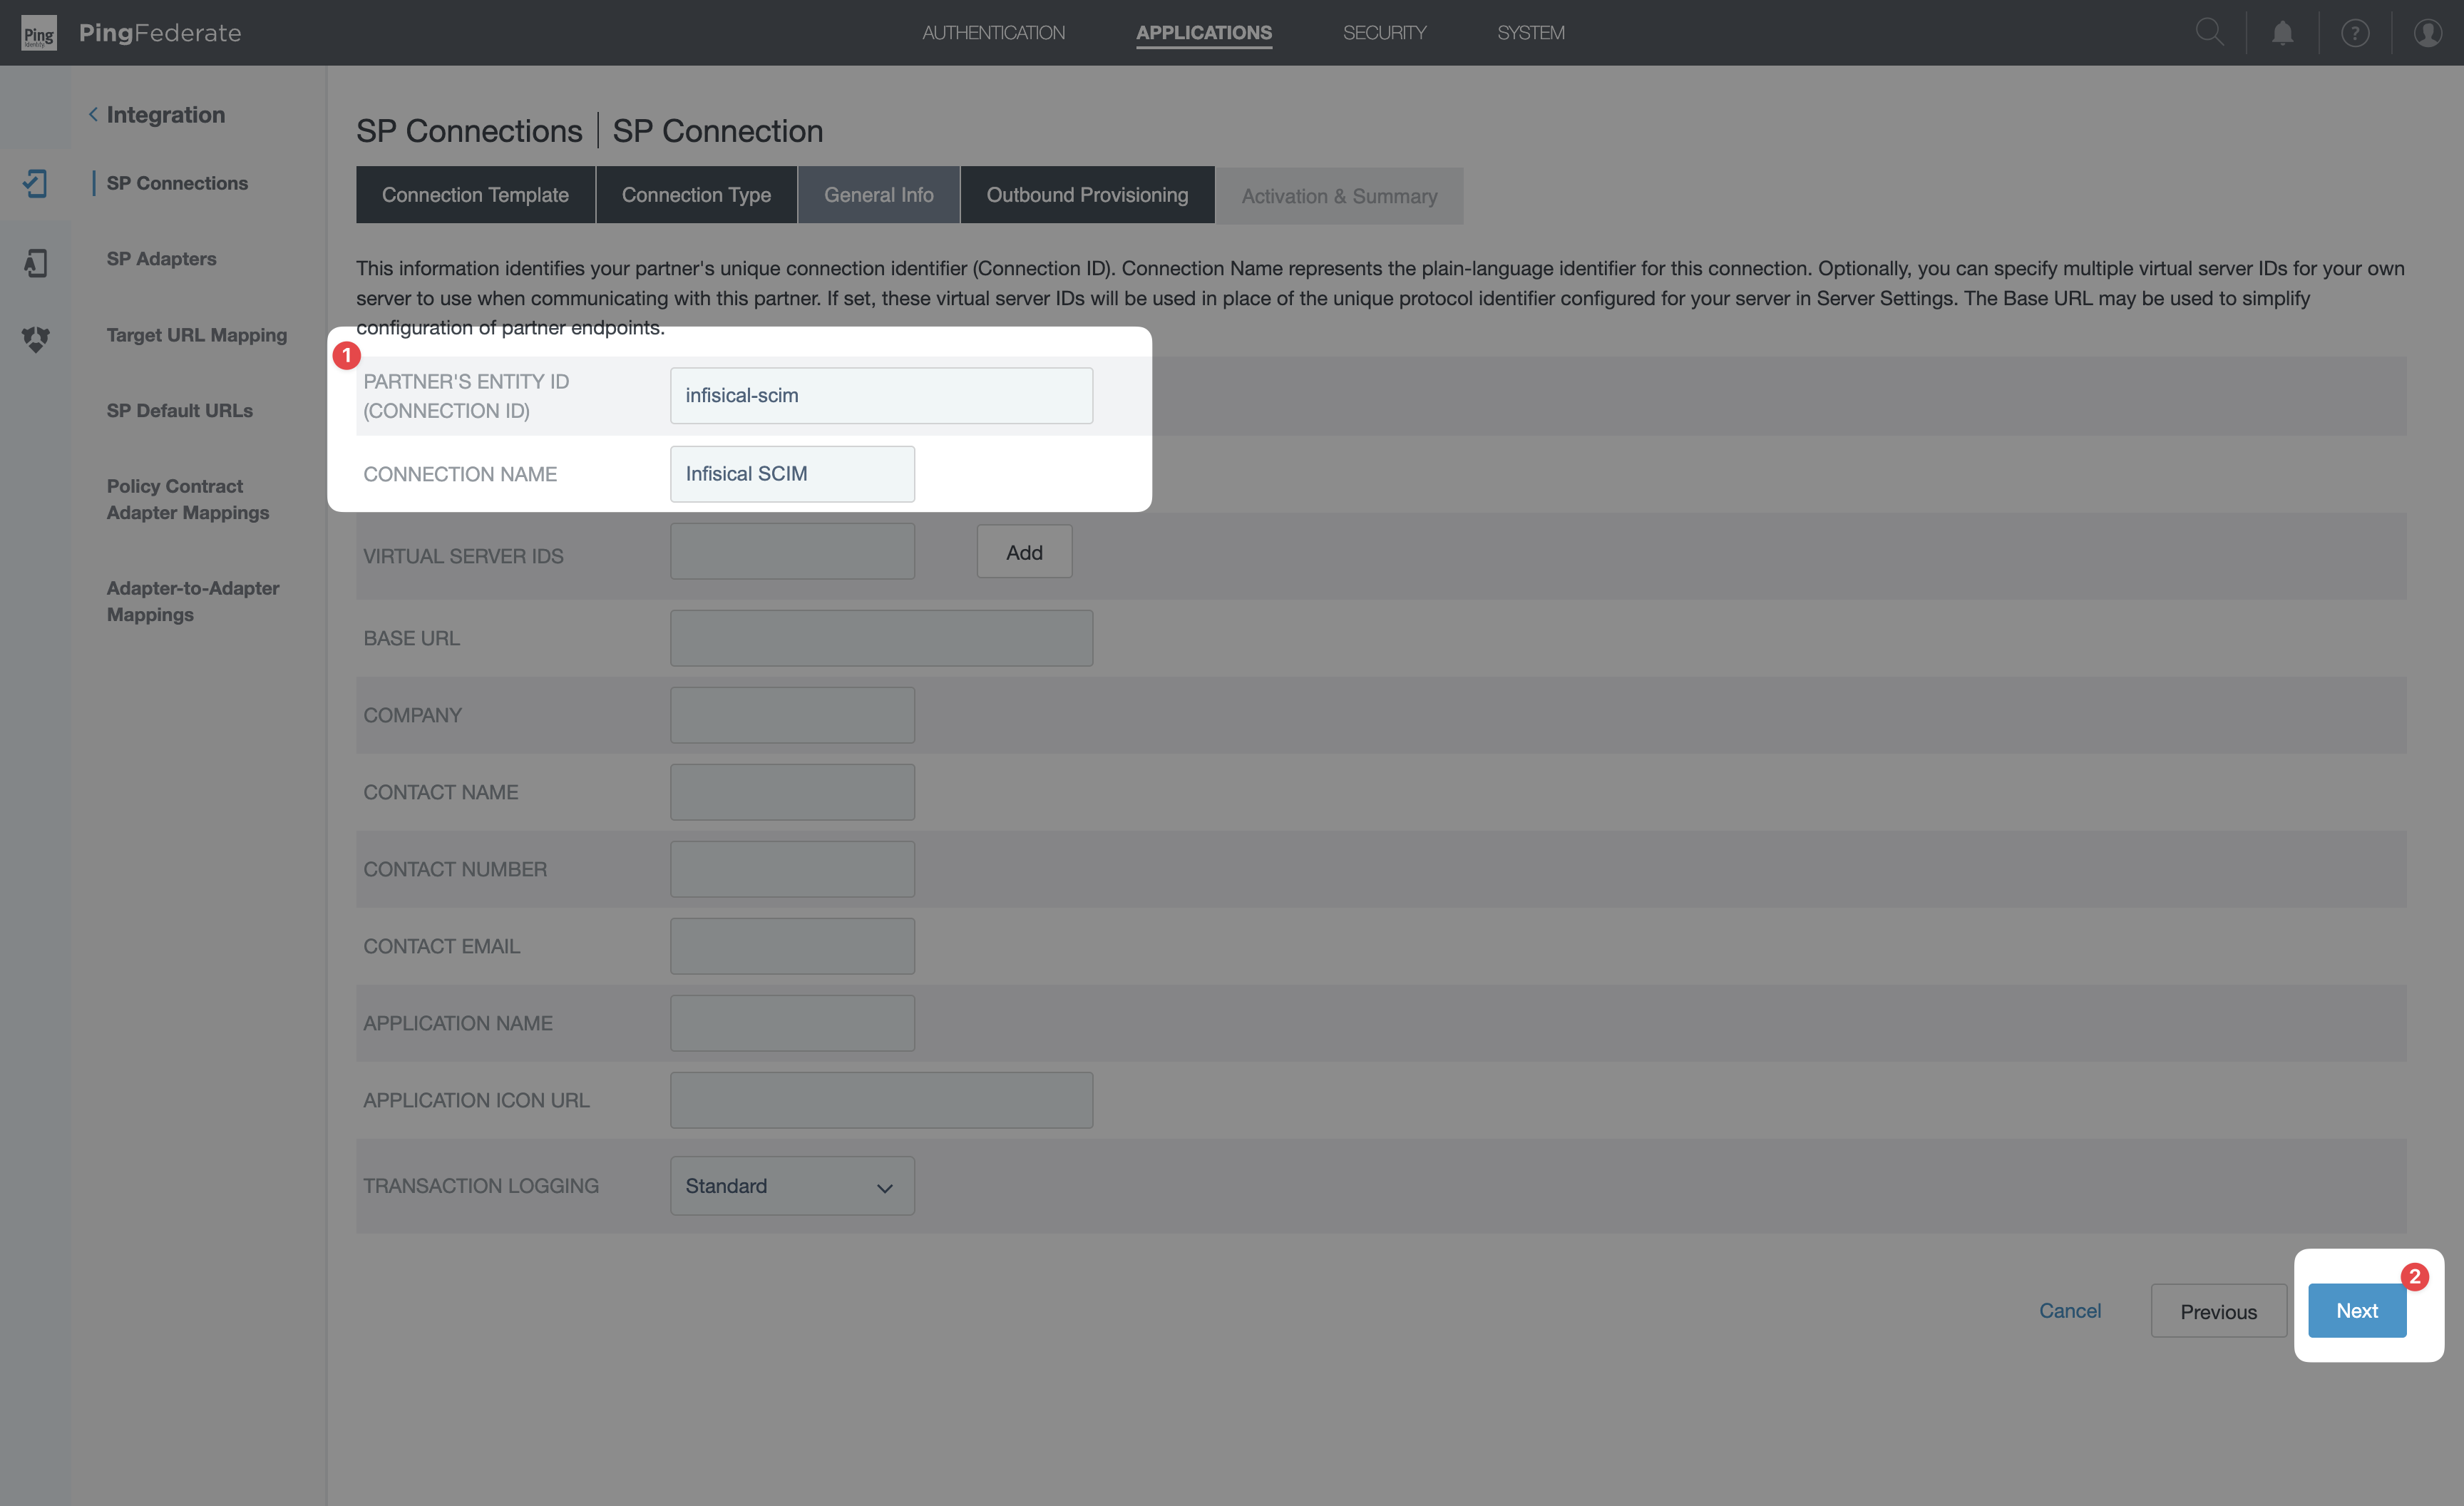
Partner’s Entity ID (Connection ID): e.g.
infisical-scim. -
Connection Name: e.g.
Infisical SCIM. - Leave the rest (Base URL, Company, Contact, Application metadata) empty or default.
-
Click Next.
7
Configure the SCIM target
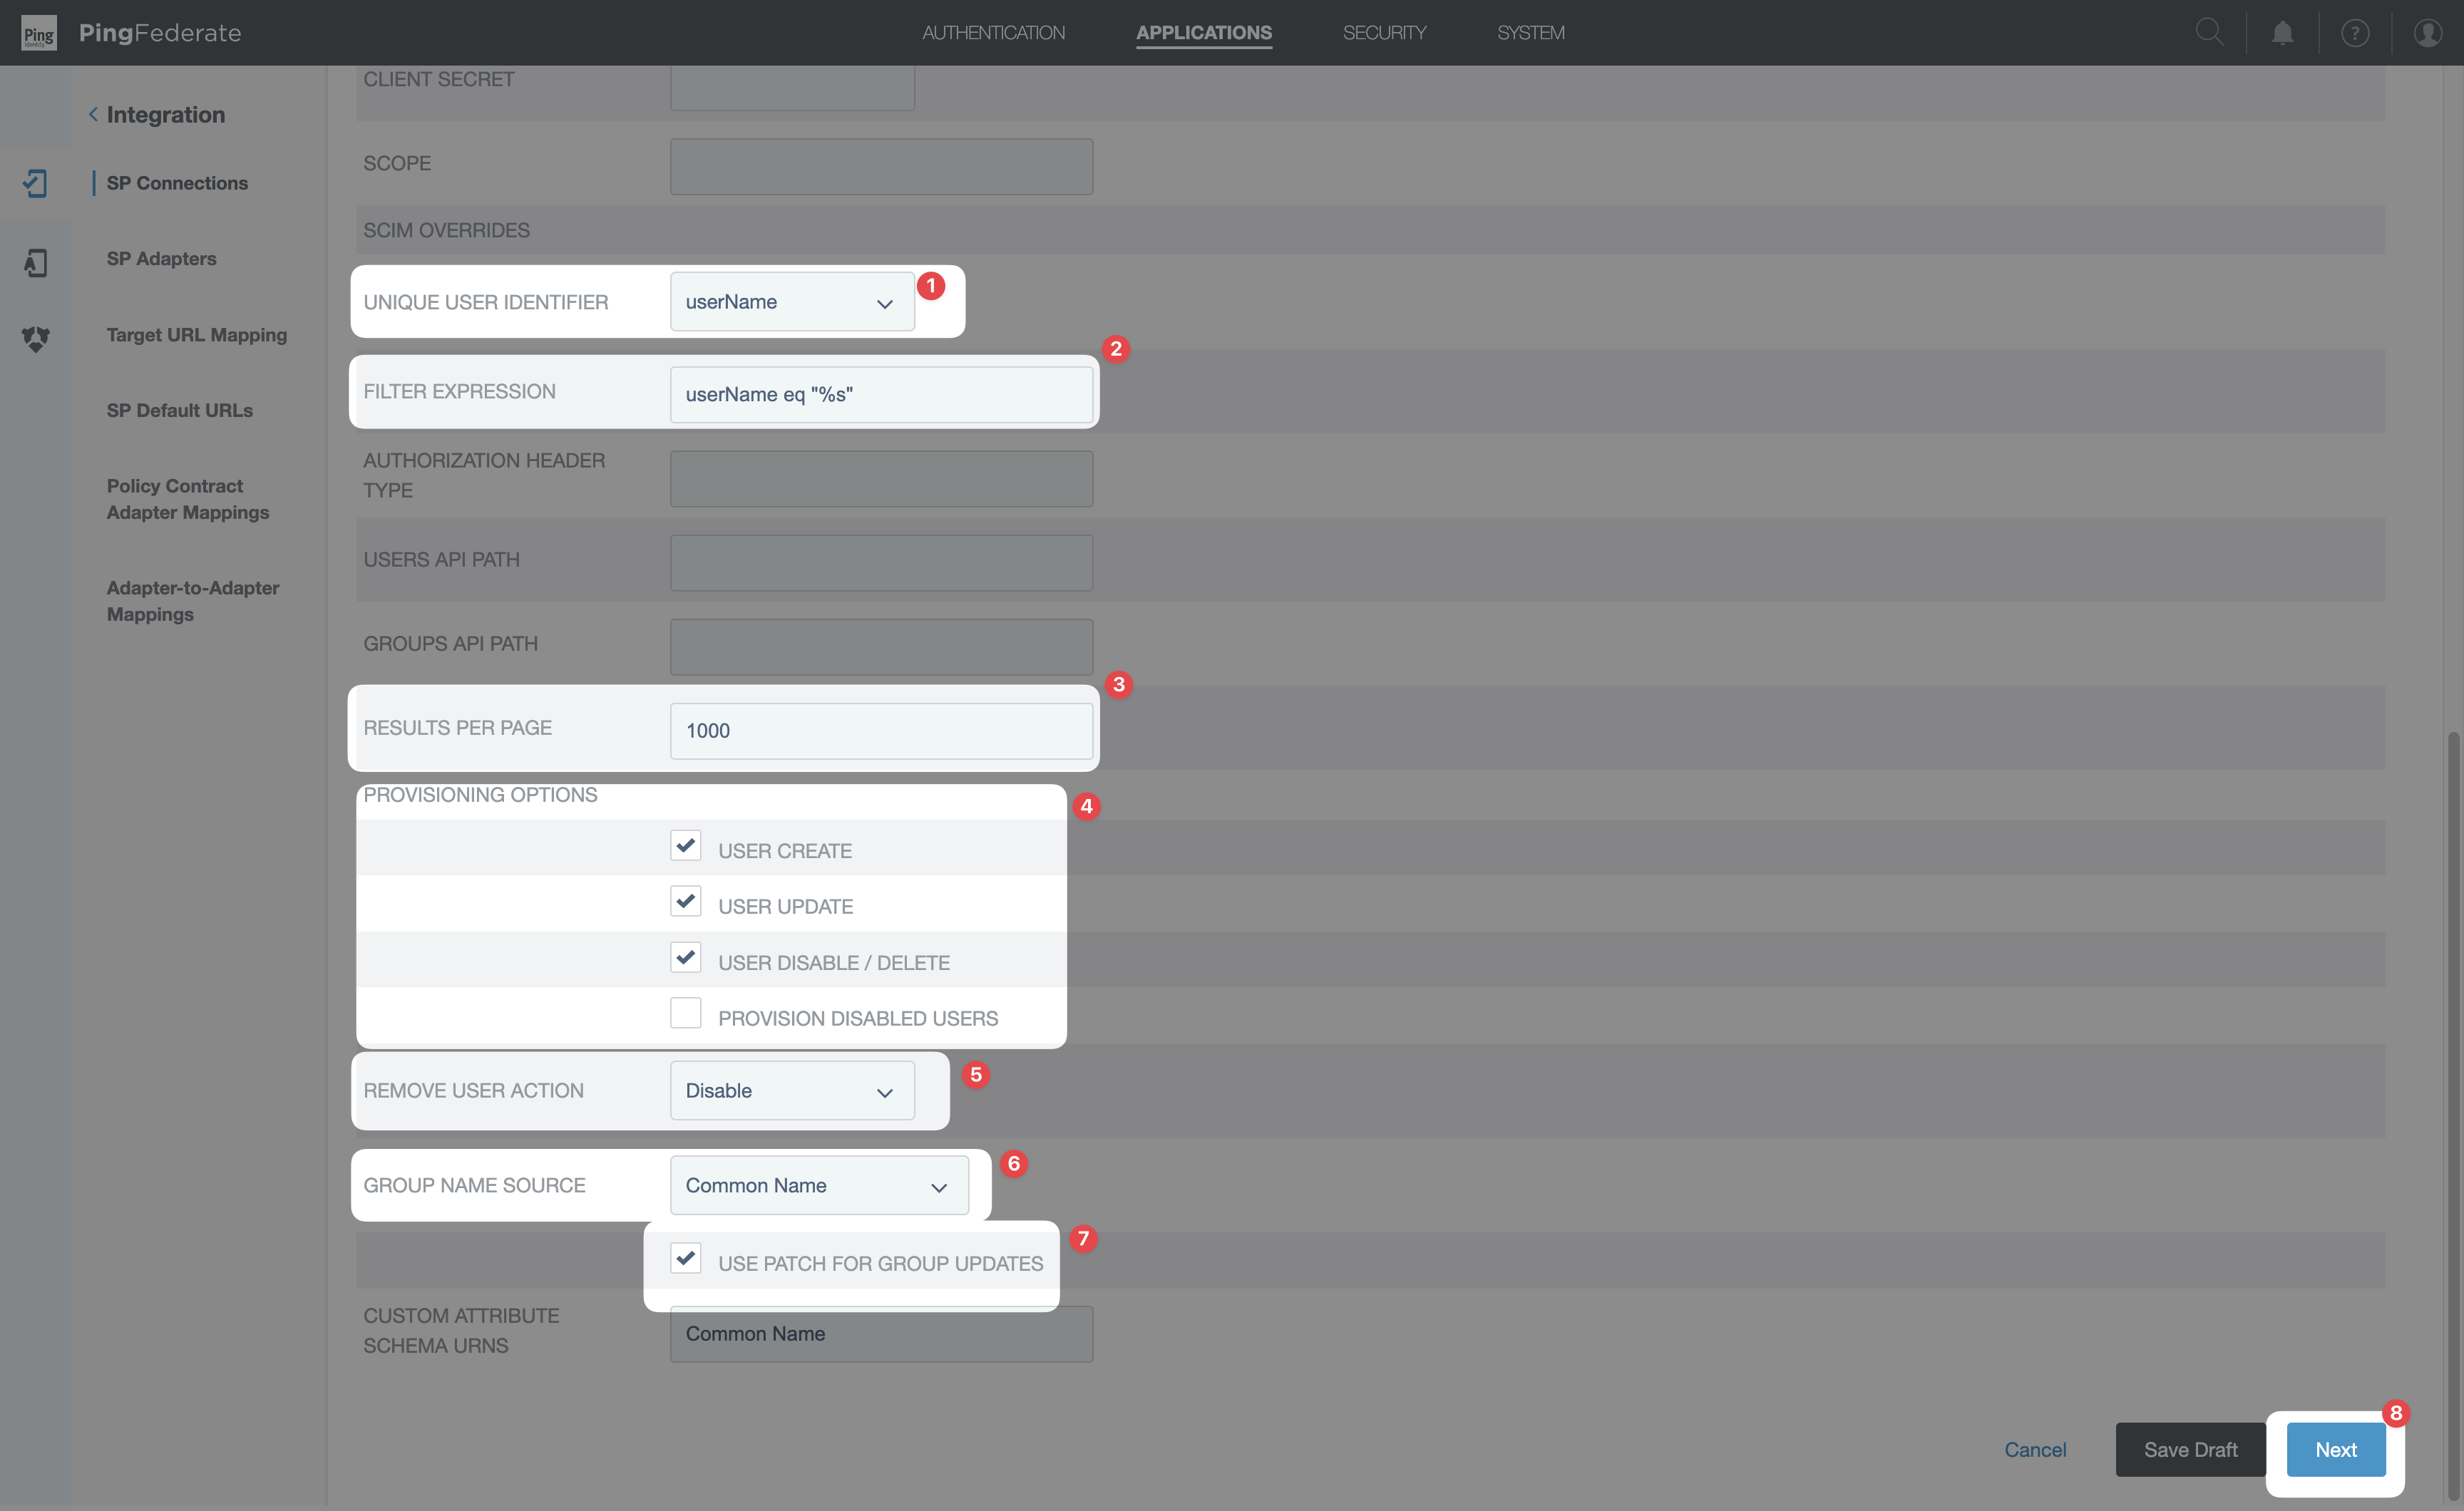
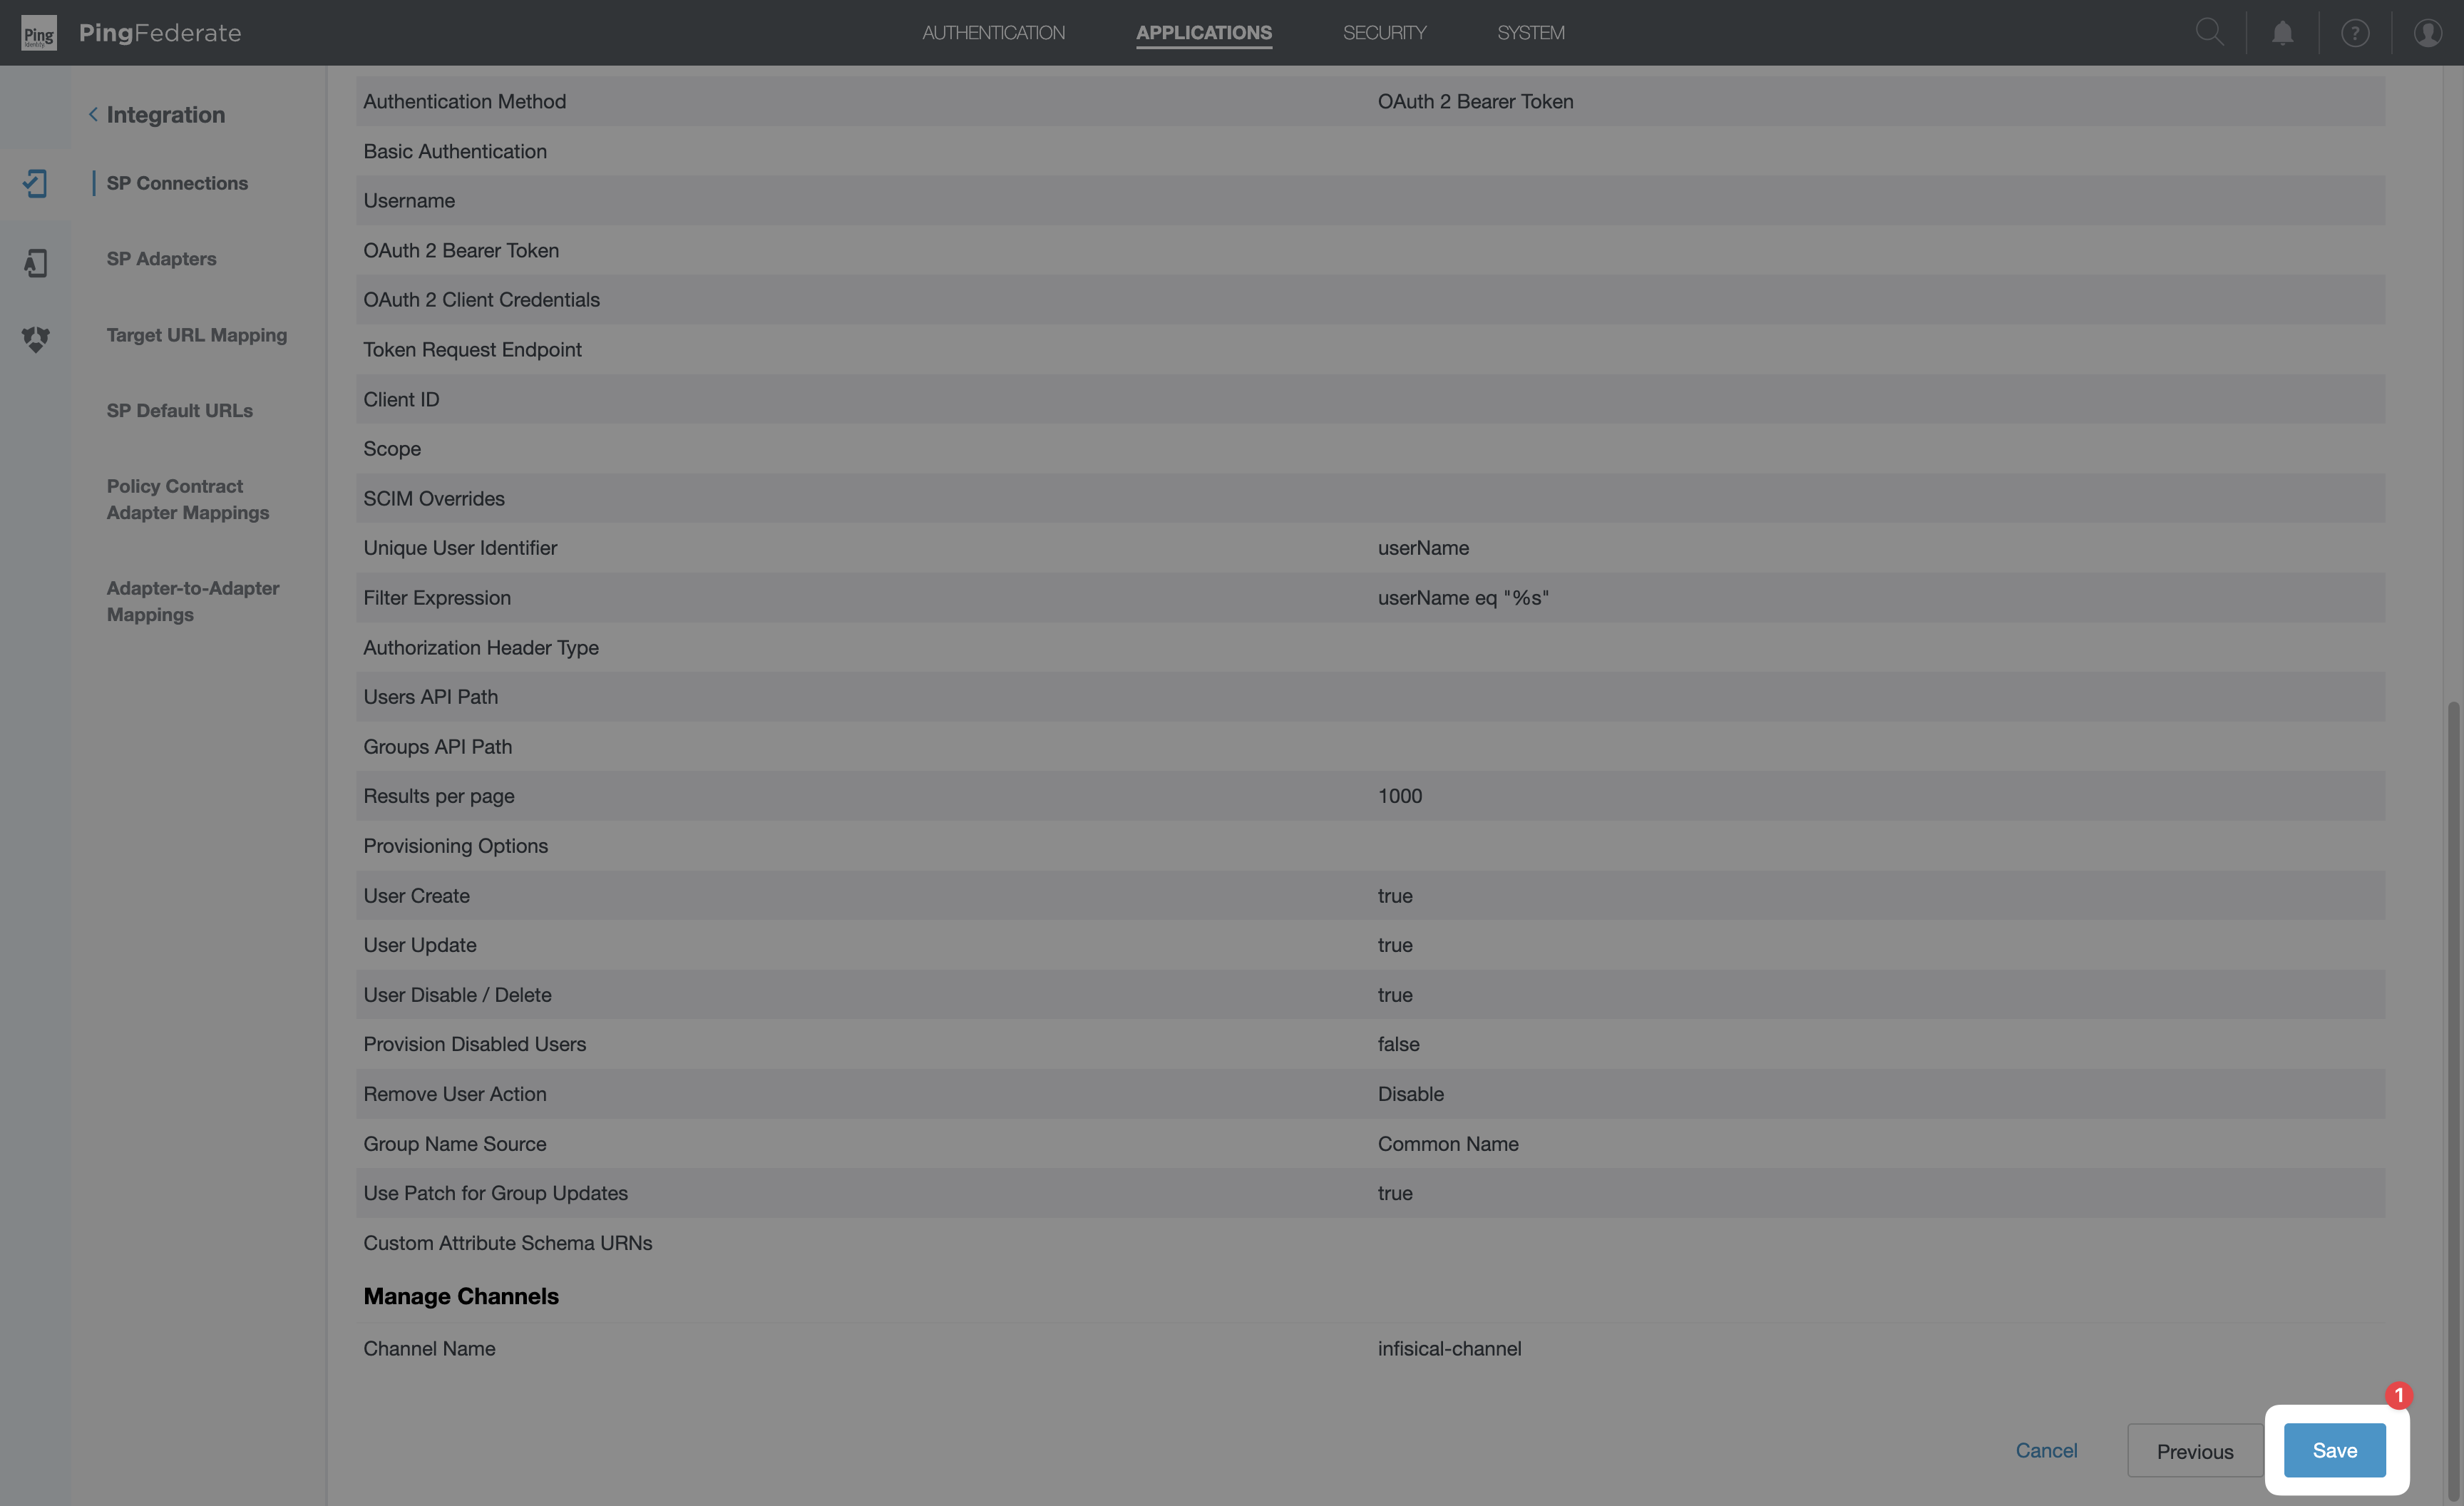
Inside the Configure Provisioning wizard, the first tab is Target — this is where you tell PingFederate how to reach Infisical.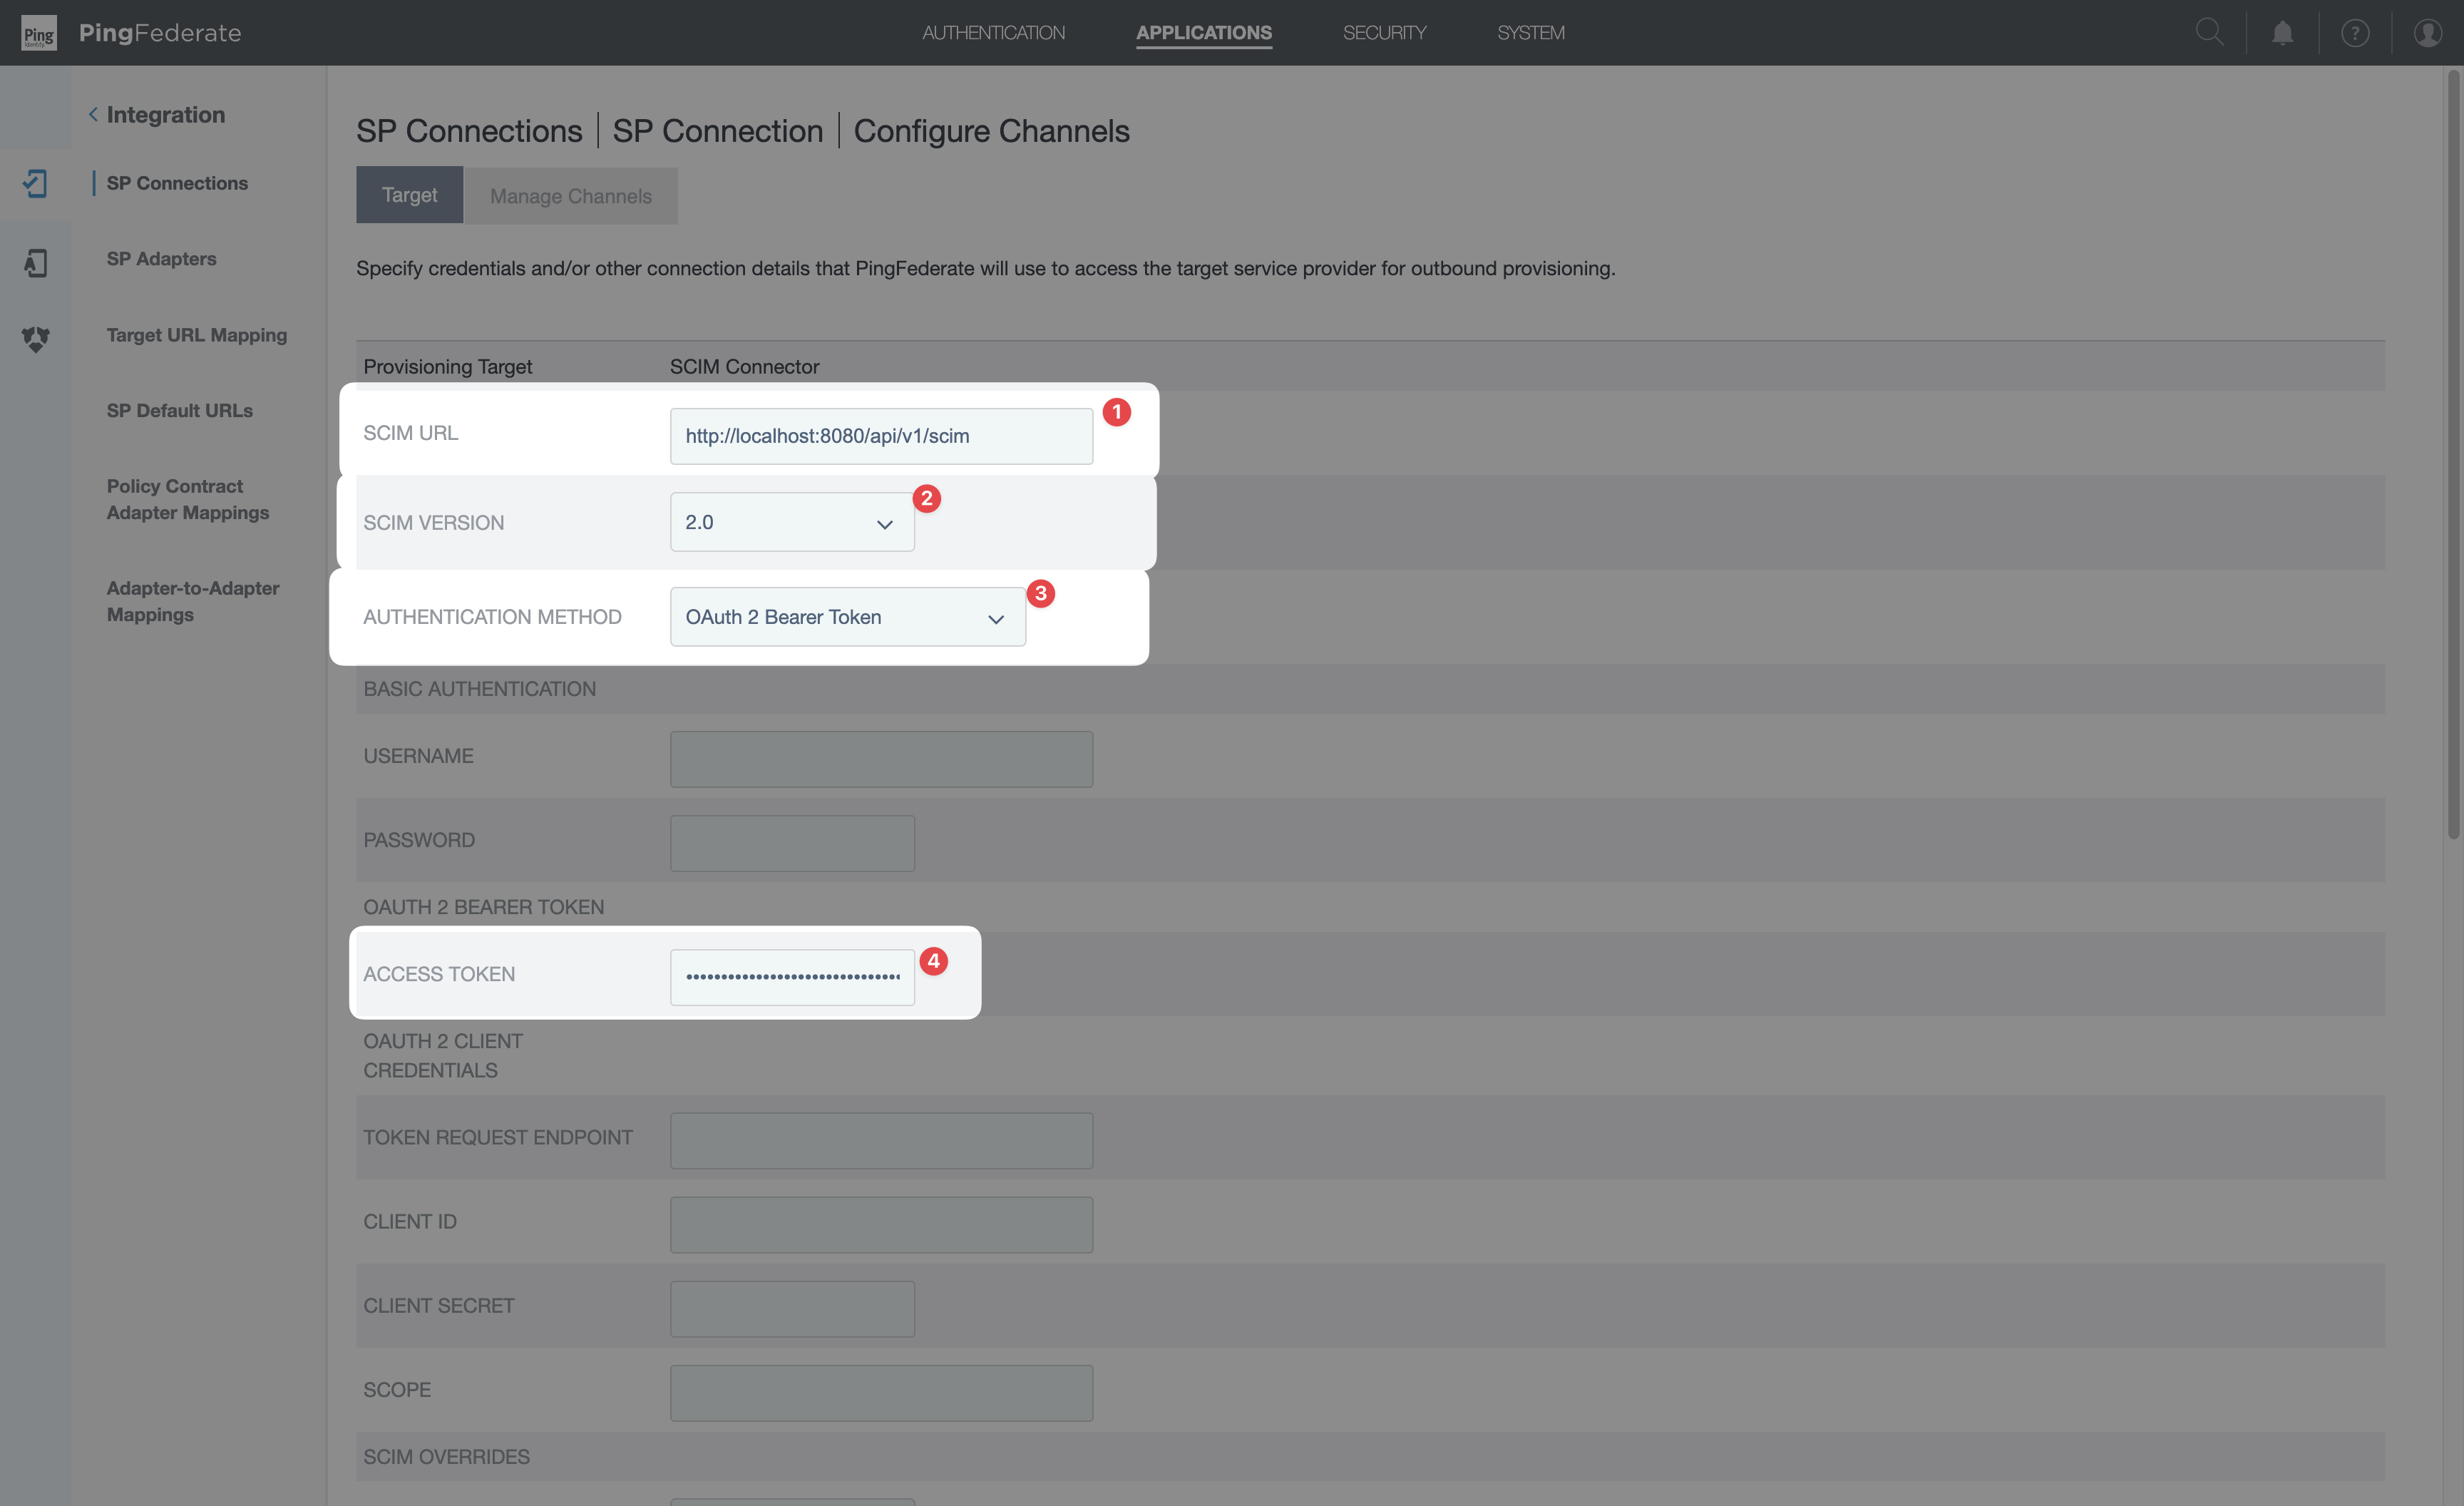
 Click Next to move on to the channel configuration.
Leave the Basic Authentication and OAuth 2 Client Credentials sections empty — only OAuth 2 Bearer Token is used.
Click Next to move on to the channel configuration.8
Configure the SCIM channel
On the Manage Channels tab, click Create. This opens the per-channel wizard with six tabs.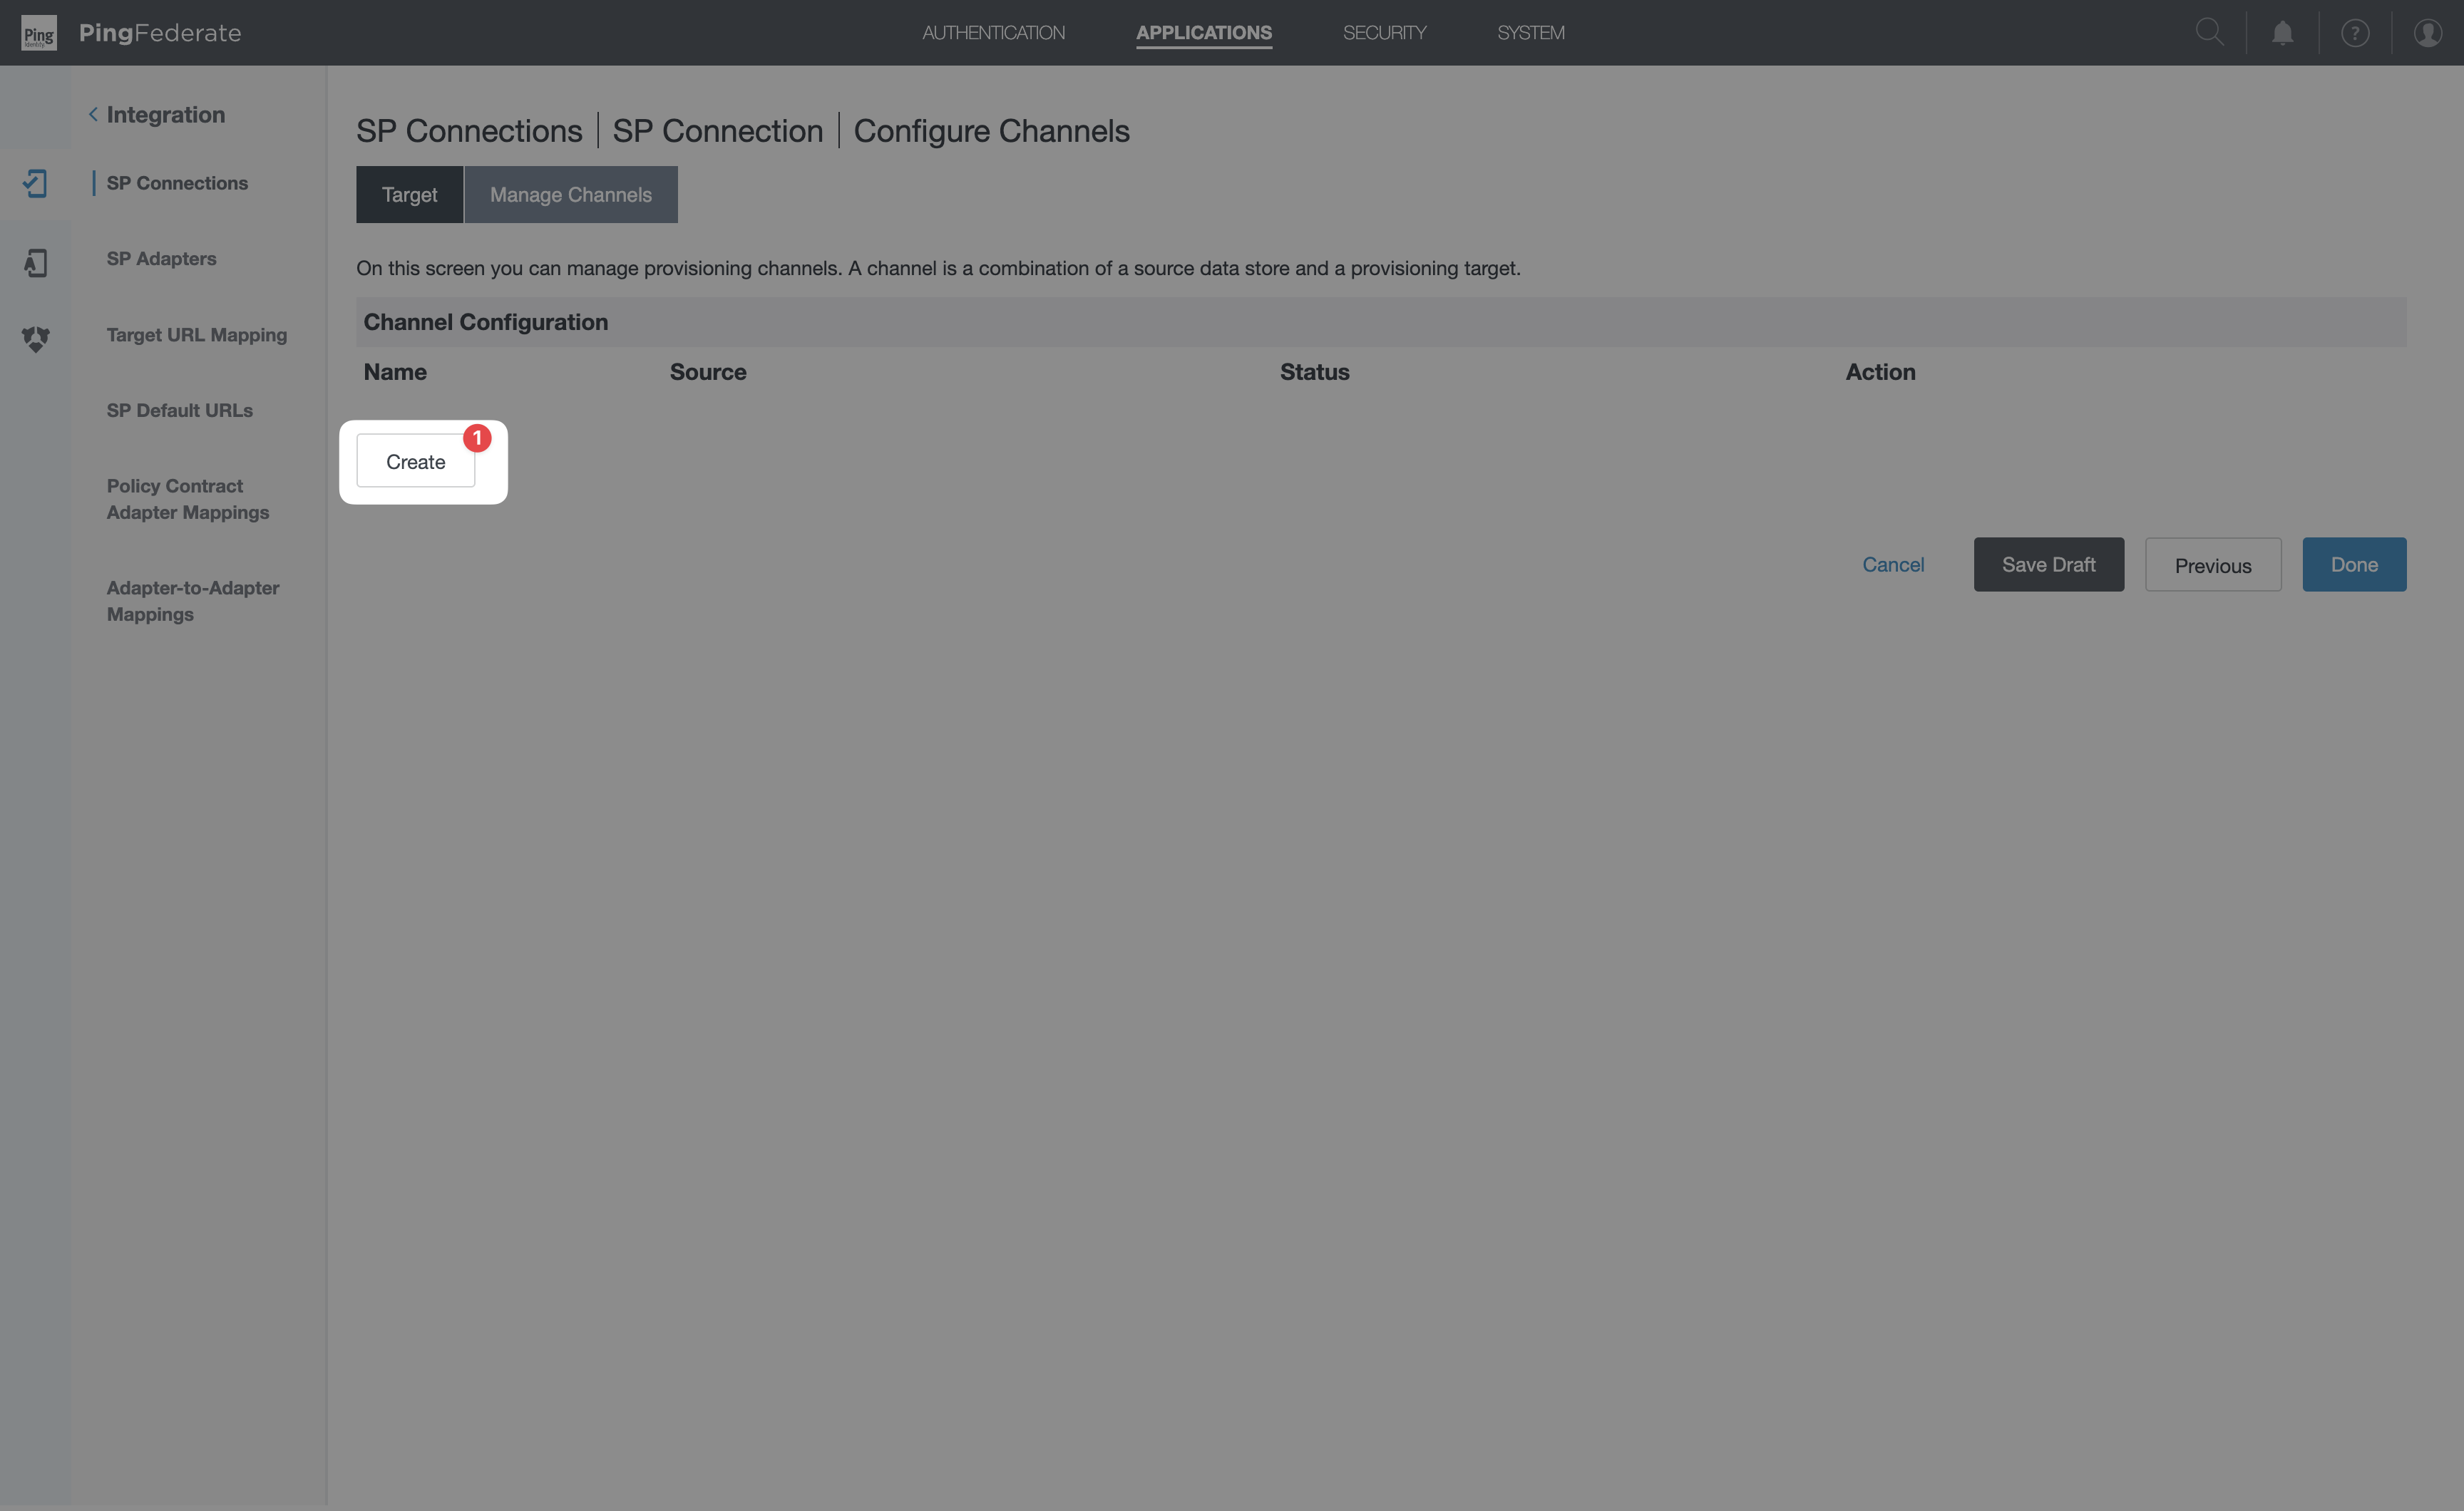 1. Channel Info
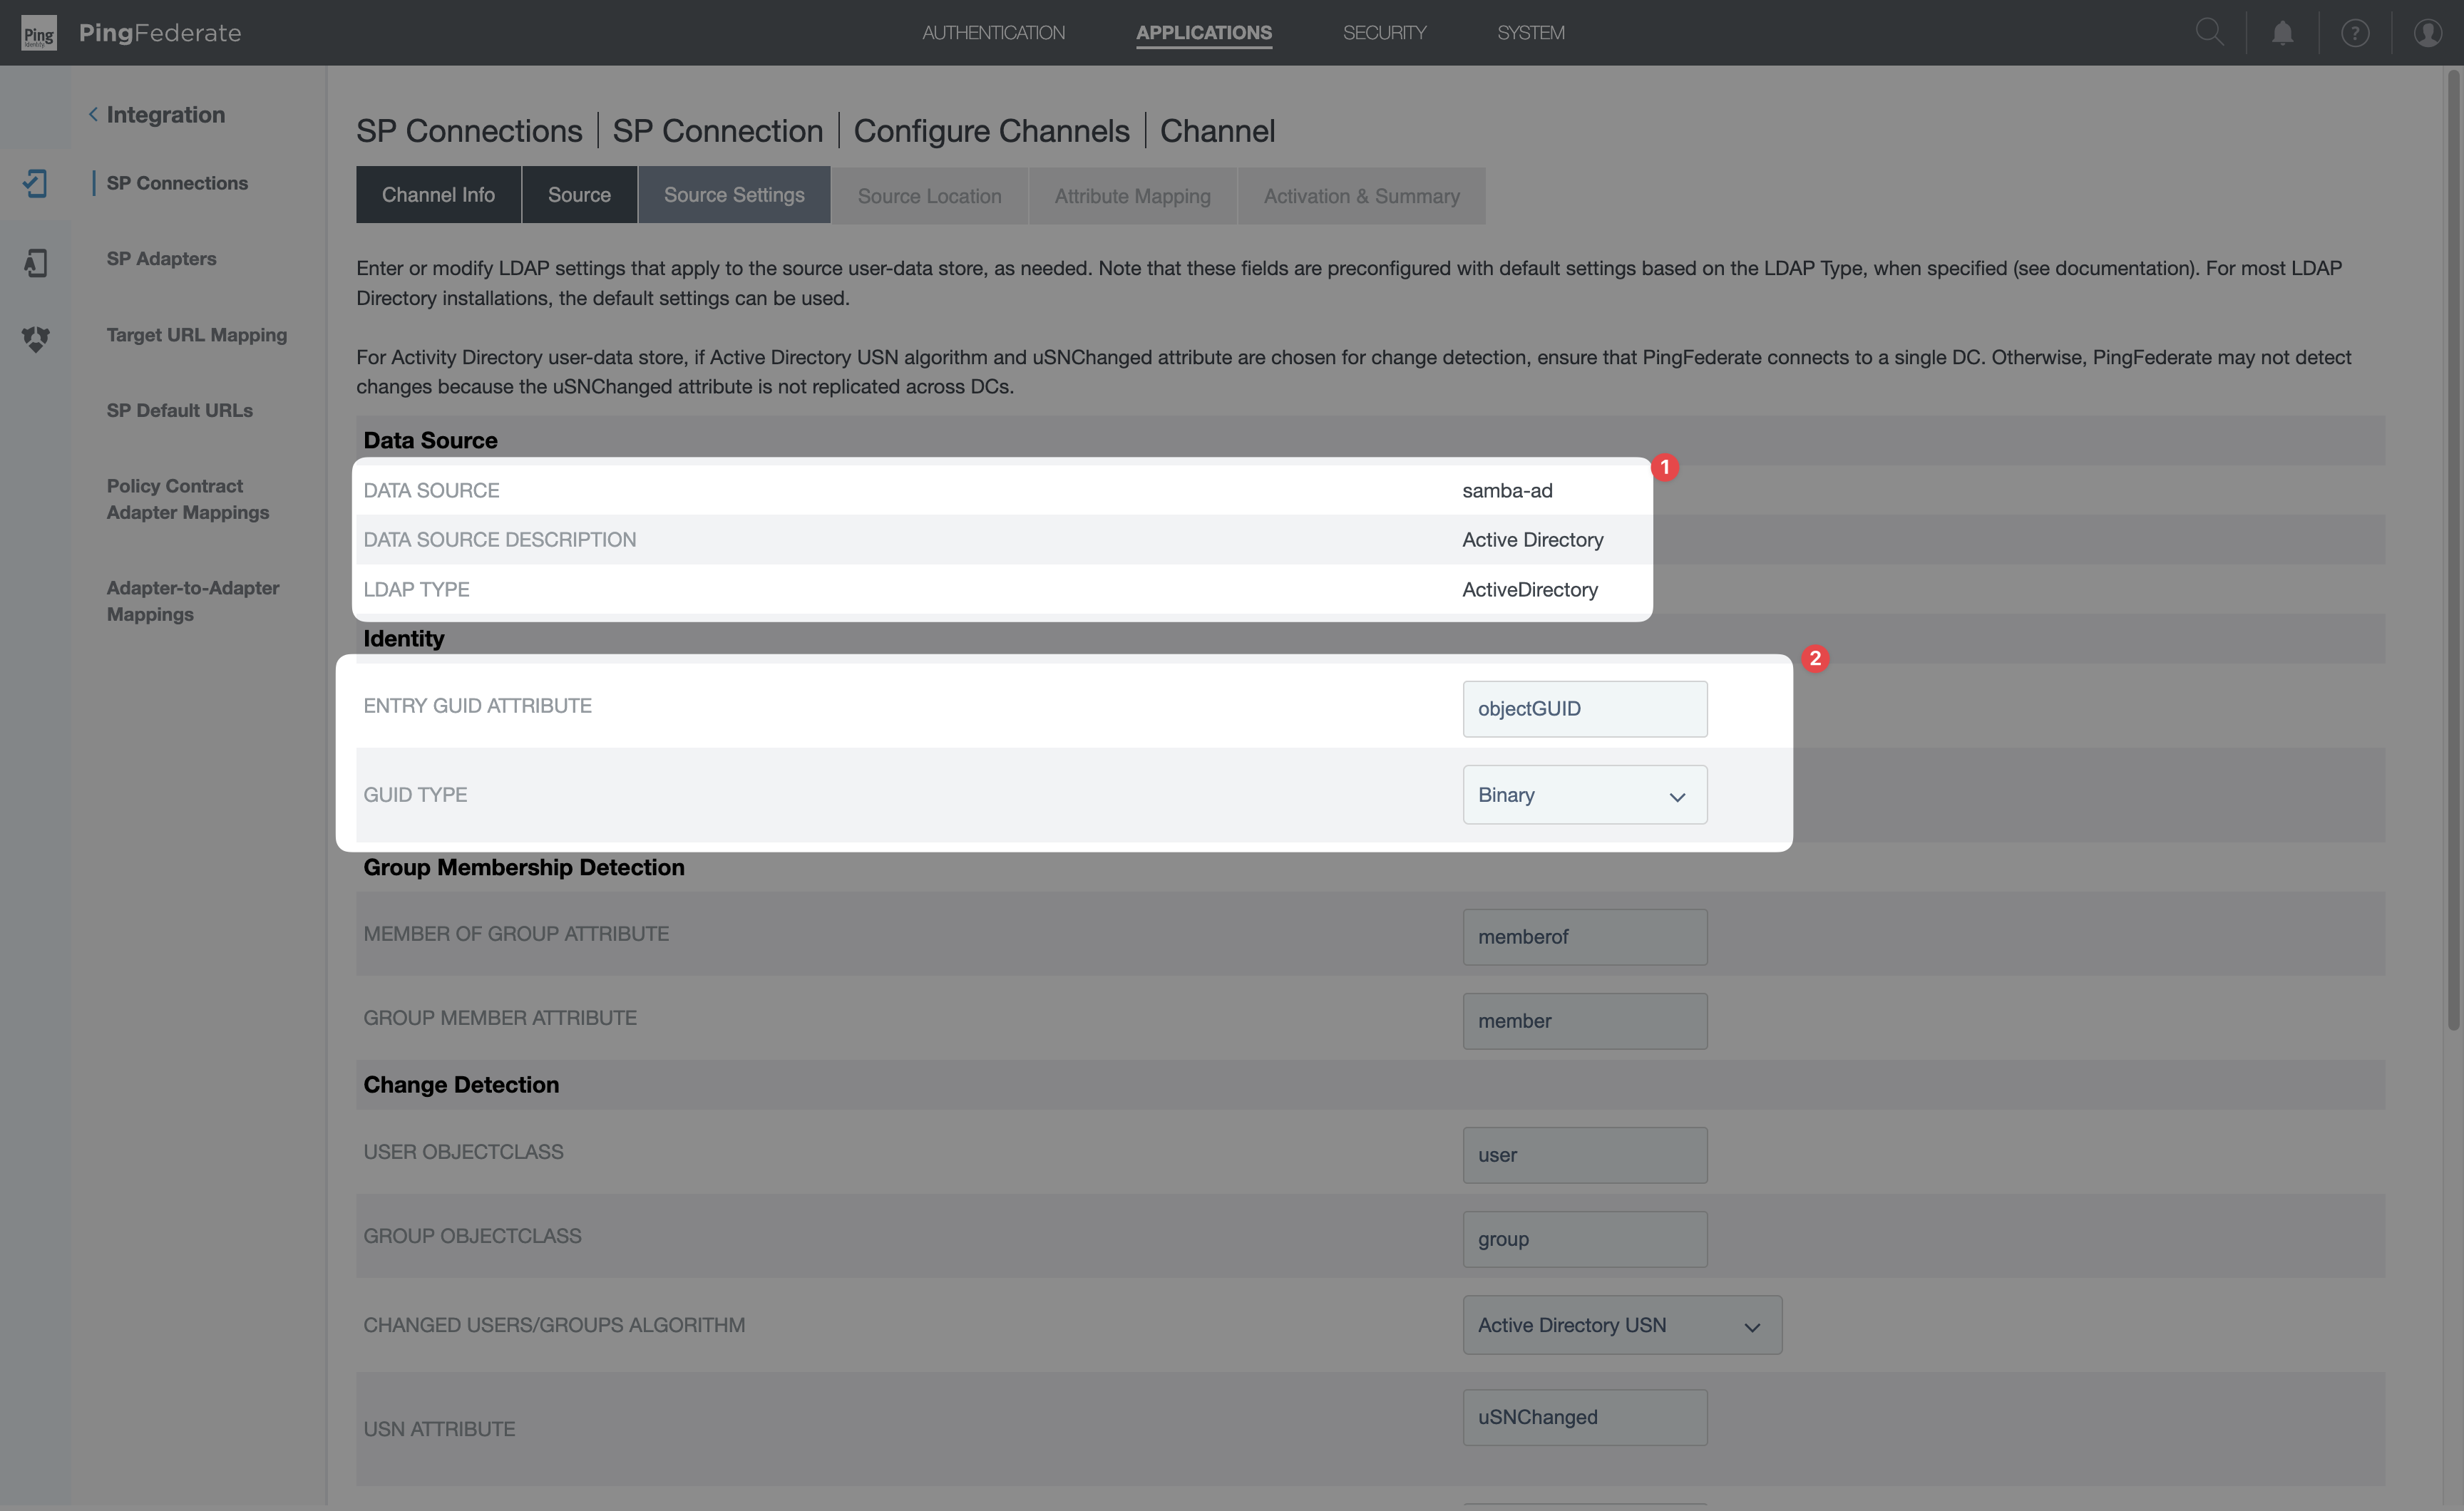
 4. Source Location5. Attribute MappingClick Edit on each SCIM field below. The edit form has two dropdowns: Root Object Class and Attribute.The minimum set Infisical requires:
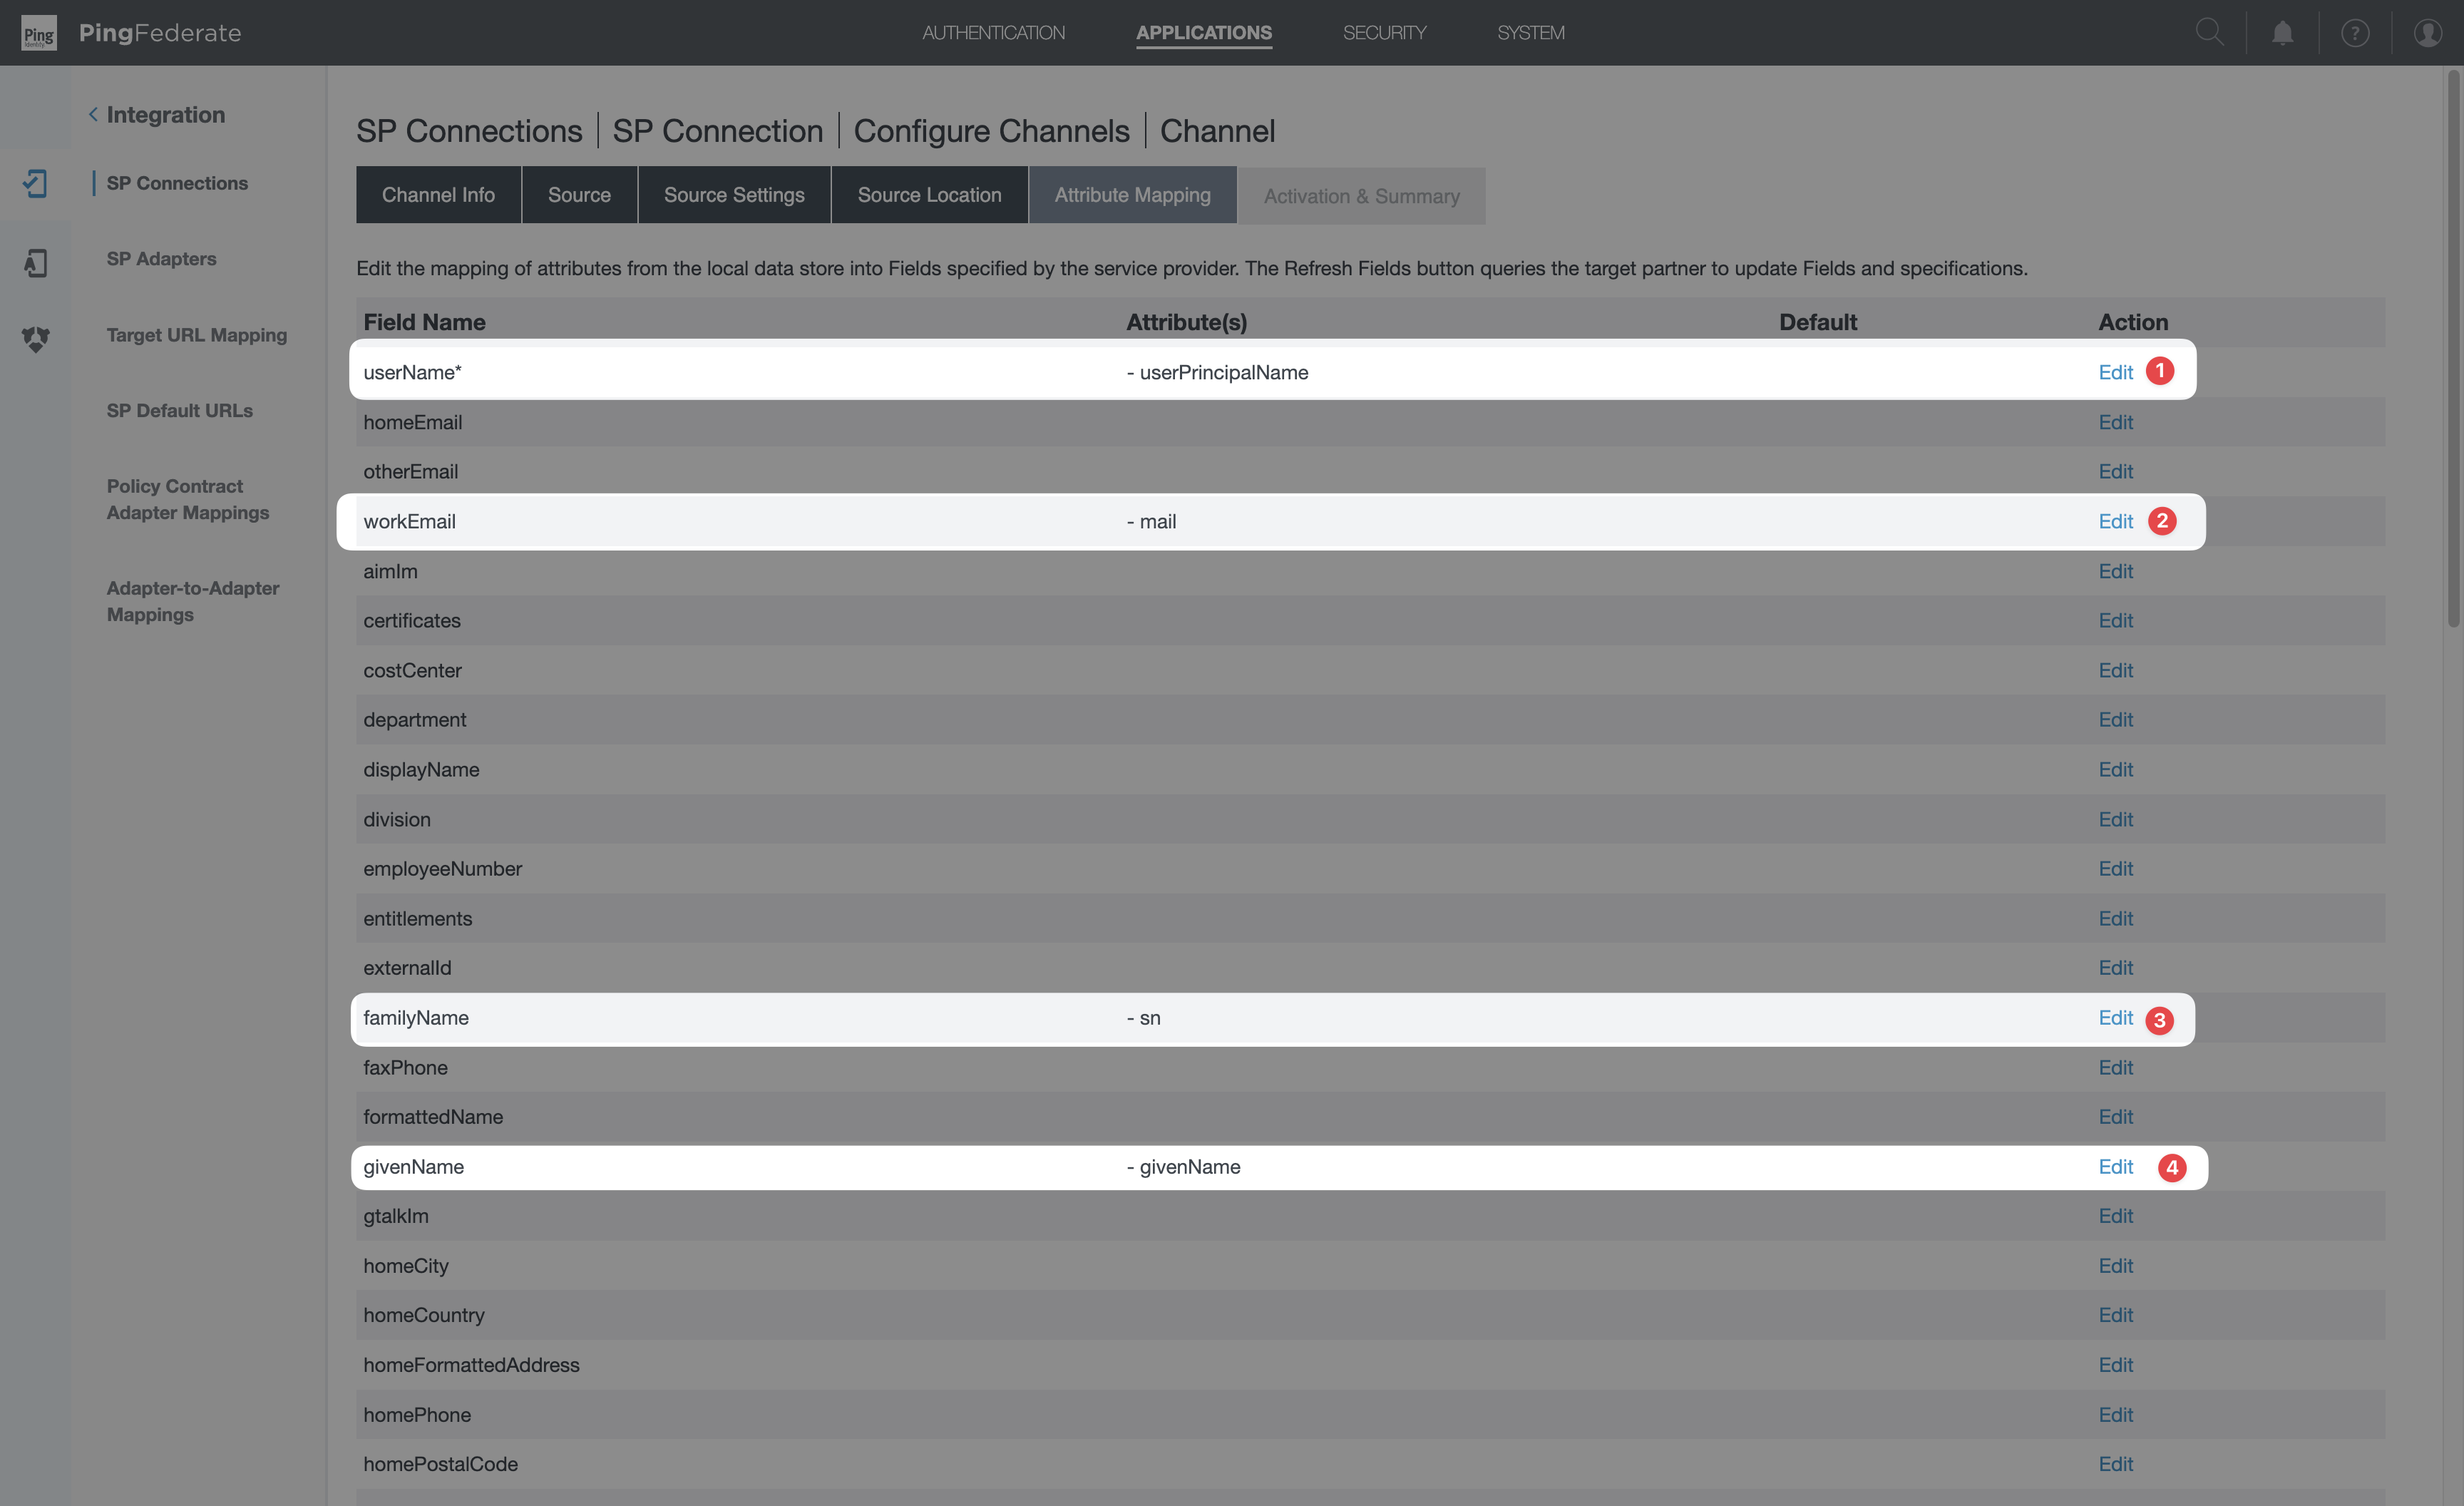
 6. Activation & Summary
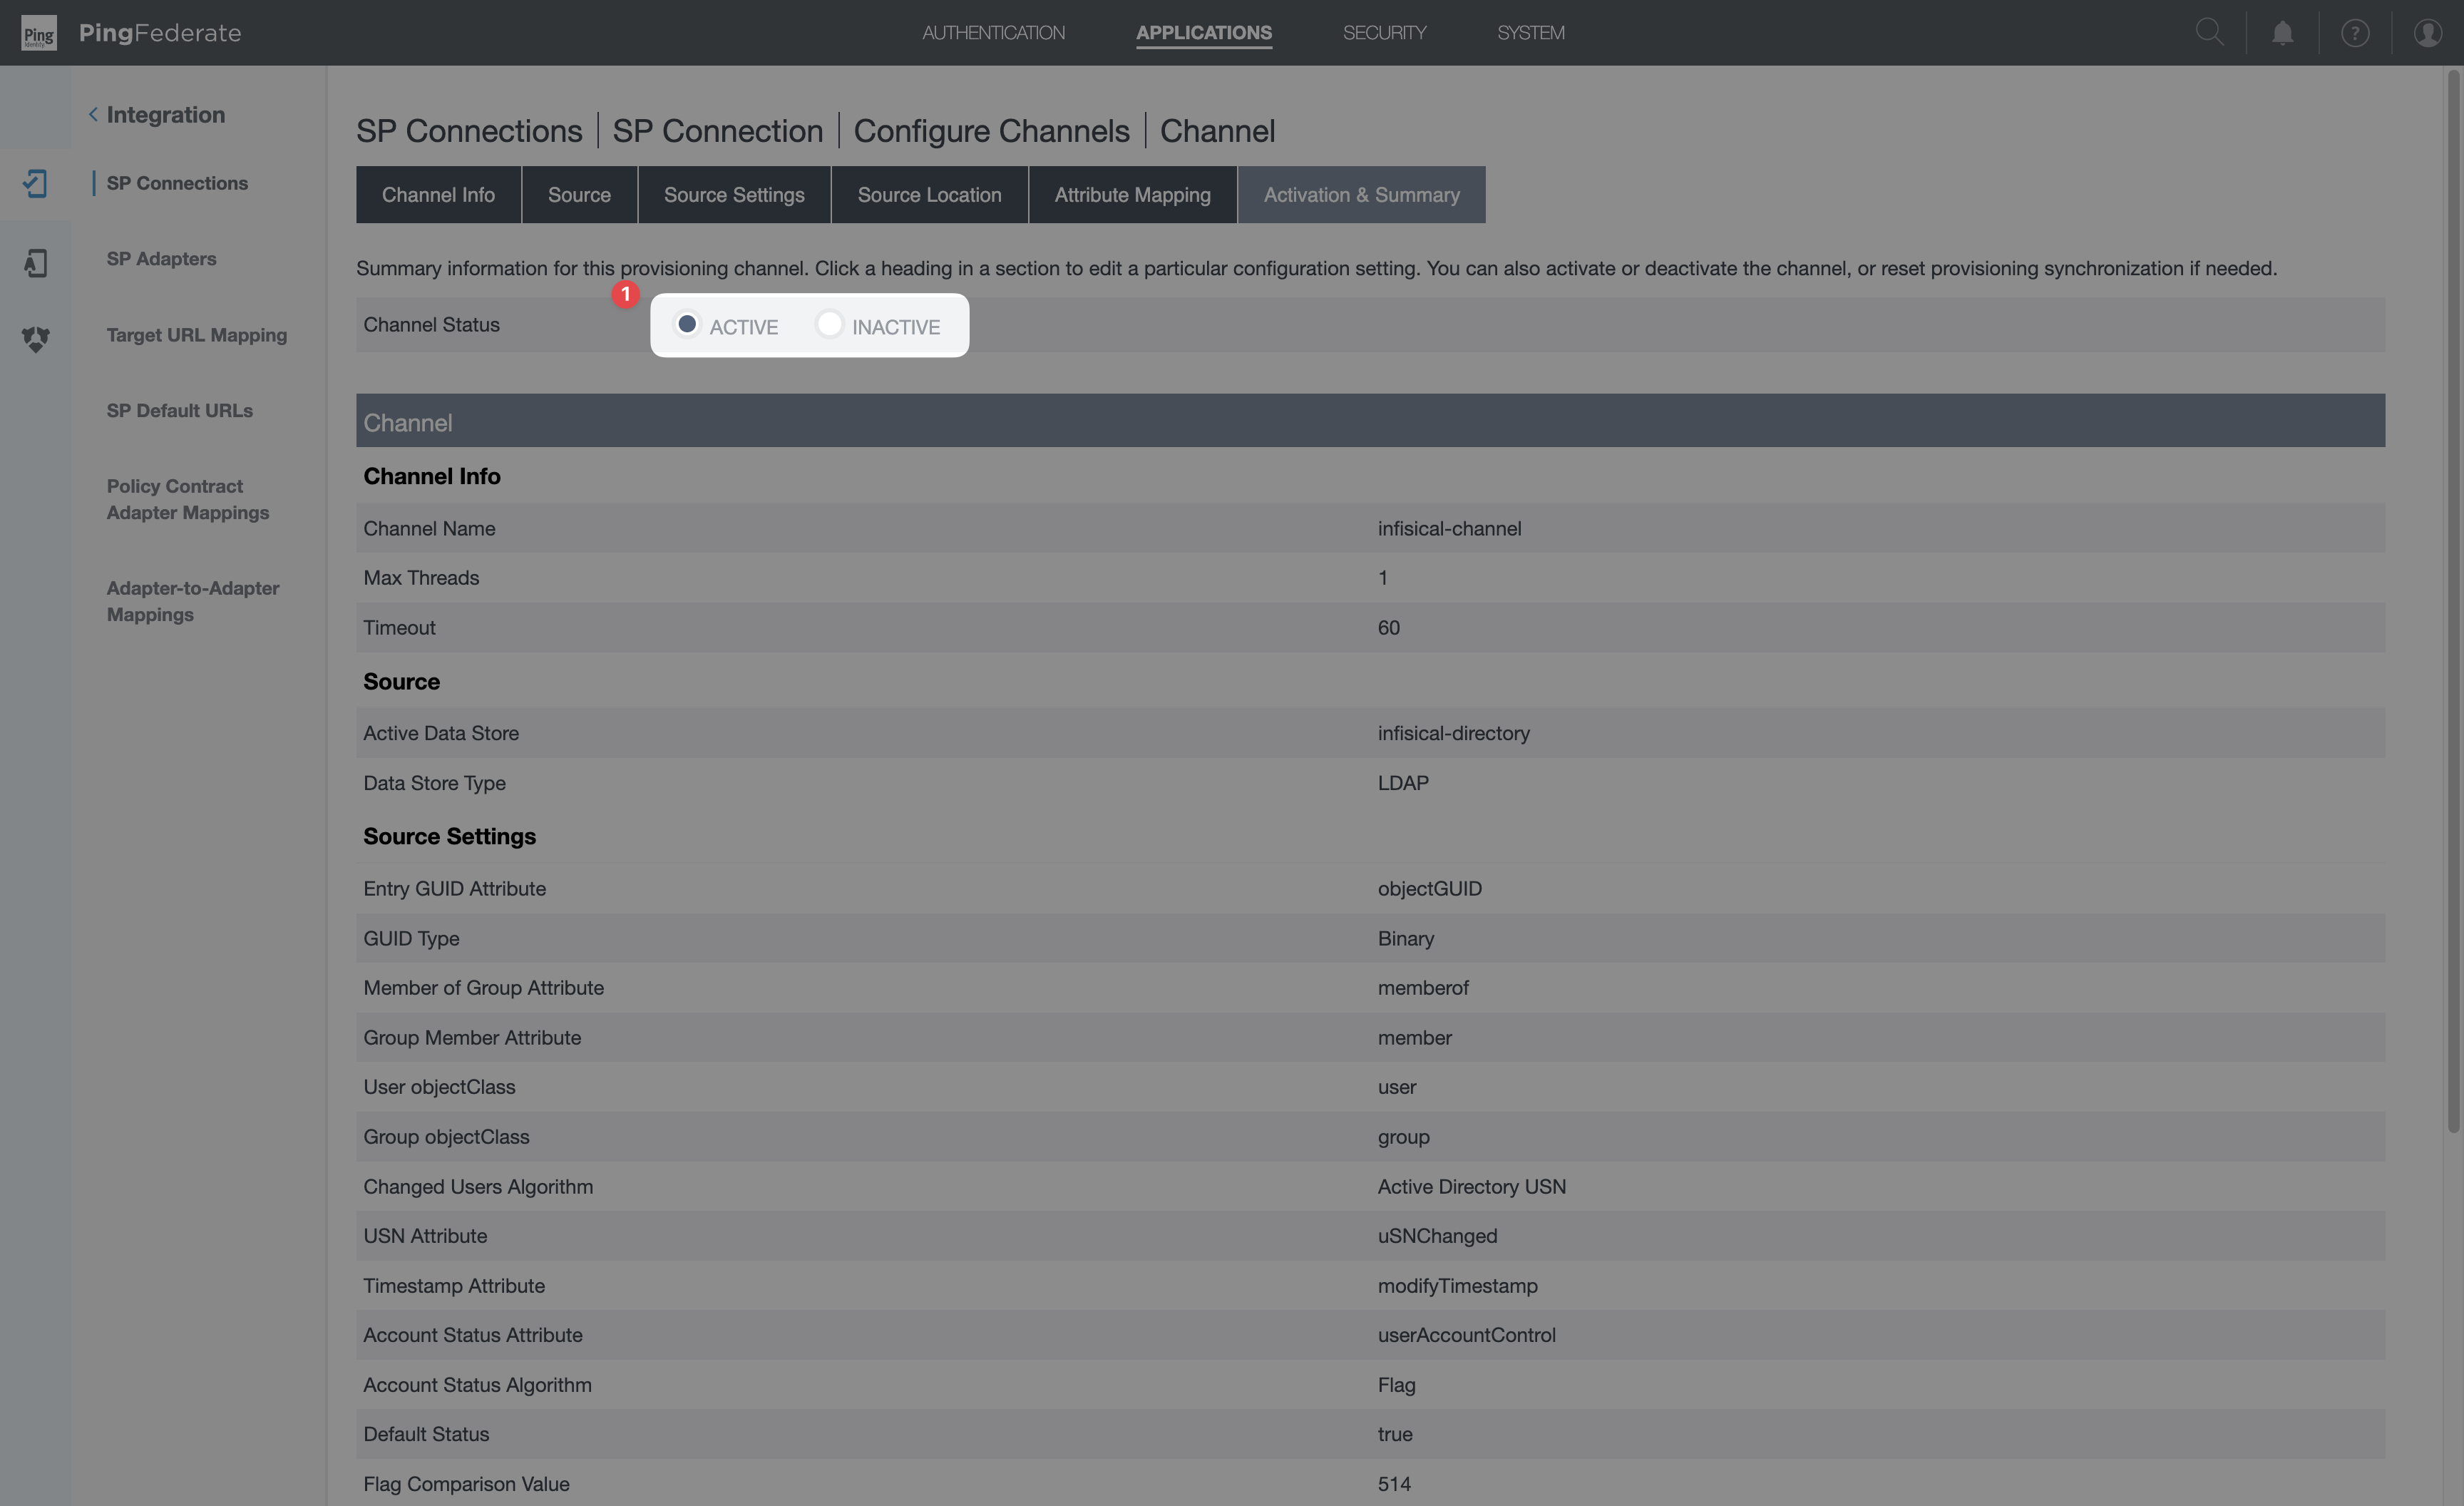
1. Channel Info-
Channel Name:
infisical-users(or any identifier). -
Max Threads:
1for dev, increase for production as needed. -
Timeout (Secs):
60(default).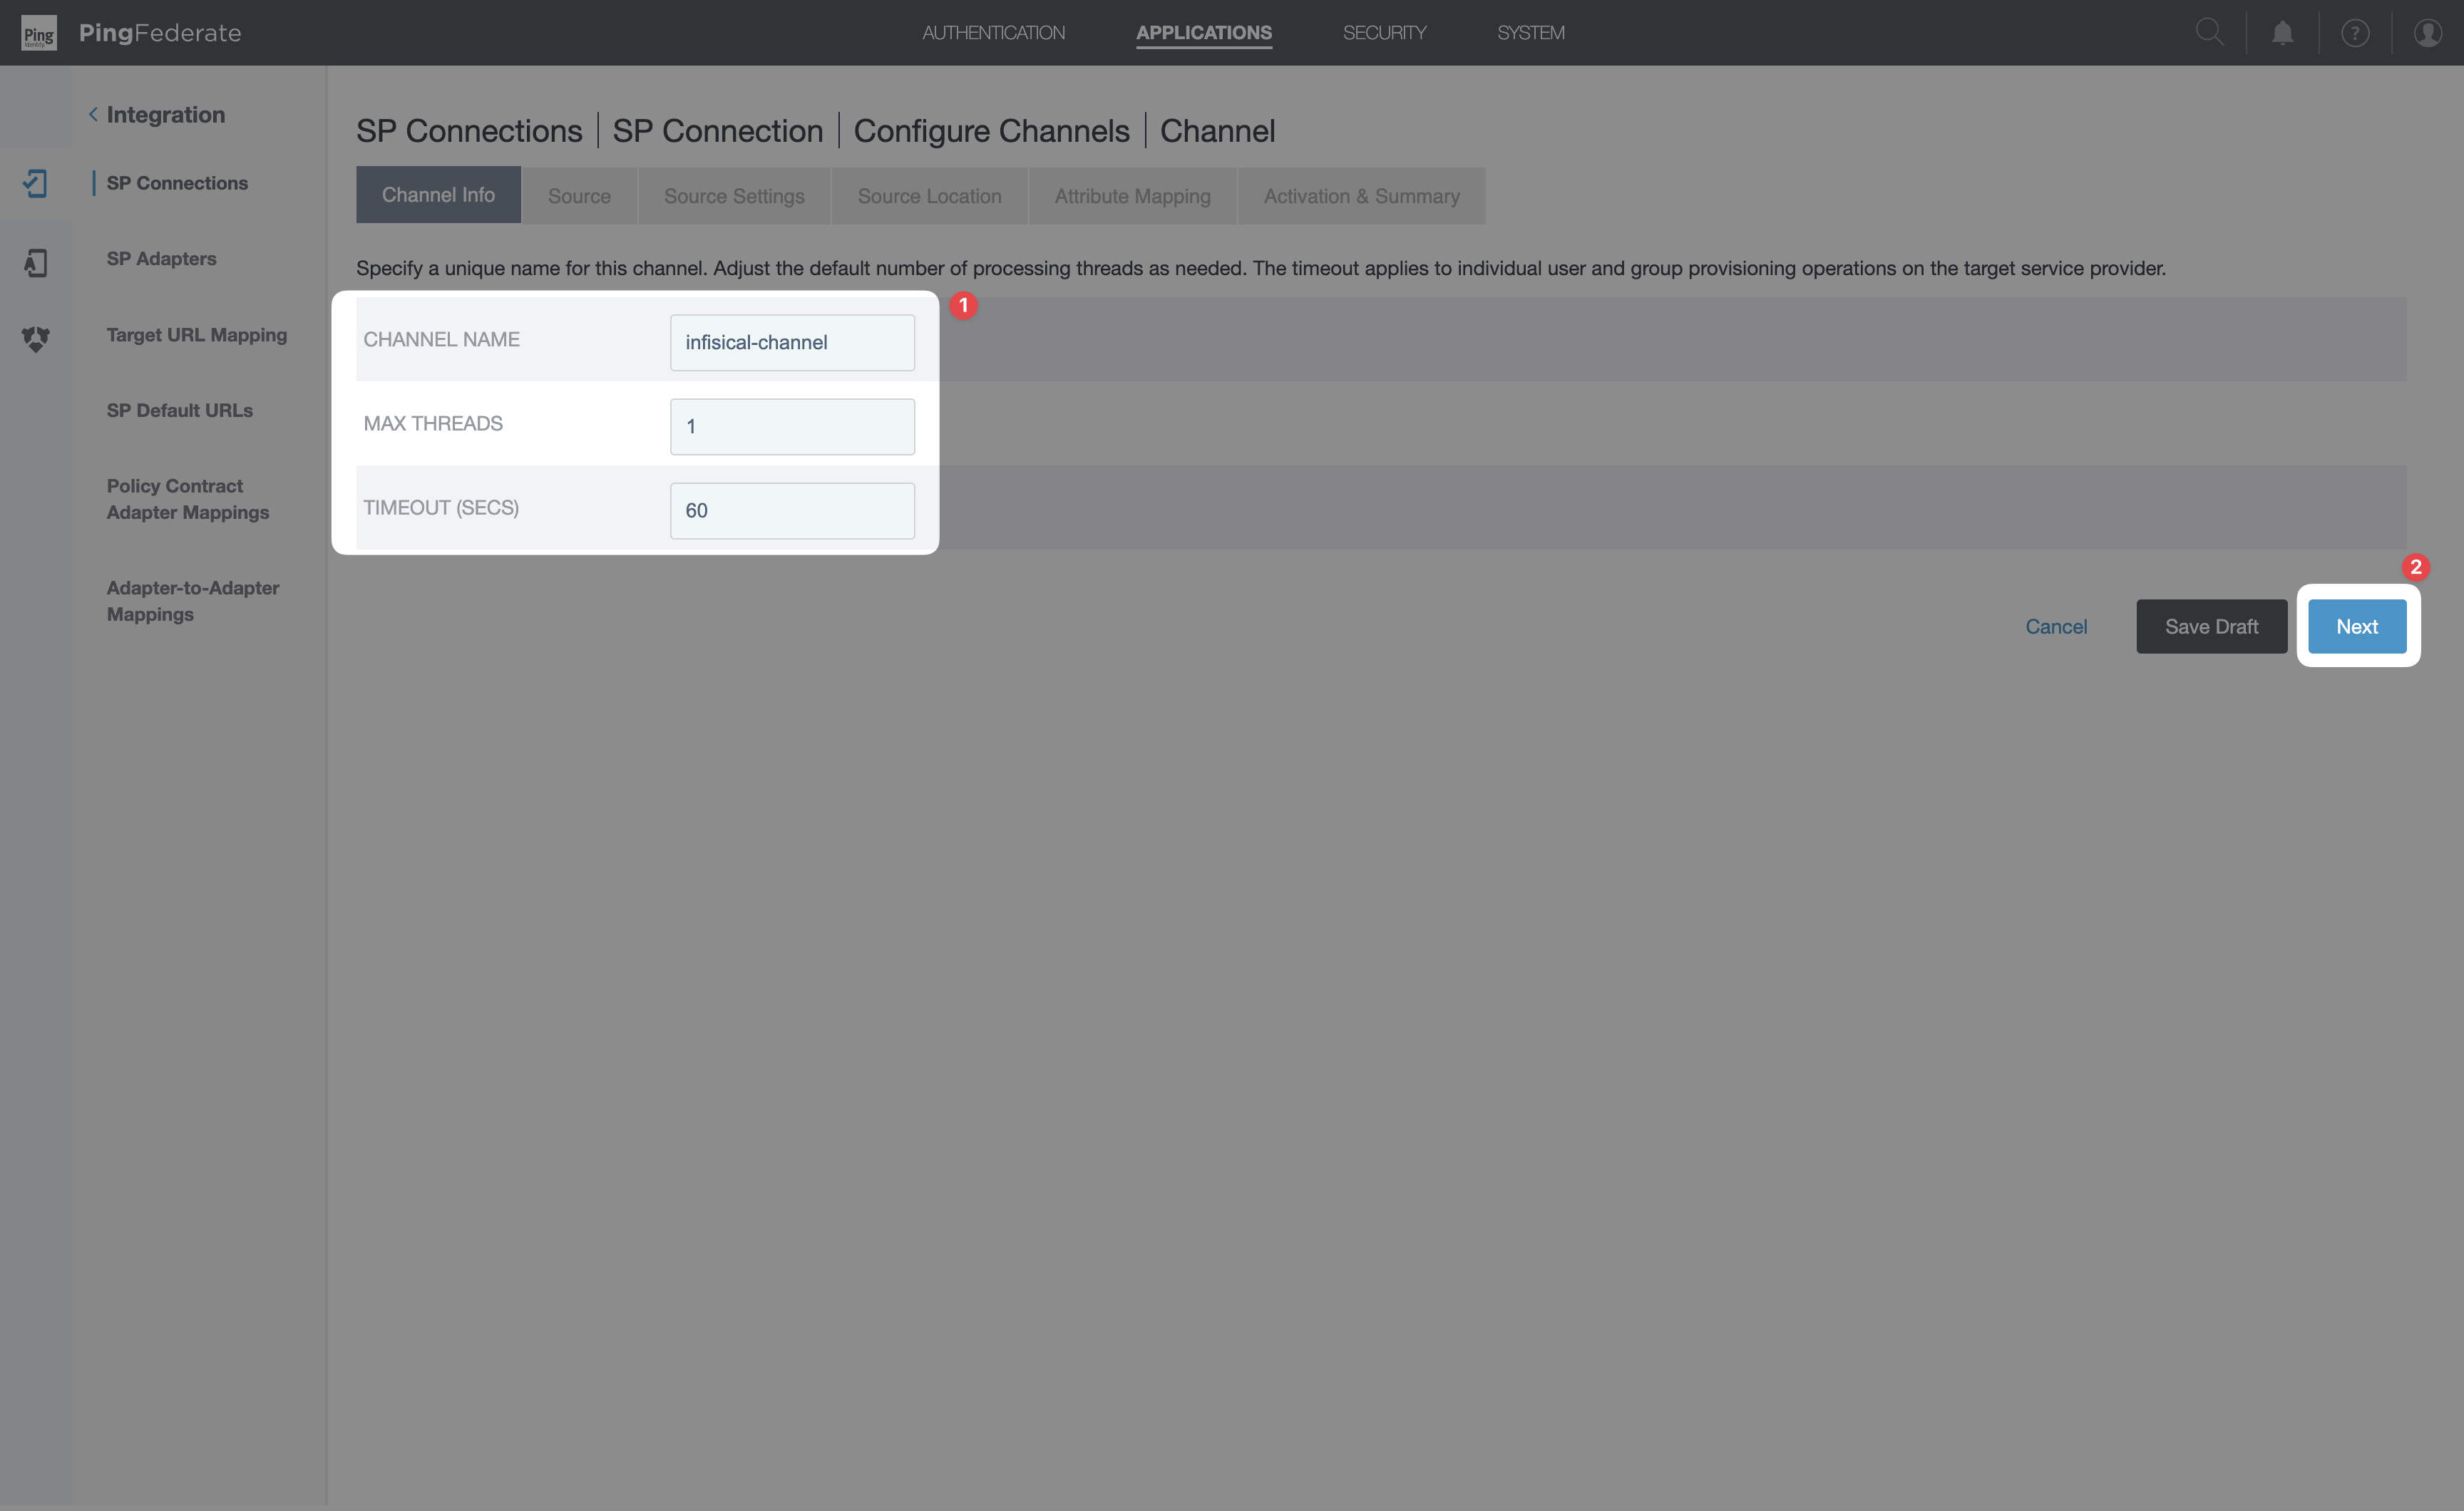
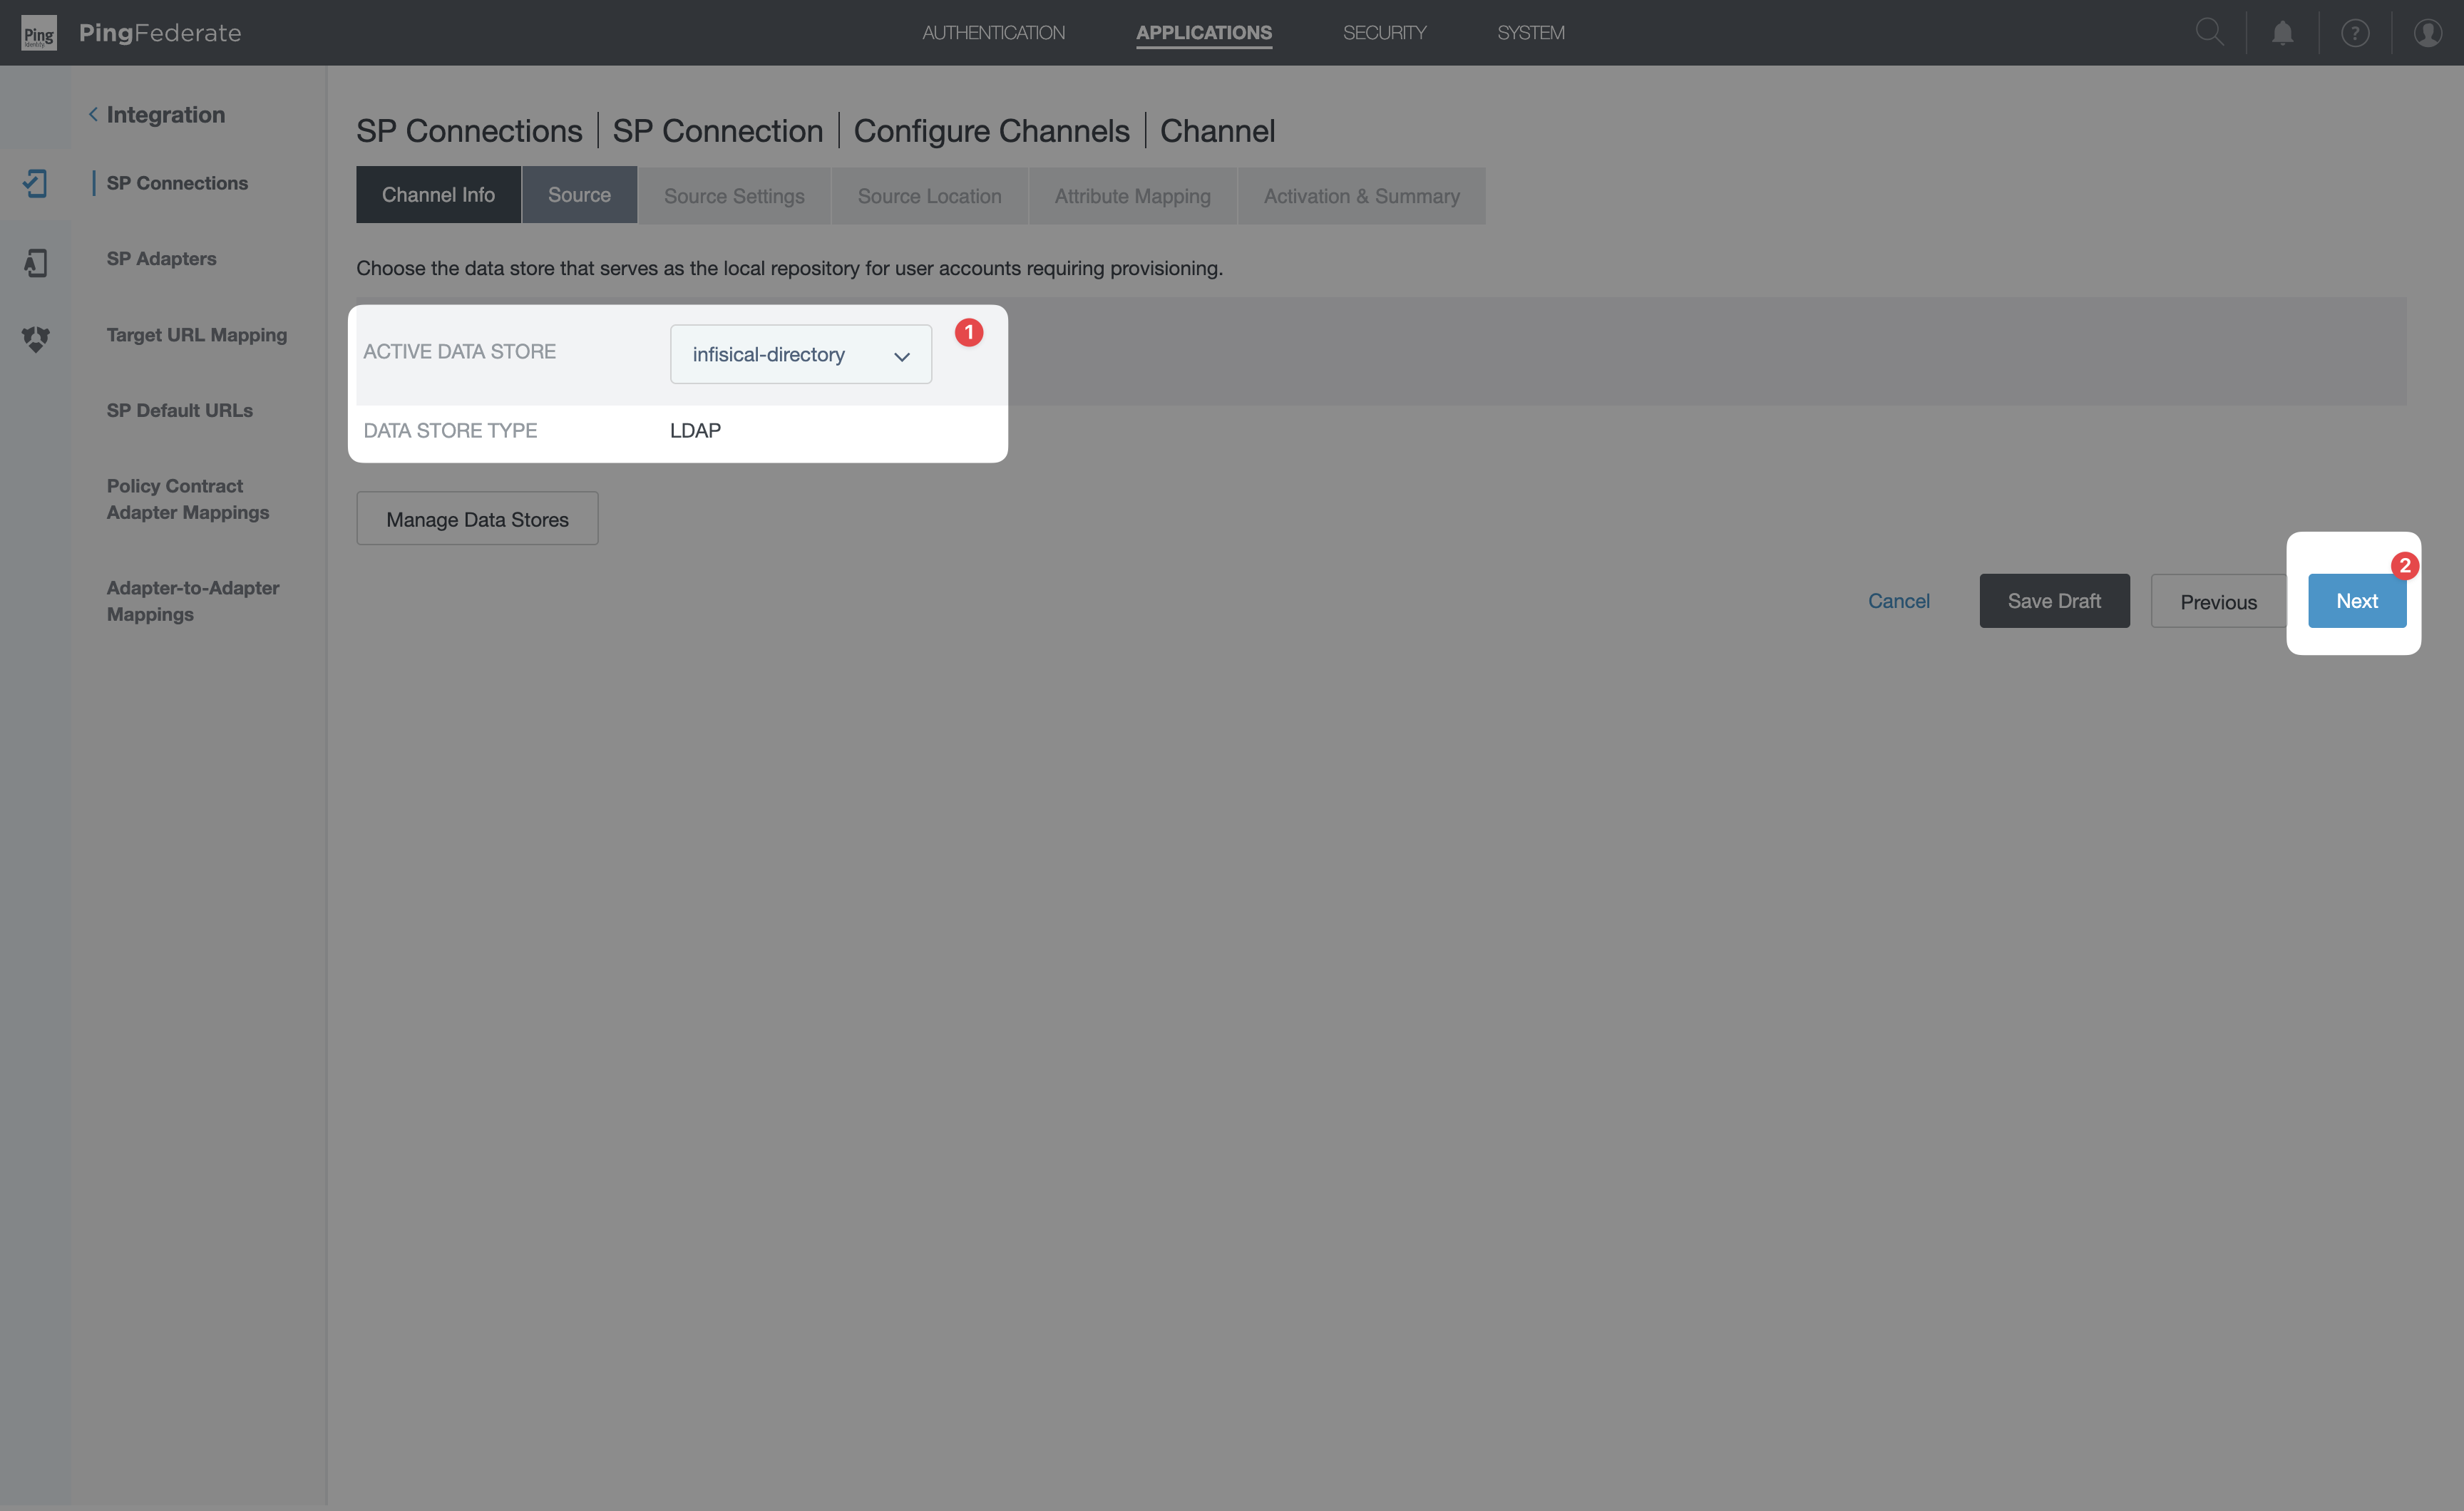
-
Active Data Store: select the LDAP data store you configured in Step 4.
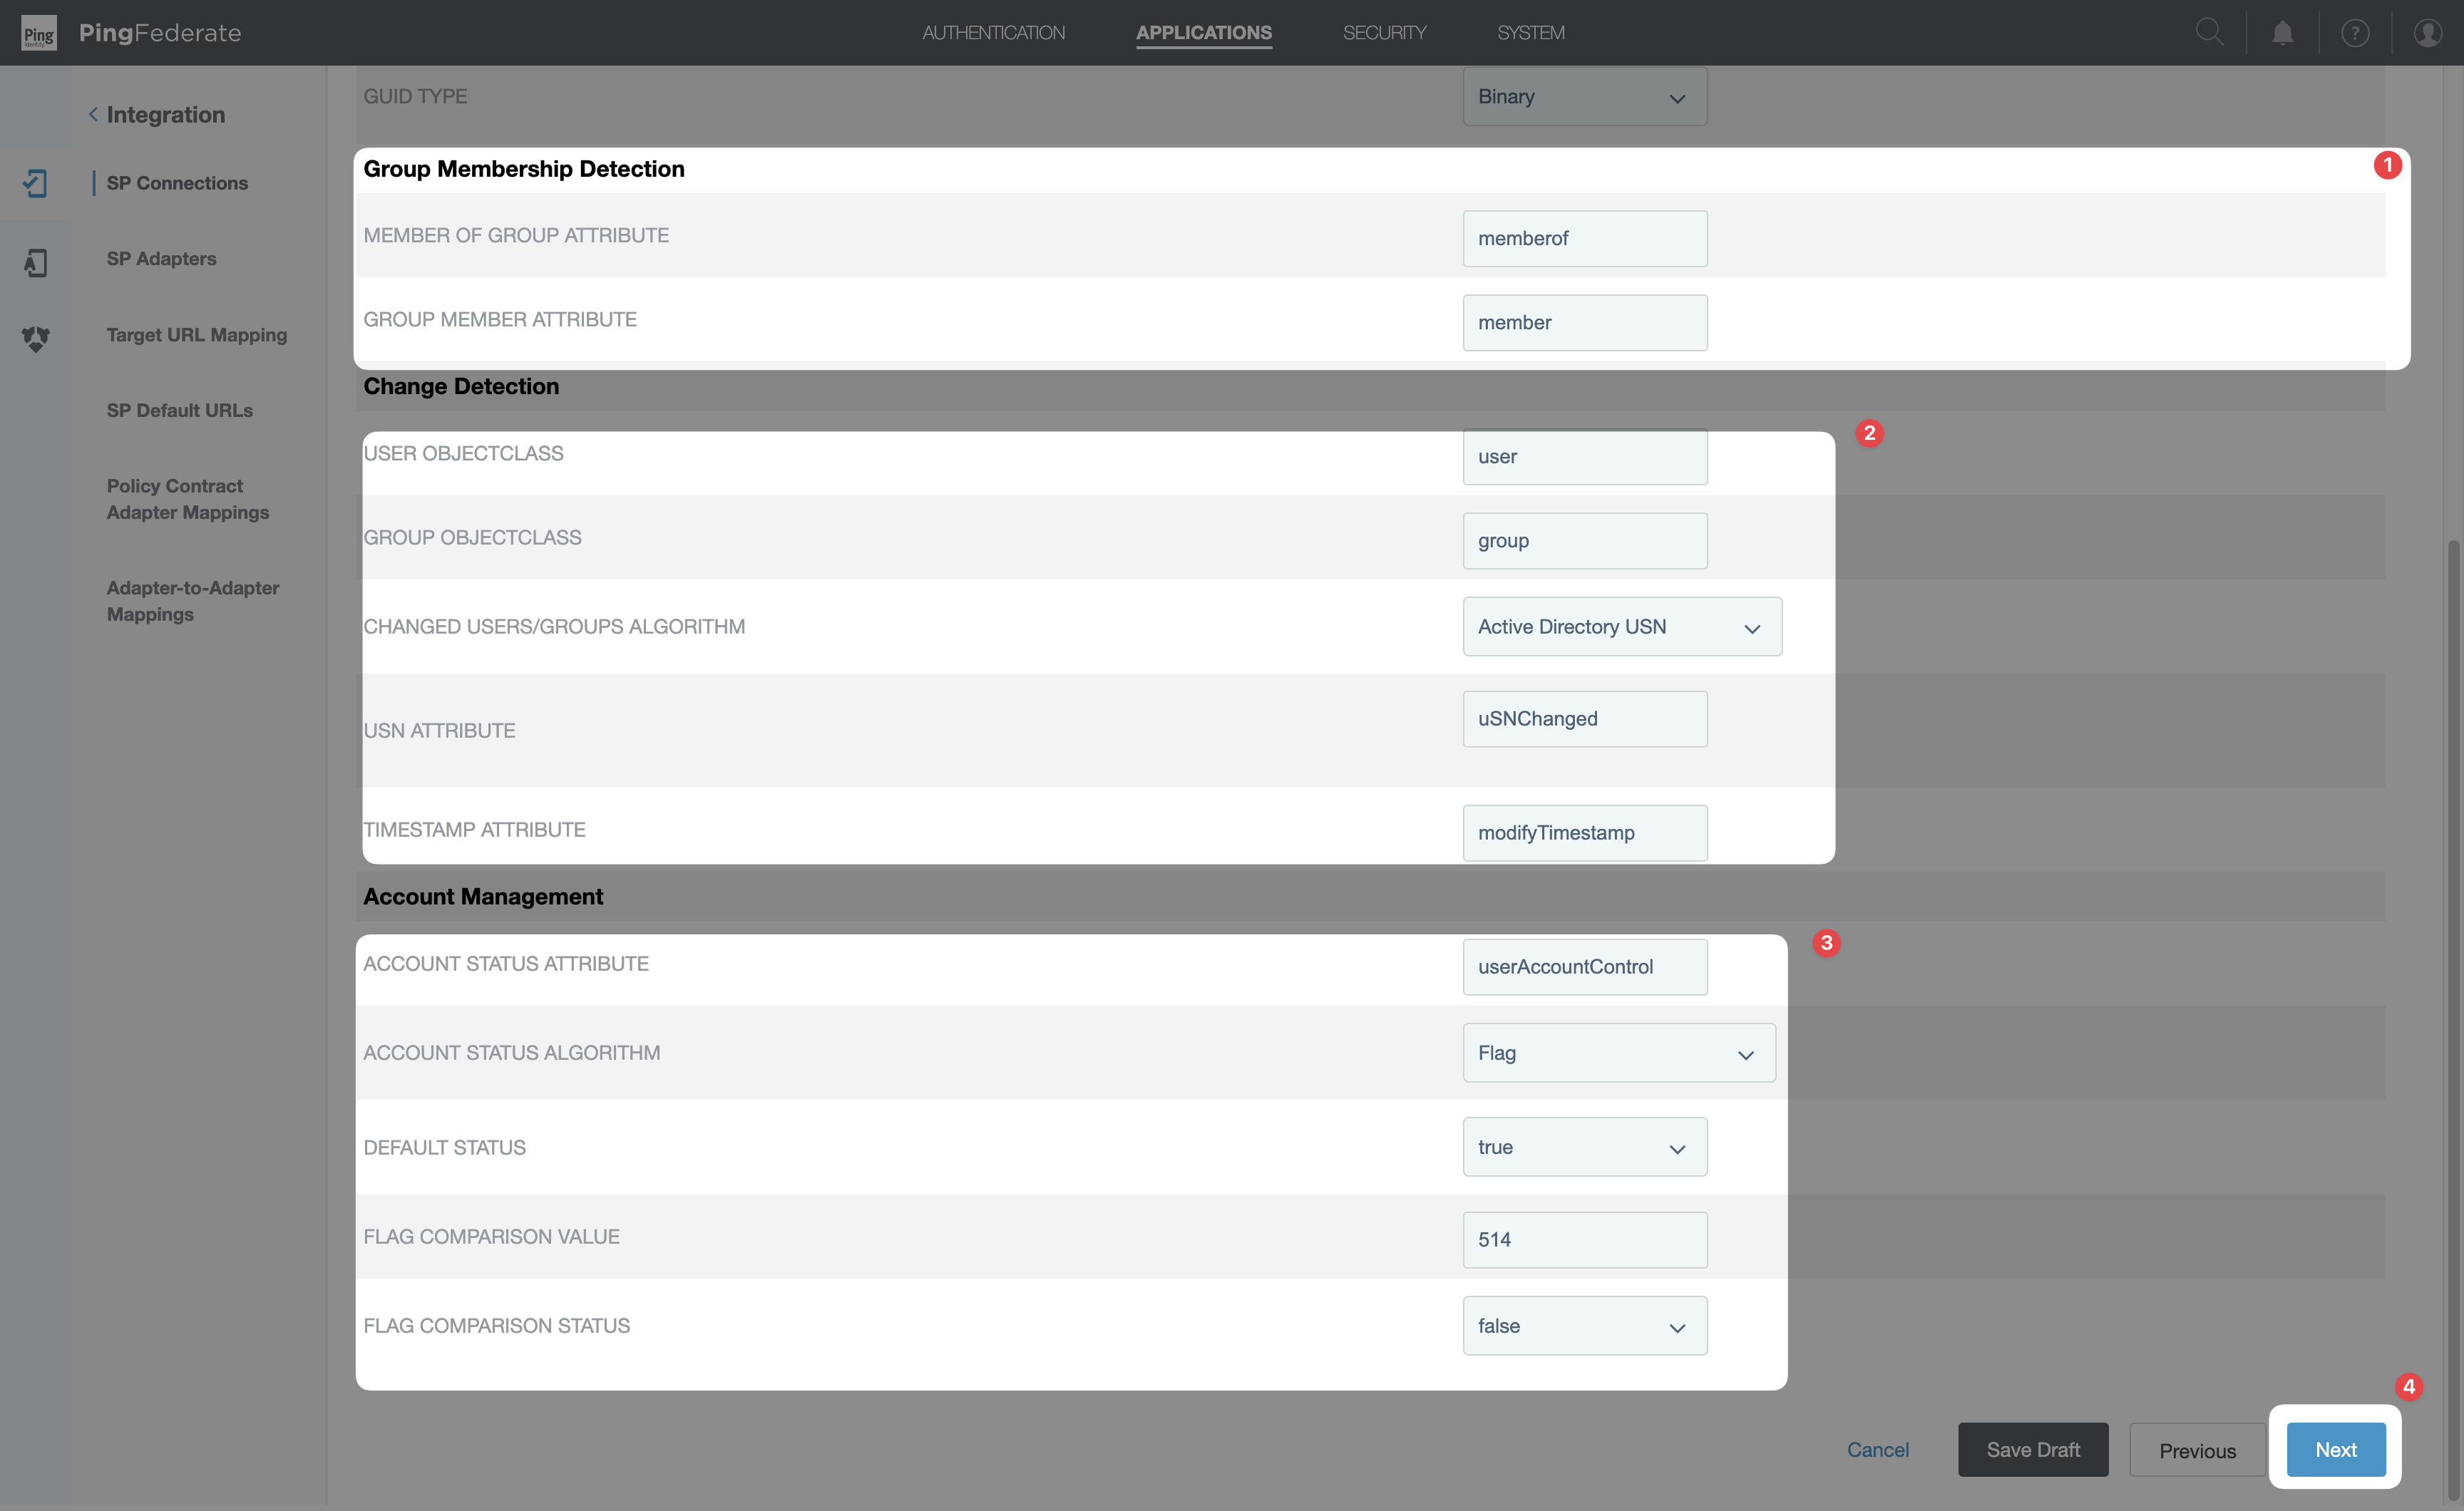
At least one of Member of Group Attribute or Group Member Attribute is required, even if you’re not actually provisioning groups. Fill in
member for Group Member Attribute as a safe default if you don’t plan to use the values.-
Base DN: the search root for both users and groups — it must contain both (use a common ancestor like the domain root if they’re in different OUs). e.g.
CN=Users,DC=corp,DC=example,DC=comfor AD. - Users → Group DN: leave blank, or set to a group to provision only its members.
-
Users → Filter: AD
(&(objectClass=user)(!(userAccountControl:1.2.840.113556.1.4.803:=2)))(enabled users); OpenLDAP(objectClass=inetOrgPerson). -
Groups → Filter (only if provisioning groups): AD
(objectClass=group); OpenLDAP(objectClass=groupOfNames)— scope it (e.g.(&(objectClass=group)(cn=infisical-*))) or you’ll also pull AD’s built-in groups. Leave Group DN and Nested Search empty (Infisical doesn’t support nested groups).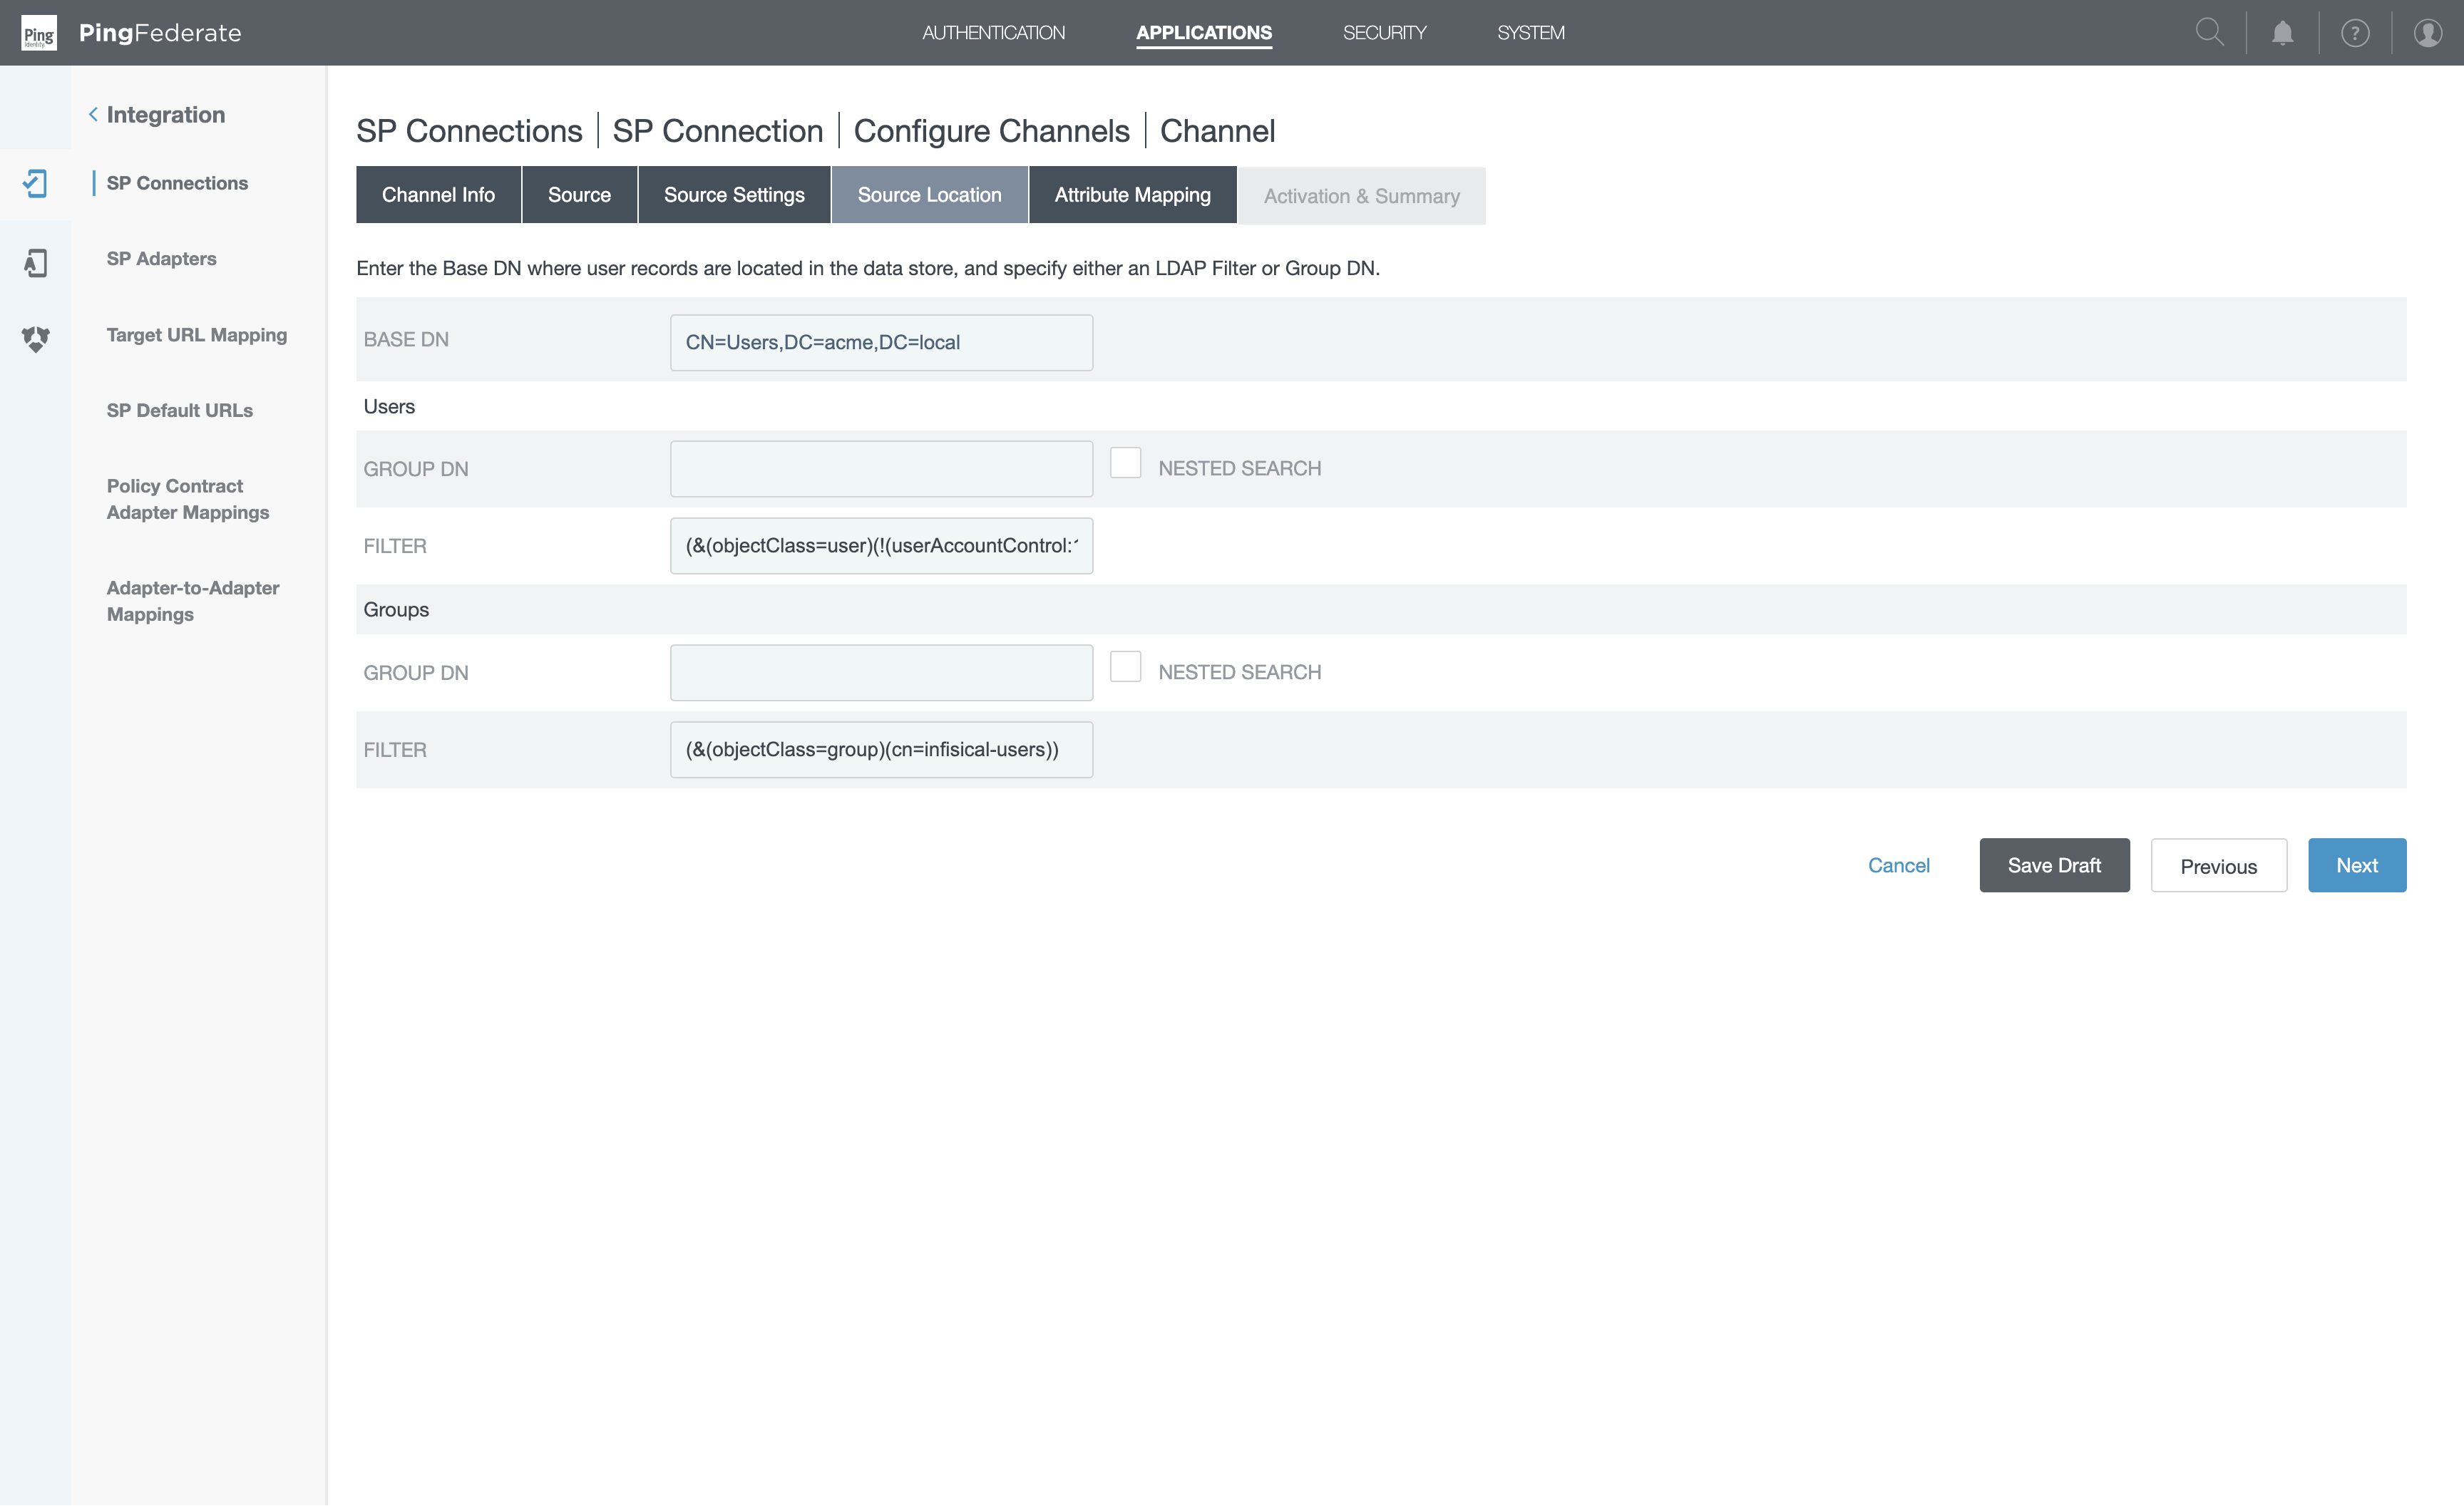
Infisical groups are flat — members are users only (nested groups are ignored), and a member resolves only if that user was also provisioned, so keep group members in your Users scope. The group’s CN (set by Group Name Source, Step 7) is what you map under Settings → Provisioning → SCIM Group to Organization Role Mappings.
Attribute mapping trap: the Root Object Class dropdown only shows attributes defined directly on that
class — it does not show inherited attributes. For LDAP,
sn is defined on the person class and inherited
by inetOrgPerson. So mapping familyName requires selecting Root Object Class = person, not inetOrgPerson.
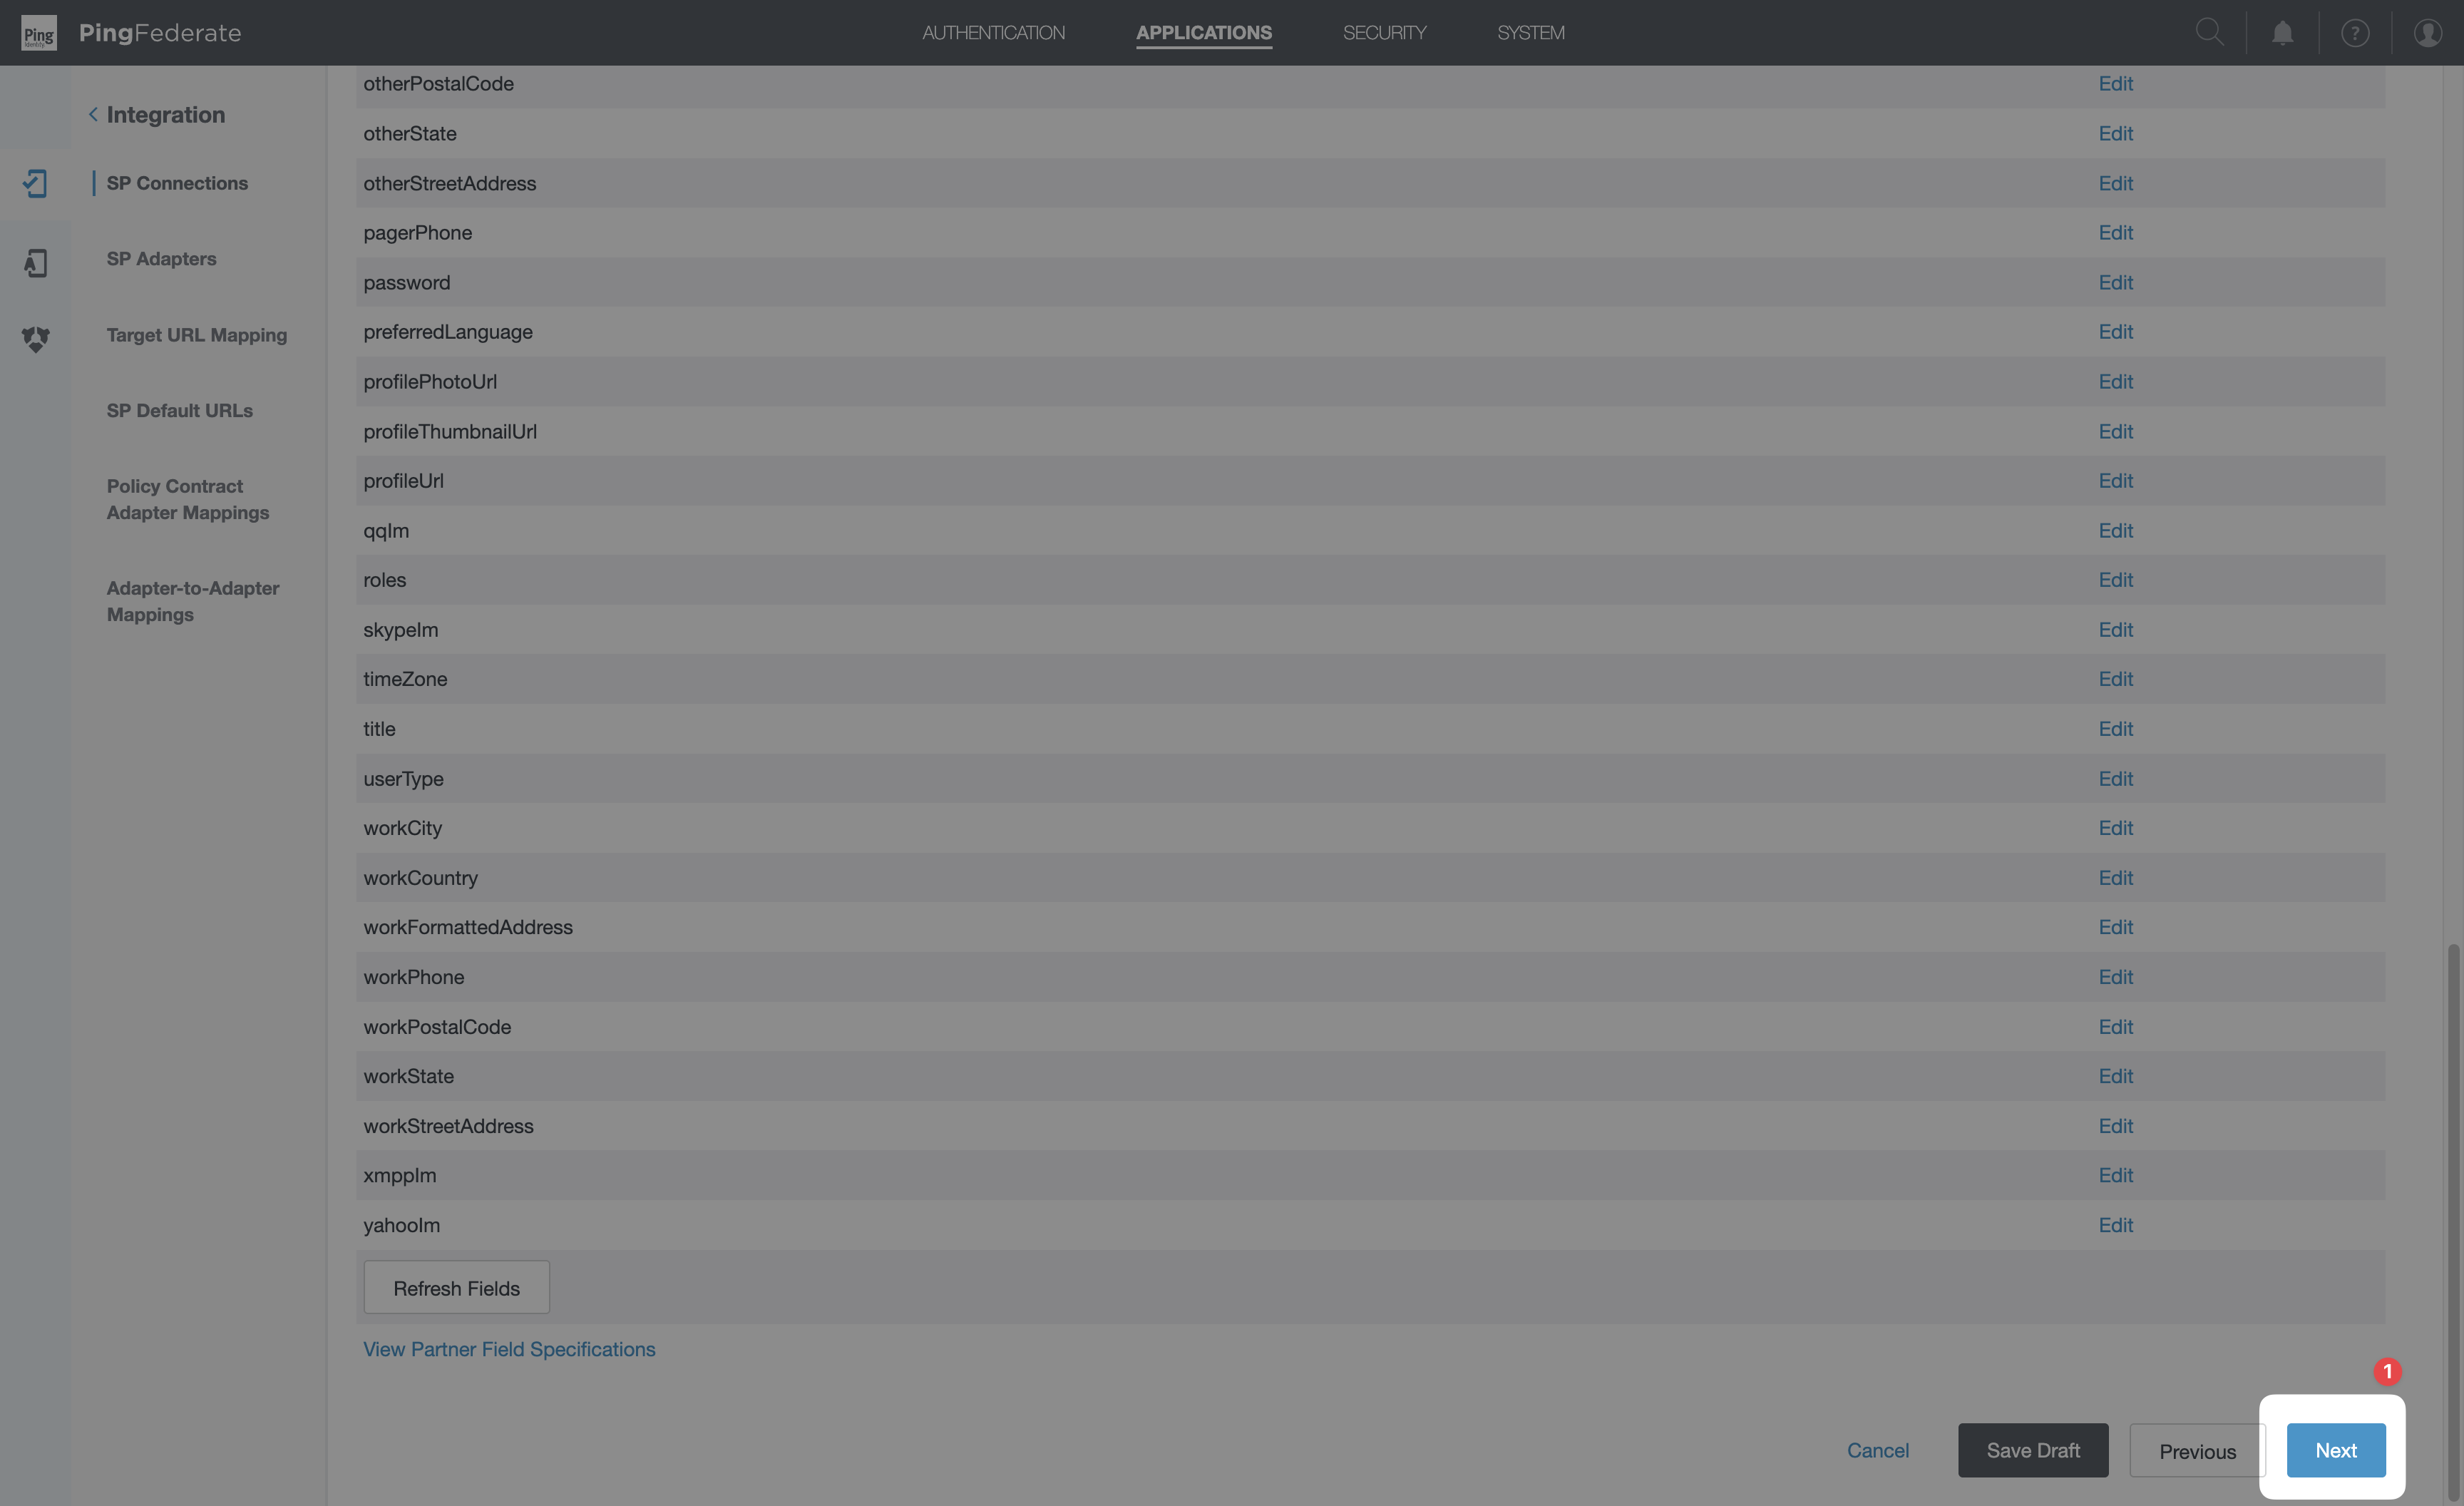
If the attribute you expect is missing from the dropdown, try a parent object class.For each row: click Edit → pick Root Object Class → pick Attribute → click Add Attribute → click Done.
active doesn’t need an explicit mapping — PingFederate derives it from the Account Status Attribute settings in Source Settings.The
userName’s email domain must be a verified email domain for your Infisical organization
(Settings → Organization → Email Domains). If it isn’t, SCIM user creation is rejected with a
403 – "…not a part of the accepted domains…" and the user is not created — groups have no such check, so
you’ll see the group sync without its members. Verify the domain before provisioning.- Set Channel Status to
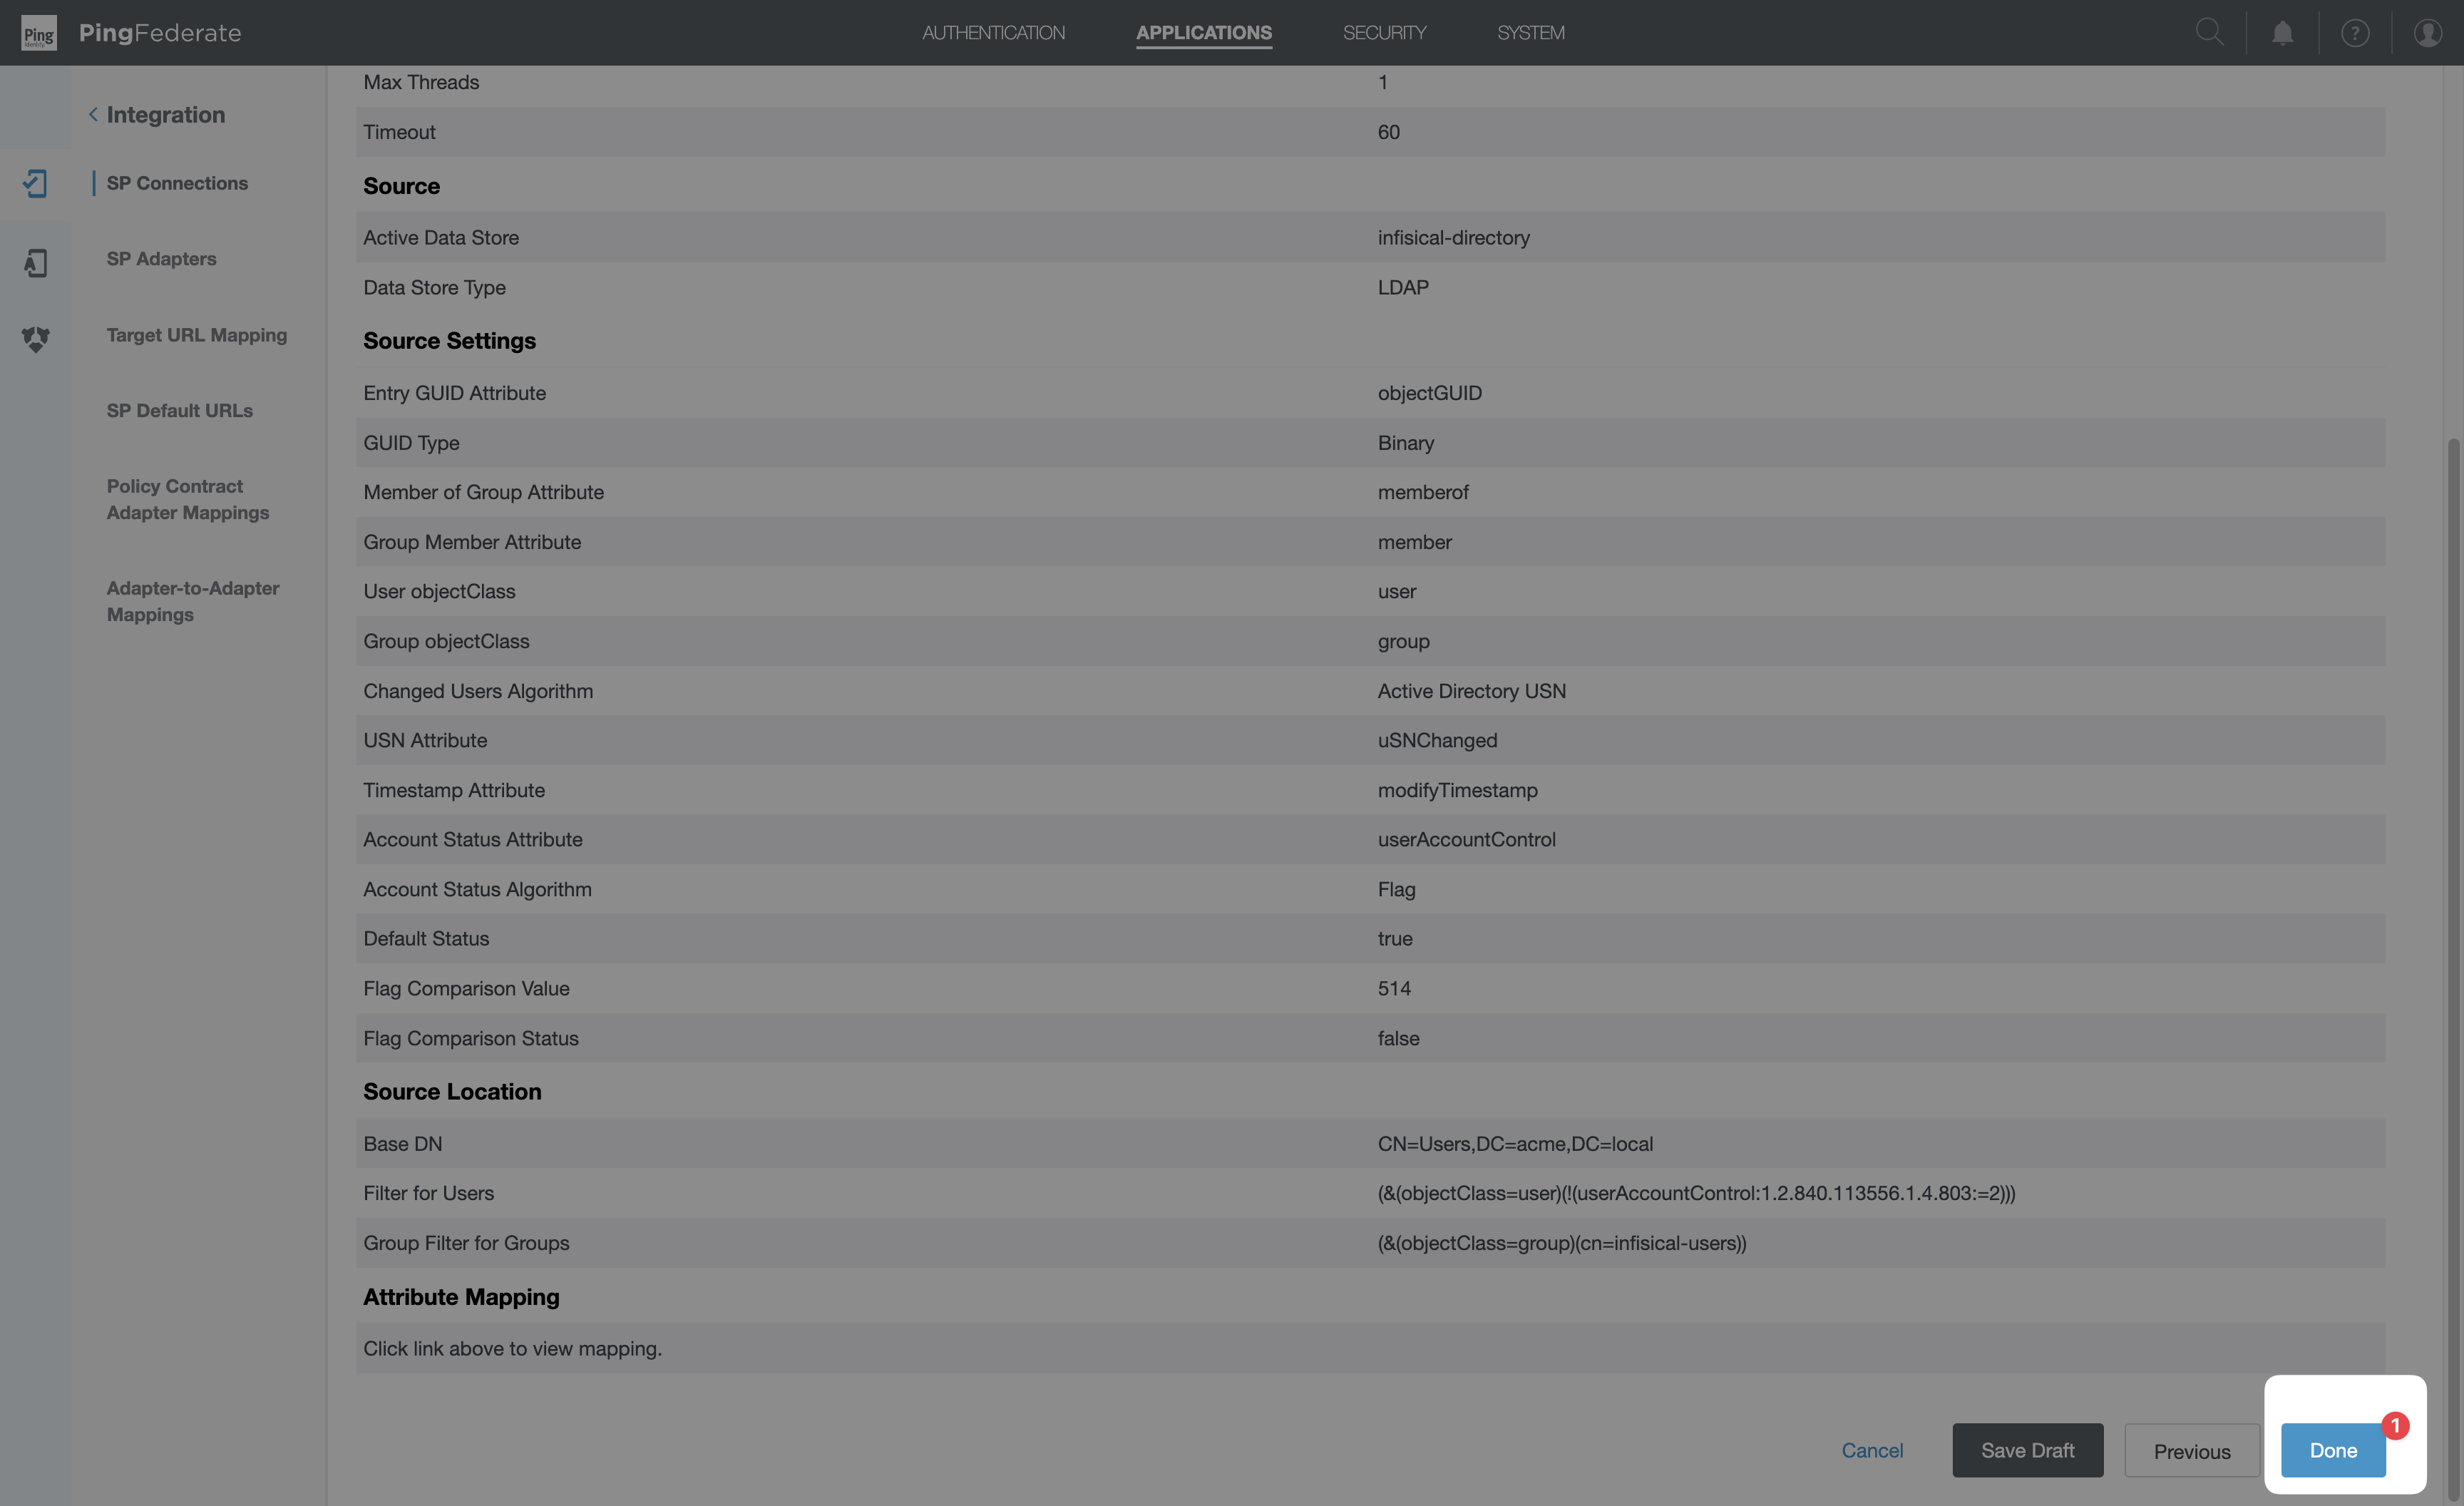
Active. - Scroll through the summary and confirm Source Settings, Source Location, and Attribute Mapping all reflect what you intended.
- Click Done.
9
Activate the SP Connection
After saving the channel you’ll be back on Configure Channels. Click Done to close that screen.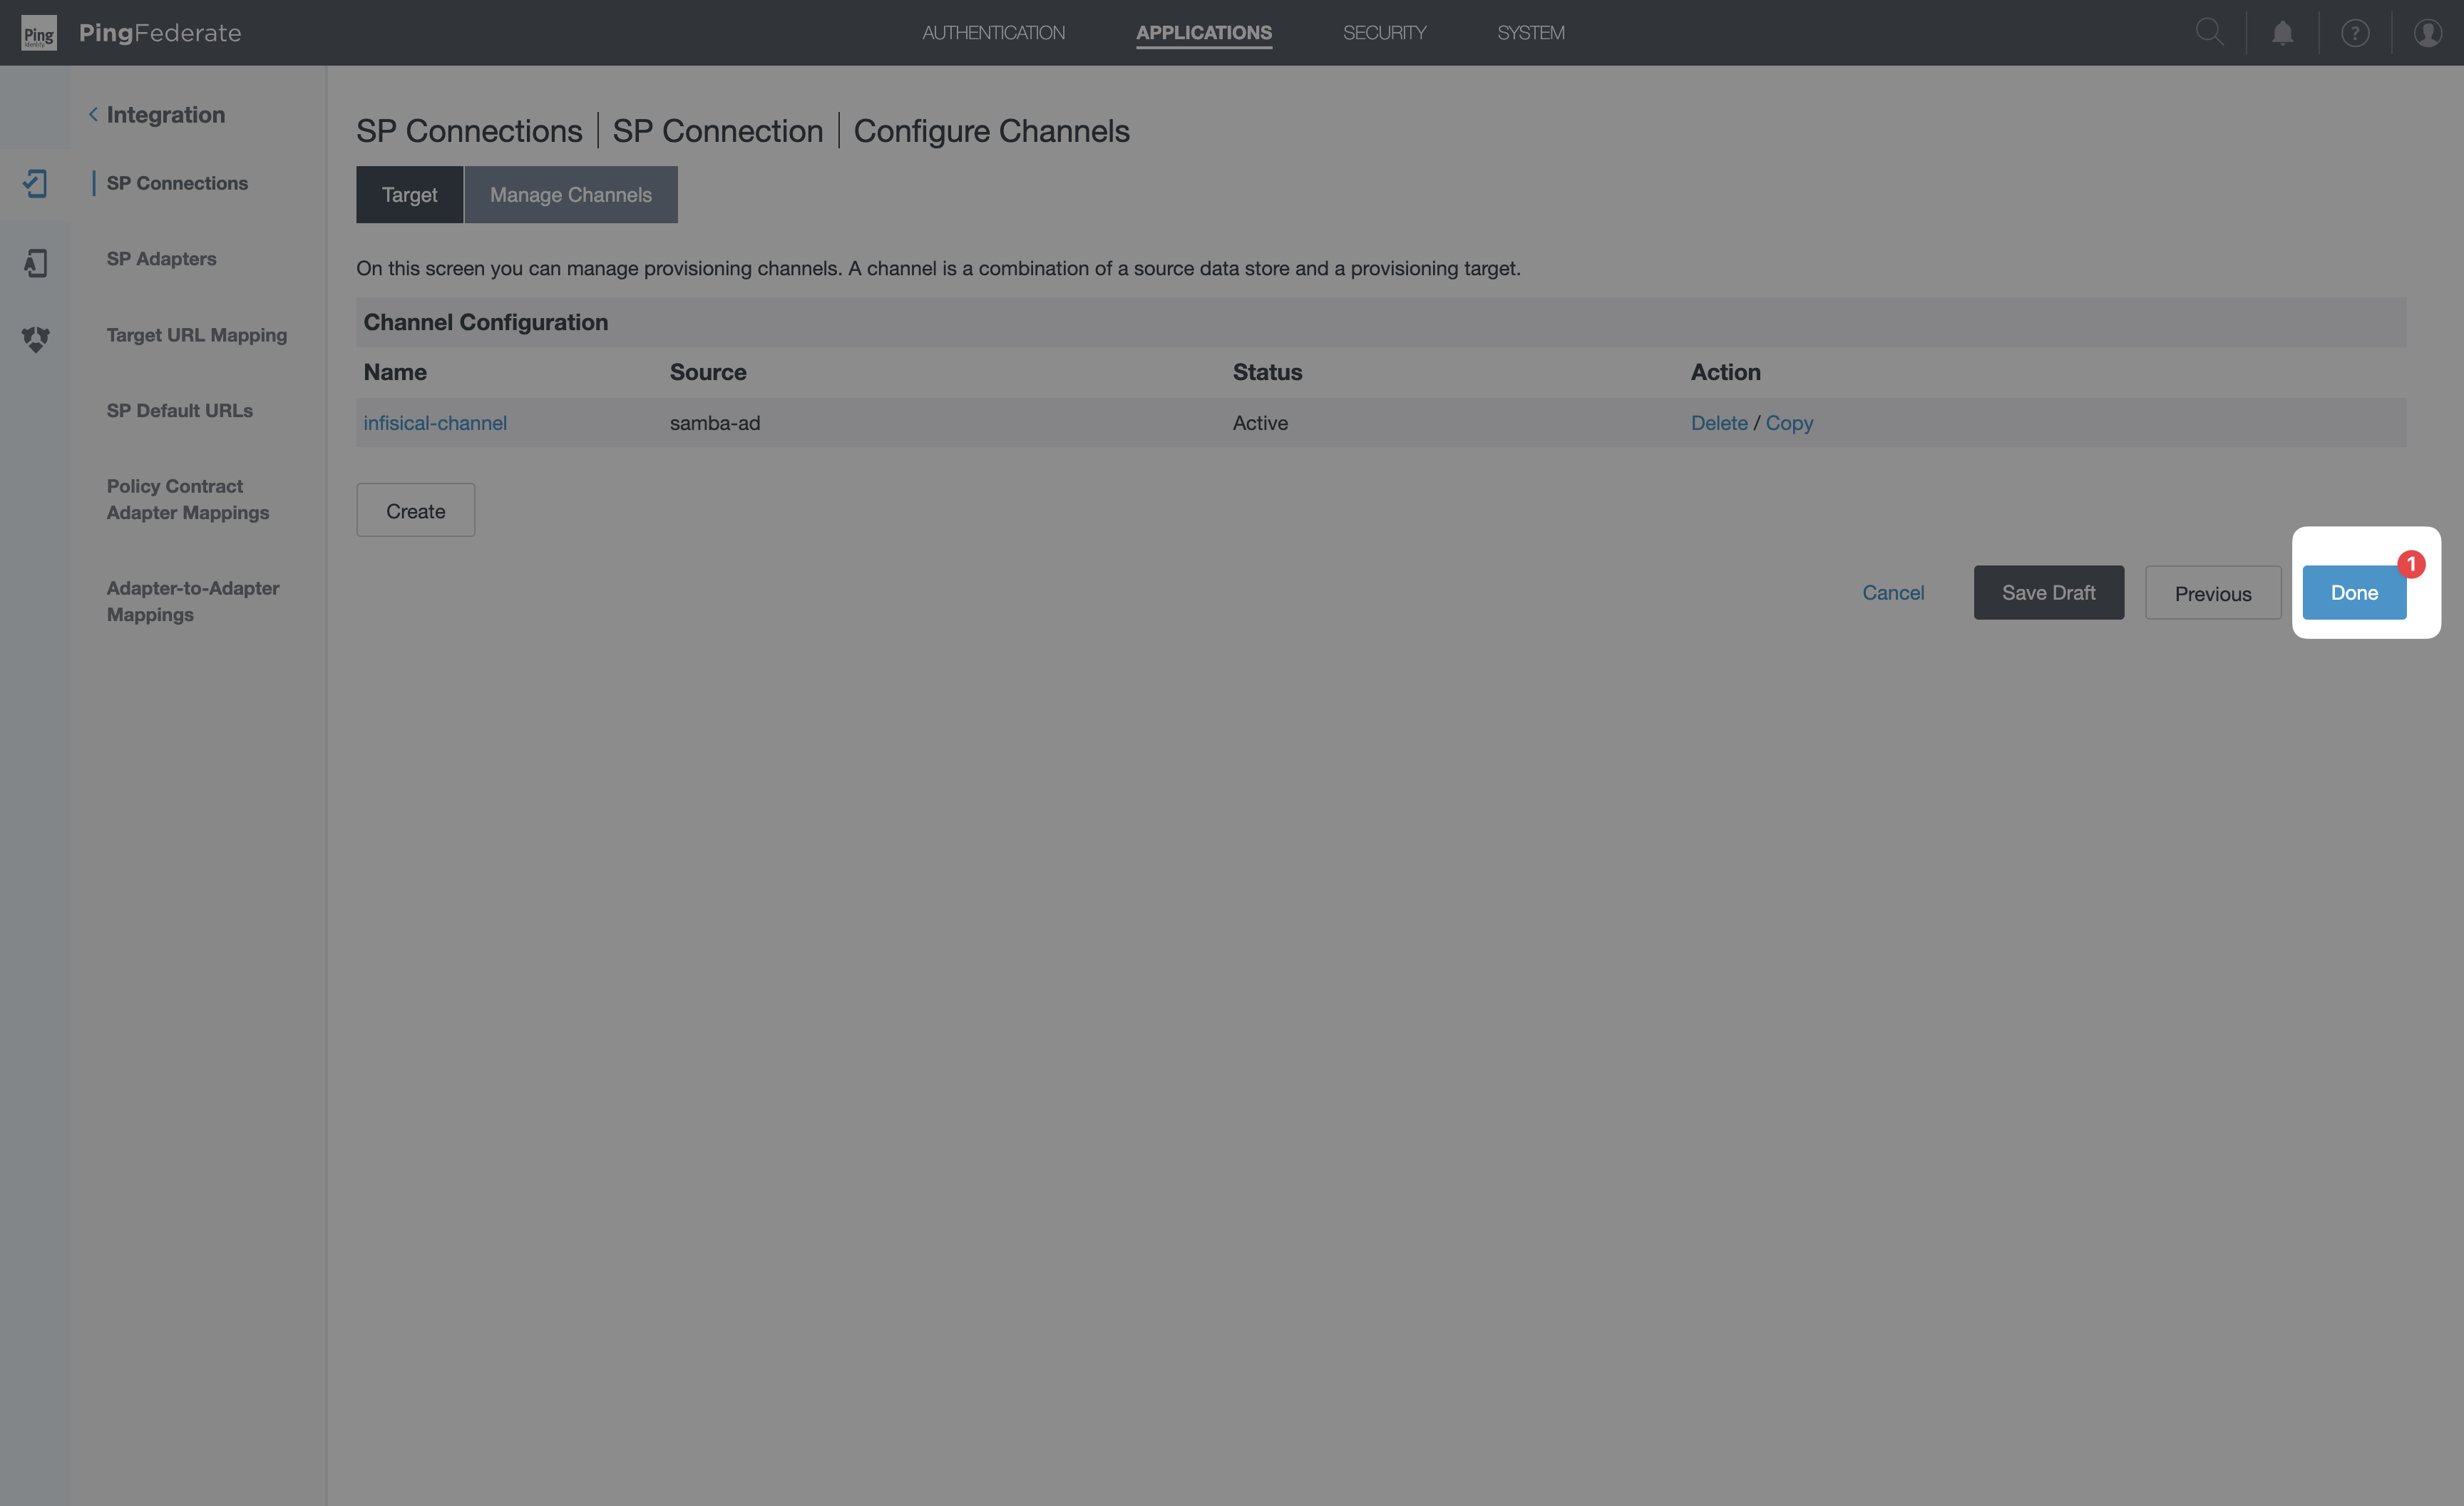 On the parent SP Connection wizard’s Outbound Provisioning tab, click Next.
 On Activation & Summary:
On the parent SP Connection wizard’s Outbound Provisioning tab, click Next.On Activation & Summary:- Set Connection Status to
Active. - Review the summary.
- Click Save.
10
Verify provisioning works
PingFederate runs the channel on the cadence set in System → Server → Protocol Settings → Outbound Provisioning → Synchronization Frequency (default 60 seconds). The first sync should run within that window of activation.Verify on three levels:1. PingFederate’s provisioner logTail If you see
<pf-install>/log/provisioner.log. Look for lines like:Connection refused or Service Unavailable errors, the SCIM URL host isn’t reachable from PingFederate — re-check Step 7.2. Infisical’s user listGo to Settings → Organization → Access Control → Users. Provisioned users appear as pending (invited) accounts.3. Infisical’s SCIM event logGo to Organization Settings → Provisioning → SCIM Events. Each successful POST/PUT/PATCH from PingFederate appears here with the SCIM payload — useful for diagnosing attribute-mapping mistakes.Troubleshooting
Sync runs successfully but Total users created is 0
Sync runs successfully but Total users created is 0
Either no users matched your Source Location → Filter, or every matching user already exists in Infisical (PingFederate tracks this in its Provisioner Data Store and skips re-creation).To diagnose: search PingFederate’s
provisioner.log for Processed N users and Users added: N lines from the most recent cycle. A zero Users added count means the filter is too restrictive or change-detection thinks nothing has changed.To force a re-provision: delete the entry for that channel from the Provisioner Data Store’s tracking tables, then trigger a new sync. (For development only — never do this in production.)Only SCIM 1.1 Service Provider appears in the Connection Type dropdown
Only SCIM 1.1 Service Provider appears in the Connection Type dropdown
The SCIM Connector Add-on isn’t loaded. Re-check Step 1 — confirm the jar landed in
<pf-install>/server/default/deploy/, PingFederate was restarted after the copy, and server.log has no errors loading the connector.LDAP attribute isn't appearing in the Attribute Mapping edit dropdown
LDAP attribute isn't appearing in the Attribute Mapping edit dropdown
The Root Object Class dropdown only exposes attributes defined directly on that class — not inherited ones. Common case:
sn is defined on person, not inetOrgPerson or user. Change the Root Object Class to the parent class that actually defines the attribute.Provisioning runs but no users land in Infisical, no errors in the logs
Provisioning runs but no users land in Infisical, no errors in the logs
Most likely: either the channel or the parent SP Connection is still in
Inactive status. Both must be Active. Confirm in both Configure Provisioning → Manage Channels (channel status column) and SP Connections list (connection status column).