InfisicalSecret custom resource definition (CRD).
In this CRD, you’ll define the authentication method to use, the secrets to fetch, and the target location to store the secrets within your cluster.
CRD properties
Generic
The following properties help define what instance of Infisical the operator will interact with, the interval it will sync secrets and any CA certificates that may be required to connect.hostAPI
hostAPI
hostAPI to
https://your-self-hosted-instace.com/apiWhen hostAPI is not defined the operator fetches secrets from Infisical Cloud.Advanced use case
Advanced use case
<backend-svc-name> and <namespace> with the appropriate values for your backend service and namespace.syncConfig
syncConfig
syncConfig.resyncInterval
syncConfig.resyncInterval
resyncInterval is a string-formatted duration that defines the time between each resync. The field is optional, and will default to 60 seconds if not defined.The format of the field is [duration][unit] where duration is a number and unit is a string representing the unit of time.The following units are supported:sfor seconds (must be at least 5 seconds)mfor minuteshfor hoursdfor dayswfor weeks
1m (1 minute) when instantUpdates is set to false, and 1h (1 hour) when instantUpdates is set to true.Valid expressions for the resyncInterval field:syncConfig.instantUpdates
syncConfig.instantUpdates
tls
tls
tls.caRef
tls.caRef
tls.caRef.secretName
tls.caRef.secretName
tls.caRef.secretNamespace
tls.caRef.secretNamespace
tls.caRef.key
tls.caRef.key
Authentication Methods
To retrieve the requested secrets, the operator must first authenticate with Infisical. The list of available authentication methods are shown below.authentication
authentication
authentication.universalAuth
authentication.universalAuth
Create a machine identity
Create Kubernetes secret containing machine identity credentials
<your-identity-client-id> with the identity client ID and <your-identity-client-secret> with the identity client secret.Add reference for the Kubernetes secret containing the identity credentials
secretName and secretNamespace of the secret that was just created under authentication.universalAuth.credentialsRef field in the InfisicalSecret resource.secretsScope field with the project slug
projectSlug, environment slug envSlug, and secrets path
secretsPath that you want to fetch secrets from. Please see the example
below.Example
authentication.kubernetesAuth
authentication.kubernetesAuth
Short-lived service account tokens (Recommended)
Short-lived service account tokens (Recommended)
Create a machine identity
 When creating an identity, you specify an organization level role for it to assume; you can configure roles in Organization Settings > Access Control > Organization Roles.
 Now input a few details for your new identity. Here’s some guidance for each field:
- Name (required): A friendly name for the identity.
- Role (required): A role from the Organization Roles tab for the identity to assume. The organization role assigned will determine what organization level resources this identity can have access to.

Add the identity to a project


Create a service account
Bind the reviewer service account
system:auth-delegator cluster role. This allows Infisical to perform delegated authentication checks against the TokenReview API.Manual long-lived service account tokens
Manual long-lived service account tokens
Create a token reviewer service account
Bind the reviewer service account
system:auth-delegator cluster role. This allows Infisical to perform delegated authentication checks against the TokenReview API.Create and retrieve the token reviewer JWT
Create a machine identity
When creating an identity, you specify an organization level role for it to assume; you can configure roles in Organization Settings Access Control Organization Roles.Now input a few details for your new identity. Here’s some guidance for each field:- Name (required): A friendly name for the identity.
- Role (required): A role from the Organization Roles tab for the identity to assume. The organization role assigned will determine what organization level resources this identity can have access to.
Add the identity to a project
Create the service account used for authentication
Create a long-lived token for the service account
Use Gateway as Reviewer
Use Gateway as Reviewer
system:auth-delegator ClusterRole binding.Deploying a gateway
Configure the Kubernetes Auth authentication method for the identity
Review Method to “Gateway as Reviewer”, and select the gateway you want to use as the token reviewer.You can select either an individual gateway or a Gateway Pool for automatic failover. When a pool is selected, the platform routes through a healthy gateway at request time. See Gateway Pools for more details.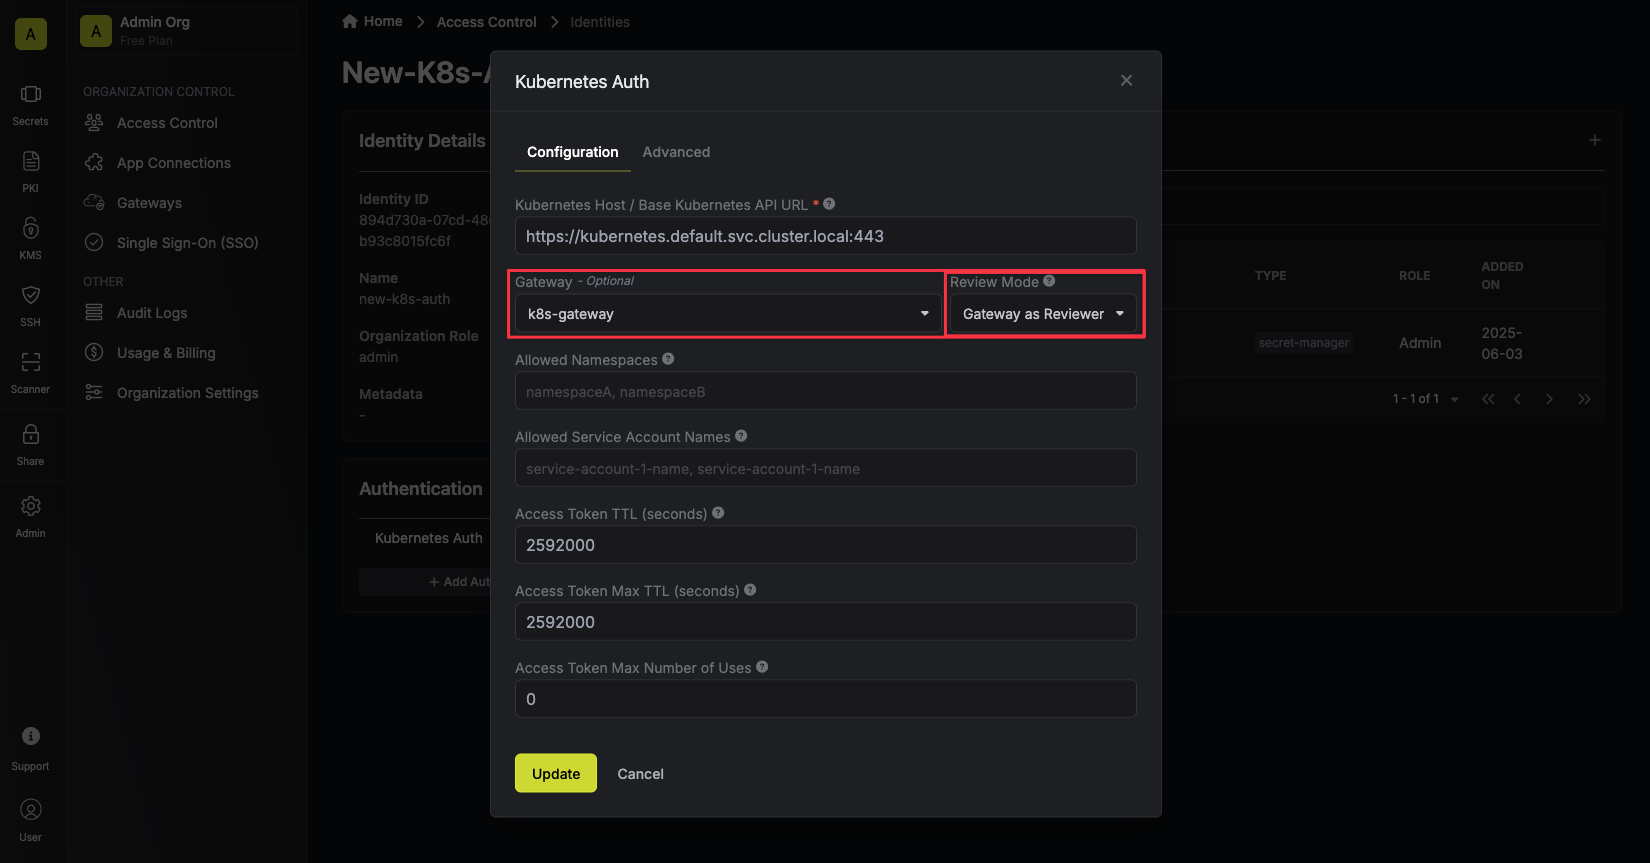
authentication.kubernetesAuth.identityId field, add the identity ID of the machine identity you created.
Under authentication.kubernetesAuth.serviceAccountRef, enter the name and namespace of the service account.If using short-lived tokens, set authentication.kubernetesAuth.autoCreateServiceAccountToken to true.secretsScope field with the project slug
projectSlug, or project ID projectId, environment slug envSlug, and secrets path
secretsPath that you want to fetch secrets from. Please see the examples
below.Please note that you can only use either projectSlug or projectId in the secretsScope field.Example with short-lived tokens
Example with short-lived tokens
Example with long-lived tokens
Example with long-lived tokens
authentication.awsIamAuth
authentication.awsIamAuth
Create a machine identity
Add your identity ID to your InfisicalSecret resource
authentication.awsIamAuth.identityId field, add the identity ID of the machine identity you created. See the example below for more details.secretsScope field with the project slug
projectSlug, or project ID projectId, environment slug envSlug, and secrets path
secretsPath that you want to fetch secrets from. Please see the example
below.Please note that you can only use either projectSlug or projectId in the secretsScope field.Example
authentication.azureAuth
authentication.azureAuth
Create a machine identity
Add your identity ID to your InfisicalSecret resource
authentication.azureAuth.identityId field, add the identity ID of the machine identity you created. See the example below for more details.secretsScope field with the project slug
projectSlug, or project ID projectId, environment slug envSlug, and secrets path
secretsPath that you want to fetch secrets from. Please see the example
below.Please note that you can only use either projectSlug or projectId in the secretsScope field.Example
authentication.gcpIdTokenAuth
authentication.gcpIdTokenAuth
Create a machine identity
Add your identity ID to your InfisicalSecret resource
authentication.gcpIdTokenAuth.identityId field, add the identity ID of the machine identity you created. See the example below for more details.secretsScope field with the project slug
projectSlug, or project ID projectId, environment slug envSlug, and secrets path
secretsPath that you want to fetch secrets from. Please see the example
below.Please note that you can only use either projectSlug or projectId in the secretsScope field.Example
authentication.gcpIamAuth
authentication.gcpIamAuth
Create a machine identity
Add your identity ID and service account token path to your InfisicalSecret resource
authentication.gcpIamAuth.identityId field, add the identity ID of the machine identity you created.
You’ll also need to add the service account key file path to your InfisicalSecret resource. In the authentication.gcpIamAuth.serviceAccountKeyFilePath field, add the path to your service account key file path. Please see the example below for more details.secretsScope field with the project slug
projectSlug, or project ID projectId, environment slug envSlug, and secrets path
secretsPath that you want to fetch secrets from. Please see the example
below.Please note that you can only use either projectSlug or projectId in the secretsScope field.Example
authentication.ldapAuth
authentication.ldapAuth
Create a machine identity
Create Kubernetes secret containing machine identity credentials
<your-identity-ldap-username> with the identity LDAP username and <your-identity-ldap-password> with the identity LDAP password.Add reference for the Kubernetes secret containing the identity credentials
secretName and secretNamespace of the secret that was just created under authentication.ldapAuth.credentialsRef field in the InfisicalSecret resource.secretsScope field with the project slug
projectSlug, or project ID projectId, environment slug envSlug, and secrets path
secretsPath that you want to fetch secrets from. Please see the example
below.Please note that you can only use either projectSlug or projectId in the secretsScope field.Example
authentication.serviceToken
authentication.serviceToken
1. Generate service token
You can generate a service token for an Infisical project by heading over to the Infisical dashboard then to Project Settings.2. Create Kubernetes secret containing service token
Once you have generated the service token, you will need to create a Kubernetes secret containing the service token you generated. To quickly create a Kubernetes secret containing the generated service token, you can run the command below. Make sure you replace<your-service-token-here> with your service token.3. Add reference for the Kubernetes secret containing service token
Once the secret is created, add the name and namespace of the secret that was just created underauthentication.serviceToken.serviceTokenSecretReference field in the InfisicalSecret resource.secretsScope field with the, environment slug
envSlug, and secrets path secretsPath that you want to fetch secrets
from. Please see the example below.Example
Operator Managed Secrets
The managed secret properties specify where to store the secrets retrieved from your Infisical project. This includes defining the name and namespace of the Kubernetes secret that will hold these secrets. The Infisical operator will automatically create the Kubernetes secret in the specified name/namespace and ensure it stays up-to-date.managedSecretReference field is deprecated and will be removed in a future release.
Replace it with managedKubeSecretReferences, which now accepts an array of references to support multiple managed secrets in a single InfisicalSecret CRD.Example:managedKubeSecretReferences
managedKubeSecretReferences
managedKubeSecretReferences[].secretName
managedKubeSecretReferences[].secretName
managedKubeSecretReferences[].secretNamespace
managedKubeSecretReferences[].secretNamespace
managedKubeSecretReferences[].secretType
managedKubeSecretReferences[].secretType
managedKubeSecretReferences[].creationPolicy
managedKubeSecretReferences[].creationPolicy
Available options
Orphan(default)Owner
Managed Secret Templating
Fetching secrets from Infisical as is via the operator may not be enough. This is where templating functionality may be helpful. Using Go templates, you can format, combine, and create new key-value pairs from secrets fetched from Infisical before storing them as Kubernetes Secrets.managedKubeSecretReferences[].template
managedKubeSecretReferences[].template
managedKubeSecretReferences[].template.includeAllSecrets
managedKubeSecretReferences[].template.includeAllSecrets
true, all secrets fetched from your Infisical project will be added into your managed Kubernetes secret resource.
Use this option when you would like to sync all secrets from Infisical to Kubernetes but want to template a subset of them.When set to false, only secrets defined in the managedKubeSecretReferences[].template.data field of the template will be included in the managed secret.
Use this option when you would like to sync only a subset of secrets from Infisical to Kubernetes.managedKubeSecretReferences[].template.data
managedKubeSecretReferences[].template.data
Example template configuration:
Available helper functions
The Infisical Secrets Operator exposes a wide range of helper functions to make it easier to work with secrets in Kubernetes.encodeBase64
encodeBase64
hello world becomes aGVsbG8gd29ybGQ=).SignaturedecodeBase64ToBytes
decodeBase64ToBytes
aGVsbG8gd29ybGQ= becomes hello world).Signaturepkcs12key
pkcs12key
-----BEGIN PRIVATE KEY-----...).
The archive must not be password-protected — use pkcs12keyPass for password-protected archives.Signaturepkcs12keyPass
pkcs12keyPass
pkcs12key, but uses the provided password to decrypt the PKCS#12 archive.Signaturepkcs12cert
pkcs12cert
-----BEGIN CERTIFICATE-----...).
Sort order: leaf → intermediate(s) → root. If disjunct or multiple leaf certs are provided, they are returned as-is.
The archive must not be password-protected — use pkcs12certPass for password-protected archives.Signaturepkcs12certPass
pkcs12certPass
pkcs12cert, but uses the provided password to decrypt the PKCS#12 archive.SignaturepemToPkcs12
pemToPkcs12
pemToPkcs12Pass to set a password.SignaturepemToPkcs12Pass
pemToPkcs12Pass
pemToPkcs12, but encrypts the PKCS#12 archive with the provided password.SignaturefullPemToPkcs12
fullPemToPkcs12
fullPemToPkcs12Pass to set a password.SignaturefullPemToPkcs12Pass
fullPemToPkcs12Pass
fullPemToPkcs12, but encrypts the PKCS#12 archive with the provided password.SignaturefilterPEM
filterPEM
CERTIFICATE or PRIVATE KEY blocks).
Common PEM types: CERTIFICATE, PRIVATE KEY, PUBLIC KEY, RSA PRIVATE KEY.SignaturefilterCertChain
filterCertChain
leaf (end-entity certificate), intermediate (all intermediate CA certificates), root (root CA certificate).
Returns an empty string if the requested type is not present in the chain.SignaturejwkPublicKeyPem
jwkPublicKeyPem
PUBLIC KEY containing the public key.
Uses x509.MarshalPKIXPublicKey internally.SignaturejwkPrivateKeyPem
jwkPrivateKeyPem
PRIVATE KEY containing the private key.
Uses x509.MarshalPKCS8PrivateKey internally.SignaturetoYaml
toYaml
fromYaml
fromYaml
map[string]any, useful for extracting individual fields from a YAML-formatted secret (e.g. (fromYaml .DB_CONFIG.Value).host returns the host field).SignaturesecretFrom
secretFrom
v1beta1 resources (e.g. InfisicalStaticSecret)..Value or .SecretPath accessors on the result — if omitted, .Value is used.This is especially useful when multiple secrets share the same key, either from recursive fetches across different paths or from multiple sources. In both cases, the merge strategy only keeps the first occurrence (read more here), so secretFrom lets you explicitly select the one you need by its full path.sources array will be used.Sprig functions
The Infisical Secrets Operator integrates with the Sprig library to provide additional helper functions.expandEnv and env from the supported functions for security reasons.managedKubeSecretReferences[].template.metadata
managedKubeSecretReferences[].template.metadata
Operator Managed ConfigMaps
The managed config map properties specify where to store the secrets retrieved from your Infisical project. Config maps can be used to store non-sensitive data, such as application configuration variables. The properties includes defining the name and namespace of the Kubernetes config map that will hold the data retrieved from your Infisical project. The Infisical operator will automatically create the Kubernetes config map in the specified name/namespace and ensure it stays up-to-date. If a config map already exists in the specified namespace, the operator will update the existing config map with the new data.managedKubeConfigMapReferences
managedKubeConfigMapReferences
managedKubeConfigMapReferences[].configMapName
managedKubeConfigMapReferences[].configMapName
managedKubeConfigMapReferences[].configMapNamespace
managedKubeConfigMapReferences[].configMapNamespace
managedKubeConfigMapReferences[].creationPolicy
managedKubeConfigMapReferences[].creationPolicy
Available options
Orphan(default)Owner
Managed ConfigMap Templating
Fetching secrets from Infisical as is via the operator may not be enough. This is where templating functionality may be helpful. Using Go templates, you can format, combine, and create new key-value pairs from secrets fetched from Infisical before storing them as Kubernetes Config Maps.managedKubeConfigMapReferences[].template
managedKubeConfigMapReferences[].template
managedKubeConfigMapReferences[].template.includeAllSecrets
managedKubeConfigMapReferences[].template.includeAllSecrets
true, all secrets fetched from your Infisical project will be added into your managed Kubernetes config map resource.
Use this option when you would like to sync all secrets from Infisical to Kubernetes but want to template a subset of them.When set to false, only secrets defined in the managedKubeConfigMapReferences[].template.data field of the template will be included in the managed config map.
Use this option when you would like to sync only a subset of secrets from Infisical to Kubernetes.managedKubeConfigMapReferences[].template.data
managedKubeConfigMapReferences[].template.data
Example template configuration:
Available helper functions
The Infisical Secrets Operator exposes a wide range of helper functions to make it easier to work with secrets in Kubernetes.encodeBase64
encodeBase64
hello world becomes aGVsbG8gd29ybGQ=).SignaturedecodeBase64ToBytes
decodeBase64ToBytes
aGVsbG8gd29ybGQ= becomes hello world).Signaturepkcs12key
pkcs12key
-----BEGIN PRIVATE KEY-----...).
The archive must not be password-protected — use pkcs12keyPass for password-protected archives.Signaturepkcs12keyPass
pkcs12keyPass
pkcs12key, but uses the provided password to decrypt the PKCS#12 archive.Signaturepkcs12cert
pkcs12cert
-----BEGIN CERTIFICATE-----...).
Sort order: leaf → intermediate(s) → root. If disjunct or multiple leaf certs are provided, they are returned as-is.
The archive must not be password-protected — use pkcs12certPass for password-protected archives.Signaturepkcs12certPass
pkcs12certPass
pkcs12cert, but uses the provided password to decrypt the PKCS#12 archive.SignaturepemToPkcs12
pemToPkcs12
pemToPkcs12Pass to set a password.SignaturepemToPkcs12Pass
pemToPkcs12Pass
pemToPkcs12, but encrypts the PKCS#12 archive with the provided password.SignaturefullPemToPkcs12
fullPemToPkcs12
fullPemToPkcs12Pass to set a password.SignaturefullPemToPkcs12Pass
fullPemToPkcs12Pass
fullPemToPkcs12, but encrypts the PKCS#12 archive with the provided password.SignaturefilterPEM
filterPEM
CERTIFICATE or PRIVATE KEY blocks).
Common PEM types: CERTIFICATE, PRIVATE KEY, PUBLIC KEY, RSA PRIVATE KEY.SignaturefilterCertChain
filterCertChain
leaf (end-entity certificate), intermediate (all intermediate CA certificates), root (root CA certificate).
Returns an empty string if the requested type is not present in the chain.SignaturejwkPublicKeyPem
jwkPublicKeyPem
PUBLIC KEY containing the public key.
Uses x509.MarshalPKIXPublicKey internally.SignaturejwkPrivateKeyPem
jwkPrivateKeyPem
PRIVATE KEY containing the private key.
Uses x509.MarshalPKCS8PrivateKey internally.SignaturetoYaml
toYaml
fromYaml
fromYaml
map[string]any, useful for extracting individual fields from a YAML-formatted secret (e.g. (fromYaml .DB_CONFIG.Value).host returns the host field).SignaturesecretFrom
secretFrom
v1beta1 resources (e.g. InfisicalStaticSecret)..Value or .SecretPath accessors on the result — if omitted, .Value is used.This is especially useful when multiple secrets share the same key, either from recursive fetches across different paths or from multiple sources. In both cases, the merge strategy only keeps the first occurrence (read more here), so secretFrom lets you explicitly select the one you need by its full path.sources array will be used.Sprig functions
The Infisical Secrets Operator integrates with the Sprig library to provide additional helper functions.expandEnv and env from the supported functions for security reasons.managedKubeConfigMapReferences[].template.metadata
managedKubeConfigMapReferences[].template.metadata
template.metadata for managed secrets. For detailed information on how metadata propagation works and examples, see the Propagating Labels & Annotations section.Applying CRD
Once you have configured the InfisicalSecret CRD with the required fields, you can apply it to your cluster. After applying, you should notice that the managed secret has been created in the desired namespace your specified.- Managed Secret
- Managed ConfigMap
Using Managed Secret In Your Deployment
To make use of the managed secret created by the operator into your deployment can be achieved through several methods. Here, we will highlight three of the most common ways to utilize it. Learn more about Kubernetes secrets hereenvFrom
envFrom
env
env
volumes
volumes
Automatic Redeployment
Deployments using managed secrets don’t reload automatically on updates, so they may use outdated secrets unless manually redeployed. To address this, we added functionality to automatically redeploy your deployment when its managed secret updates.Enabling Automatic Redeployment
To enable auto redeployment you simply have to add the following annotation to the Deployment, StatefulSet, or DaemonSet that consumes a managed secret.Deployment example
Deployment example
DaemonSet example
DaemonSet example
StatefulSet example
StatefulSet example
How it works When a managed secret is updated, the operator checks for
any Deployments, DaemonSets, or StatefulSets that consume the updated secret and have the annotationsecrets.infisical.com/auto-reload: "true". For each
matching workload, the operator triggers a rolling restart to ensure it picks
up the latest secret values.Using Managed ConfigMap In Your Deployment
To make use of the managed ConfigMap created by the operator into your deployment can be achieved through several methods. Here, we will highlight three of the most common ways to utilize it. Learn more about Kubernetes ConfigMaps hereenvFrom
envFrom
env
env
volumes
volumes
Propagating Labels & Annotations
The operator provides flexible options for managing labels and annotations on managed Kubernetes secrets.Default Behavior (Without template.metadata)
Default Behavior (Without template.metadata)
InfisicalSecret to the managed Kubernetes secret to be created.Example
Custom Metadata (With template.metadata)
Custom Metadata (With template.metadata)
template.metadata in your template configuration, you have full control over which labels and annotations are applied to the managed secret:- Labels and annotations from
template.metadataare used exclusively on the managed secret - InfisicalSecret labels and annotations are NOT propagated to the managed secret
- This allows you to keep InfisicalSecret-specific metadata separate from the managed secret metadata