- Install the Infisical Kubernetes Operator and set up a Machine Identity with Kubernetes Auth.
- Connect the operator to Infisical with the
InfisicalConnectionandInfisicalAuthCRDs. - Pull a secret from Infisical into your cluster with the
InfisicalStaticSecretCRD and consume it from a demo app. - Push a Kubernetes Secret back to Infisical with the
InfisicalPushSecretCRD. - Generate a dynamic database credential in your cluster with the
InfisicalDynamicSecretCRD.
This tutorial’s pull path uses the operator’s
v1beta1 decoupled model: an InfisicalConnection says where your Infisical instance is, an InfisicalAuth says how the operator authenticates, and an InfisicalStaticSecret says which secrets sync where.Pushing and dynamic secrets have no v1beta1 equivalents, so those sections use the v1alpha1 InfisicalPushSecret and InfisicalDynamicSecret CRDs, which each carry their own inline authentication block. See the Kubernetes Operator overview for the other CRDs and authentication methods.Prerequisites
Before you begin, make sure you have:- helm, kubectl, and jq installed.
- Access to a running Kubernetes cluster that
kubectlis pointed at, with an API server reachable from your Infisical instance. Confirm withkubectl cluster-info. - Access to an Infisical instance, either Infisical Cloud or a self-hosted instance.
- A PostgreSQL database reachable from your Infisical instance, for the dynamic-secret step.
Dynamic Secrets are available under the Pro Tier and Enterprise Tier on Infisical Cloud.If you’re self-hosting Infisical, contact team@infisical.com to purchase an enterprise license.
Set up the operator and identity groundwork
Install the Infisical Operator
The Infisical Operator runs inside your cluster and reconciles the secret-synchronization resources you create.The Helm chart installs every operator CRD, including the You should see a pod whose name begins with
v1beta1 InfisicalConnection, InfisicalAuth, and InfisicalStaticSecret kinds this tutorial uses for the pull path.Confirm the operator pod is running:infisical-opera-controller-manager- in the Running state with 1/1 ready:The
infisical-opera prefix comes from the Helm release and chart names truncated to 15 characters, so a different release name changes it. helm install also uses your current kubeconfig namespace: if the pod is not under -n default, run kubectl get pods -A | grep infisical to find it, and adjust the -n flag in later commands to match.Create a Machine Identity
The operator authenticates to Infisical with a Machine Identity using the Kubernetes Auth method.
- Log in to Infisical.
- Select Access Control from the left navigation pane.
- Open the Machine Identities tab and create an identity. Give it a name and assign it the Member organization role. You grant it project-level access in the next step.
- Copy the Identity ID and record it. It lands in two different places later:
- Pull path: you store it in a Kubernetes Secret named
kubernetes-credentials. TheInfisicalAuthCRD reads it from there throughidentityIdRef. It is never pasted inline for pull. - Push and dynamic: you paste it inline as
identityIdin each CRD’sauthentication.kubernetesAuthblock.
- Pull path: you store it in a Kubernetes Secret named
- Select the identity, then add a Kubernetes Auth method with these values:
- Allowed Service Account Names:
infisical-service-account - Allowed Namespaces:
default - Kubernetes Host URL: the control-plane URL from
kubectl cluster-info. It is the line beginning “Kubernetes control plane is running at”. This URL must be reachable from your Infisical instance, as covered in the prerequisites. - Token Reviewer JWT and CA Certificate: leave both blank for now. You generate these in the next steps and return to paste them in. The CA Certificate field is on the Advanced tab.
- Allowed Service Account Names:
You will return to this Kubernetes Auth method in the “Wire up the Kubernetes Auth method” step. With this tutorial’s RBAC setup, authentication fails until you paste the Token Reviewer JWT. The CA certificate is optional but recommended.
Create a project and add a secret
- Navigate back to Overview and select Add New Project.
- Enter a Project Name and select Secrets Management as the product type.
- Add a description (optional).
- Open the project and add a secret. Use these values so they match the
InfisicalStaticSecretCRD later in this tutorial:- Key:
SMTP_HOST - Value:
smtp@gmail.com - Environment:
Production
- Key:
- Record the Project Slug and confirm the environment slug; you need both for the CRDs.
- In Project Settings, copy the Slug field (distinct from the project name). It fills the
projectSlugfield in every CRD. - In Project Settings > Environments, find the Production environment’s slug. It is usually
prod, but confirm it: each CRD’s environment field must match exactly, or the sync targets the wrong environment.
- In Project Settings, copy the Slug field (distinct from the project name). It fills the
- Open the Project Access tab and add the Machine Identity you created. Grant it Admin permissions for this tutorial.
Admin is used here only to keep the tutorial simple. In production, scope the identity to the least privilege it needs.
Create service accounts, RBAC, and tokens
The Kubernetes Auth method needs two Kubernetes service accounts:Create a long-lived token secret for it:Bind the token-reviewer service account to the built-in Create the operator’s working service account and its token secret:Associate the token secret with the service account:You should see
infisical-token-reviewer: its JWT lets the Infisical backend call the Kubernetes TokenReview API to validate tokens presented by the operator. It serves both the pull path and the push/dynamic path.infisical-service-account: the identity the operator presents when it authenticates to Infisical.
system:auth-delegator ClusterRole. This lets the Infisical backend, acting with this service account’s JWT, submit TokenReview requests. Without this binding, TokenReview calls are denied.serviceaccount/infisical-service-account patched.The
infisical-service-account-token Secret and the kubectl patch serve only the v1alpha1 push and dynamic CRDs, which read the service account’s stored token. The v1beta1 pull path does not use them: InfisicalAuth mints a short-lived token (10 minutes) through the Kubernetes TokenRequest API on every login.The service-account names and namespaces above must match the Allowed Service Account Names (
infisical-service-account) and Allowed Namespaces (default) you set on the Kubernetes Auth method. They must also match the serviceAccountRef in the InfisicalAuth CRD and in the push and dynamic CRDs’ inline kubernetesAuth blocks. Do not rename them.Verify the service accounts and tokens
Confirm the two service accounts exist:You should see You should see
infisical-token-reviewer and infisical-service-account (alongside the operator’s own infisical-opera-controller-manager service account).Confirm the two token secrets exist:infisical-token-reviewer-token and infisical-service-account-token, each of type kubernetes.io/service-account-token. The operator’s own Helm release secret (sh.helm.release.v1.infisical-operator...) also matches the grep; ignore it.Wire up the Kubernetes Auth method
Now retrieve the reviewer JWT and CA certificate, then paste them into the Machine Identity’s Kubernetes Auth method to complete the auth loop you left open earlier.Print the Token Reviewer JWT:Print the cluster CA certificate:Then, in Infisical:After saving, the Machine Identity can authenticate operator requests.
- Open the Machine Identity and open its Kubernetes Auth method for editing.
- Paste the decoded JWT into the Token Reviewer JWT field.
- Switch to the Advanced tab and paste the decoded certificate into the CA Certificate field.
- Save the configuration.
The CA Certificate field is optional and pairs with the Verify TLS Certificate toggle on the Advanced tab. When that toggle is on, Infisical validates the Kubernetes API server’s TLS certificate against this CA. You can save with the CA left empty, but for production keep verification on and provide the cluster CA.
Connect the operator to Infisical
Thev1beta1 pull path splits connection and authentication into two reusable objects. The InfisicalConnection records where your Infisical instance is. The InfisicalAuth records how the operator authenticates to it. Any number of InfisicalStaticSecret resources can then share the same pair.
Create the InfisicalConnection
Save the manifest below as Apply the resource:On each reconcile, the operator health-checks the instance by calling You should see If
infisical-connection.yaml:If you self-host Infisical, set
spec.address to your instance’s base URL instead, for example https://infisical.example.com. Provide the base URL only, without a trailing /api. The InfisicalStaticSecret pull path uses spec.address exactly as written and appends the API path itself, so an address that ends in /api produces failing requests to /api/api/.... For the same reason, always set spec.address explicitly. The operator’s INFISICAL_HOST_API fallback, which the Helm chart sets to https://app.infisical.com/api, ends in /api and does not work for the pull path.<address>/api/status and sets the secrets.infisical.com/IsReady condition on the result. Healthy connections are re-checked every 5 minutes. Confirm the connection is ready:True in the READY column:READY is not True, see the Troubleshooting section at the end of this tutorial.Store the Identity ID in a Kubernetes Secret
In Confirm the Secret exists and holds the You should see
v1beta1, the Machine Identity ID is never written inline in a manifest. InfisicalAuth reads it from a Kubernetes Secret through a reference. Create that Secret now. Replace your-identity-id with the Identity ID you recorded:identityId key:["identityId"].Create the InfisicalAuth
The Field notes:On reconcile, the operator performs a real login against the connection. The referenced You should see For detail,
InfisicalAuth ties everything together: it references the connection, names the auth method, points at the Identity ID Secret, and names the service account the operator presents. Save the manifest below as infisical-auth.yaml:identityIdRefnames the Secret (name,namespace) and the data key (key) holding the Identity ID. There is no inlineidentityIdfield inv1beta1.serviceAccountRefmust name theinfisical-service-accountyou created. The operator mints a fresh 10-minute token for it via the TokenRequest API on every login.methodselects the authentication method; this tutorial useskubernetes. See theInfisicalAuthreference for the other methods.
InfisicalConnection must be ready first. Confirm the auth is ready:True in the READY column:kubectl describe infisicalauth infisical-auth -n default shows the secrets.infisical.com/IsReady and secrets.infisical.com/AuthMethod conditions. If the login fails, this is where the error message lands; see Troubleshooting.Pull a secret with the InfisicalStaticSecret CRD
TheInfisicalStaticSecret CRD tells the operator to fetch secrets from Infisical (sources) and write them into native Kubernetes objects (targets). It authenticates through the InfisicalAuth you just created.
Create the InfisicalStaticSecret resource
Save the manifest below as Each recorded value now lands here:
infisical-static-secret.yaml. Replace your-project-slug and the environment slug you confirmed (prod unless yours differs).Field notes:
- Each source sets exactly one of
projectSlugorprojectId, plus a requiredenvironmentSlugandsecretPath. Setting both or neither project field makes the reconcile fail; the error surfaces in the resource’s status conditions. syncOptions.refreshIntervalis required. It takes the form<number><unit>with unitss,m,h,d, orw, and must be at least 5 seconds. SetinstantUpdates: trueto also receive near-real-time updates over server-sent events; availability is plan-gated server-side.- Each target requires
name,namespace,kind(SecretorConfigMap), andcreationPolicy.Ownermarks the managed object as owned by the CRD, so it is deleted with it;Orphanleaves the object behind. Targets can also apply templates to transform the data.
Verify the InfisicalStaticSecret synced
Confirm the resource synced. If the You should see Confirm the operator created the managed secret:View the secret contents:You should see a base64-encoded entry for
SYNCED column is empty at first, wait a few seconds for the first reconcile and run it again:True in the SYNCED column:SMTP_HOST.Deploy a demo app that consumes the secret
Save this Deployment as Apply it:Wait 15 to 20 seconds, then confirm the deployment and pod are ready:
demo-deployment.yaml. It mounts managed-secret as environment variables into an nginx pod.Push a secret with the InfisicalPushSecret CRD
TheInfisicalPushSecret CRD does the reverse: it reads a Kubernetes Secret and writes its values into Infisical.
This v1alpha1 CRD does not use the InfisicalConnection or InfisicalAuth objects; it carries its own inline authentication block with the Identity ID pasted as a plain identityId string.
Create the InfisicalPushSecret resource
Save the manifest below as Note the differences from the pull flow you built with Apply the resource:
push-secret.yaml. Replace your-identity-id and your-project-slug, and set environmentSlug to the environment you want to push into (the slug you confirmed earlier).InfisicalStaticSecret:- Authentication is inline. The CRD carries its own
authentication.kubernetesAuthblock, with the Identity ID as a plainidentityIdstring and the sameserviceAccountRef. The shared connection and auth objects are not in play here. - Scope lives under
spec.destination(projectSlug,environmentSlug,secretsPath) instead ofspec.sources, and the environment field isenvironmentSlug. - The direction reverses:
push.secretnames the source Kubernetes Secret to read from, and there are notargets. updatePolicy: Replacemakes the operator overwrite values that already exist in Infisical. Without it, pre-existing Infisical secrets are left untouched.deletionPolicy: Deletemakes the operator remove the pushed secrets from Infisical when you delete this CRD. This matters during cleanup.push.secret.secretNamemust match the source secret you created (push-secret-demo).
In
spec.destination, set exactly one of projectSlug or projectId. Setting both, or neither, makes the reconcile fail: kubectl apply still succeeds, and the error surfaces in the resource’s status conditions.If you self-host Infisical, point this CRD at your instance with the optional
spec.hostAPI field, or set the hostAPI Helm value for the operator. When neither is set, the operator’s default is https://app.infisical.com/api.Verify the push reached Infisical
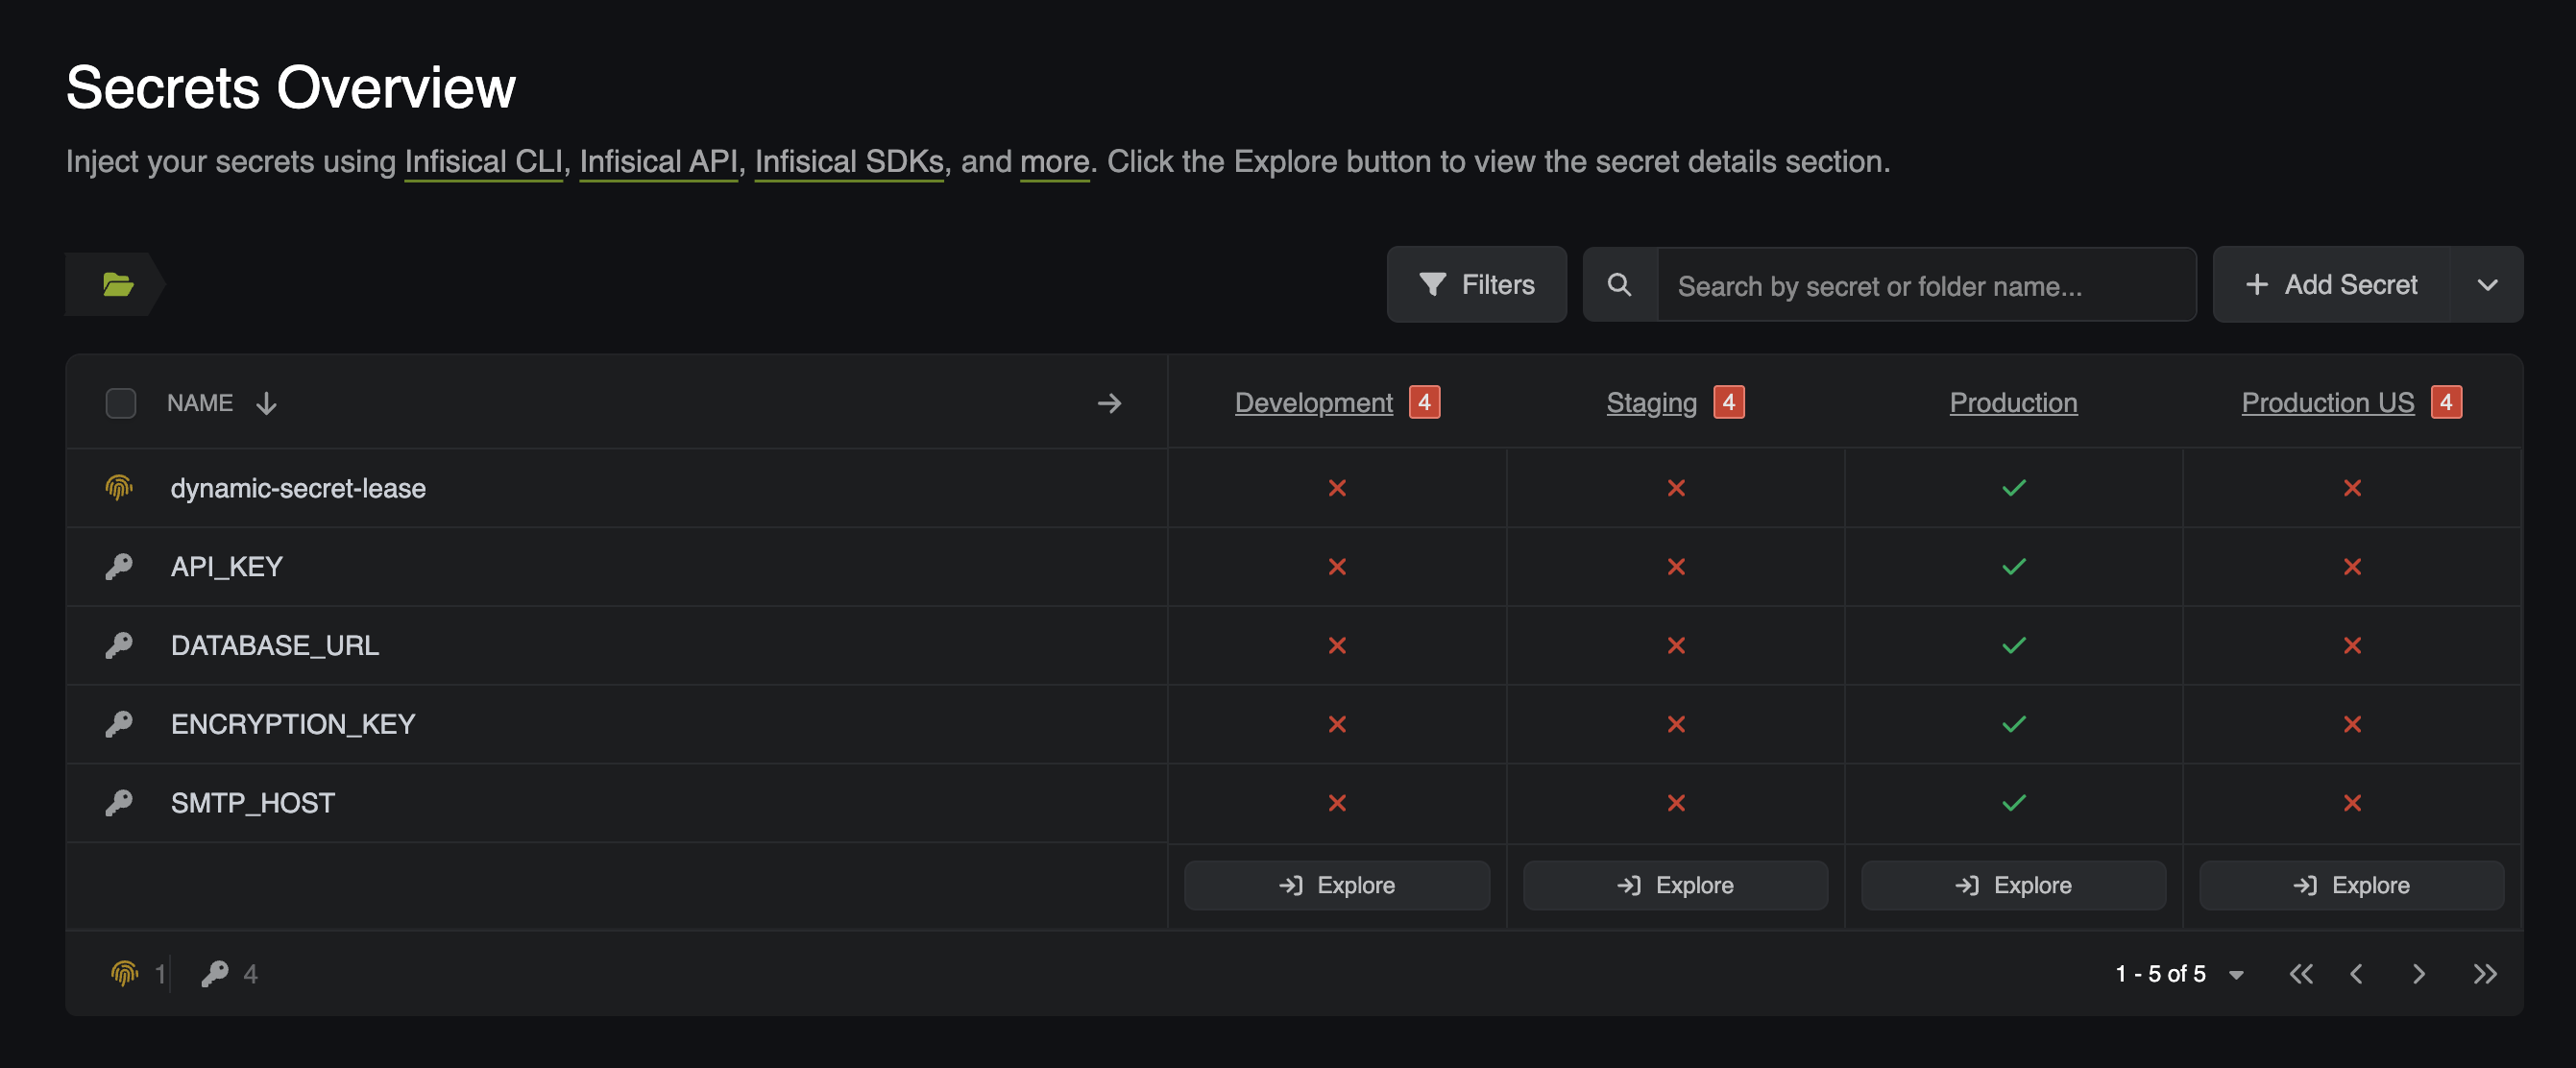
Open your project in Infisical, select the environment you pushed to, and confirm 
API_KEY now appears. The operator pushes when you apply the resource and again whenever it changes; it does not re-sync on a timer unless you set spec.resyncInterval (for example 1m). If API_KEY is missing, check the resource’s status conditions and the operator logs as described in Troubleshooting.Generate a dynamic secret with the InfisicalDynamicSecret CRD
TheInfisicalDynamicSecret CRD tells the operator to create and lease a Dynamic Secret, then write the lease credentials into a Kubernetes Secret that any workload can consume. Like the push CRD, it is a v1alpha1 resource with its own inline authentication block; the shared connection and auth objects are not used here.
Create the dynamic secret in Infisical
- In your project, open the dropdown next to Add Secret and select Add Dynamic Secret.
- Select SQL Database, then PostgreSQL as the provider.
- Enter your database’s Host, Port, User, Password, and Database Name. The database must be network-reachable from your Infisical instance, as noted in the prerequisites.
- In the CA (SSL) section, upload your database’s CA certificate if it enforces TLS with a custom CA. If it does not require a custom CA, leave this empty.
-
Set the Secret Name to
dynamic-secret-lease. -
Select the environment matching the slug you confirmed earlier.
Create the InfisicalDynamicSecret resource
Three names are in play. Keep them straight:Note for this CRD:
The verify command reads the Kubernetes Secret, so it uses
managedSecretReference.secretName.Save the manifest below as dynamic-secret.yaml. Replace your-identity-id and your-project-slug, and set environmentSlug to your confirmed slug.- The authentication block is the same inline shape as the push CRD, and the environment field is
environmentSlug. HereprojectSlug/environmentSlug/secretsPathlive underspec.dynamicSecret. leaseRevocationPolicy: Revokerevokes the lease when you delete the resource, which matters for cleanup. Omit it to leave leases in place.leaseTTLis optional. When omitted, the operator sends no TTL and the lease uses the dynamic secret’s own default TTL configured in Infisical.- Like the push CRD, it accepts
spec.hostAPIfor self-hosted instances.
Verify the lease was created
Confirm the operator created the Kubernetes Secret holding the lease credentials. If it is not there yet, wait a few seconds for the first reconcile and run the command again:The 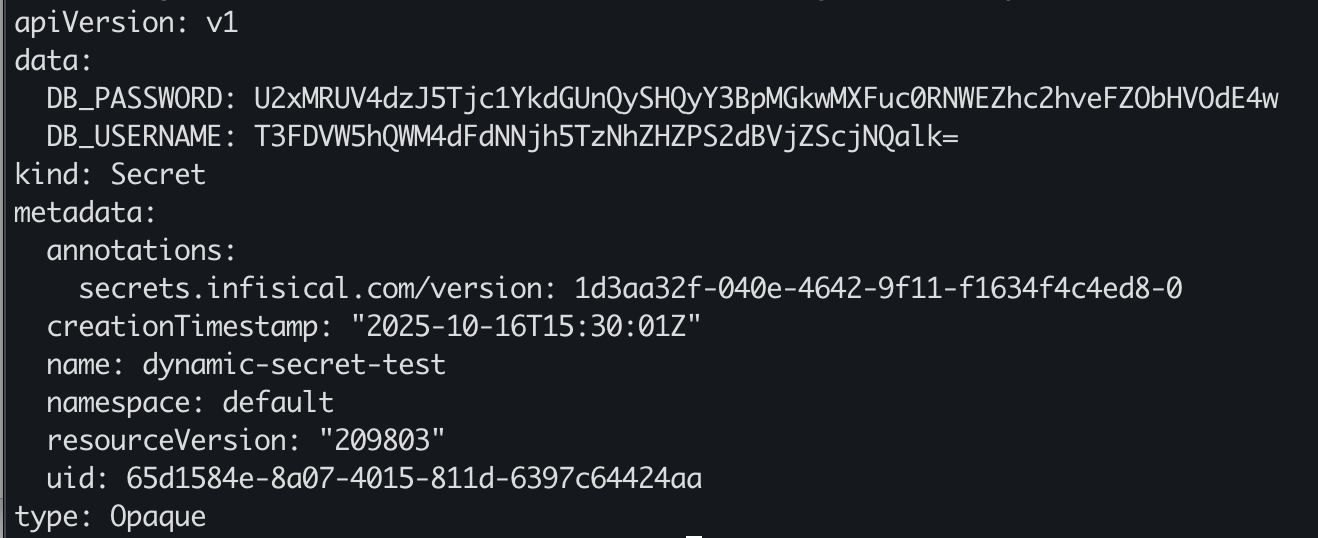
data section should contain the generated database username and password for the lease. If you renamed managedSecretReference.secretName, substitute that name in the command above.Verify the result
Confirm the shared objects are healthy and all three workflows succeeded:- Connection:
kubectl get infisicalconnection infisical-connection -n defaultshowsTruein theREADYcolumn. - Auth:
kubectl get infisicalauth infisical-auth -n defaultshowsTruein theREADYcolumn. - Pull:
kubectl exec -it $(kubectl get pod -l app=nginx -n default -o jsonpath='{.items[0].metadata.name}') -n default -- env | grep SMTPprintsSMTP_HOST=smtp@gmail.com. - Push:
API_KEYappears in your Infisical project’s environment. - Dynamic:
kubectl get secret dynamic-secret-test -n default -o jsonpath='{.data}' | jqshows lease credentials.
Troubleshooting
If a sync does not produce the expected result, inspect the resources’ status conditions and the operator logs before changing anything. For the pull path, diagnose in dependency order: connection first, then auth, then the static secret. Each resource only becomes ready after the one it references.The InfisicalConnection is not Ready
The InfisicalConnection is not Ready
Describe the resource and read its conditions:The operator sets
secrets.infisical.com/IsReady from a health check: it calls <address>/api/status and expects a successful response. If IsReady is False, the condition message names the error. Common causes:- The address is wrong, or the Infisical instance is not reachable from inside the cluster (this direction is the operator calling Infisical).
spec.addressis empty and the operator’sINFISICAL_HOST_APIenvironment variable is not set. The error message says exactly this.- A self-hosted instance uses a custom CA the operator does not trust. Reference the CA via
spec.tls.caCertificate.
Ready again.The InfisicalAuth is not ready or authentication fails
The InfisicalAuth is not ready or authentication fails
Describe the resource and read its conditions:The operator sets
secrets.infisical.com/IsReady (the login result) and secrets.infisical.com/AuthMethod (the method in use). If IsReady is False, check these causes in order:- The referenced
InfisicalConnectionis not ready. The auth cannot log in until the connection’sIsReadycondition isTrue; fix the connection first. identityIdRefpoints at a missing Secret or key, or the stored Identity ID is wrong. Confirm withkubectl get secret kubernetes-credentials -n default -o jsonpath='{.data.identityId}' | base64 -d.- The Kubernetes Auth method is not fully wired: the Token Reviewer JWT was never pasted, or the service-account name or namespace does not match the Allowed Service Account Names / Allowed Namespaces you configured.
- The cluster’s API server is not reachable from the Infisical instance. Kubernetes Auth requires the Infisical backend to call your cluster’s TokenReview API at the Kubernetes Host URL. If you pasted a local address such as
https://127.0.0.1:6443while using Infisical Cloud, every login fails even though the JWT and names are correct. Revisit the prerequisites.
The managed secret is missing or the InfisicalStaticSecret is not syncing
The managed secret is missing or the InfisicalStaticSecret is not syncing
Describe the resource and read its conditions:The operator sets
secrets.infisical.com/LastReconcileStatus: True with reason OK on success, or False with a “Reconciliation failed” message naming the error. Common causes:- The referenced
InfisicalAuthis not ready. The static secret cannot sync until the auth’sIsReadycondition isTrue; work up the chain. - A wrong
projectSlug,environmentSlug, orsecretPathinsources, or the Machine Identity lacks access to the project. - A source sets both or neither of
projectId/projectSlug; exactly one is required.
The push to Infisical did not appear
The push to Infisical did not appear
Describe the push resource:Check the
secrets.infisical.com/Authenticated and secrets.infisical.com/Reconcile conditions. Read the Reconcile condition’s Reason and Message rather than its True/False status: on failure this condition reports Status=True with Reason=Error, the opposite of the usual Kubernetes convention, and the message names the error. Confirm push.secret.secretName matches an existing Kubernetes Secret and that destination.projectSlug and destination.environmentSlug are correct. If you self-host, confirm spec.hostAPI (or the Helm hostAPI value) points at your instance; otherwise the operator targets https://app.infisical.com/api.The dynamic secret lease was not created
The dynamic secret lease was not created
Describe the dynamic-secret resource:The operator sets
secrets.infisical.com/Authenticated, secrets.infisical.com/LeaseCreated, and secrets.infisical.com/LeaseRenewal. A failed LeaseCreated carries whatever error lease creation returned, commonly an unreachable database or wrong connection credentials. Confirm the database is reachable from your Infisical instance and that the connection details entered in the UI are correct.Clean up
Remove the resources this tutorial created so you do not leave an active database lease or orphaned objects behind. Delete consumers before the objects they reference, so nothing reconciles against a missing dependency.-
Delete the sync resources. Deleting the
InfisicalDynamicSecretwithleaseRevocationPolicy: Revokerevokes the active database lease.Because the static secret’s target usedcreationPolicy: Owner, the managedmanaged-secretis deleted along with the CRD. -
Delete the auth object, then the connection it references:
-
Delete the demo app and the remaining secrets, including the Identity ID Secret:
-
Delete the service accounts, their token secrets, and the ClusterRoleBinding:
-
Uninstall the operator:
- In Infisical, delete the dynamic secret, the demo Machine Identity, and the demo Project if you no longer need them.