Learn more about integrating an HSM with Infisical KMS.
Changing the encryption strategy for your instance is an Enterprise-only feature.
This section is intended for users who have obtained an Enterprise license and are on-premise.Please reach out to sales@infisical.com if you have any questions.
Infisical KMS currently supports two encryption strategies:
Standard Encryption: This is the default encryption strategy used by Infisical KMS. It uses a software-protected encryption key to encrypt KMS keys within your Infisical instance. The root encryption key is defined by setting the ENCRYPTION_KEY environment variable.
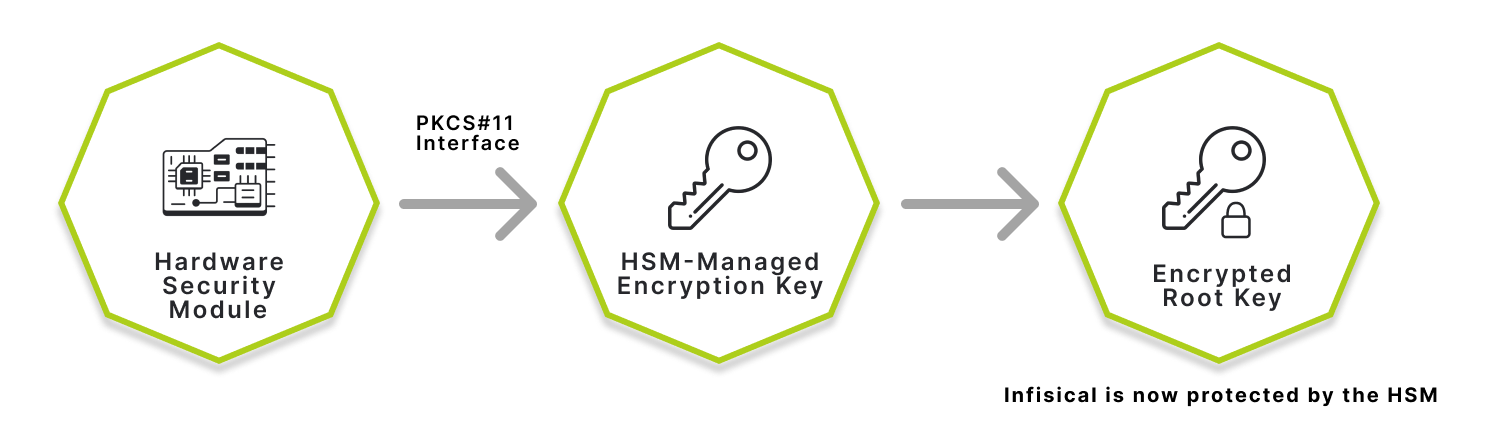
Hardware Security Module (HSM): This encryption strategy uses a Hardware Security Module (HSM) to create a root encryption key that is stored on a physical device to encrypt the KMS keys within your instance.
Using a hardware security module comes with the added benefit of having a secure and tamper-proof device to store your encryption keys. This ensures that your data is protected from unauthorized access.
All encryption keys used for cryptographic operations are stored within the HSM. This means that if the HSM is lost or destroyed, you will no longer be able to decrypt your data stored within Infisical. Most providers offer recovery options for HSM devices, which you should consider when setting up an HSM device.
Enabling HSM encryption has a set of key benefits:
Root Key Wrapping: The root KMS encryption key that is used to secure your Infisical instance will be encrypted using the HSM device rather than the standard software-protected key.
Performance: Using an HSM device can have a performance impact on your Infisical instance. This is due to the additional latency introduced by the HSM device. This is however only noticeable when your instance(s) start up or when the encryption strategy is changed.
Key Recovery: If the HSM device is lost or destroyed, you will no longer be able to decrypt your data stored within Infisical. Most HSM providers offer recovery options, which you should consider when setting up an HSM device.
An HSM device (PKCS#11 compatible library) from a compatible provider such as Thales Luna HSM, AWS CloudHSM, Fortanix HSM, or others.
Infisical is validated to work with PKCS#11 2.30 and newer. If your HSM device doesn’t follow the >=2.30 PKCS#11 standard you may see degraded performance.
To configure your Infisical instance to use an HSM, you must set the required environment variables. Below you’ll find an example of the required environment variables.
For further instructions on how to configure the HSM device for your Infisical instance, please see the Setup Instructions section.
HSM_LIB_PATH: The path to the PKCS#11 library provided by the HSM provider. This usually comes in the form of a .so for Linux and MacOS, or a .dll file for Windows. For Docker, you need to mount the library path as a volume. Further instructions can be found below. If you are using Docker, make sure to set the HSM_LIB_PATH environment variable to the path where the library is mounted in the container.
HSM_PIN: The PKCS#11 PIN to use for authentication with the HSM device.
HSM_SLOT: The slot number to use for the HSM device. This is typically between 0 and 5 for most HSM devices.
HSM_KEY_LABEL: The label of the key to use for encryption. Please note that if no key is found with the provided label, the HSM will create a new key with the provided label.
If no AES key or HMAC key already exists with the label you defined on the HSM_KEY_LABEL environment variable, then Infisical will create one for you automatically using the label specified on HSM_KEY_LABEL.
Below you’ll find a list of the attributes each key will be created with.
CKA_TOKEN: true — The key material will persist in your HSM so it can be reused.
Note that for security reasons it is highly recommended to create an AES key with the full set of key attributes seen below if you’re going to bring your own key.
CKA_CLASS: CKO_SECRET_KEY — Defines the key class (secret key).
CKA_KEY_TYPE: CKO_AES — Defines the key type (AES key).
CKA_VALUE_LEN: 32 — 256-bit key size.
CKA_LABEL: Your specified label in the HSM_KEY_LABEL environment variable.
CKA_TOKEN: true — The key material will persist in your HSM so it can be reused.
Note that for security reasons it is highly recommended to create an HMAC key with the full set of key attributes seen below if you’re going to bring your own key.
CKA_CLASS: CKO_SECRET_KEY — Defines the key class (secret key).
CKA_KEY_TYPE: CKO_GENERIC_SECRET — Defines the key class (generic secret key).
CKA_VALUE_LEN: 32 — 256-bit key size.
CKA_LABEL: Your specified label in the HSM_KEY_LABEL environment variable, suffixed with _HMAC. If you specify infisical-key-v1, then the HMAC key label will become infisical-key-v1_HMAC.
To set up HSM encryption, you need to configure an HSM provider and HSM key. The HSM provider is used to connect to the HSM device, and the HSM key is used to encrypt Infisical’s KMS keys. We recommend using a Cloud HSM provider such as Thales Luna HSM, AWS CloudHSM, or Fortanix HSM.You need to follow the instructions provided by the HSM provider to set up the HSM device. Once the HSM device is set up, the HSM device can be used within Infisical.After setting up the HSM from your provider, you will have a set of files that you can use to access the HSM. These files need to be present on the machine where Infisical is running.
If you are using containers, you will need to mount the folder where these files are stored as a volume in the container.The setup process for an HSM device varies depending on the provider. We have created guides for Thales Luna Cloud HSM and Fortanix HSM, which you can find below.
2
Configure HSM on Infisical
Are you using Docker or Kubernetes for your deployment? If you are using Docker or Kubernetes, please follow the instructions in the Using HSM’s in your Deployment section.
Configuring the HSM on Infisical requires setting a set of environment variables:
HSM_LIB_PATH: The path to the PKCS#11 library provided by the HSM provider. This usually comes in the form of a .so for Linux and MacOS, or a .dll file for Windows. For Docker, you need to mount the library path as a volume. Further instructions can be found below. If you are using Docker, make sure to set the HSM_LIB_PATH environment variable to the path where the library is mounted in the container.
HSM_PIN: The PKCS#11 PIN to use for authentication with the HSM device.
HSM_SLOT: The slot number to use for the HSM device. This is typically between 0 and 5 for most HSM devices.
HSM_KEY_LABEL: The label of the key to use for encryption. Please note that if no key is found with the provided label, the HSM will create a new key with the provided label.
After setting up the HSM, you need to restart the Infisical instance for the changes to take effect.
4
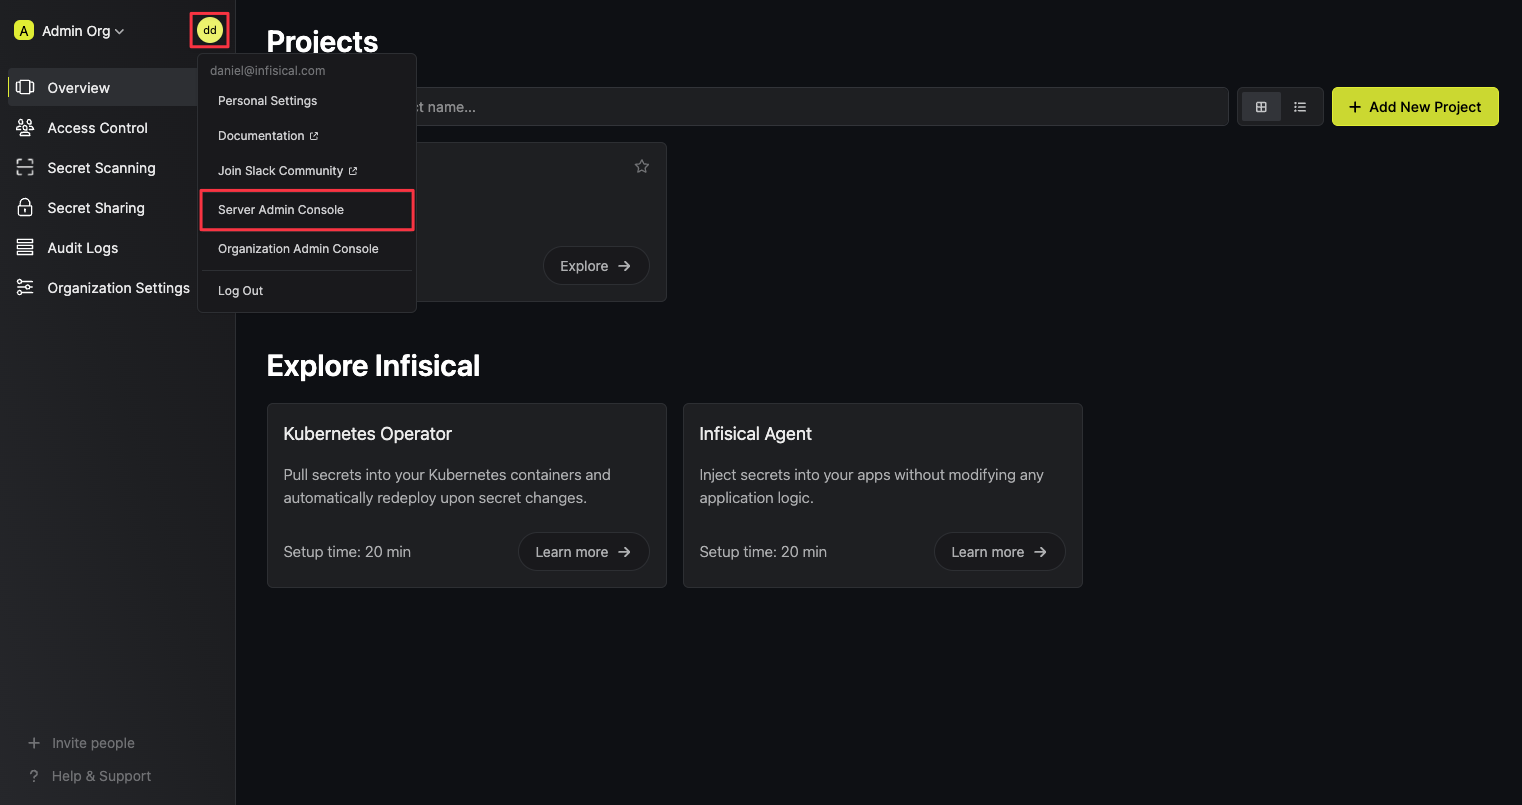
Navigate to the Server Admin Console
5
Update the KMS Encryption Strategy to HSM
Once you press the ‘Save’ button, your Infisical instance will immediately switch to the HSM encryption strategy. This will re-encrypt your KMS key with keys from the HSM device.
6
Verify Encryption Strategy
To verify that the HSM was correctly configured, you can try creating a new secret in one of your projects. If the secret is created successfully, the HSM is now being used for encryption.
When using Docker, you need to mount the path containing the HSM client files. This section covers how to configure your Infisical instance to use an HSM with Docker.
Thales Luna Cloud HSM
Fortanix HSM
AWS CloudHSM
1
Create HSM client folder
When using Docker, you are able to set your HSM library path to any location on your machine. In this example, we are going to be using /etc/luna-docker.
mkdir /etc/luna-docker
After setting up your Luna Cloud HSM client, you should have a set of files, referred to as the HSM client. You don’t need all the files, but for simplicity we recommend copying all the files from the client.A folder structure of a client folder will often look like this:
The most important parts of the client folder is the Chrystoki.conf file, and the libs, plugins, and jsp folders. You need to copy these files to the folder you created in the first step.
The Chrystoki.conf file is used to configure the HSM client. You need to update the Chrystoki.conf file to point to the correct file paths.In this example, we will be mounting the /etc/luna-docker folder to the Docker container under a different path. The path we will use in this example is /usr/safenet/lunaclient. This means /etc/luna-docker will be mounted to /usr/safenet/lunaclient in the Docker container.An example config file will look like this:
    Chrystoki2 = {
      # This path points to the mounted path, /usr/safenet/lunaclient
      LibUNIX64 = /usr/safenet/lunaclient/libs/64/libCryptoki2.so;
    }

    Luna = {
      DefaultTimeOut = 500000;
      PEDTimeout1 = 100000;
      PEDTimeout2 = 200000;
      PEDTimeout3 = 20000;
      KeypairGenTimeOut = 2700000;
      CloningCommandTimeOut = 300000;
      CommandTimeOutPedSet = 720000;
    }

    CardReader = {
      LunaG5Slots = 0;
      RemoteCommand = 1;
    }

    Misc = {
      # Update the paths to point to the mounted path if your folder structure is different from the one mentioned in the previous step.
      PluginModuleDir = /usr/safenet/lunaclient/plugins;
      MutexFolder = /usr/safenet/lunaclient/lock;
      PE1746Enabled = 1;
      ToolsDir = /usr/bin;

    }

    Presentation = {
      ShowEmptySlots = no;
    }

    LunaSA Client = {
      ReceiveTimeout = 20000;
      # Update the paths to point to the mounted path if your folder structure is different from the one mentioned in the previous step.
      SSLConfigFile = /usr/safenet/lunaclient/etc/openssl.cnf;
      ClientPrivKeyFile = ./etc/ClientNameKey.pem;
      ClientCertFile = ./etc/ClientNameCert.pem;
      ServerCAFile = ./etc/CAFile.pem;
      NetClient = 1;
      TCPKeepAlive = 1;
    }


    REST = {
      AppLogLevel = error
      ServerName = <REDACTED>;
      ServerPort = 443;
      AuthTokenConfigURI = <REDACTED>;
      AuthTokenClientId = <REDACTED>;
      AuthTokenClientSecret = <REDACTED>;
      RestClient = 1;
      ClientTimeoutSec = 120;
      ClientPoolSize = 32;
      ClientEofRetryCount = 15;
      ClientConnectRetryCount = 900;
      ClientConnectIntervalMs = 1000;
    }
    XTC = {
      Enabled = 1;
      TimeoutSec = 600;
    }
Save the file after updating the paths.
3
Run Docker
Running Docker with HSM encryption requires setting the HSM-related environment variables as mentioned previously in the HSM setup instructions. You can set these environment variables in your Docker run command.We are setting the environment variables for Docker via the command line in this example, but you can also pass in a .env file to set these environment variables.
If no key is found with the provided key label, the HSM will create a new key with the provided label.
Infisical depends on an AES and HMAC key to be present in the HSM. If these keys are not present, Infisical will create them. The AES key label will be the value of the HSM_KEY_LABEL environment variable, and the HMAC key label will be the value of the HSM_KEY_LABEL environment variable with the suffix _HMAC.
docker run -p 80:8080 \
  -v /etc/luna-docker:/usr/safenet/lunaclient \
  -e HSM_LIB_PATH="/usr/safenet/lunaclient/libs/64/libCryptoki2.so" \
  -e HSM_PIN="<your-hsm-device-pin>" \
  -e HSM_SLOT=<hsm-device-slot> \
  -e HSM_KEY_LABEL="<your-key-label>" \

  # The rest are unrelated to HSM setup...
  -e ENCRYPTION_KEY="<>" \
  -e AUTH_SECRET="<>" \
  -e DB_CONNECTION_URI="<>" \
  -e REDIS_URL="<>" \
  -e SITE_URL="<>" \
  infisical/infisical:<version> # Replace <version> with the version you want to use
After following these steps, your Docker setup will be ready to use HSM encryption.
1
Set up Fortanix HSM
To use Fortanix HSM with Infisical, you need to:
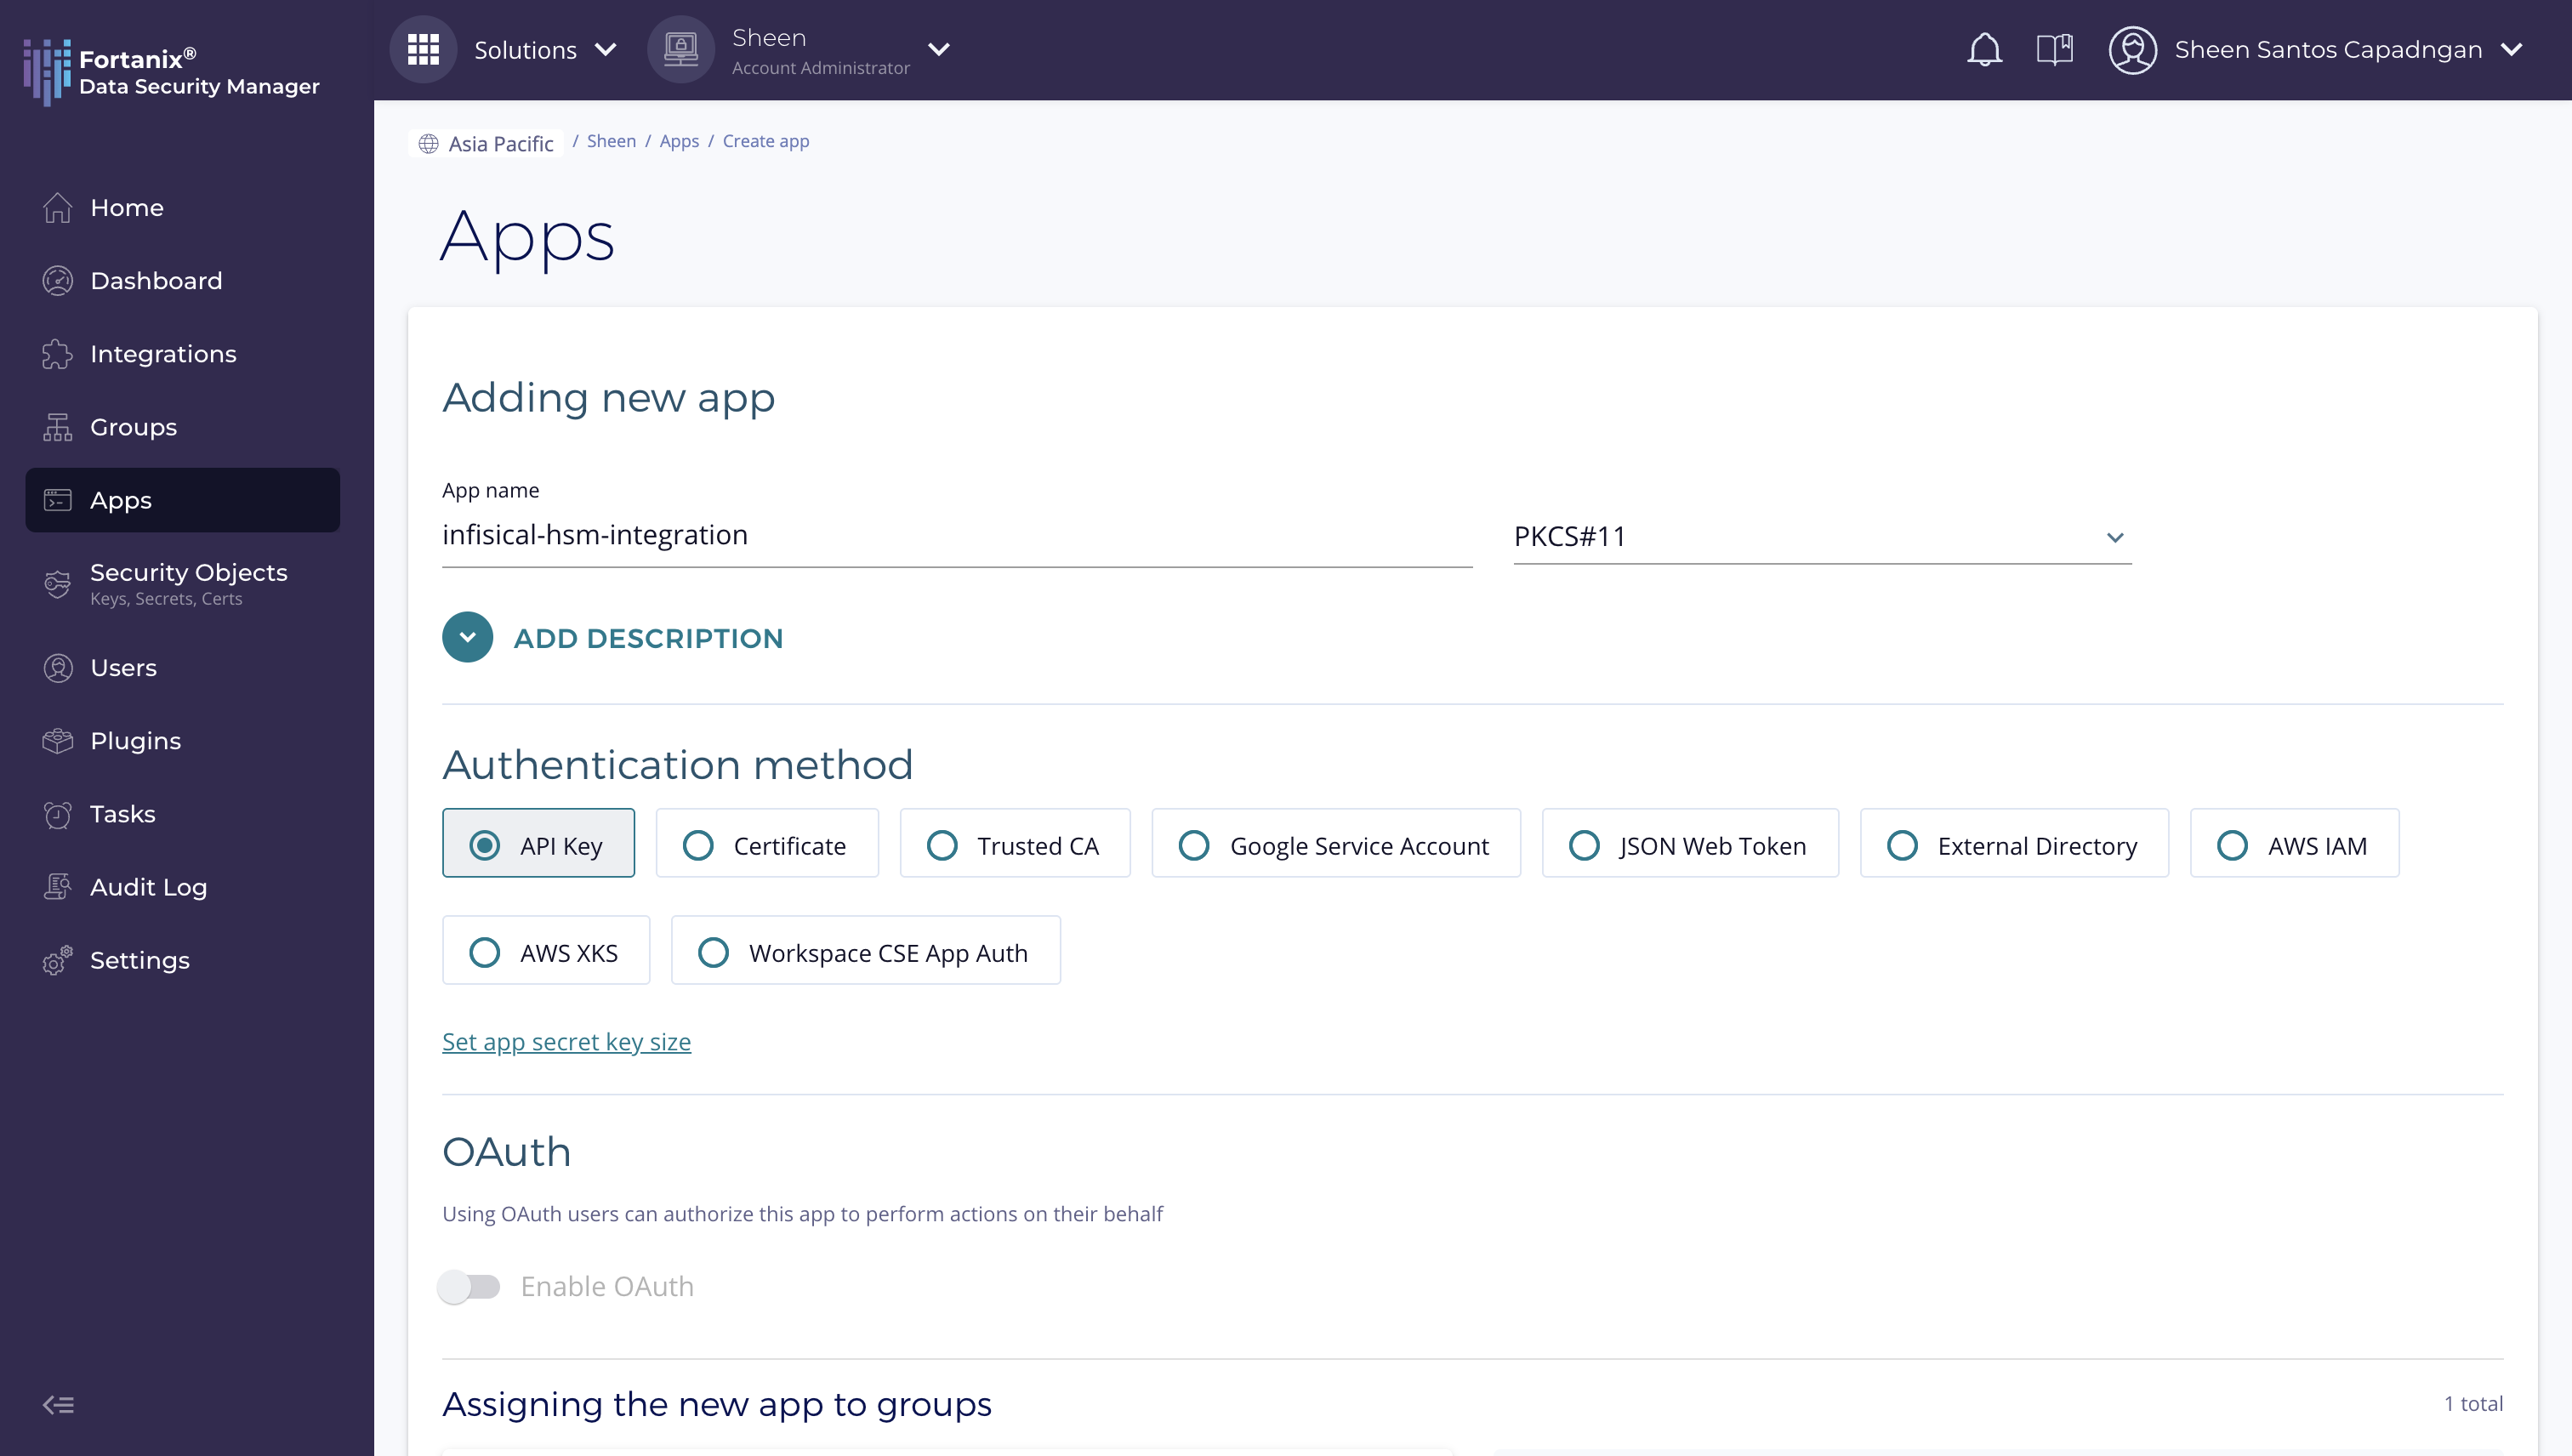
Create an App in Fortanix:
Set Interface value to be PKCS#11
Select API key as authentication method
Assign app to a group
Take note of the domain (e.g., apac.smartkey.io). You will need this to set up the configuration file for the Fortanix client.
2
Install PKCS11 Library
The easiest approach would be to download the .so file for Linux directly from the Fortanix PKCS#11 installation page.Create a configuration file named pkcs11.conf with the following content:
Note: Replace apac.smartkey.io with your actual Fortanix domain if different. For more details about the configuration file format and additional options, refer to the Fortanix PKCS#11 Configuration File Documentation.
3
Create a directory for Fortanix files
Create a directory to store the Fortanix library and configuration file:
mkdir -p /etc/fortanix-hsm
Copy the downloaded .so file and the pkcs11.conf file to this directory:
Run Docker with Fortanix HSM by mounting the directory and setting the required environment variables:
docker run -p 80:8080 \
  -v /etc/fortanix-hsm:/etc/fortanix-hsm \
  -e HSM_LIB_PATH="/etc/fortanix-hsm/fortanix_pkcs11_4.37.2554.so" \  # Path to the PKCS#11 library
  -e HSM_PIN="MDE3YWUxO..." \  # Your Fortanix app API key used for authentication
  -e HSM_SLOT=0 \              # Slot value (arbitrary for Fortanix HSM)
  -e HSM_KEY_LABEL="hsm-key-label" \  # Label to identify the encryption key in the HSM
  -e FORTANIX_PKCS11_CONFIG_PATH="/etc/fortanix-hsm/pkcs11.conf" \  # Path to Fortanix configuration file

  # The rest are unrelated to HSM setup...
  -e ENCRYPTION_KEY="<>" \
  -e AUTH_SECRET="<>" \
  -e DB_CONNECTION_URI="<>" \
  -e REDIS_URL="<>" \
  -e SITE_URL="<>" \
  infisical/infisical:<version> # Replace <version> with the version you want to use
Note: Fortanix HSM integration only works for AMD64 CPU architectures.
After following these steps, your Docker setup will be ready to use Fortanix HSM encryption.
Before using the CloudHSM client, it must be configured properly so Infisical can use it for cryptographic operations.1. Download the AWS CloudHSM clientYou can download the AWS CloudHSM client from the AWS documentation.
Note that the AWS CloudHSM client is only available for Linux and Windows.
If you’re on a different operating system, you’ll need to access a Linux machine to configure the client, such as an AWS EC2 Debian instance.
2. Configure the CloudHSM clientAfter installing the CloudHSM client, you should see all related files in the /opt/cloudhsm/ directory on your machine.You need to run the configure-pkcs11 binary which will configure the client to connect with your AWS CloudHSM cluster. Depending on if you have multiple HSM’s inside your cluster, you’ll need to run the command with different arguments. Below you’ll find the appropriate command for your use case:
Single HSM
sudo /opt/cloudhsm/bin/configure-pkcs11 -a <HSM_ENI_IPV4_ADDRESS> --disable-key-availability-check
To use a single HSM, you must first manage client key durability settings by setting disable_key_availability_check to true by passing the --disable-key-availability-check flag. For more information read the Key Synchronization section in the AWS CloudHSM documentation.
Multiple HSM's
sudo /opt/cloudhsm/bin/configure-pkcs11 -a <HSM_ENI_IPV4_ADDRESS_1> <HSM_ENI_IPV4_ADDRESS_2> ... --disable-key-availability-check
Downloaded and configured the CloudHSM client as described in the previous steps.
3. Download the configured HSM client filesAfter configuring the CloudHSM client, you should notice that the PKCS11 configuration file has been updated to include the HSM’s ENI IP address. You can find this file in the /opt/cloudhsm/etc/cloudhsm-pkcs11.cfg directory, and it should look like this:
cloudhsm-pkcs11.cfg
{ "clusters": [ { "type": "hsm1", "cluster": { // Your issuing CA certificate. // As per AWS documentation, this defaults to `/opt/cloudhsm/etc/customerCA.crt`. "hsm_ca_file": "/opt/cloudhsm/etc/customerCA.crt", "servers": [ { "hostname": "<HSM_ENI_IPV4_ADDRESS_1>", "port": 2223, "enable": true }, { "hostname": "<HSM_ENI_IPV4_ADDRESS_2>", "port": 2223, "enable": true } ], // Only relevant if you passed the --disable-key-availability-check flag "options": { "disable_key_availability_check": true } } } ], "logging": { "log_type": "file", "log_file": "/opt/cloudhsm/run/cloudhsm-pkcs11.log", "log_level": "info", "log_interval": "daily" }}
Save the entire /opt/cloudhsm folder, as you will need to mount this to your Infisical Docker container in the later steps. In this guide we will be saving all the files from the folder as /etc/cloudhsm and mounting it to the /etc/cloudhsm directory in the Docker container.
2
Find HSM slot number
On the same machine that you configured the CloudHSM client, you can use pkcs11-tool to find the HSM slot number and to verify that the client is working correctly.First, install the pkcs11-tool package:
sudo apt-get install opensc -y
Then, run the following command to find the HSM slot number:
It’ll prompt you to log in with your PIN, which is your username and password separated by a colon. Example: testUser:testPassword.This will output the HSM slot number like so:
ubuntu@ec-2:~$ pkcs11-tool --module /opt/cloudhsm/lib/libcloudhsm_pkcs11.so --list-slotsAvailable slots:Slot 0 (0x2000000000000001): hsm1 token label : hsm1 token manufacturer : Marvell Semiconductors, Inc. token model : LS2 token flags : login required, rng, token initialized hardware version : 66.48 firmware version : 10.2 serial num : pin min/max : 8/32
In this case we see that the HSM has a slot in the position of 0. This slot number will be used in the later steps to set the HSM_SLOT environment variable.
3
Download the HSM issuing CA certificate
When you initialized your HSM, you were prompted to download the cluster CSR and sign it.
In order to use the HSM with Infisical, you need to obtain the issuer CA certificate that was used to sign the cluster CSR.If you followed the official AWS documentation, you should have a CA certificate called customerCA.crt.Save the CA certificate to a path, as this will need to be mounted as a Docker volume in the next step. For this example, we’ll save it to /aws-files/customerCA.crt.
4
Run Docker
Running Docker with HSM encryption requires setting the HSM-related environment variables as mentioned previously in the HSM setup instructions. You can set these environment variables in your Docker run command.We are setting the environment variables for Docker via the command line in this example, but you can also pass in a .env file to set these environment variables.
If no key is found with the provided key label, the HSM will create a new key with the provided label.
Infisical depends on an AES and HMAC key to be present in the HSM. If these keys are not present, Infisical will create them. The AES key label will be the value of the HSM_KEY_LABEL environment variable, and the HMAC key label will be the value of the HSM_KEY_LABEL environment variable with the suffix _HMAC.
docker run -p 80:8080 \

  # Mount the HSM client files to "/opt/cloudhsm"
  -v /etc/cloudhsm:/opt/cloudhsm \
  # Mount the issuer CA certificate to "/opt/cloudhsm/etc/customerCA.crt"
  -v /aws-files/customerCA.crt:/opt/cloudhsm/etc/customerCA.crt \

  # Set the HSM library path to whats expected within Docker (/opt/cloudhsm/lib/libcloudhsm_pkcs11.so)
  -e HSM_LIB_PATH="/opt/cloudhsm/lib/libcloudhsm_pkcs11.so" \
  # Set the HSM PIN to the username and password of the HSM user, separated by a colon
  -e HSM_PIN=CryptoUserUsername:CryptoUserPassword \
  # Set the HSM slot number to the slot number of the HSM device as found in the previous step
  -e HSM_SLOT=<hsm-device-slot> \
  # Set the HSM key label to a label that will be used to identify the encryption key in the HSM. This key label does not need to exist before hand.
  -e HSM_KEY_LABEL=infisical-crypto-key \

  # The rest of your environment variables ...
  # -e ...
  infisical/infisical:<version> # Replace <version> with the version you want to use
After following these steps, your Docker setup will be ready to use HSM encryption.
When you are deploying Infisical with the Kubernetes self-hosting option, you can still use HSM encryption, but you need to ensure that the HSM client files are present in the container.
Thales Luna Cloud HSM
Fortanix HSM
AWS CloudHSM
This is only supported on helm chart version 1.7.1 and above. Please see the Helm Chart Changelog for more information.
1
Create HSM client folder
When using Kubernetes, you need to mount the path containing the HSM client files. This section covers how to configure your Infisical instance to use an HSM with Kubernetes. In this example, we are going to be using /etc/luna-docker.
mkdir /etc/luna-docker
After setting up your Luna Cloud HSM client, you should have a set of files, referred to as the HSM client. You don’t need all the files, but for simplicity we recommend copying all the files from the client.A folder structure of a client folder will often look like this:
The most important parts of the client folder is the Chrystoki.conf file, and the libs, plugins, and jsp folders. You need to copy these files to the folder you created in the first step.
The /* wildcard will copy all files and folders within the HSM client. The wildcard is important to ensure that the file structure is inline with the rest of this guide.
After copying the files, the /etc/luna-docker directory should have the following file structure:
The Chrystoki.conf file is used to configure the HSM client. You need to update the Chrystoki.conf file to point to the correct file paths.In this example, we will be mounting the /etc/luna-docker folder from the host to containers in our deployment’s pods at the path /usr/safenet/lunaclient. This means the contents of /etc/luna-docker on the host will be accessible at /usr/safenet/lunaclient within the containers.An example config file will look like this:
  Chrystoki2 = {
    # This path points to the mounted path, /usr/safenet/lunaclient
    LibUNIX64 = /usr/safenet/lunaclient/libs/64/libCryptoki2.so;
  }

  Luna = {
    DefaultTimeOut = 500000;
    PEDTimeout1 = 100000;
    PEDTimeout2 = 200000;
    PEDTimeout3 = 20000;
    KeypairGenTimeOut = 2700000;
    CloningCommandTimeOut = 300000;
    CommandTimeOutPedSet = 720000;
  }

  CardReader = {
    LunaG5Slots = 0;
    RemoteCommand = 1;
  }

  Misc = {
    # Update the paths to point to the mounted path if your folder structure is different from the one mentioned in the previous step.
    PluginModuleDir = /usr/safenet/lunaclient/plugins;
    MutexFolder = /usr/safenet/lunaclient/lock;
    PE1746Enabled = 1;
    ToolsDir = /usr/bin;

  }

  Presentation = {
    ShowEmptySlots = no;
  }

  LunaSA Client = {
    ReceiveTimeout = 20000;
    # Update the paths to point to the mounted path if your folder structure is different from the one mentioned in the previous step.
    SSLConfigFile = /usr/safenet/lunaclient/etc/openssl.cnf;
    ClientPrivKeyFile = ./etc/ClientNameKey.pem;
    ClientCertFile = ./etc/ClientNameCert.pem;
    ServerCAFile = ./etc/CAFile.pem;
    NetClient = 1;
    TCPKeepAlive = 1;
  }


  REST = {
    AppLogLevel = error
    ServerName = <REDACTED>;
    ServerPort = 443;
    AuthTokenConfigURI = <REDACTED>;
    AuthTokenClientId = <REDACTED>;
    AuthTokenClientSecret = <REDACTED>;
    RestClient = 1;
    ClientTimeoutSec = 120;
    ClientPoolSize = 32;
    ClientEofRetryCount = 15;
    ClientConnectRetryCount = 900;
    ClientConnectIntervalMs = 1000;
  }
  XTC = {
    Enabled = 1;
    TimeoutSec = 600;
  }
Save the file after updating the paths.
3
Creating Persistent Volume Claim (PVC)
You need to create a Persistent Volume Claim (PVC) to mount the HSM client files to the Infisical deployment.
The above command will create a PVC named infisical-data-pvc with a storage size of 500Mi. You can change the storage size if needed.Next we need to create a temporary pod with the PVC mounted as a volume, allowing us to copy the HSM client files into this mounted storage.
The above command will create a pod named hsm-setup-pod with a busybox image. The pod will sleep for 3600 seconds (one hour), which is enough time to upload the HSM client files to the PVC.Ensure that the pod is running and is healthy by running the following command:
Next we need to copy the HSM client files into the PVC.
kubectl exec hsm-setup-pod -- mkdir -p /data/ # Create the data directorykubectl cp /etc/luna-docker/. hsm-setup-pod:/data/ # Copy the HSM client files into the PVCkubectl exec hsm-setup-pod -- chmod -R 755 /data/ # Set the correct permissions for the HSM client files
Finally, we are ready to delete the temporary pod, as we have successfully uploaded the HSM client files to the PVC. This step may take a few minutes to complete.
kubectl delete pod hsm-setup-pod
4
Updating your environment variables
Next we need to update the environment variables used for the deployment. If you followed the setup instructions for Kubernetes deployments, you should have a Kubernetes secret called infisical-secrets.
We need to update the secret with the following environment variables:
HSM_LIB_PATH - The path to the HSM client library (mapped to /usr/safenet/lunaclient/libs/64/libCryptoki2.so)
HSM_PIN - The PIN for the HSM device that you created when setting up your Luna Cloud HSM client
HSM_SLOT - The slot number for the HSM device that you selected when setting up your Luna Cloud HSM client
HSM_KEY_LABEL - The label for the HSM key. If no key is found with the provided key label, the HSM will create a new key with the provided label.
The following is an example of the secret that you should update:
apiVersion: v1kind: Secretmetadata: name: infisical-secretstype: OpaquestringData: # ... Other environment variables ... HSM_LIB_PATH: "/usr/safenet/lunaclient/libs/64/libCryptoki2.so" # If you followed this guide, this will be the path of the Luna Cloud HSM client HSM_PIN: "<your-hsm-device-pin>" HSM_SLOT: "<hsm-device-slot>" HSM_KEY_LABEL: "<your-key-label>"
Save the file after updating the environment variables, and apply the secret changes
kubectl apply -f ./secret-file-name.yaml
5
Updating the Deployment
After we’ve successfully configured the PVC and updated our environment variables, we are ready to update the deployment configuration so that the pods it creates can access the HSM client files.
  # ... The rest of the values.yaml file ...

  image:
    repository: infisical/infisical
    tag: "v0.117.1-postgres"
    pullPolicy: IfNotPresent

  extraVolumeMounts:
    - name: hsm-data
      mountPath: /usr/safenet/lunaclient # The path we will mount the HSM client files to

  extraVolumes:
    - name: hsm-data
      persistentVolumeClaim:
        claimName: infisical-data-pvc # The PVC we created in the previous step

  # ... The rest of the values.yaml file ...
6
Upgrading the Helm Chart
After updating the values.yaml file, you need to upgrade the Helm chart in order for the changes to take effect.
After following these steps, your Kubernetes setup will be ready to use HSM encryption.
1
Set up Fortanix HSM
First, you need to set up Fortanix HSM by:
Creating an App in Fortanix:
Set Interface value to be PKCS#11
Select API key as authentication method
Assign app to a group
Take note of the domain (e.g., apac.smartkey.io). You will need this when setting up the configuration file.
2
Create configuration files
Create a directory to store the Fortanix configuration files:
mkdir -p /etc/fortanix-hsm
Download the Fortanix PKCS#11 library for Linux from the Fortanix PKCS#11 installation page.Create a configuration file named pkcs11.conf with the following content:
Update your Kubernetes secret with the Fortanix HSM environment variables:
apiVersion: v1kind: Secretmetadata: name: infisical-secretstype: OpaquestringData: # ... Other environment variables ... HSM_LIB_PATH: "/etc/fortanix-hsm/fortanix_pkcs11_4.37.2554.so" # Path to the PKCS#11 library in the container HSM_PIN: "<your-fortanix-api-key>" # Your Fortanix app API key used for authentication HSM_SLOT: "0" # Slot value (can be set to 0 for Fortanix HSM as it's arbitrary) HSM_KEY_LABEL: "hsm-key-label" # Label to identify the encryption key in the HSM FORTANIX_PKCS11_CONFIG_PATH: "/etc/fortanix-hsm/pkcs11.conf" # Path to Fortanix configuration file
Apply the updated secret:
kubectl apply -f ./secret-file-name.yaml
5
Update Helm Values
Update your Helm values to mount the Fortanix HSM files:
# ... The rest of the values.yaml file ...image: repository: infisical/infisical tag: "v0.117.1-postgres" pullPolicy: IfNotPresentextraVolumeMounts: - name: fortanix-data mountPath: /etc/fortanix-hsm # The path where Fortanix files will be availableextraVolumes: - name: fortanix-data persistentVolumeClaim: claimName: fortanix-hsm-pvc# ... The rest of the values.yaml file ...
Note: Fortanix HSM integration only works for AMD64 CPU architectures.
AWS CloudHSM is supported on helm chart version 1.7.1 and above. Please see the Helm Chart Changelog for more information.
1
Creating Persistent Volume Claim (PVC)
Prerequisites for using AWS EKS
If you’re using AWS EKS, you need to specify a storage class for the PVC and ensure that the EBS CSI Driver is installed and running.By default, EKS exposes gp2 as the default storage class. Below are the steps required for setting the default storage class and ensuring the EBS CSI Driver is installed and running:
This will set the gp2 storage class as the default storage class.Now when you run kubectl get storageclass, you should see that gp2 is the default storage class.
The above command will create a PVC named cloudhsm-data-pvc with a storage size of 500Mi. You can change the storage size if needed.Next we need to create a temporary pod with the PVC mounted as a volume, allowing us to copy the HSM client files into this mounted storage.
The above command will create a pod named cloudhsm-setup-pod with a Debian image. The pod will sleep for 7200 seconds (two hours), which is enough time to set up the PVC and configure the HSM client.Ensure that the pod is running and is healthy by running the following command:
We need to configure the PVC to work with the CloudHSM, so Infisical can consume the HSM client files.2.1. Start a shell in the PVC pod:This will allow us to run commands directly within the setup pod. We’ll use this to configure the CloudHSM client and to validate that it’s working correctly.
kubectl exec -it cloudhsm-setup-pod -- /bin/sh
2.2. Install the necessary packages:This will install the necessary packages to allow us to test and install the CloudHSM client.
2.3. Try to reach the HSM device:We need to validate that we’re able to reach the HSM device from within Kubernetes. You can use telnet to ping the HSM device like so:
telnet <HSM_ENI_IPV4_ADDRESS> 2223
You should see an output like this:
$ telnet <HSM_ENI_IPV4_ADDRESS> 2223Trying <HSM_ENI_IPV4_ADDRESS>...Connected to <HSM_ENI_IPV4_ADDRESS>.
If it gets stuck on Trying ...., you may have configured your HSM client’s security group incorrectly. Make sure you configure the security group to allow traffic from EKS on port 2223-2225.2.4. Install the AWS CloudHSM client:The Infisical images run on Debian, so we need to install a Debian-compatible version of the AWS CloudHSM client.
2.5. Configure the CloudHSM client:After installing the CloudHSM client, you should see all related files in the /opt/cloudhsm/ directory on the CloudHSM setup pod.You need to run the configure-pkcs11 binary which will configure the client to connect with your AWS CloudHSM cluster. Depending on if you have multiple HSM’s inside your cluster, you’ll need to run the command with different arguments. Below you’ll find the appropriate command for your use case:
Single HSM
/opt/cloudhsm/bin/configure-pkcs11 -a <HSM_ENI_IPV4_ADDRESS> --disable-key-availability-check
To use a single HSM, you must first manage client key durability settings by setting disable_key_availability_check to true by passing the --disable-key-availability-check flag. For more information read the Key Synchronization section in the AWS CloudHSM documentation.
Multiple HSM's
/opt/cloudhsm/bin/configure-pkcs11 -a <HSM_ENI_IPV4_ADDRESS_1> <HSM_ENI_IPV4_ADDRESS_2> ... --disable-key-availability-check
2.6. Verify the CloudHSM client is configured correctly:You can verify the CloudHSM client is configured correctly by running the following command:
2.7. Exit the pod:Exit the pod by running the following command:
exit
2.8. Copy your issuer CA certificate to the PVC:When you initialized your HSM, you were prompted to download the cluster CSR and sign it.
In order to use the HSM with Infisical, you need to obtain the issuer CA certificate that was used to sign the cluster CSR.If you followed the official AWS documentation, you should have a CA certificate called customerCA.crt.Copy the CA certificate from your local machine to the setup pod:
2.9. Test the HSM client:Finally, after we’re done configuring the HSM client, we need to test it to ensure that it’s working correctly.First, start a new shell into the setup pod by running the same shell command as before:
kubectl exec -it cloudhsm-setup-pod -- /bin/sh
Next, try generating a random 32 bytes long string by running the following command:
Using slot 0 with a present token (0x2000000000000001)av1dlhVEsssjpcTNS+ysGUoKWH6+/PCaEDIdal5oQc0=
Replace the <crypto-user-username>:<crypto-user-password> with your username and password combination of the Crypto user you have created that you want to use to perform cryptographic operations.In AWS CloudHSM, the PIN is always the username and password separated by a colon.
2.10. Copy the configured client to the PVC:Copy from the HSM files into the /data directory in the PVC, which is what will be mounted for the Infisical deployment.
cp -r /opt/cloudhsm/. /data/
Verify the files were copied correctly by running the following command:
ls -la /data/
You should see an output like this:
drwxr-xr-x. 8 root root 4096 Oct 13 18:50 .drwxr-xr-x. 1 root root 131 Oct 13 18:29 ..drwxr-xr-x. 2 root root 4096 Oct 13 18:50 bindrwxr-xr-x. 3 root root 4096 Oct 13 18:50 docdrwxr-xr-x. 2 root root 4096 Oct 13 18:50 etcdrwxr-xr-x. 3 root root 4096 Oct 13 18:50 includedrwxr-xr-x. 2 root root 4096 Oct 13 18:50 libdrwxr-xr-t. 2 root root 4096 Oct 13 18:50 run
2.11. Set the correct permissions for the HSM client files:
chmod -R 755 /data/
2.12. Exit the pod:Exit the pod by running the following command:
exit
2.13. Delete the setup pod:Delete the setup pod by running the following command:
kubectl delete pod cloudhsm-setup-pod
3
Updating your environment variables
Next we need to update the environment variables used for the deployment. If you followed the setup instructions for Kubernetes deployments, you should have a Kubernetes secret called infisical-secrets.
We need to update the secret with the following environment variables:
HSM_LIB_PATH - The path to the CloudHSM PKCS#11 library (mapped to /opt/cloudhsm/lib/libcloudhsm_pkcs11.so)
HSM_PIN - The PIN for the HSM device, which is the username and password of your Crypto User separated by a colon (e.g., testUser:testPassword)
HSM_SLOT - The slot number for the HSM device that you found in the previous step
HSM_KEY_LABEL - The label for the HSM key. If no key is found with the provided key label, the HSM will create a new key with the provided label.
The following is an example of the secret that you should update:
apiVersion: v1kind: Secretmetadata: name: infisical-secretstype: OpaquestringData: # ... Other environment variables ... HSM_LIB_PATH: "/opt/cloudhsm/lib/libcloudhsm_pkcs11.so" HSM_PIN: "testUser:testPassword" # Replace with your actual Crypto User credentials HSM_SLOT: "0" # Replace with your actual slot number HSM_KEY_LABEL: "infisical-crypto-key"
Save the file after updating the environment variables, and apply the secret changes
kubectl apply -f ./secret-file-name.yaml
4
Updating the Deployment
After we’ve successfully configured the PVC and updated our environment variables, we are ready to update the deployment configuration so that the pods it creates can access the HSM client files.
  # ... The rest of the values.yaml file ...
  infisical:
    image:
      repository: infisical/infisical
      tag: "v0.151.0"
      pullPolicy: IfNotPresent

    extraVolumeMounts:
      - name: cloudhsm-data
        mountPath: /opt/cloudhsm  # The path we will mount the HSM client files to

    extraVolumes:
      - name: cloudhsm-data
        persistentVolumeClaim:
          claimName: cloudhsm-data-pvc  # The PVC we created in the previous step

  # ... The rest of the values.yaml file ...
Make sure to set the tag to v0.151.0-nightly-20251013.1 or above, as this is the minimum Infisical version that supports AWS CloudHSM.
Ensure that the configuration file at /opt/cloudhsm/etc/cloudhsm-pkcs11.cfg references the correct path for the issuer CA certificate (/opt/cloudhsm/etc/customerCA.crt). This should already be configured correctly if you followed the previous steps.
5
Upgrading the Helm Chart
After updating the values.yaml file, you need to upgrade the Helm chart in order for the changes to take effect.
To disable HSM encryption, navigate to Infisical’s Server Admin Console and set the KMS encryption strategy to Software-based Encryption. This will revert the encryption strategy back to the default software-based encryption.
In order to disable HSM encryption, the Infisical instance must be able to access the HSM device. If the HSM device is no longer accessible, you will not be able to disable HSM encryption.
 Using a hardware security module comes with the added benefit of having a secure and tamper-proof device to store your encryption keys. This ensures that your data is protected from unauthorized access.
Enabling HSM encryption has a set of key benefits:
Using a hardware security module comes with the added benefit of having a secure and tamper-proof device to store your encryption keys. This ensures that your data is protected from unauthorized access.
Enabling HSM encryption has a set of key benefits:
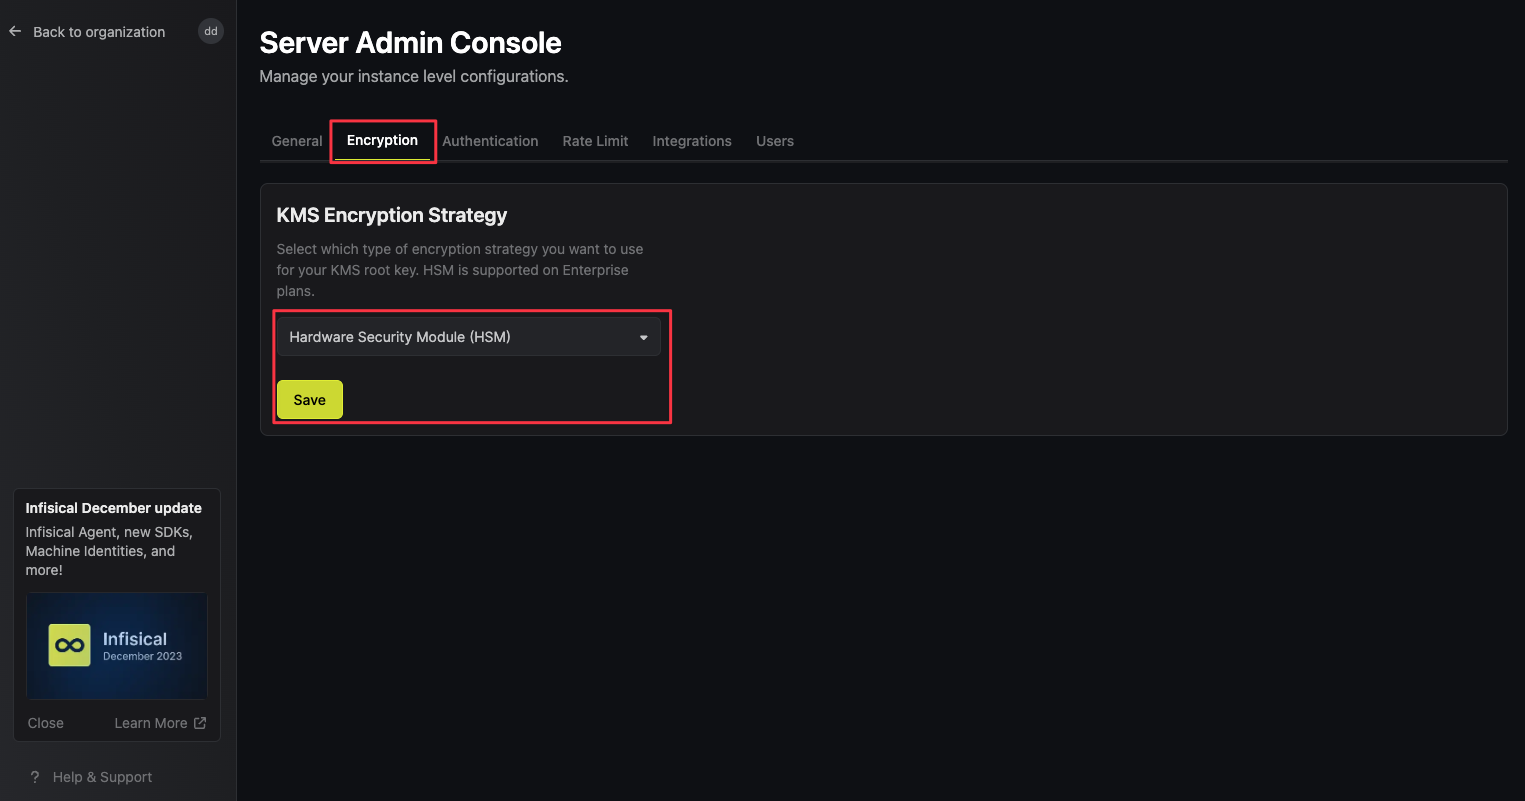 Once you press the ‘Save’ button, your Infisical instance will immediately switch to the HSM encryption strategy. This will re-encrypt your KMS key with keys from the HSM device.