KMIP integration is an Enterprise-only feature. Please reach out to
sales@infisical.com if you have any questions.
How KMIP Works with Infisical
At a high level, the KMIP integration follows this architecture: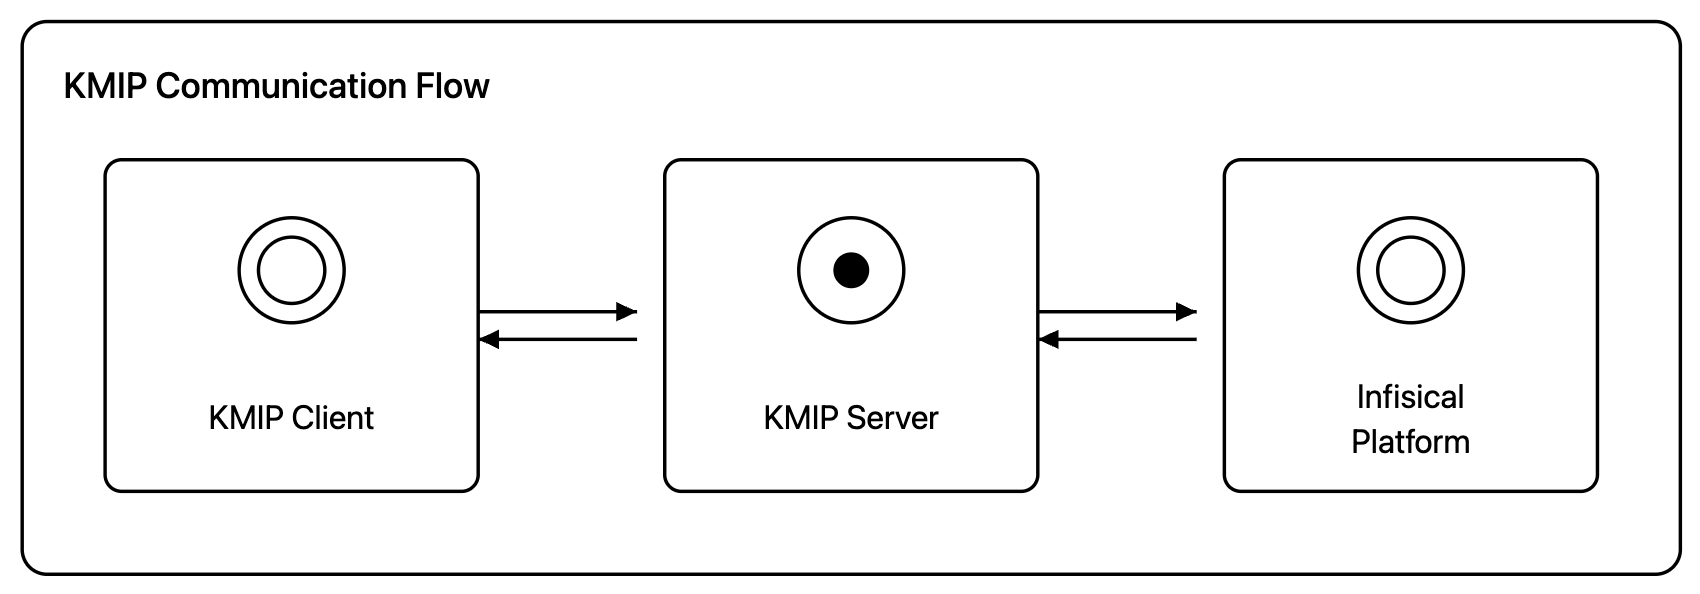 At a high level, the KMIP integration works as follows:
- KMIP clients (your applications or tools) communicate with the KMIP server
- The KMIP server acts as a proxy and forwards requests to Infisical KMS
- The KMIP server authenticates to Infisical using an enrollment-based access token
infisical kmip start command) and serves as an intermediary between your KMIP clients and Infisical’s key management system.
You create a KMIP server entity in Infisical, then enroll a deployed server against it using a one-time enrollment token or AWS authentication. This is the same enrollment model used by Gateways and Relays.
Supported Operations
The Infisical KMIP server supports the following operations for symmetric keys:- Create - Generate symmetric keys
- Register - Register externally created keys
- Locate - Find keys using attributes
- Get - Retrieve keys securely
- Activate - Enable keys for usage
- Revoke - Revoke existing keys
- Destroy - Permanently remove keys
- Get Attributes - Retrieve metadata associated with keys
- Query - Query server capabilities and supported operations
Compatibility
Infisical KMIP supports KMIP versions 1.0 to 1.4, ensuring compatibility with a wide range of clients and security tools.Network Requirements
Ensure the following network connectivity is in place:- KMIP Client → KMIP Server: KMIP clients must be able to reach the KMIP server on port 5696 (or your configured port). Ensure firewalls allow this traffic and DNS resolution works if using hostnames.
- KMIP Server → Infisical Platform: The KMIP server needs outbound HTTPS access to Infisical. For self-hosted instances, ensure connectivity to your custom domain.
Configure and Deploy the KMIP Server
A KMIP server is created as an organization-wide entity in Infisical and then enrolled from the host where you run it.1
Create the KMIP Server in the UI
- In the Infisical dashboard, open Infisical KMS and select KMIP Servers.
-
Click Create KMIP Server and fill in:
- Name of the server.
- Hostnames or IPs: a comma-separated list of the hostnames or IPs that KMIP clients will use to reach this server (for example
kmip.example.comor10.0.1.50). These become the Subject Alternative Names (SANs) of the server’s TLS certificate, so they must match how clients connect. - Certificate TTL: validity period of the server certificate (for example
1y). - Key Algorithm: key algorithm used to sign the server certificate.
-
(Optional) Open the new server’s detail page and click the edit icon next to Authentication to switch the auth method. Two methods are supported:
- Token (default): a one-time enrollment token (1h expiry) bootstraps the server.
- AWS: the server authenticates by signing an
sts:GetCallerIdentityrequest with whatever AWS credentials it can resolve on the host (instance role, env vars, shared profile). Configure the allowed principal ARNs and/or account IDs that match your hosts.
- Click Show deploy command in the Deployment card and copy the generated CLI command.
2
Install the Infisical CLI
Make sure the Infisical CLI is installed on the target machine where you want to run the KMIP server. See the CLI Installation Guide for instructions.You can run the KMIP server on any infrastructure that can reach the Infisical platform, such as a VM or container.
3
Configure Network & Firewall
Ensure your network and firewall settings allow the required traffic.
Only the KMIP client port (default
5696) needs to be reachable by your clients. All traffic from the server to Infisical is outbound.4
Run the CLI Command
Run the command you copied from the UI on the target machine. This single command enrolls the KMIP server and starts it immediately.
Token Auth
Token Auth
A one-time enrollment token (1h expiry) bootstraps the KMIP server.
- Linux (Production)
- Foreground
AWS Auth
AWS Auth
The host must have AWS credentials whose principal matches your allowlist. The server re-authenticates via STS on every start.
- Linux (Production)
- Foreground
The server’s certificate configuration (hostnames/IPs, TTL, key algorithm) is read from the server entity you configured in the UI, so the deploy command does not include it. To change the certificate, edit the Certificate Configuration card on the server’s detail page and restart the server.
By default the server listens on
localhost:5696, which only accepts connections from the same host. To accept connections from your KMIP clients, set --listen-address="0.0.0.0:5696" (or bind to a specific interface).Token-method enrollment tokens are single-use and expire after 1 hour. If the token expires before deployment, click Show deploy command again on the detail page to generate a new one.
You can safely re-run the same command to restart the server. For token auth the CLI reuses the locally stored access token and skips enrollment; for AWS auth it re-authenticates via STS on each start.
5
Verify the KMIP Server
After deployment, verify the server is running:
- Check logs for a “Listening on …” message and confirm the certificates loaded successfully.
- For systemd installations, check the service status:
Managing a KMIP Server
From the KMIP server’s detail page (under Infisical KMS > KMIP Servers):- Show deploy command — Generates a fresh enrollment token (token method) or re-displays the AWS start command. For token-method servers this does not disconnect a running server; the next enrollment with the new token supersedes the old one.
- Edit certificate configuration: Update the hostnames/IPs, TTL, or key algorithm used for the server’s TLS certificate. Restart the server after saving for the new certificate to take effect.
- Edit authentication — Switch between Token and AWS, or update the AWS allowlists.
- Options → Revoke Access — Invalidates the server’s outstanding access tokens and enrollment tokens. The server must re-enroll to reconnect.
- Options → Delete — Permanently removes the KMIP server entity.
Register a KMIP Client
Once the KMIP server is running, register the KMIP clients that will connect to it. Clients are managed per-project from a KMS project’s KMIP settings and authenticate via mTLS certificates.1
Navigate to Your KMS Project
Navigate to the desired KMS project if you already have one or create a new project of type KMS, then select KMIP once inside the project, and click Add KMIP Client.
2
Configure the KMIP Client
Define the client and its permissions.In the modal, provide the details of your client. The selected permissions determine what KMIP operations (Create, Get, Revoke, etc.) can be performed in your KMS project.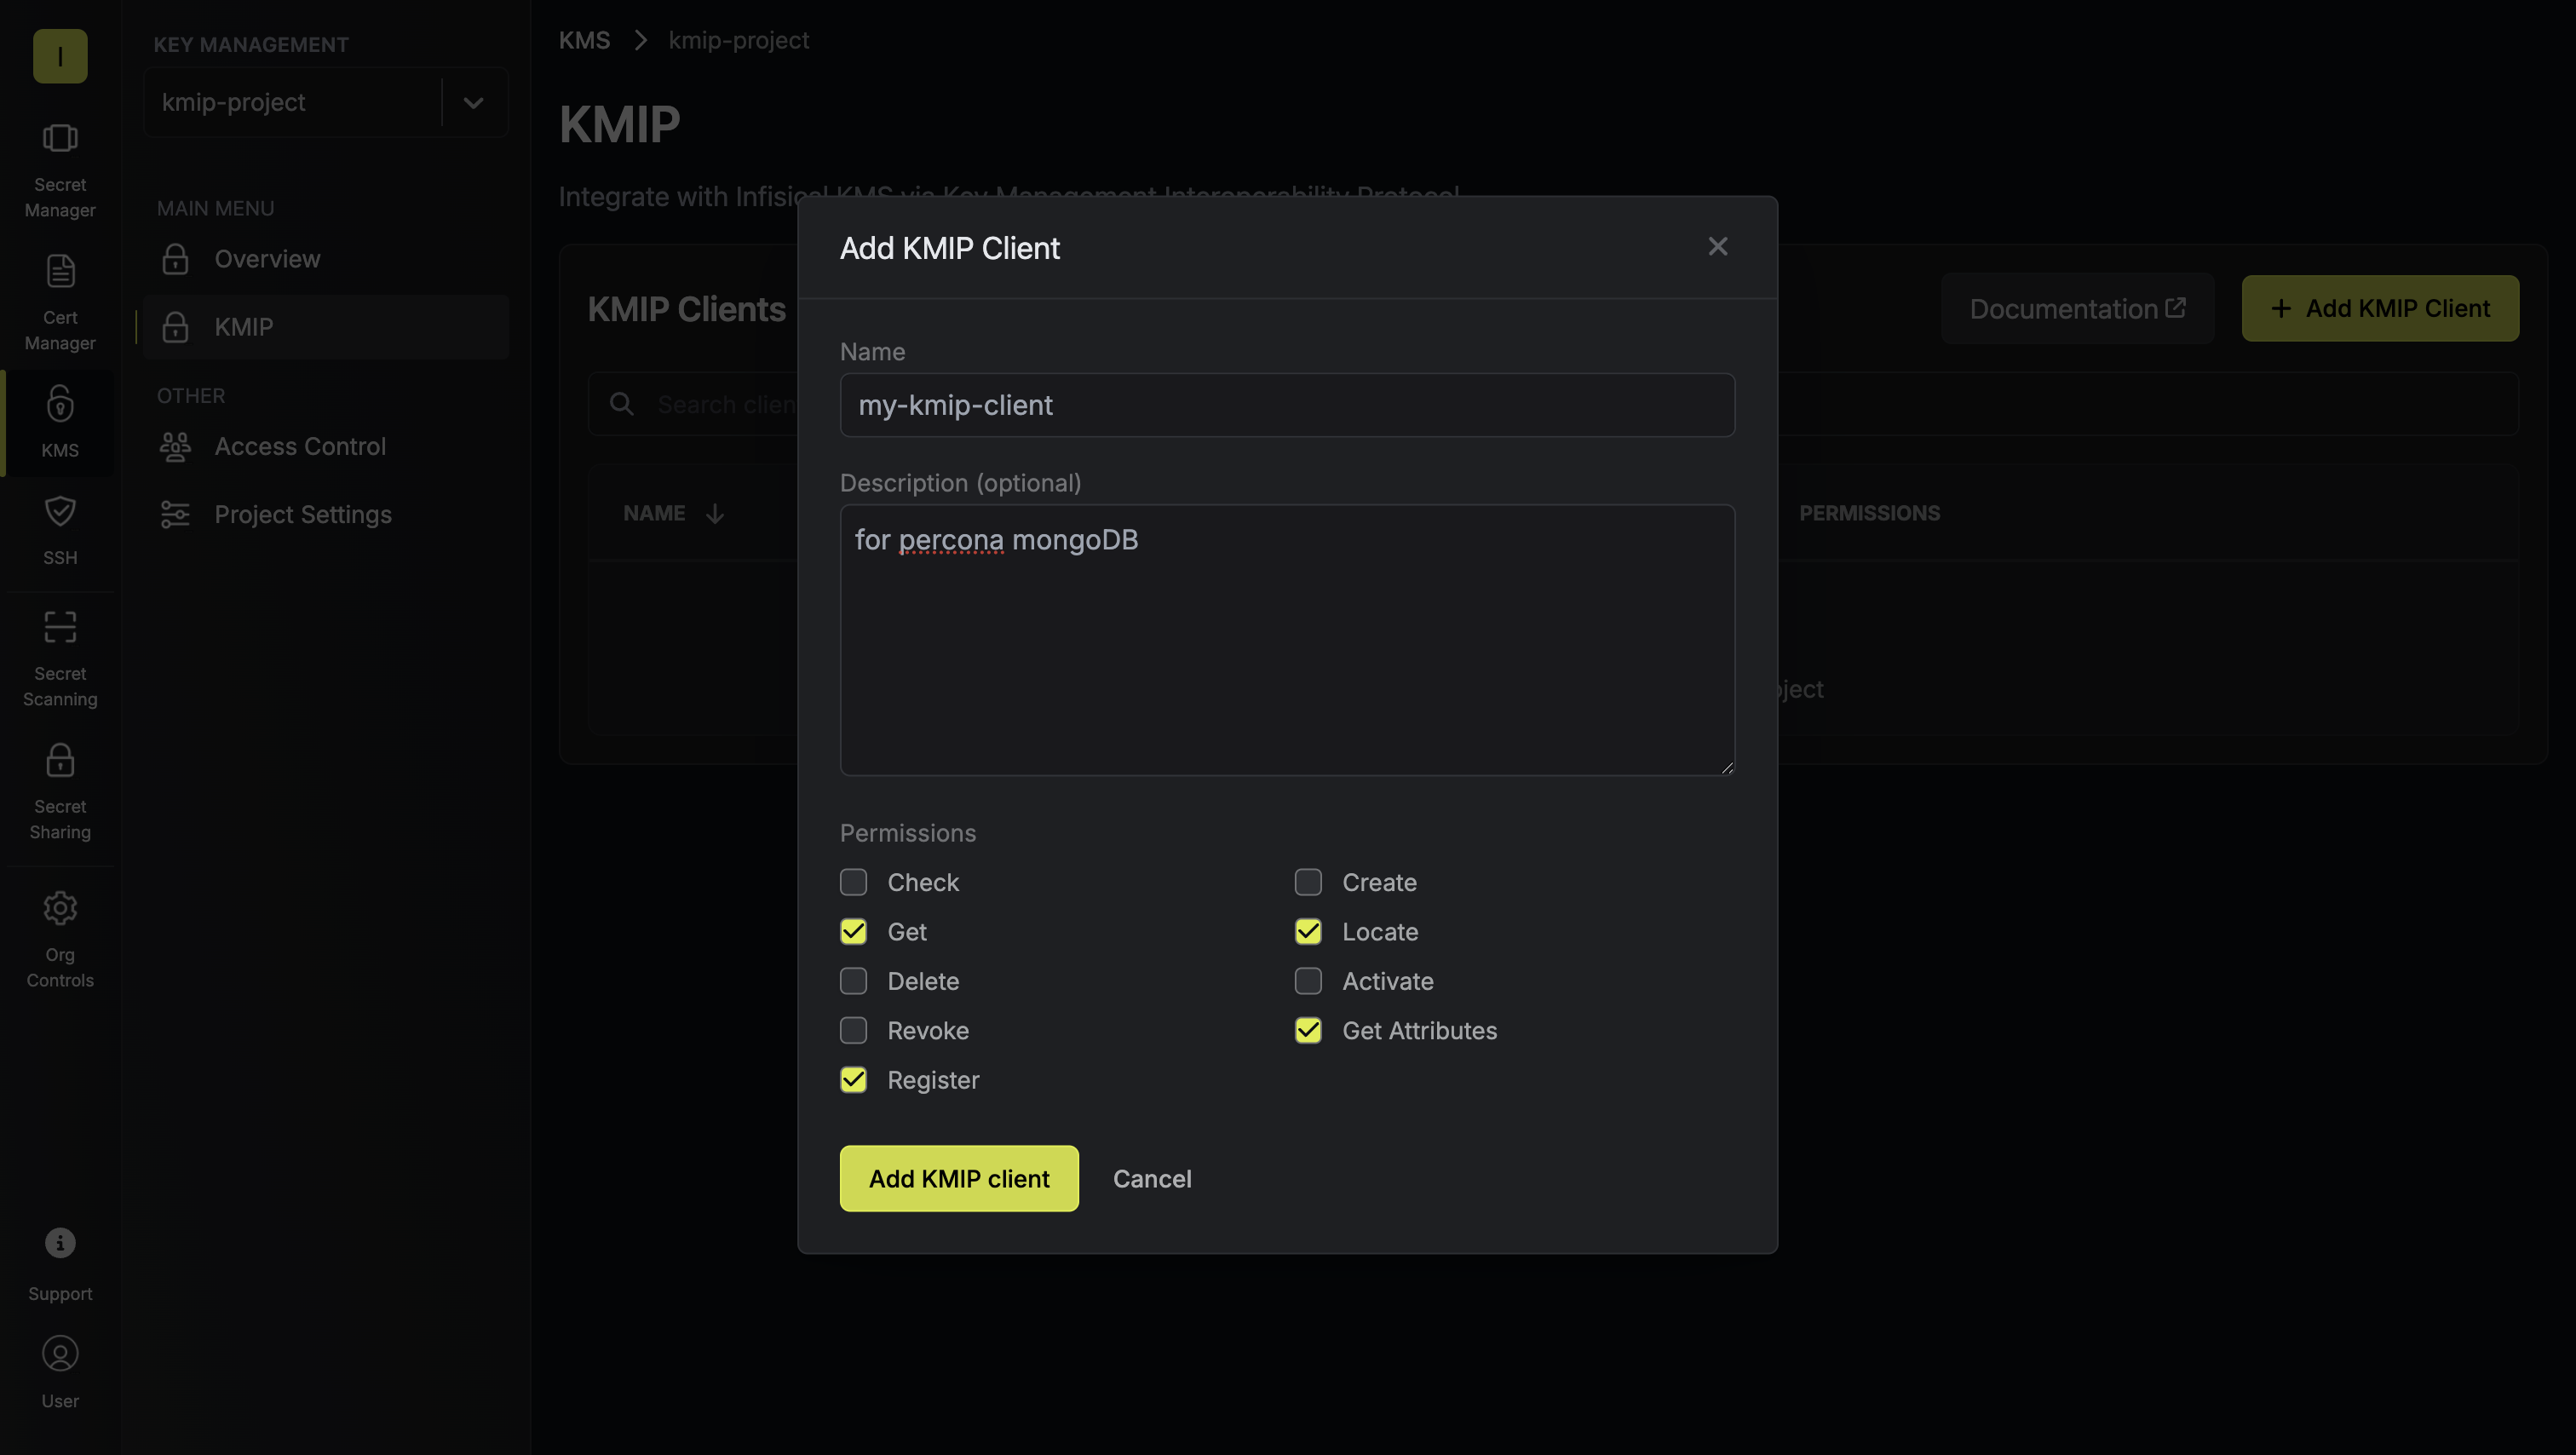 This creates a KMIP client entity in Infisical that will be authenticated via mTLS certificates.
This creates a KMIP client entity in Infisical that will be authenticated via mTLS certificates.3
Generate Client Certificate
Each KMIP client needs its own certificate for mTLS authentication.Click Generate Certificate for your newly created client. Select the request method:
- Managed: Infisical generates the key pair and certificate for you. Provide the TTL and key algorithm.
- CSR: Provide your own Certificate Signing Request if your device generates keys internally (e.g., Dell iDRAC). See the Dell PowerEdge SEKM guide for details.
Connecting your KMIP Client to Infisical
After completing the setup, configure your KMIP compatible application to connect to the KMIP server. While exact configuration steps vary by application, you’ll generally need to provide:-
KMIP Server Address: The hostname or IP and port where your KMIP server is listening (e.g.,
my-kmip-server.com:5696) -
Client Certificates: The certificate credentials generated from your Infisical KMS project:
- Client Certificate (
client-cert.pem) - Identifies your KMIP client - Client Private Key (
client-key.pem) - Used for mTLS authentication - Certificate Chain (
cert-chain.pem) - Verifies the KMIP server
- Client Certificate (
General Configuration Steps
1
Identify Your KMIP Server Endpoint
Determine the address where your KMIP server is accessible. This should match one of the hostnames or IPs configured on the server entity in the UI.Example endpoints:
my-kmip-server.com:569610.0.1.50:5696kmip.example.com:5696
5696, but this can be changed using the --listen-address flag when starting the server.2
Prepare Certificate Files
Organize the certificate materials you downloaded when generating the client certificate from the Infisical KMS project. You should have three files:
- client-cert.pem - The client certificate
- cert-chain.pem - The certificate chain (includes intermediate and root CA certificates)
- client-key.pem - The private key
3
Configure Your KMIP Client Application
The exact configuration steps vary depending on your KMIP client application. Generally, you’ll need to specify:Common configuration parameters:
- Server hostname/IP: Your KMIP server address (e.g.,
my-kmip-server.com) - Server port: Default is
5696 - Client certificate: Path to
client-cert.pem - Client private key: Path to
client-key.pem - CA certificate: Path to
cert-chain.pem(used to verify the server) - Protocol version: KMIP 1.0 through 1.4 are supported
4
Test the Connection
Once configured, test the connection by performing a simple KMIP operation, such as:This command attempts to establish a TLS connection to the KMIP server using your client certificate and key, displaying detailed information about the handshake process.
If the connection is successful, you’ll see the server’s certificate chain and a message indicating that the handshake was completed.
- Querying server capabilities
- Creating a test key
- Listing available keys
- Verify network connectivity between your KMIP client and the KMIP server
- Check that certificate files are readable and in the correct format
- Ensure the KMIP server is running and accessible
- Review KMIP server logs for authentication errors
- Confirm the client certificate has not expired