If you’re planning on building out any platform-platform integrations, you’re going to be running into the OAuth 2.0 protocol at some point. Having implemented it a dozen times as part of my work at Infisical, I summarize it; including nuances; practical examples; and recommendations for how you can implement it yourself.
To note, in this article, I’ll be focusing on the Authorization Code Flow since it is the most common variation of OAuth 2.0 flow that you’ll see in practice.
For the full protocol specification, you should check out RFC 6749.
Introduction
Consider these use-cases where you want to build:
- A social media management application that requires access to a user’s Twitter profile.
- A project management application that requires access to a user’s Google Calendar.
Here, the application may redirect the user to a platform like Twitter or Google Calendar for them to grant the application access to their platform account. After the user gives consent, the application can perform operations such as automatically scheduling tasks and deadlines for the user on Google Calendar.
As you might expect, the protocol powering this entire flow under the hood turns out to be OAuth 2.0.
What is OAuth 2.0?
OAuth 2.0 is an authorization framework or protocol that lets an application get limited access to another service on behalf of a user. As part of the framework, a user explicitly grants the application access to their service account.
By the way, OAuth 2.0 is an updated version of the older OAuth 1.0 protocol which should be considered obsolete.
Why do we need OAuth?
In a usual setup, an application gets access to a service by using the user’s login credentials, namely password, for that service.
However, this has many issues including:
- Login credentials and, in particular passwords, tend to be a weak form of security since people are terrible at choosing passwords. Unsurprisingly, weak passwords are frequently exploited by bad actors who use sophisticated methods to brute-force their way into user accounts.
- The application has to securely store the user’s login credentials for that service. It may insecurely store the credentials, such as by storing them in plaintext, and put the user at risk if the application gets hacked. Once the application does get hacked, then it exposes the user’s password and thus all the service data secured by it.
- If the user wanted to cut off the application’s access to the service, they’d have to change their password for that service; this creates a “password sprawl” since, if the user uses other services too, then they may now have different passwords for each service.
OAuth addresses these issues by enabling an application to access a service without the need for using the user’s password. In doing so, it separates the roles of client (the application) and resource owner (the user). So, instead of using the user’s login credentials, OAuth enables the application to use an “access token” with specific permissions and expiration dates to access that particular service. The access token is issued by the service itself and only after the user explicitly grants the application consent to access the service.
The OAuth 2.0 flow
Now that I’ve convinced you of the need for OAuth, we can go over OAuth 2.0 as presented in RFC 6749 including the specific steps and jargon used throughout the specification.
For a more lightweight mental model, please do feel free to skip to the next section in this article titled “Building a mental model of OAuth 2.0.”
Roles
Alright. Let’s define the parties involved in the flow:
- Resource Owner: This is the individual or entity that can grant access to a protected resource. When it’s a person, we call them an “end-user.”
- Resource Server: This is where the protected data or resources are stored. It’s set up to accept requests that come with the right access tokens.
- Client: This is an app or tool that asks to access the protected resource on behalf of the resource owner and with their permission. A “client” could be anything, like a web server app, a desktop application, or a mobile app.
- Authorization Server: This is the system that checks if the resource owner has given permission and, if so, gives the client an “access token” to access the data.
- User-Agent: The tool or software used by the Resource Owner to interact with the Client and the Authorization Server. Most often, it refers to a web browser (like Chrome, Firefox, or Safari).
To note, we previously referred to the resource owner as the user, the client as the application, and the resource and authorization server together as service.
Protocol flow
The OAuth 2.0 authorization code flow involves fetching both access and refresh tokens. Using this method, the client needs to work with the user’s browser and handle redirects from the authorization server. In most cases, this is the flow that you’ll be looking to implement for your own applications.
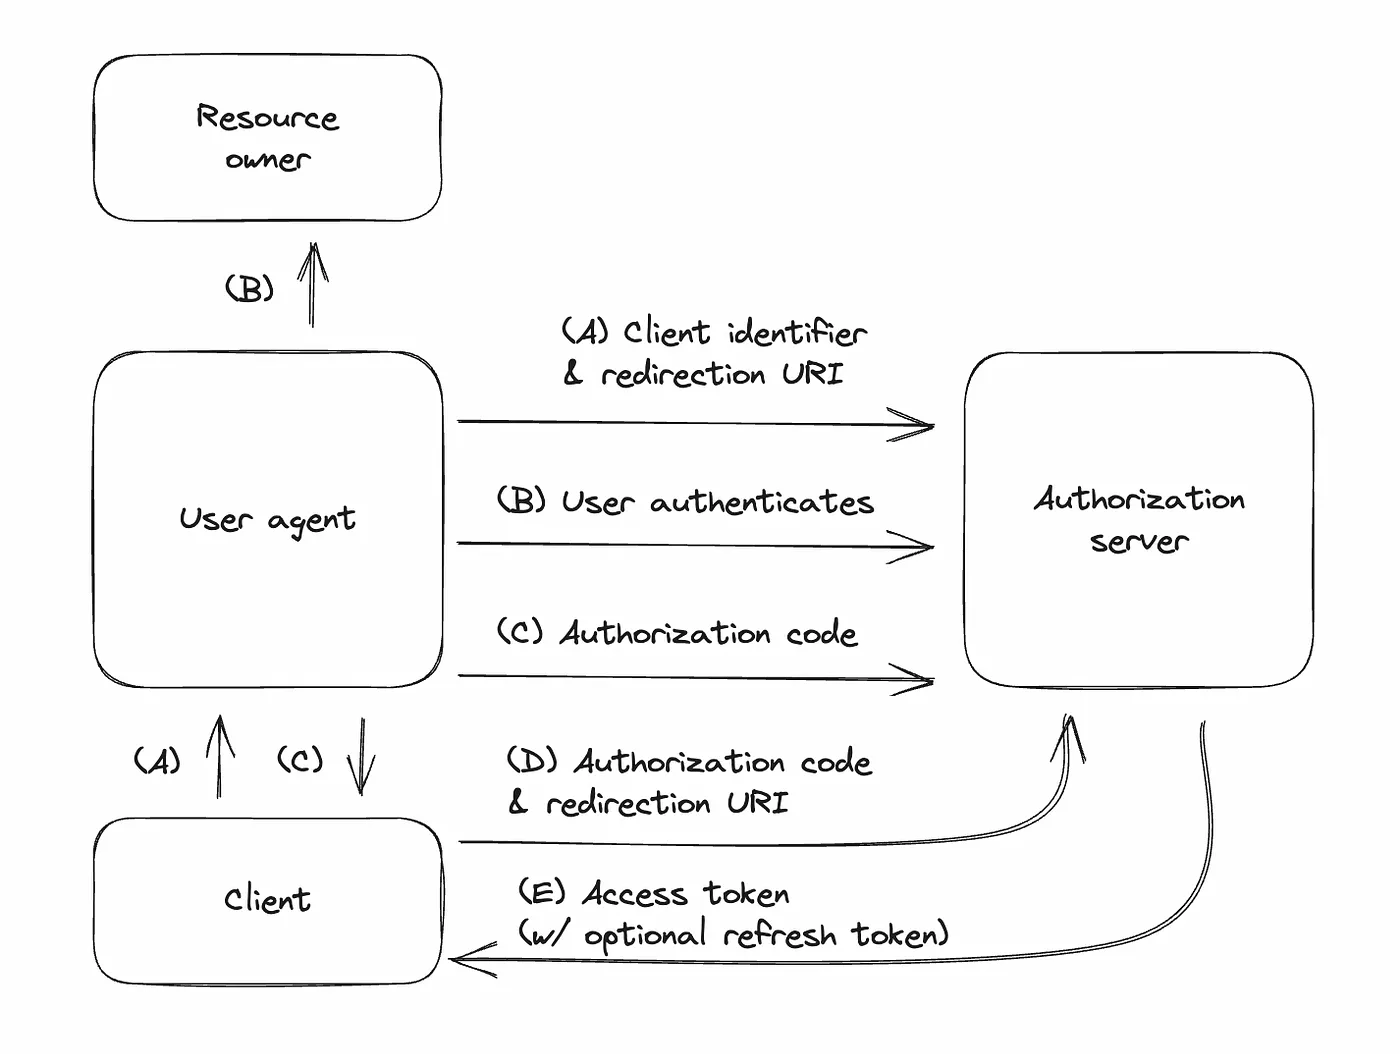
(A) Client redirects user to authorization server:
- The client sends the user to the authorization server. It includes details like its ID, the information it wants, where to redirect back, and some local data.
- At this step, the user is redirected to a page informing them that the client is requesting access to the service at which point they may or may not grant access in the next step.
(B) User logs in and grants access:
- The user logs into the authorization server and decides whether to allow the client’s request.
(C) User returns to client with a code:
- If the user agrees, they are sent back to the client’s specified address with an “authorization code” and the local data from step 1.
(D) Client exchanges code for token:
- The client gives the authorization server this code, proves its identity, and specifies where it received the code. In return, it asks for an “access token”.
(E) Authorization server gives token:
- If everything checks out, the server gives the client an access token (and maybe a “refresh token” to get more access tokens later).
Building a mental model of OAuth 2.0
Whew — That was a lot.
OAuth 2.0 can be overwhelming to keep track of, especially if it’s your first time implementing it. In this section, I help you build a mental model of the flow in simple chunks.
Let’s start with some definitions:
- User
- Browser (user-agent): Your application frontend.
- Server (client): Your application backend.
- Service (authorization server): The service you wish the user to grant the application access to.
Next, let’s visualize each step of the user journey:
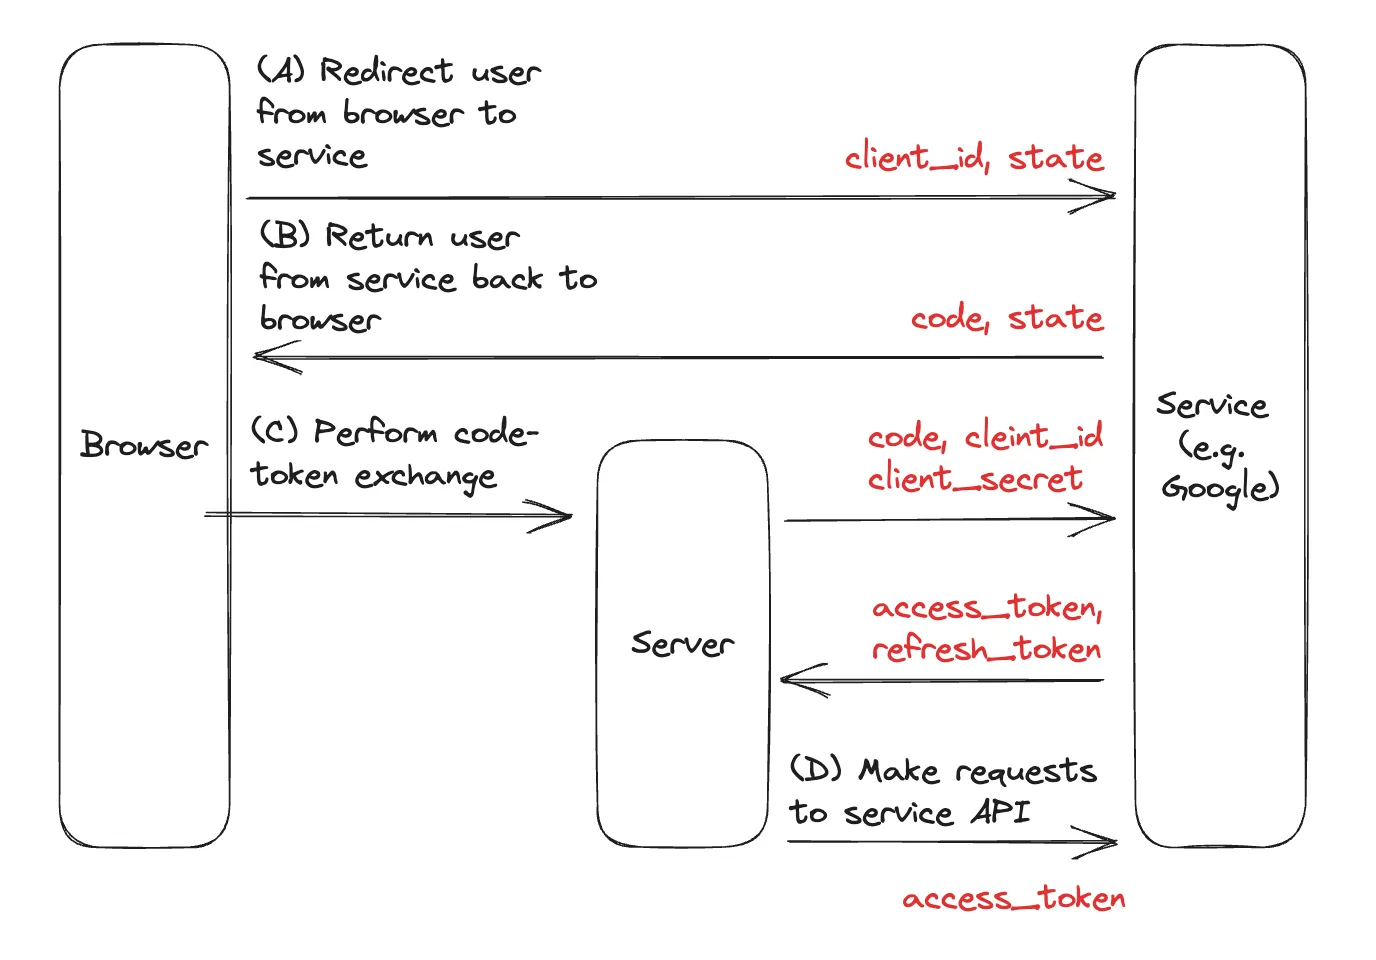
- (A) Redirect the user from browser to service: The user presses a button in the browser and gets redirected to the service where they can grant the application access to the service.
- (B) Return the user from service back to browser: After the grant, the user is redirected back to the browser with a code .
- (C) Perform the code-token exchange: Send the code from the browser to the server to be exchanged with the service. After the exchange, we should receive an access_token back from the service, and often a refresh_token .
- (D) Use the access token to make requests against the service API: With the access_token , we can now make requests to the service on behalf of the user. If the access_token expires, then we can use the refresh_token to obtain a new access_token .
Finally, let’s zoom into the technical underpinnings of each step:
- (A) Redirect the user from the browser to the service: This requires us only to redirect the user to the service; we can do that with a method like window.location.assign() . As part of this step, we’re often asked to create a state parameter to be stored in local storage and included during the redirect; we may also need to include a client_id .
- (B) Return the user from the service back to the browser: Here, we just compare the state included by the service in the URL to the state we created in the previous step. If these values match, then we’re good to proceed to the next step.
- (C) Perform the code-token exchange: This step requires that we send the code obtained in the previous step to the server and exchange it with the service. We do exactly that and get an access_token and refresh_token back.
- (D) Use the access token to make requests against the service API: With the access_token in hand from the previous step, we can now make requests to the service on behalf of the user. Here, we can also think about the lifecycle management of the access token that is refreshing it whenever it expires.
That’s it!
We’re now equipped with the prerequisite knowledge for implementing OAuth 2.0.
How to Implement OAuth 2.0 (Example with Google API)
A complete article about implementing OAuth would be incomplete without real-world example for it. In this section, we demonstrate how to authenticate with the Google API, a popular use-case, using OAuth 2.0 — Authorization Code Flow; the example come directly from the implementation used in Infisical.
Authenticating with the Google API can allow your web application to access Google services, user data, etc. At a high-level, we’ll need to configure an OAuth application in Google Cloud Platform (GCP) and set up the OAuth 2.0 flow in our application to work with it.
Let’s dive right in.
- Create an account with GCP here: https://cloud.google.com
- Start by navigating to your project API & Services > Credentials in GCP to create a new OAuth application.
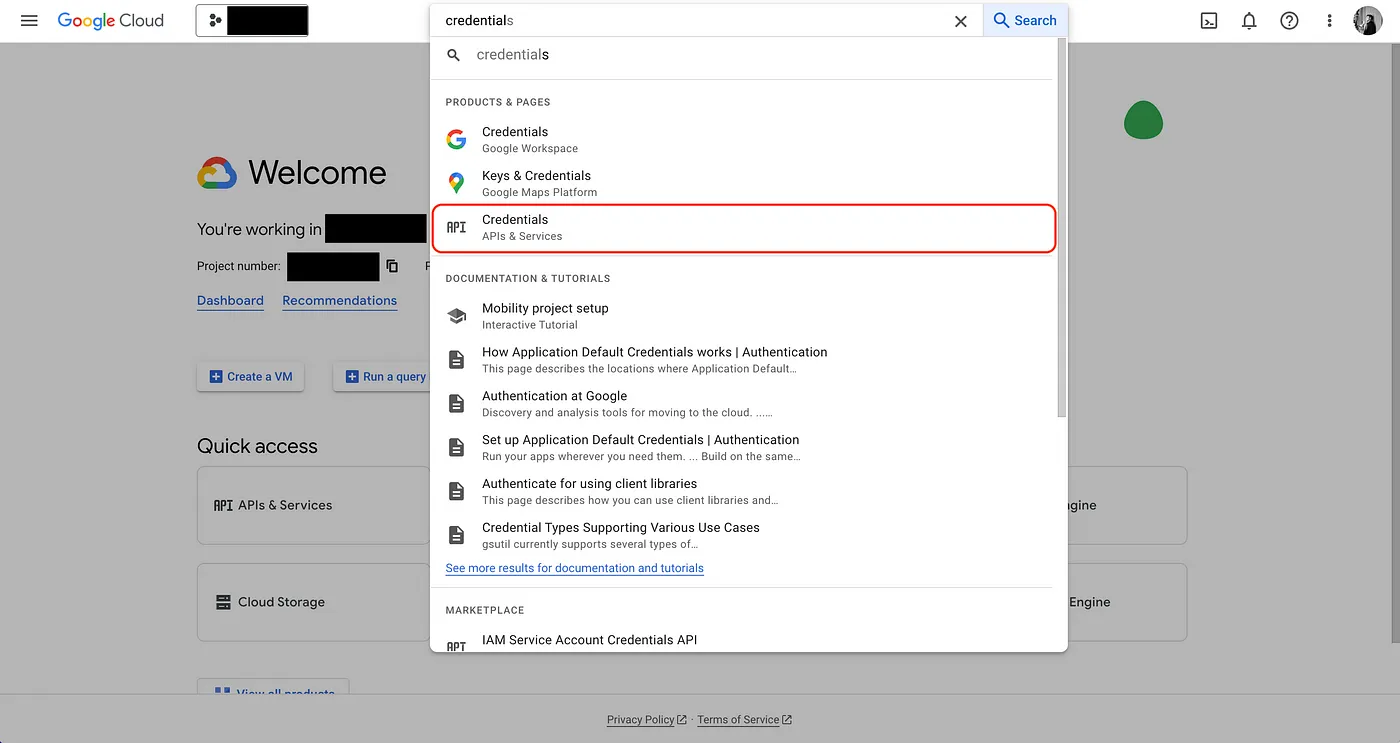
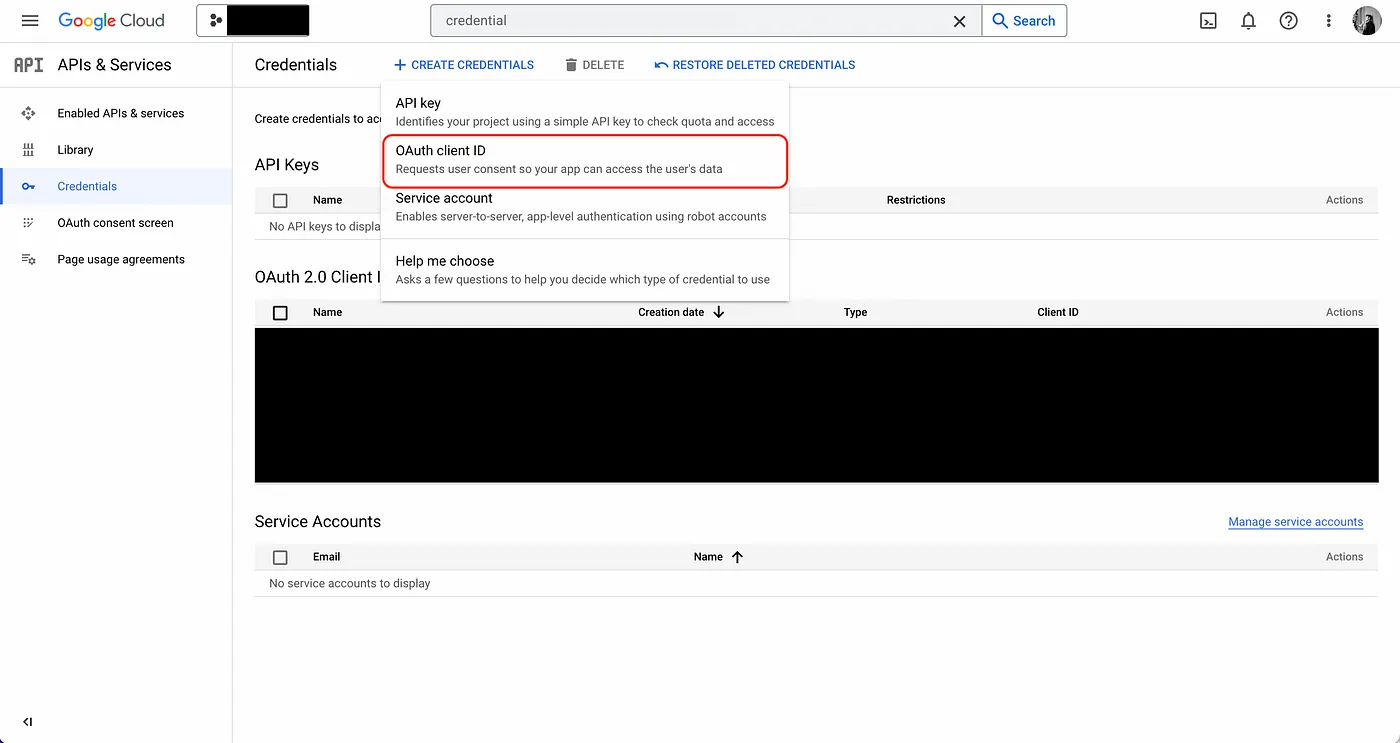
- Create the OAuth application.
As part of the form, add to Authorized redirect URIs a redirect URL such as https://your-domain.com/integrations/google/oauth2/callback. This is the URL that Google will redirect the user back to after they have authorized the application to access their Google account.
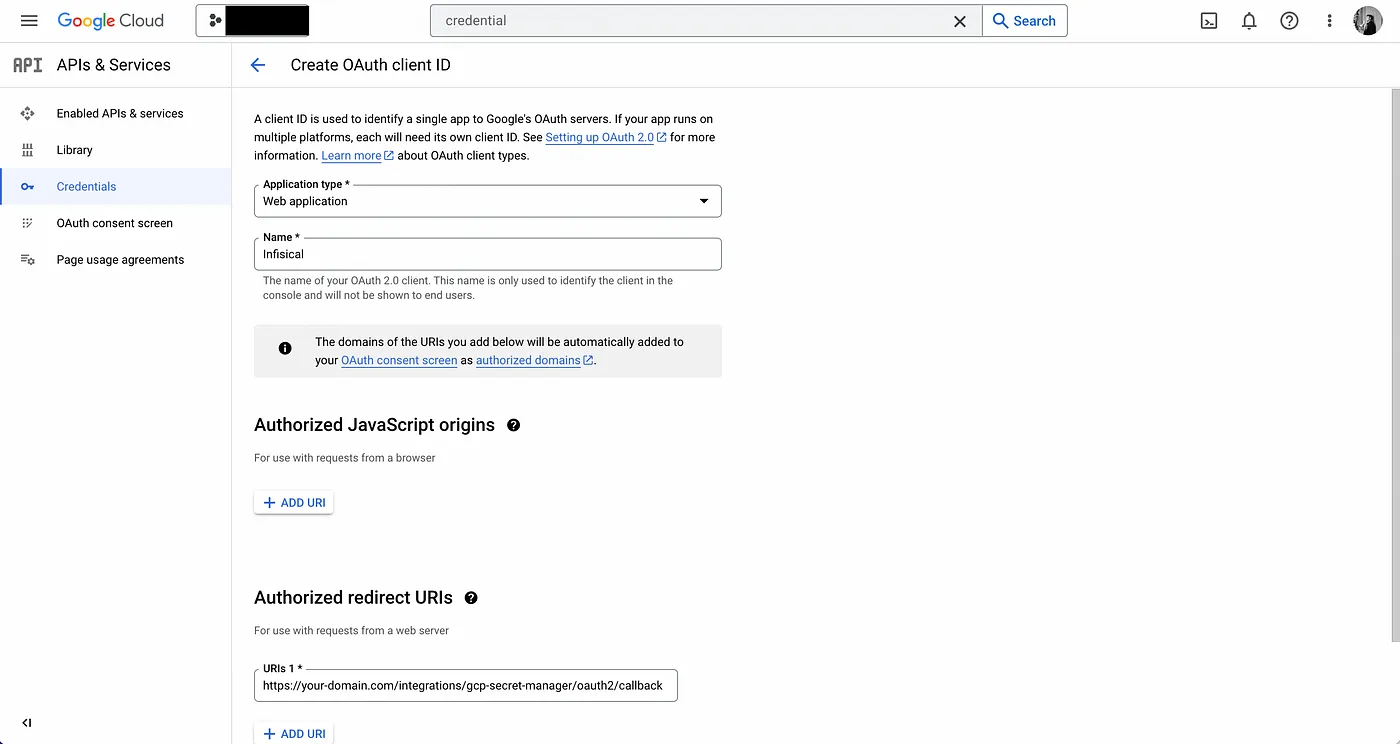
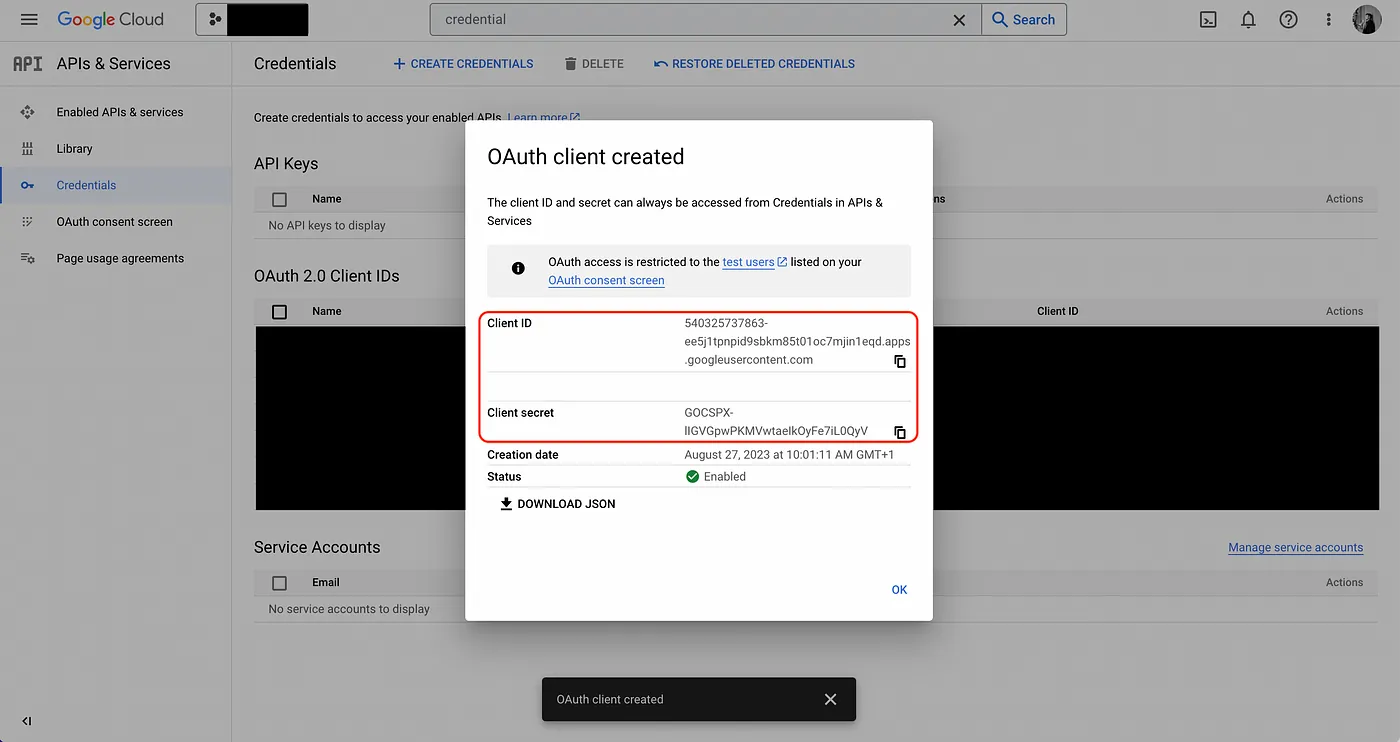
- Obtain the Client ID and Client Secret for your Google OAuth2 application; keep this handy.
Now, we need to configure your web application to interact with GCP:
- Redirect the user to GCP from your web application frontend.
In your web application frontend, create a button that, when pressed, initiates the OAuth 2.0 flow by redirecting users to Google, so they can log in and grant the web application access to their Google account. The button handler should contain the following logic:
// the client id from GCP
const client_id = ""

// create a CSRF token and store it locally
const state = crypto.randomBytes(16).toString("hex");
localStorage.setItem("latestCSRFToken", state);

// redirect the user to Google
const link = `https://accounts.google.com/o/oauth2/auth?scope=https://www.googleapis.com/auth/cloud-platform&response_type=code&access_type=offline&state=${state}&redirect_uri=${window.location.origin}/integrations/google/oauth2/callback&client_id=${client_id}`;
window.location.assign(link);
Here, we generate a CSRF token to be stored in local storage and sent along as the state parameter to GCP; this has to do with mitigating Cross-Site Request Forgery (CSRF) attack which is beyond the scope of this article.
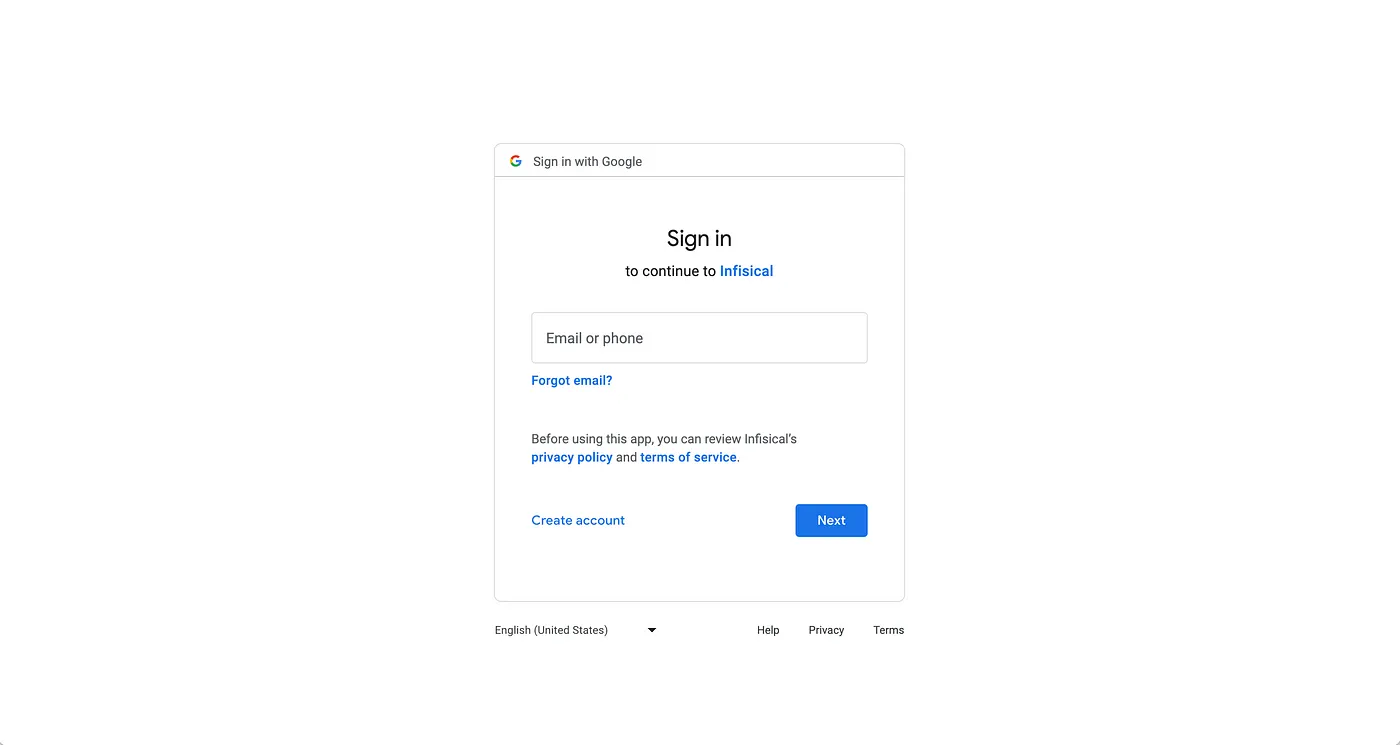
Note that you should replace the redirect_uri in link with the one that you registered in step 2 in GCP. When users press the button, they should be redirected to Google as shown below:
- Validate the state parameter upon the user being redirected back to the web application and send code to
Since Google will redirect the user back to redirect_uri after they have logged in and granted the web application access to their Google account, you need to make a page for it to handle the next part of the OAuth 2.0 flow. Here, the redirect_uri will come with a code and state parameter; you should parse these parameters off the URL and validate that the state parameter matches the CSRF token in local storage from step 4. If it’s good, you can proceed to send the code to the web application backend to perform the code-token exchange.
const { code, state } = queryString.parse(router.asPath.split("?")[1]);

// validate the state parameter
if (state !== localStorage.getItem("latestCSRFToken") {
  localStorage.removeItem("latestCSRFToken");

  // send the code to the backend
  const res = await axios.post("/api/oauth-token", {
    code
  });
}
- Exchange the code for an access_token and refresh_token .
In your application backend, you should now perform a code-token exchange with the Google API endpoint for it.
const res = await axios.post(
  "https://oauth2.googleapis.com/token",
  new URLSearchParams({
    grant_type: "authorization_code",
    code: code,
    client_id: process.env.GCP_CLIENT_ID,
    client_secret: process.env.GCP_CLIENT_SECRET,
    redirect_uri: `your-domain/integrations/gcp-secret-manager/oauth2/callback`,
  } as any)
);

const access_token = res.data.access_token; // used to access the Google API
const refresh_token = res.data.refresh_token; // used to refresh the access token
const expires_in = res.data.expires_in; // used to know when to refresh the access token
- Use the access_token to access the Google API on behalf of the user.
You can now access the Google API on behalf of the user by including the access_token in requests made to the API.
- If the accessToken expires, redeem the refresh_token to obtain a new access_token .
In step 6, you may have noticed that GCP returns two additional fields that we bind to the variables refresh_token and expires_in. Since access_token is a short-lived authentication credential for the Google API, the expires_in field helps inform us when it will expire. Once we know the access token has expired, we can make a special API request containing the refresh_token to the token endpoint to obtain a new access_token and continue to access the Google API on behalf of the user as in step 7.
const res = await standardRequest.post(
  "https://oauth2.googleapis.com/token",
  new URLSearchParams({
    client_id: process.env.GCP_CLIENT_ID,
    client_secret: process.env.GCP_CLIENT_SECRET,
    refresh_token: refreshToken,
    grant_type: "refresh_token",
  } as any)
);

const accessToken = res.data.access_token;
const expiresIn = res.data.expires_in;
Tips
Implementing OAuth 2.0 correctly is critical for your application and user security.
Here’s some practical advice that you should keep in mind:
- Don’t hardcode the Client ID and Client Secret for your application anywhere in your codebase. Instead, you should store both the Client ID and Client Secret for your application securely, preferably as application environment variables. Even better, you should consider storing these credentials in a secret manager like Infisical and fetch them back to the backend at runtime.
- Don’t perform the OAuth code-token exchange (i.e. step 6) multiple times. The exchange should be performed once after which you should manage refresh and access tokens to make all subsequent requests to the service API. Since these tokens should be dealt with securely, as with my previous tip, you should consider storing them in a secret manager as well.
Closing thoughts
OAuth 2.0 is an important flow found in most web applications, enabling them to authenticate with other services. By understanding the OAuth 2.0 flow, building a mental model of it yourself, and seeing a practical example of implementing it with a popular service (i.e. Google), I hope you now feel confident about implementing it yourself for your own application use-cases.