--- title: "Machine Identity Attestation and Authentication for Bare Metal and Virtualised Systems" canonical: "https://infisical.com/blog/machine-identity-attestation-bare-metal" published: "2026-10-05" tags: ["Technical"] source-index: https://infisical.com/llms.txt --- # Machine Identity Attestation and Authentication for Bare Metal and Virtualised Systems Living in the UK has taught me almost as much about clouds as a decade working on AWS. I still remember when I first used EC2 authentication. Machine identity was still emerging, and it was incredible that I didn’t have to hardcode a token into an instance to retrieve a secret. AWS IAM has evolved a lot since then, and so has all of the other cloud infrastructure. A little later, I needed to accomplish machine-to-machine authentication for on-prem infrastructure. I had a couple of decent answers, but nothing was as smooth, cryptographically assured as authentication using AWS IAM, service accounts in GCP, or a managed identity in Azure. It’s been ten years since then. What looked like an impending complete migration of workloads to cloud hasn’t quite happened. Some organisations are even [back to buying hardware](https://basecamp.com/cloud-exit), certain virtualisation companies got acquired. The on-prem world is alive and kicking, especially in regulated industries with tight compliance requirements. Security hasn’t become as smooth for on-premises workloads as it has for those in the big three clouds. One big part of that is [secrets management](https://infisical.com/blog/secrets-management-complete-guide). Hardcoding credentials is unacceptable these days (insecure and cumbersome), so most organizations opt for a secrets manager to centralize and automate it. The big clouds offer native secrets managers that centralize and automate this by storing credentials and delivering them to workloads at runtime. These are smooth because they natively integrate with their respective cloud’s workloads. AWS Secrets Manager understands an EC2 instance’s machine identity because AWS is vouching for it. This isn’t true if you’re buying your own hardware. On premises, your machines aren’t trusted by default, so something needs to prove its identity, and that something can’t be a hardcoded secret. My objectives were simple: I have a couple of home-grown apps running on my virtualization cluster, that I wanted to authenticate to Infisical securely and consume secrets. As a bonus, (and yes, this is all covered in the following article), I’ve also found out how to restrict that login to the specific `systemd` service. ## How to solve machine identity attestations outside of the big clouds Machine identity works as a chain of trust. We must have a reason to trust the machine itself before we trust the workloads it runs. ### TPM: the hardware root of trust A TPM (Trusted Platform Module) solves the first piece of the puzzle. Every Windows 11 admin knows it, and it’s an outstanding choice for root of trust in your machine identity attestation chain. They contain an [endorsement key](https://en.wikipedia.org/wiki/Trusted_Platform_Module#Endorsement_keys) (EK), burned in at the factory, signed by a public certificate authority. If you’re using a vTPM (virtual TPM), Proxmox nodes generate their own. These are mostly tamper proof (that “mostly” carries weight, depending on your threat modelling. If someone decaps one of your TPM’s chips, it’s game over). TPM anchors the machine’s identity. ### SPIFFE and Spire: validating each machine But now we need to validate each machine? For this, I use Spire (the SPIFFE Runtime Environment), an implementation of the [SPIFFE](https://spiffe.io/) (Secure Production Identity Framework For Everyone) APIs. SPIFFE is a framework that describes how to identify workloads across heterogeneous infrastructure (so while I’m using it with TPMs here, it could use other methods of attestation). At its core, [Spire](https://spiffe.io/docs/latest/spire-about/spire-concepts/) has a few simple components: - A Spire server that contains the trust domain, registration entries, CA/signing authority, etc. - Spire nodes/agents that tell the server which workloads the machine is allowed to represent. In practice, we don’t need to configure all of this from scratch. Spire has a number of plugins that allow attestation at the server, node, and workload level. ### How the attestation flow works Let’s say I have a VM with a TPM running the Spire agent and a Spire Server. I’ll keep this intentionally generic: - The Virtual machine is running in [Proxmox](https://www.proxmox.com/en/) (Not an endorsement, just a personal preference. You can find out more about it in https://www.proxmox.com/en/) - The [Spire Server](https://spiffe.io/docs/latest/spire-about/spire-concepts/) has a Proxmox plugin that simplifies the setup because I don’t need to harvest the public hashes for the EKs in my nodes, So in my case, I have set this up in the following way. 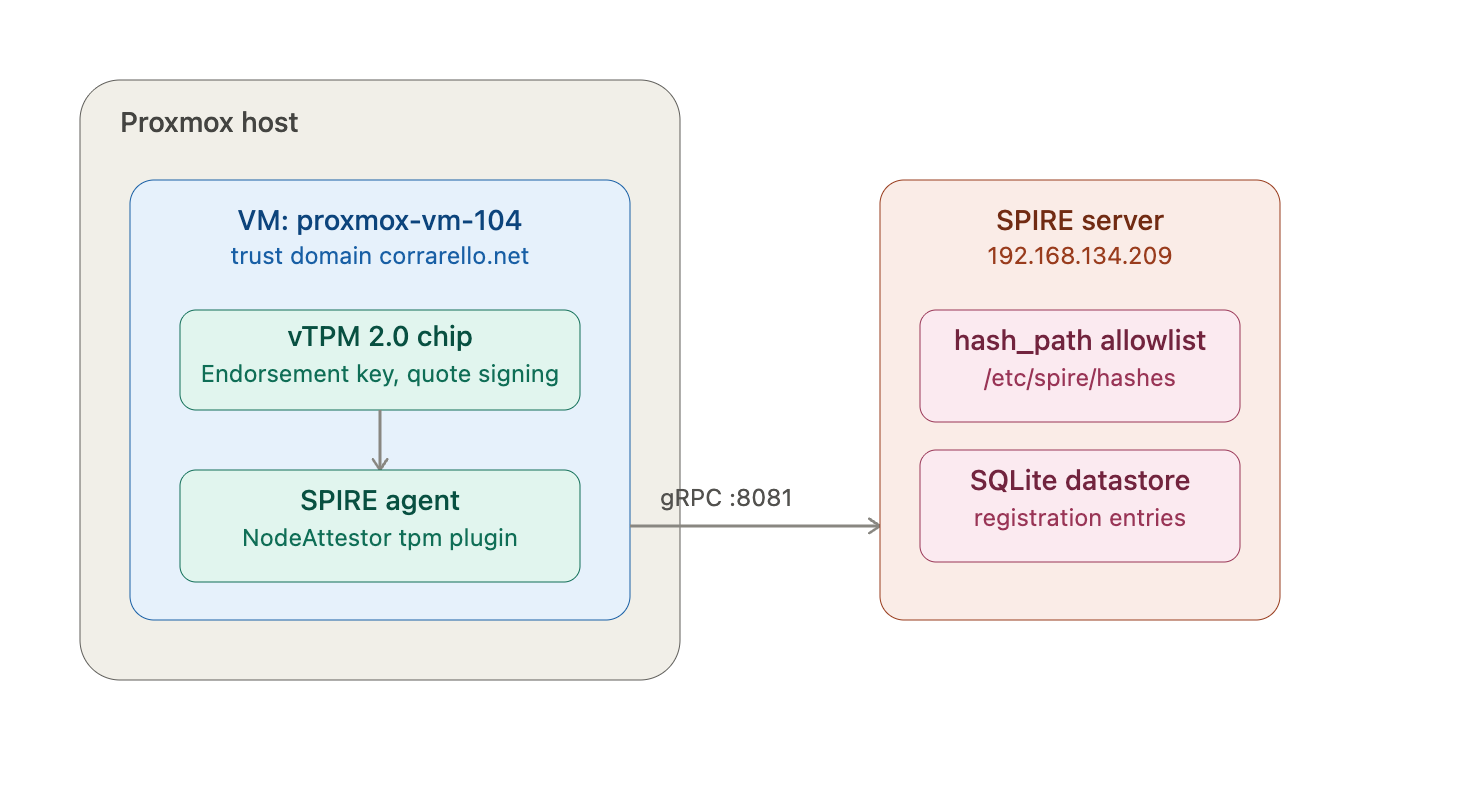 - The hash is being extracted from the server being authenticated, using the `get_tpm_pubhash` binary, provided by the Spire tpm plugin ([https://github.com/spiffe/spire-tpm-plugin/releases/](https://github.com/spiffe/spire-tpm-plugin/releases/tag/v1.11.3)) - The spire-agent authenticates the spire-server, with the bundle pre-provisioned - The spire-server can validate that the key is valid by virtue of being signed by a trusted CA, and knowing the hash of the server in advance 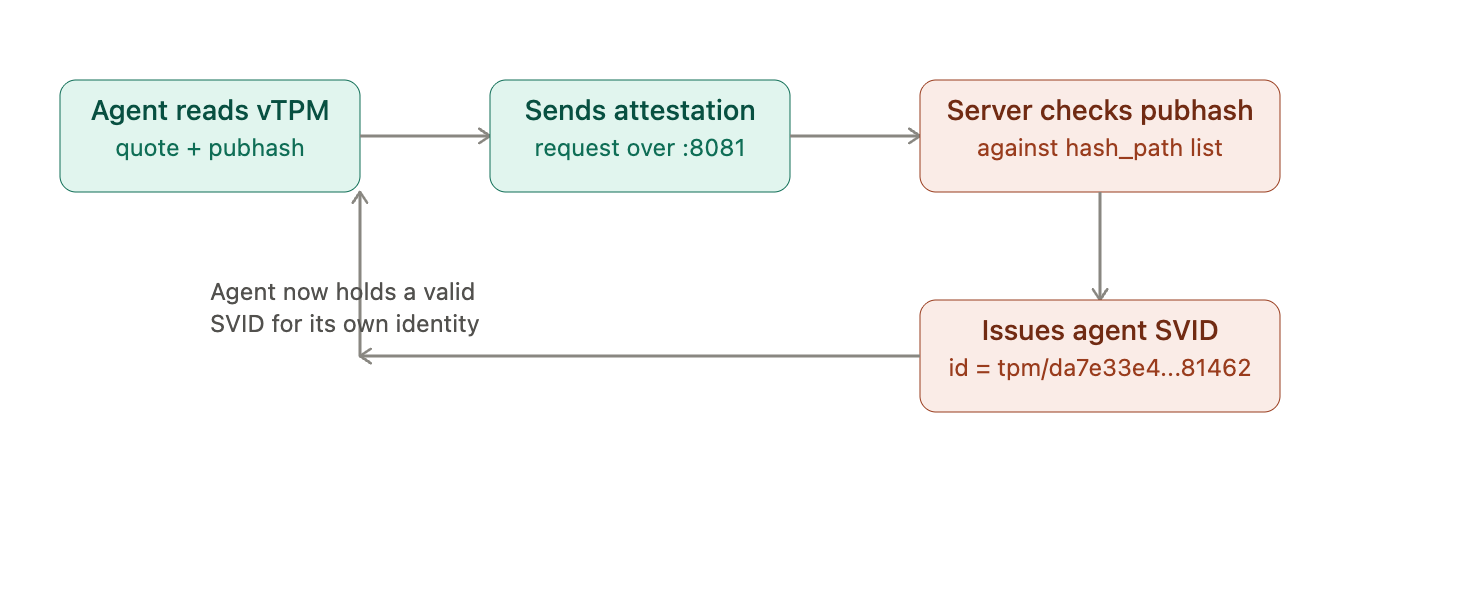 - Based on this chain of trust, the spire-agent in the server gets issued an SVID (SPIFFE Verifiable Identity Document, the certificate or JWT that proves a SPIFFE identity) for itself, and potentially an SVID for the workloads running on the server, using workload plugins. 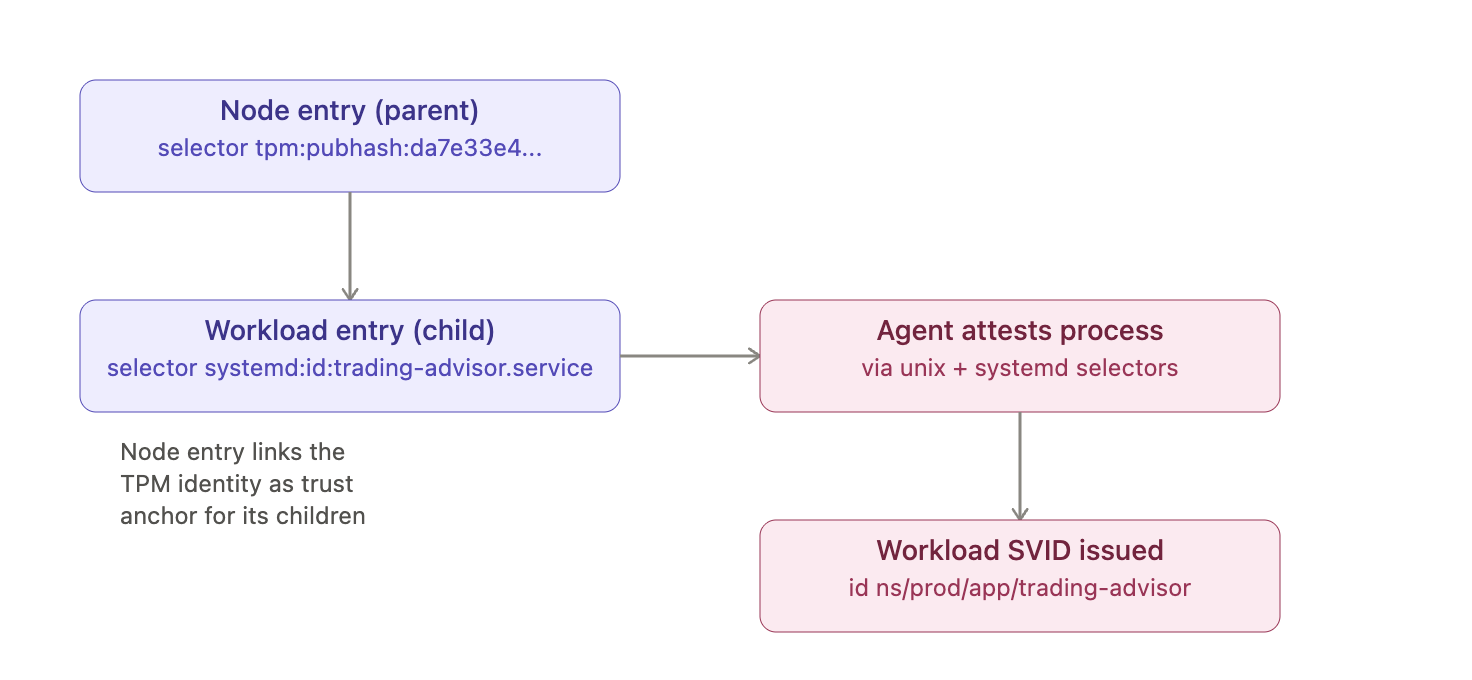 Now you trust the system, and even the workload that runs in the host. ## How to use Infisical to manage secrets with on-prem SPIFFE/Spire attestation 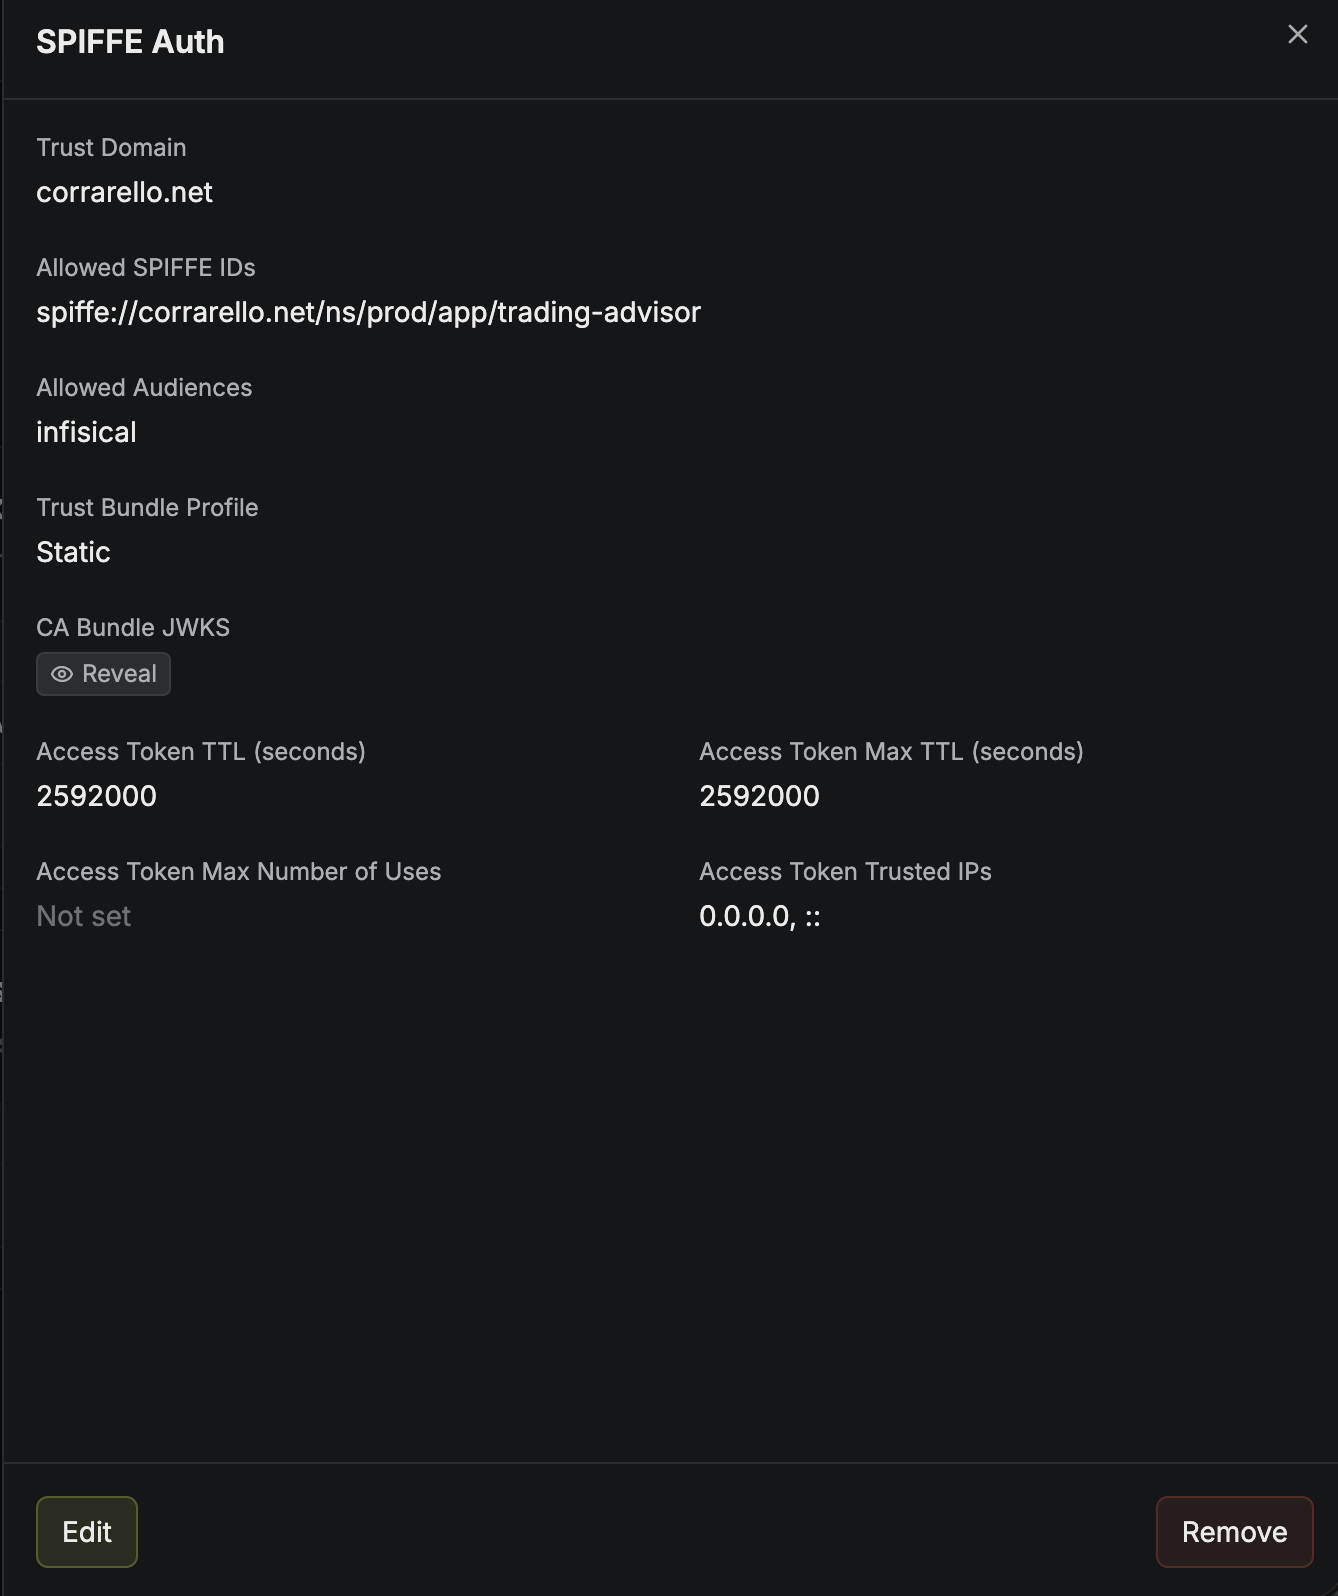 Once you have machine identity solved, Infisical solves the secrets management part. Infisical is a secrets manager that workloads authenticate to. Just like you do with any other authentication method, now you can use SPIFFE to authenticate your machine identity in Infisical, using the SVID you provided to your system (or workload) Once the identity is configured, you can retrieve a JWT from the spire-agent (`spire-agent api fetch jwt`) in the system. This means your on-prem hardware can now authenticate to Infisical via the JWT, and use the CLI to deliver secrets as environment variables, `.env` files, or simply have a token for your application to consume secrets. Infisical is open-source and offers a variety of ways for secrets to go from one place to another. So you can configure Infisical to wrap up as a script that only executes when the process is running and ensure secrets are cleaned up after the process finishes. These pieces solve both the machine identity piece and then the secrets management one, giving you the smooth security operations of a big cloud vendor while staying on your own hardware. ## How to set up the Spire server So how do we set this up? Ask your favourite LLM of course! Just kidding, let’s start with the server. - Pull the binaries for the spire-server from the [official project repository](https://github.com/spiffe/spire/releases/tag/v1.15.3). You will also need the TPM attestor for the server that you can get from the tpm [plugin repository](https://github.com/spiffe/spire-tpm-plugin/releases/tag/v1.11.3). The server itself needs two binaries, a configuration file, and a systemd unit file. All directories, users and files need to be created - I’ve dropped the binaries on `/usr/local/bin` on my system
](https://images.ctfassets.net/rzezkvk1rm65/7KzrlVhBm3eH3QA8E64niZ/d34b7bba8a7490bdf8a1177b6e078e5c/spire-tpm-attestation-topology.png)
](https://images.ctfassets.net/rzezkvk1rm65/2TFPd1jGNaj6UF52eyx3as/984655acf555dd624856440db3ee0a85/spire-agent-node-attestation-flow.png)
](https://images.ctfassets.net/rzezkvk1rm65/6E1ffEx7noR1vqS2v5YdlE/0ba95d7ff4d34e2f488f86f8b47bf654/spire-workload-svid-issuance.png)
](https://images.ctfassets.net/rzezkvk1rm65/1ON3pFpFUzTG2ONEClRVY8/0250e2140bbeb95046bf5731247a6822/infisical-spiffe-auth-config.png)
```bash
user@spire:~$ ls /usr/local/bin/
spire-server  tpm_attestor_server
```
- And I created the following basic configuration file, which I’m annotating where needed.
```hcl
# Basic Server Configuration
server {
        bind_address = "ip.address"
        bind_port = "8081"
        trust_domain = "corrarello.net"
        data_dir = "/var/lib/spire/data/server"
        ca_ttl = "168h"
        default_x509_svid_ttl = "48h"
        socket_path = "/run/spire/private/api.sock"
      }

plugins {
 # The spire server needs to persist its state somewhere. For my simple setup, I’m using sqlite, though other options are available.
    DataStore "sql" {
        plugin_data {
            database_type = "sqlite3"
            connection_string = "/var/lib/spire/data/server/datastore.sqlite3"
        }
    }
 # What node attestor to use. In my case I’m using the aforementioned TPM, other options are available.
NodeAttestor "tpm" {
        plugin_cmd = "/usr/local/bin/tpm_attestor_server"
        plugin_checksum = "ace348084a391cc96d6be225e999539641cef373ddc40e736dc8badc6a2c99d3"
        plugin_data {
            ca_path = "/etc/spire/certs"
            hash_path = "/etc/spire/hashes"
 # In my example, I will be adding the hashes manually to the directory above, that being said you can use the pve plug-in to verify them directly with Proxmox
            #pve {
                #enabled = true
                #cluster "pve-prod" {
                    #hosts = ["your.pve.host","your.other.pve.host"]
 # Add your Proxmox API credentials here
                    #user = "spire-attestor@pve"
                    #token_id = "spire-token"
                    token_secret = "00000000-0000-0000-0000-000000000"

                    # Set to true if you are using self-signed certs for Proxmox UI
                    #insecure_skip_verify = true
                #}
            }
        }
    }
# The KeyManager is the plugin used to sign the JWTs and Certificates.
    KeyManager "disk" {
        plugin_data {
            keys_path = "/var/lib/spire/data/server/keys.json"
        }
    }
}
```
- I’ve also created the following systemd unit file for the spire server, trying to apply some sane security defaults:
```ini
[Unit]
Description=SPIRE Server
Description=SPIFFE Runtime Environment Server
After=network.target
[Service]
Type=simple
User=spire
Group=spire
ExecStart=/usr/local/bin/spire-server run -config /etc/spire/server.conf
Restart=on-failure
RestartSec=5
RuntimeDirectory=spire
RuntimeDirectoryMode=0750
# Security Hardening
CapabilityBoundingSet=
ProtectSystem=strict
ProtectHome=true
ReadWritePaths=/var/lib/spire/data/server
ReadOnlyPaths=/etc/spire /usr/local/bin/spire-server /usr/local/bin/tpm_attestor_server
PrivateTmp=true
[Install]
WantedBy=multi-user.target
```
- Finally, start the service and extract the PEM bundle, you will need it for the spire-agents
```bash
user@spire:~$ sudo /usr/local/bin/spire-server bundle show -socketPath /run/spire/private/api.sock
-----BEGIN CERTIFICATE-----
[...]
-----END CERTIFICATE-----
-----BEGIN CERTIFICATE-----
[...]
-----END CERTIFICATE-----
```
## How to set up the Spire agent

Now switching to your agents, you will need

- The spire-agent from the official project repository ([https://github.com/spiffe/spire/releases/tag/v1.15.3](https://github.com/spiffe/spire/releases/tag/v1.15.3)). You will also need the TPM attestor for the agent that you can get from the tpm plugin repository ([https://github.com/spiffe/spire-tpm-plugin/releases](https://github.com/spiffe/spire-tpm-plugin/releases/tag/v1.11.3)). Also grab the `tpm_pubhash` binary, as you’ll need it to extract the hashes and authorise it on the server, if you’re not using something like the pve plugin for Proxmox.
```bash
user@agent:~$ ls -l /usr/local/bin/
total 78200
-rwxr-xr-x 1 root root 66663576 Sep 10 09:46 spire-agent
-rwxr-xr-x 1 root root 13406370 Sep 10 09:46 tpm_attestor_agent
```
- You will need to drop the server’s bundle somewhere in `/etc/spire/agent/certs/` (at least if you’re following my configuration examples, YMMV).
- My sample configuration is quite simple, setting up a NodeAttestor, and a number of workload attestors to scope the svid right down to the systemd unit in my case:
```hcl
agent {
    data_dir = "/var/lib/spire/data/agent"
    log_level = "DEBUG"
    server_address = "your.spire.server"
    server_port = "8081"
    socket_path = "/run/spire/agent_sockets/public.sock"
    trust_domain = "corrarello.net"
    trust_bundle_path = "/etc/spire/agent/certs/server-trust-bundle.pem"
}
plugins {
    # 1. Core Hardware Node Attestor (vTPM via Kernel Resource Manager)
    NodeAttestor "tpm" {
        plugin_cmd = "/usr/local/bin/tpm_attestor_agent"
        plugin_checksum = "5e1d927e3c18cfe2c28989330349003e43287b0289cceab4f12be3aa12e05eb2"
        plugin_data {
            tpm_path = "/dev/tpmrm0"
        }
    }

    # 2. Key Manager for storing dynamic client identities
    KeyManager "disk" {
        plugin_data {
            directory = "/var/lib/spire/data/agent"
        }
    }

    # 3. Unix and Systemd Attestor for resolving local systemd app identity properties later
    WorkloadAttestor "unix" {
    }
    WorkloadAttestor "systemd" {
    }
}
```
- You’ll also need a systemd unit file to run this
```ini
[Unit]
Description=SPIRE Agent
Description=SPIFFE Runtime Environment Agent
After=network.target
[Service]
Type=simple
User=spire
Group=spire
SupplementaryGroups=tss
ExecStart=/usr/local/bin/spire-agent run -config /etc/spire/agent.conf
Restart=on-failure
RestartSec=5
# Set up runtime directories for local application socket mounting
RuntimeDirectory=spire/agent_sockets
RuntimeDirectoryMode=0755
# Security Isolation Hardening
#ProtectSystem=strict
ProtectHome=true
PrivateTmp=true
ReadWritePaths=/var/lib/spire/data/agent
ReadOnlyPaths=/etc/spire /usr/local/bin/spire-agent /usr/local/bin/tpm_attestor_agent /dev/tpmrm0
[Install]
WantedBy=multi-user.target
```
## How to register the node and workload

- You can now hopefully start the agent process. Collect the hash from this EK to drop it into the spire server
```bash
user@agent:~$ sudo ./get_tpm_pubhash
66972674931c5ac68e652ca609239756e7ca97013564dc0900fc5a183fb6367c
```
- Back on the server, drop the hash in the right path
```bash
user@spire:~$ sudo touch /etc/spire/hashes/66972674931c5ac68e652ca609239756e7ca97013564dc0900fc5a183fb6367c
```
- And create the entry for both the node, and the workload (again in my case, I’m using a systemd selector to isolate it)
```bash
user@spire:~$ sudo /usr/local/bin/spire-server entry create      -socketPath /run/spire/private/api.sock -selector tpm:pubhash:66972674931c5ac68e652ca609239756e7ca97013564dc0900fc -parentID spiffe://corrarello.net/spire/server -spiffeID spiffe://corrarello.net/node/proxmox-vm-104

user@spire:~$ sudo /usr/local/bin/spire-server entry create     -socketPath /run/spire/private/api.sock     -parentID "spiffe://corrarello.net/spire/agent/tpm/66972674931c5ac68e652ca609239756e7ca97013564dc0900fc"     -spiffeID "spiffe://corrarello.net/ns/prod/app/trading-advisor"     -selector "unix:systemd_unit_name:trading-advisor.service"     -audience "infisical"
```
## How to log in to Infisical with the Spire JWT

- Note that the audience has been set as infisical, because of course, in the agent, now I’m using the JWTs issued by the spire-server to authenticate
```bash
JWT_TOKEN=$(spire-agent api fetch jwt \
  -socketPath "$SPIRE_SOCKET" \
  -audience "infisical" \
  -spiffeID "$SPIFFE_ID" \
  | grep -oE '[A-Za-z0-9_-]+\.[A-Za-z0-9_-]+\.[A-Za-z0-9_-]+' | head -n1)

RAW_RESPONSE=$(curl -sS -w $'\n%{http_code}' -X POST \
  "${INFISICAL_DOMAIN}/api/v1/auth/spiffe-auth/login" \
  -H "Content-Type: application/json" \
  -d "{\"identityId\":\"${INFISICAL_IDENTITY_ID}\",\"jwt\":\"${JWT_TOKEN}\"}")
HTTP_STATUS="${RAW_RESPONSE##*$'\n'}"
LOGIN_RESPONSE="${RAW_RESPONSE%$'\n'*}"
```
## TPM-backed attestation beats hardcoded secrets on-prem

EC2 authentication was magical because AWS vouched for the instance, so I didn't have to hardcode a token into it. Authentication has evolved since then, but machine identity is still not solved in on-prem workloads. Many, many organizations still fall back to hardcoded secrets because building a chain of trust yourself is hard.

I've helped with different on-prem machine authentication approaches. They all help with automation, but share a weakness: the machine needs a secret before it can log in, so the problem of a hardcoded credential still exists.

A TPM and Spire fix this by replicating on your own hardware what the cloud provider does in AWS, GCP, or Azure:

- There is no secret to deliver. The machine's identity is anchored in a key burned into the TPM (or generated by the hypervisor for a vTPM), so there is nothing to hardcode, copy, or leak.
- Credentials are short-lived and rotate on their own. The Spire agent renews its SVIDs automatically, and the JWT used to log in to Infisical is fetched on demand rather than stored on disk.
- Identity is scoped to the workload, not just the host. Selectors tie the identity to a specific systemd service on a specific attested machine, so another process on the same box can't reuse it.

Getting started is simple: install a Spire server, attest your nodes, and start registering your workloads. Infisical exchanges JWTs for access to the secrets your systems need. Your on-prem workloads get the same smooth, cryptographically assured authentication the big clouds give their own.

To start securing your own on-premise workloads with Infisical, [talk to an expert for help](https://infisical.com/talk-to-us) or use the [open-source version](https://github.com/infisical/infisical) today.
/blog/machine-identity-attestation-bare-metal.md · raw source