```
## Uninstall Operator
The managed secret created by the operator will not be deleted when the operator is uninstalled.
Install Infisical Helm repository
```bash
helm uninstall
```
# PM2
Source: https://infisical.com/docs/integrations/platforms/pm2
How to use Infisical to inject environment variables and secrets with PM2 into a Node.js app
Prerequisites:
* Set up and add envars to [Infisical Cloud](https://app.infisical.com)
* [Install the CLI](/cli/overview)
## Initialize Infisical for your Node.js app
```bash
# navigate to the root of your of your project
cd /path/to/project
# then initialize infisical
infisical init
```
## Create a bash or js script
```bash infisical-run.sh
infisical run -- npm start
```
```js infisical-run.js
const spawn = require("child_process").spawn;
const infisical = spawn("infisical", ["run", "--", "npm", "start"]);
infisical.stdout.on("data", (data) => console.log(`${data}`));
infisical.stderr.on("data", (data) => console.error(`${data}`));
```
## Start your application as usual but with the script
```bash infisical-run.sh
pm2 start infisical-run.sh
```
```bash infisical-run.js
pm2 start infisical-run.js
```
# AWS Parameter Store Sync
Source: https://infisical.com/docs/integrations/secret-syncs/aws-parameter-store
Learn how to configure an AWS Parameter Store Sync for Infisical.
**Prerequisites:**
* Set up and add secrets to [Infisical Cloud](https://app.infisical.com)
* Create an [AWS Connection](/integrations/app-connections/aws) with the required **Secret Sync** permissions
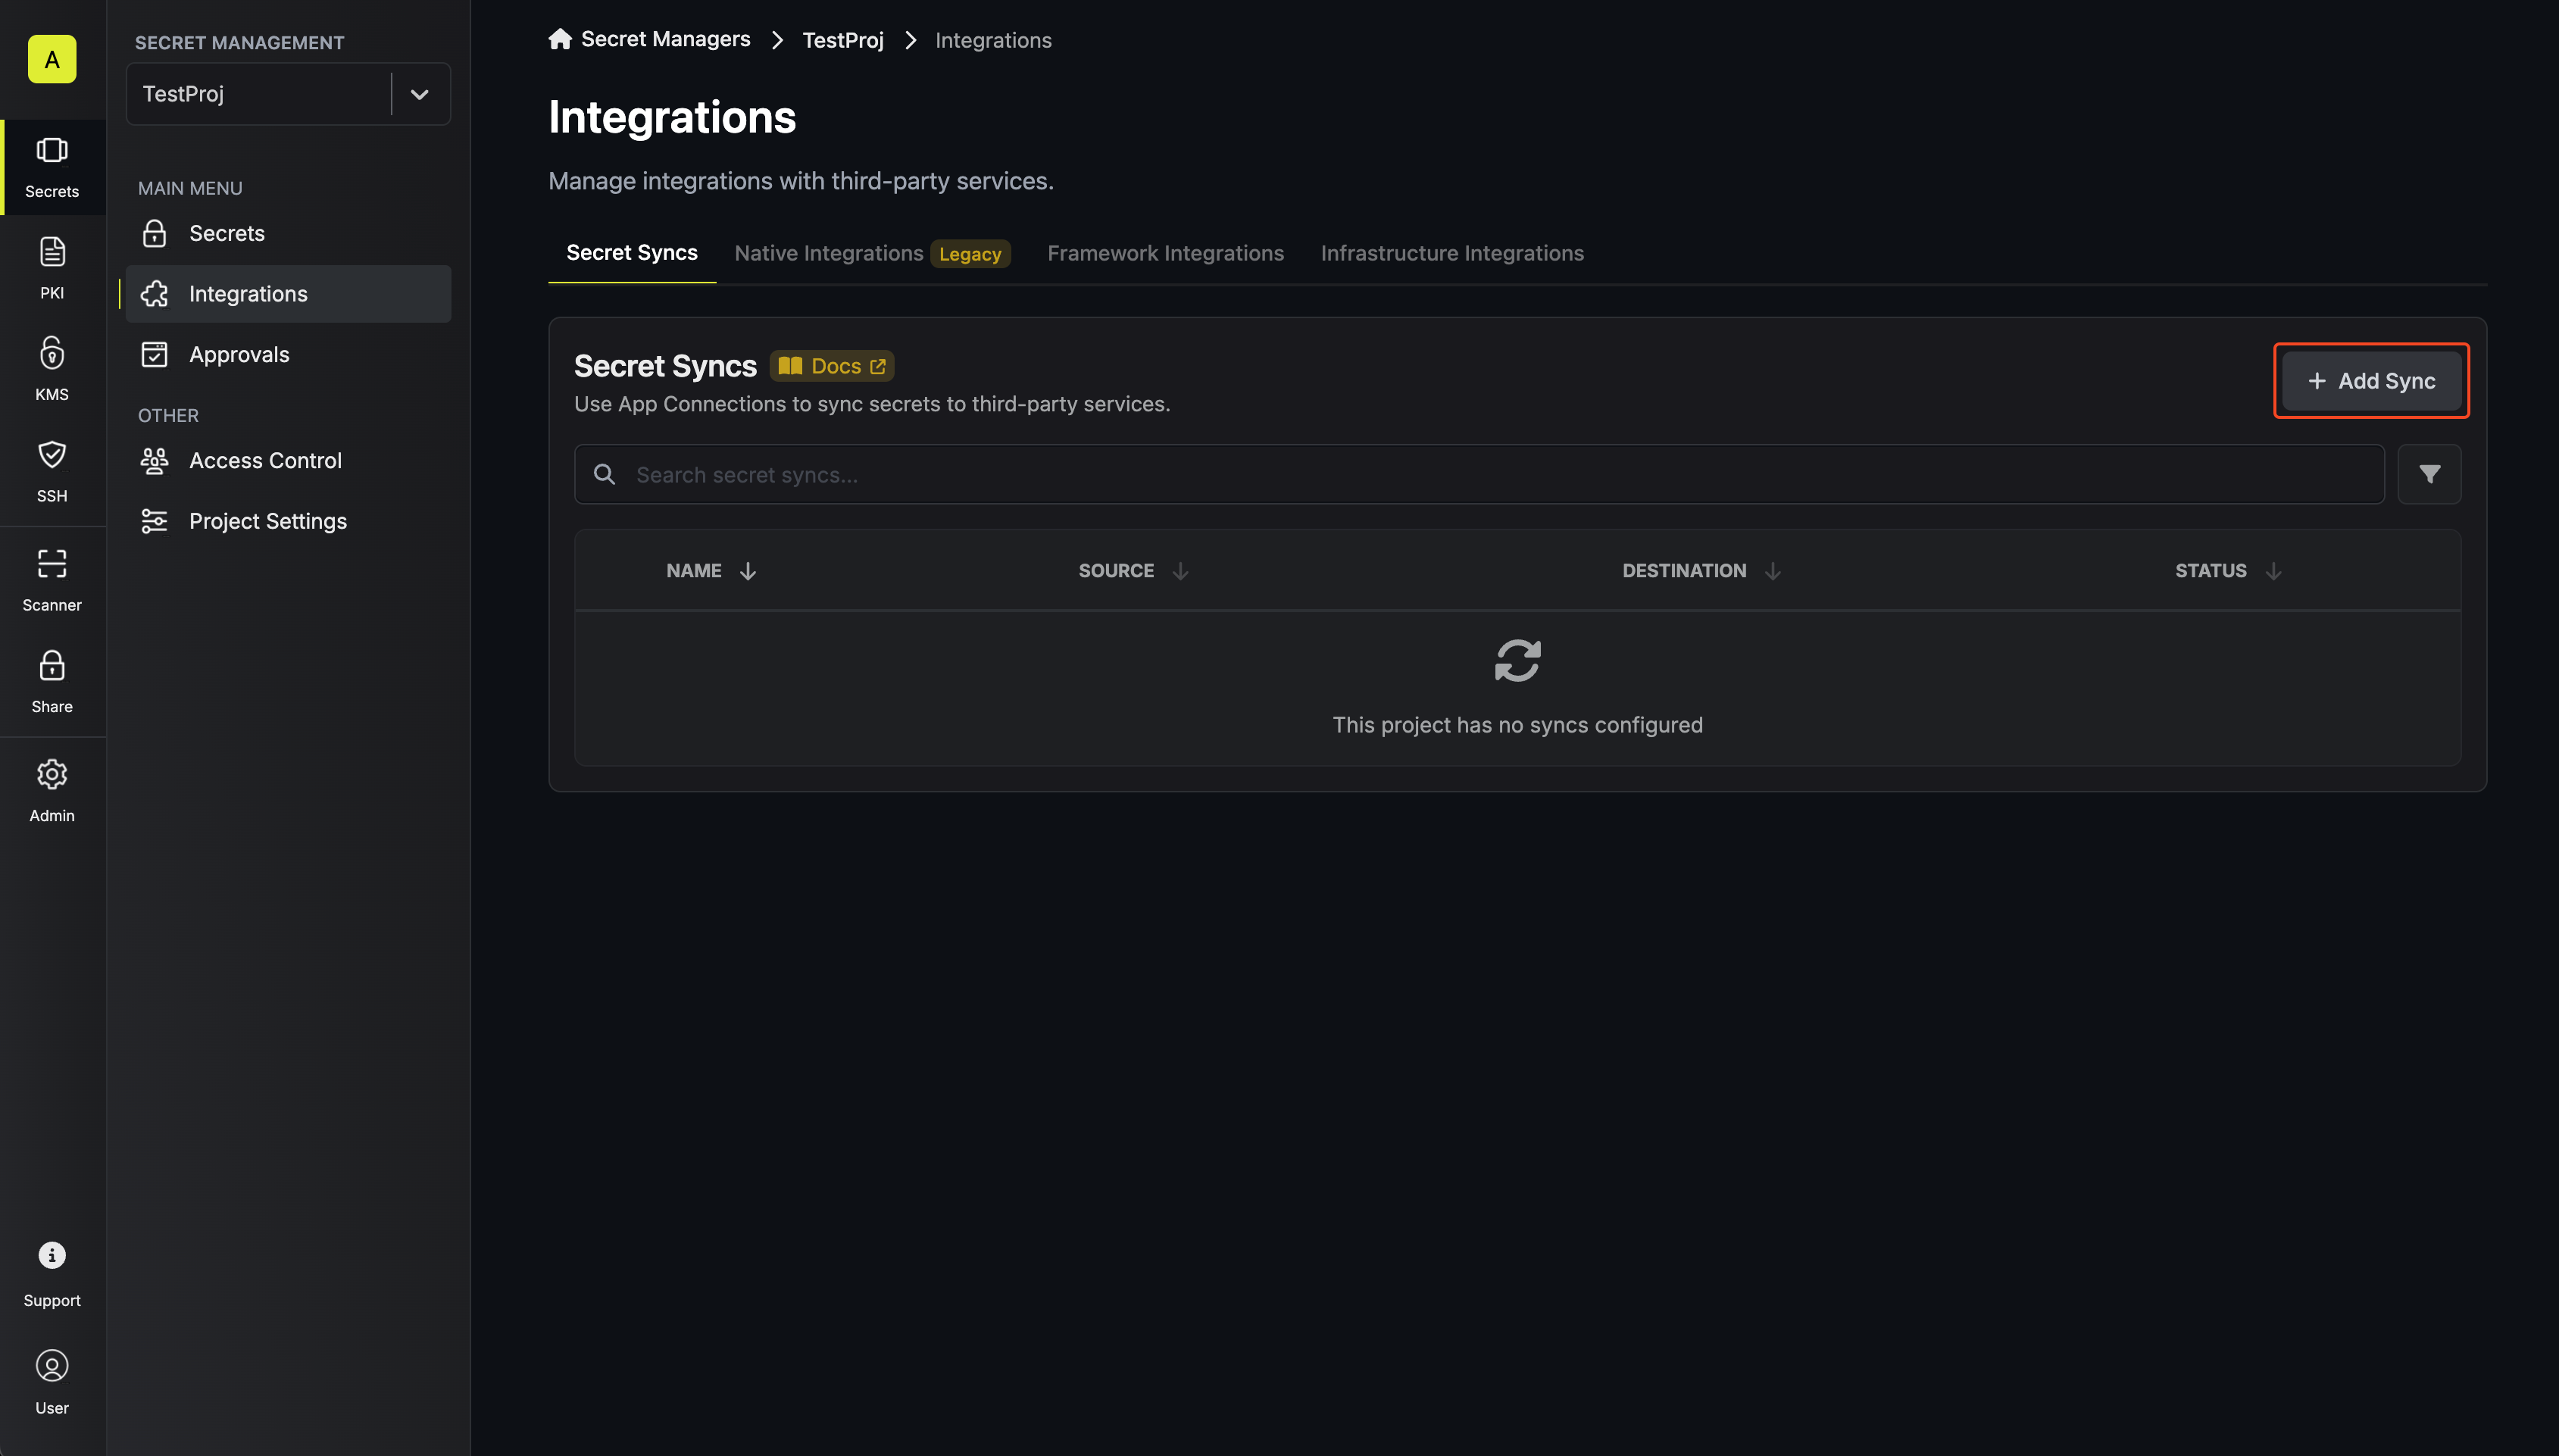
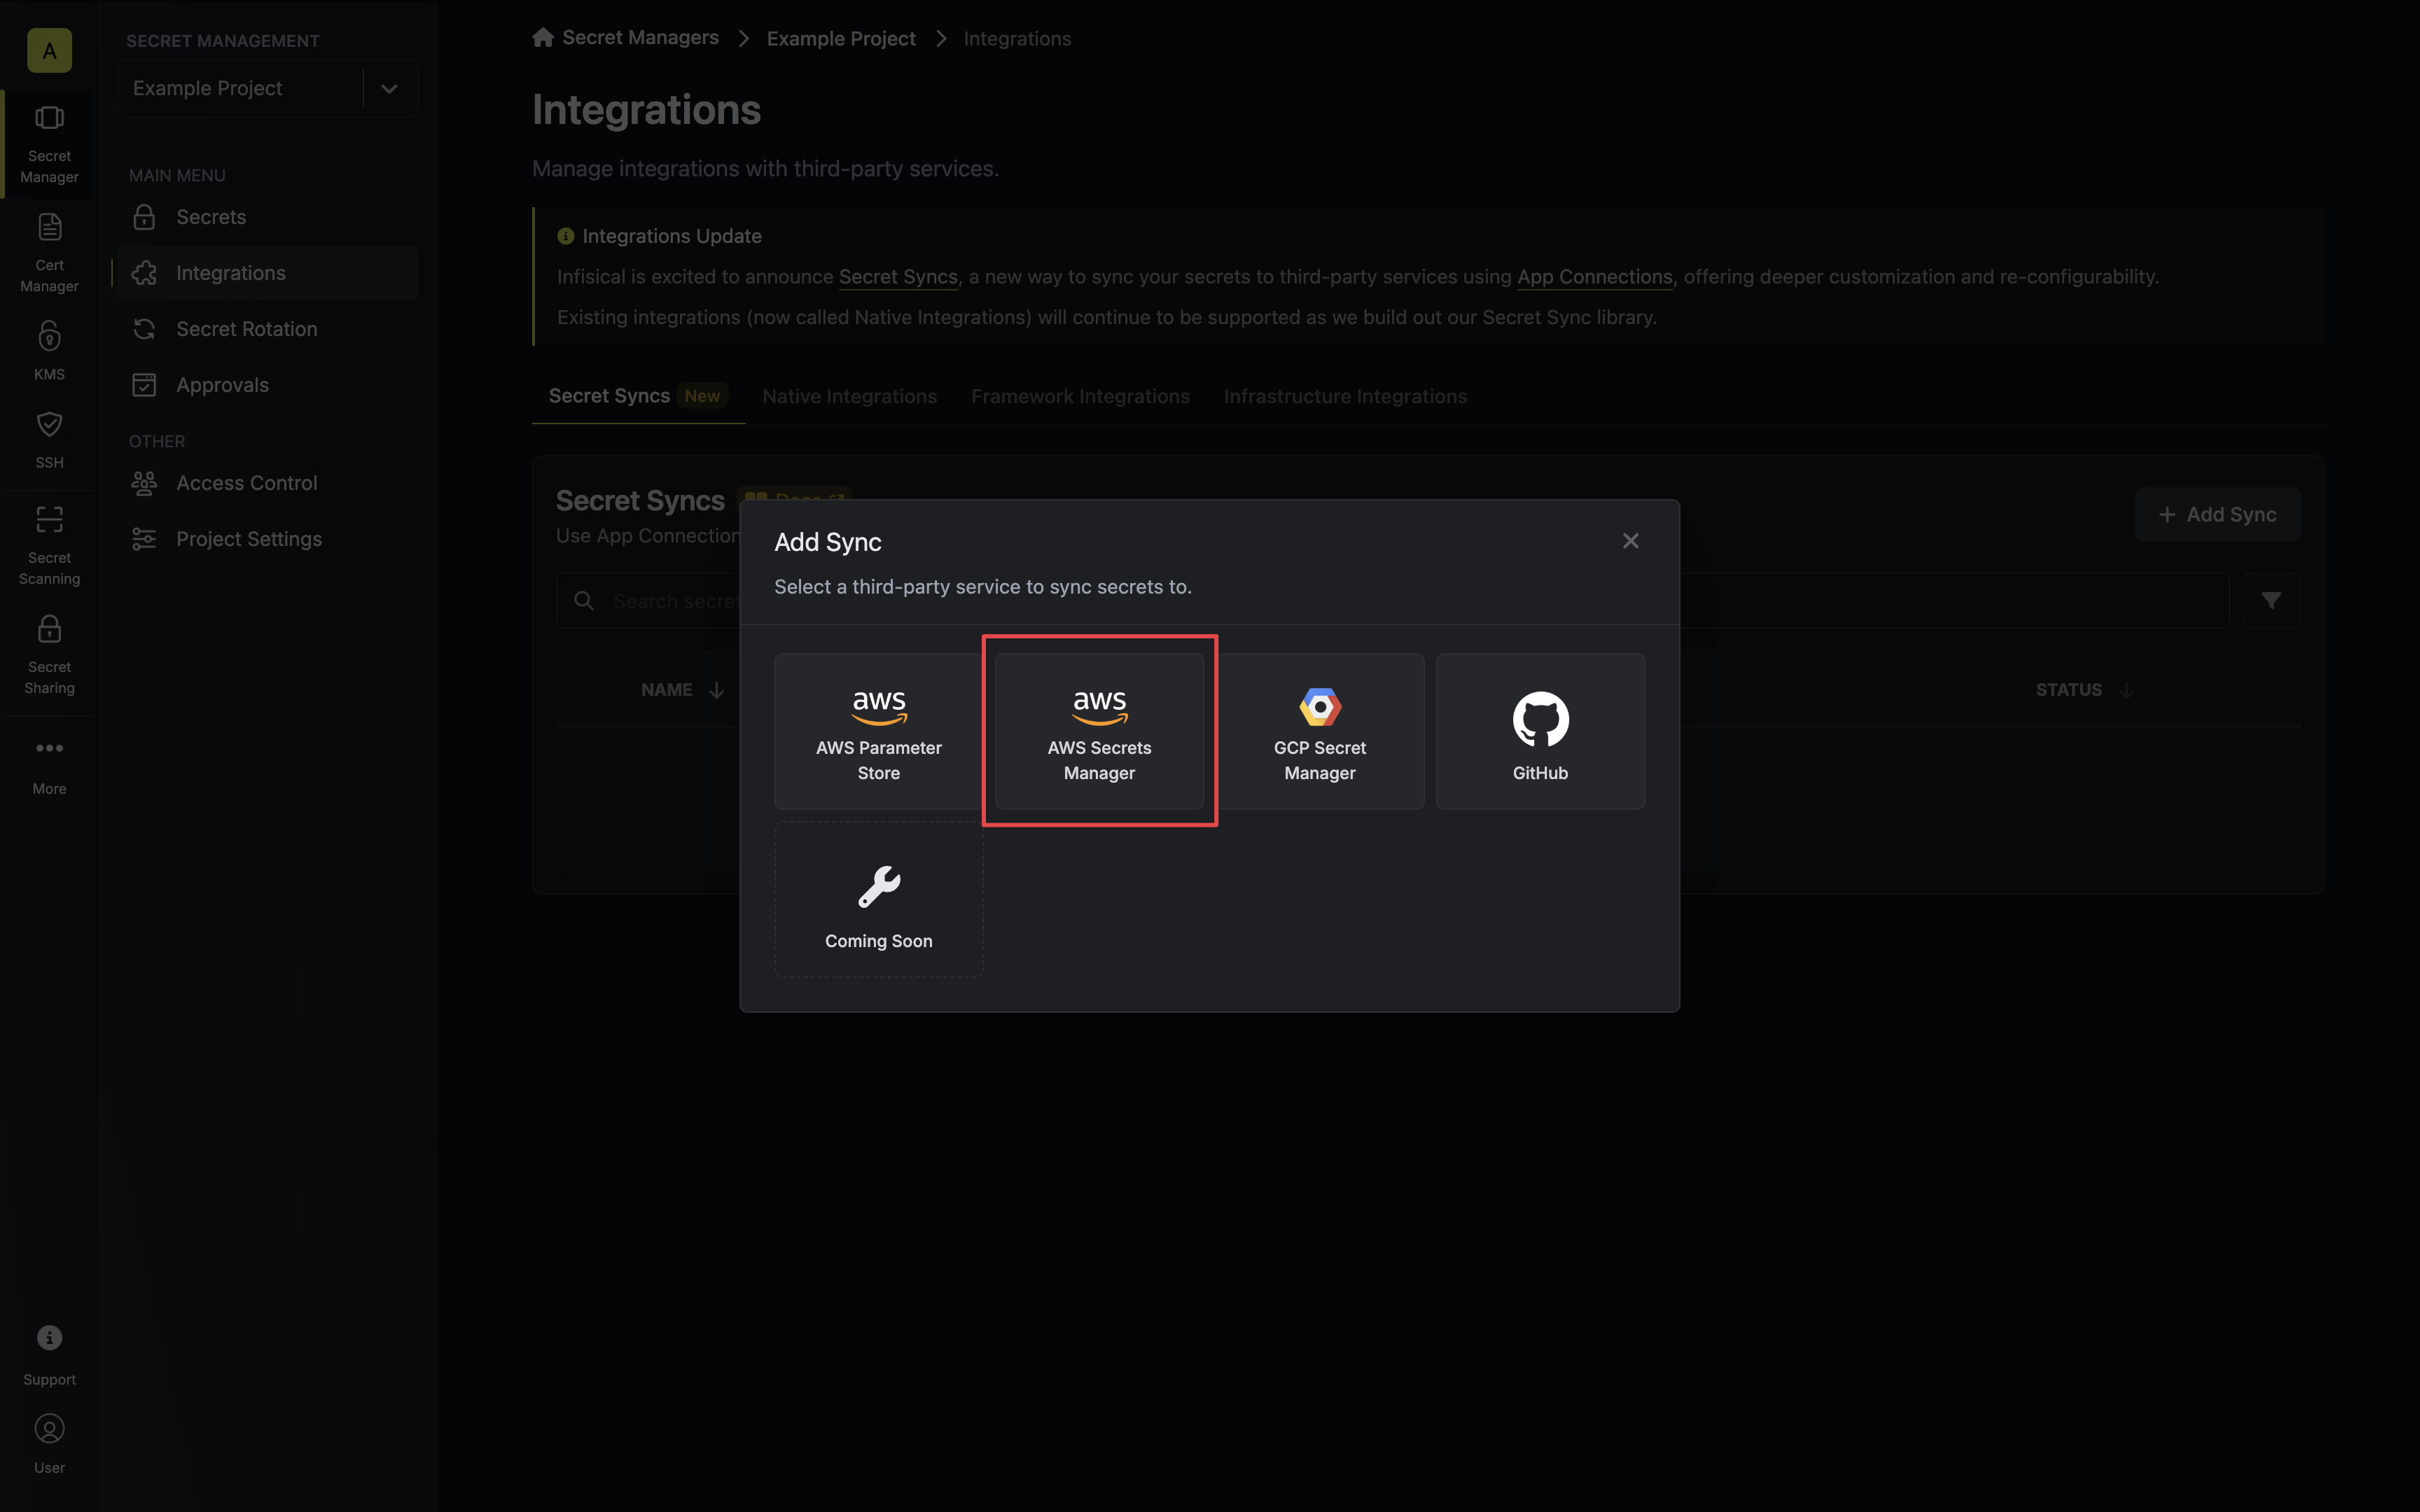
1. Navigate to **Project** > **Integrations** and select the **Secret Syncs** tab. Click on the **Add Sync** button.
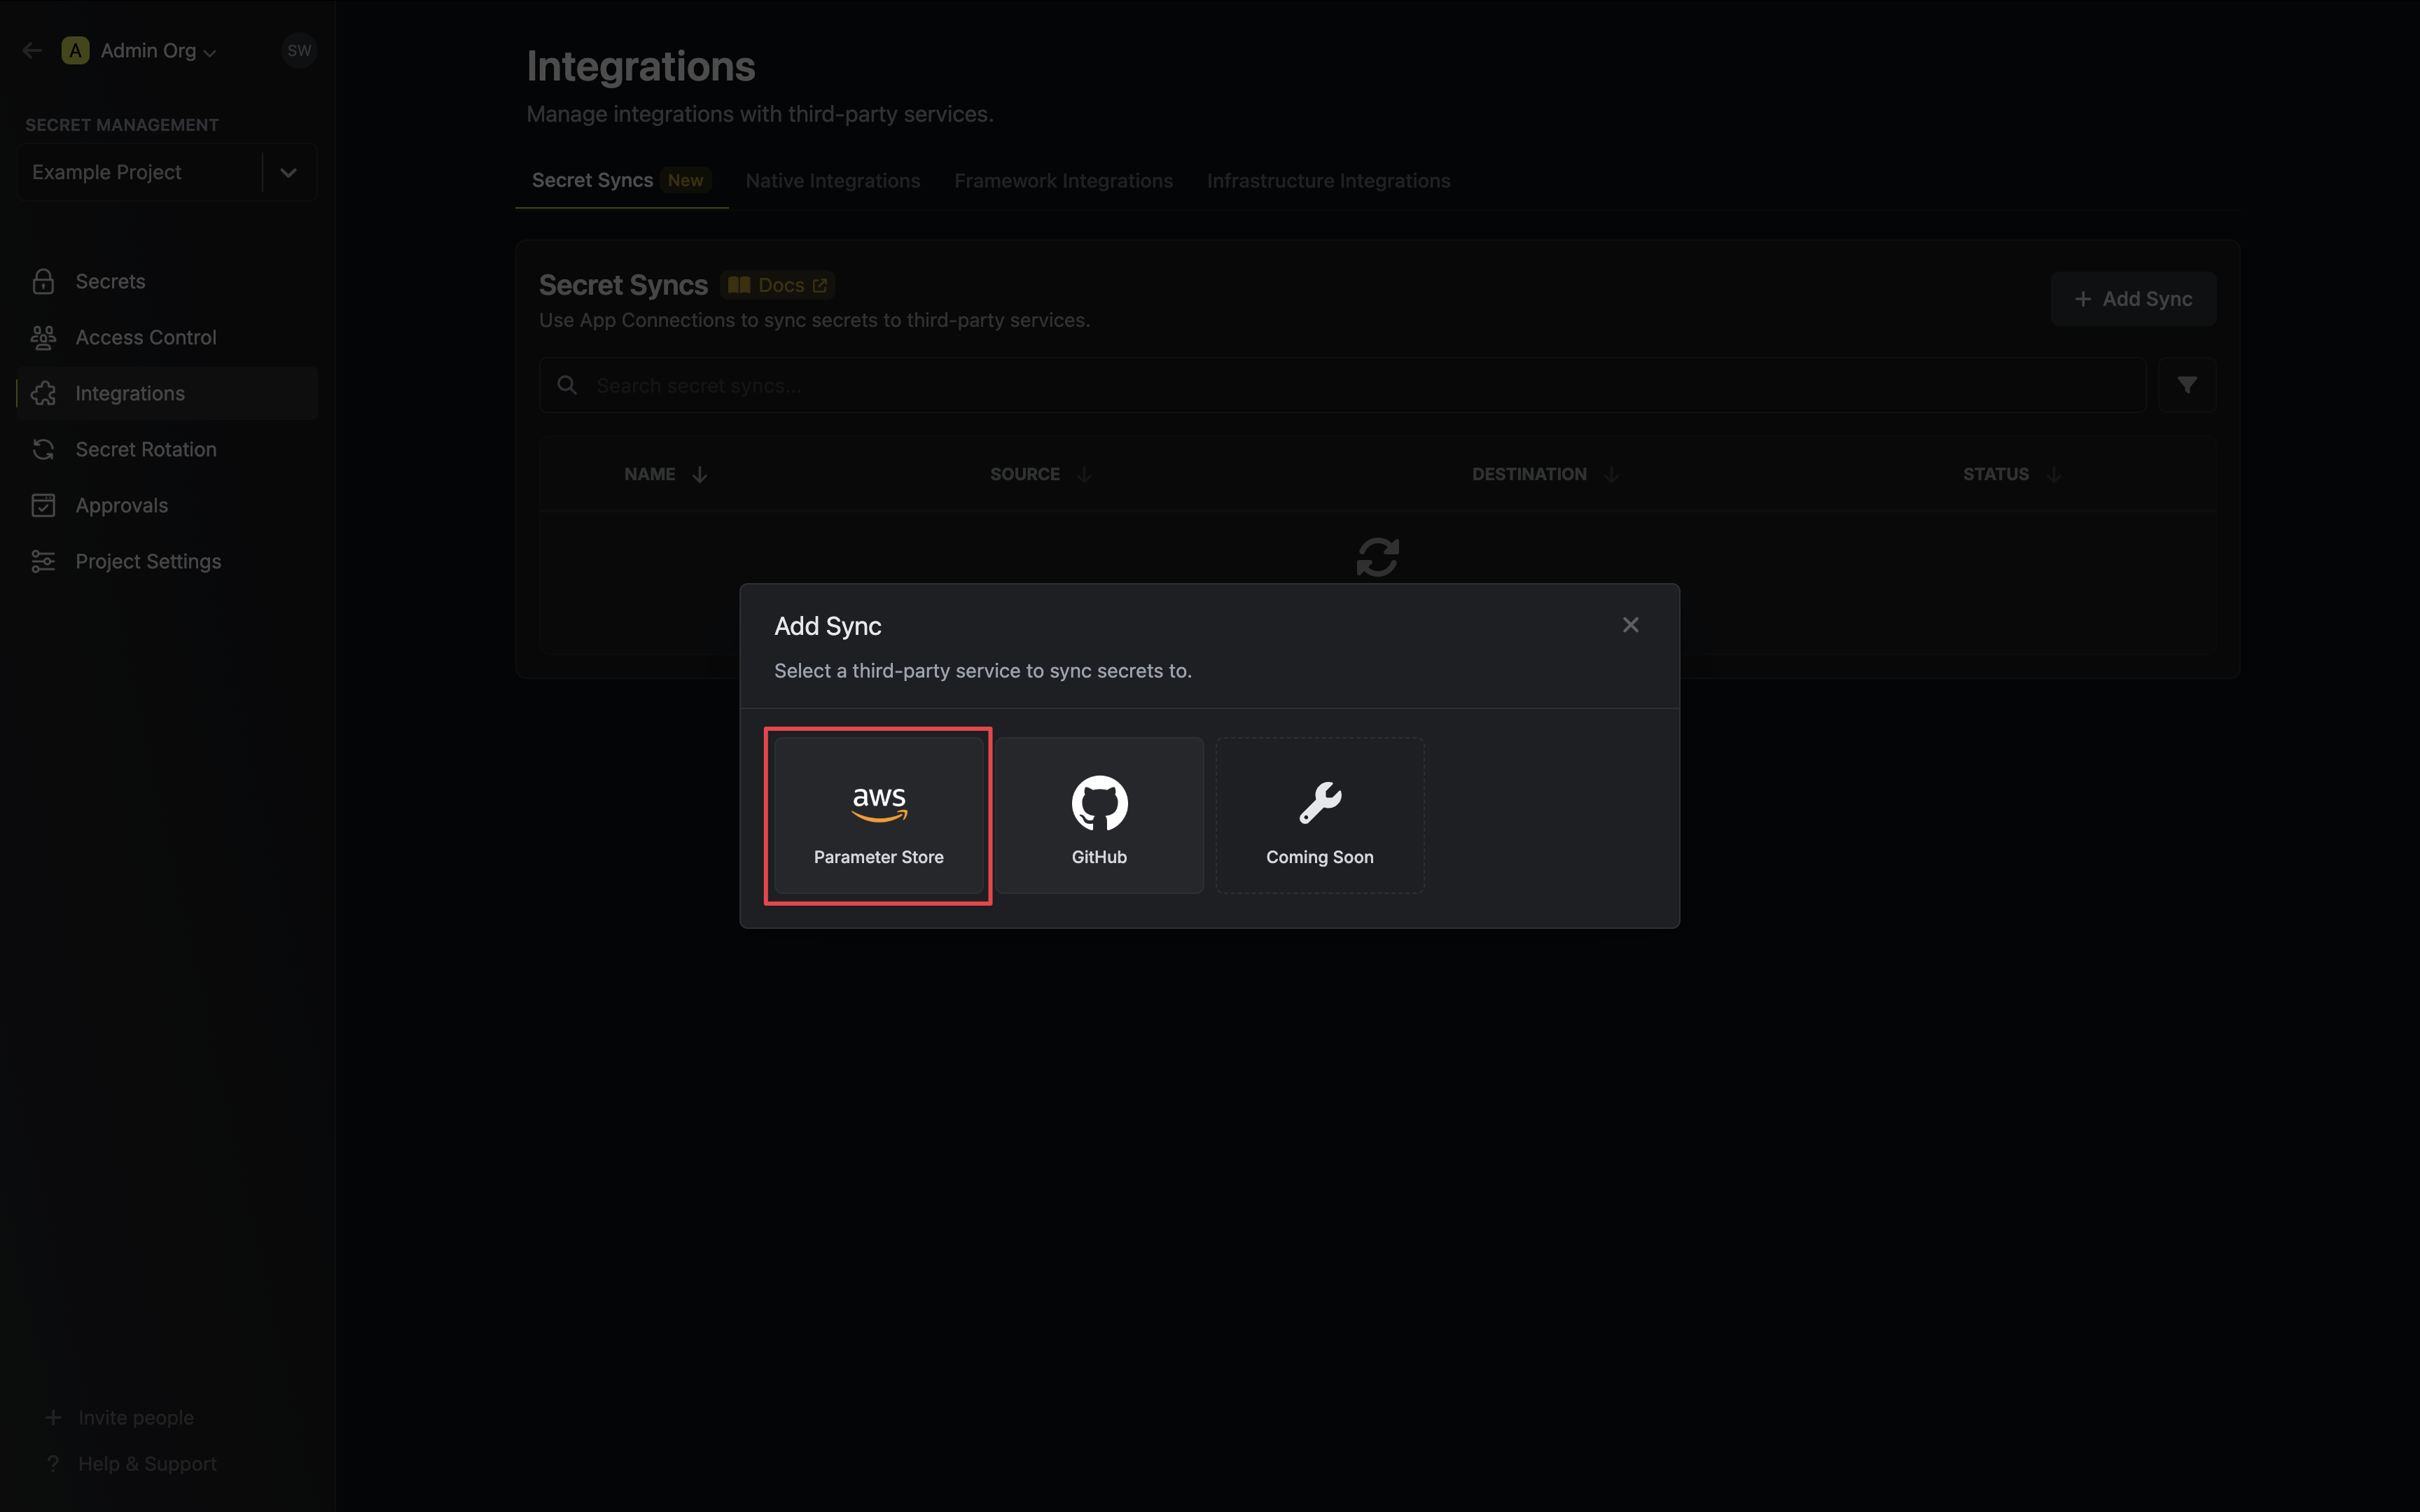
2. Select the **AWS Parameter Store** option.
3. Configure the **Source** from where secrets should be retrieved, then click **Next**.
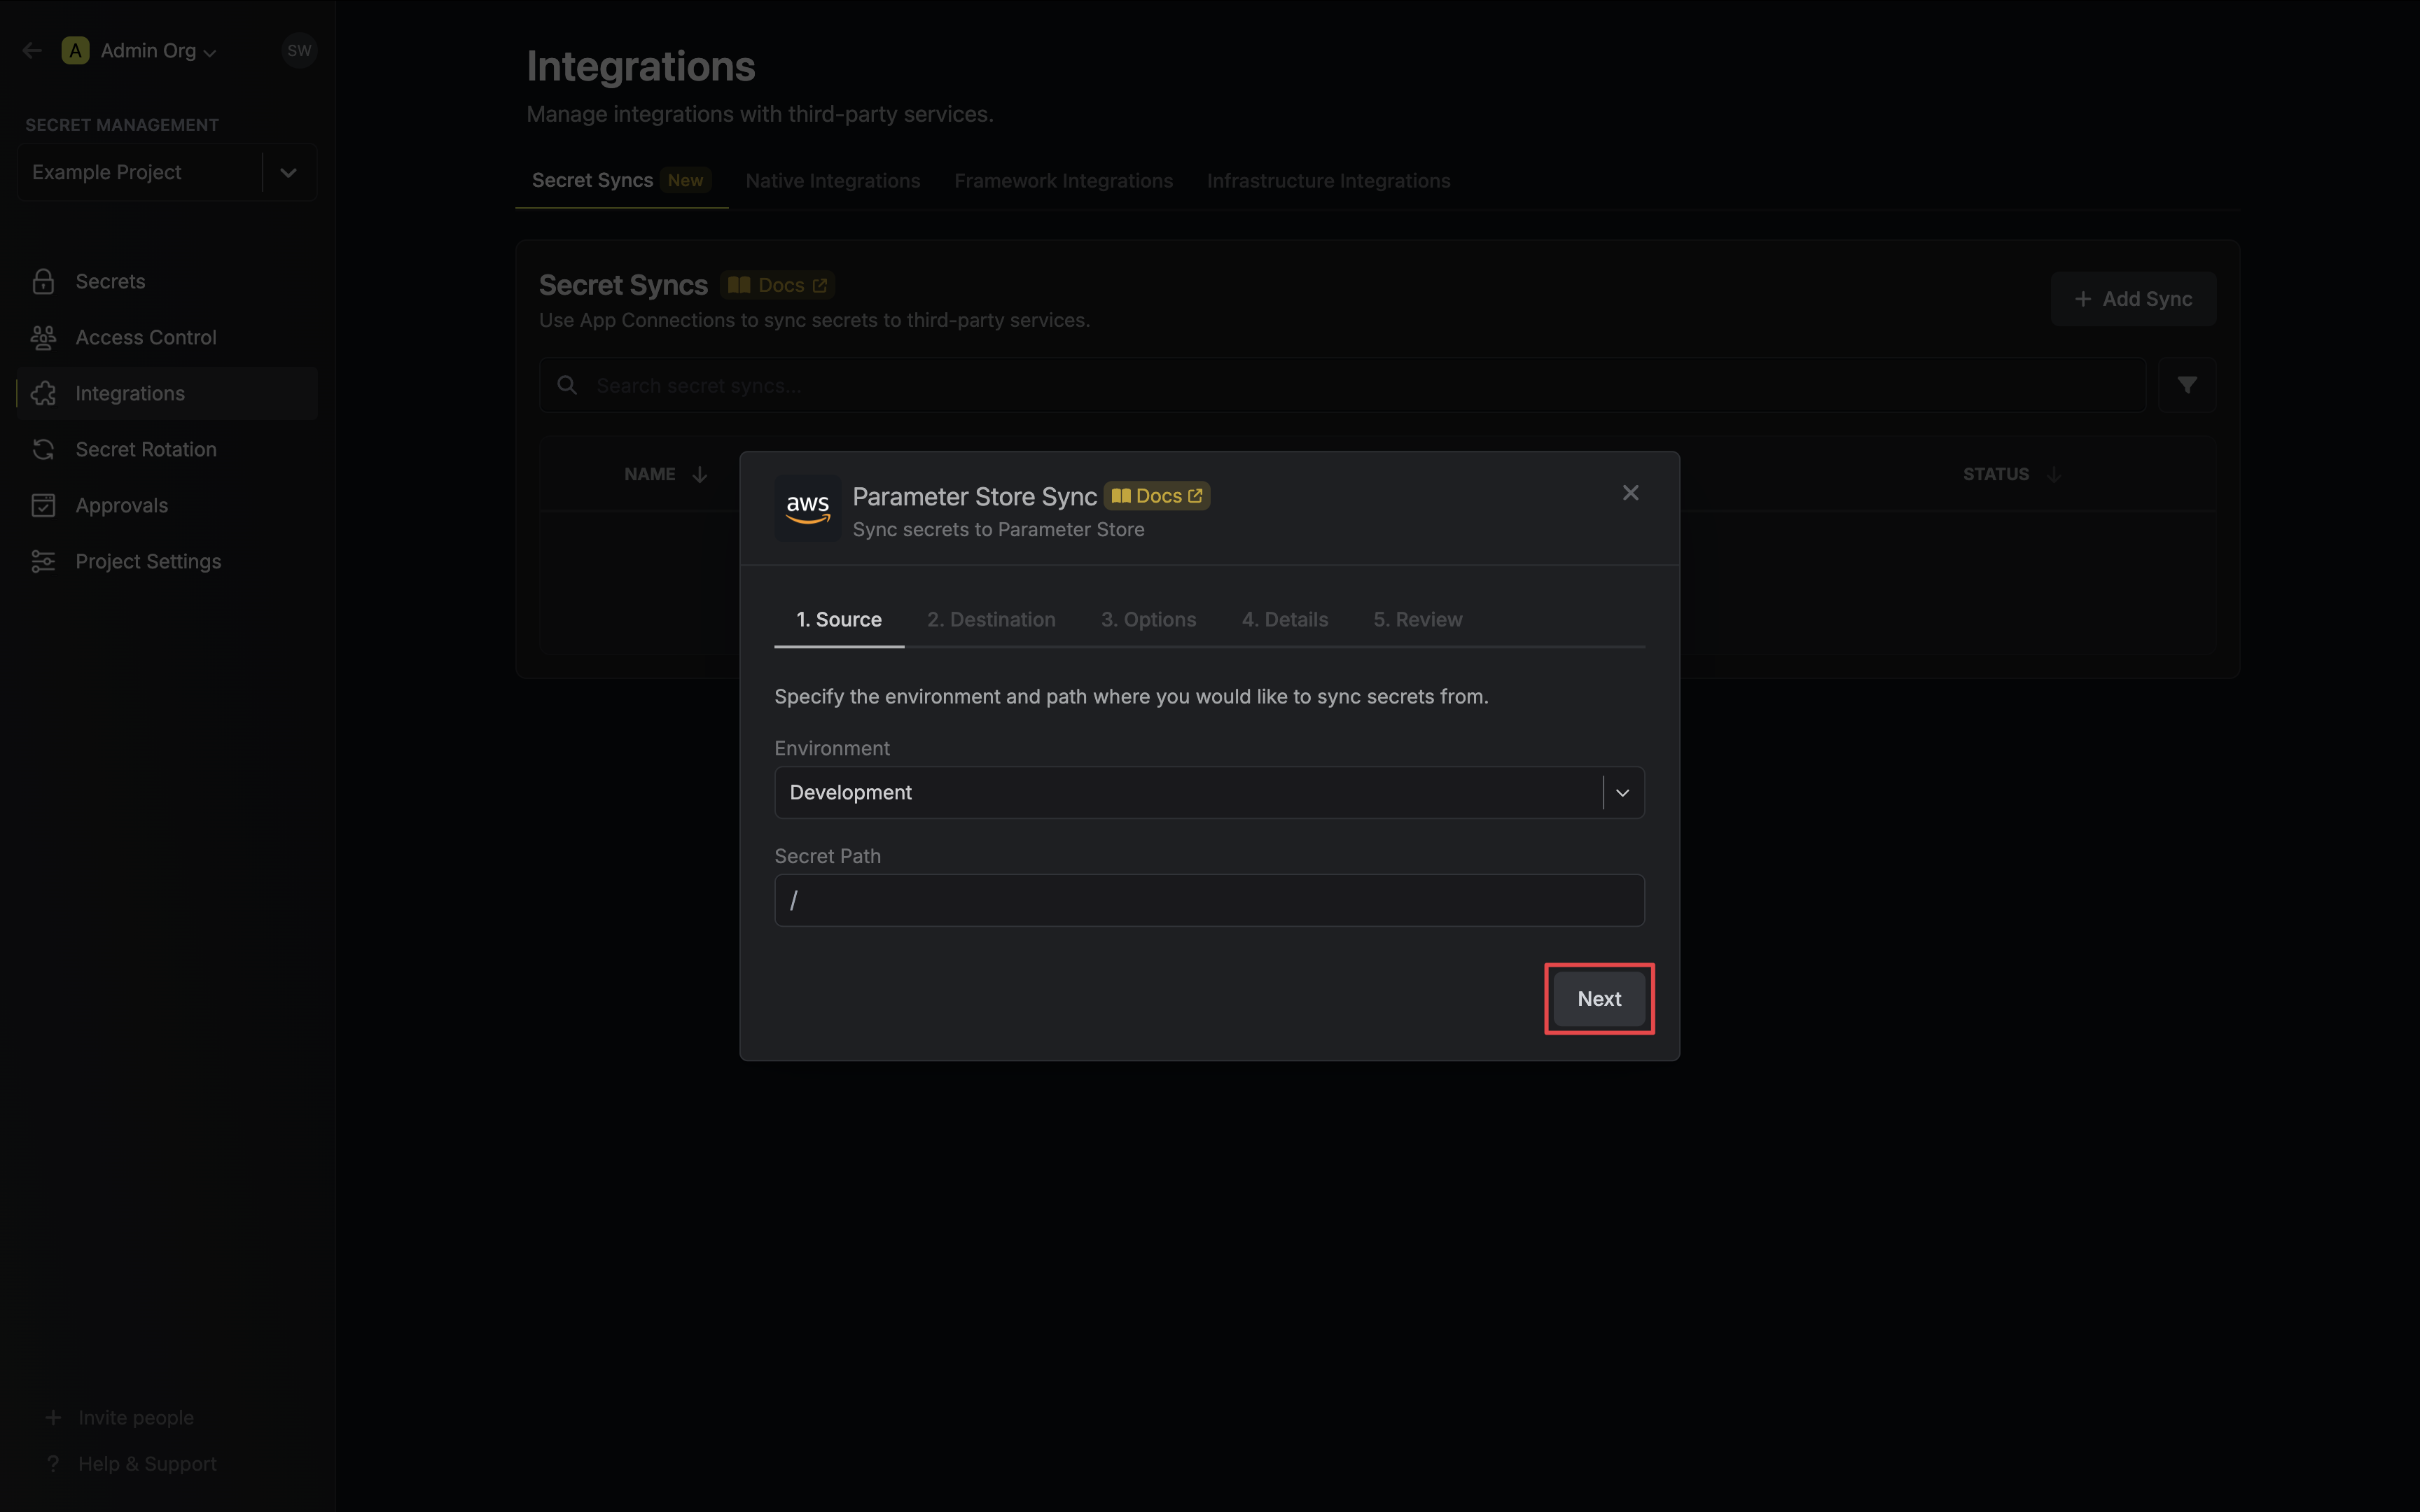
* **Environment**: The project environment to retrieve secrets from.
* **Secret Path**: The folder path to retrieve secrets from.
If you need to sync secrets from multiple folder locations, check out [secret imports](/documentation/platform/secret-reference#secret-imports).
4. Configure the **Destination** to where secrets should be deployed, then click **Next**.
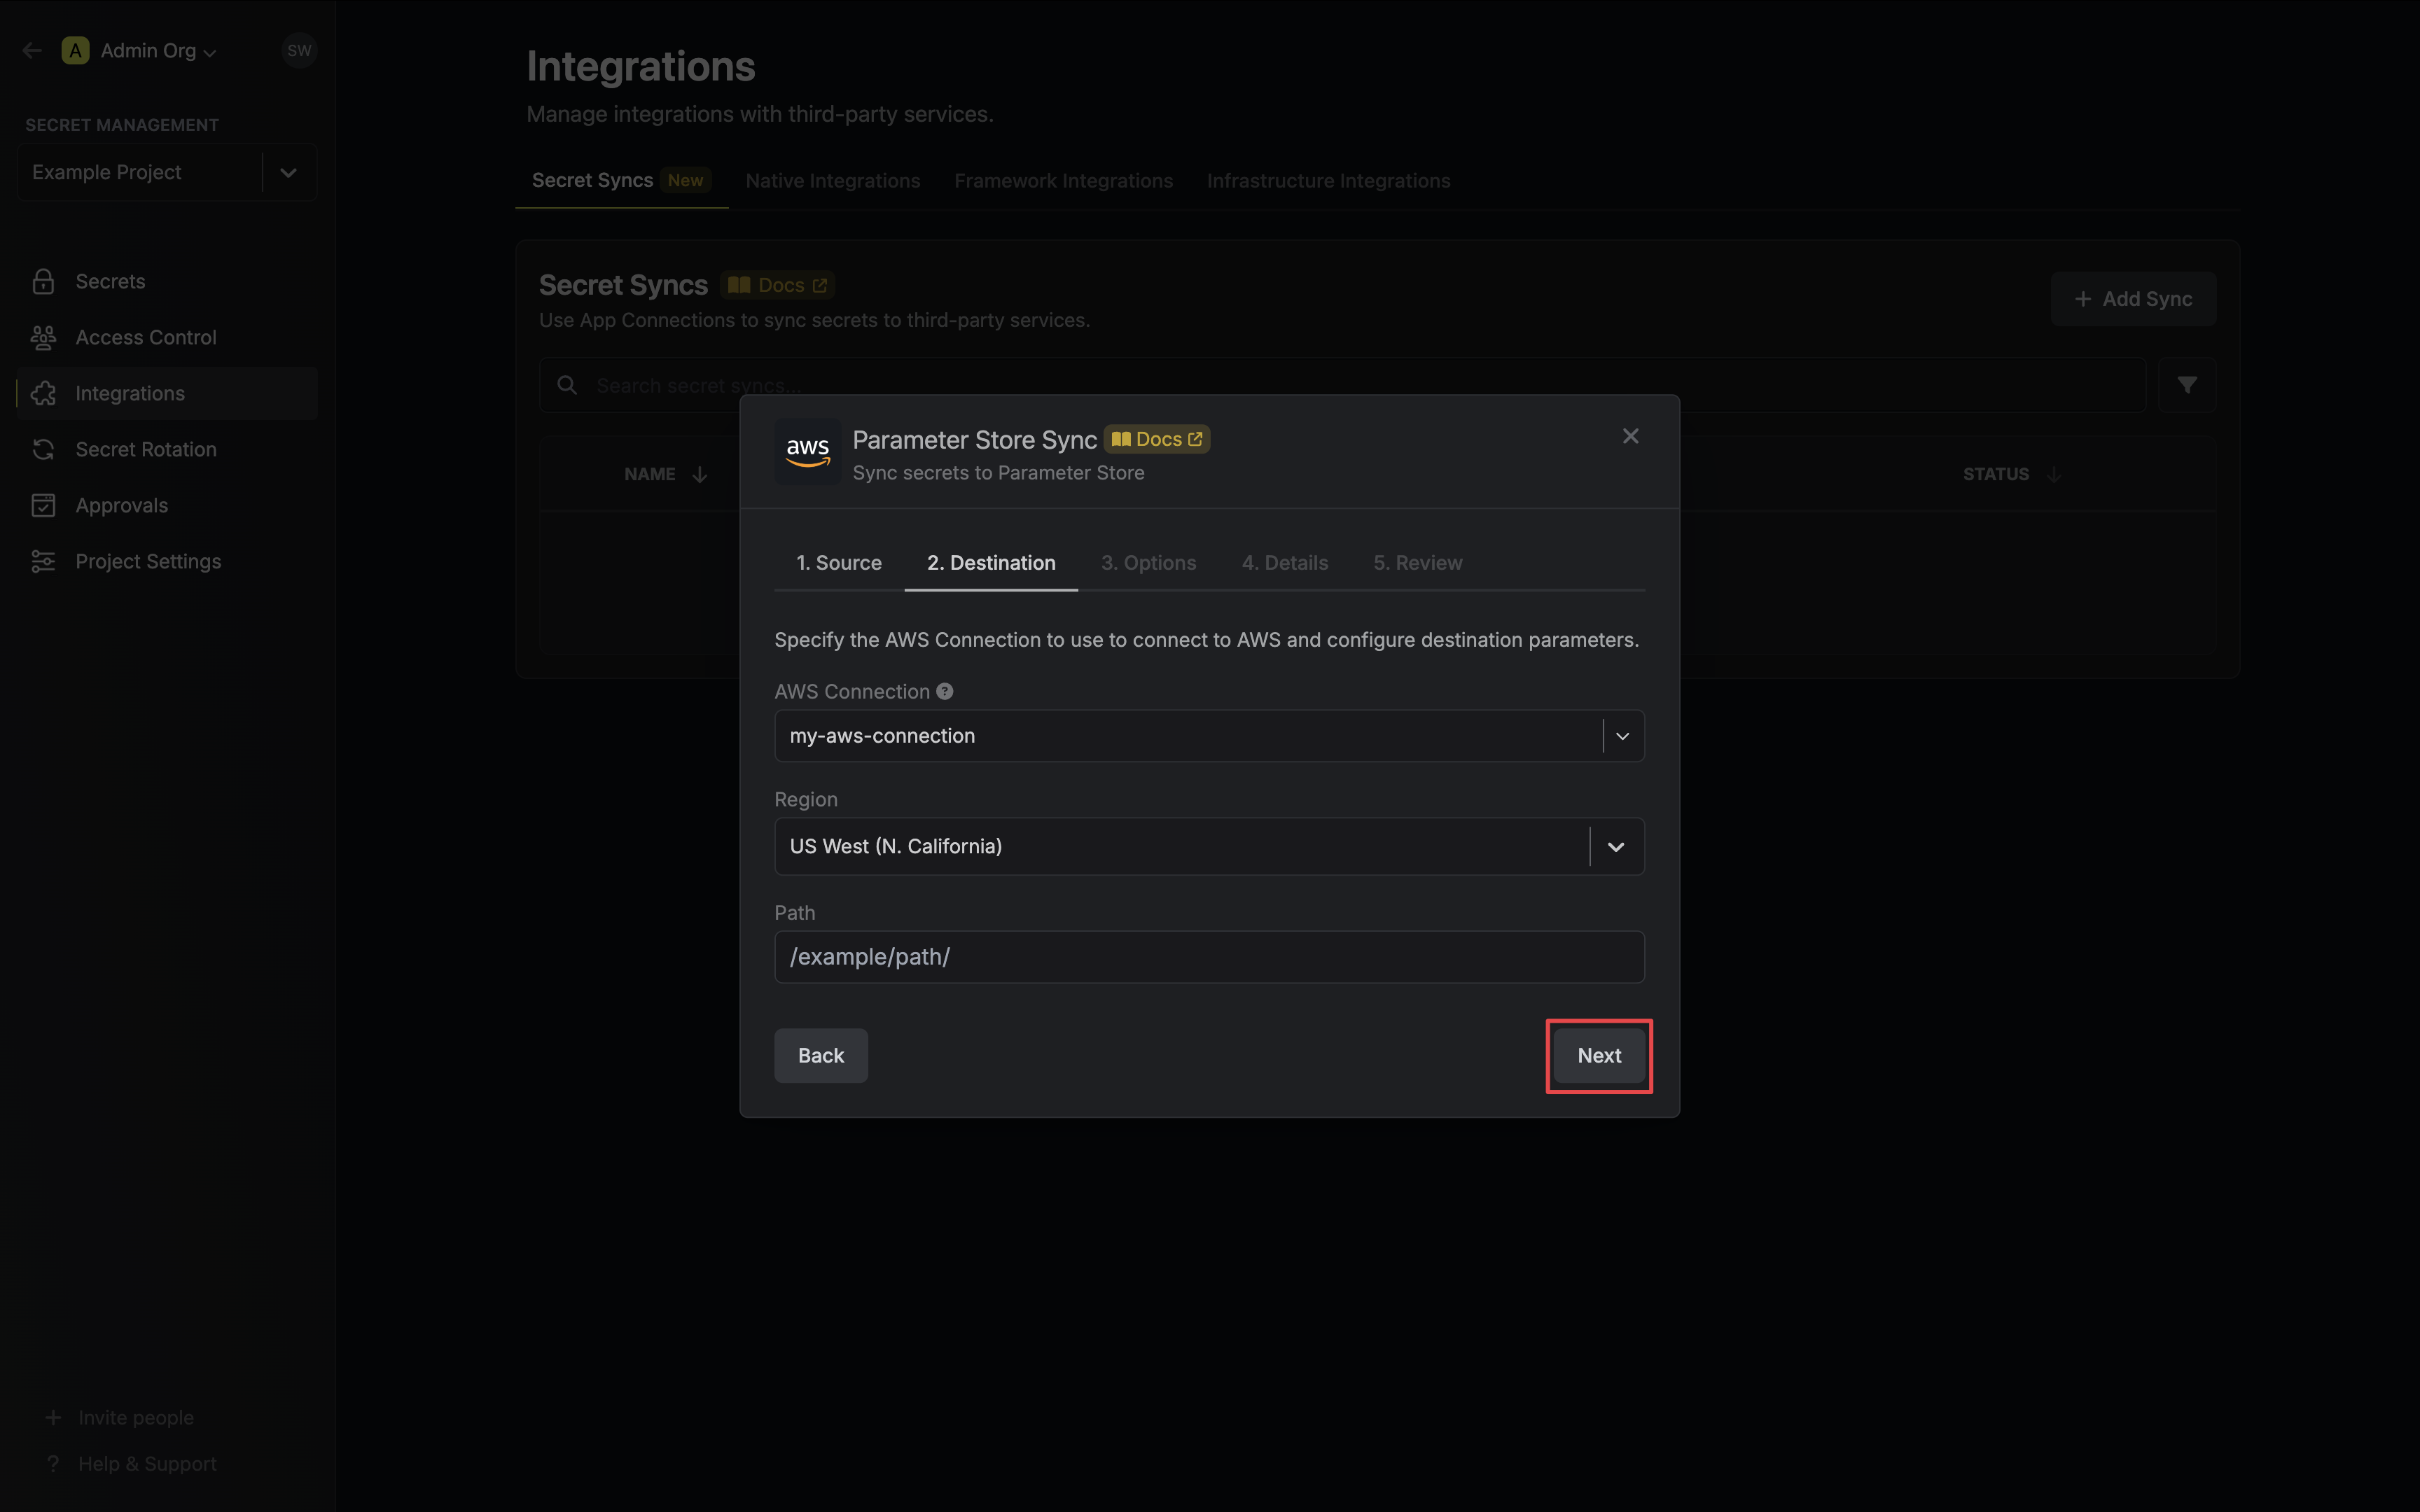
* **AWS Connection**: The AWS Connection to authenticate with.
* **Region**: The AWS region to deploy secrets to.
* **Path**: The AWS Parameter Store path to deploy secrets to.
5. Configure the **Sync Options** to specify how secrets should be synced, then click **Next**.

* **Initial Sync Behavior**: Determines how Infisical should resolve the initial sync.
* **Overwrite Destination Secrets**: Removes any secrets at the destination endpoint not present in Infisical.
* **Import Secrets (Prioritize Infisical)**: Imports secrets from the destination endpoint before syncing, prioritizing values from Infisical over Parameter Store when keys conflict.
* **Import Secrets (Prioritize AWS Parameter Store)**: Imports secrets from the destination endpoint before syncing, prioritizing values from Parameter Store over Infisical when keys conflict.
* **Auto-Sync Enabled**: If enabled, secrets will automatically be synced from the source location when changes occur. Disable to enforce manual syncing only.
6. Configure the **Details** of your Parameter Store Sync, then click **Next**.
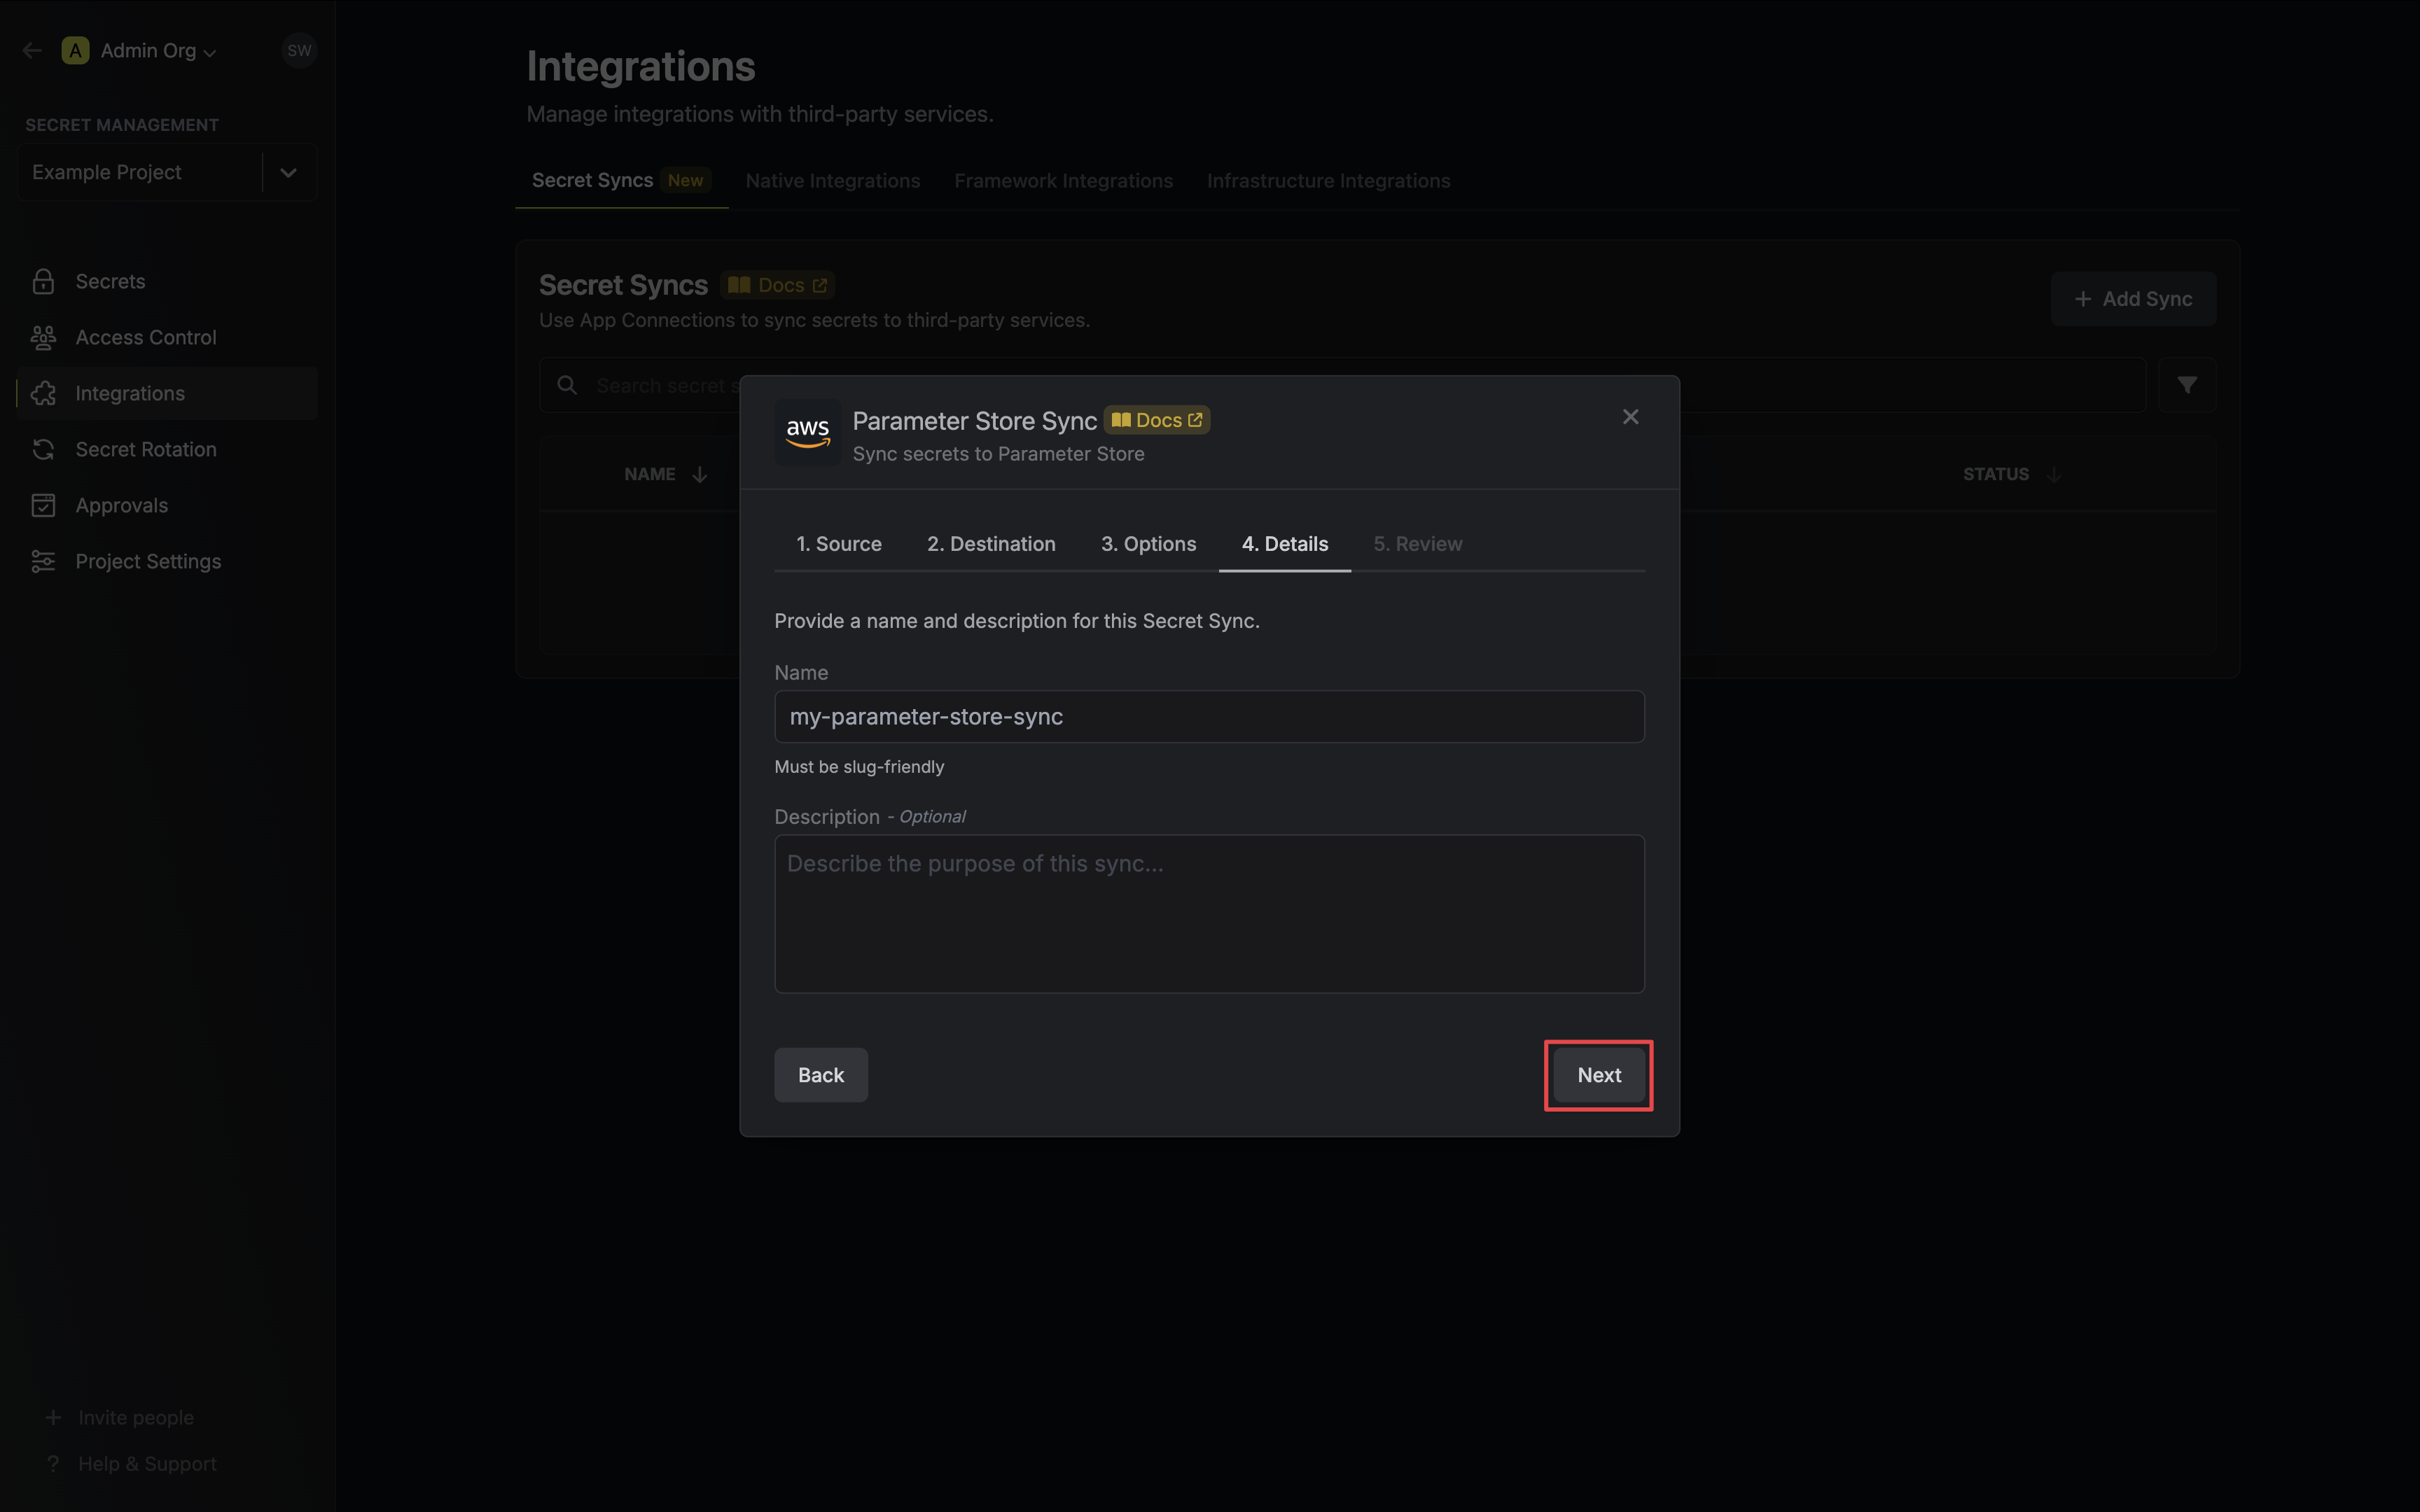
* **Name**: The name of your sync. Must be slug-friendly.
* **Description**: An optional description for your sync.
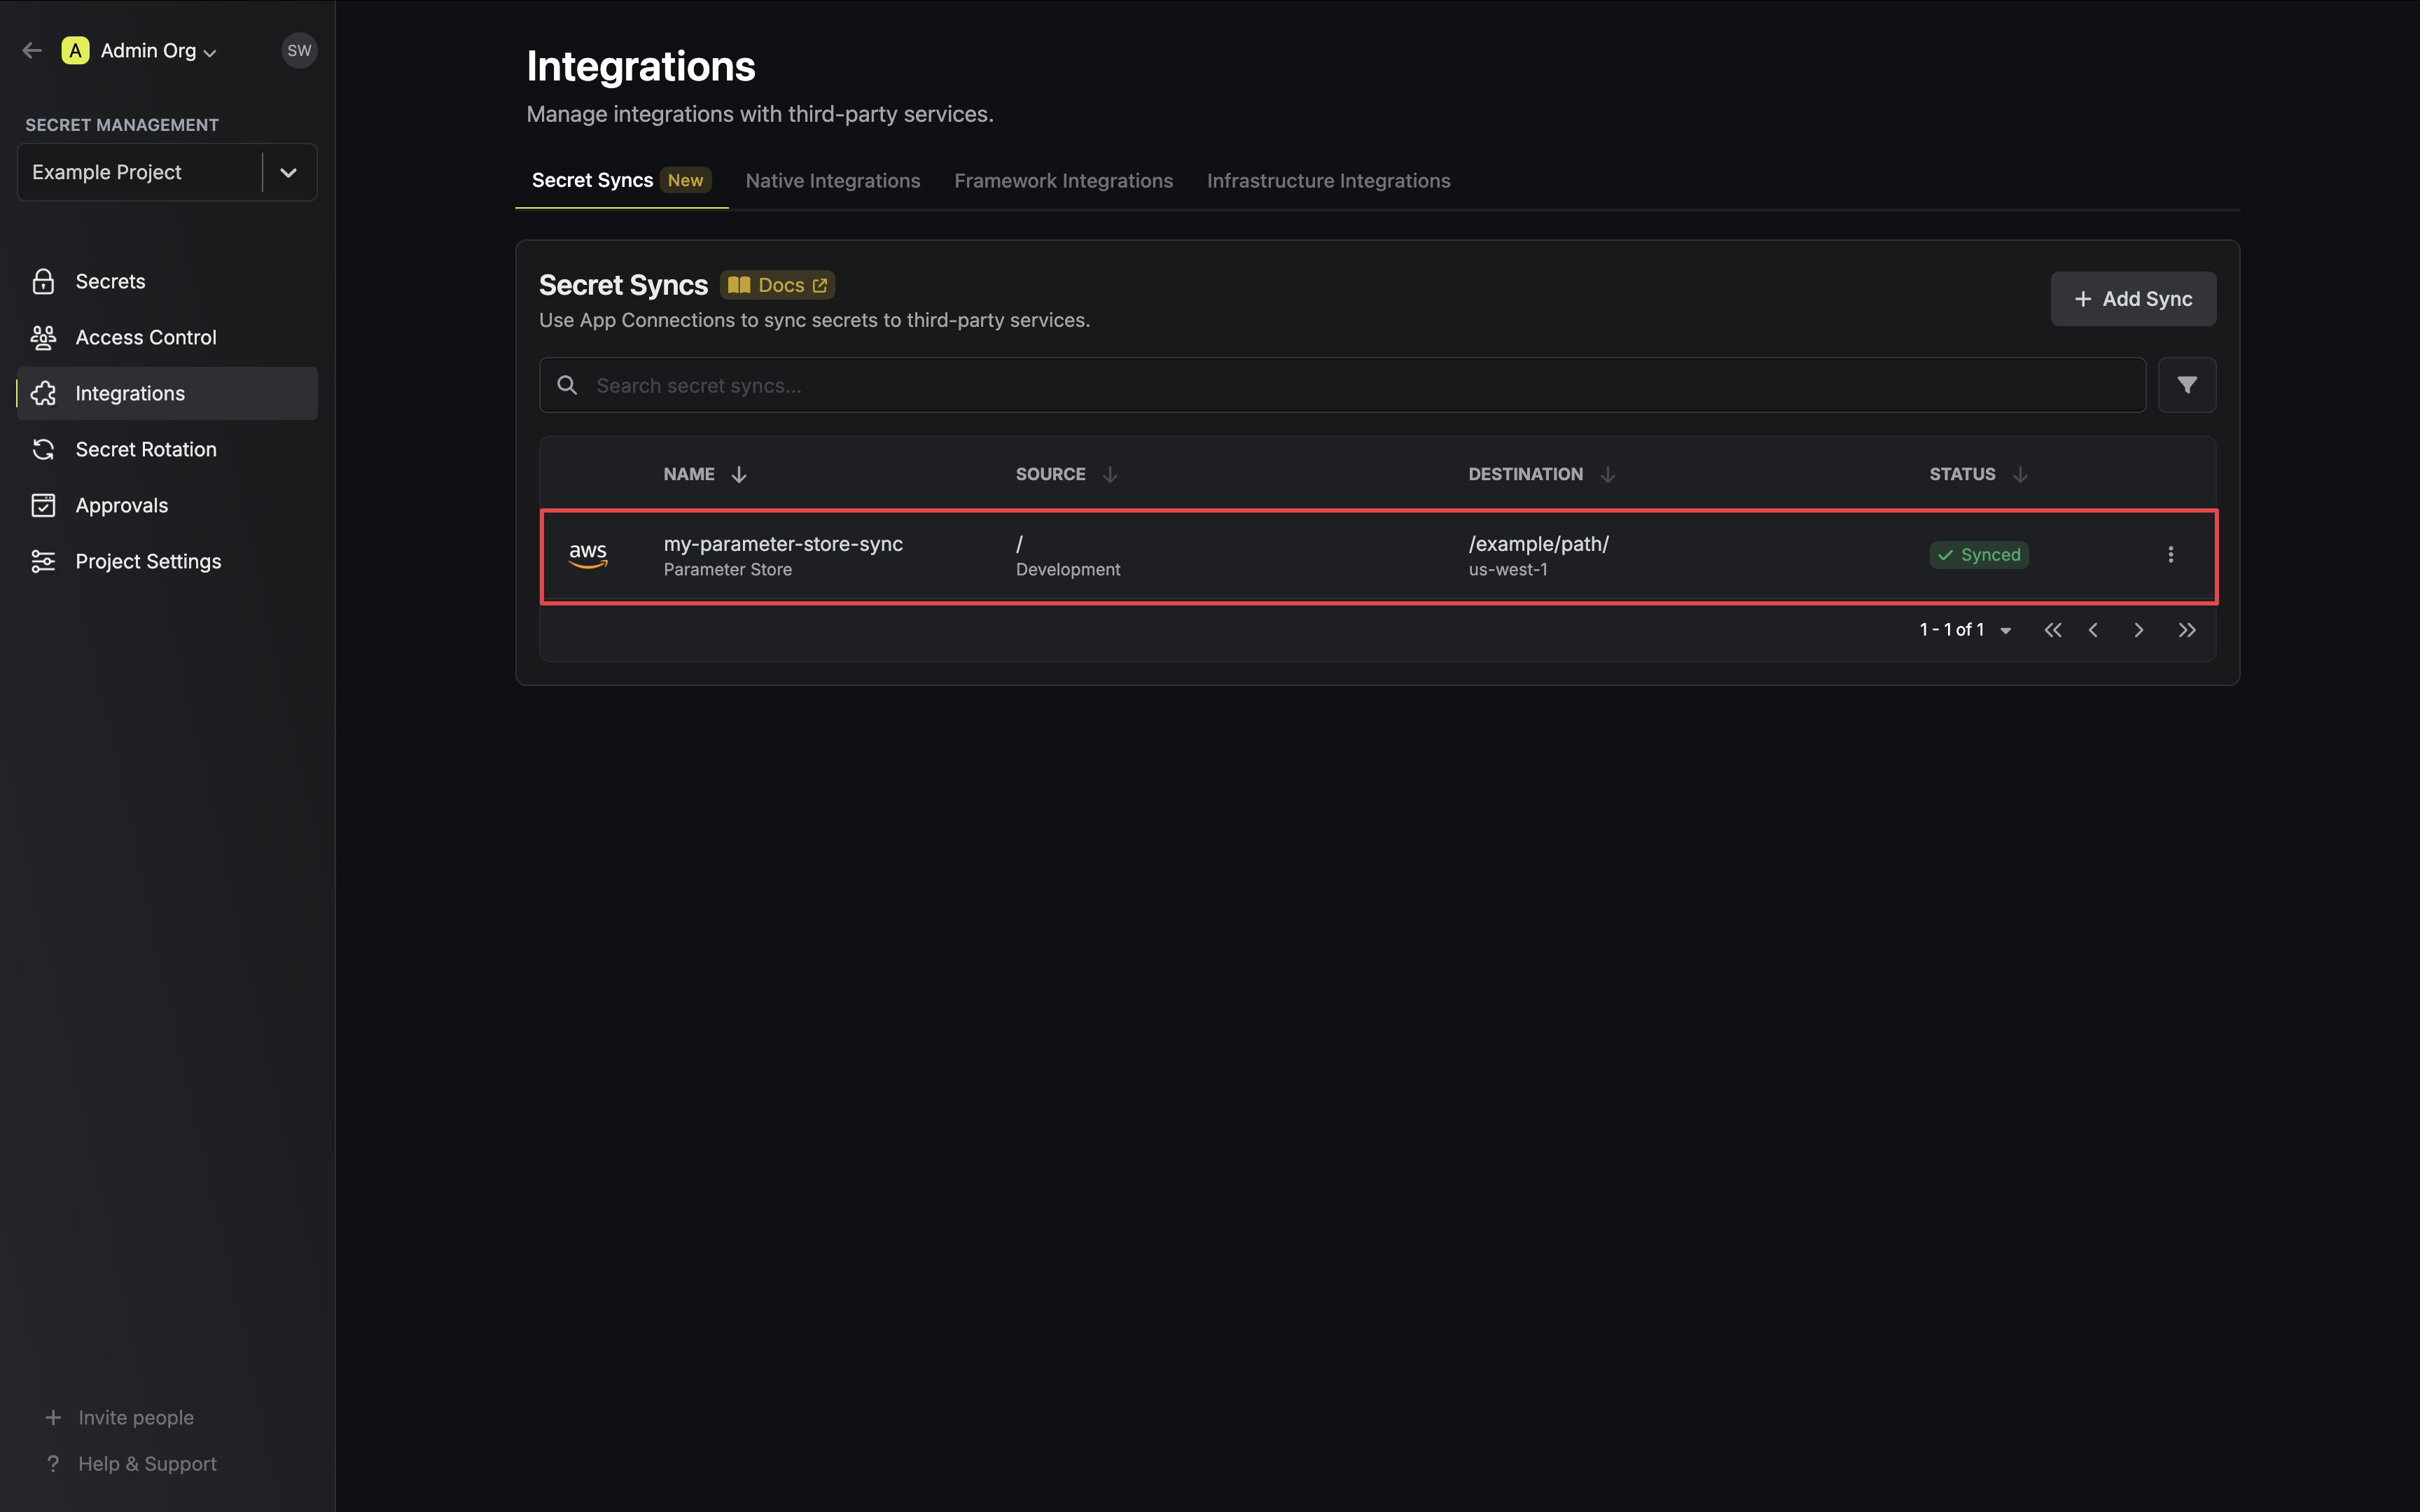
7. Review your Parameter Store Sync configuration, then click **Create Sync**.
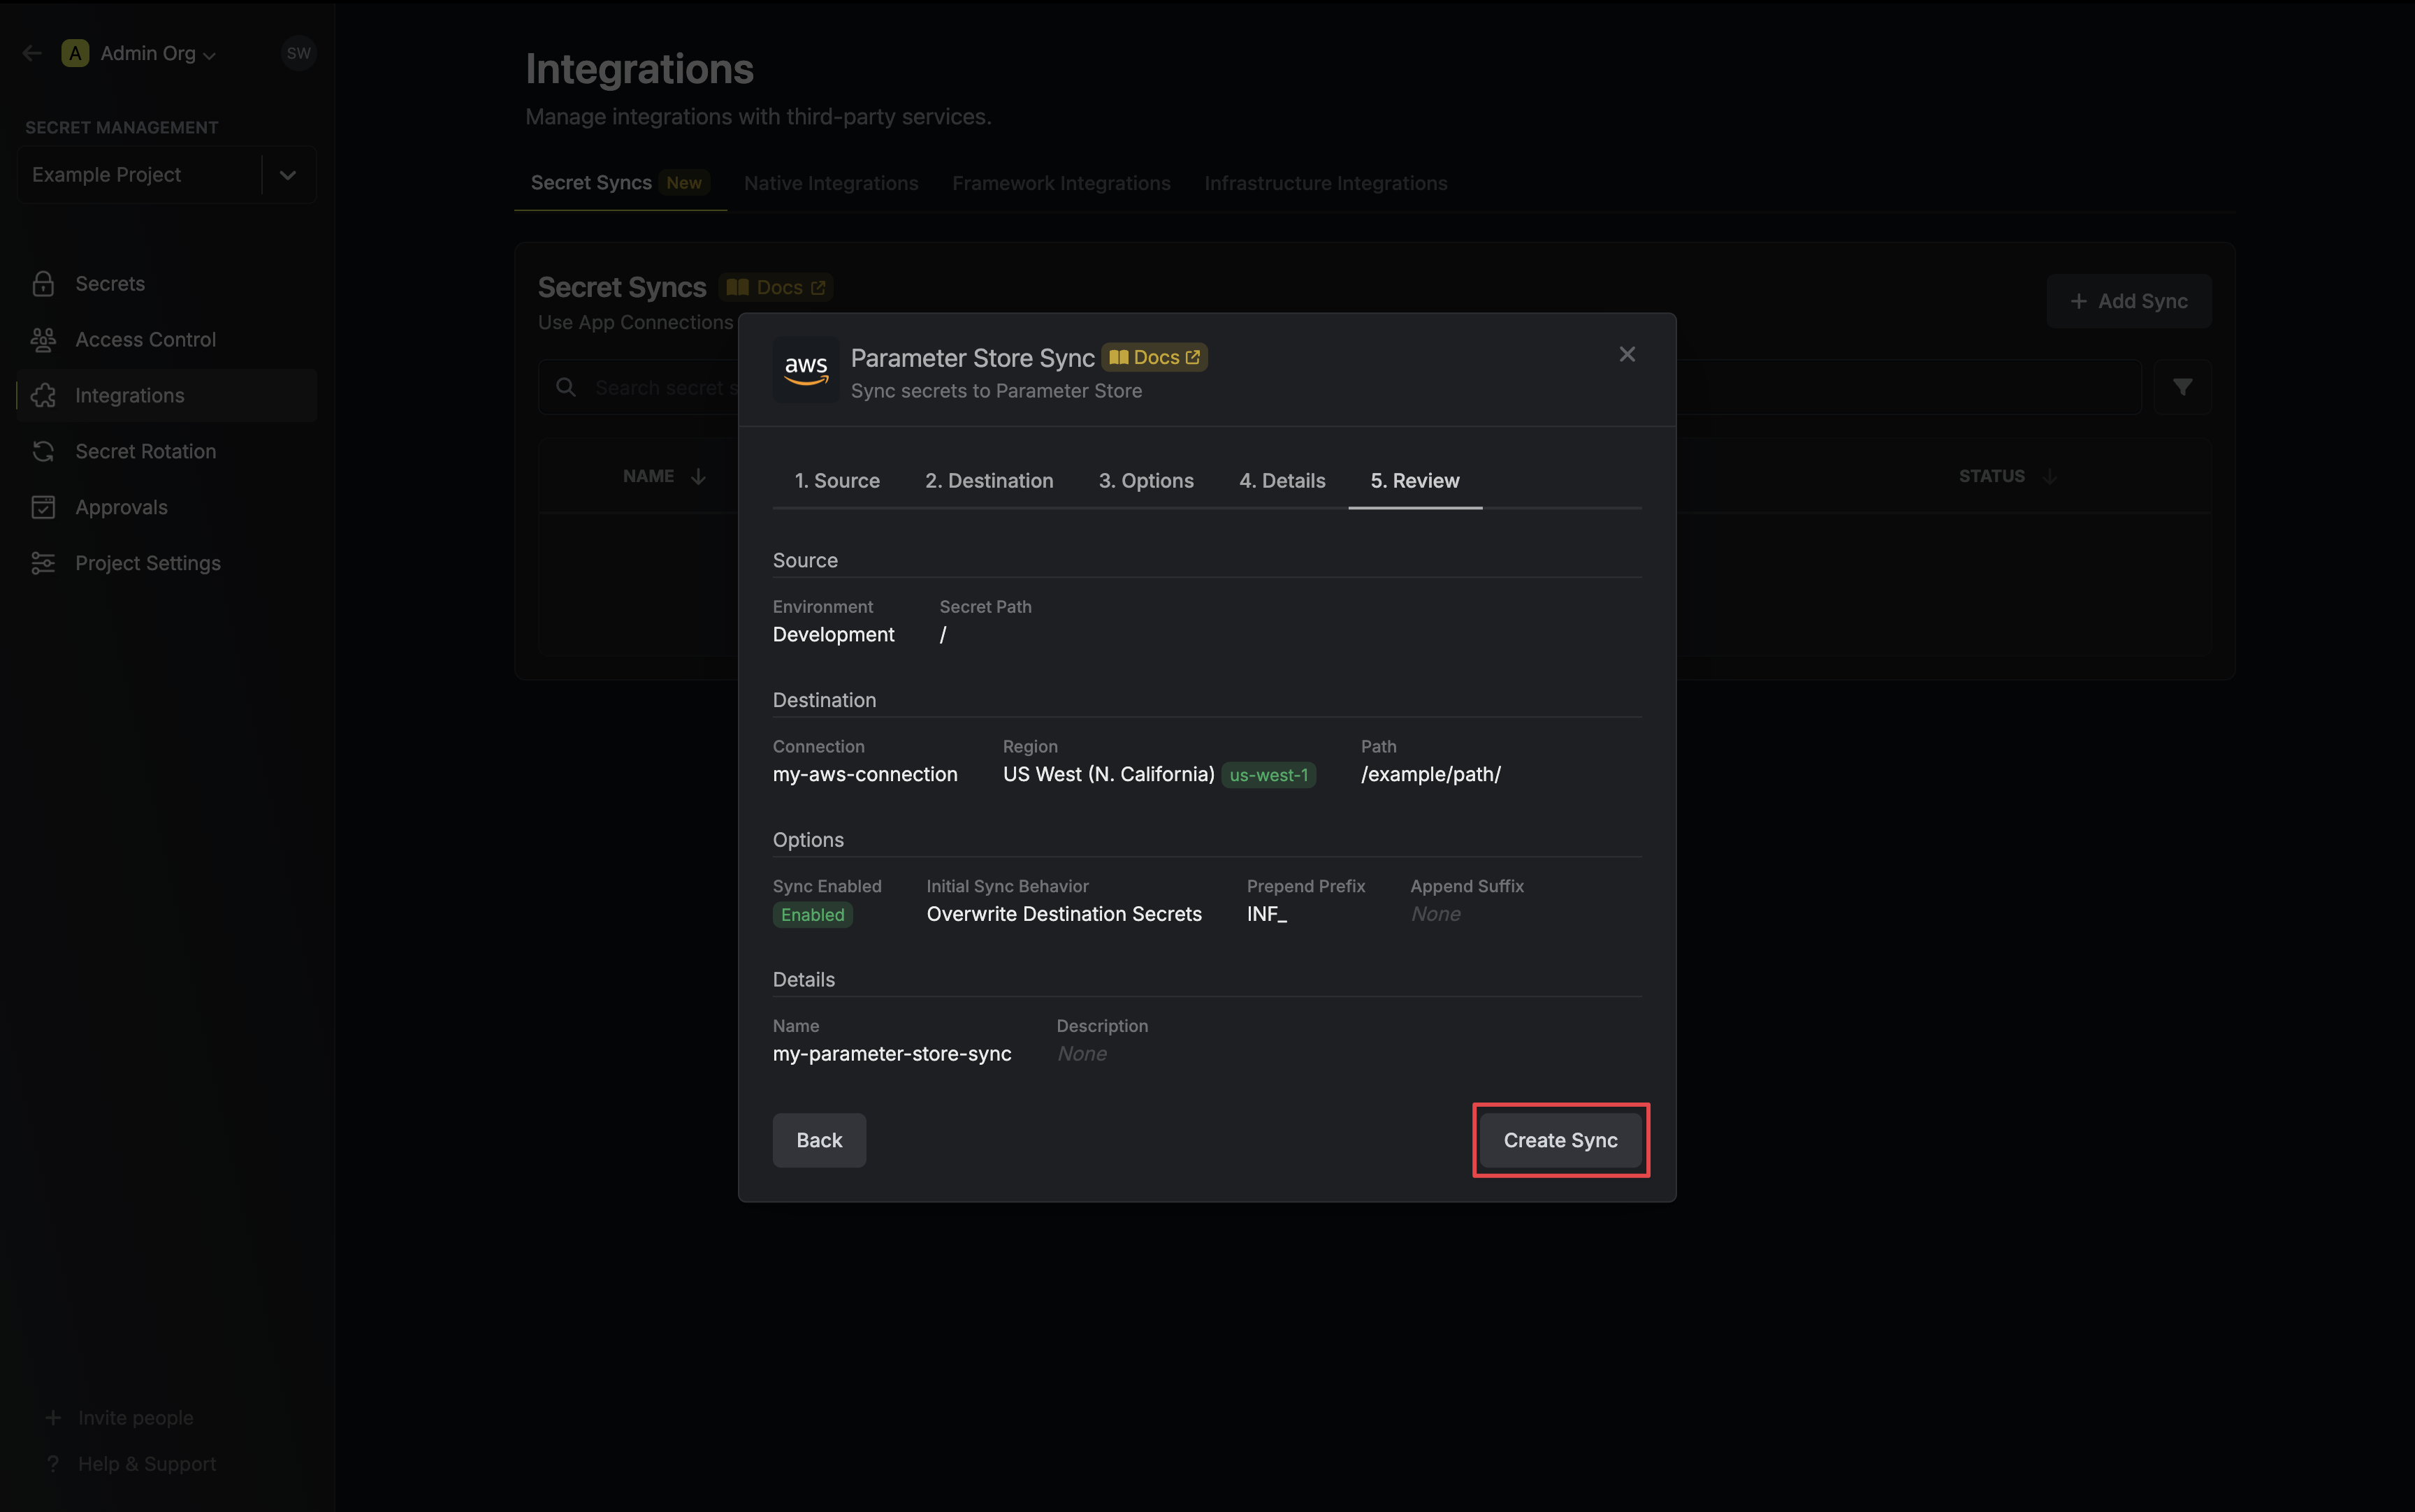
8. If enabled, your Parameter Store Sync will begin syncing your secrets to the destination endpoint.
To create an **AWS Parameter Store Sync**, make an API request to the [Create AWS
Parameter Store Sync](/api-reference/endpoints/secret-syncs/aws-parameter-store/create) API endpoint.
### Sample request
```bash Request
curl --request POST \
--url https://app.infisical.com/api/v1/secret-syncs/aws-parameter-store \
--header 'Content-Type: application/json' \
--data '{
"name": "my-parameter-store-sync",
"projectId": "3c90c3cc-0d44-4b50-8888-8dd25736052a",
"description": "an example sync",
"connectionId": "3c90c3cc-0d44-4b50-8888-8dd25736052a",
"environment": "dev",
"secretPath": "/my-secrets",
"isEnabled": true,
"syncOptions": {
"initialSyncBehavior": "overwrite-destination"
},
"destinationConfig": {
"region": "us-east-1",
"path": "/my-aws/path/"
}
}'
```
### Sample response
```bash Response
{
"secretSync": {
"id": "3c90c3cc-0d44-4b50-8888-8dd25736052a",
"name": "my-parameter-store-sync",
"description": "an example sync",
"isEnabled": true,
"version": 1,
"folderId": "3c90c3cc-0d44-4b50-8888-8dd25736052a",
"connectionId": "3c90c3cc-0d44-4b50-8888-8dd25736052a",
"createdAt": "2023-11-07T05:31:56Z",
"updatedAt": "2023-11-07T05:31:56Z",
"syncStatus": "succeeded",
"lastSyncJobId": "123",
"lastSyncMessage": null,
"lastSyncedAt": "2023-11-07T05:31:56Z",
"importStatus": null,
"lastImportJobId": null,
"lastImportMessage": null,
"lastImportedAt": null,
"removeStatus": null,
"lastRemoveJobId": null,
"lastRemoveMessage": null,
"lastRemovedAt": null,
"syncOptions": {
"initialSyncBehavior": "overwrite-destination"
},
"projectId": "3c90c3cc-0d44-4b50-8888-8dd25736052a",
"connection": {
"app": "aws",
"name": "my-aws-connection",
"id": "3c90c3cc-0d44-4b50-8888-8dd25736052a"
},
"environment": {
"slug": "dev",
"name": "Development",
"id": "3c90c3cc-0d44-4b50-8888-8dd25736052a"
},
"folder": {
"id": "3c90c3cc-0d44-4b50-8888-8dd25736052a",
"path": "/my-secrets"
},
"destination": "aws-parameter-store",
"destinationConfig": {
"region": "us-east-1",
"path": "/my-aws/path/"
}
}
}
```
# AWS Secrets Manager Sync
Source: https://infisical.com/docs/integrations/secret-syncs/aws-secrets-manager
Learn how to configure an AWS Secrets Manager Sync for Infisical.
**Prerequisites:**
* Set up and add secrets to [Infisical Cloud](https://app.infisical.com)
* Create an [AWS Connection](/integrations/app-connections/aws) with the required **Secret Sync** permissions
1. Navigate to **Project** > **Integrations** and select the **Secret Syncs** tab. Click on the **Add Sync** button.

2. Select the **AWS Secrets Manager** option.
3. Configure the **Source** from where secrets should be retrieved, then click **Next**.
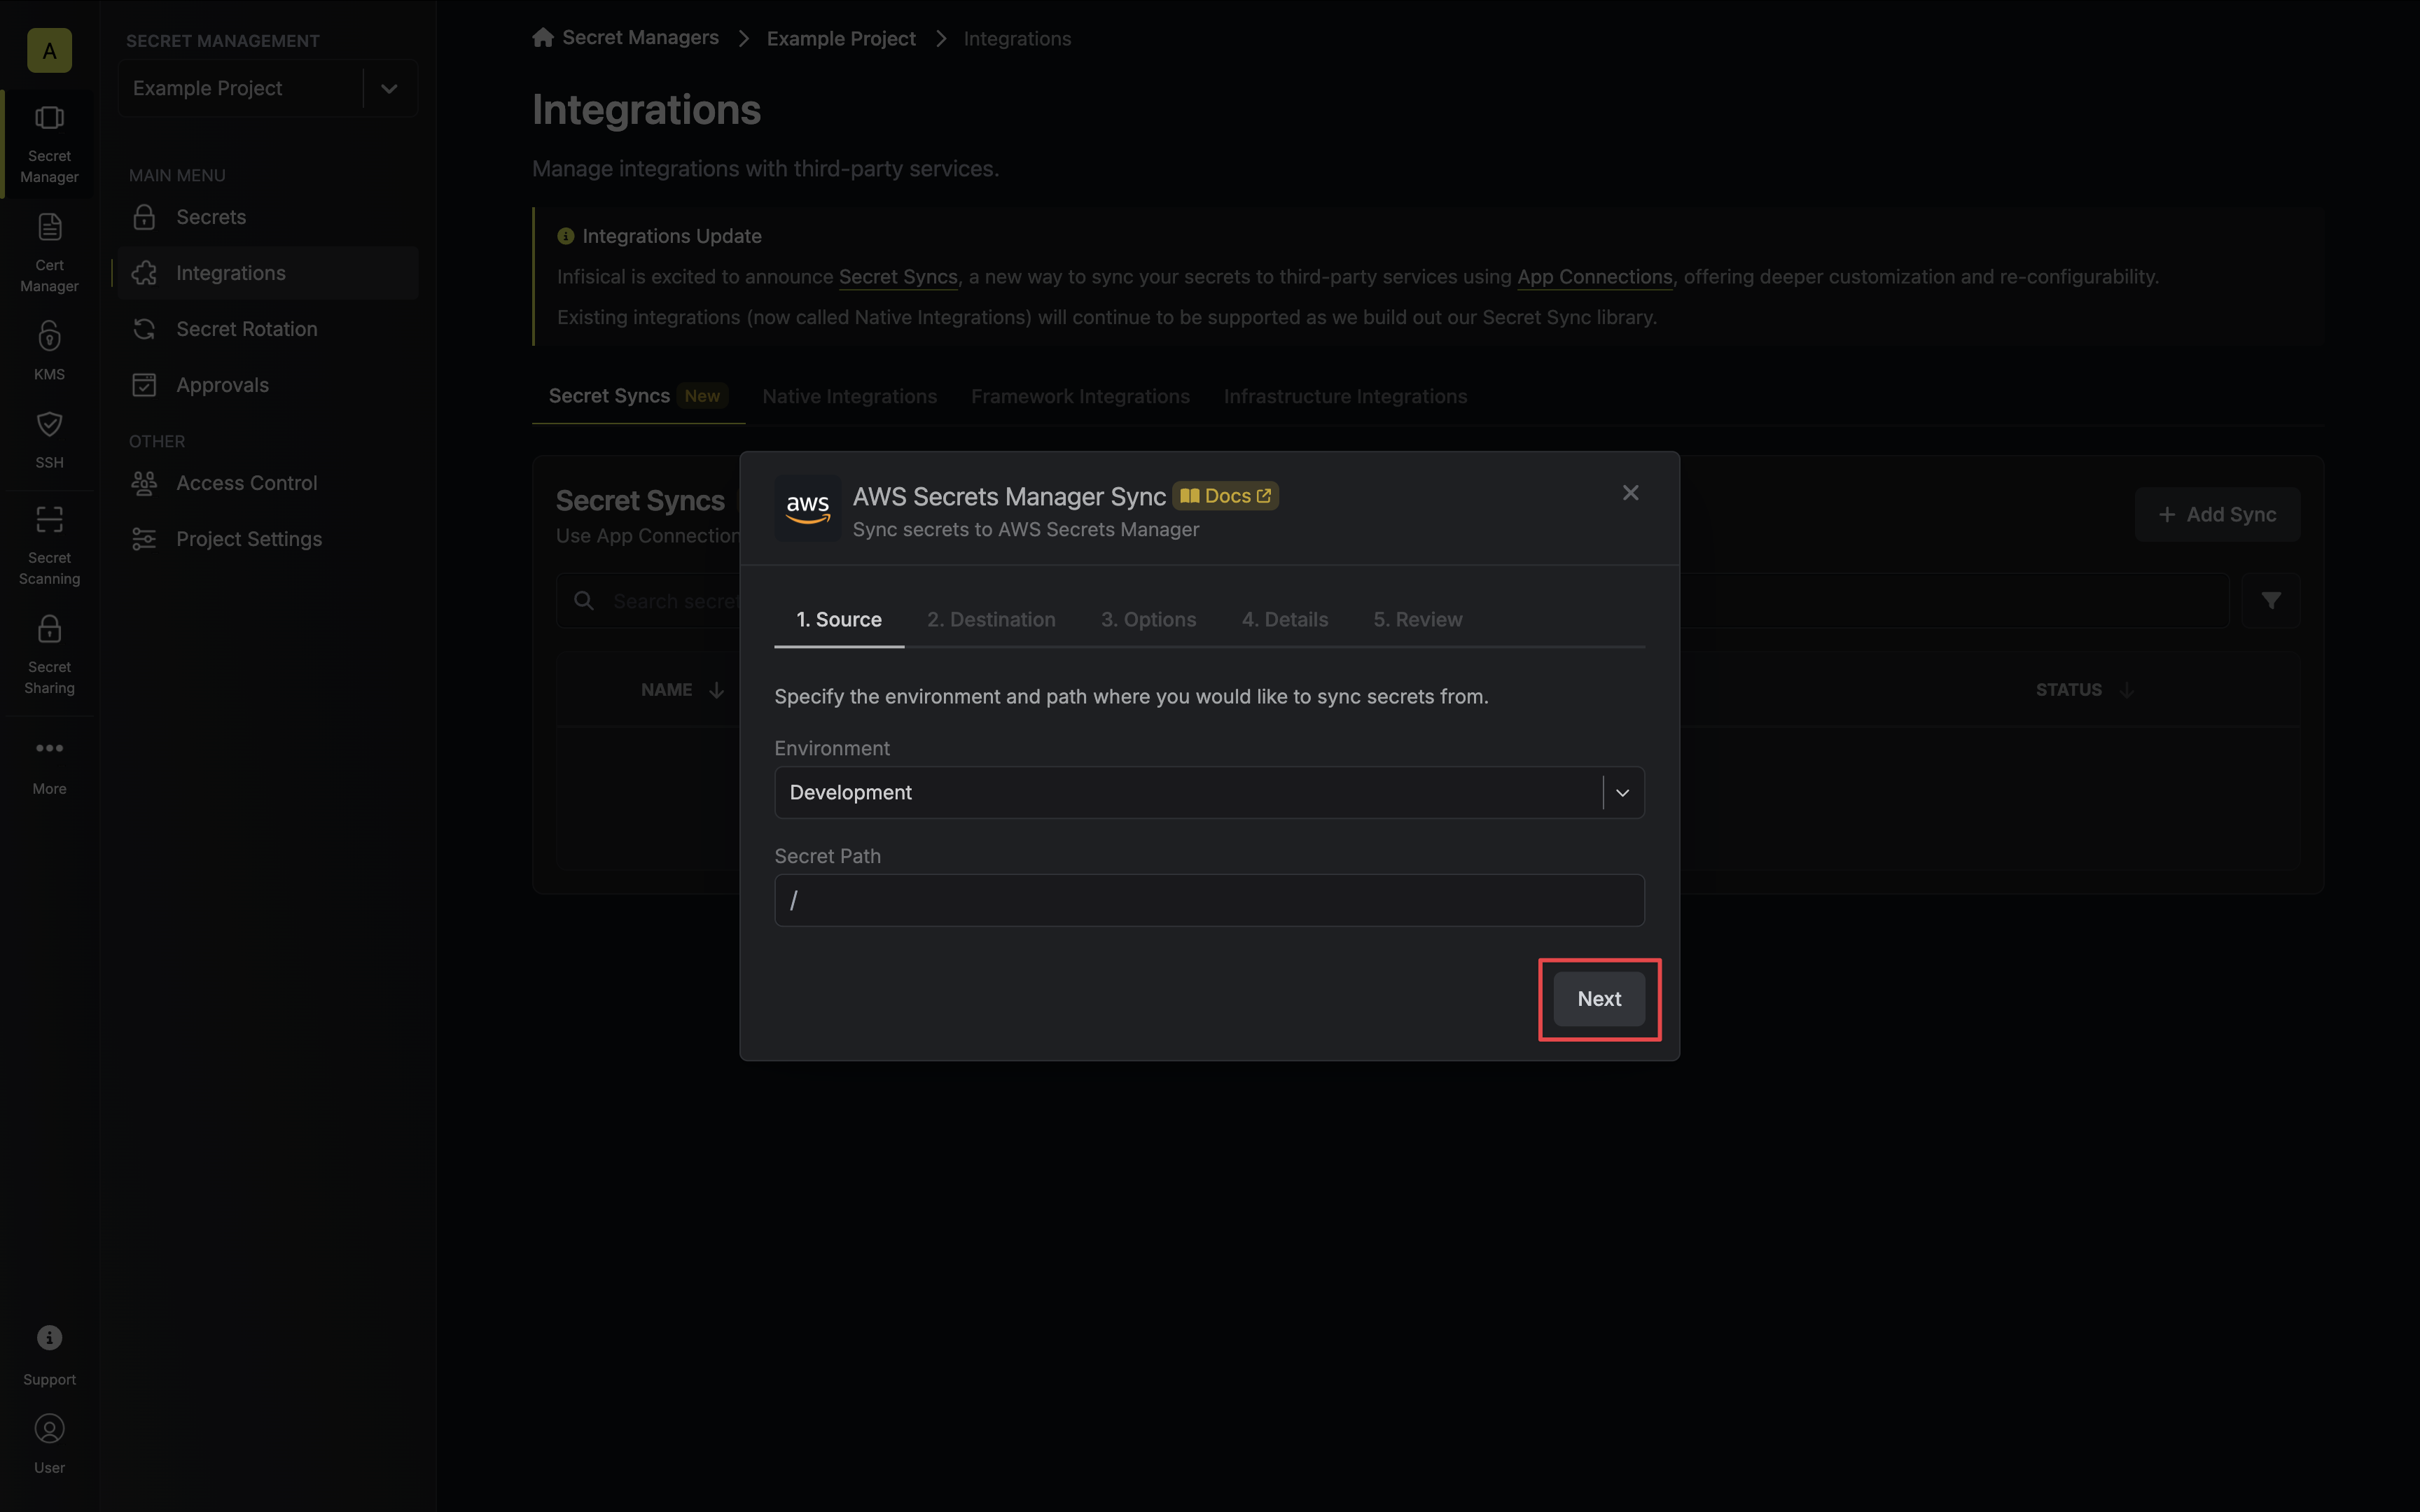
* **Environment**: The project environment to retrieve secrets from.
* **Secret Path**: The folder path to retrieve secrets from.
If you need to sync secrets from multiple folder locations, check out [secret imports](/documentation/platform/secret-reference#secret-imports).
4. Configure the **Destination** to where secrets should be deployed, then click **Next**.
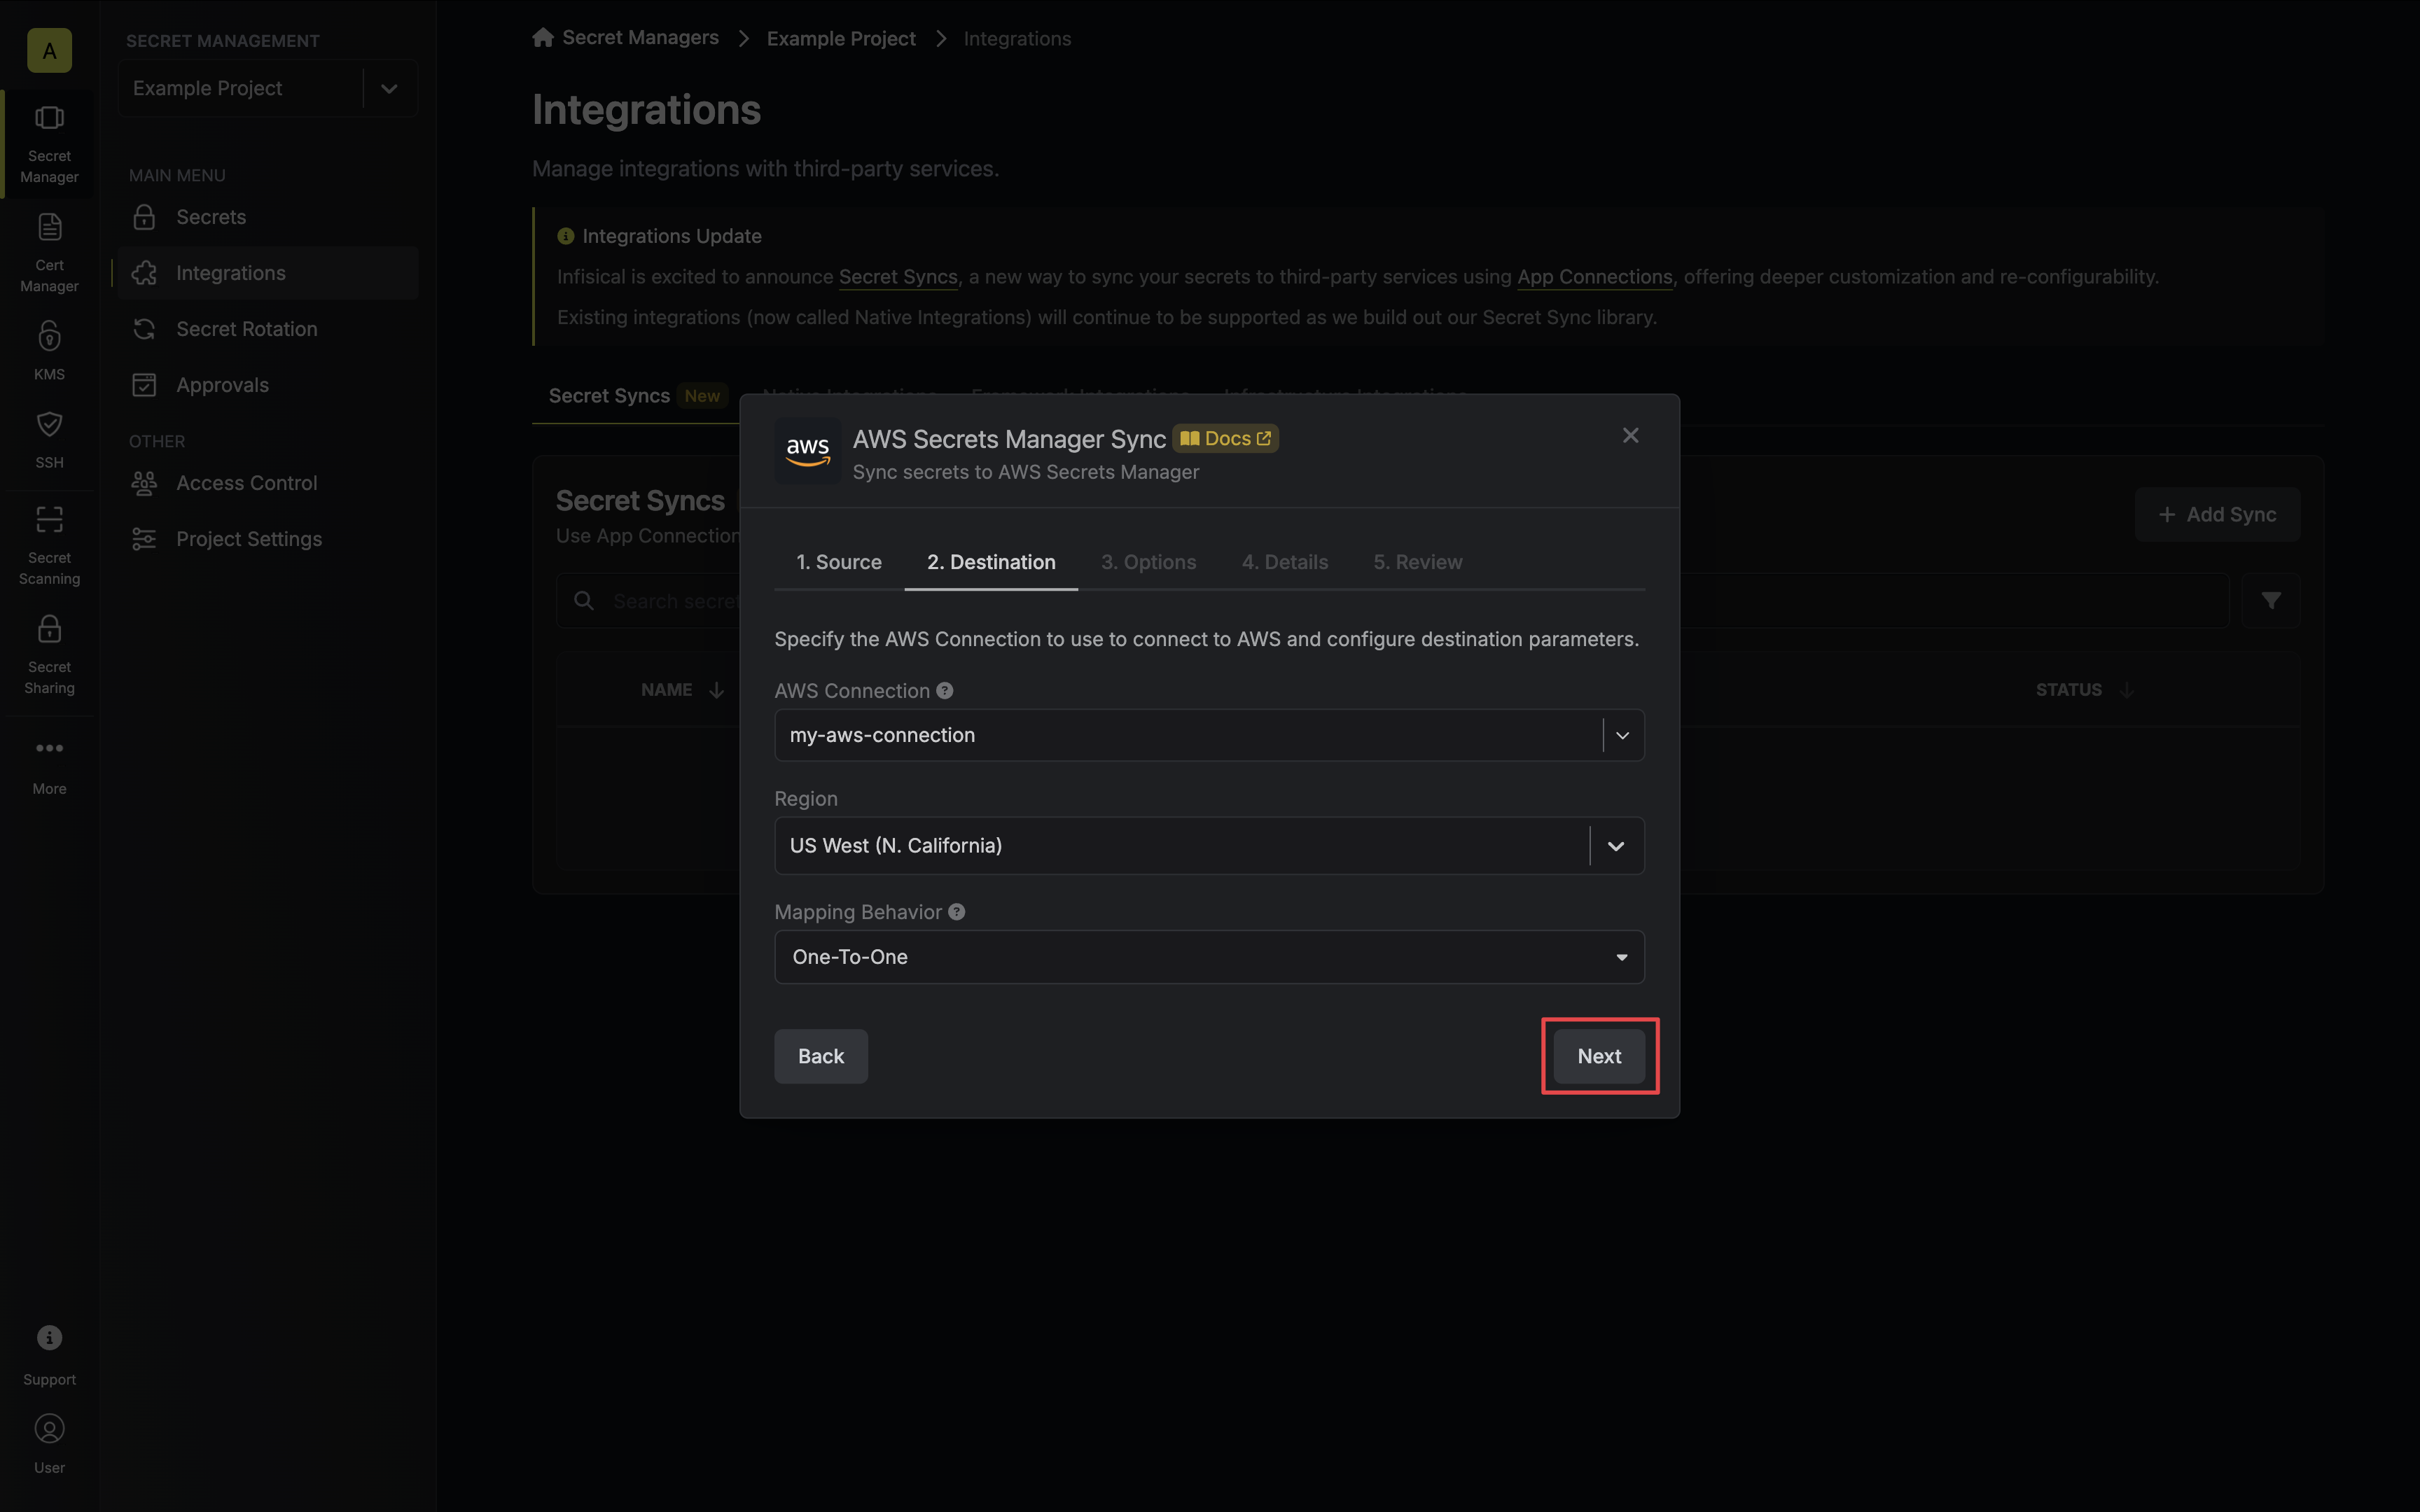
* **AWS Connection**: The AWS Connection to authenticate with.
* **Region**: The AWS region to deploy secrets to.
* **Mapping Behavior**: Specify how Infisical should map secrets to AWS Secrets Manager:
* **One-To-One**: Each Infisical secret will be mapped to a separate AWS Secrets Manager secret.
* **Many-To-One**: All Infisical secrets will be mapped to a single AWS Secrets Manager secret.
* **Secret Name**: Specifies the name of the AWS Secret to map secrets to if **Many-To-One** mapping behavior is selected.
5. Configure the **Sync Options** to specify how secrets should be synced, then click **Next**.
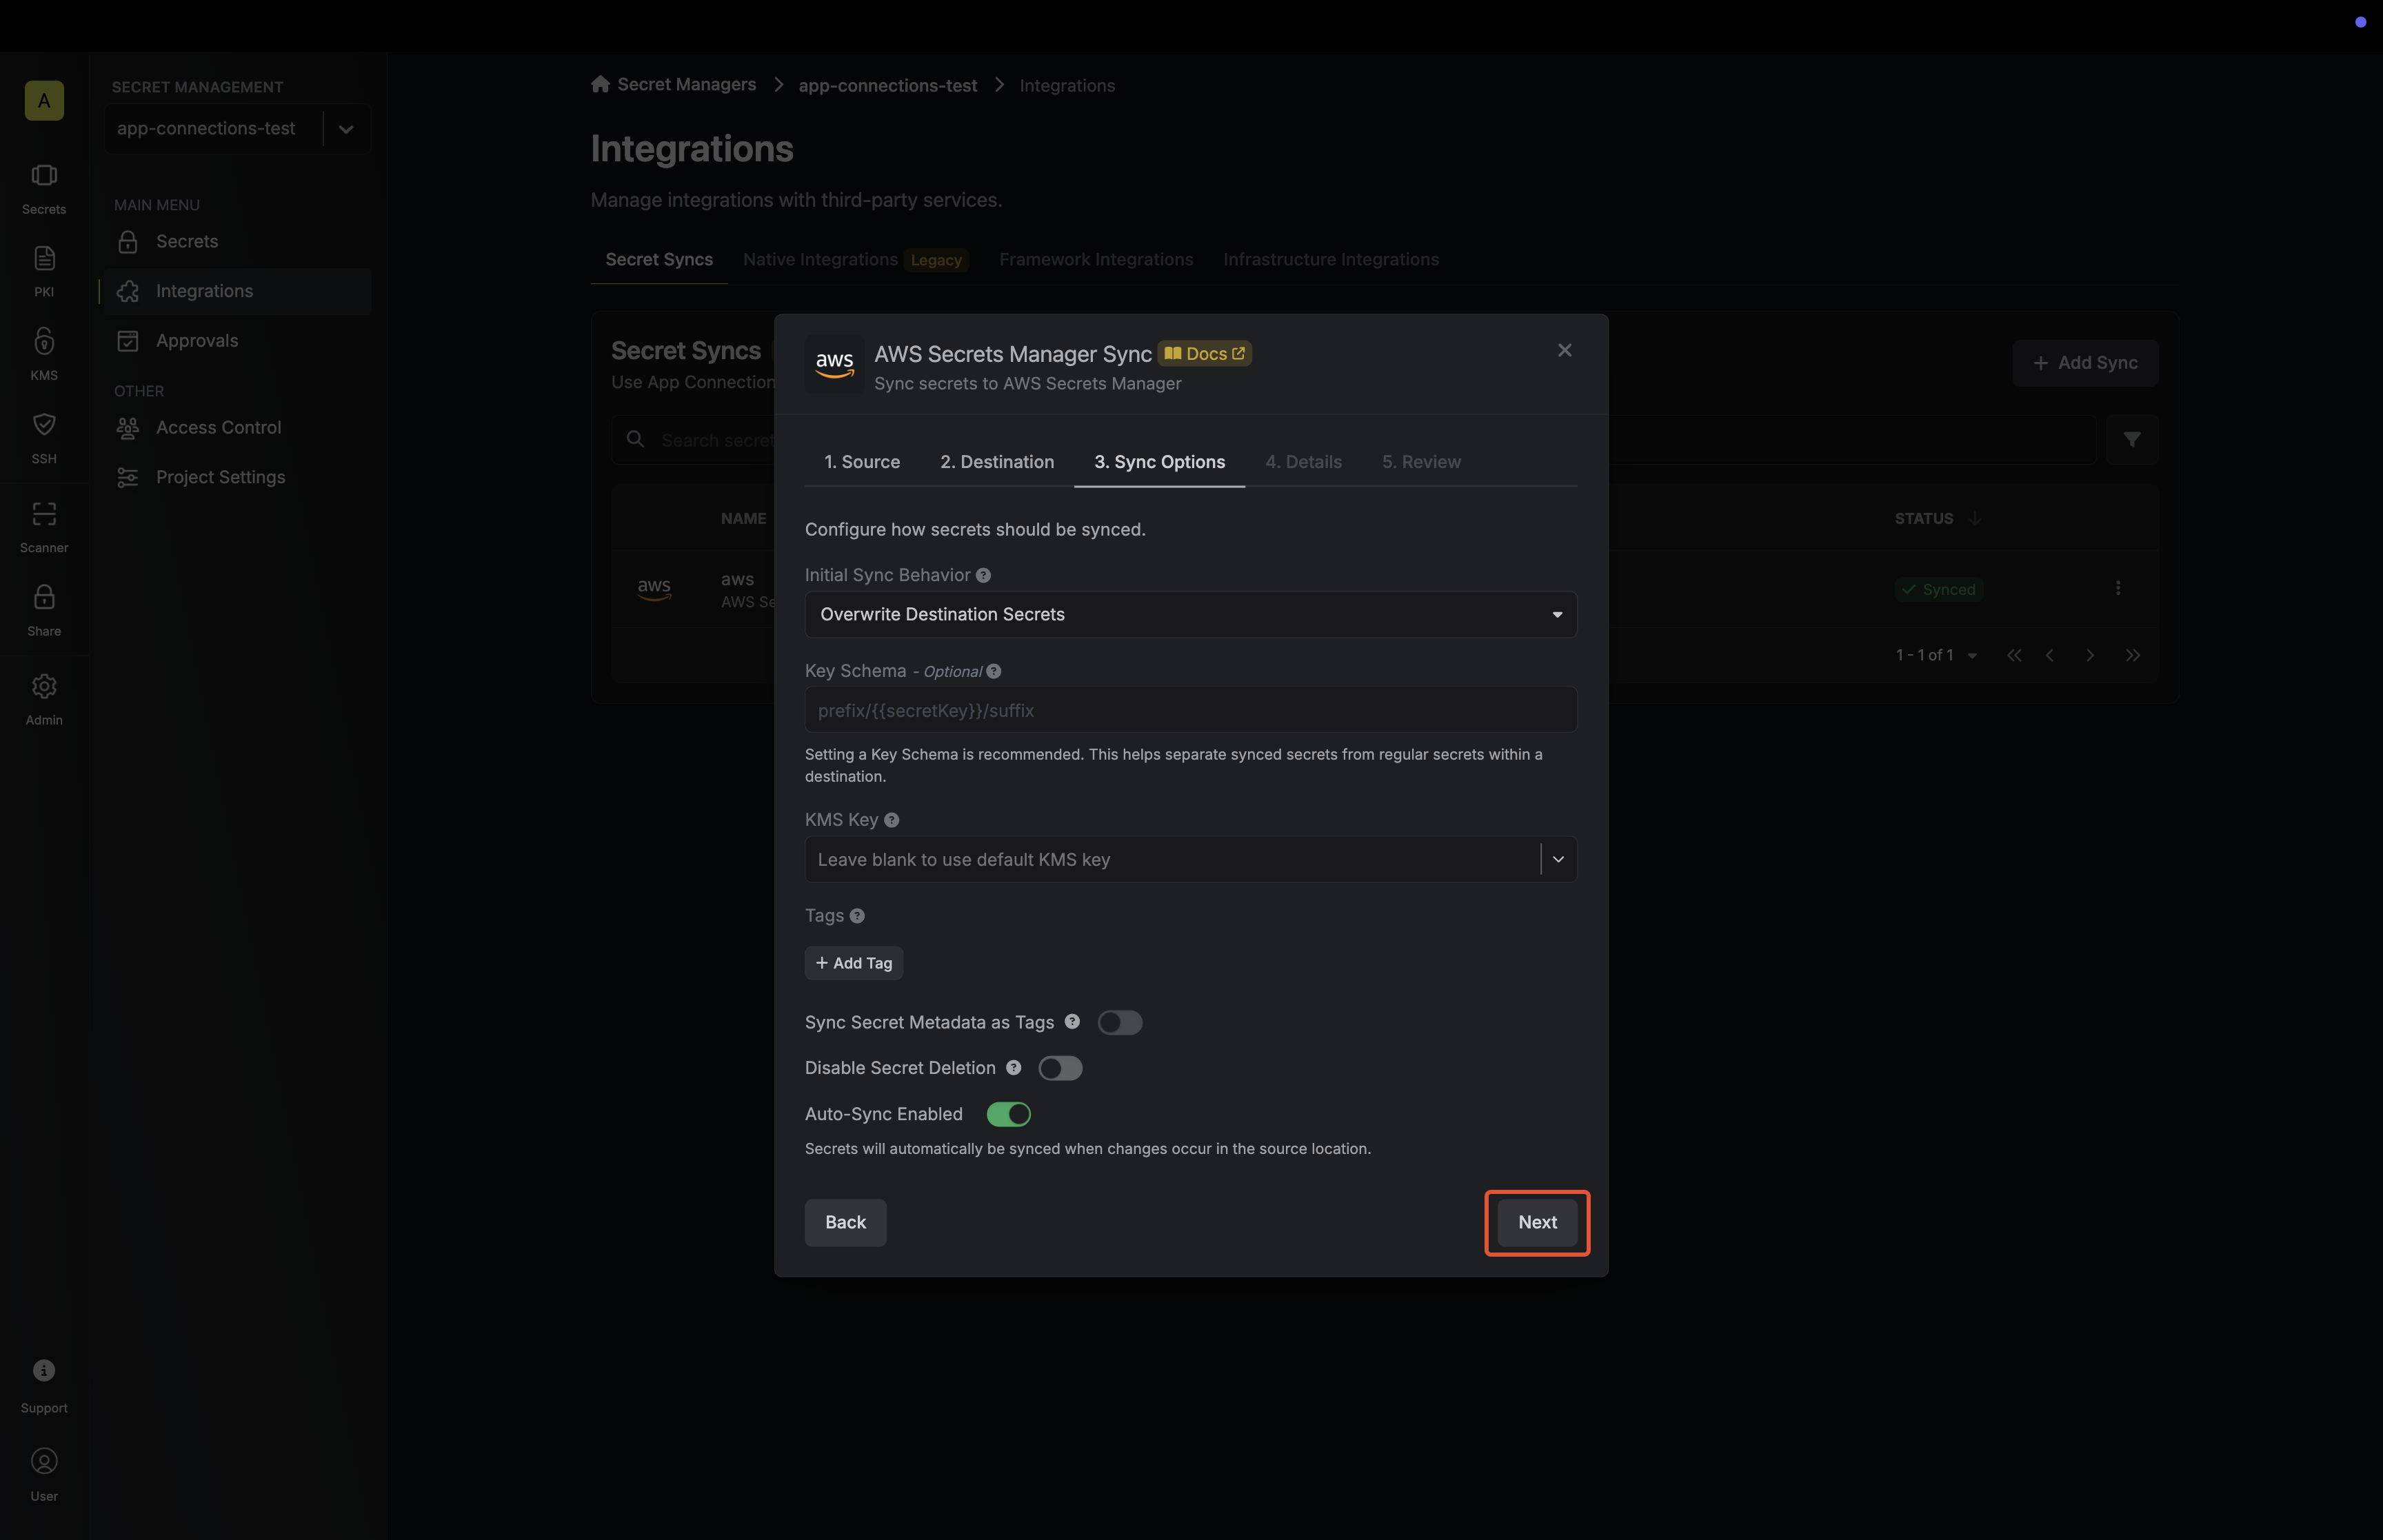
* **Initial Sync Behavior**: Determines how Infisical should resolve the initial sync.
* **Overwrite Destination Secrets**: Removes any secrets at the destination endpoint not present in Infisical.
* **Import Secrets (Prioritize Infisical)**: Imports secrets from the destination endpoint before syncing, prioritizing values from Infisical over Secrets Manager when keys conflict.
* **Import Secrets (Prioritize AWS Secrets Manager)**: Imports secrets from the destination endpoint before syncing, prioritizing values from Secrets Manager over Infisical when keys conflict.
* **Auto-Sync Enabled**: If enabled, secrets will automatically be synced from the source location when changes occur. Disable to enforce manual syncing only.
6. Configure the **Details** of your Secrets Manager Sync, then click **Next**.
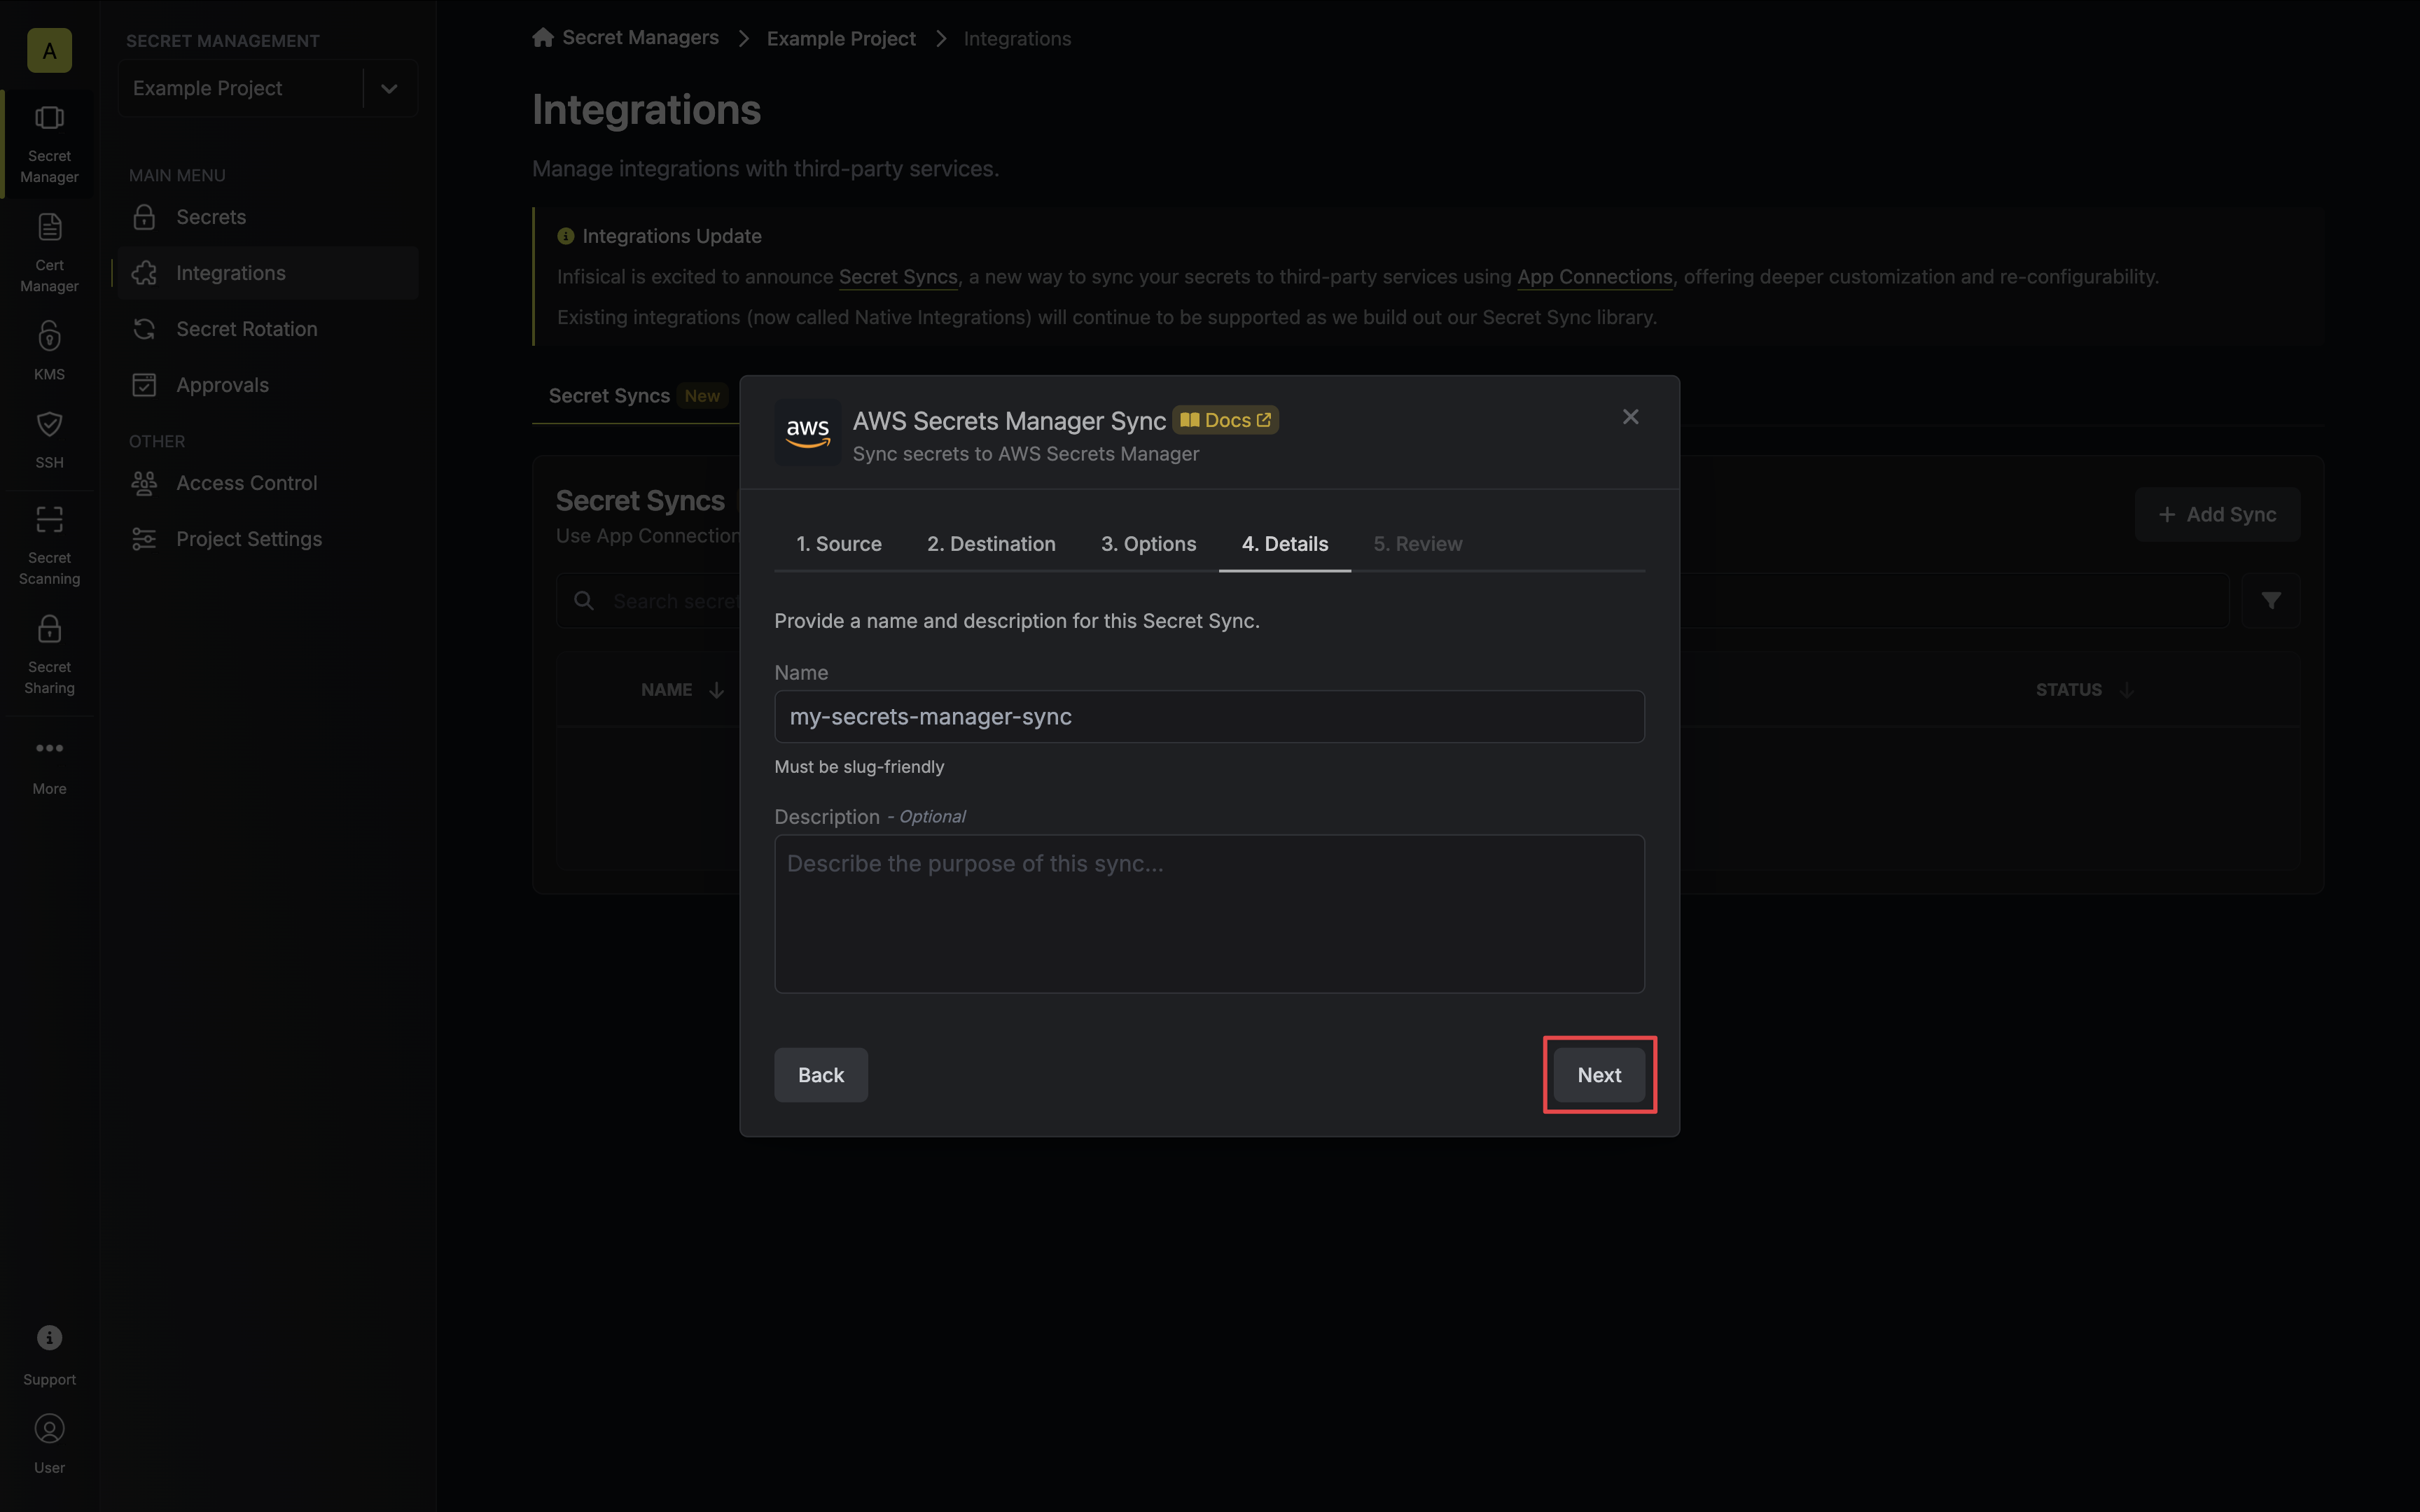
* **Name**: The name of your sync. Must be slug-friendly.
* **Description**: An optional description for your sync.
7. Review your Secrets Manager Sync configuration, then click **Create Sync**.
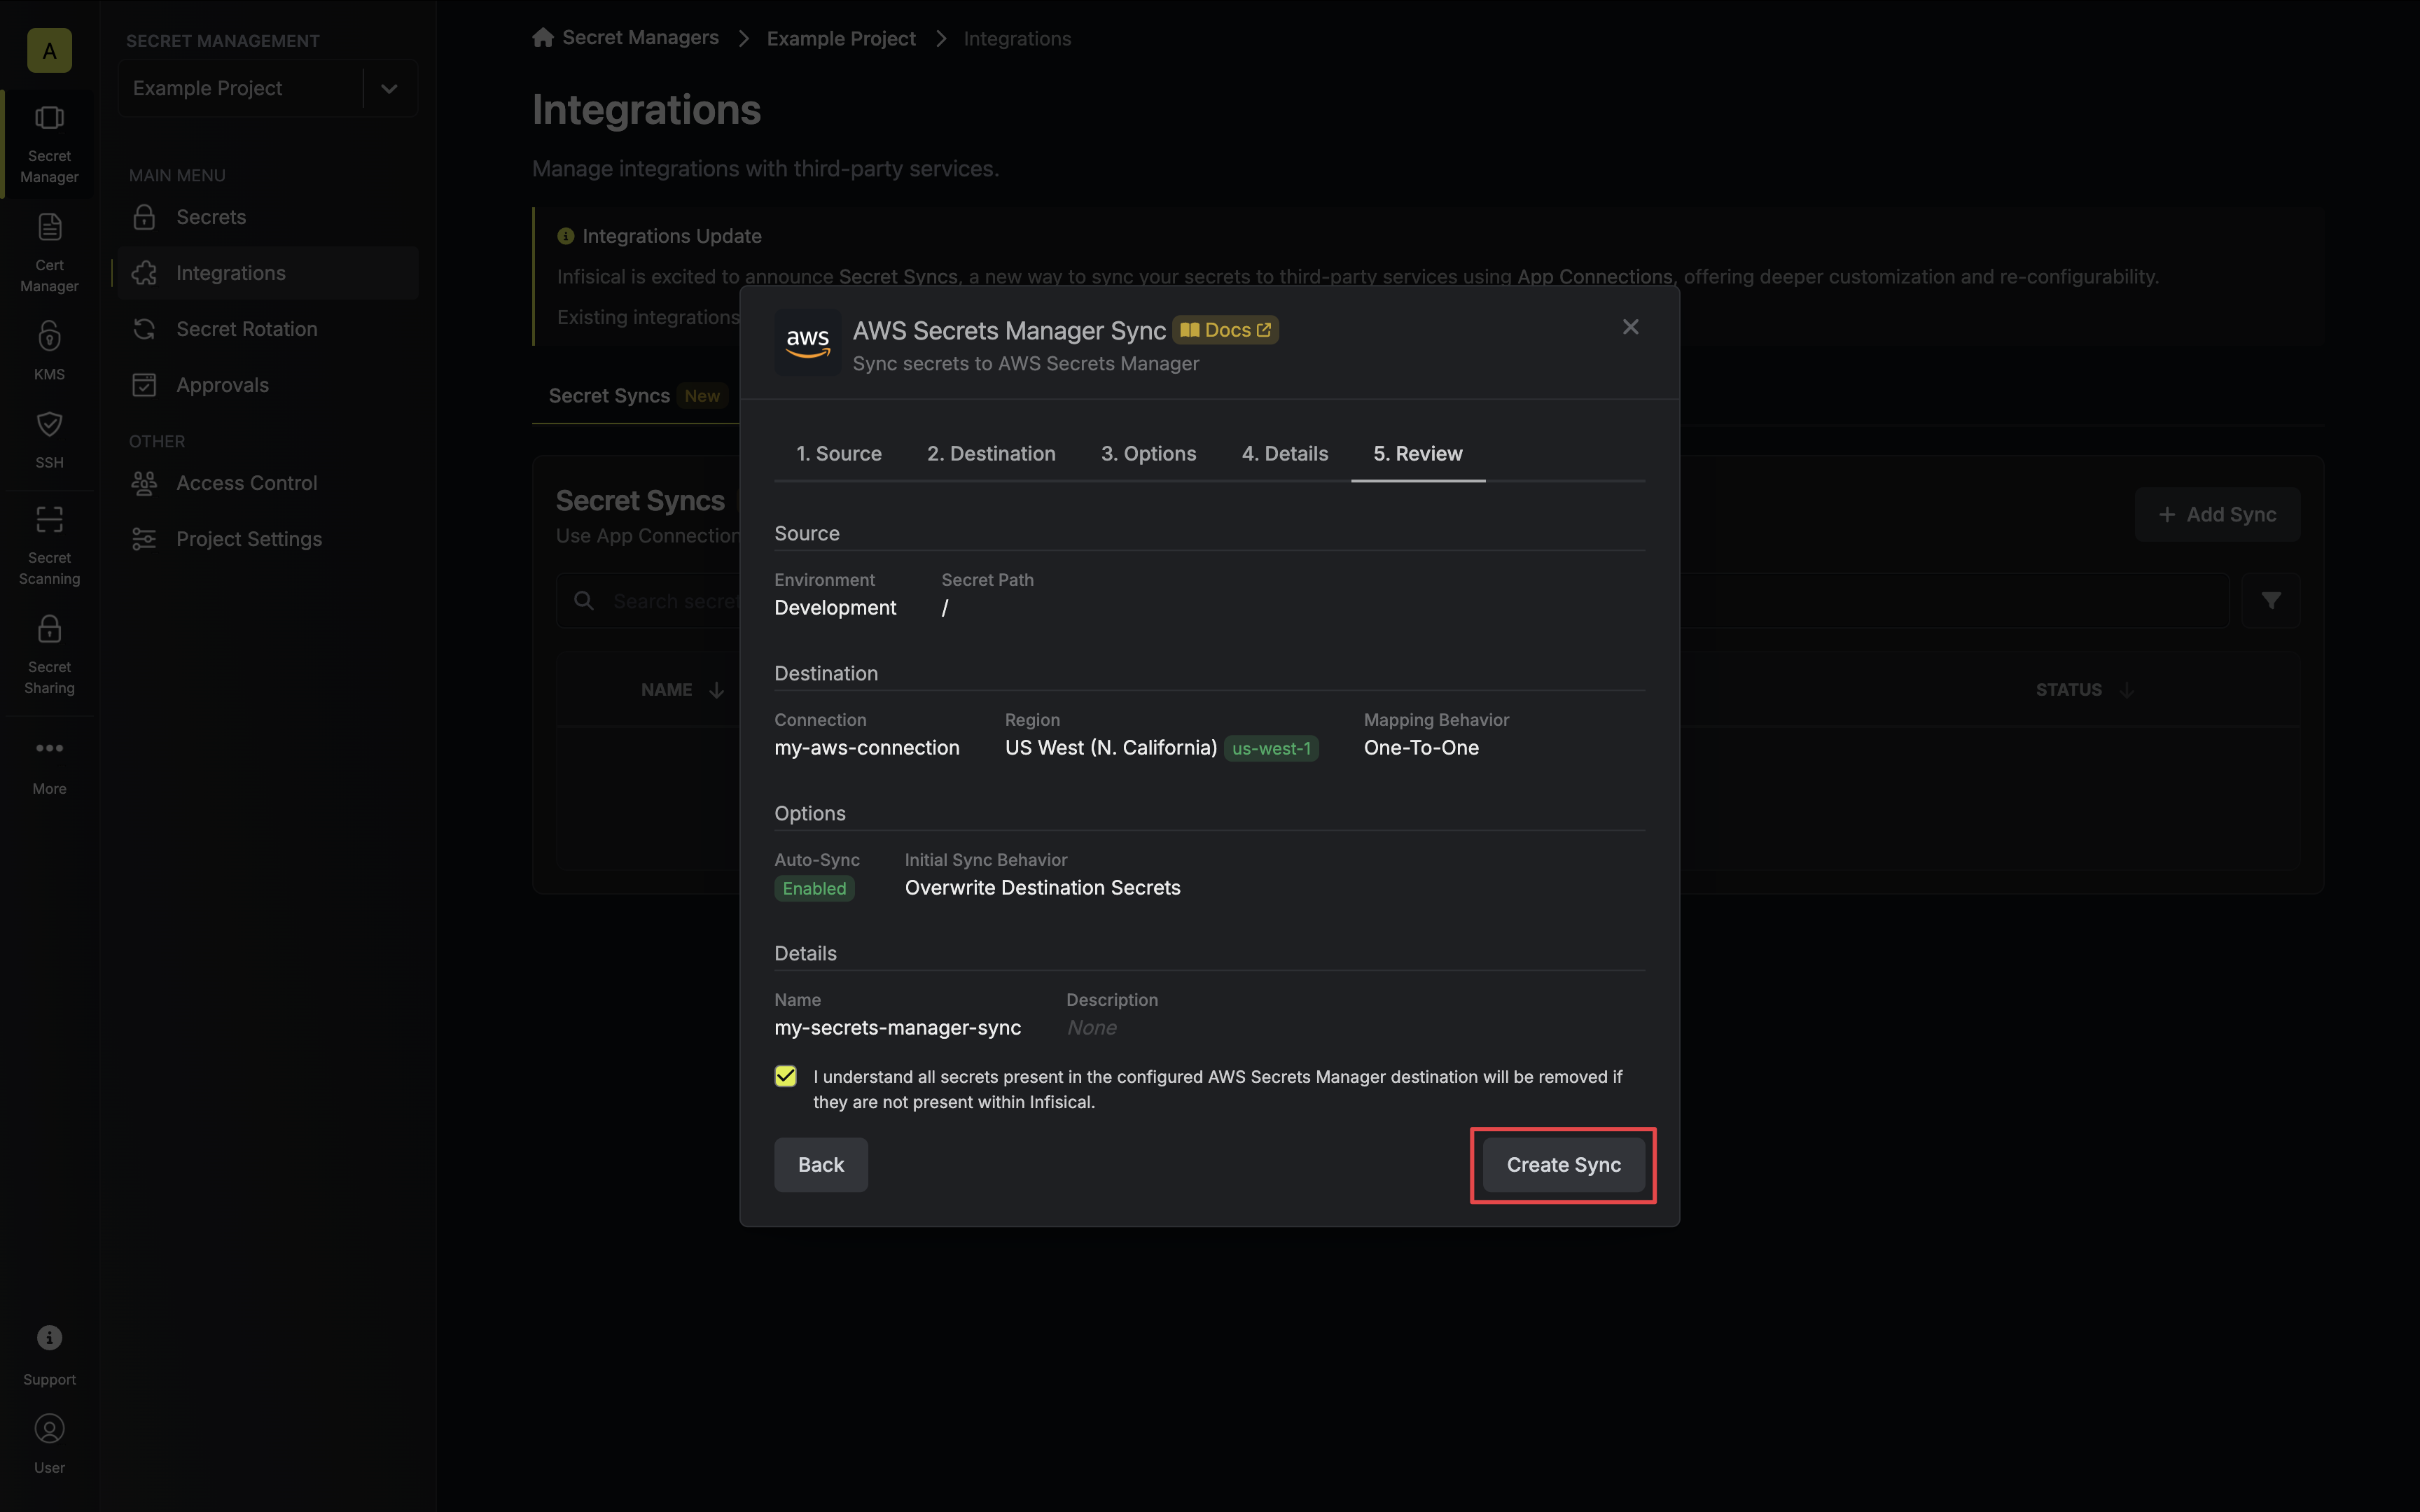
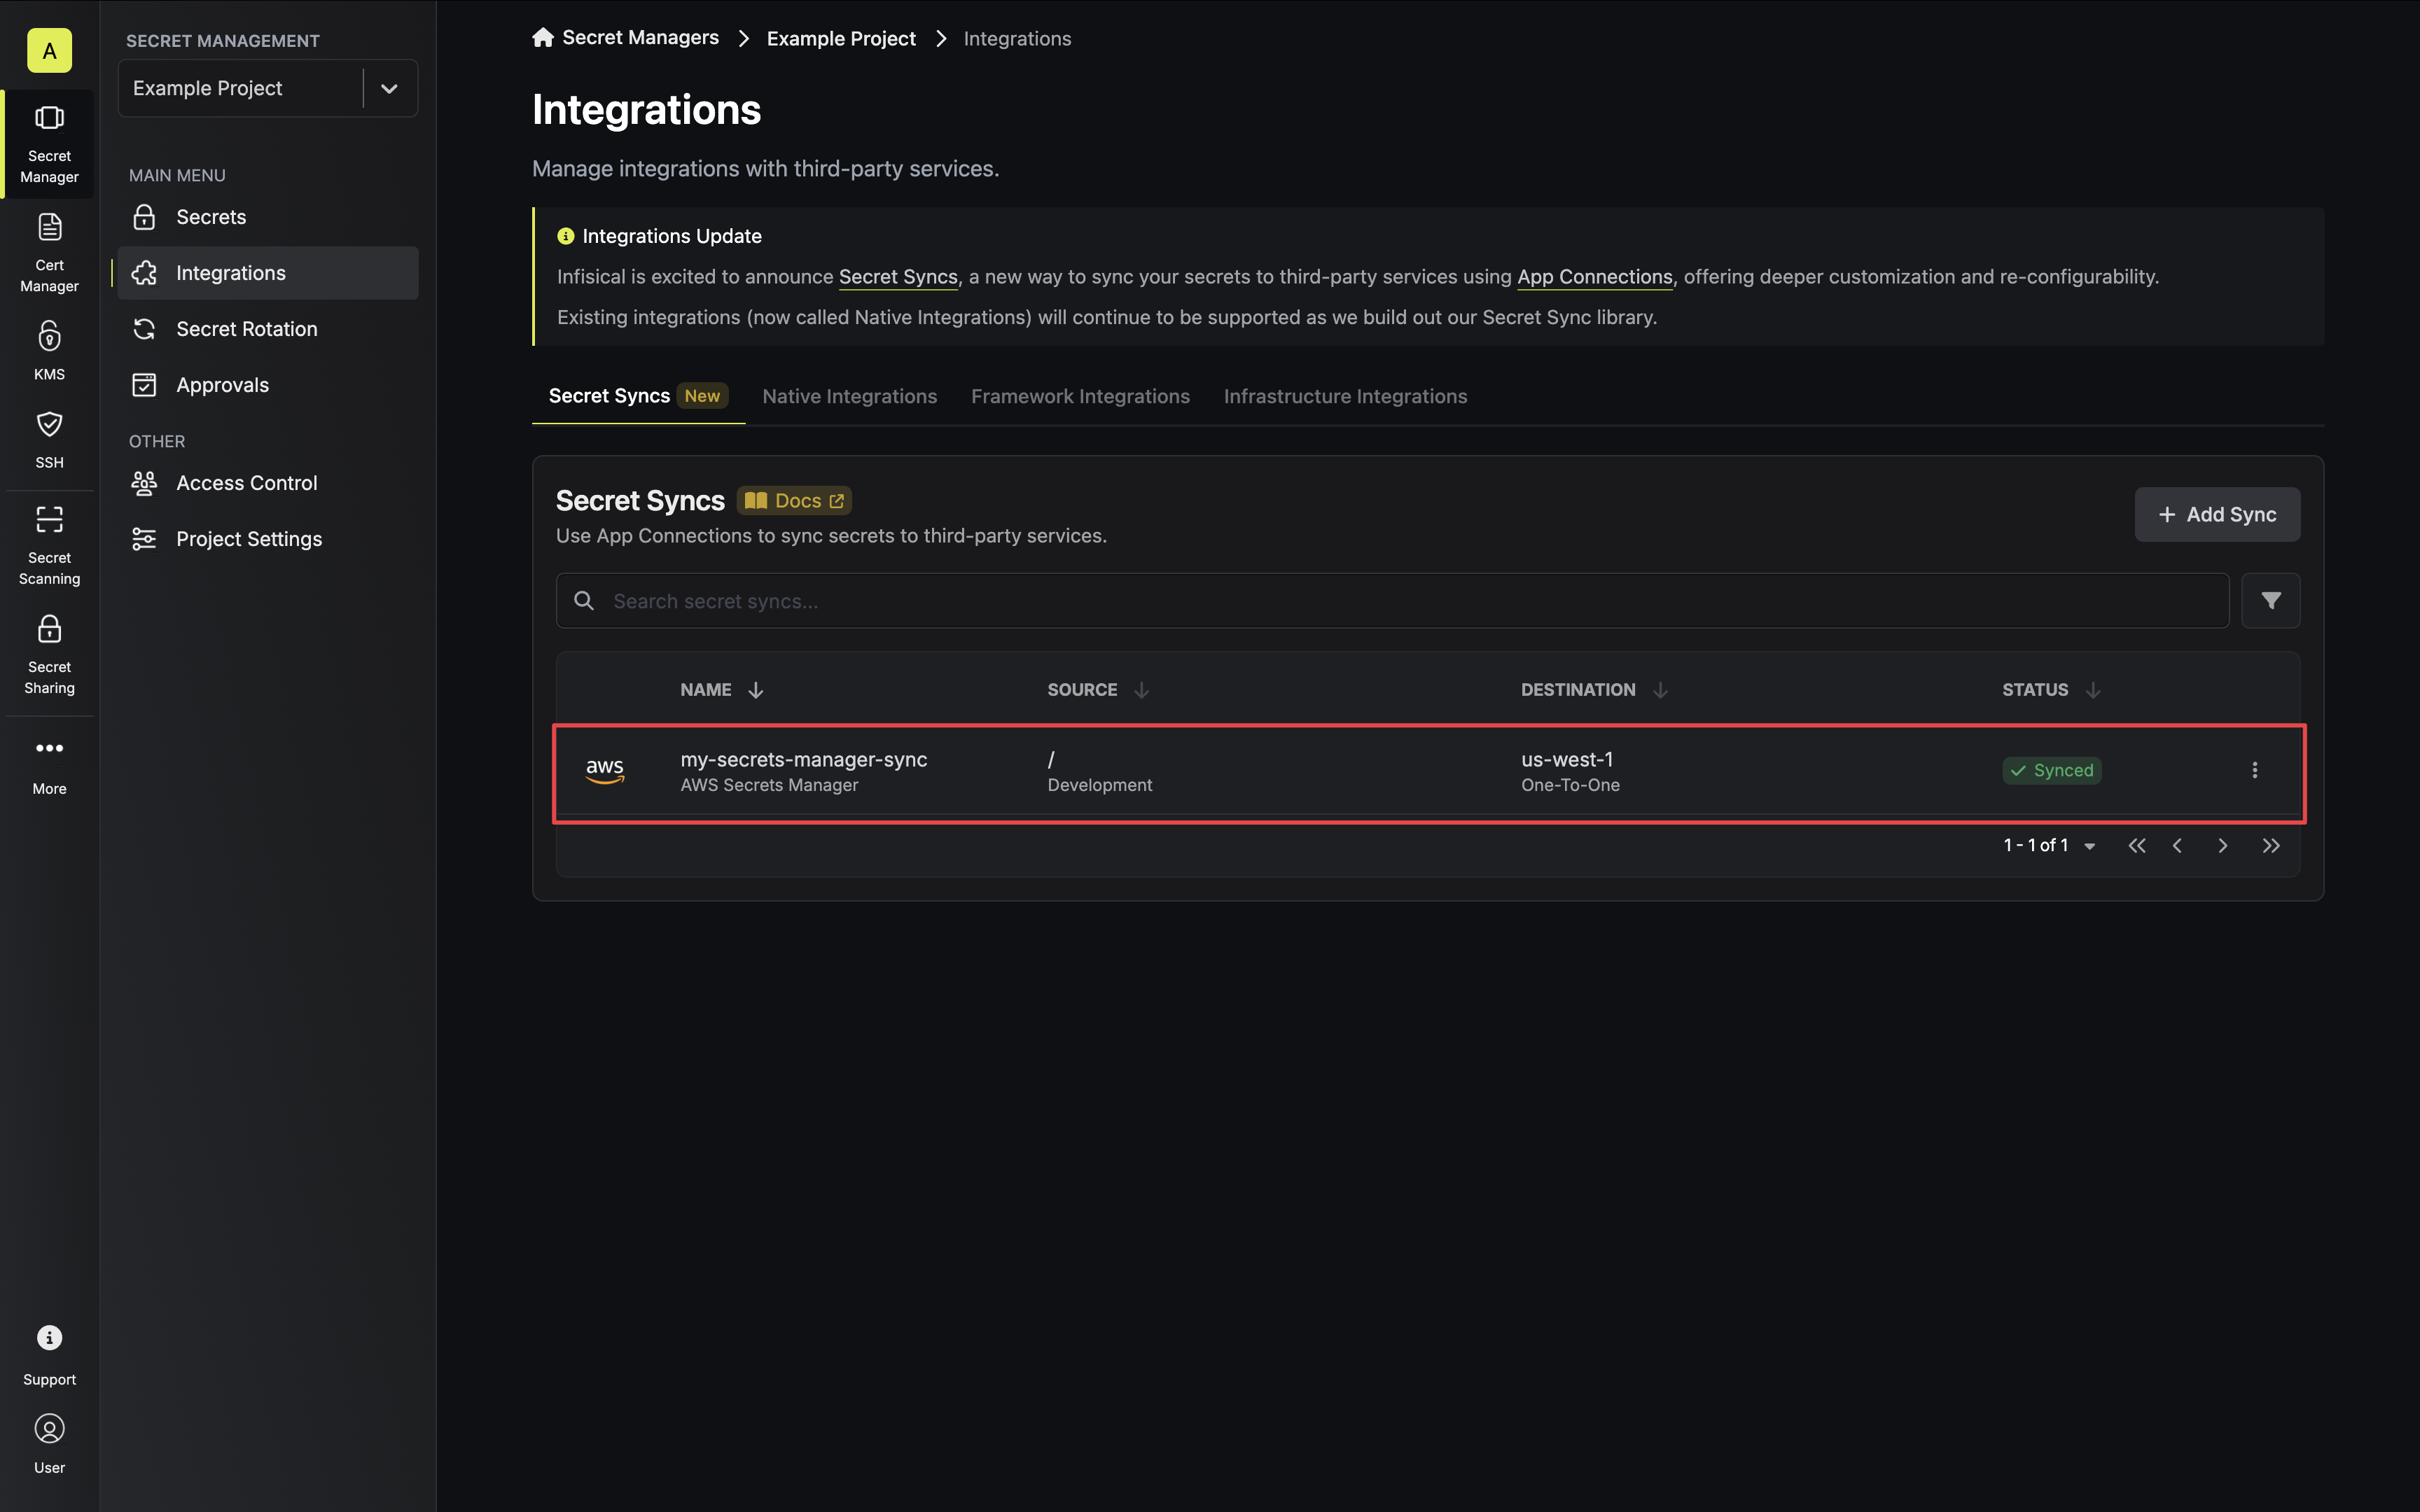
8. If enabled, your Secrets Manager Sync will begin syncing your secrets to the destination endpoint.
To create an **AWS Secrets Manager Sync**, make an API request to the [Create AWS
Secrets Manager Sync](/api-reference/endpoints/secret-syncs/aws-secrets-manager/create) API endpoint.
### Sample request
```bash Request
curl --request POST \
--url https://app.infisical.com/api/v1/secret-syncs/aws-secrets-manager \
--header 'Content-Type: application/json' \
--data '{
"name": "my-secrets-manager-sync",
"projectId": "3c90c3cc-0d44-4b50-8888-8dd25736052a",
"description": "an example sync",
"connectionId": "3c90c3cc-0d44-4b50-8888-8dd25736052a",
"environment": "dev",
"secretPath": "/my-secrets",
"isEnabled": true,
"syncOptions": {
"initialSyncBehavior": "overwrite-destination"
},
"destinationConfig": {
"region": "us-east-1",
"mappingBehavior": "one-to-one"
}
}'
```
### Sample response
```bash Response
{
"secretSync": {
"id": "3c90c3cc-0d44-4b50-8888-8dd25736052a",
"name": "my-secrets-manager-sync",
"description": "an example sync",
"isEnabled": true,
"version": 1,
"folderId": "3c90c3cc-0d44-4b50-8888-8dd25736052a",
"connectionId": "3c90c3cc-0d44-4b50-8888-8dd25736052a",
"createdAt": "2023-11-07T05:31:56Z",
"updatedAt": "2023-11-07T05:31:56Z",
"syncStatus": "succeeded",
"lastSyncJobId": "123",
"lastSyncMessage": null,
"lastSyncedAt": "2023-11-07T05:31:56Z",
"importStatus": null,
"lastImportJobId": null,
"lastImportMessage": null,
"lastImportedAt": null,
"removeStatus": null,
"lastRemoveJobId": null,
"lastRemoveMessage": null,
"lastRemovedAt": null,
"syncOptions": {
"initialSyncBehavior": "overwrite-destination"
},
"projectId": "3c90c3cc-0d44-4b50-8888-8dd25736052a",
"connection": {
"app": "aws",
"name": "my-aws-connection",
"id": "3c90c3cc-0d44-4b50-8888-8dd25736052a"
},
"environment": {
"slug": "dev",
"name": "Development",
"id": "3c90c3cc-0d44-4b50-8888-8dd25736052a"
},
"folder": {
"id": "3c90c3cc-0d44-4b50-8888-8dd25736052a",
"path": "/my-secrets"
},
"destination": "aws-secrets-manager",
"destinationConfig": {
"region": "us-east-1",
"mappingBehavior": "one-to-one"
}
}
}
```
# Azure App Configuration Sync
Source: https://infisical.com/docs/integrations/secret-syncs/azure-app-configuration
Learn how to configure an Azure App Configuration Sync for Infisical.
**Prerequisites:**
* Set up and add secrets to [Infisical Cloud](https://app.infisical.com)
* Create a [Azure Connection](/integrations/app-connections/azure), configured for Azure App Configuration.
The Azure App Configuration Secret Sync requires the following permissions to be set on the user / service principal
for Infisical to sync secrets to Azure App Configuration: `Read Key-Value`, `Write Key-Value`, `Delete Key-Value`.
Any role with these permissions would work such as the **App Configuration Data Owner** role. Alternatively, you can use the **App Configuration Data Contributor** role for read/write access.
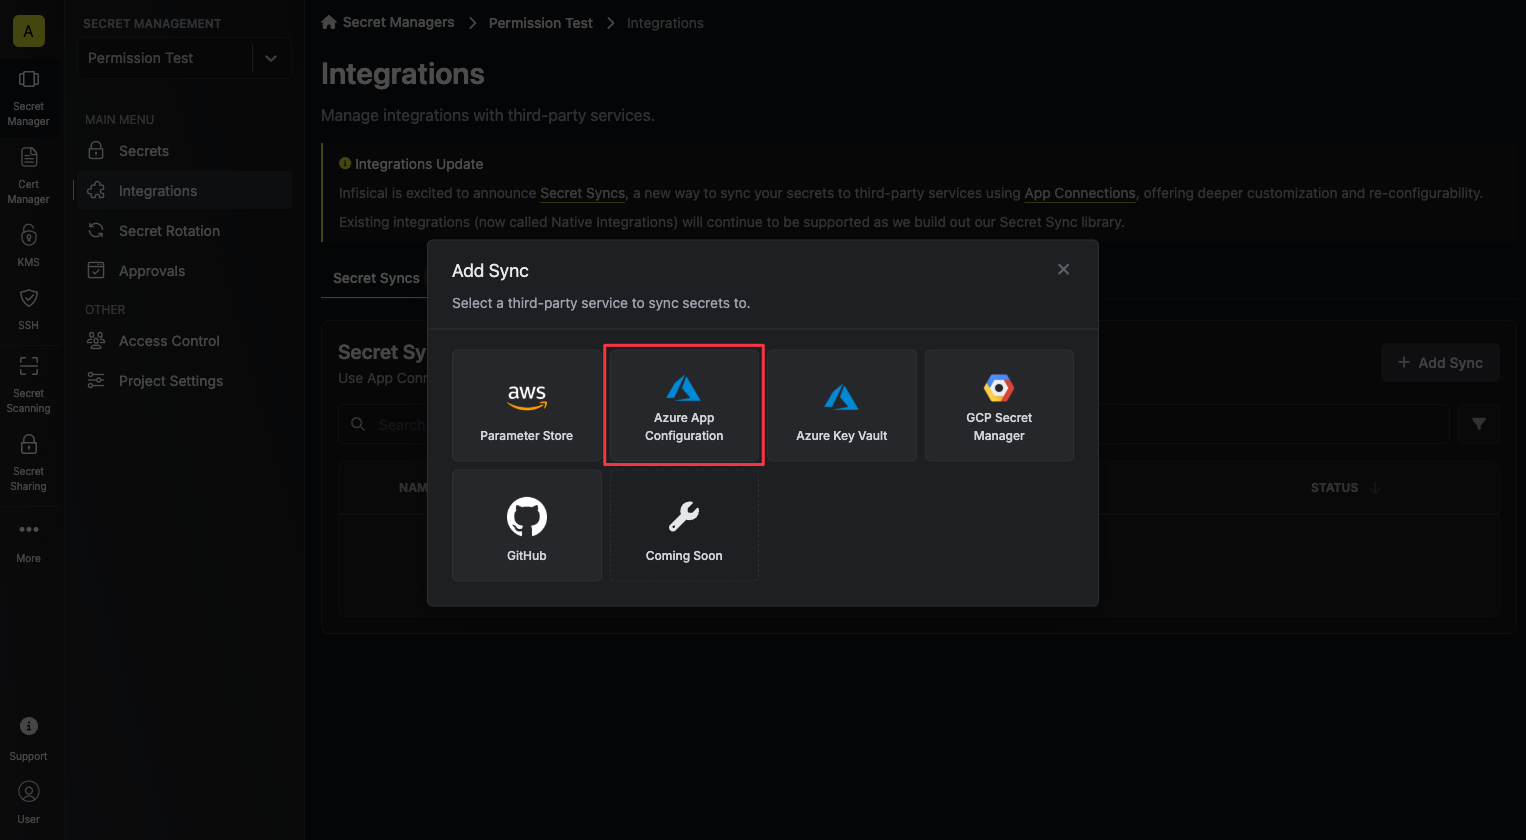
1. Navigate to **Project** > **Integrations** and select the **Secret Syncs** tab. Click on the **Add Sync** button.

2. Select the **Azure App Configuration** option.
3. Configure the **Source** from where secrets should be retrieved, then click **Next**.
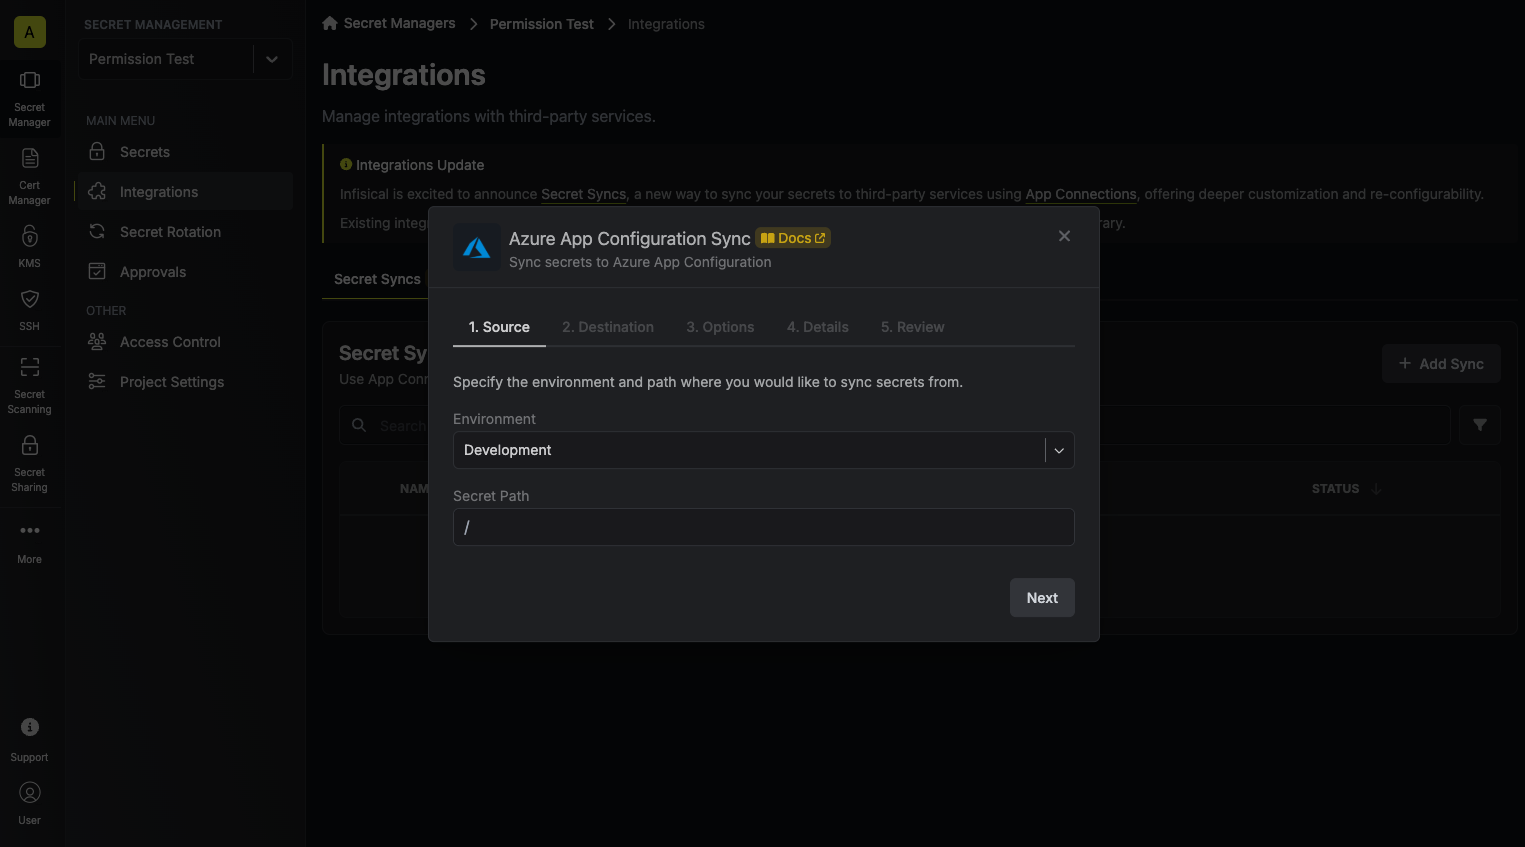
* **Environment**: The project environment to retrieve secrets from.
* **Secret Path**: The folder path to retrieve secrets from.
If you need to sync secrets from multiple folder locations, check out [secret imports](/documentation/platform/secret-reference#secret-imports).
4. Configure the **Destination** to where secrets should be deployed, then click **Next**.
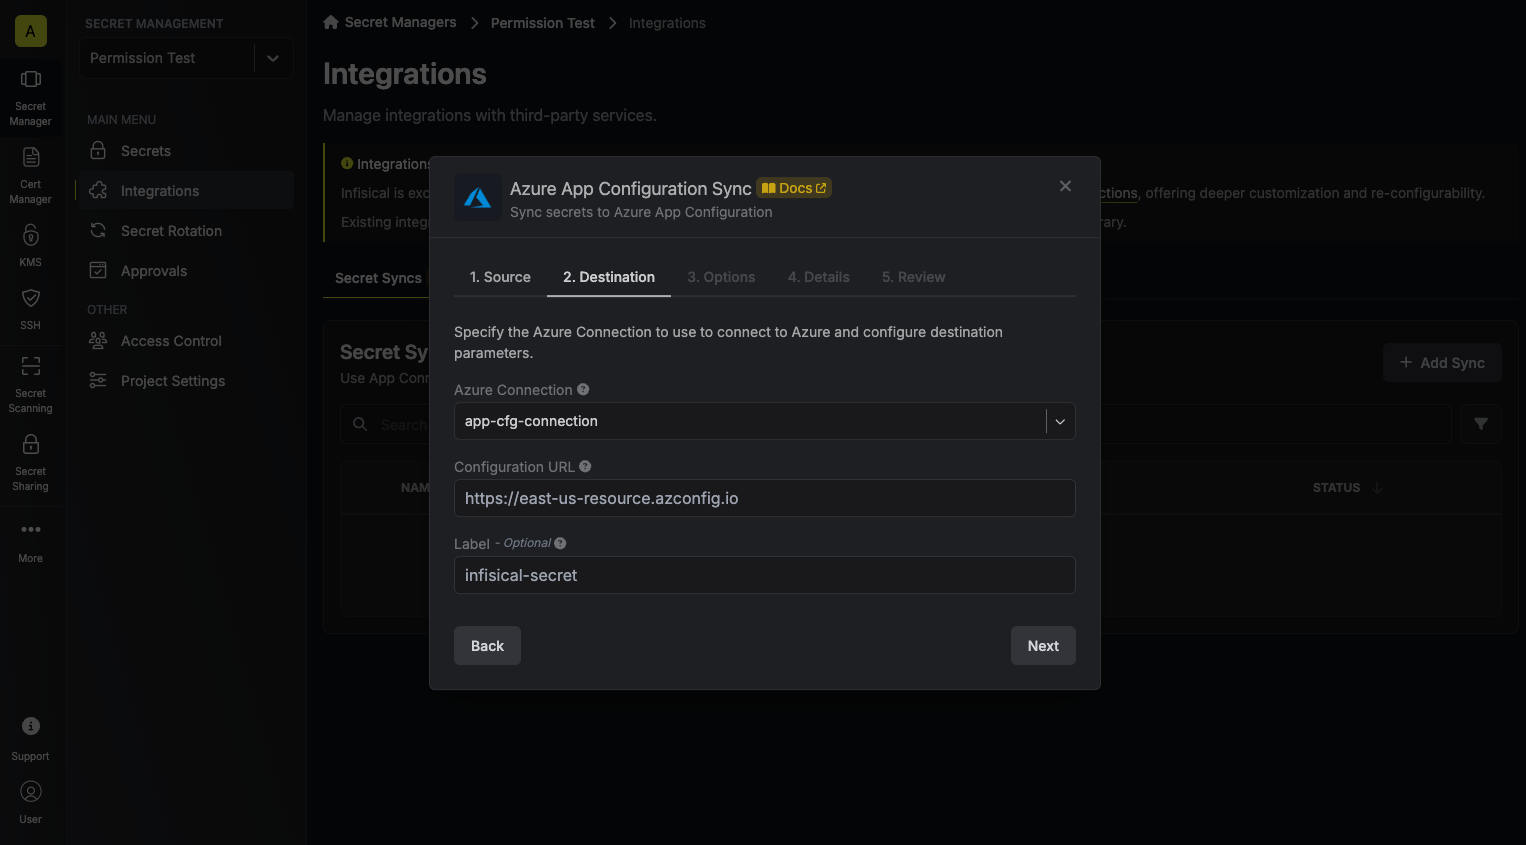
* **Azure Connection**: The Azure Connection to authenticate with.
* **Configuration URL**: The URL of your Azure App Configuration.
* **Label**: An optional label to attach to all secrets created by Infisical inside your Azure App Configuration.
5. Configure the **Sync Options** to specify how secrets should be synced, then click **Next**.
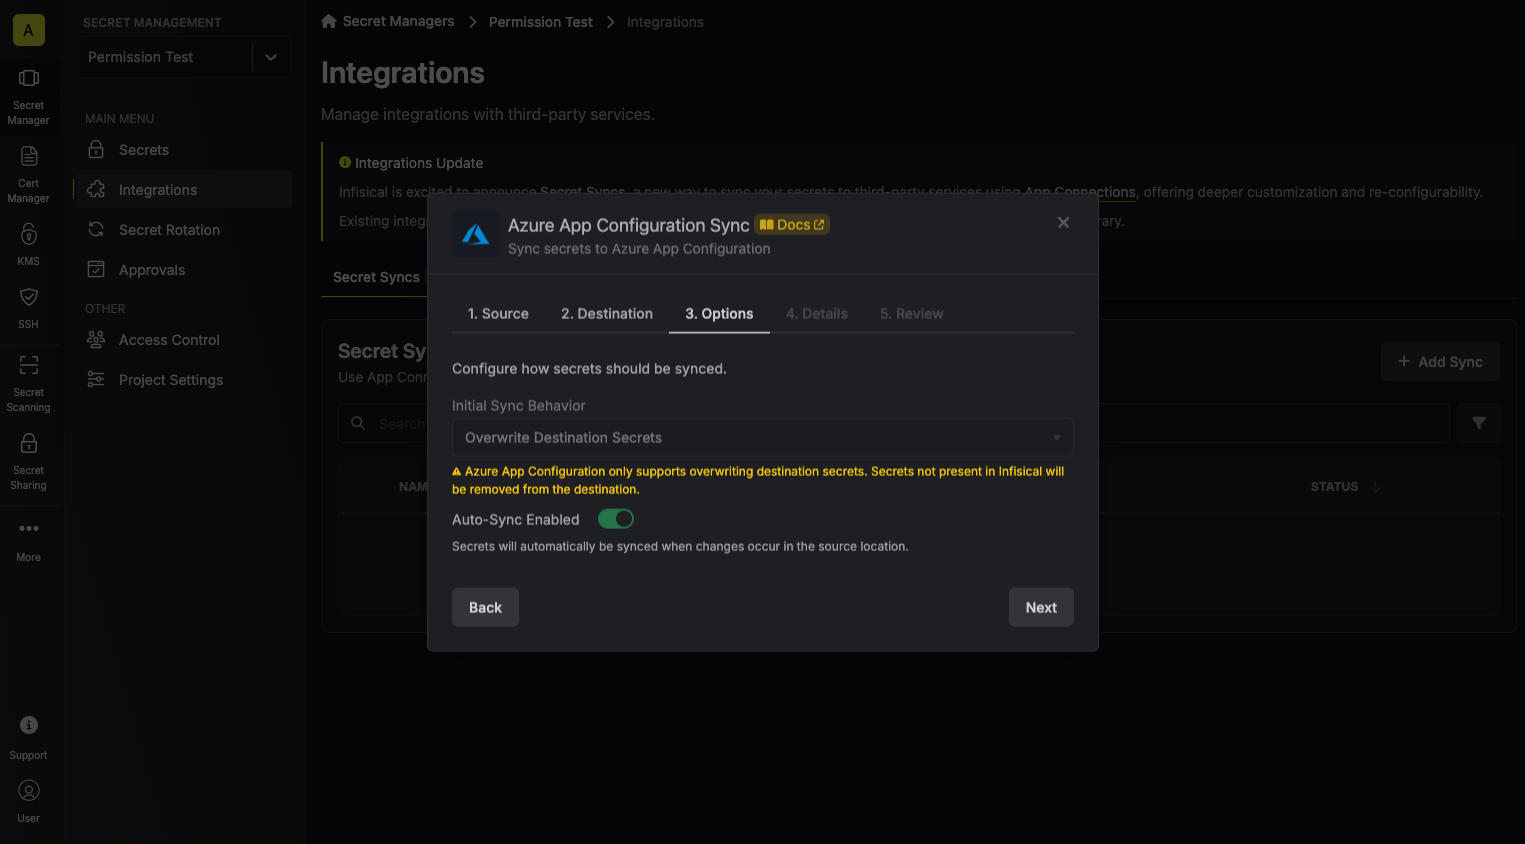
* **Initial Sync Behavior**: Determines how Infisical should resolve the initial sync.
* **Overwrite Destination Secrets**: Removes any secrets at the destination endpoint not present in Infisical.
* **Import Secrets (Prioritize Infisical)**: Imports secrets from the destination endpoint before syncing, prioritizing values from Infisical over Secrets Manager when keys conflict.
* **Import Secrets (Prioritize Azure App Configuration)**: Imports secrets from the destination endpoint before syncing, prioritizing values from Secrets Manager over Infisical when keys conflict.
* **Auto-Sync Enabled**: If enabled, secrets will automatically be synced from the source location when changes occur. Disable to enforce manual syncing only.
6. Configure the **Details** of your Azure App Configuration Sync, then click **Next**.
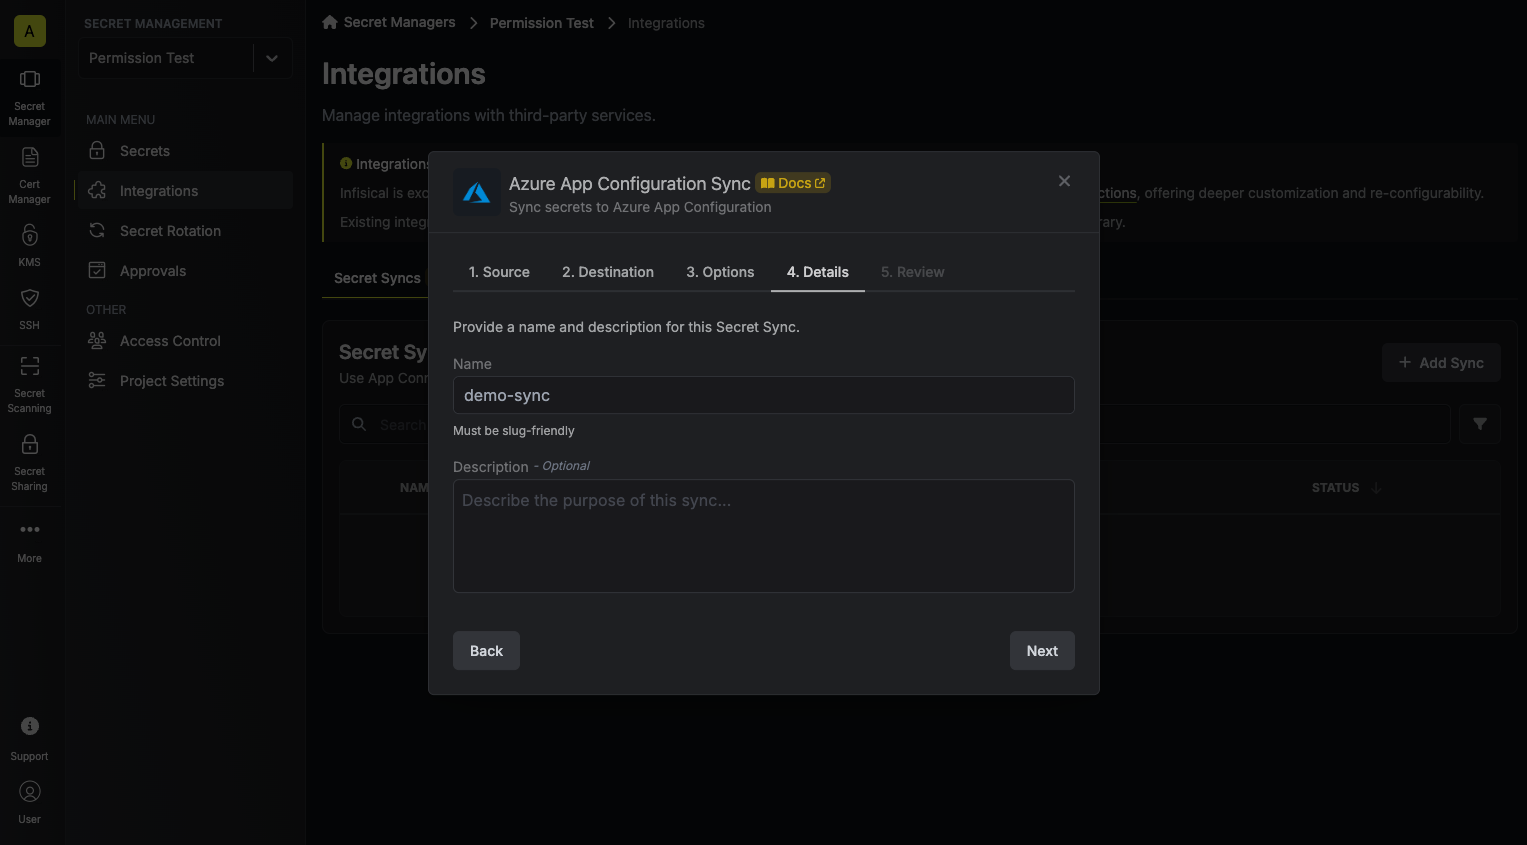
* **Name**: The name of your sync. Must be slug-friendly.
* **Description**: An optional description for your sync.
7. Review your Azure App Configuration Sync configuration, then click **Create Sync**.
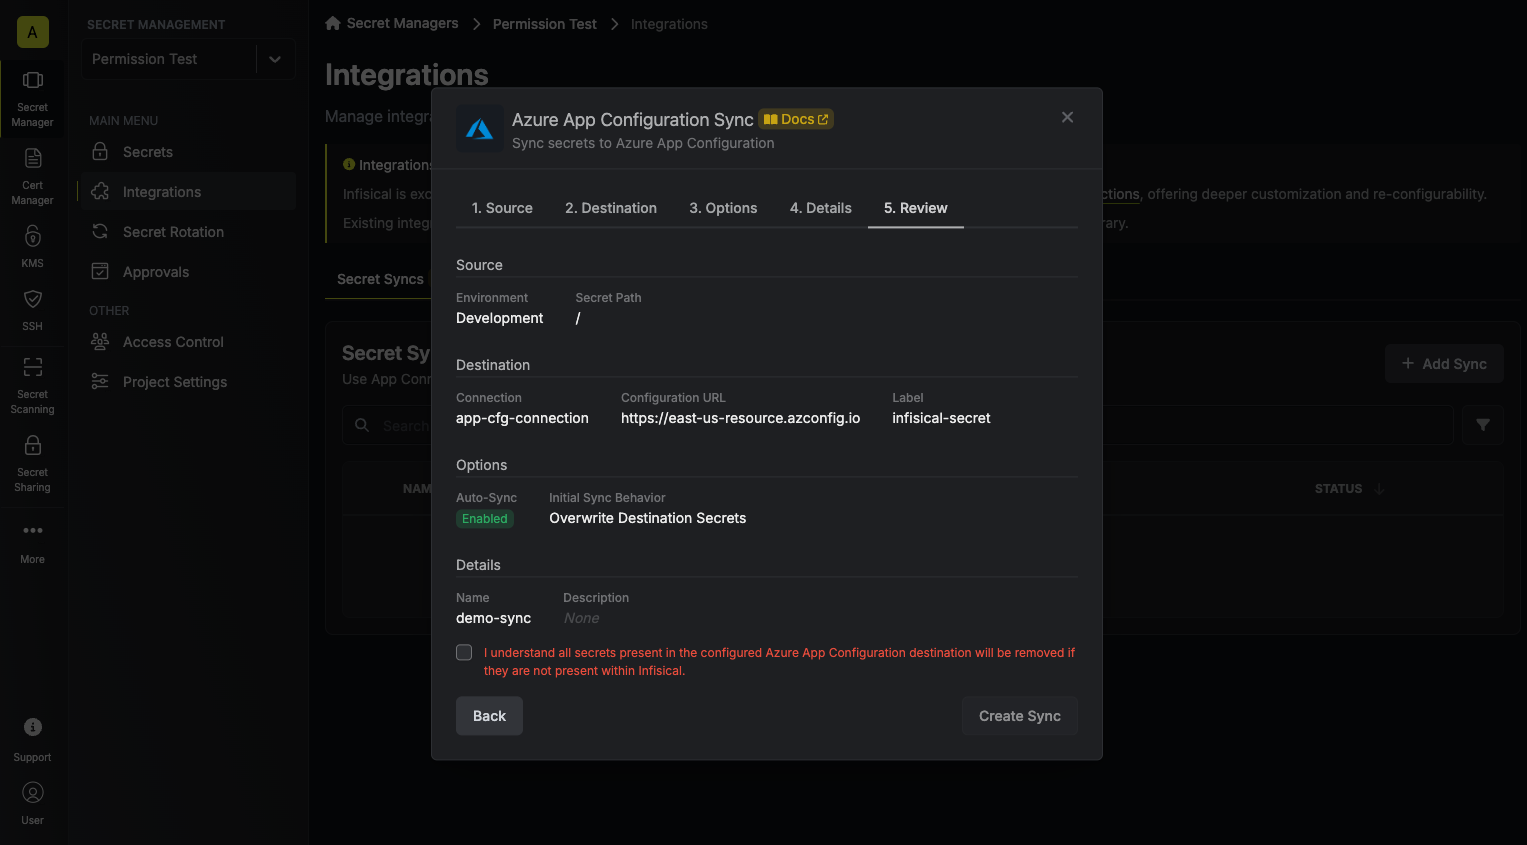
8. If enabled, your Azure App Configuration Sync will begin syncing your secrets to the destination endpoint.
To create an **Azure App Configuration Sync**, make an API request to the [Create Azure App Configuration Sync](/api-reference/endpoints/secret-syncs/azure-app-configuration/create) API endpoint.
### Sample request
```bash Request
curl --request POST \
--url https://app.infisical.com/api/v1/secret-syncs/azure-app-configuration \
--header 'Content-Type: application/json' \
--data '{
"name": "my-azure-app-configuration-sync",
"projectId": "3c90c3cc-0d44-4b50-8888-8dd25736052a",
"description": "an example sync",
"connectionId": "3c90c3cc-0d44-4b50-8888-8dd25736052a",
"environment": "dev",
"secretPath": "/my-secrets",
"isEnabled": true,
"syncOptions": {
"initialSyncBehavior": "overwrite-destination"
},
"destinationConfig": {
"configurationUrl": "https://my-azure-app-configuration.azconfig.io",
"label": "my-label"
}
}'
```
### Sample response
```json Response
{
"secretSync": {
"id": "3c90c3cc-0d44-4b50-8888-8dd25736052a",
"name": "my-azure-app-configuration-sync",
"description": "an example sync",
"isEnabled": true,
"version": 1,
"folderId": "3c90c3cc-0d44-4b50-8888-8dd25736052a",
"connectionId": "3c90c3cc-0d44-4b50-8888-8dd25736052a",
"createdAt": "2023-11-07T05:31:56Z",
"updatedAt": "2023-11-07T05:31:56Z",
"syncStatus": "succeeded",
"lastSyncJobId": "123",
"lastSyncMessage": null,
"lastSyncedAt": "2023-11-07T05:31:56Z",
"importStatus": null,
"lastImportJobId": null,
"lastImportMessage": null,
"lastImportedAt": null,
"removeStatus": null,
"lastRemoveJobId": null,
"lastRemoveMessage": null,
"lastRemovedAt": null,
"syncOptions": {
"initialSyncBehavior": "overwrite-destination"
},
"projectId": "3c90c3cc-0d44-4b50-8888-8dd25736052a",
"connection": {
"app": "azure",
"name": "my-azure-connection",
"id": "3c90c3cc-0d44-4b50-8888-8dd25736052a"
},
"environment": {
"slug": "dev",
"name": "Development",
"id": "3c90c3cc-0d44-4b50-8888-8dd25736052a"
},
"folder": {
"id": "3c90c3cc-0d44-4b50-8888-8dd25736052a",
"path": "/my-secrets"
},
"destination": "azure-app-configuration",
"destinationConfig": {
"configurationUrl": "https://my-azure-app-configuration.azconfig.io",
"label": "my-label"
}
}
}
```
# Azure Key Vault Sync
Source: https://infisical.com/docs/integrations/secret-syncs/azure-key-vault
Learn how to configure a Azure Key Vault Sync for Infisical.
**Prerequisites:**
* Set up and add secrets to [Infisical Cloud](https://app.infisical.com)
* Create a [Azure Connection](/integrations/app-connections/azure), configured for Azure Key Vault.
The Azure Key Vault Secret Sync requires the following secrets permissions to be set on the user / service principal
for Infisical to sync secrets to Azure Key Vault: `secrets/list`, `secrets/get`, `secrets/set`, `secrets/recover`.
Any role with these permissions would work such as the **Key Vault Secrets Officer** role.
Secrets in Infisical that contain an underscore (`_`) will be converted to a hyphen (`-`) when synced to Azure Key Vault.
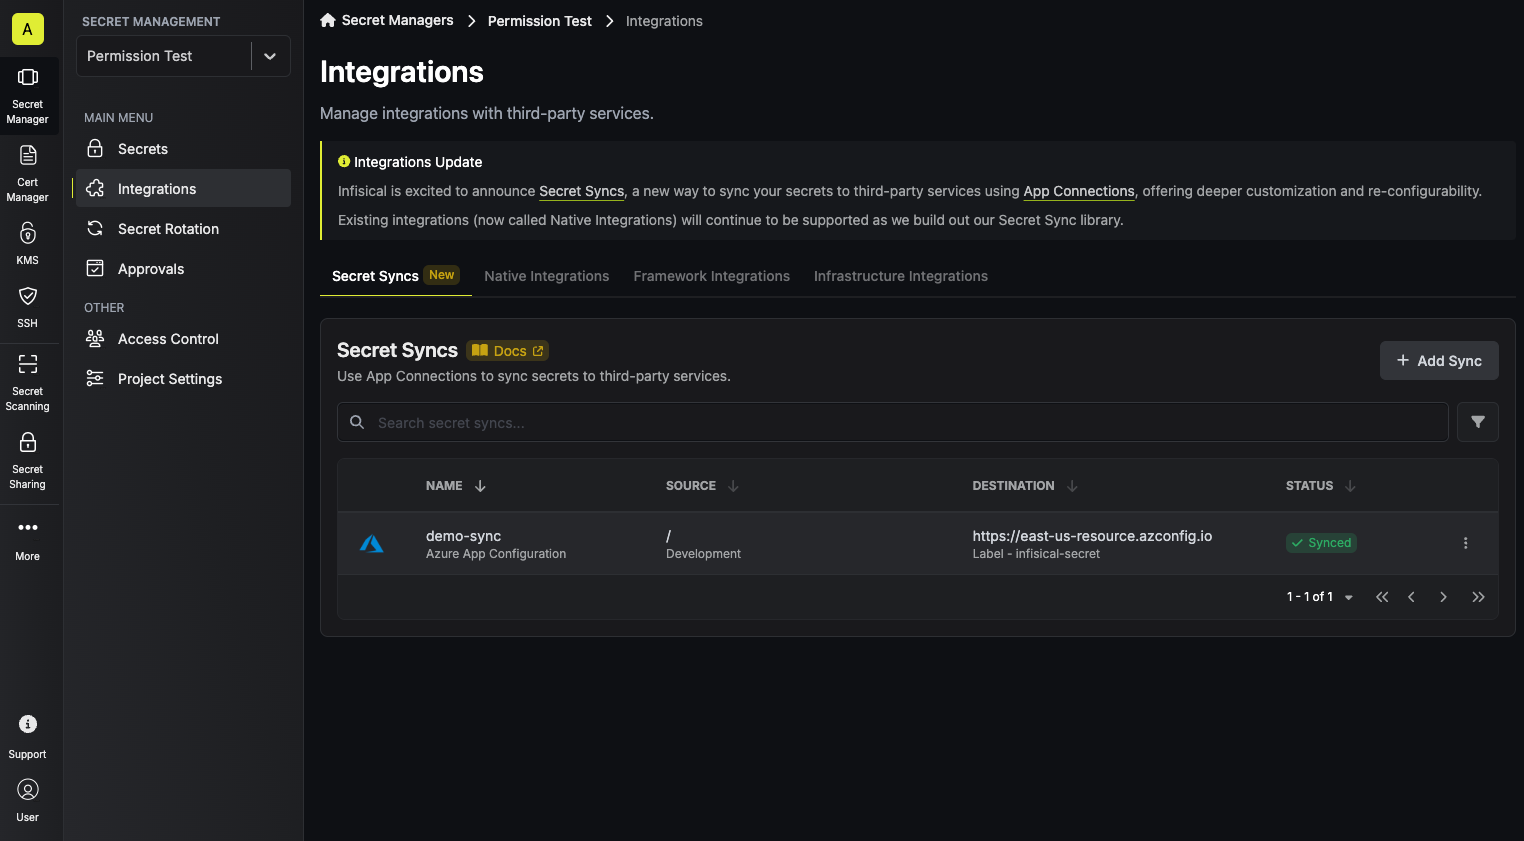
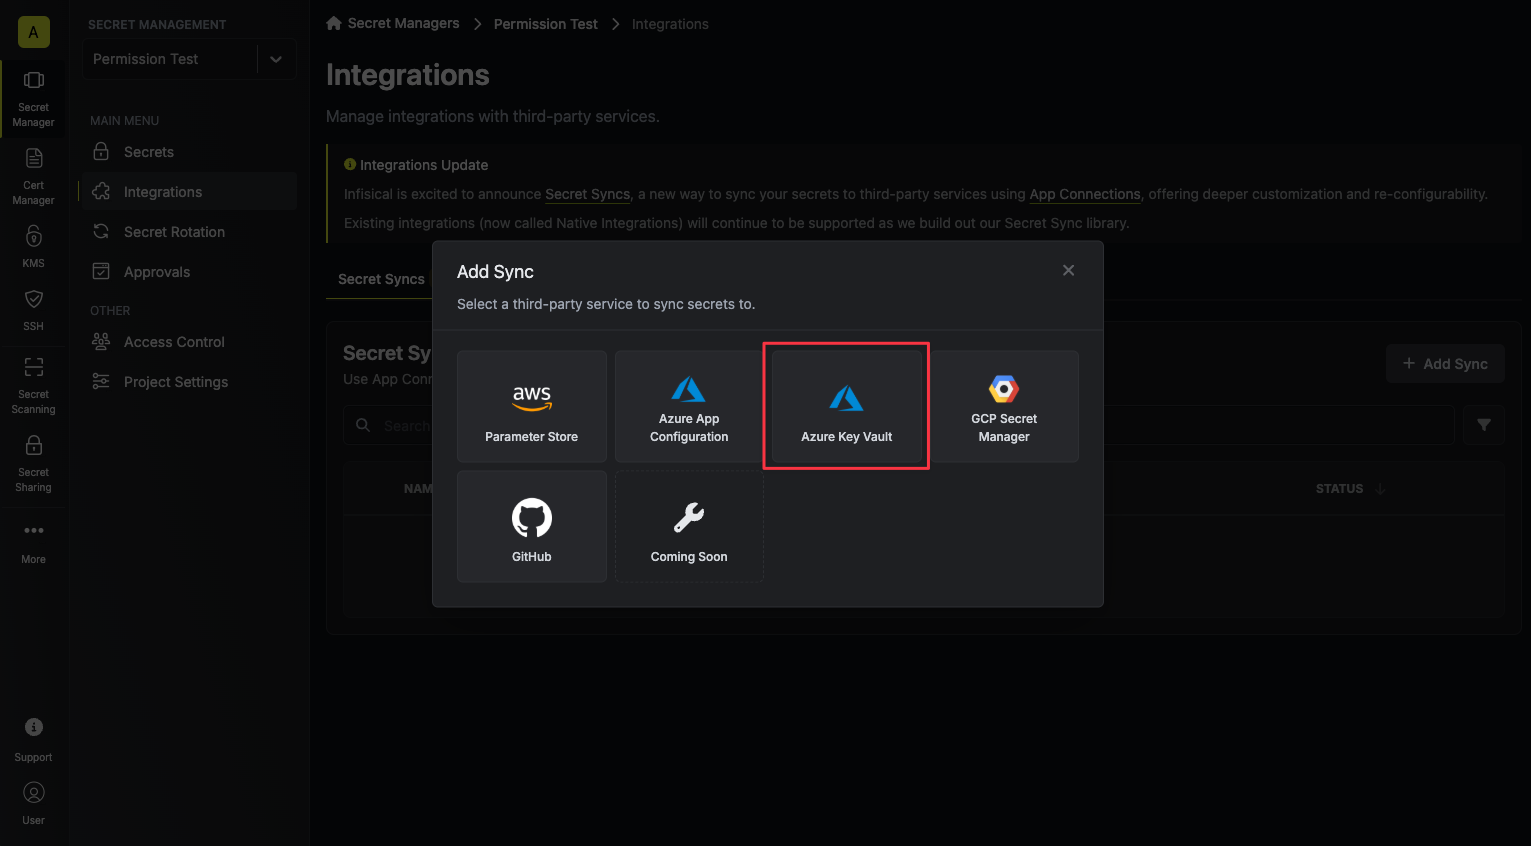
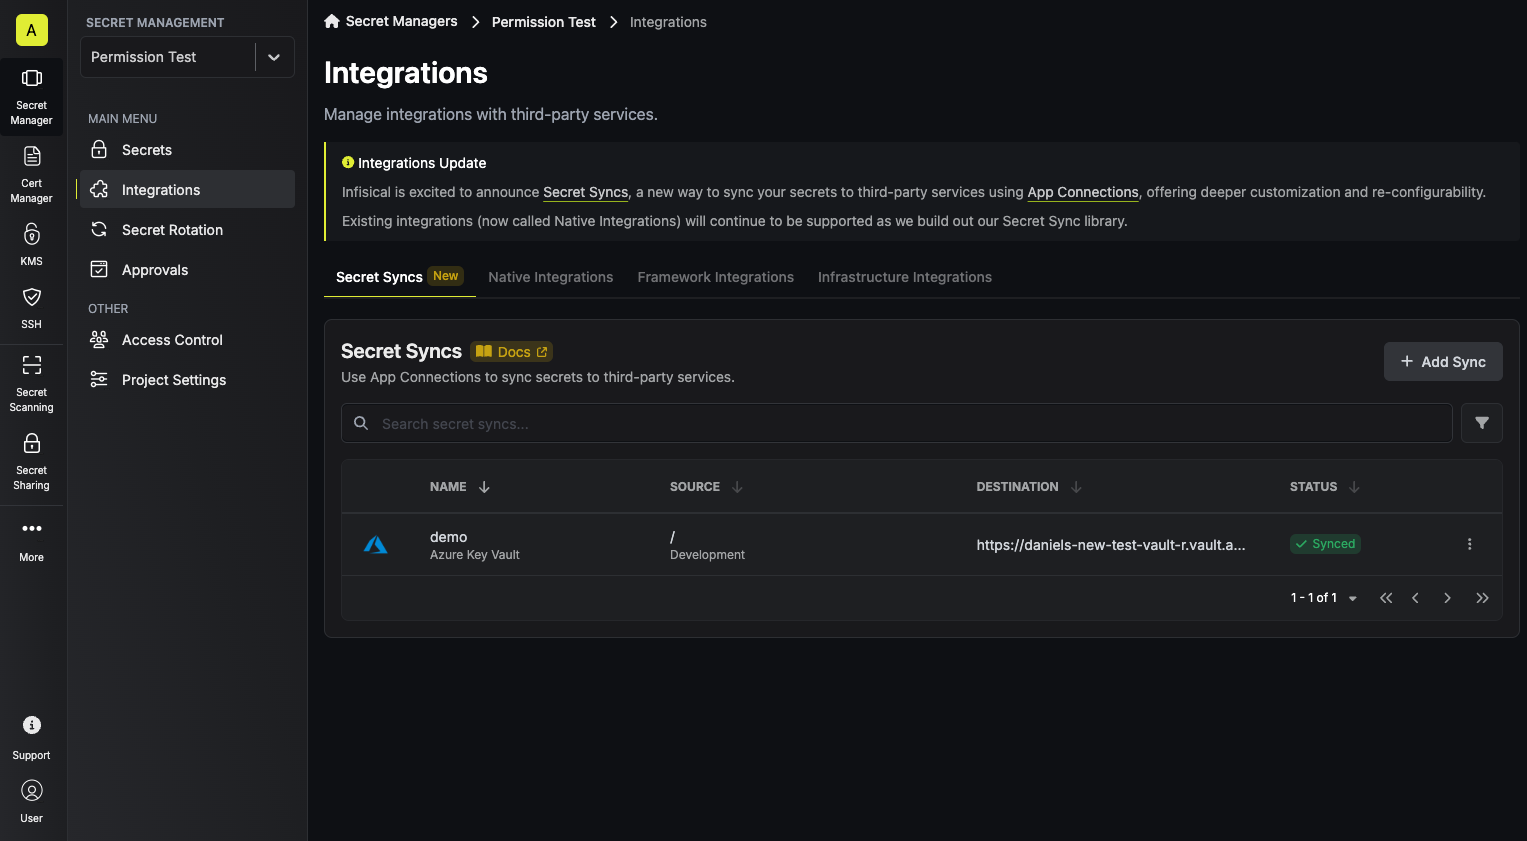
1. Navigate to **Project** > **Integrations** and select the **Secret Syncs** tab. Click on the **Add Sync** button.

2. Select the **Azure Key Vault** option.
3. Configure the **Source** from where secrets should be retrieved, then click **Next**.
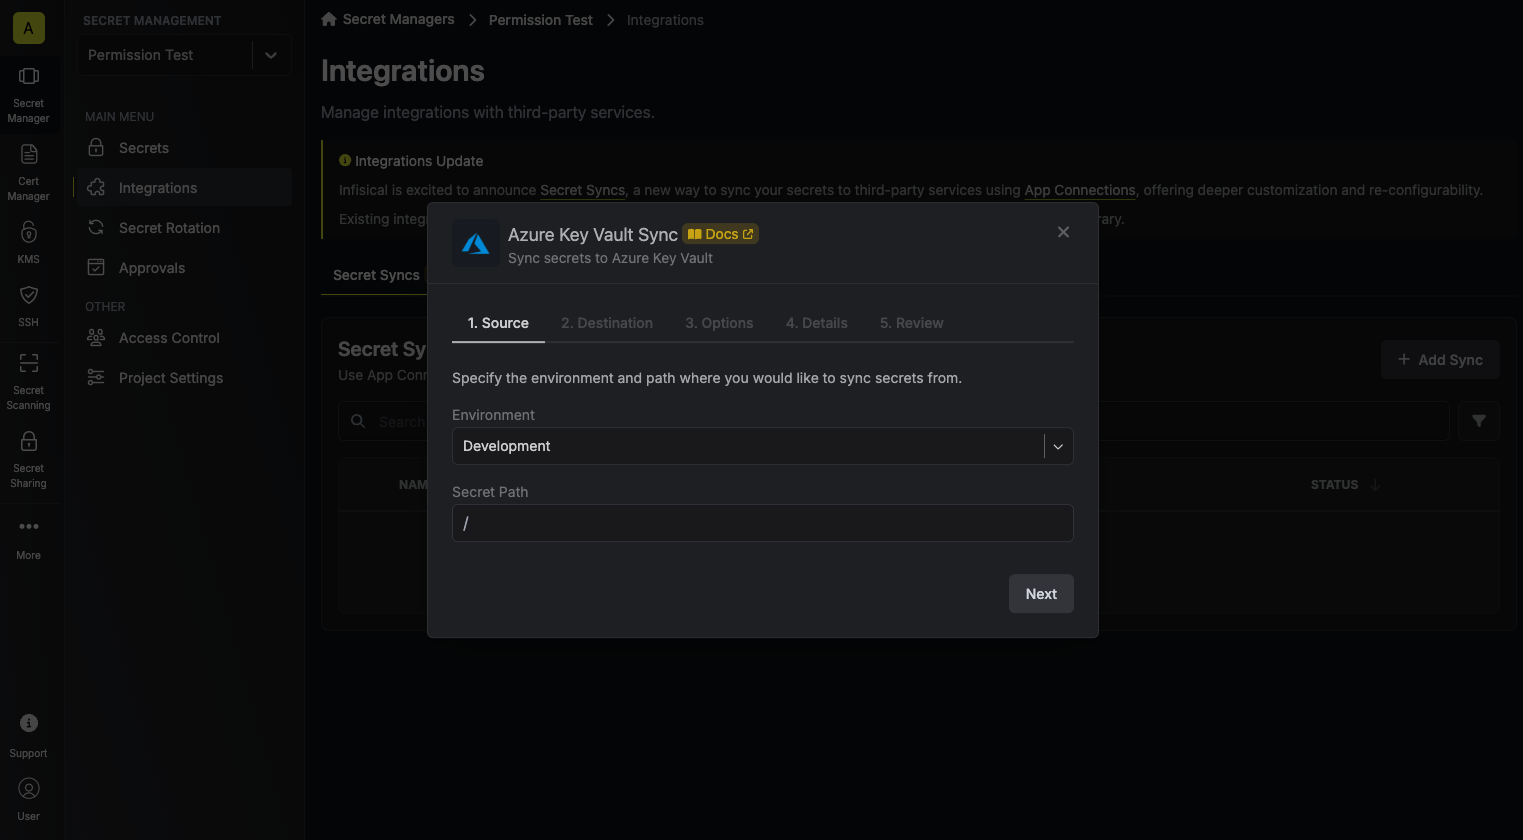
* **Environment**: The project environment to retrieve secrets from.
* **Secret Path**: The folder path to retrieve secrets from.
If you need to sync secrets from multiple folder locations, check out [secret imports](/documentation/platform/secret-reference#secret-imports).
4. Configure the **Destination** to where secrets should be deployed, then click **Next**.
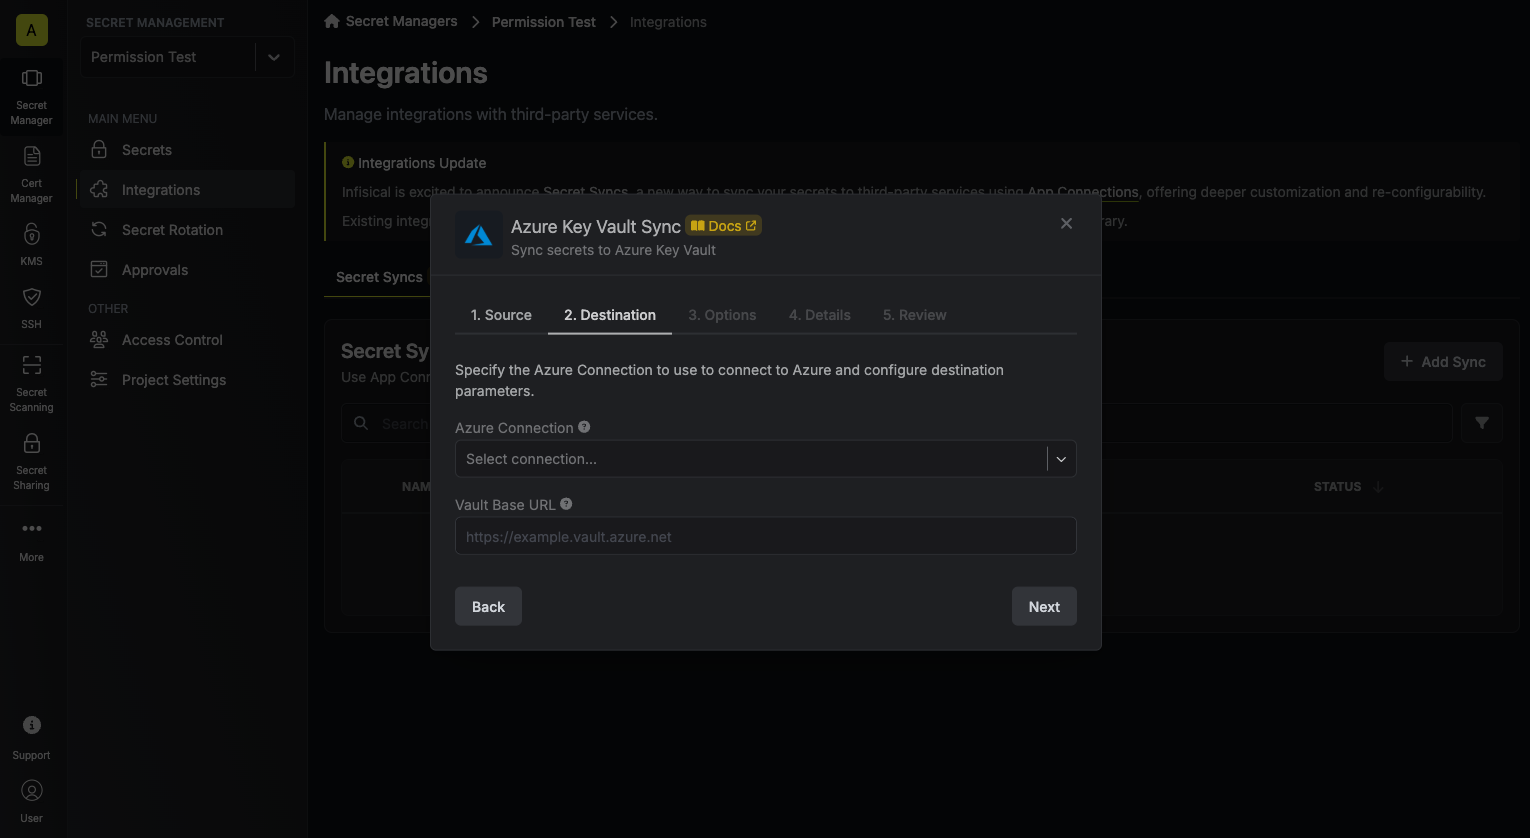
* **Azure Connection**: The Azure Connection to authenticate with.
* **Vault Base URL**: The URL of your Azure Key Vault.
5. Configure the **Sync Options** to specify how secrets should be synced, then click **Next**.
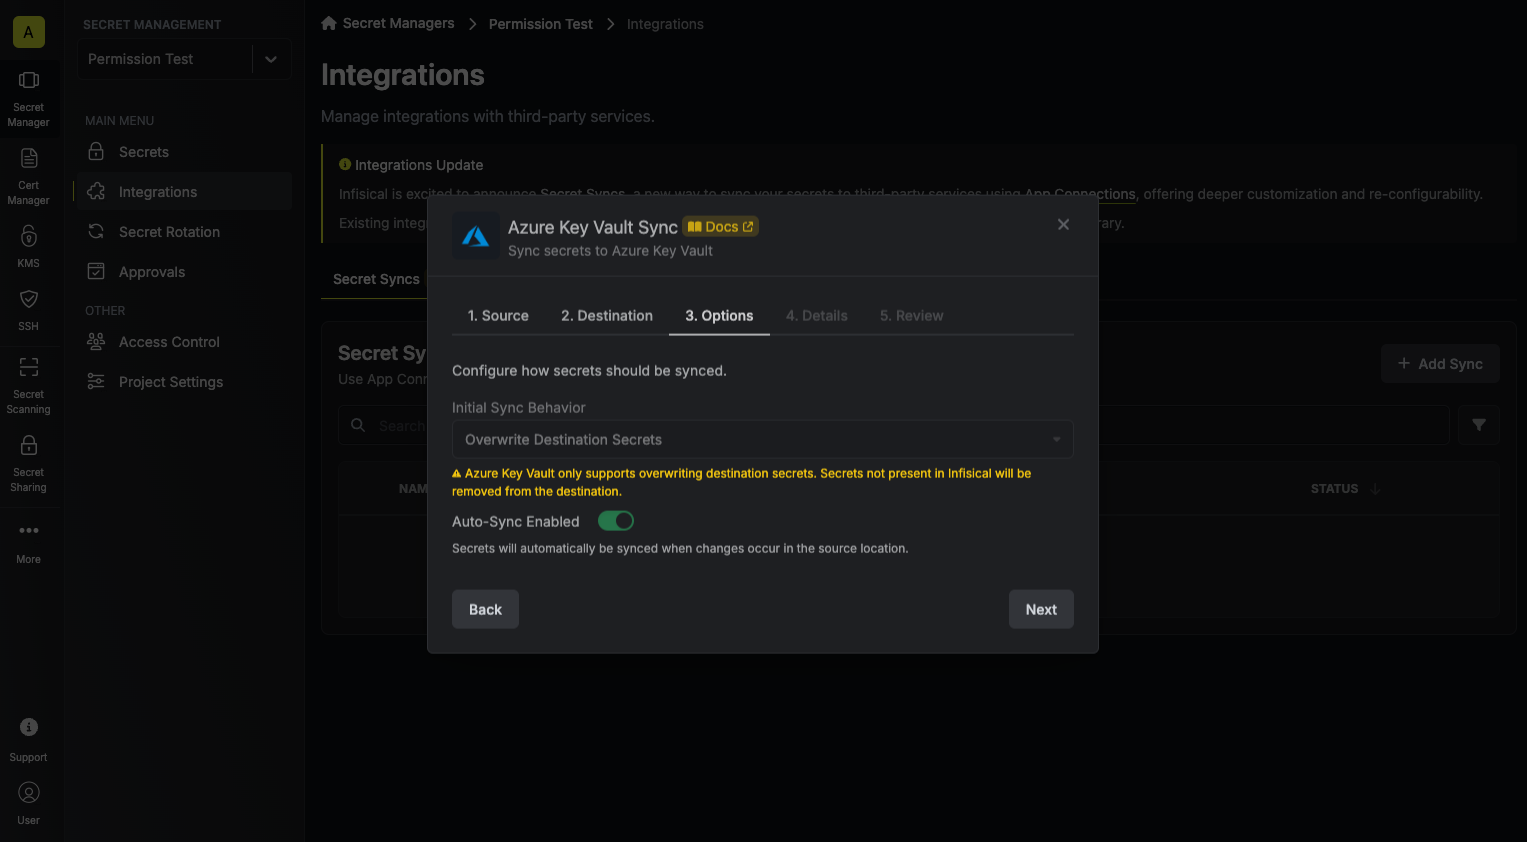
* **Initial Sync Behavior**: Determines how Infisical should resolve the initial sync.
* **Overwrite Destination Secrets**: Removes any secrets at the destination endpoint not present in Infisical.
* **Import Secrets (Prioritize Infisical)**: Imports secrets from the destination endpoint before syncing, prioritizing values from Infisical over Secrets Manager when keys conflict.
* **Import Secrets (Prioritize Azure Key Vault)**: Imports secrets from the destination endpoint before syncing, prioritizing values from Secrets Manager over Infisical when keys conflict.
* **Auto-Sync Enabled**: If enabled, secrets will automatically be synced from the source location when changes occur. Disable to enforce manual syncing only.
6. Configure the **Details** of your Azure Key Vault Sync, then click **Next**.
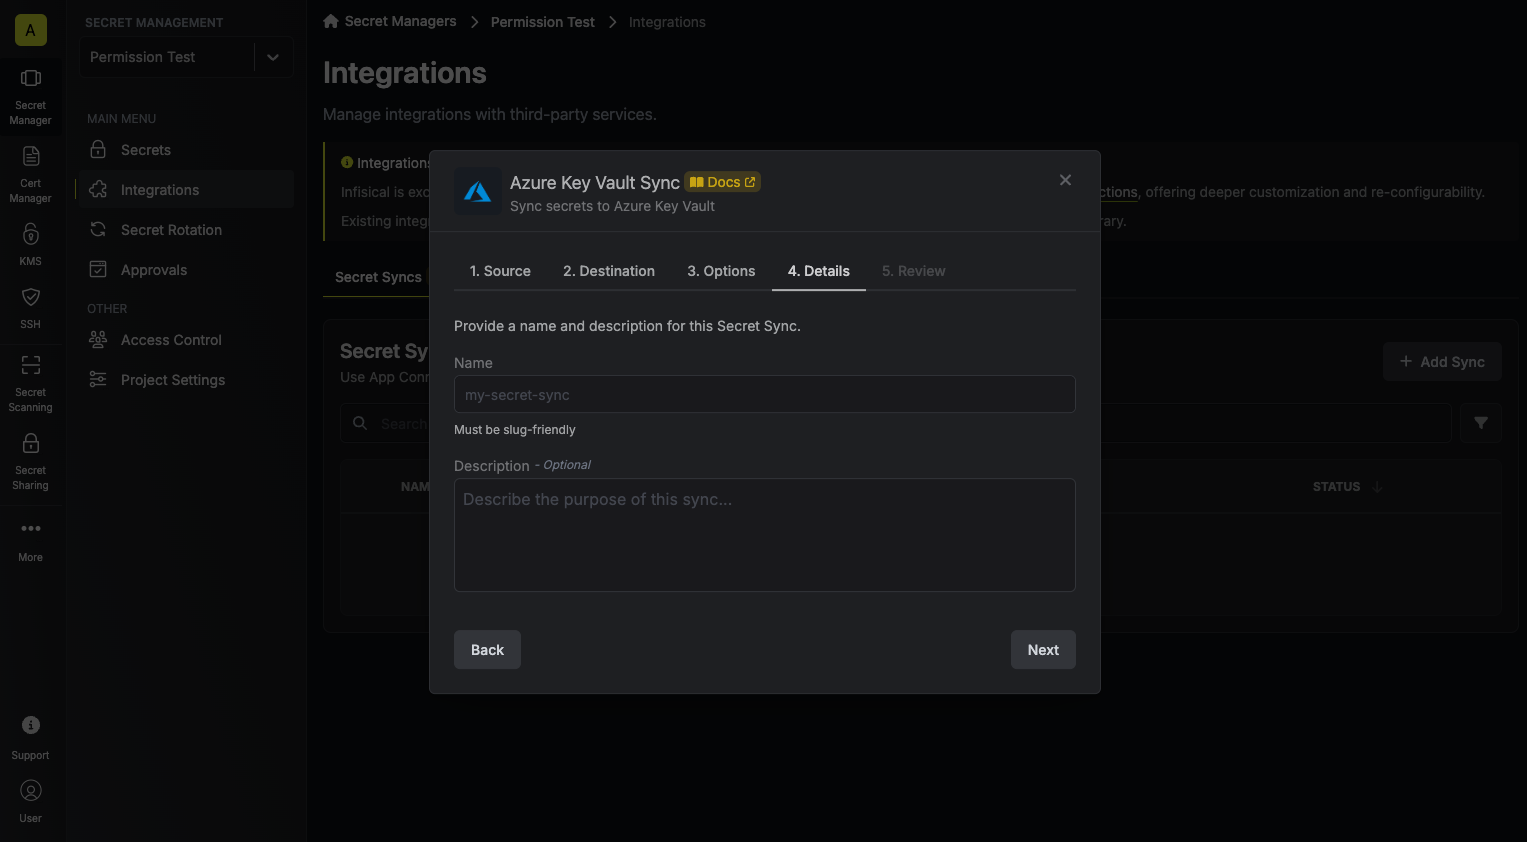
* **Name**: The name of your sync. Must be slug-friendly.
* **Description**: An optional description for your sync.
7. Review your Azure Key Vault Sync configuration, then click **Create Sync**.
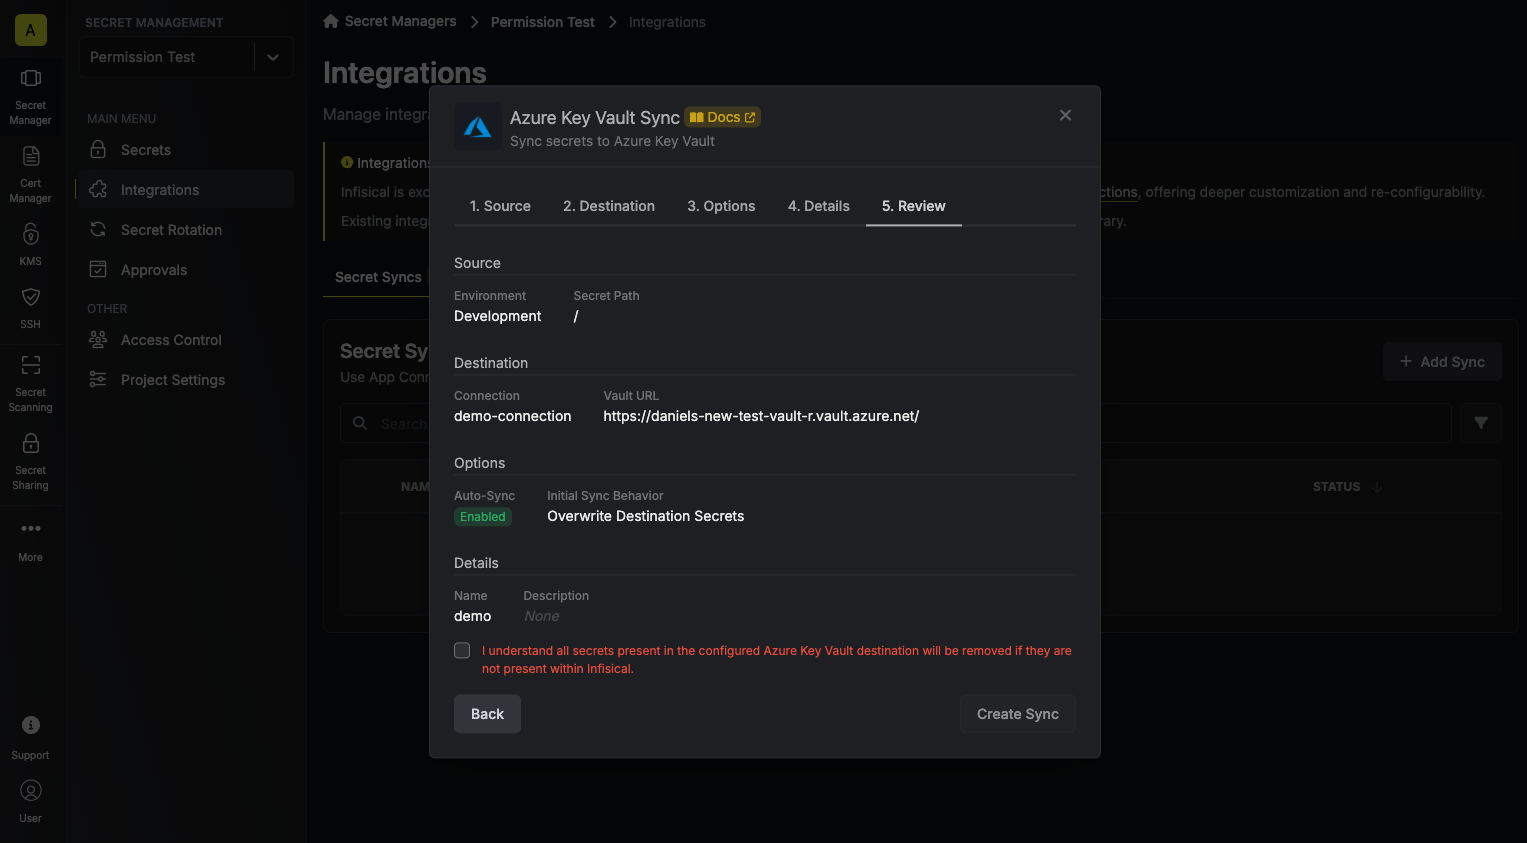
8. If enabled, your Azure Key Vault Sync will begin syncing your secrets to the destination endpoint.
To create a **Azure Key Vault Sync**, make an API request to the [Create Key Vault Sync](/api-reference/endpoints/secret-syncs/azure-key-vault/create) API endpoint.
### Sample request
```bash Request
curl --request POST \
--url https://app.infisical.com/api/v1/secret-syncs/azure-key-vault \
--header 'Content-Type: application/json' \
--data '{
"name": "my-key-vault-sync",
"projectId": "3c90c3cc-0d44-4b50-8888-8dd25736052a",
"description": "an example sync",
"connectionId": "3c90c3cc-0d44-4b50-8888-8dd25736052a",
"environment": "dev",
"secretPath": "/my-secrets",
"isEnabled": true,
"syncOptions": {
"initialSyncBehavior": "overwrite-destination"
},
"destinationConfig": {
"vaultBaseUrl": "https://my-key-vault.vault.azure.net"
}
}'
```
### Sample response
```json Response
{
"secretSync": {
"id": "3c90c3cc-0d44-4b50-8888-8dd25736052a",
"name": "my-key-vault-sync",
"description": "an example sync",
"isEnabled": true,
"version": 1,
"folderId": "3c90c3cc-0d44-4b50-8888-8dd25736052a",
"connectionId": "3c90c3cc-0d44-4b50-8888-8dd25736052a",
"createdAt": "2023-11-07T05:31:56Z",
"updatedAt": "2023-11-07T05:31:56Z",
"syncStatus": "succeeded",
"lastSyncJobId": "123",
"lastSyncMessage": null,
"lastSyncedAt": "2023-11-07T05:31:56Z",
"importStatus": null,
"lastImportJobId": null,
"lastImportMessage": null,
"lastImportedAt": null,
"removeStatus": null,
"lastRemoveJobId": null,
"lastRemoveMessage": null,
"lastRemovedAt": null,
"syncOptions": {
"initialSyncBehavior": "overwrite-destination"
},
"projectId": "3c90c3cc-0d44-4b50-8888-8dd25736052a",
"connection": {
"app": "azure",
"name": "my-azure-key-vault-connection",
"id": "3c90c3cc-0d44-4b50-8888-8dd25736052a"
},
"environment": {
"slug": "dev",
"name": "Development",
"id": "3c90c3cc-0d44-4b50-8888-8dd25736052a"
},
"folder": {
"id": "3c90c3cc-0d44-4b50-8888-8dd25736052a",
"path": "/my-secrets"
},
"destination": "azure-key-vault",
"destinationConfig": {
"vaultBaseUrl": "https://my-key-vault.vault.azure.net"
}
}
}
```
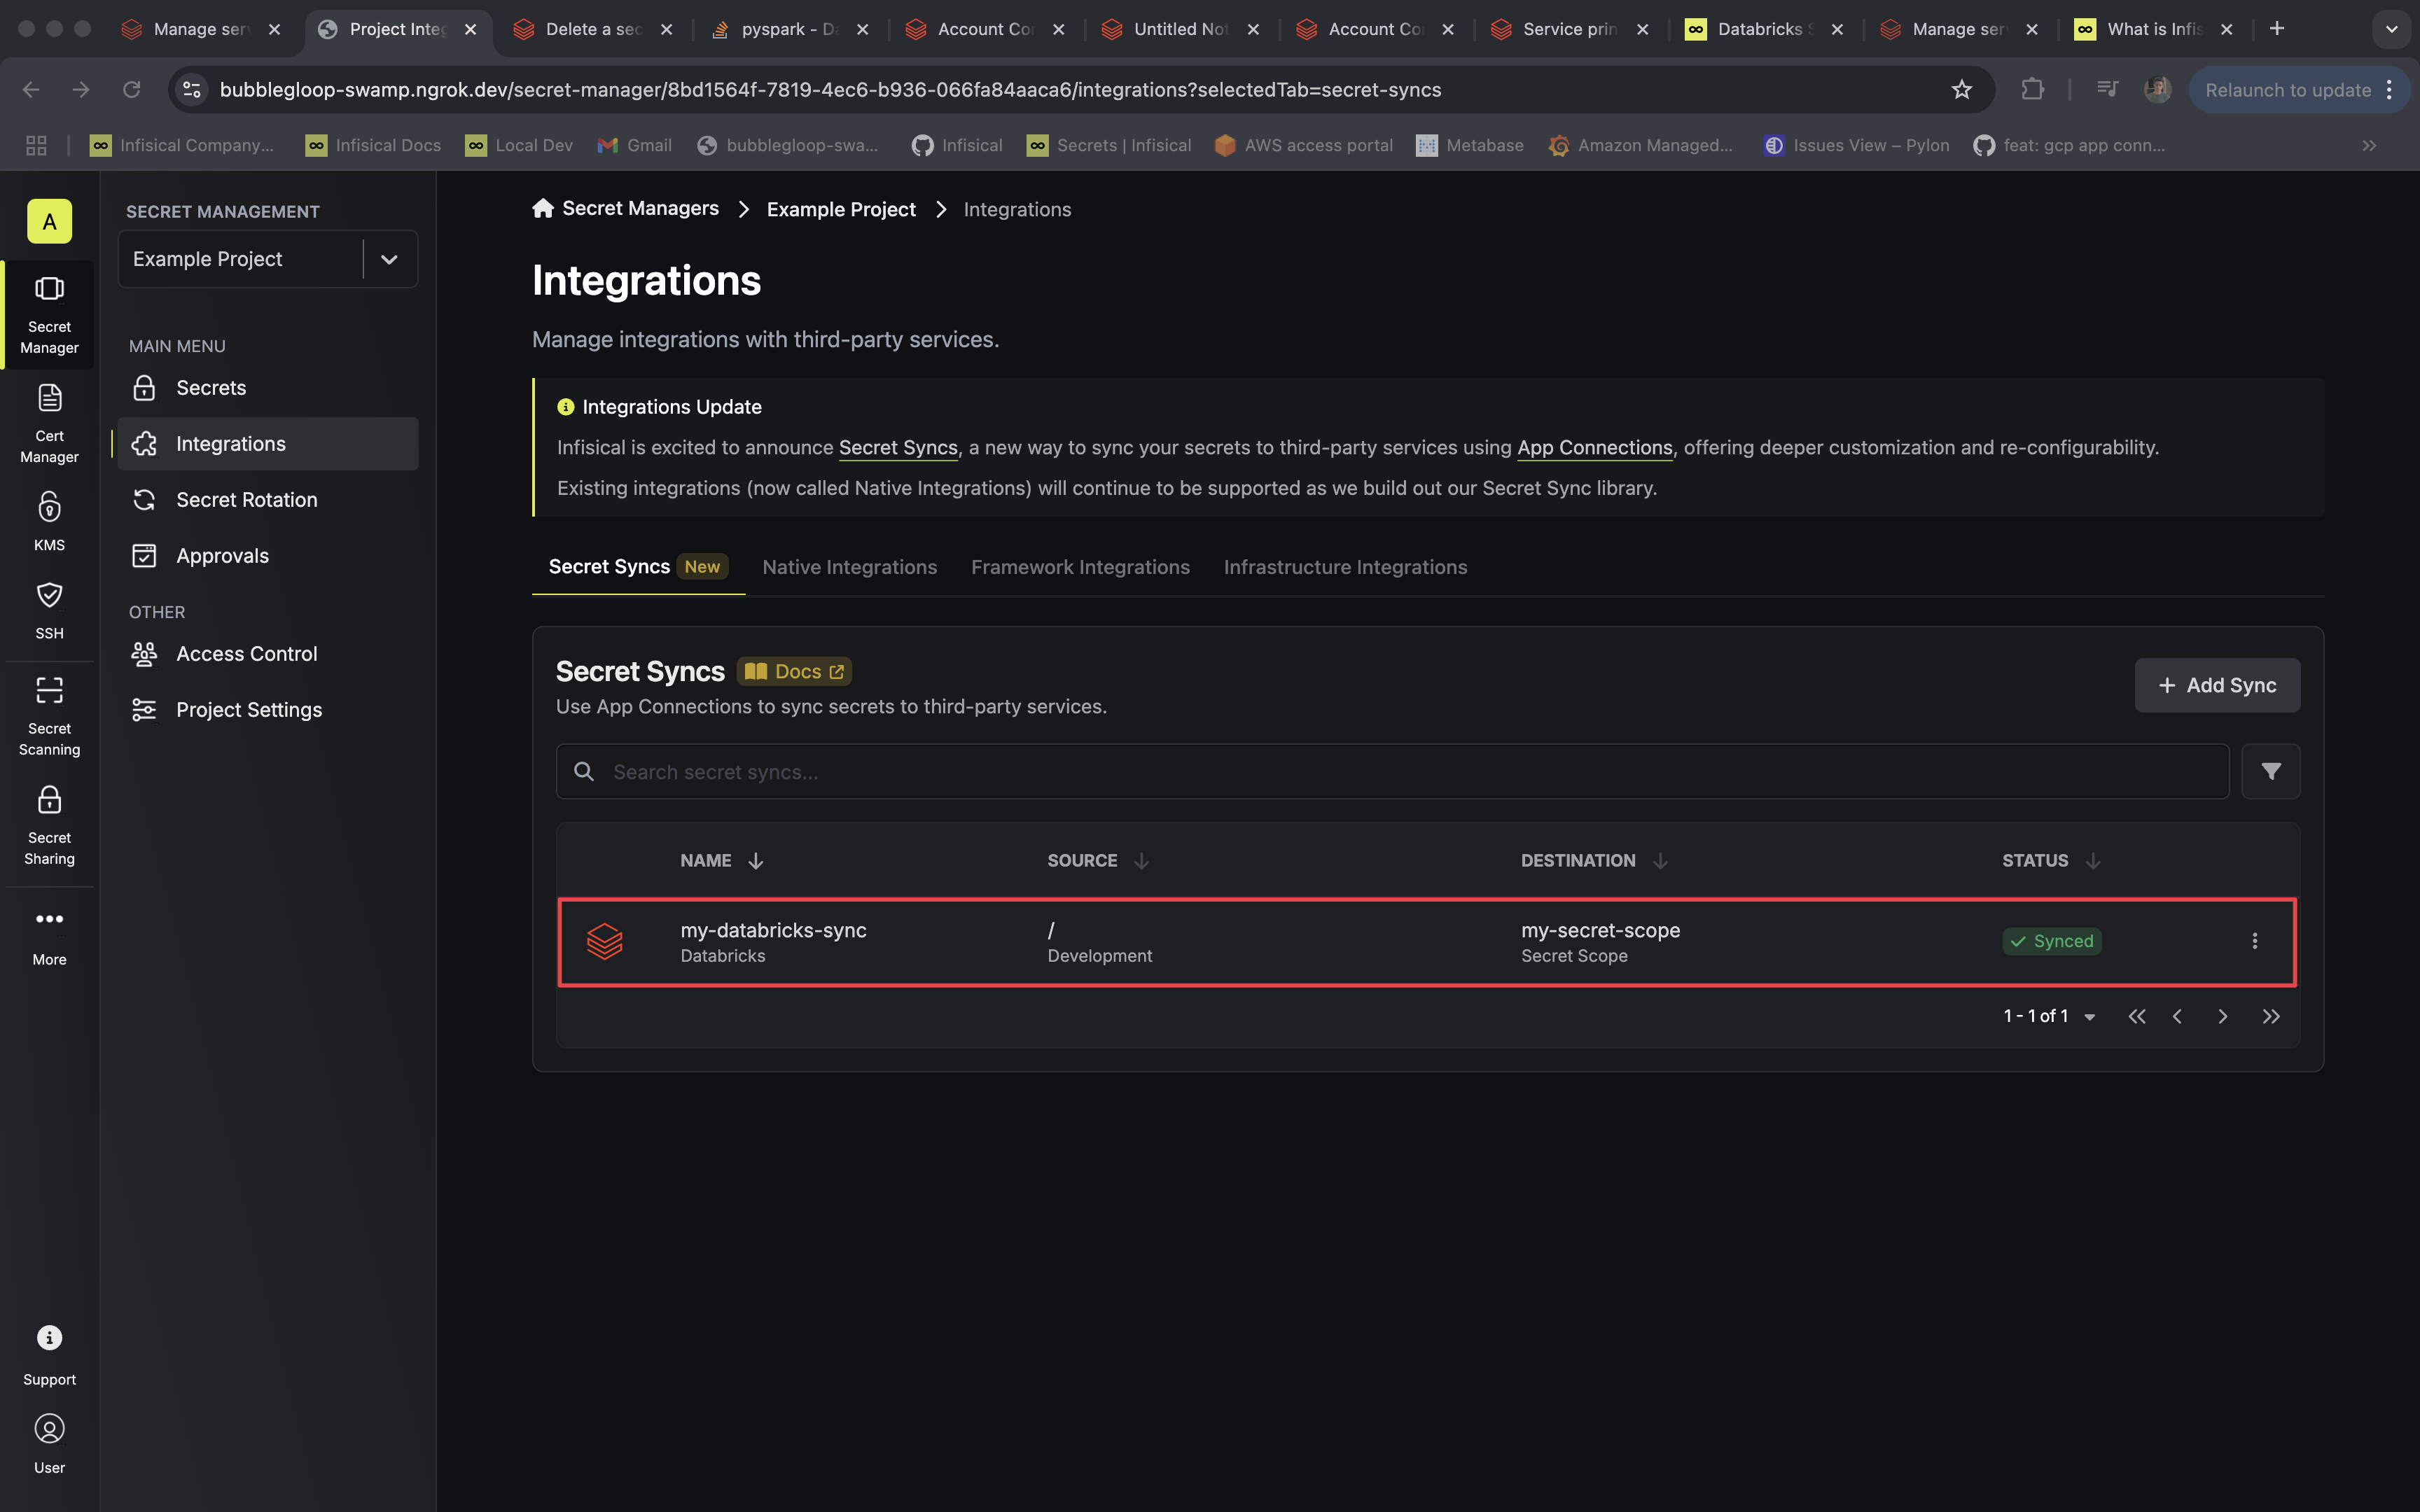
# Databricks Sync
Source: https://infisical.com/docs/integrations/secret-syncs/databricks
Learn how to configure a Databricks Sync for Infisical.
**Prerequisites:**
* Set up and add secrets to [Infisical Cloud](https://app.infisical.com)
* Create a [Databricks Connection](/integrations/app-connections/databricks)
1. Navigate to **Project** > **Integrations** and select the **Secret Syncs** tab. Click on the **Add Sync** button.

2. Select the **Databricks** option.

3. Configure the **Source** from where secrets should be retrieved, then click **Next**.

* **Environment**: The project environment to retrieve secrets from.
* **Secret Path**: The folder path to retrieve secrets from.
If you need to sync secrets from multiple folder locations, check out [secret imports](/documentation/platform/secret-reference#secret-imports).
4. Configure the **Destination** to where secrets should be deployed, then click **Next**.
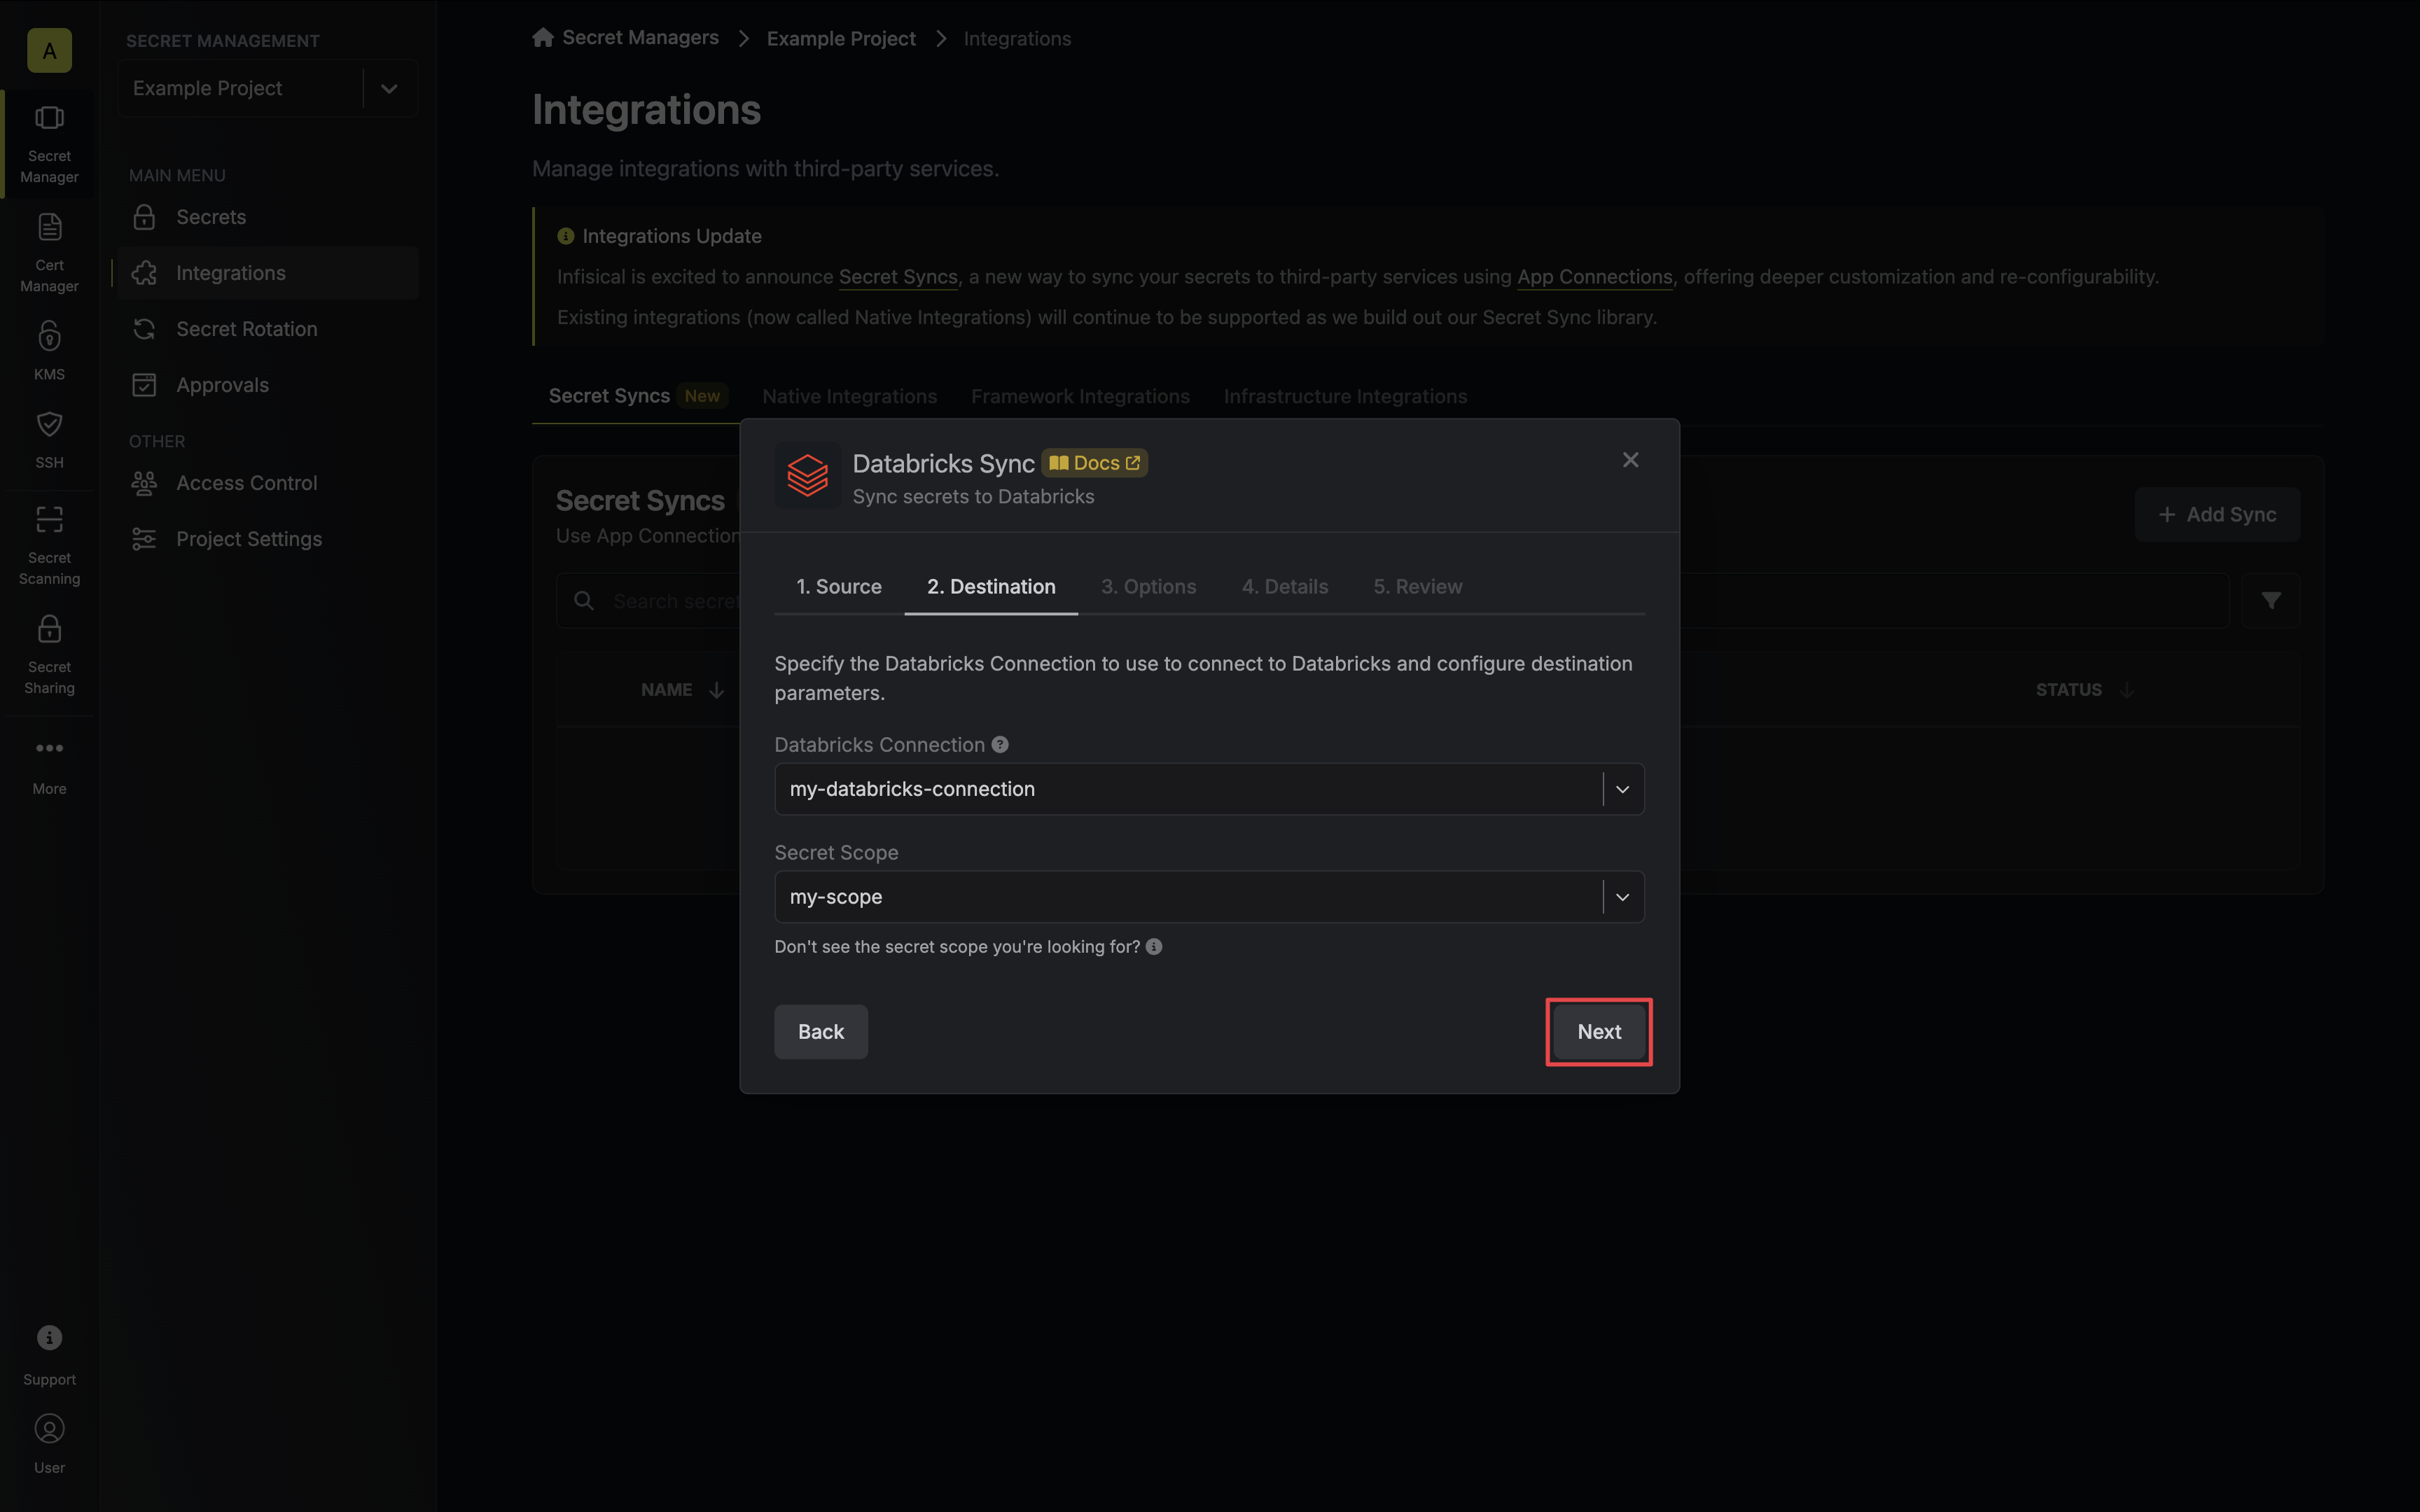
* **Databricks Connection**: The Databricks Connection to authenticate with.
* **Scope**: The Databricks secret scope to sync secrets to.
You must create a secret scope in your Databricks workspace prior to configuration. Ensure your service principal has [Write permissions](https://docs.databricks.com/en/security/auth/access-control/index.html#secret-acls) for the specified secret scope.
5. Configure the **Sync Options** to specify how secrets should be synced, then click **Next**.
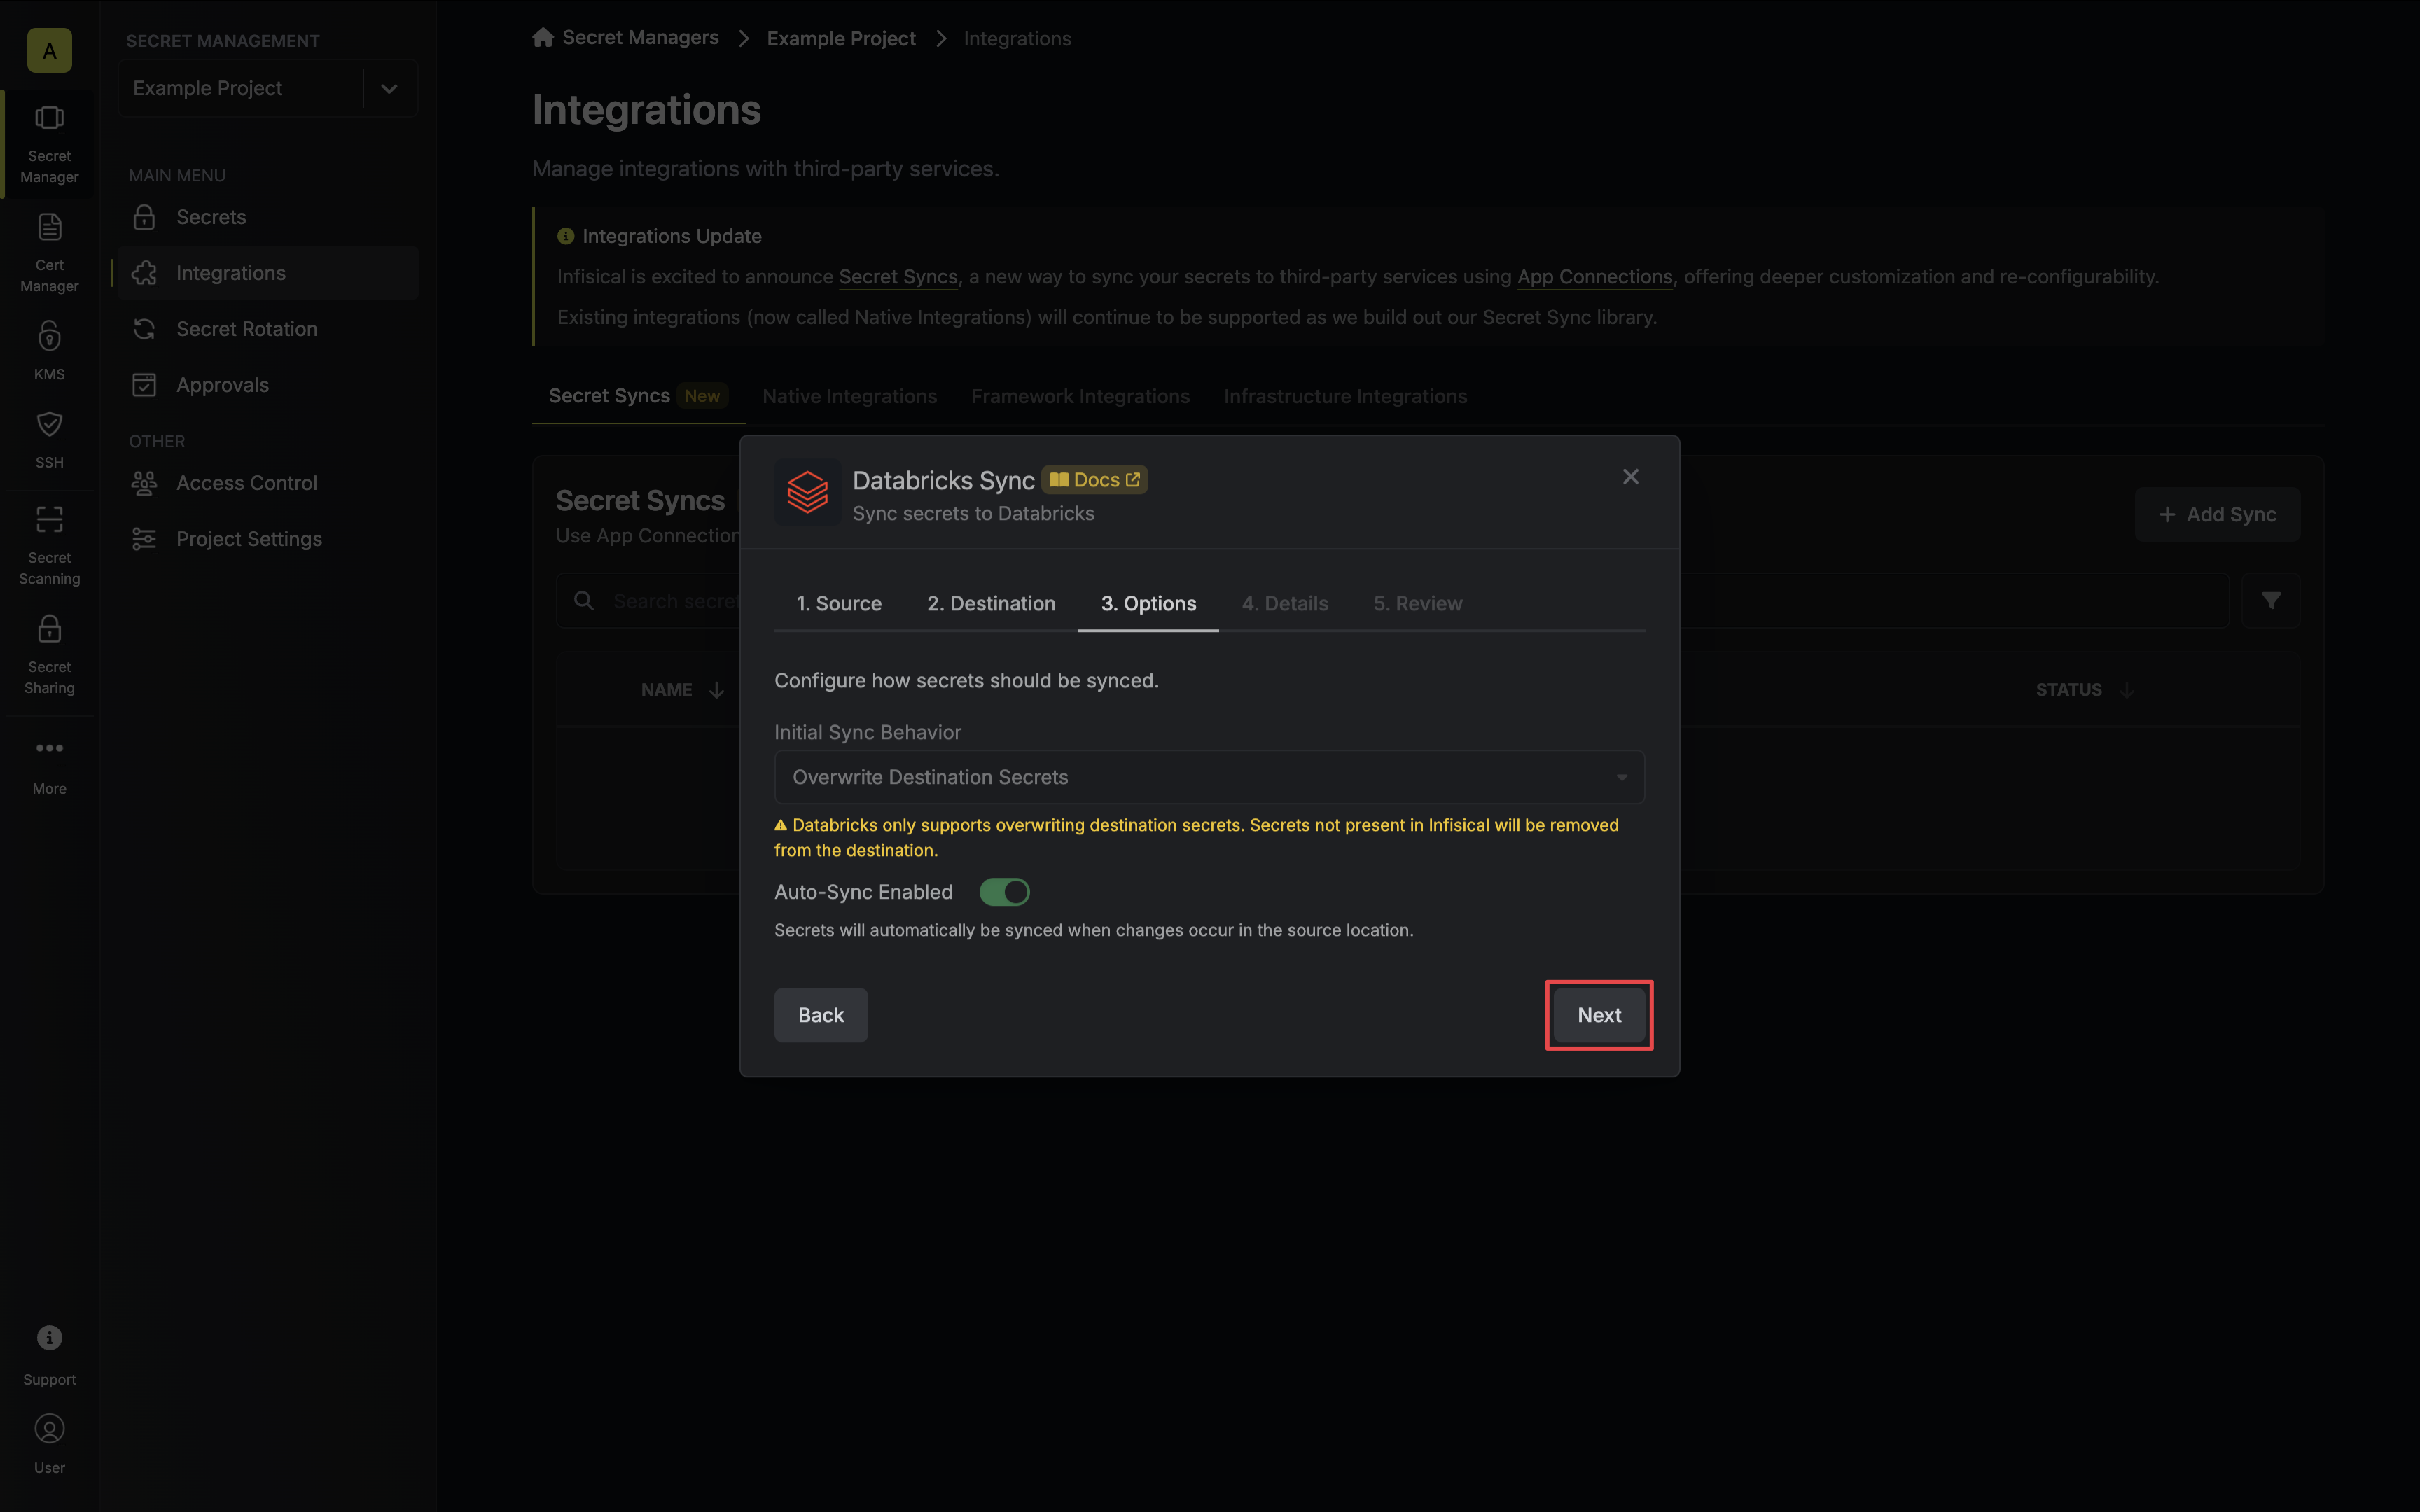
* **Initial Sync Behavior**: Determines how Infisical should resolve the initial sync.
* **Overwrite Destination Secrets**: Removes any secrets at the destination endpoint not present in Infisical.
Databricks does not support importing secrets.
* **Auto-Sync Enabled**: If enabled, secrets will automatically be synced from the source location when changes occur. Disable to enforce manual syncing only.
6. Configure the **Details** of your Databricks Sync, then click **Next**.
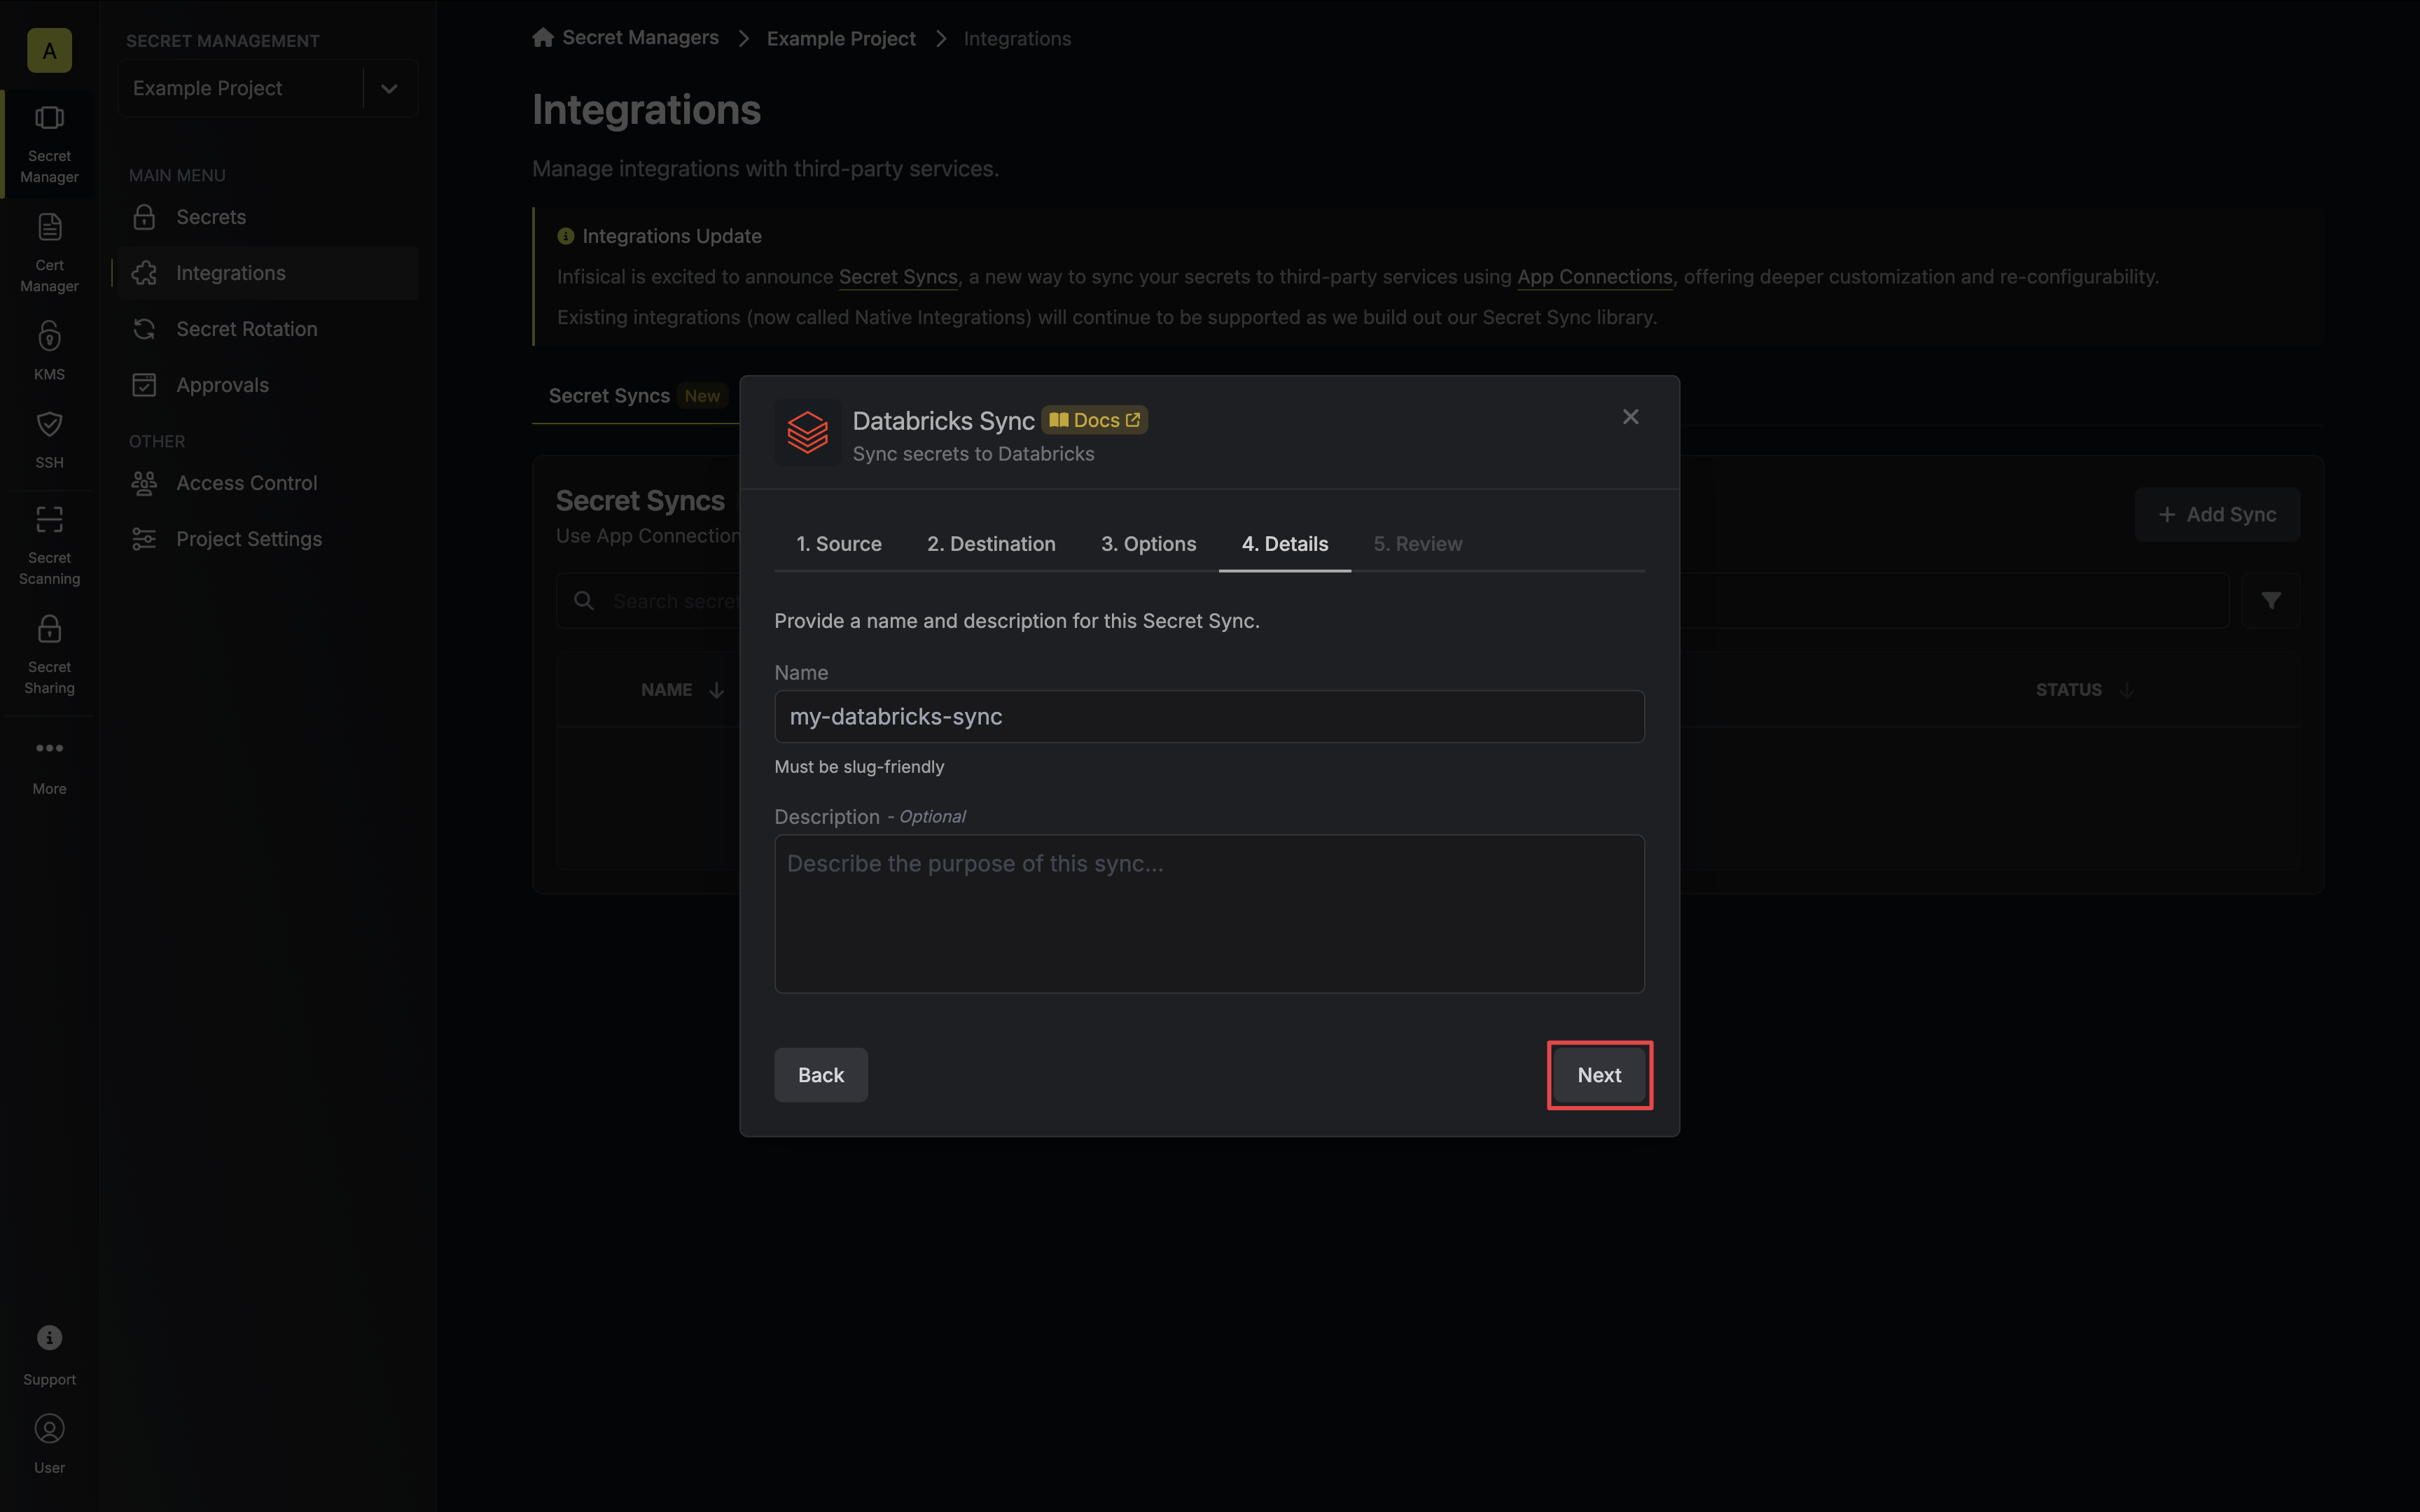
* **Name**: The name of your sync. Must be slug-friendly.
* **Description**: An optional description for your sync.
7. Review your Databricks Sync configuration, then click **Create Sync**.
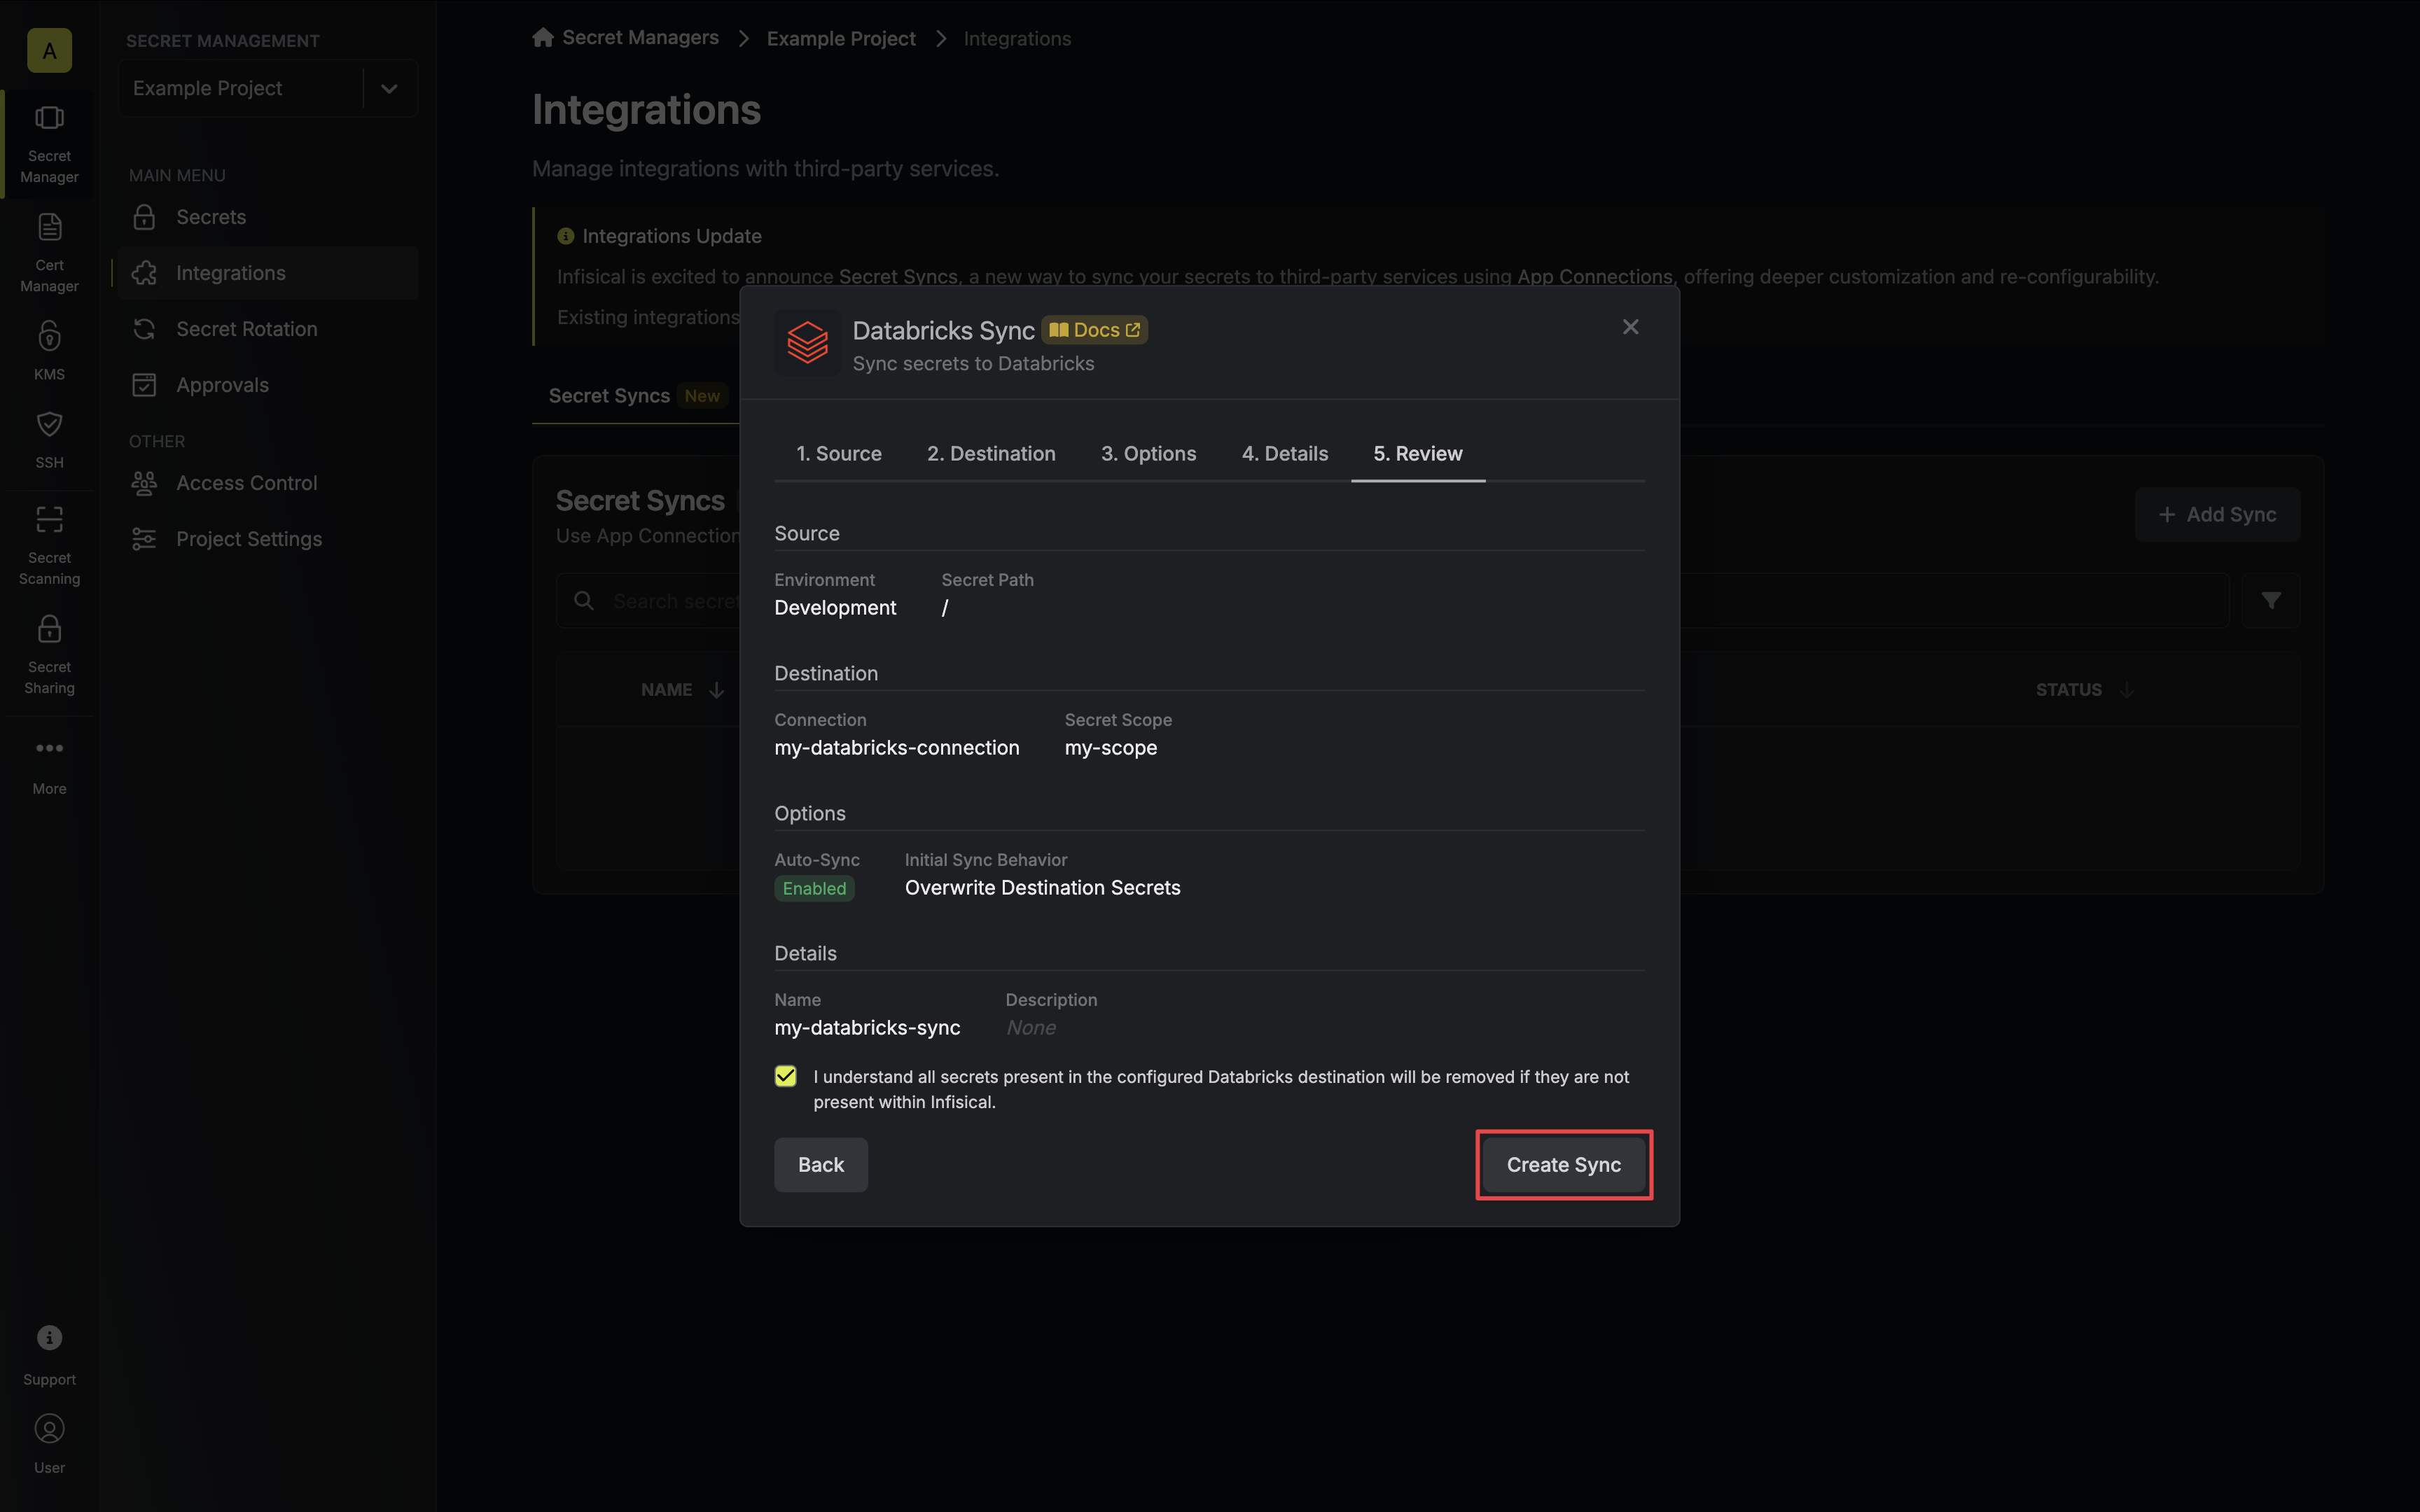
8. If enabled, your Databricks Sync will begin syncing your secrets to the destination endpoint.
To create an **Databricks Sync**, make an API request to the [Create Databricks Sync](/api-reference/endpoints/secret-syncs/databricks/create) API endpoint.
### Sample request
```bash Request
curl --request POST \
--url https://app.infisical.com/api/v1/secret-syncs/databricks \
--header 'Content-Type: application/json' \
--data '{
"name": "my-databricks-sync",
"projectId": "3c90c3cc-0d44-4b50-8888-8dd25736052a",
"description": "an example sync",
"connectionId": "3c90c3cc-0d44-4b50-8888-8dd25736052a",
"environment": "dev",
"secretPath": "/my-secrets",
"isEnabled": true,
"syncOptions": {
"initialSyncBehavior": "overwrite-destination"
},
"destinationConfig": {
"scope": "my-scope"
}
}'
```
### Sample response
```bash Response
{
"secretSync": {
"id": "3c90c3cc-0d44-4b50-8888-8dd25736052a",
"name": "my-databricks-sync",
"description": "an example sync",
"isEnabled": true,
"version": 1,
"folderId": "3c90c3cc-0d44-4b50-8888-8dd25736052a",
"connectionId": "3c90c3cc-0d44-4b50-8888-8dd25736052a",
"createdAt": "2023-11-07T05:31:56Z",
"updatedAt": "2023-11-07T05:31:56Z",
"syncStatus": "succeeded",
"lastSyncJobId": "123",
"lastSyncMessage": null,
"lastSyncedAt": "2023-11-07T05:31:56Z",
"importStatus": null,
"lastImportJobId": null,
"lastImportMessage": null,
"lastImportedAt": null,
"removeStatus": null,
"lastRemoveJobId": null,
"lastRemoveMessage": null,
"lastRemovedAt": null,
"syncOptions": {
"initialSyncBehavior": "overwrite-destination"
},
"projectId": "3c90c3cc-0d44-4b50-8888-8dd25736052a",
"connection": {
"app": "databricks",
"name": "my-databricks-connection",
"id": "3c90c3cc-0d44-4b50-8888-8dd25736052a"
},
"environment": {
"slug": "dev",
"name": "Development",
"id": "3c90c3cc-0d44-4b50-8888-8dd25736052a"
},
"folder": {
"id": "3c90c3cc-0d44-4b50-8888-8dd25736052a",
"path": "/my-secrets"
},
"destination": "databricks",
"destinationConfig": {
"scope": "my-scope"
}
}
}
```
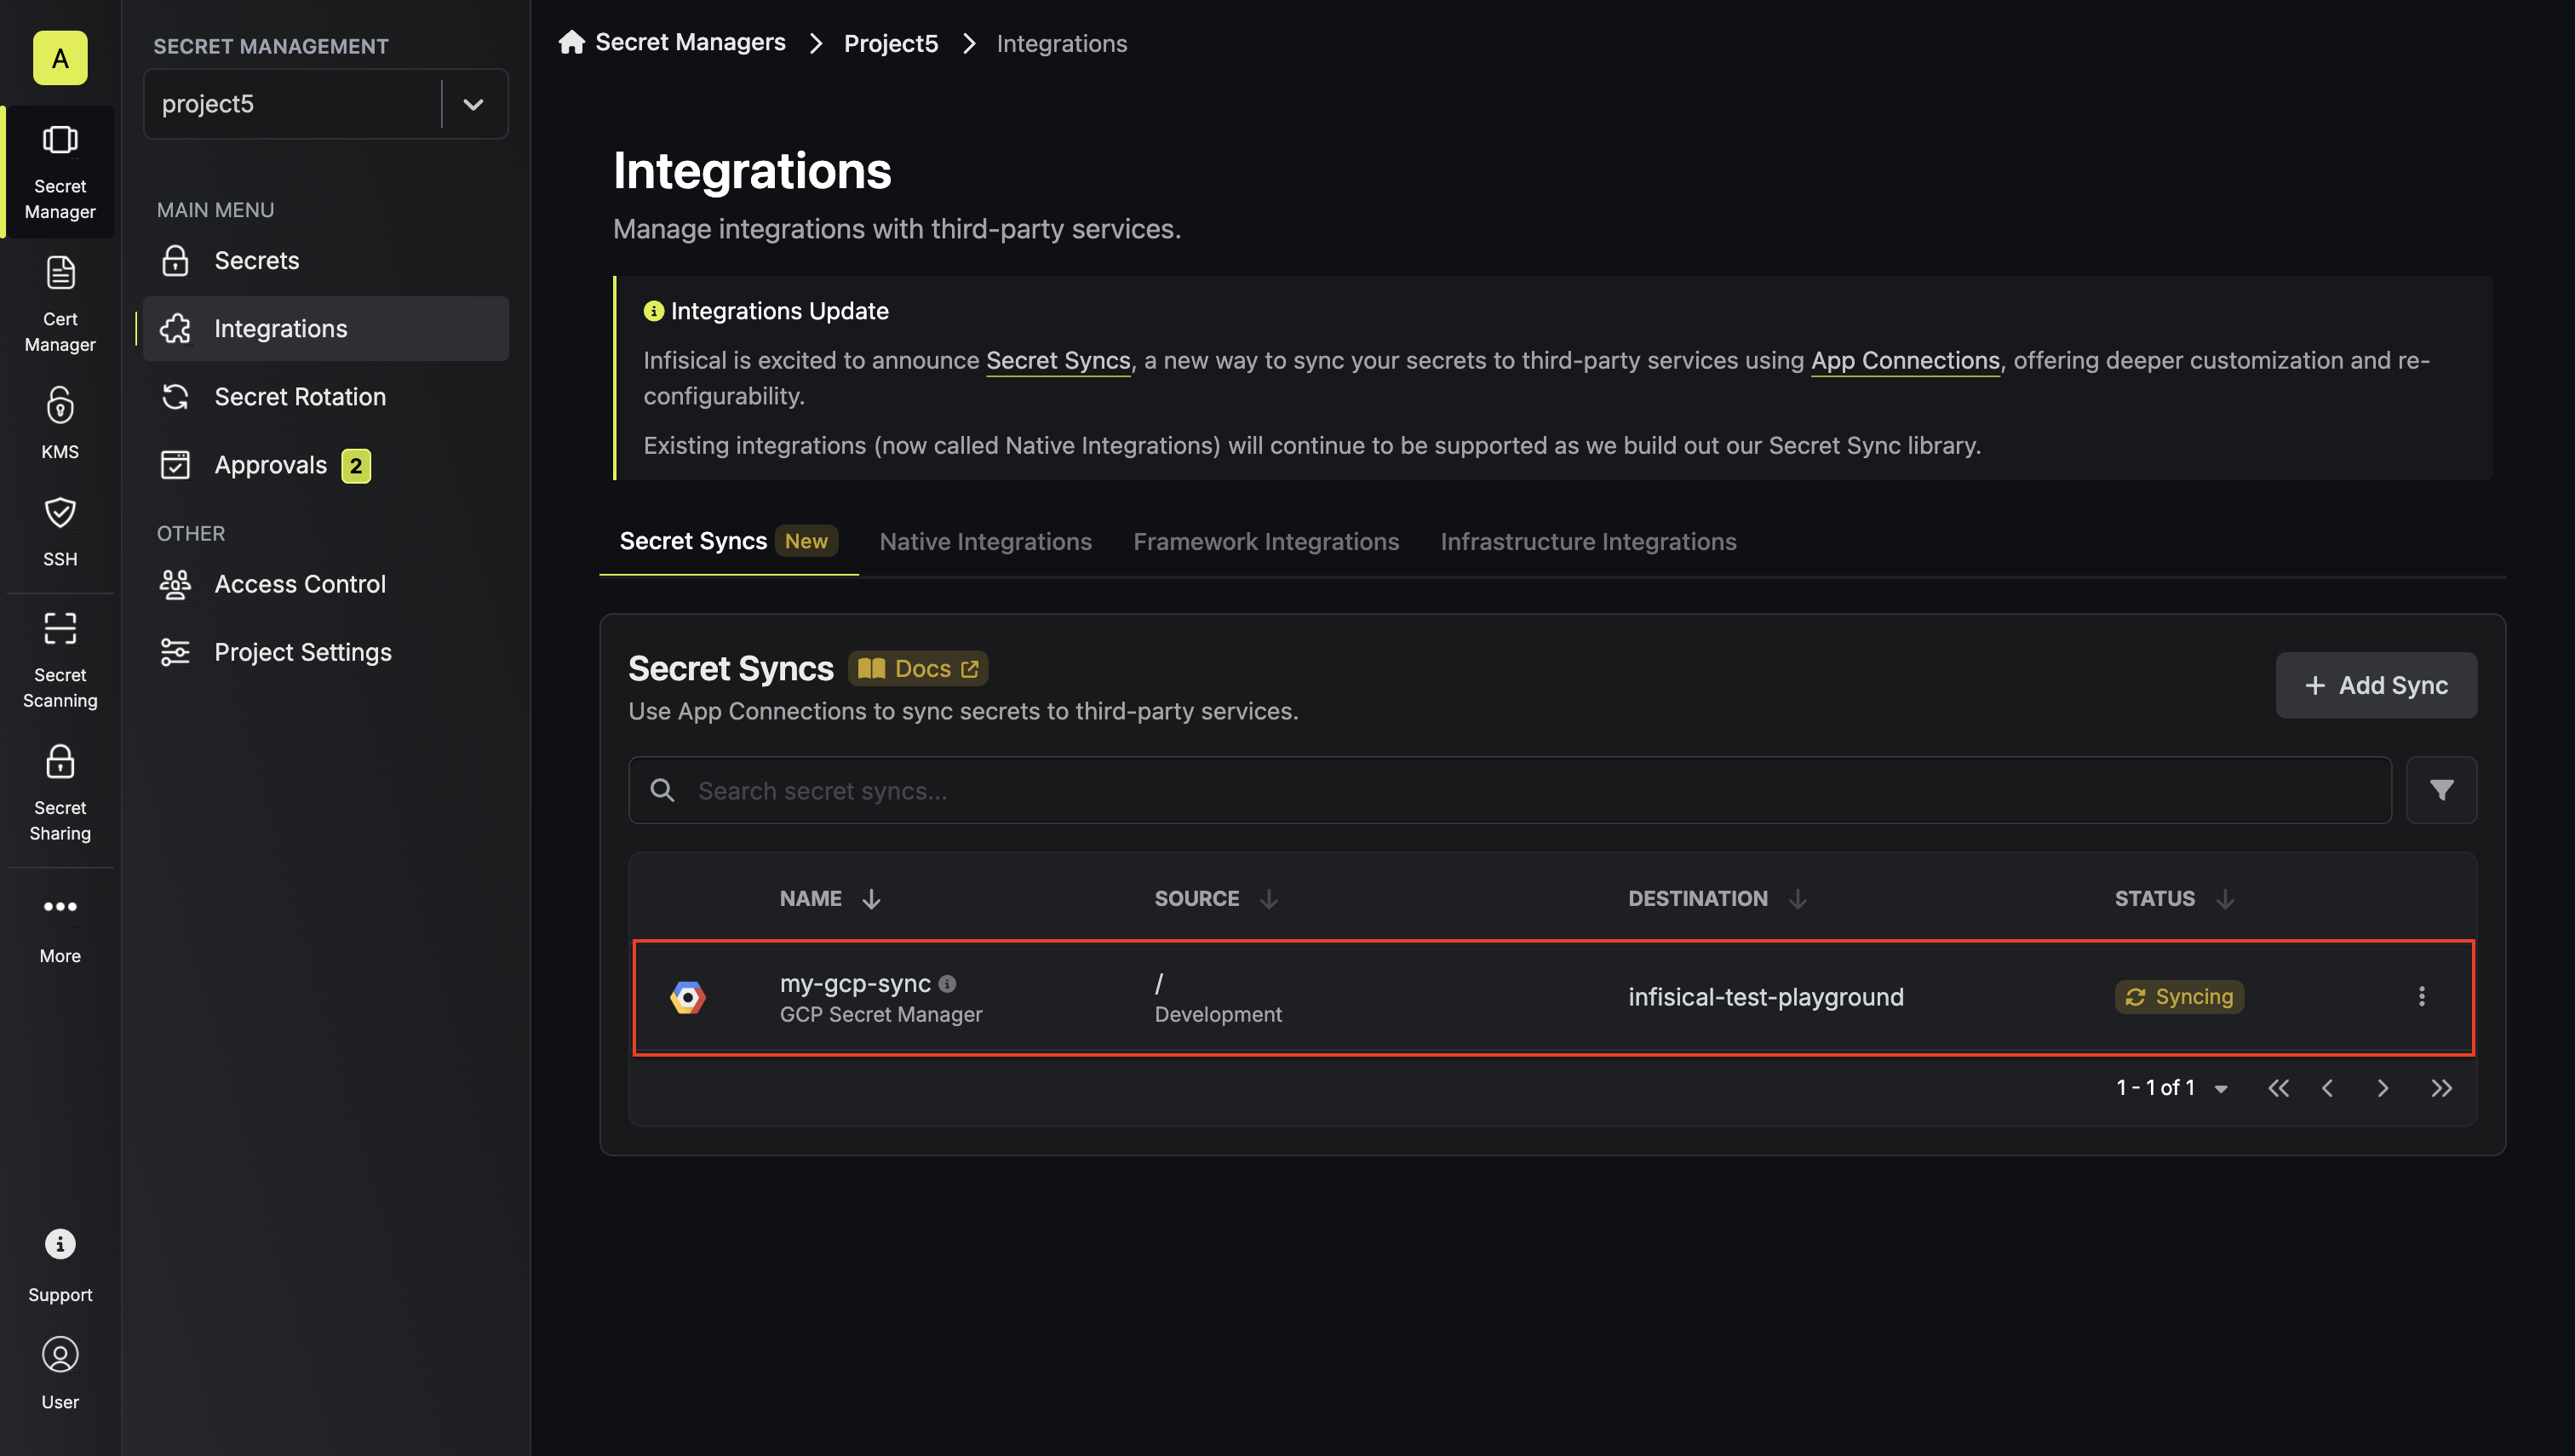
# GCP Secret Manager Sync
Source: https://infisical.com/docs/integrations/secret-syncs/gcp-secret-manager
Learn how to configure a GCP Secret Manager Sync for Infisical.
**Prerequisites:**
* Set up and add secrets to [Infisical Cloud](https://app.infisical.com)
* Create a [GCP Connection](/integrations/app-connections/gcp) with the required **Secret Sync** permissions
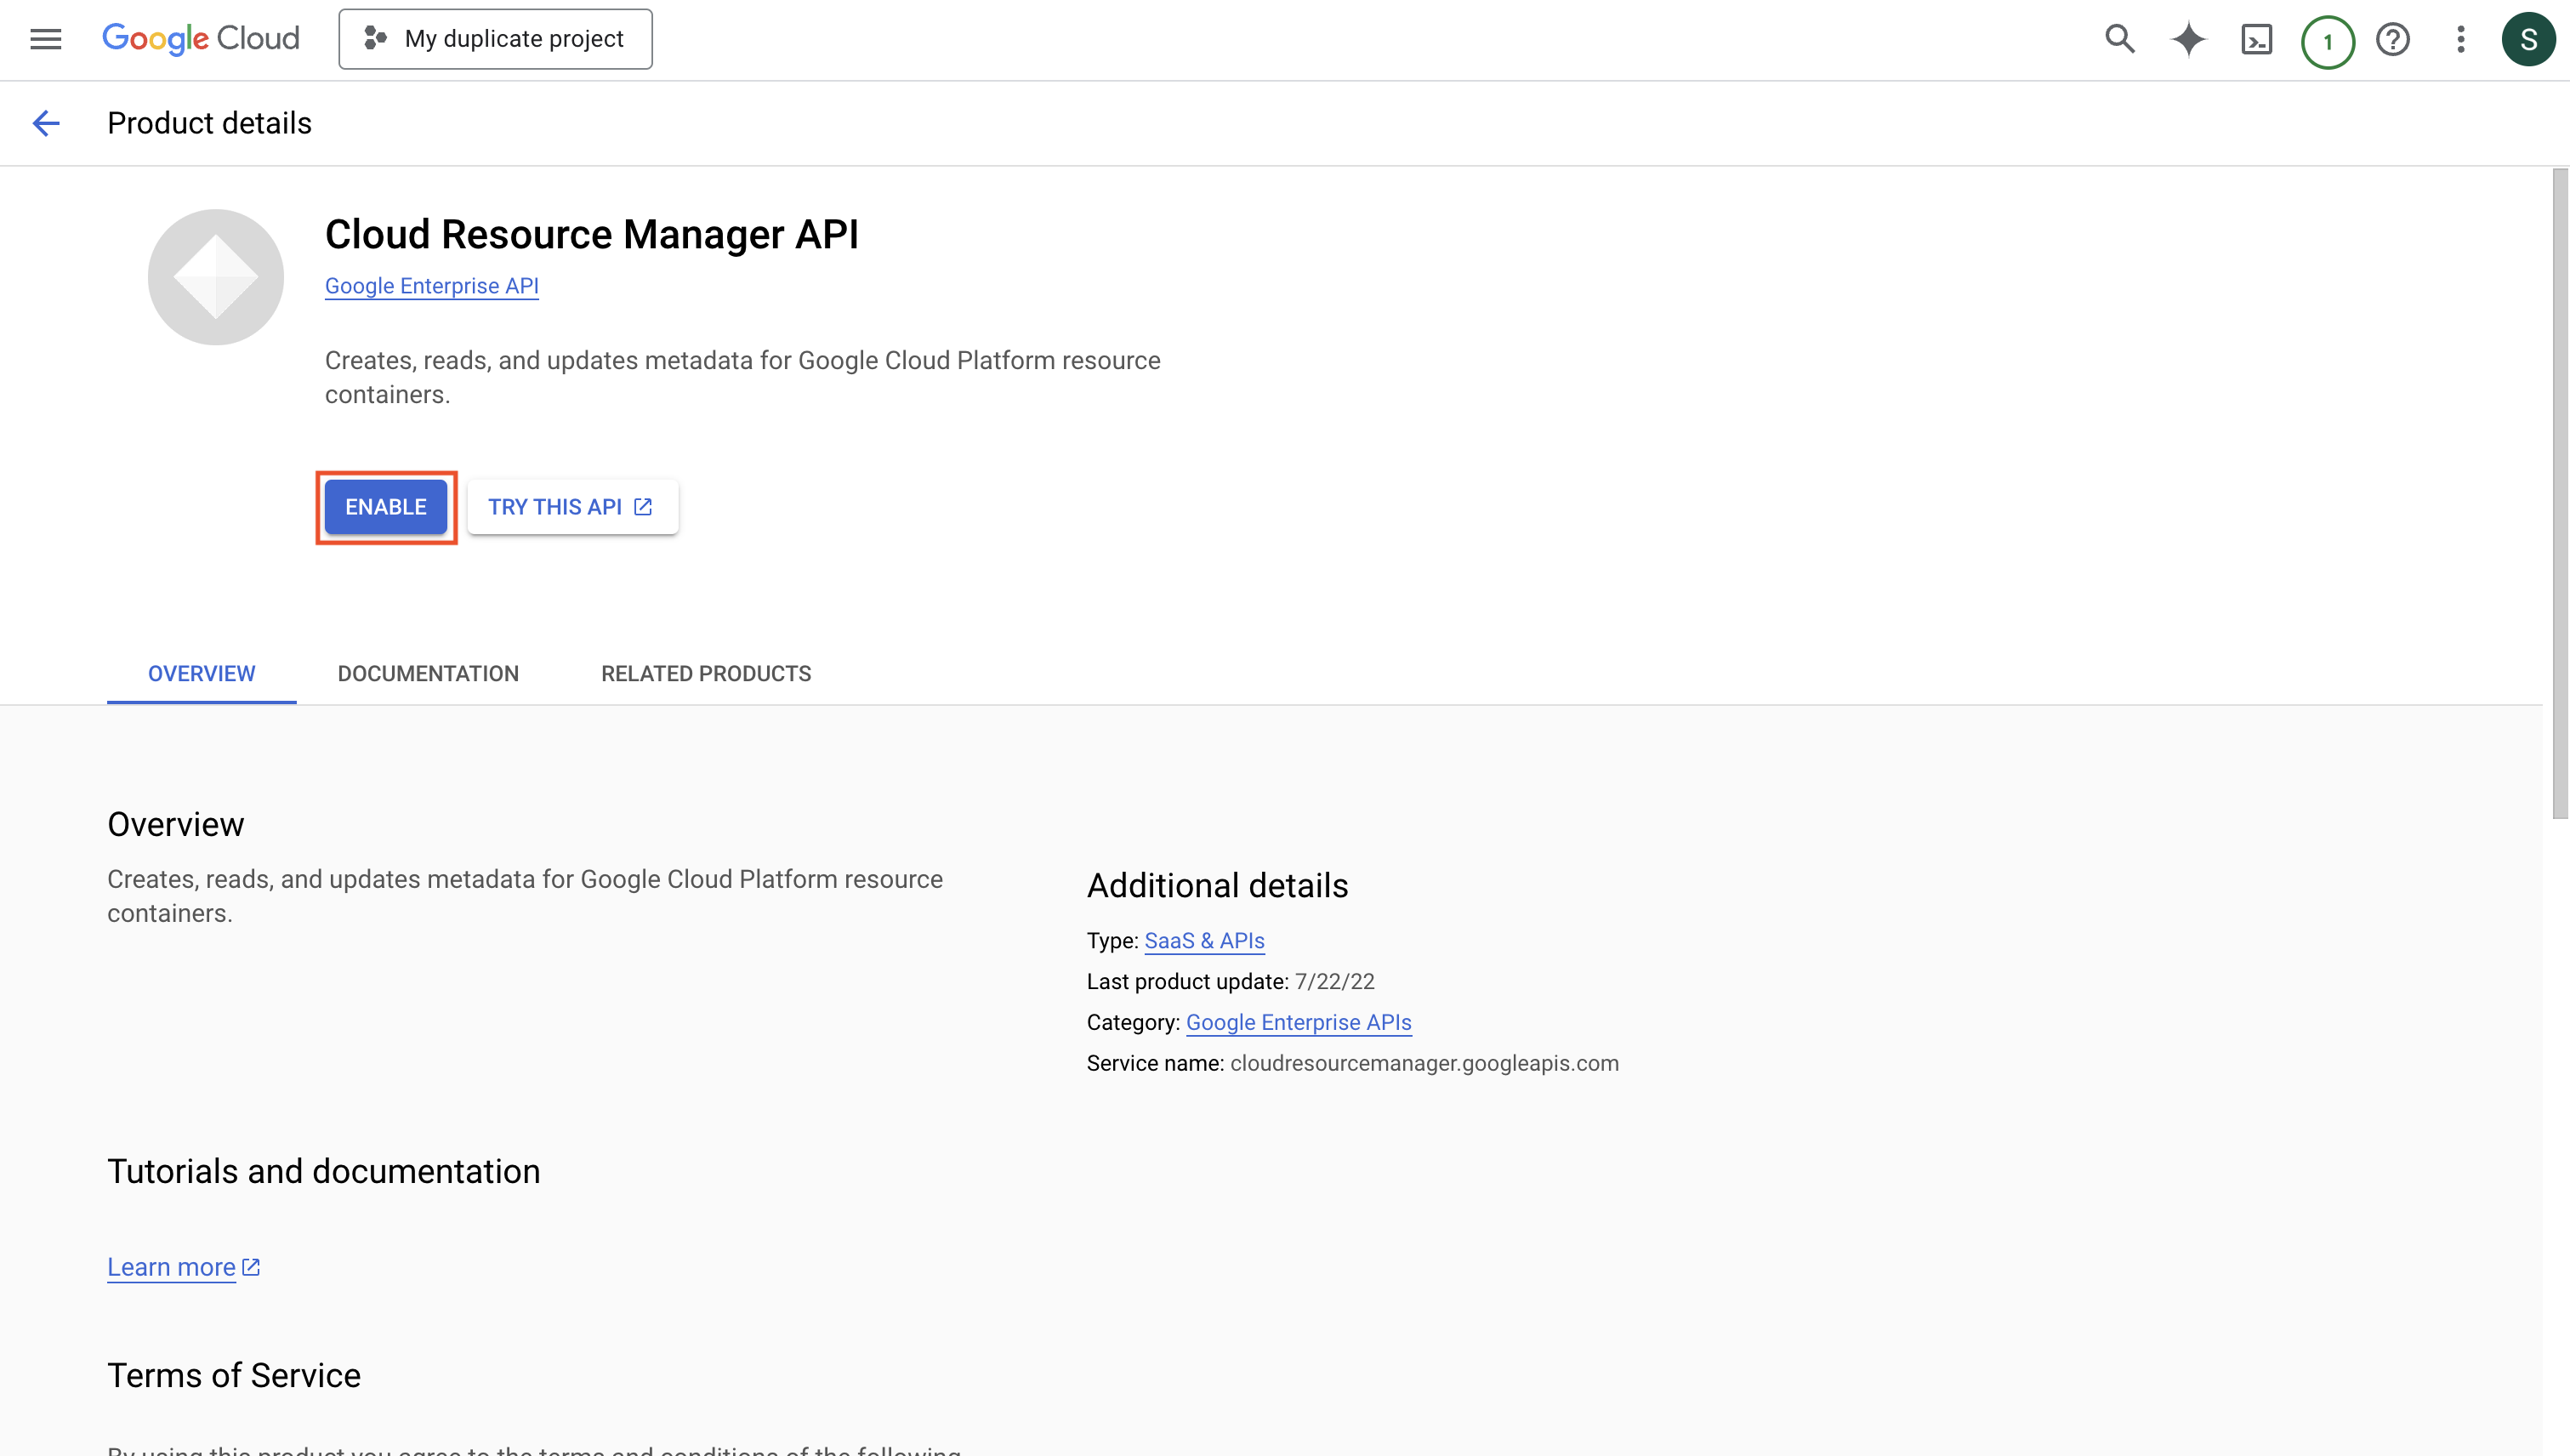
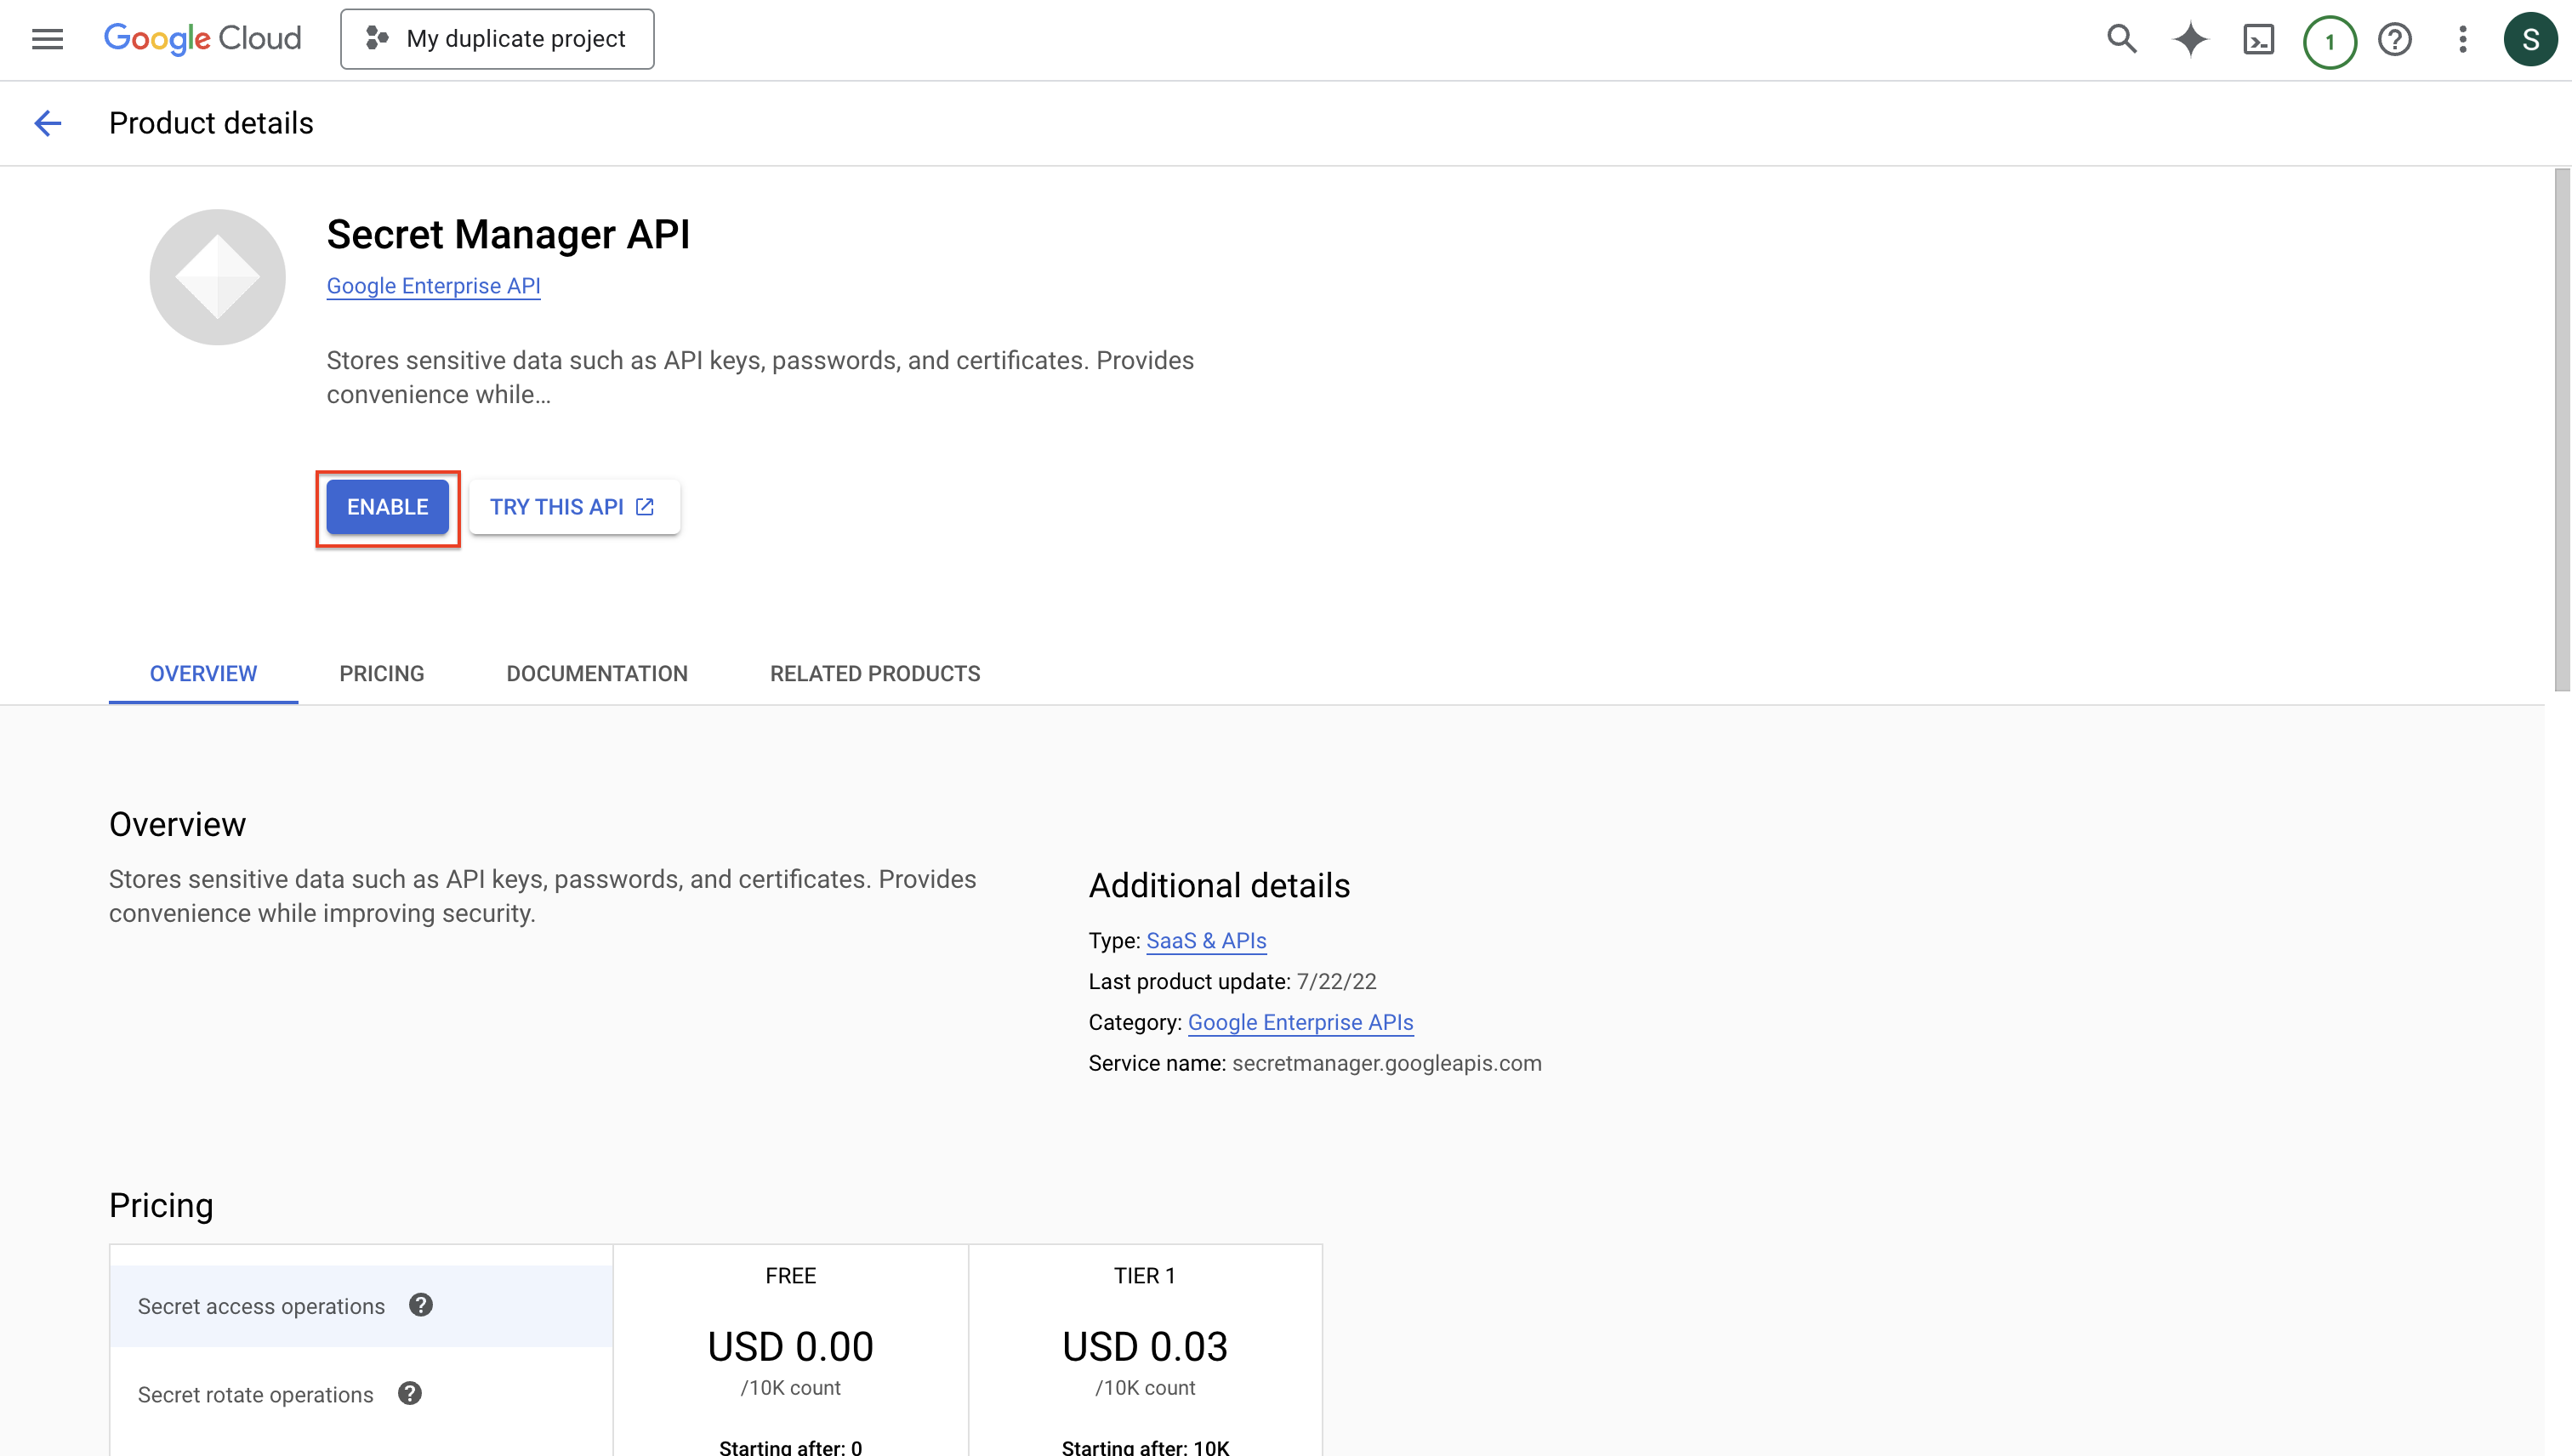
* Enable **Cloud Resource Manager API** and **Secret Manager API** on your GCP project
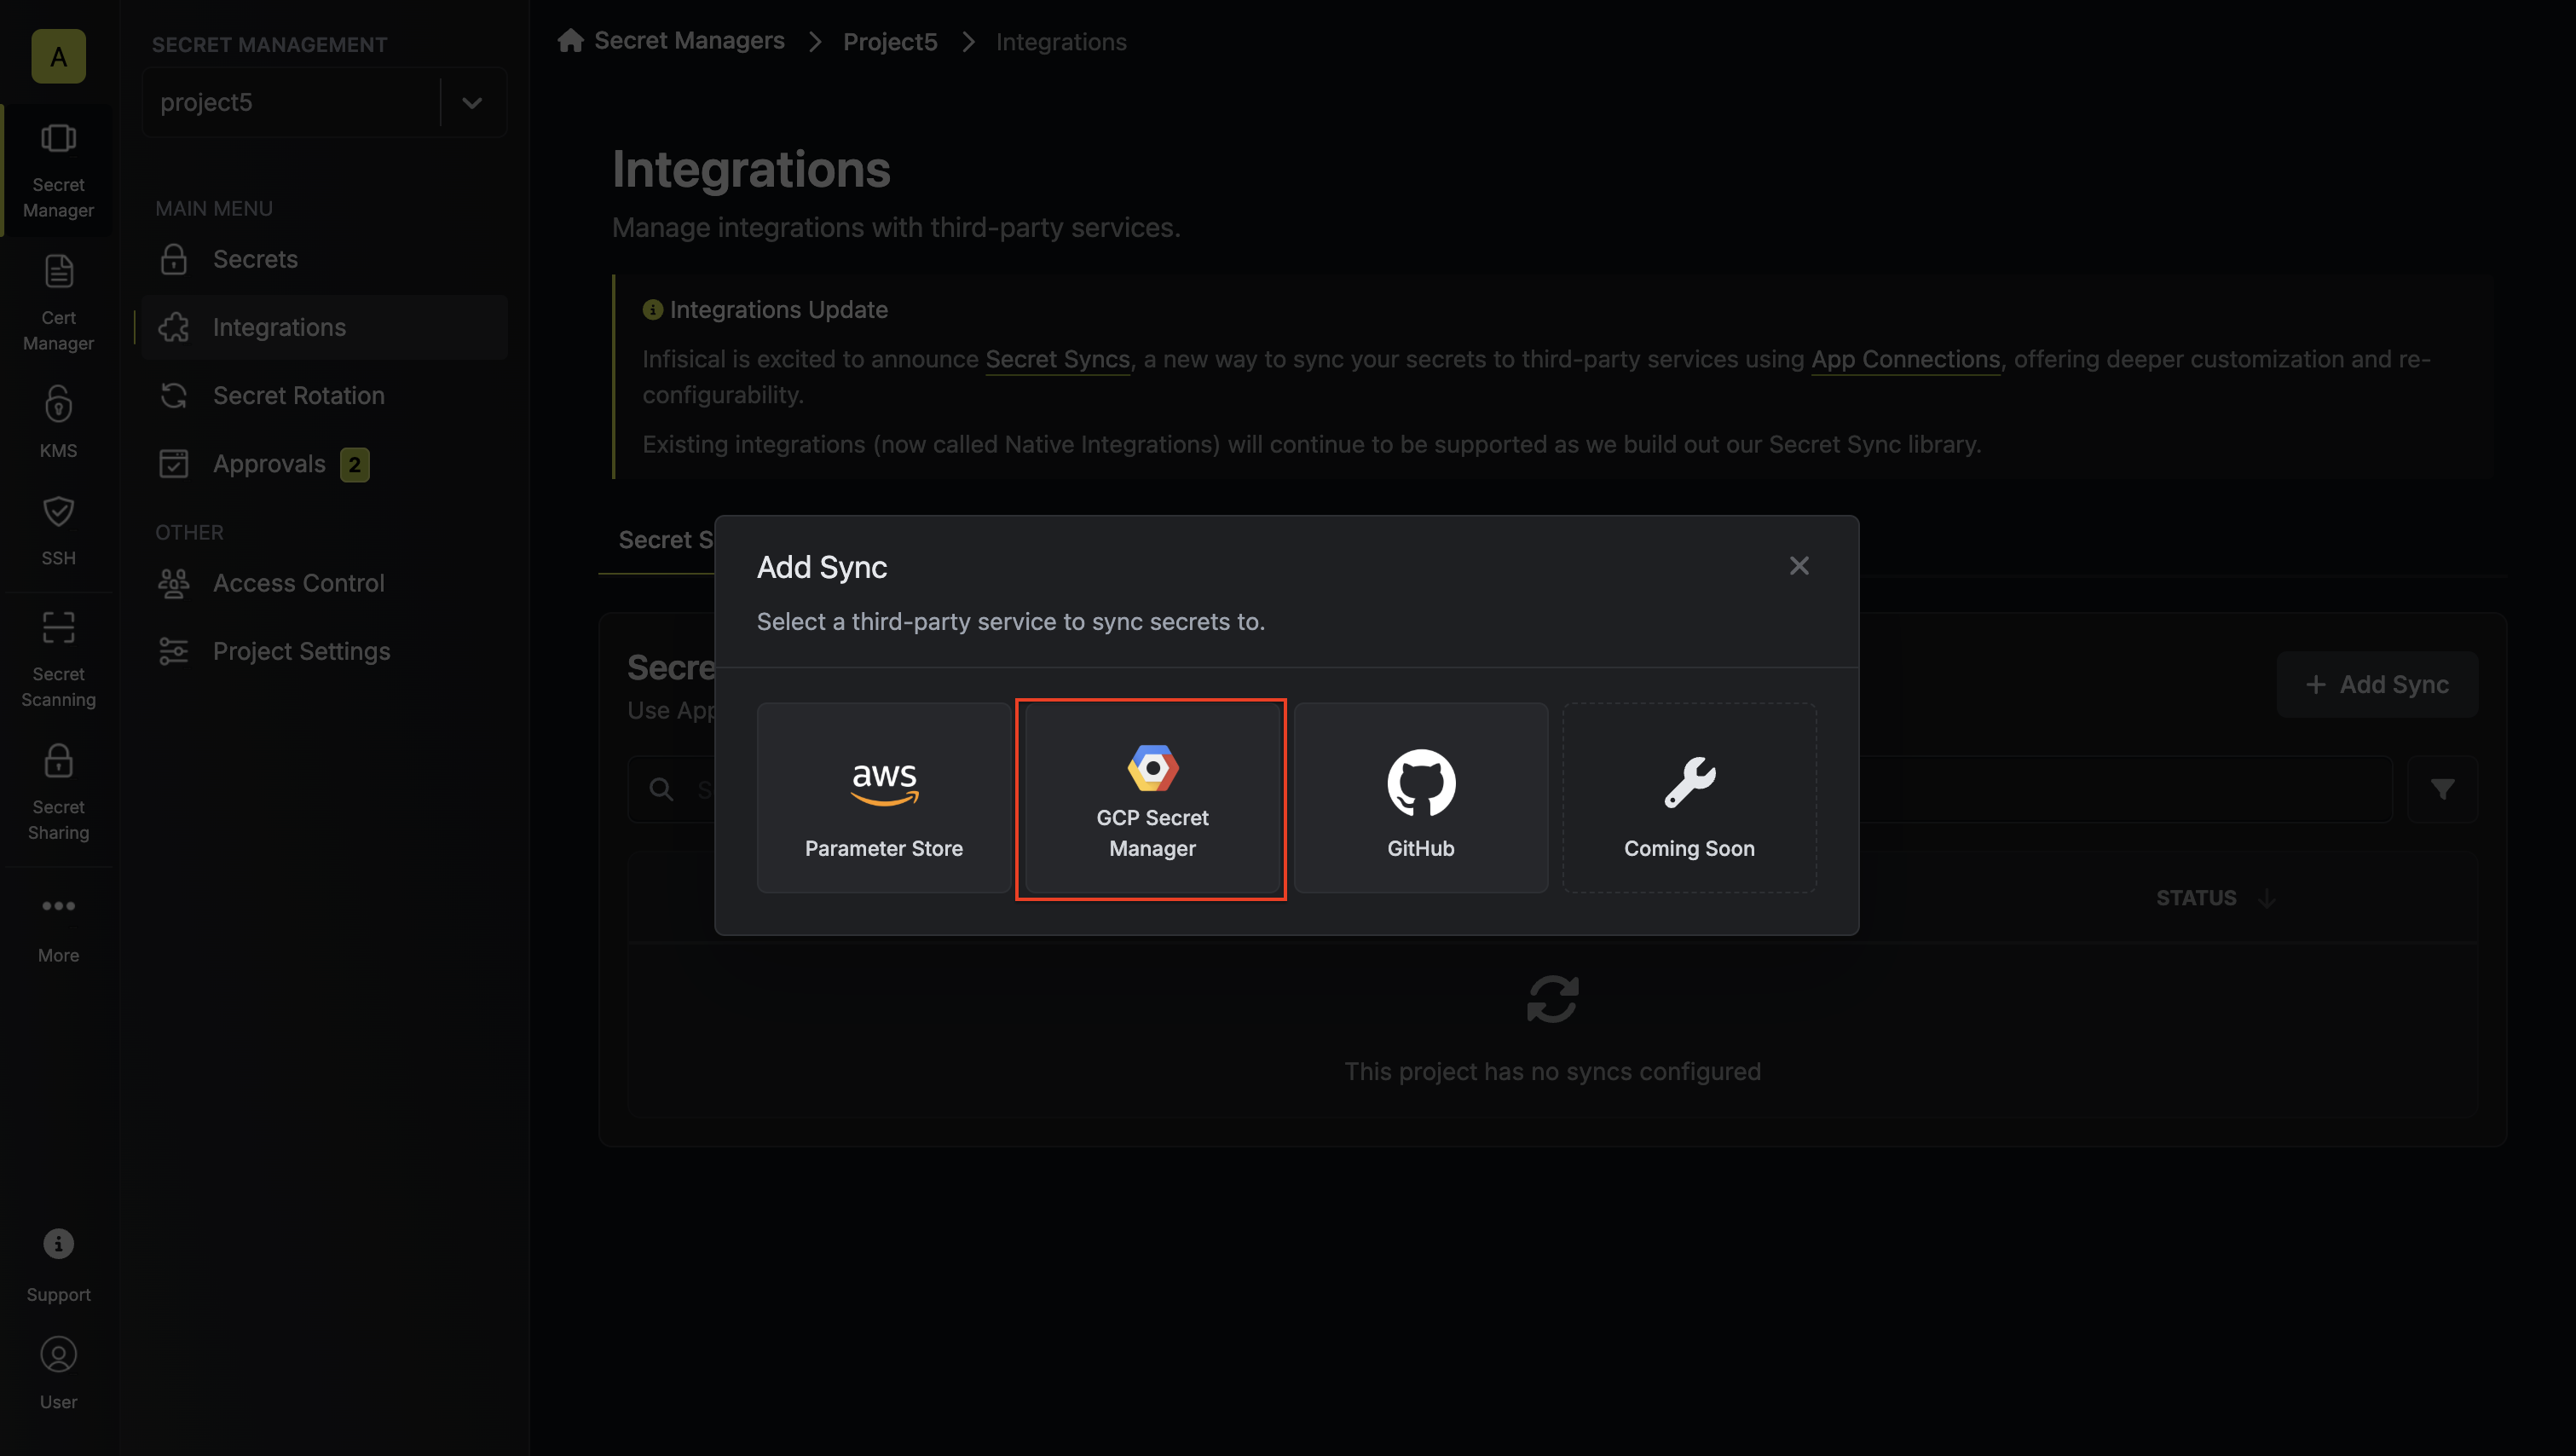
1. Navigate to **Project** > **Integrations** and select the **Secret Syncs** tab. Click on the **Add Sync** button.

2. Select the **GCP Secret Manager** option.
3. Configure the **Source** from where secrets should be retrieved, then click **Next**.
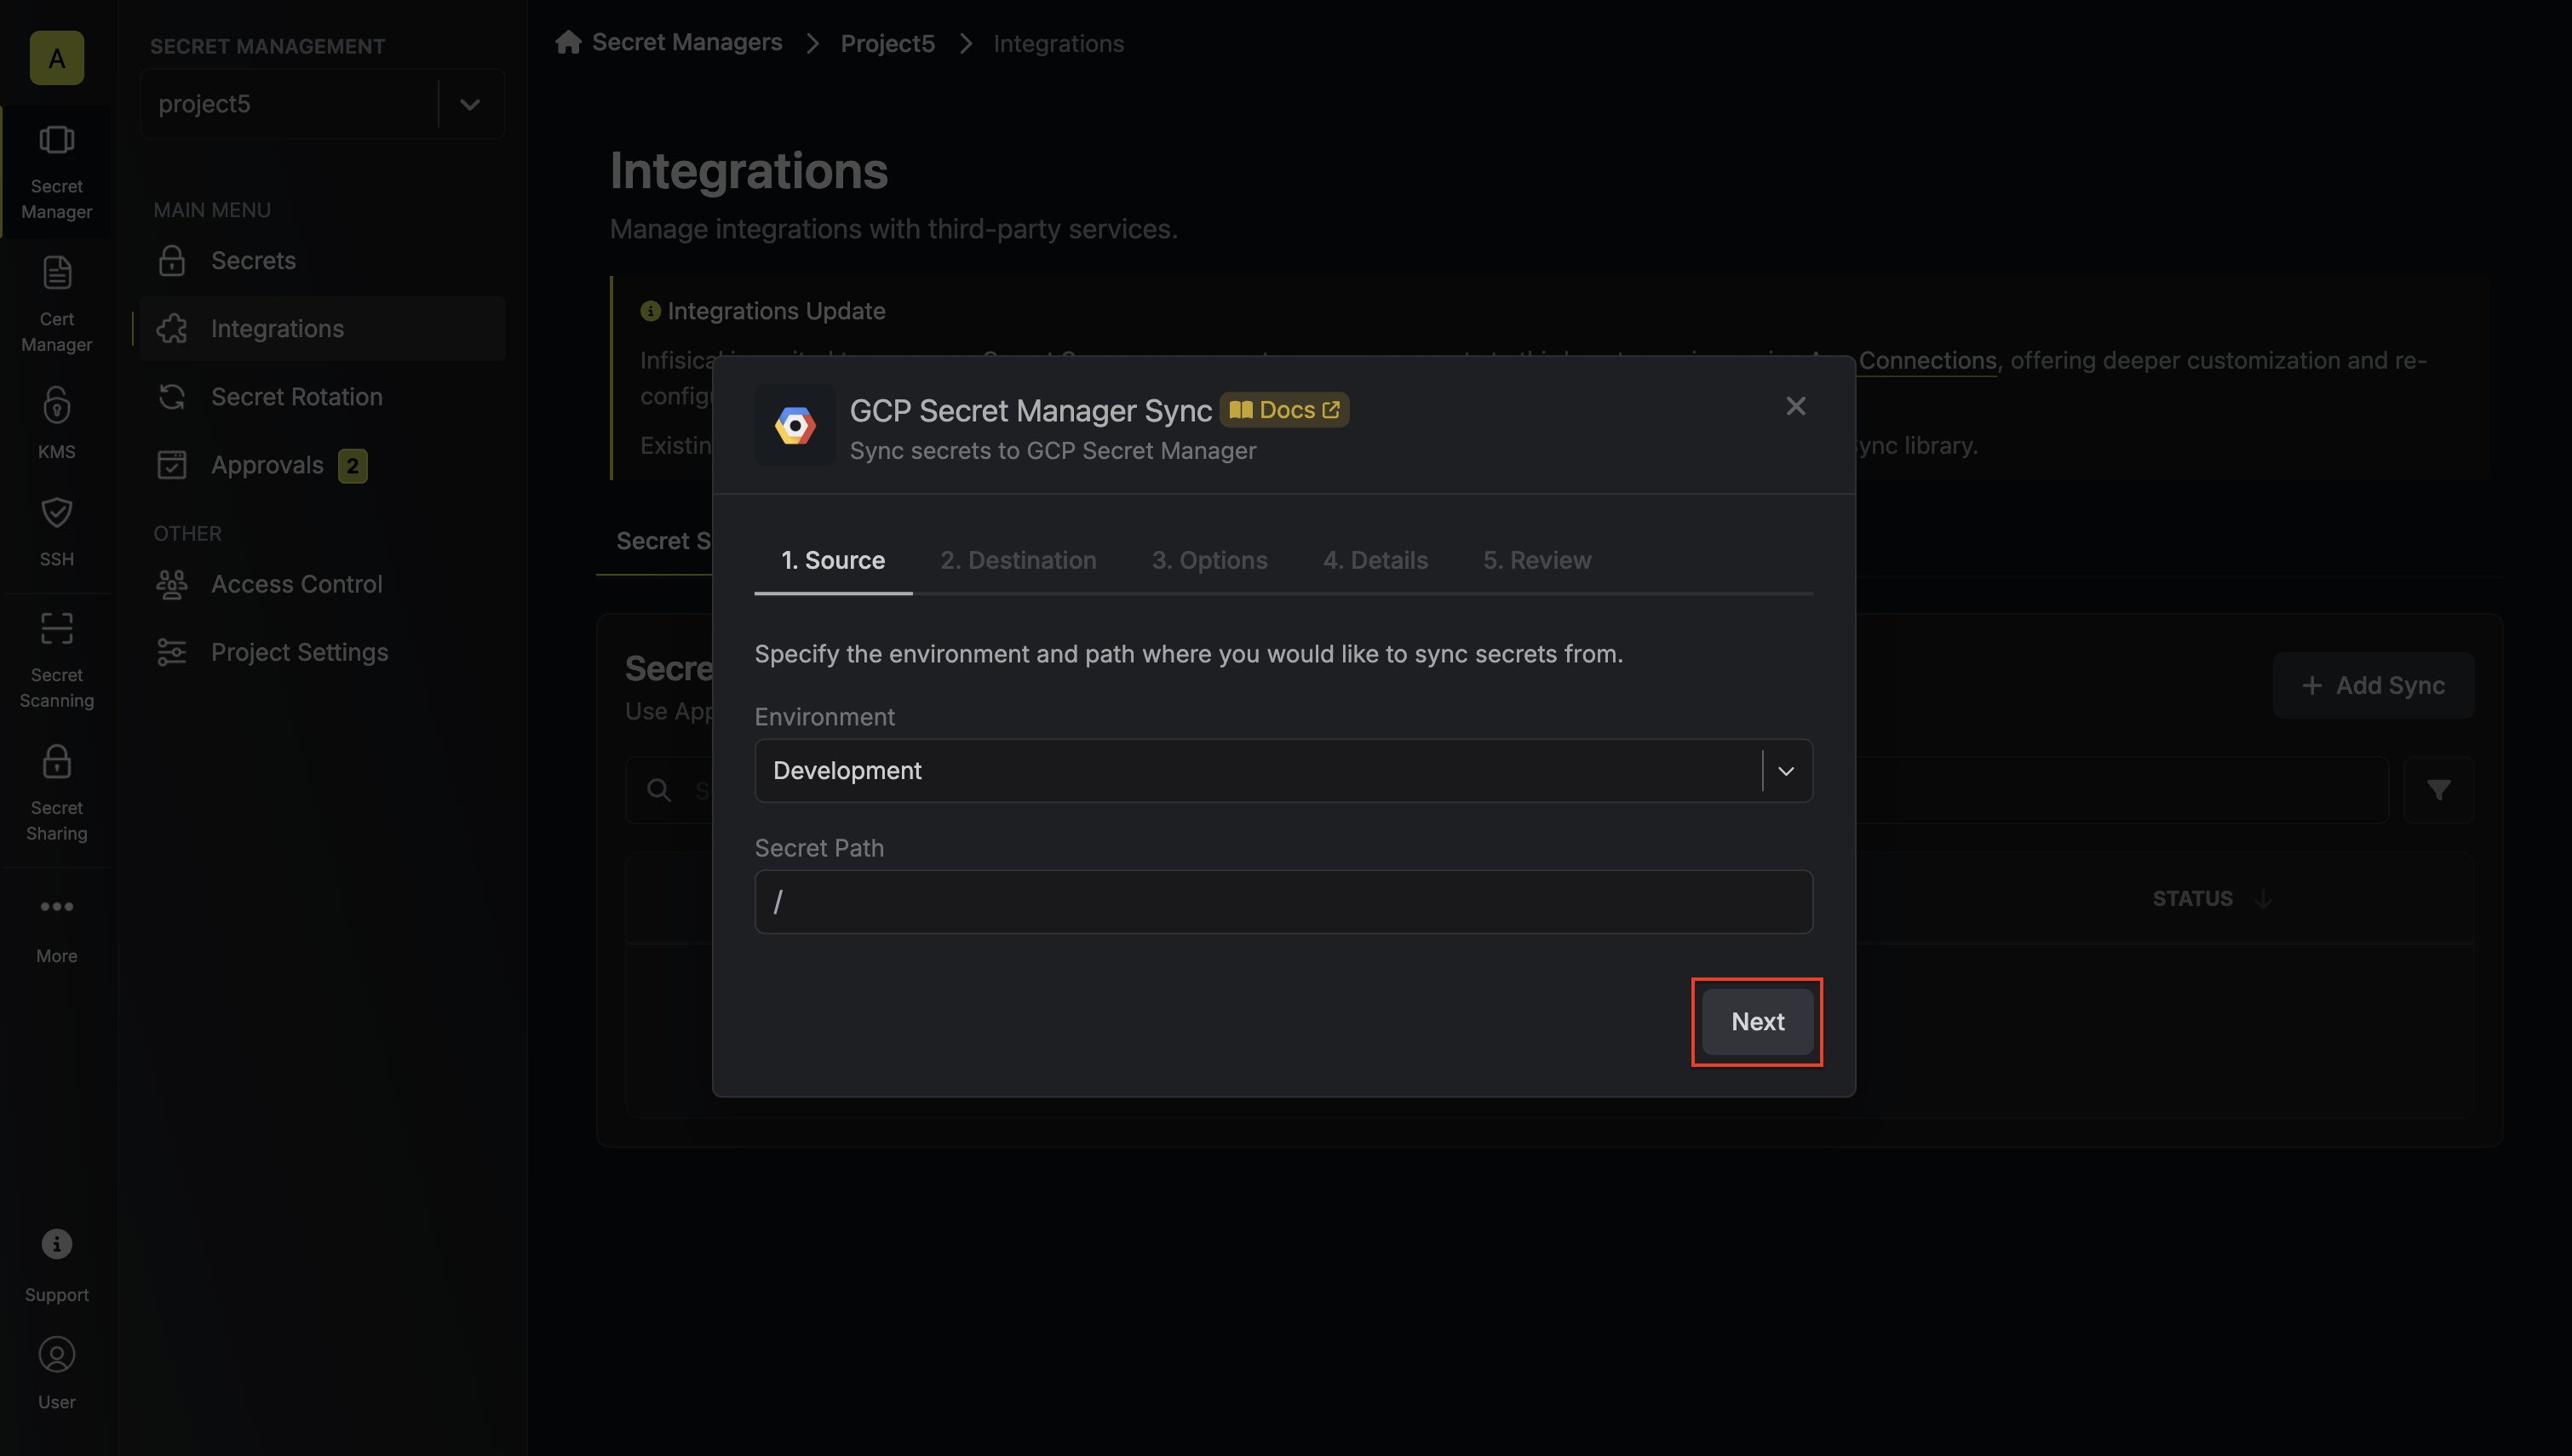
* **Environment**: The project environment to retrieve secrets from.
* **Secret Path**: The folder path to retrieve secrets from.
If you need to sync secrets from multiple folder locations, check out [secret imports](/documentation/platform/secret-reference#secret-imports).
4. Configure the **Destination** to where secrets should be deployed, then click **Next**.
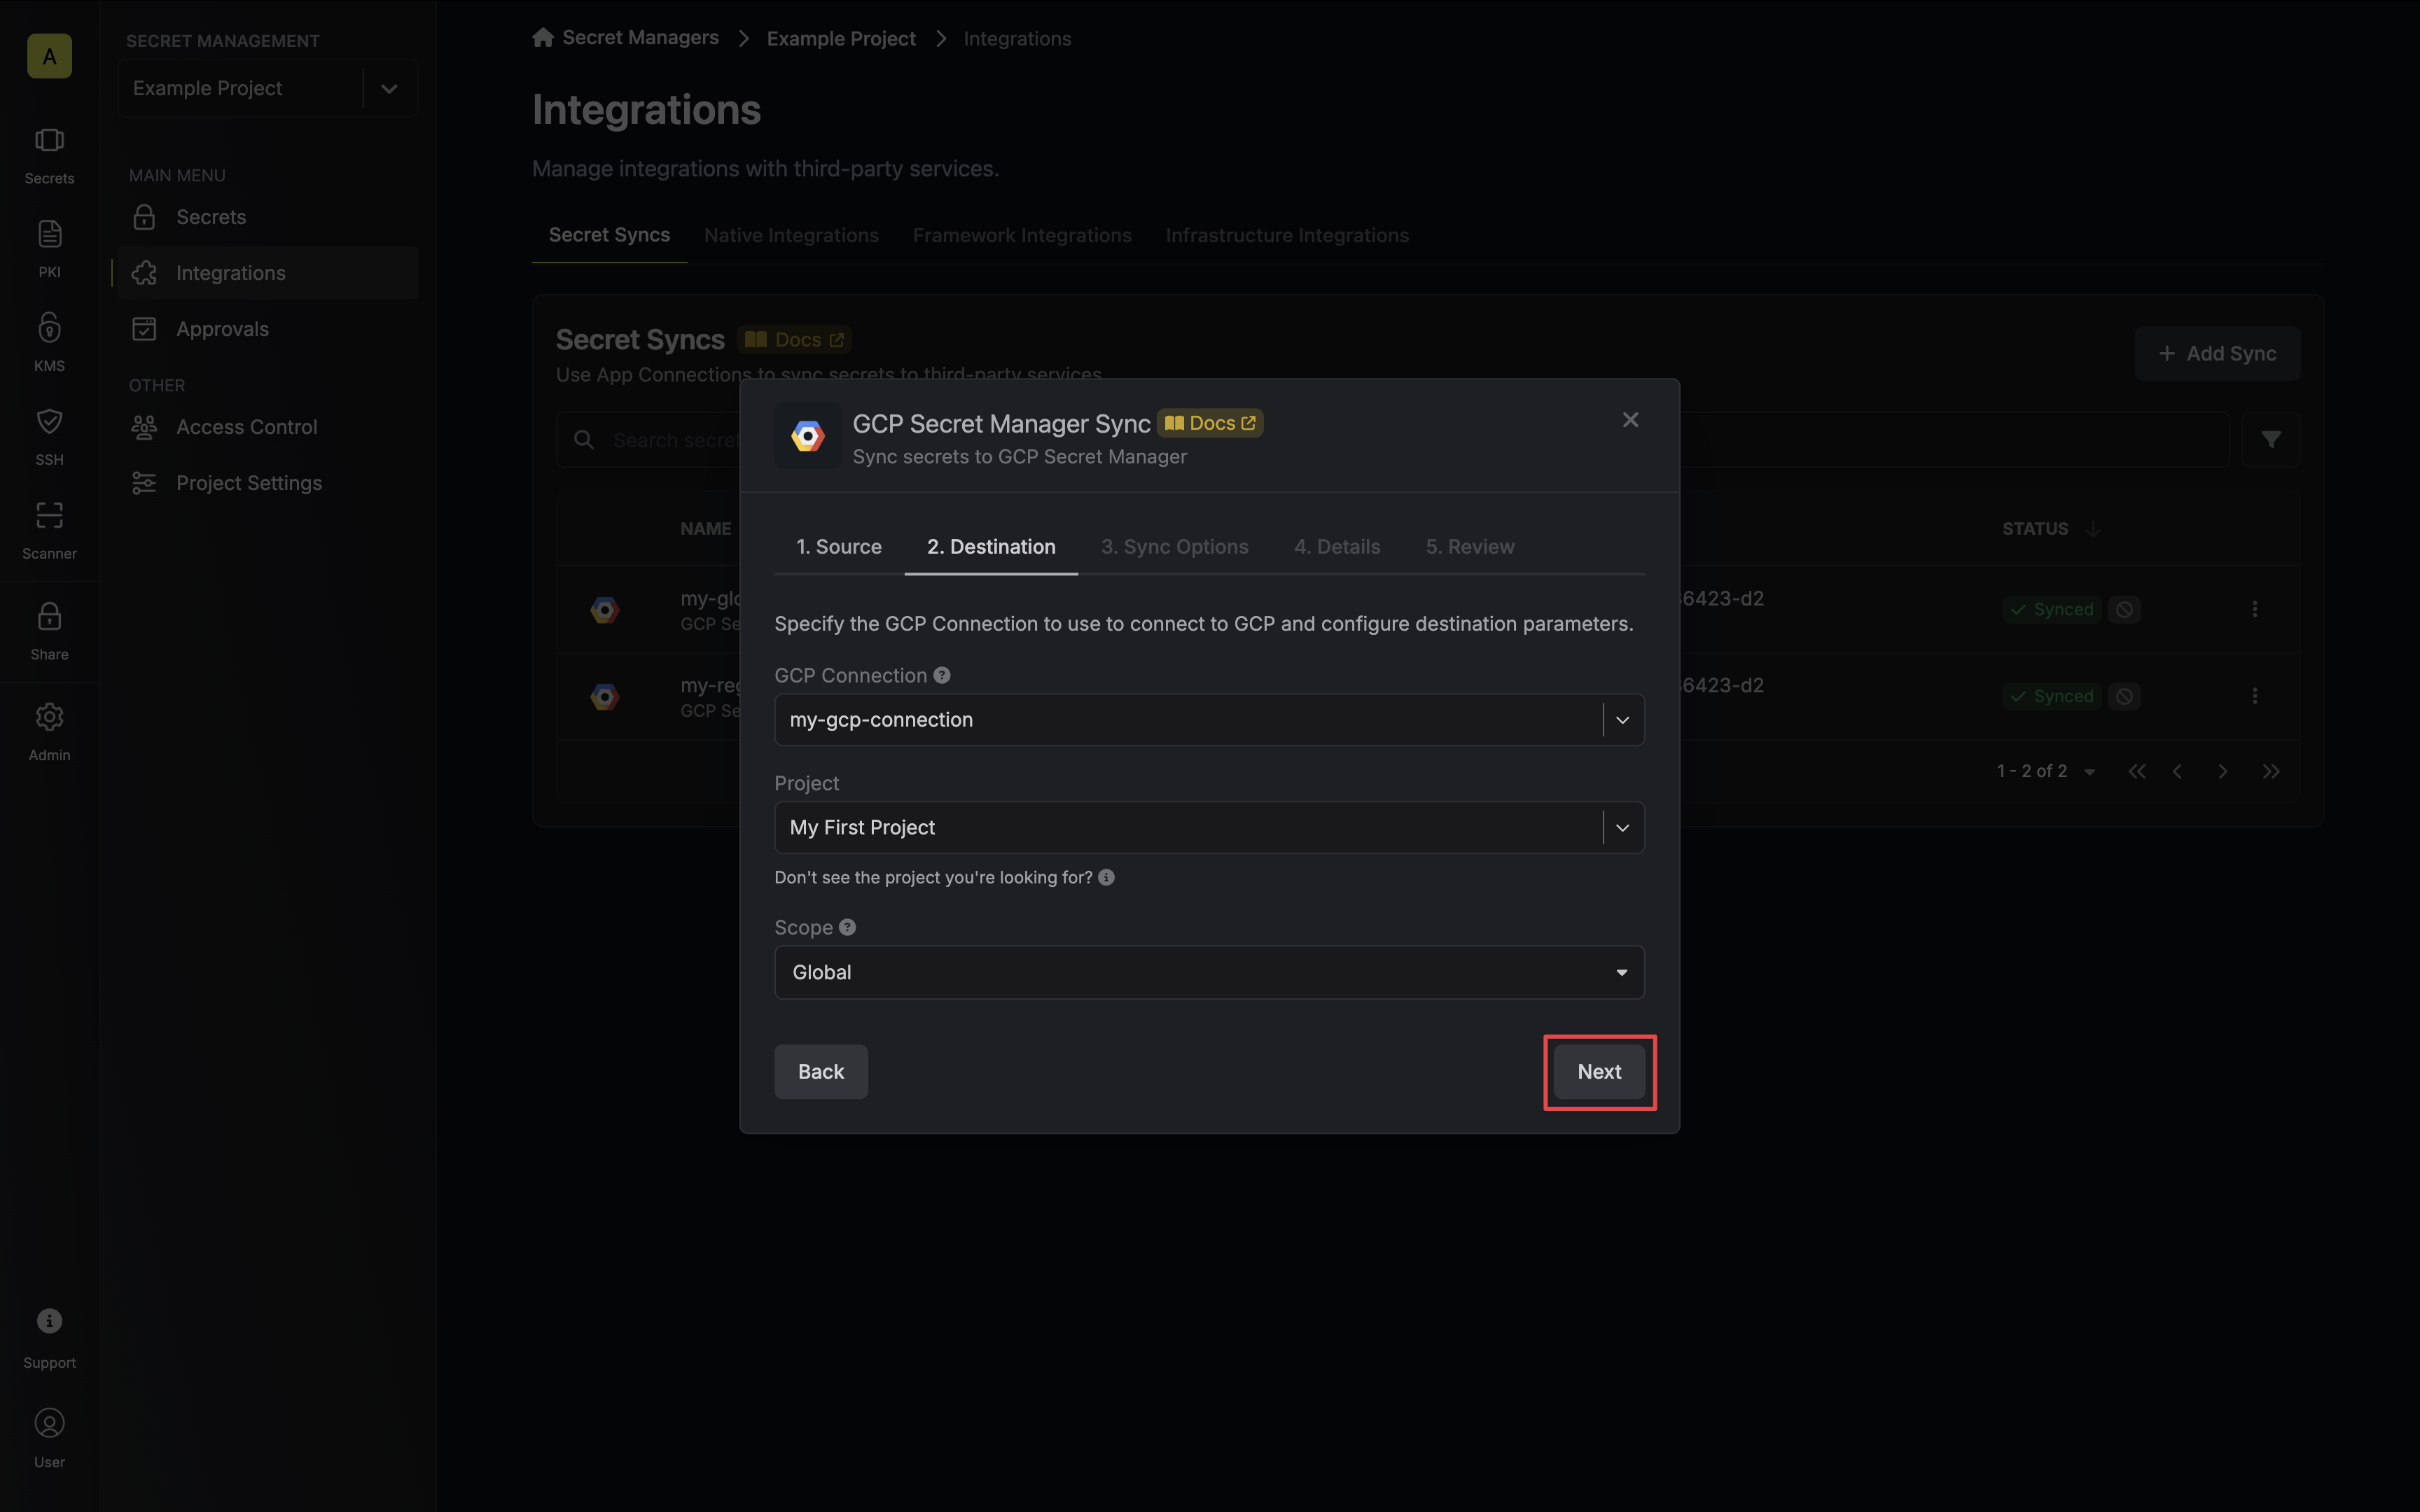
* **GCP Connection**: The GCP Connection to authenticate with.
* **Project**: The GCP project to sync with.
5. Configure the **Sync Options** to specify how secrets should be synced, then click **Next**.
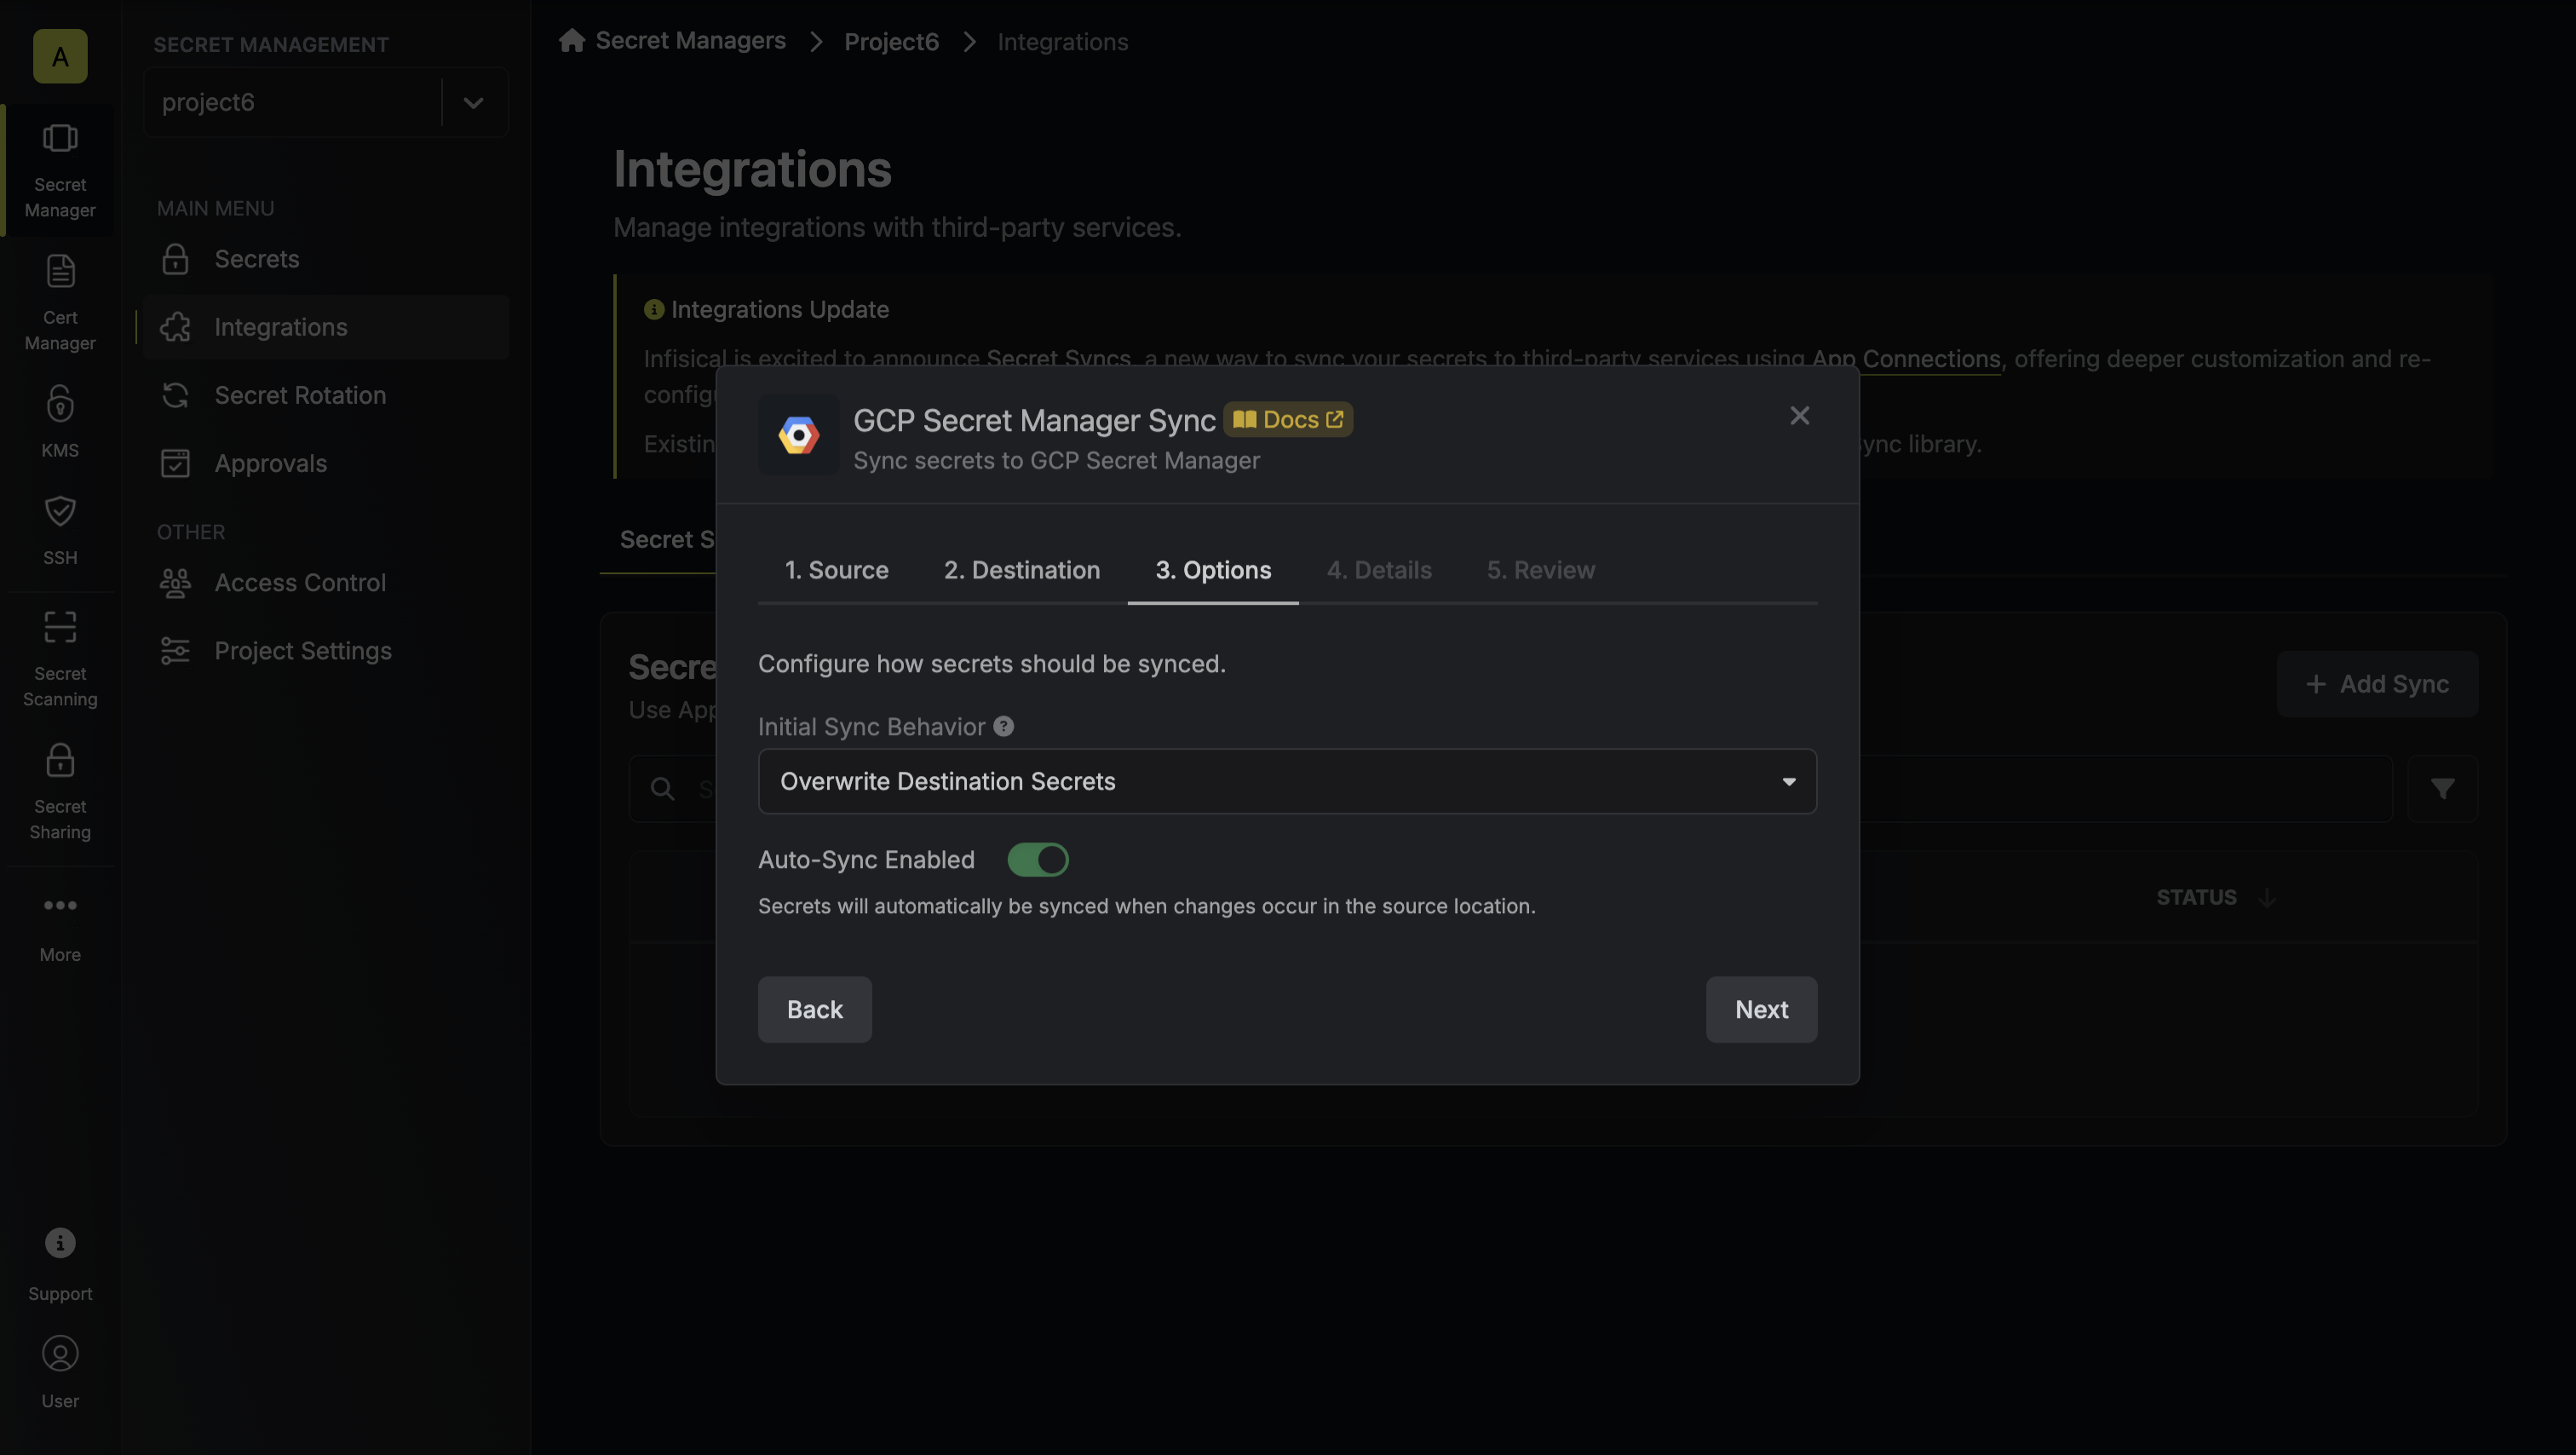
* **Initial Sync Behavior**: Determines how Infisical should resolve the initial sync.
* **Overwrite Destination Secrets**: Removes any secrets at the destination endpoint not present in Infisical.
* **Import Secrets (Prioritize Infisical)**: Imports secrets from the destination endpoint before syncing, prioritizing values from Infisical over GCP Secret Manager when keys conflict.
* **Import Secrets (Prioritize GCP Secret Manager)**: Imports secrets from the destination endpoint before syncing, prioritizing values from GCP Secret Manager over Infisical when keys conflict.
* **Auto-Sync Enabled**: If enabled, secrets will automatically be synced from the source location when changes occur. Disable to enforce manual syncing only.
6. Configure the **Details** of your GCP Secret Manager Sync, then click **Next**.
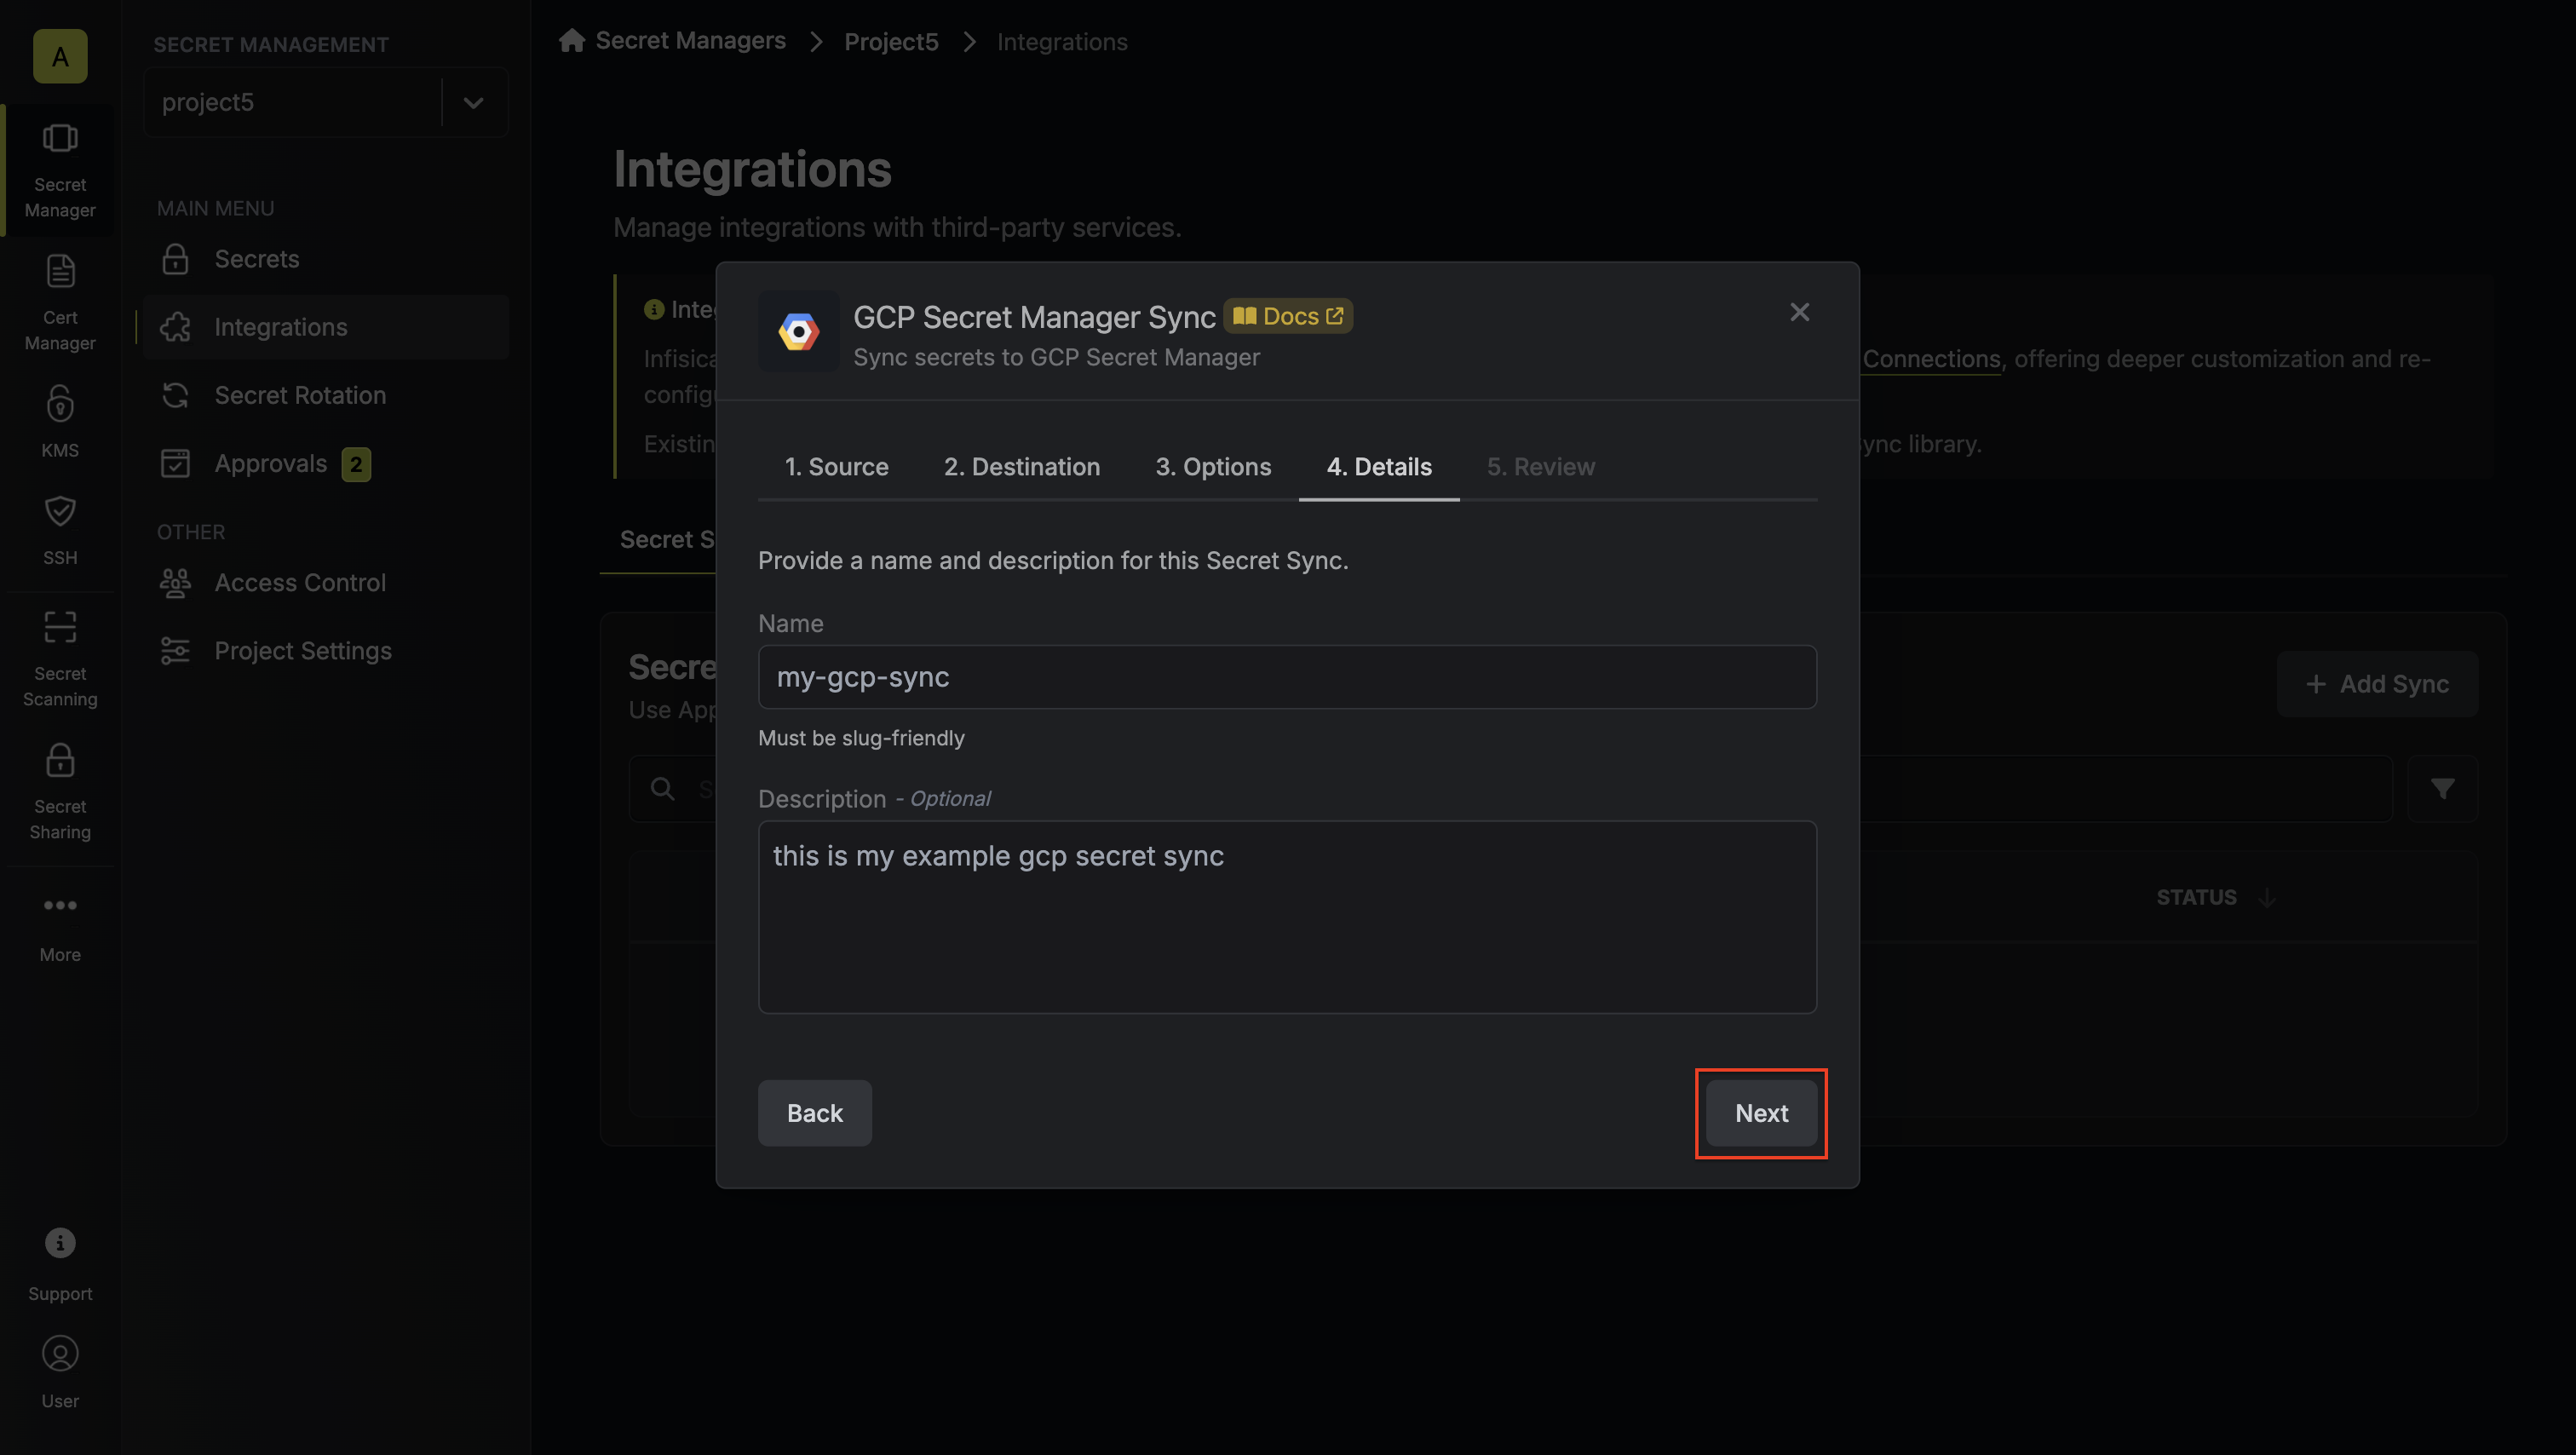
* **Name**: The name of your sync. Must be slug-friendly.
* **Description**: An optional description for your sync.
7. Review your Secret Manager Sync configuration, then click **Create Sync**.

8. If enabled, your GCP Secret Manager Sync will begin syncing your secrets to the destination endpoint.
To create a **GCP Secret Manager Sync**, make an API request to the [Create GCP
Secret Manager Sync](/api-reference/endpoints/secret-syncs/gcp-secret-manager/create) API endpoint.
### Sample request
```bash Request
curl --request POST \
--url https://app.infisical.com/api/v1/secret-syncs/gcp-secret-manager \
--header 'Content-Type: application/json' \
--data '{
"destinationConfig": {
"scope": "global",
"projectId": "infisical-test-playground"
},
"name": "my-gcp-sync",
"description": "this is an example secret sync",
"secretPath": "/",
"syncOptions": {
"initialSyncBehavior": "overwrite-destination"
},
"isAutoSyncEnabled": true,
"connectionId": "eec83609-5eb4-4d8d-9f6e-ded016984f0d",
"environment": "dev",
"projectId": "09eda1f8-85a3-47a9-8a6f-e27f133b2a36"
}'
```
### Sample response
```bash Response
{
"secretSync": {
"id": "aee02c4a-4a5f-488c-82dd-0b3164772871",
"name": "my-gcp-sync",
"description": "this is an example secret sync",
"isAutoSyncEnabled": true,
"version": 1,
"projectId": "09eda1f8-85a3-47a9-8a6f-e27f133b2a36",
"folderId": "1447389e-16fb-49ba-96fd-361b5a2522af",
"connectionId": "eec83609-5eb4-4d8d-9f6e-ded016984f0d",
"createdAt": "2025-01-27T12:28:59.408Z",
"updatedAt": "2025-01-27T12:28:59.408Z",
"syncStatus": "pending",
"lastSyncJobId": null,
"lastSyncMessage": null,
"lastSyncedAt": null,
"importStatus": null,
"lastImportJobId": null,
"lastImportMessage": null,
"lastImportedAt": null,
"removeStatus": null,
"lastRemoveJobId": null,
"lastRemoveMessage": null,
"lastRemovedAt": null,
"syncOptions": {
"initialSyncBehavior": "overwrite-destination"
},
"connection": {
"app": "gcp",
"name": "my-gcp-connection",
"id": "eec83609-5eb4-4d8d-9f6e-ded016984f0d"
},
"environment": {
"slug": "dev",
"name": "Development",
"id": "124e0392-4070-4b1c-900e-ced30cd55bf3"
},
"folder": {
"id": "1447389e-16fb-49ba-96fd-361b5a2522af",
"path": "/"
},
"destination": "gcp-secret-manager",
"destinationConfig": {
"projectId": "infisical-test-playground"
}
}
}
```
# GitHub Sync
Source: https://infisical.com/docs/integrations/secret-syncs/github
Learn how to configure a GitHub Sync for Infisical.
**Prerequisites:**
* Set up and add secrets to [Infisical Cloud](https://app.infisical.com)
* Create a [GitHub Connection](/integrations/app-connections/github)
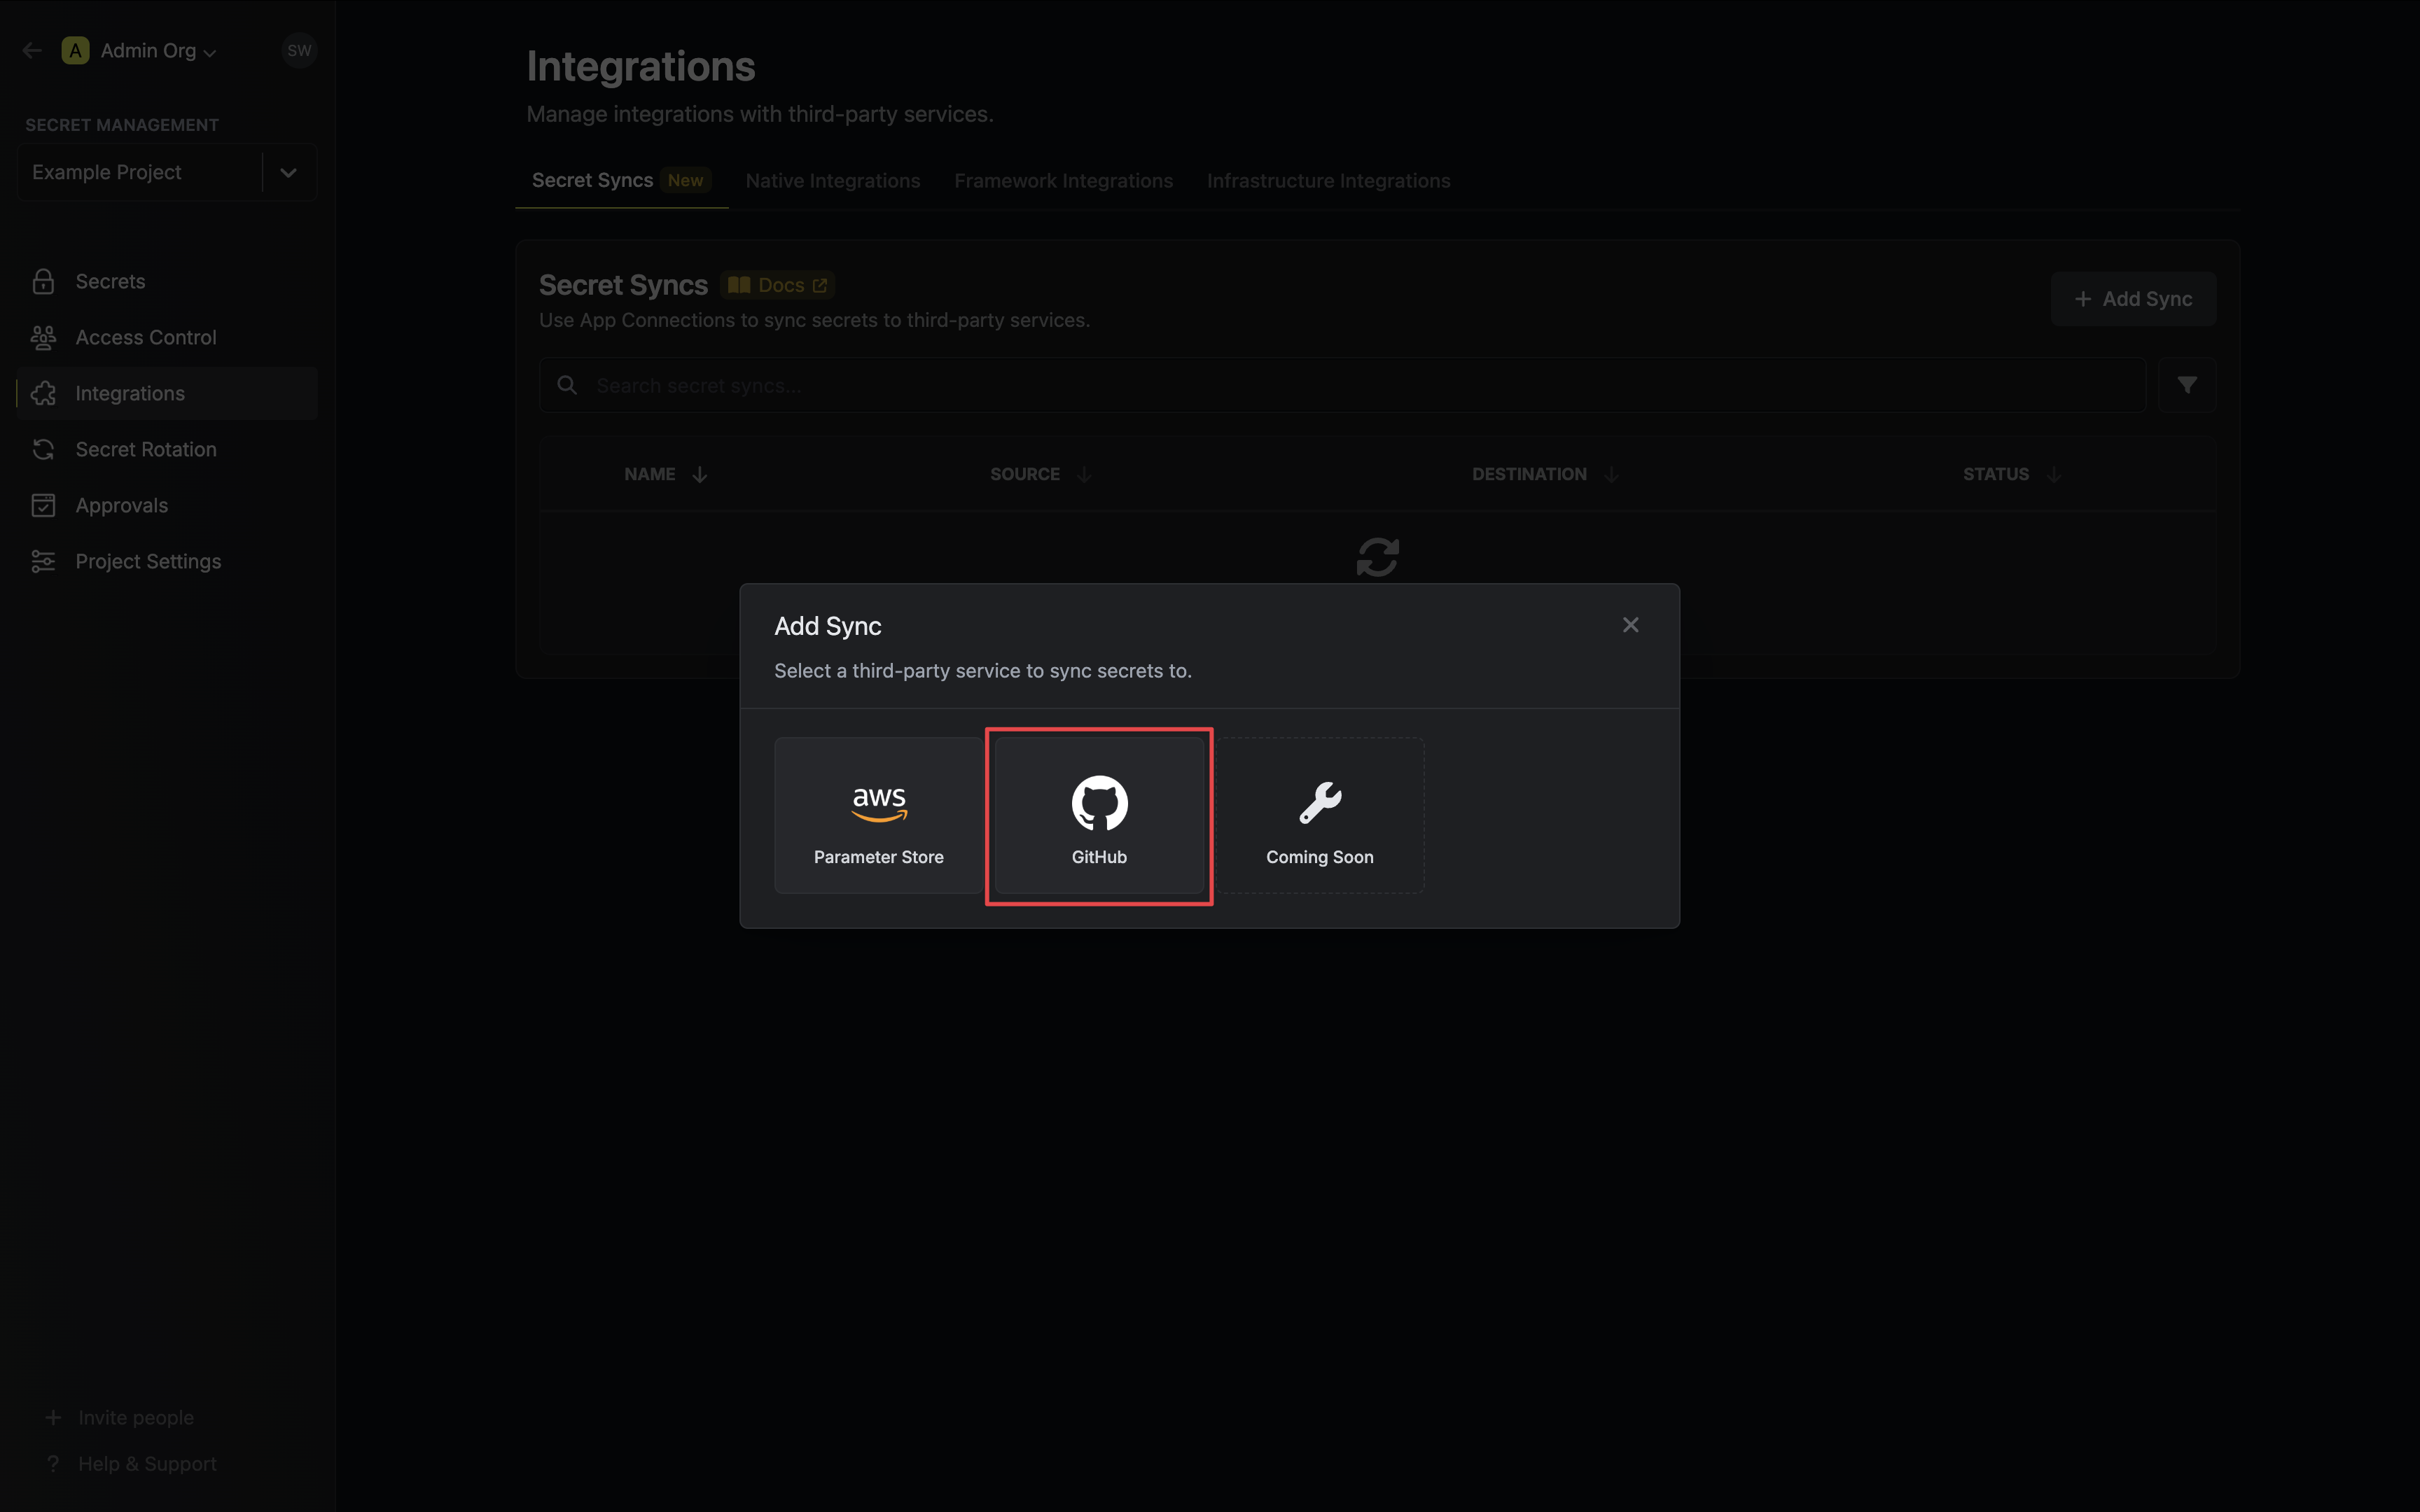
1. Navigate to **Project** > **Integrations** and select the **Secret Syncs** tab. Click on the **Add Sync** button.

2. Select the **GitHub** option.
3. Configure the **Source** from where secrets should be retrieved, then click **Next**.
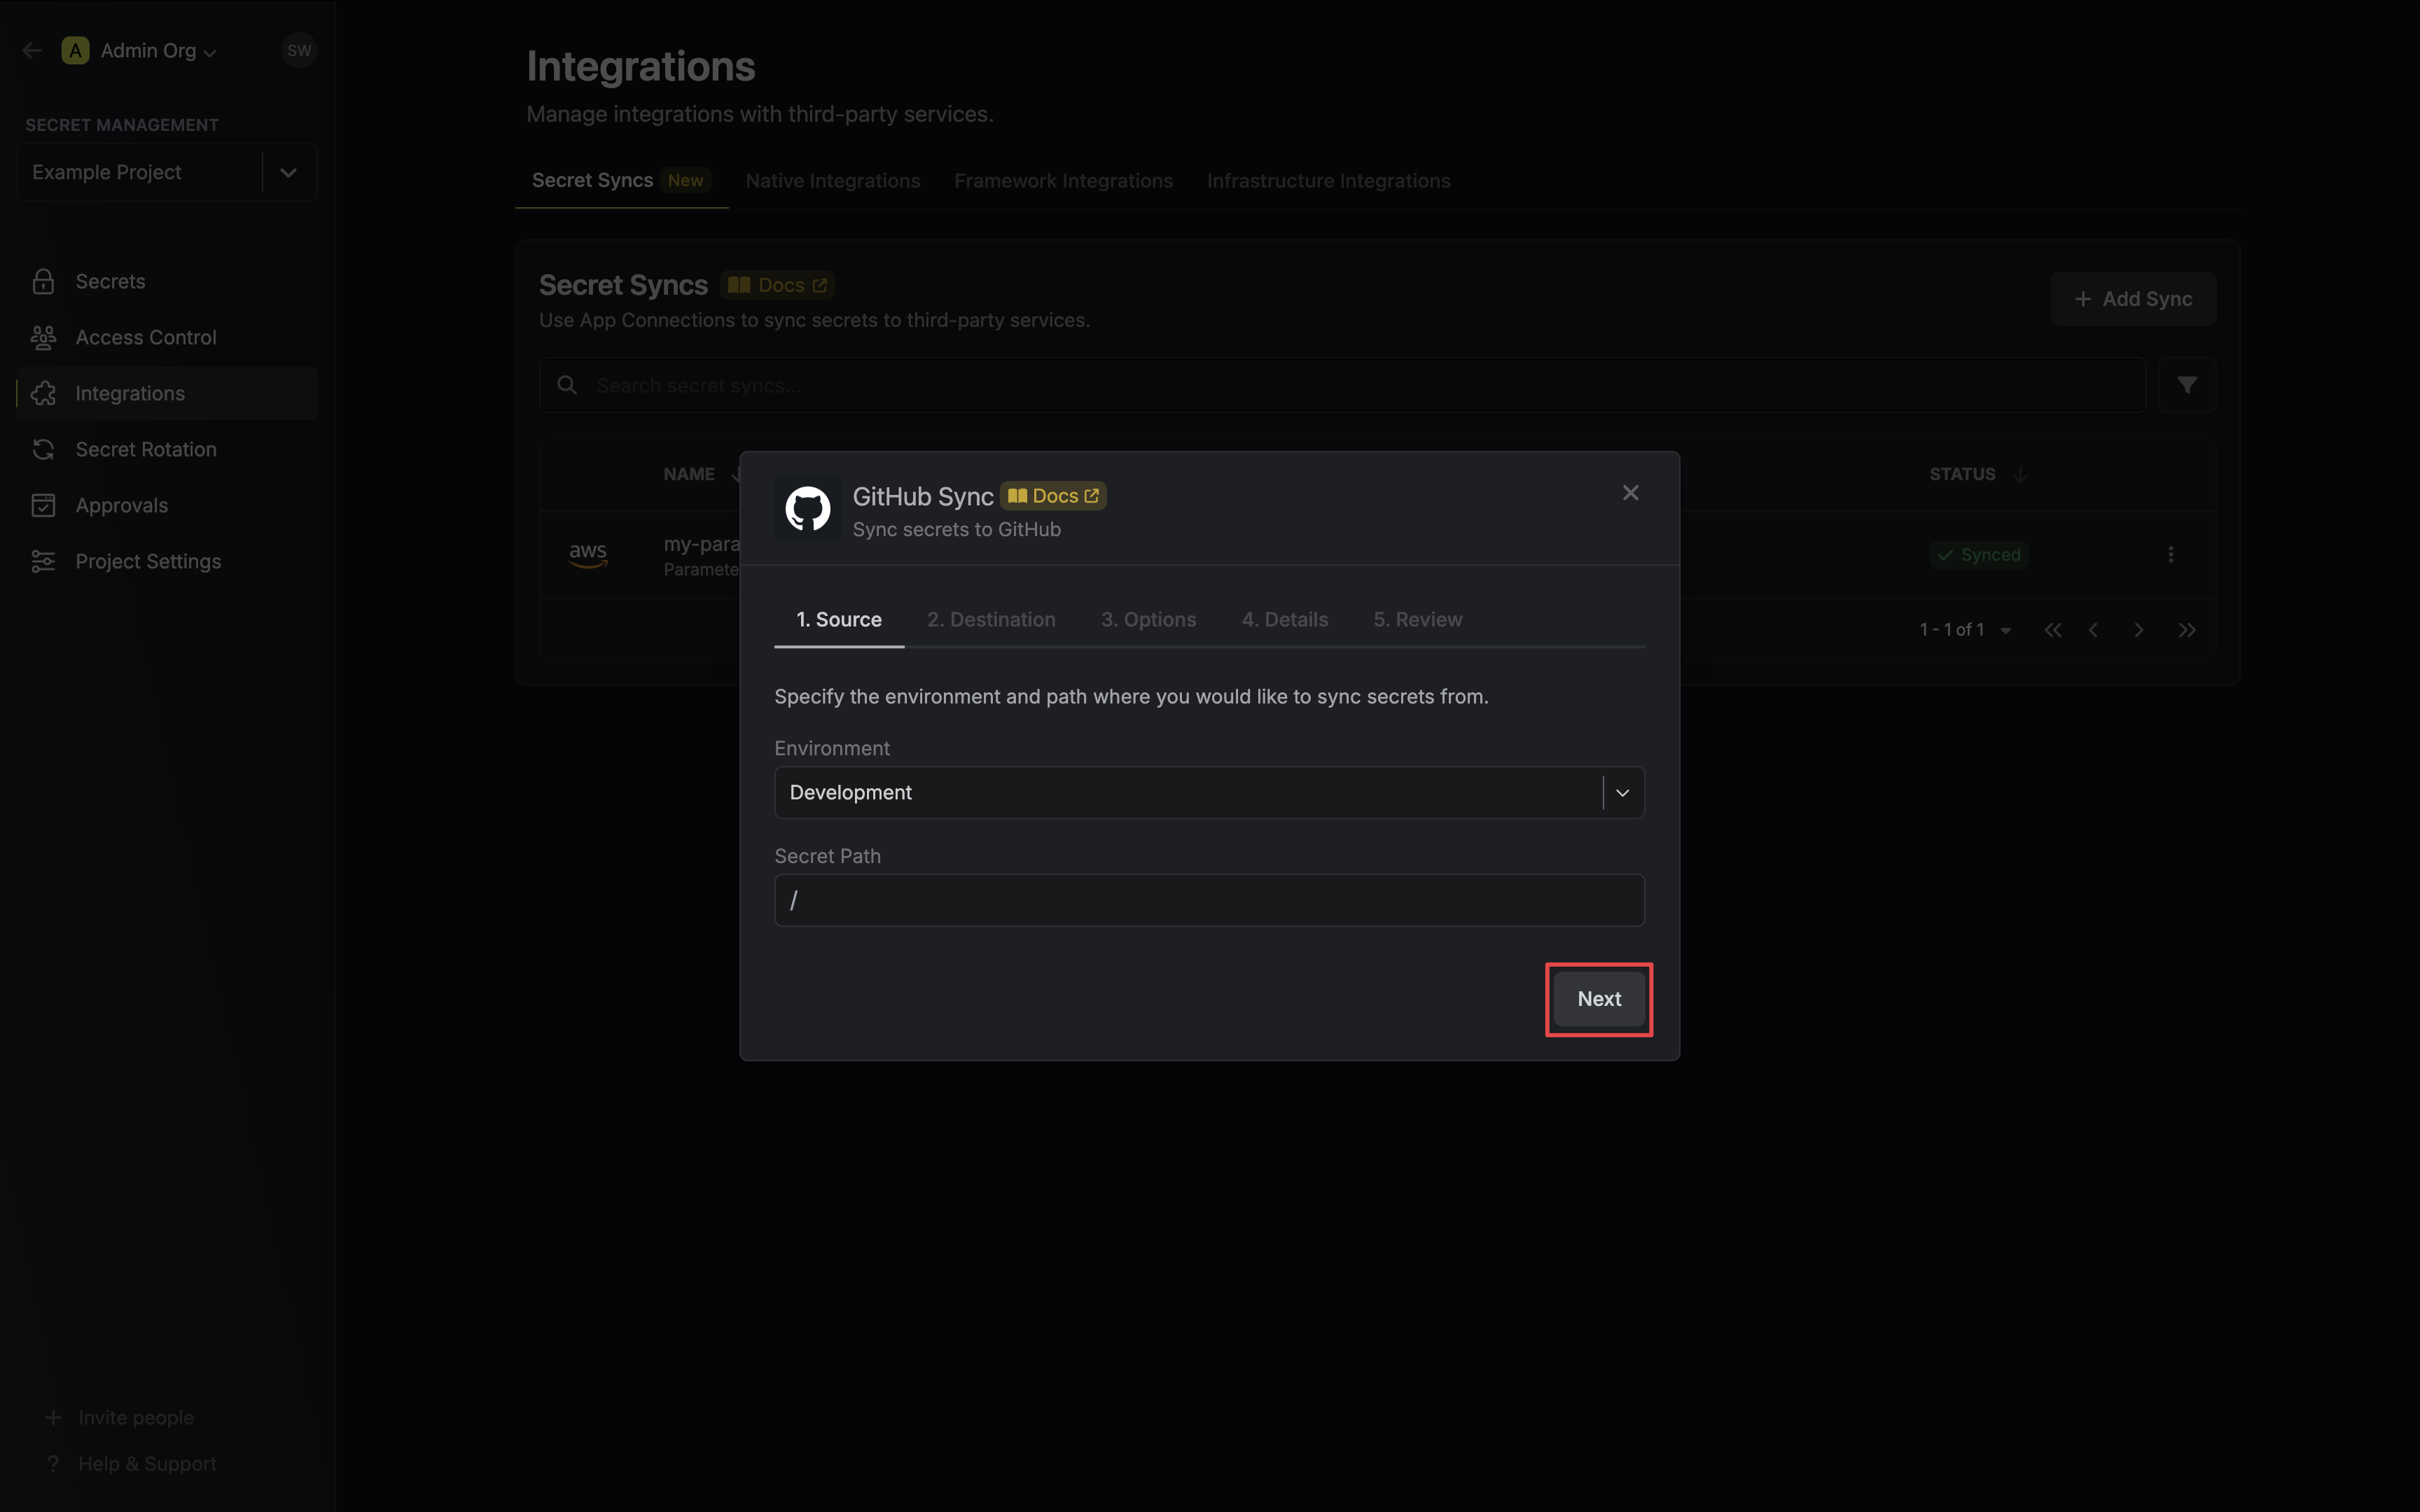
* **Environment**: The project environment to retrieve secrets from.
* **Secret Path**: The folder path to retrieve secrets from.
If you need to sync secrets from multiple folder locations, check out [secret imports](/documentation/platform/secret-reference#secret-imports).
4. Configure the **Destination** to where secrets should be deployed, then click **Next**.
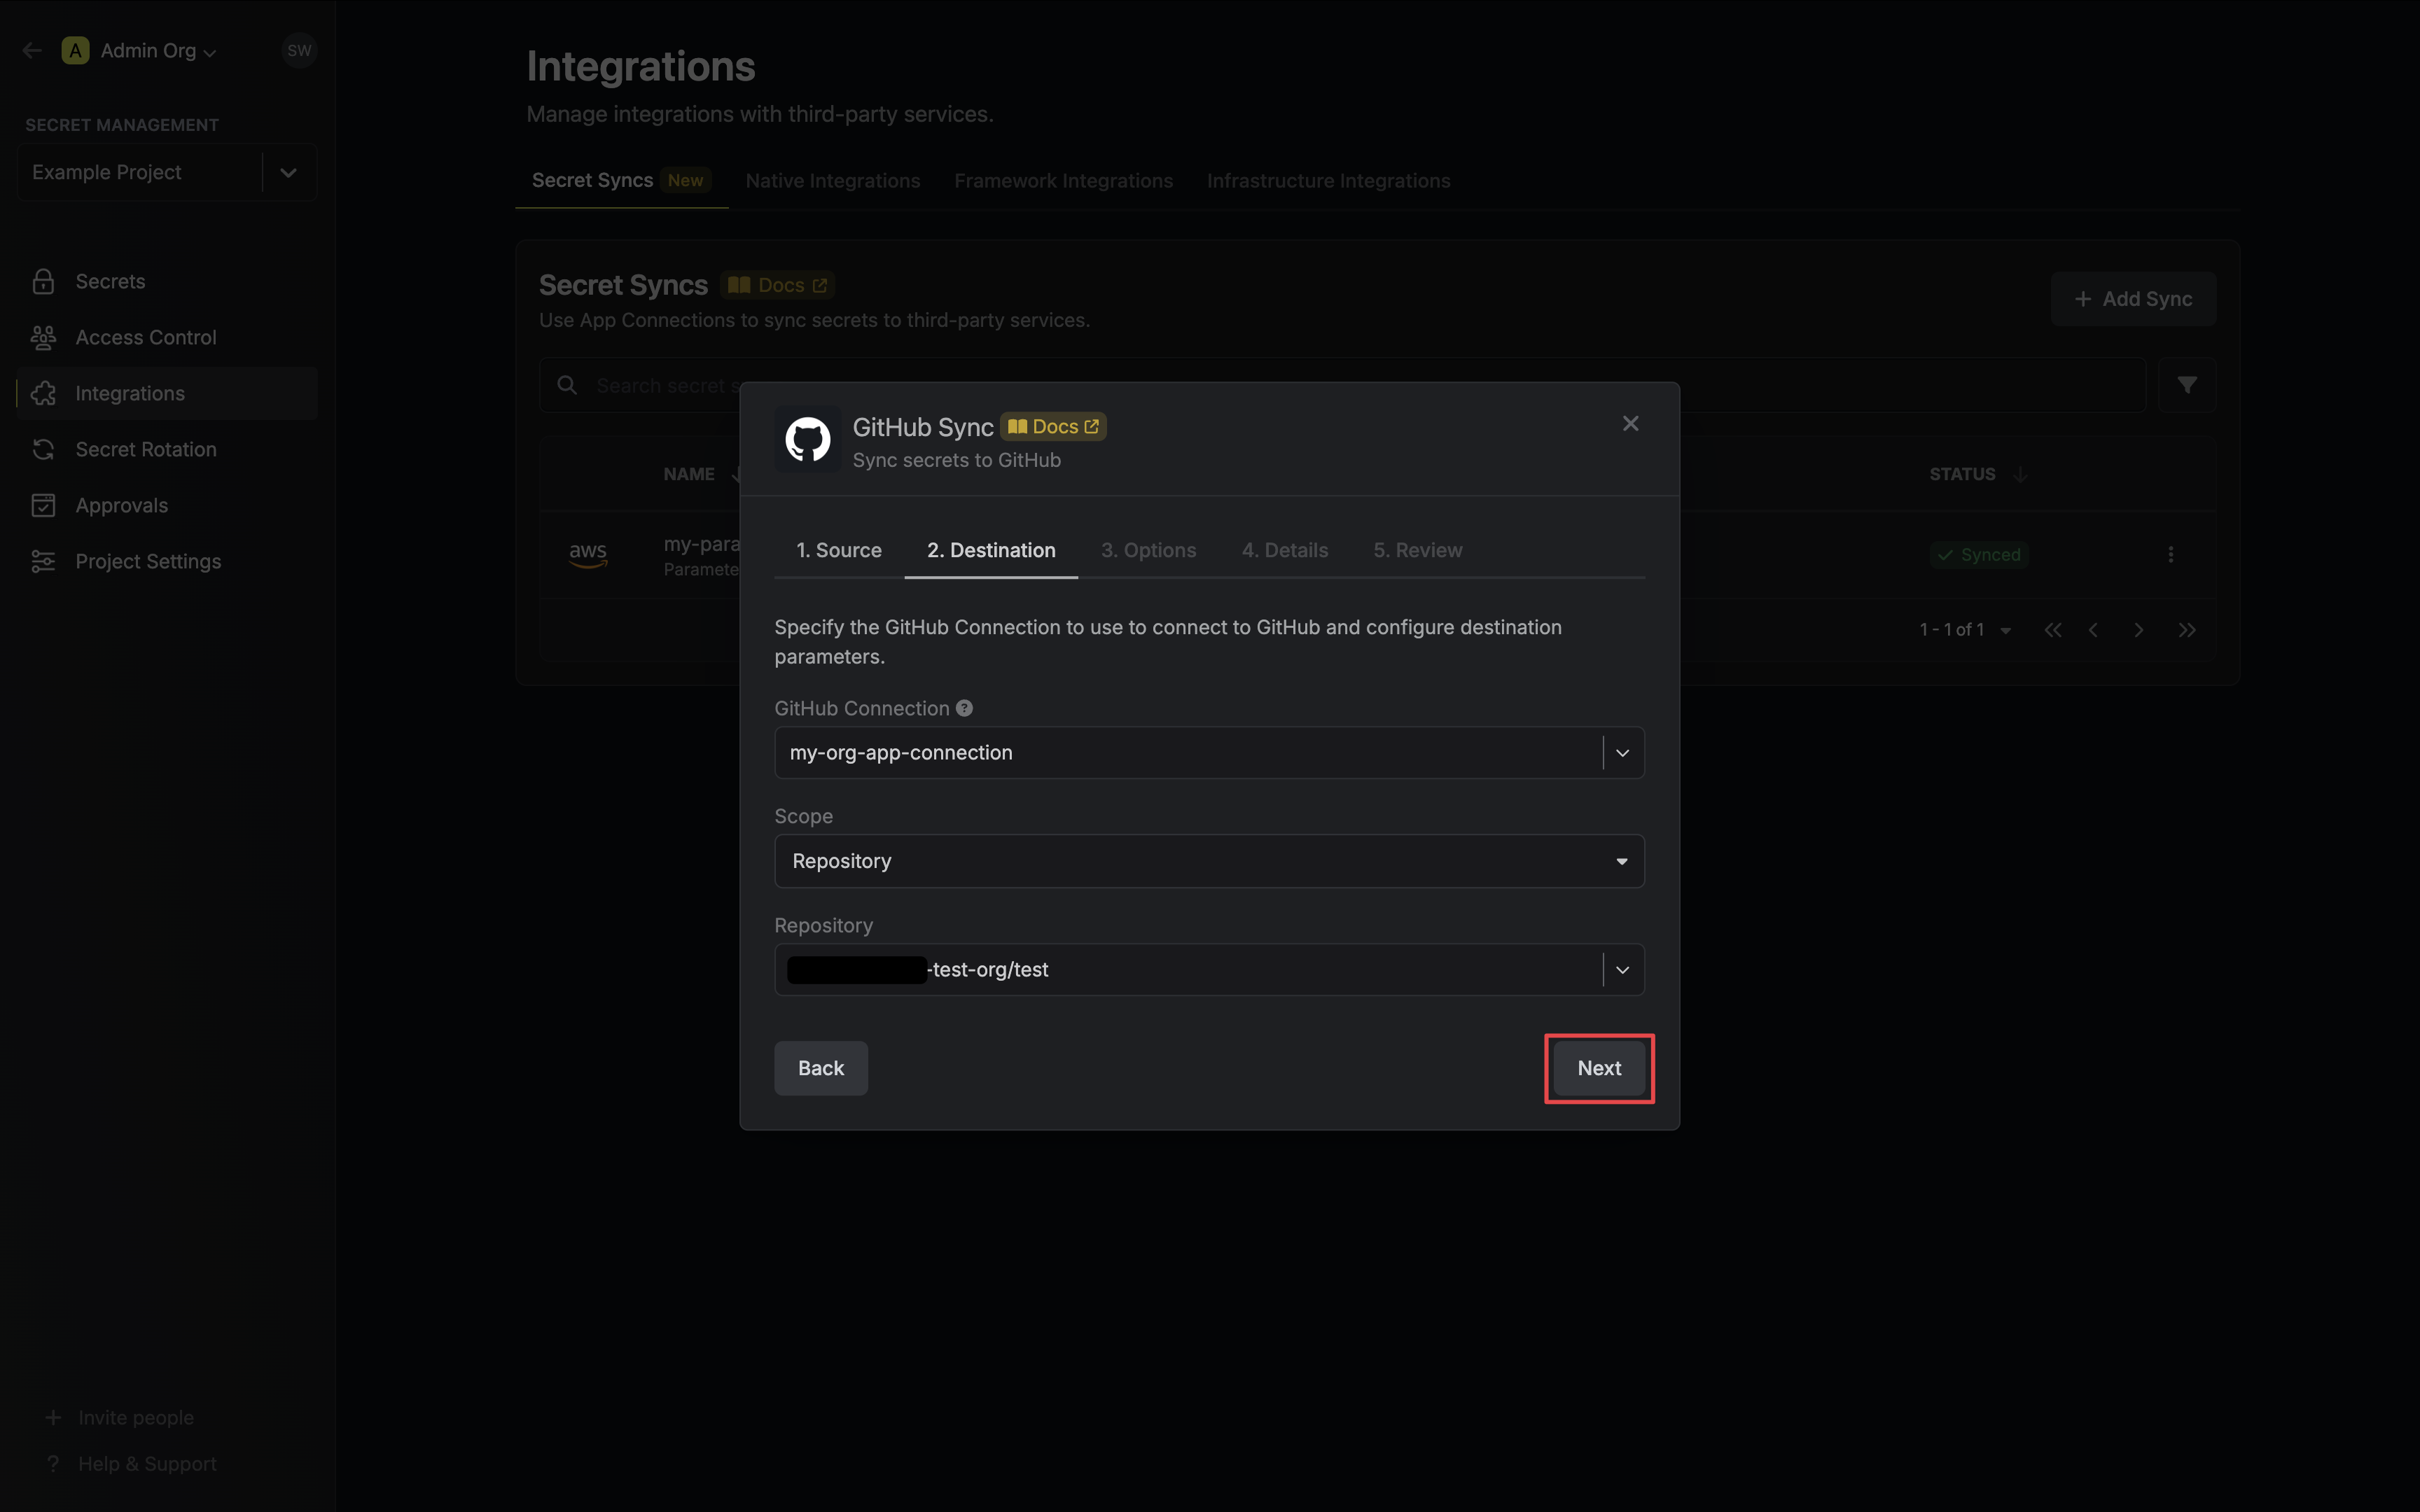
* **GitHub Connection**: The GitHub Connection to authenticate with.
* **Scope**: The GitHub secret scope to sync secrets to.
* **Organization**: Sync secrets to a specific organization.
* **Repository**: Sync secrets to a specific repository.
* **Repository Environment**: Sync secrets to a specific repository's environment.
The remaining fields are determined by the selected **Scope**:
* **Organization**: The organization to deploy secrets to.
* **Visibility**: Determines which organization repositories can access deployed secrets.
* **All Repositories**: All repositories of the organization. (Public repositories if not a Pro/Team account)
* **Private Repositories**: All private repositories of the organization. (Requires Pro/Team account)
* **Selected Repositories**: Only the selected Repositories.
* **Selected Repositories**: The selected repositories if **Visibility** is set to **Selected Repositories**.
* **Repository**: The repository to deploy secrets to.
* **Repository**: The repository to deploy secrets to.
* **Environment**: The repository's environment to deploy secrets to.
5. Configure the **Sync Options** to specify how secrets should be synced, then click **Next**.
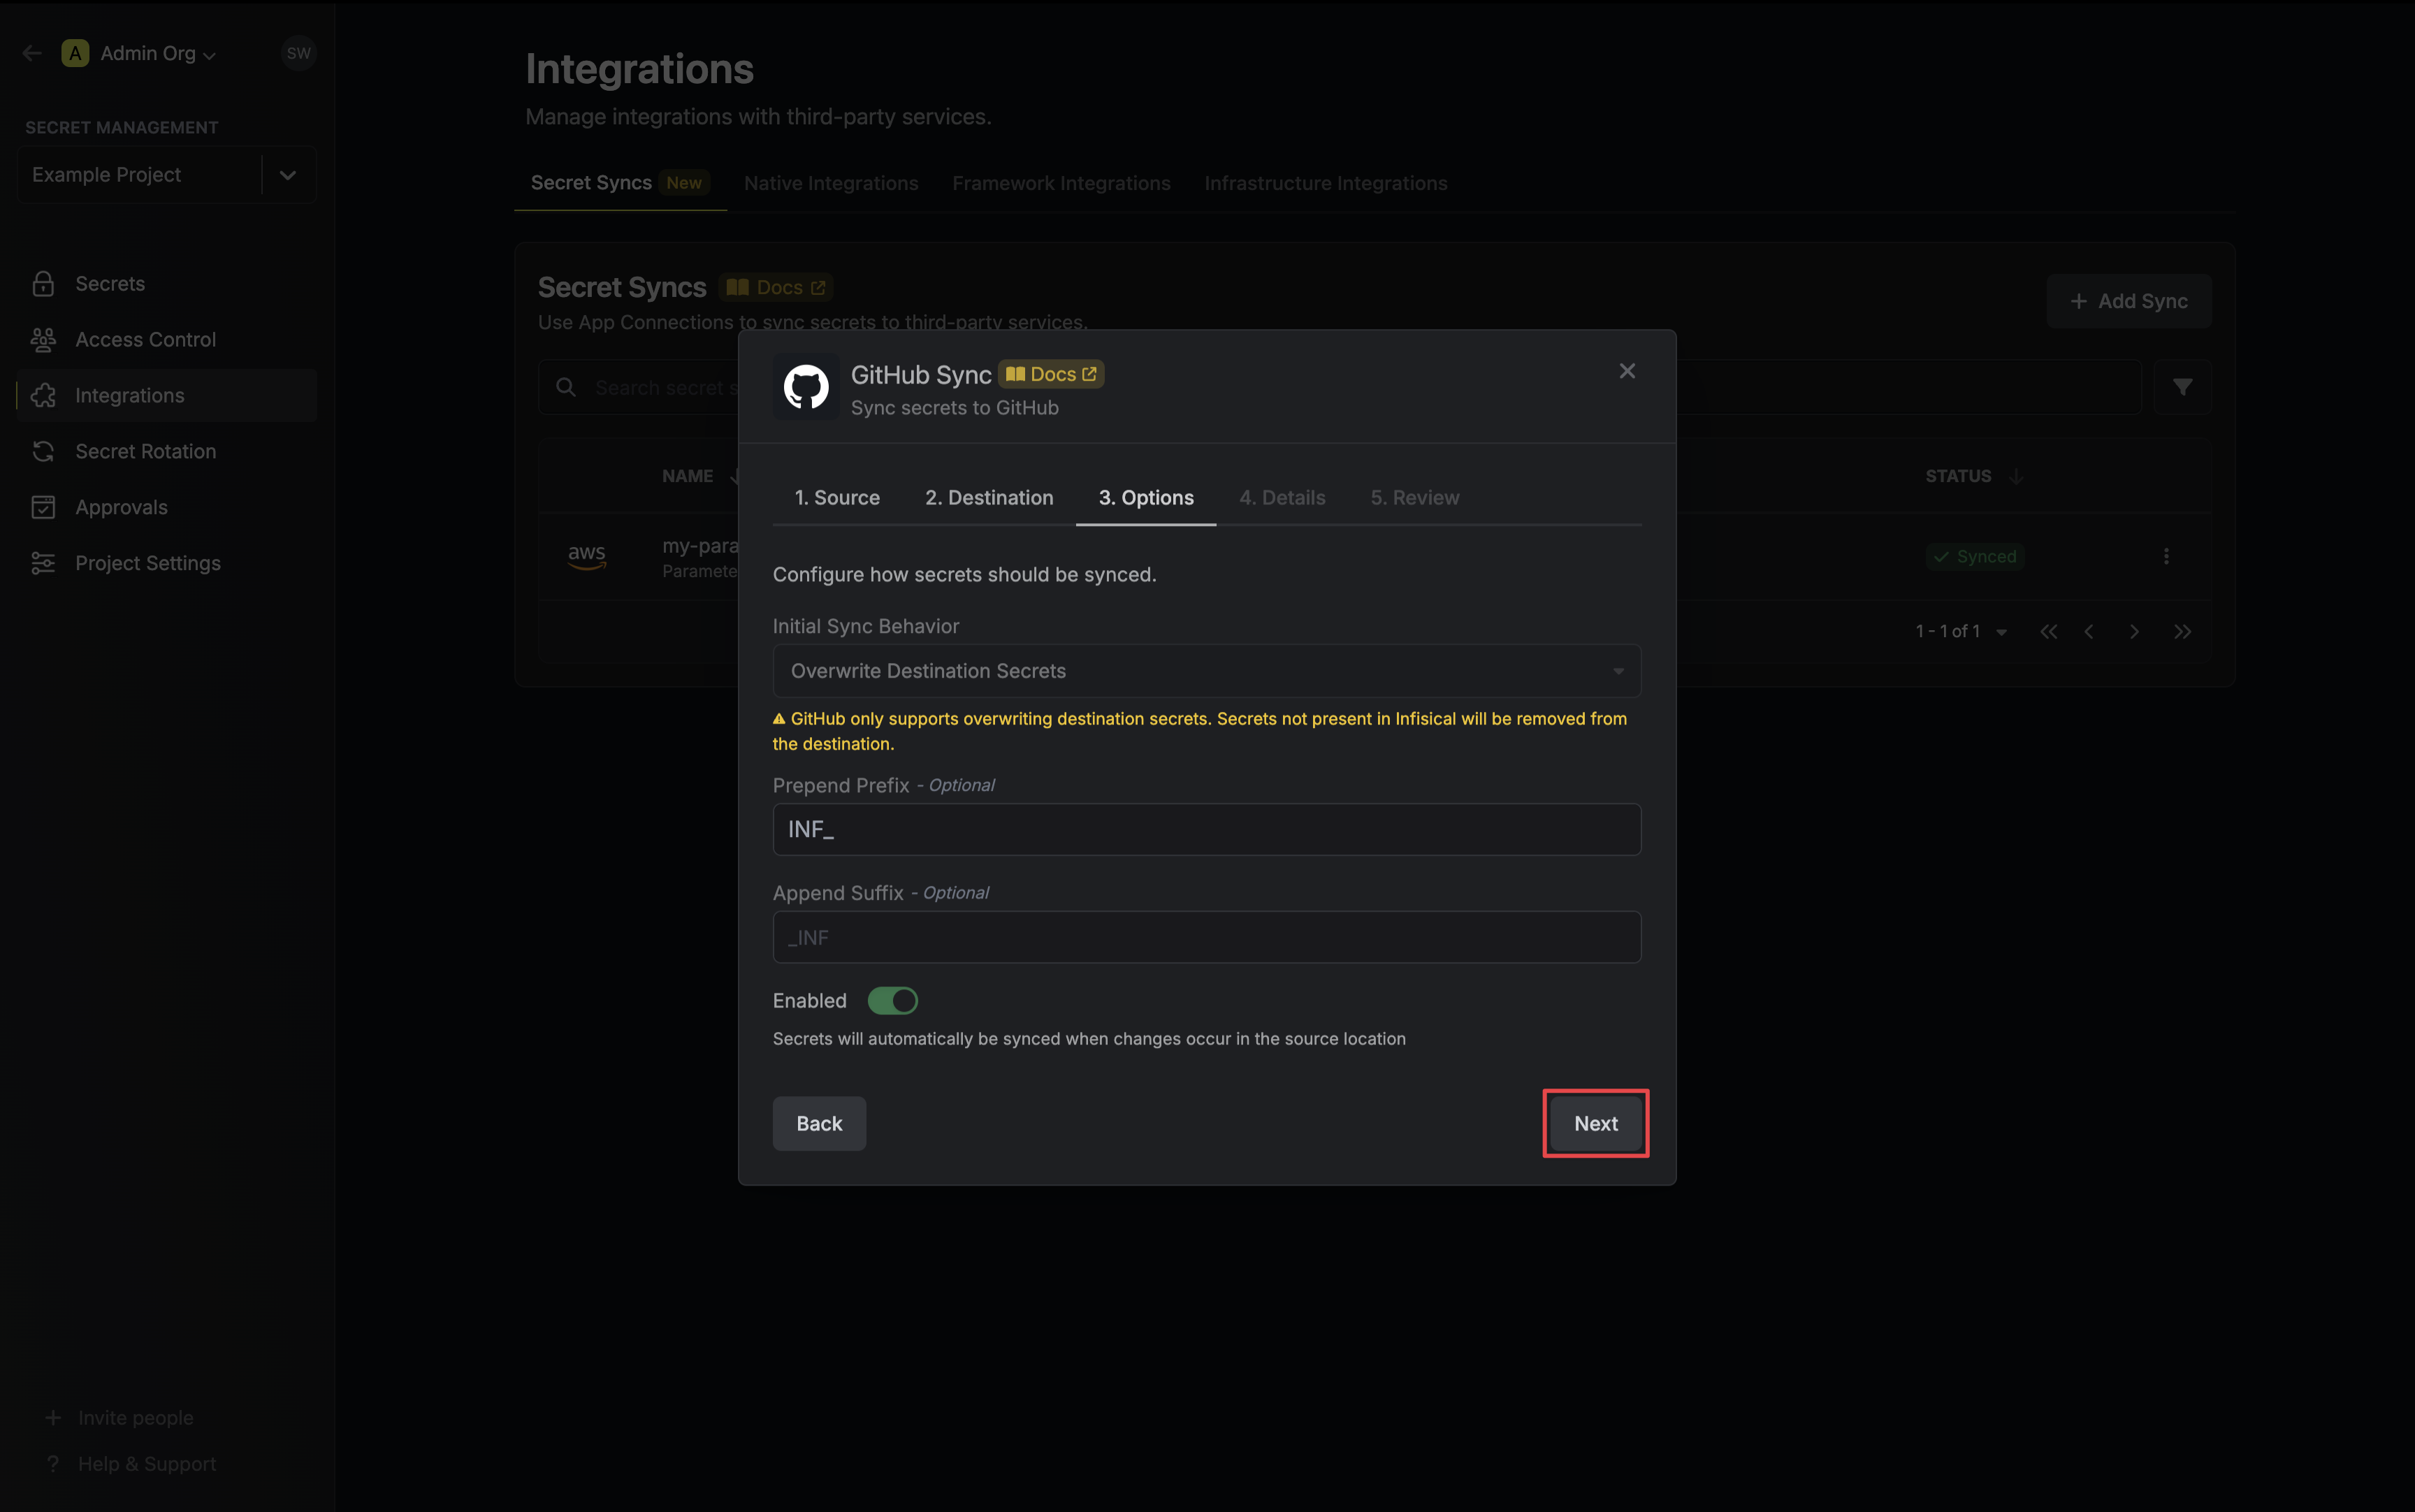
* **Initial Sync Behavior**: Determines how Infisical should resolve the initial sync.
* **Overwrite Destination Secrets**: Removes any secrets at the destination endpoint not present in Infisical.
GitHub does not support importing secrets.
* **Auto-Sync Enabled**: If enabled, secrets will automatically be synced from the source location when changes occur. Disable to enforce manual syncing only.
6. Configure the **Details** of your GitHub Sync, then click **Next**.
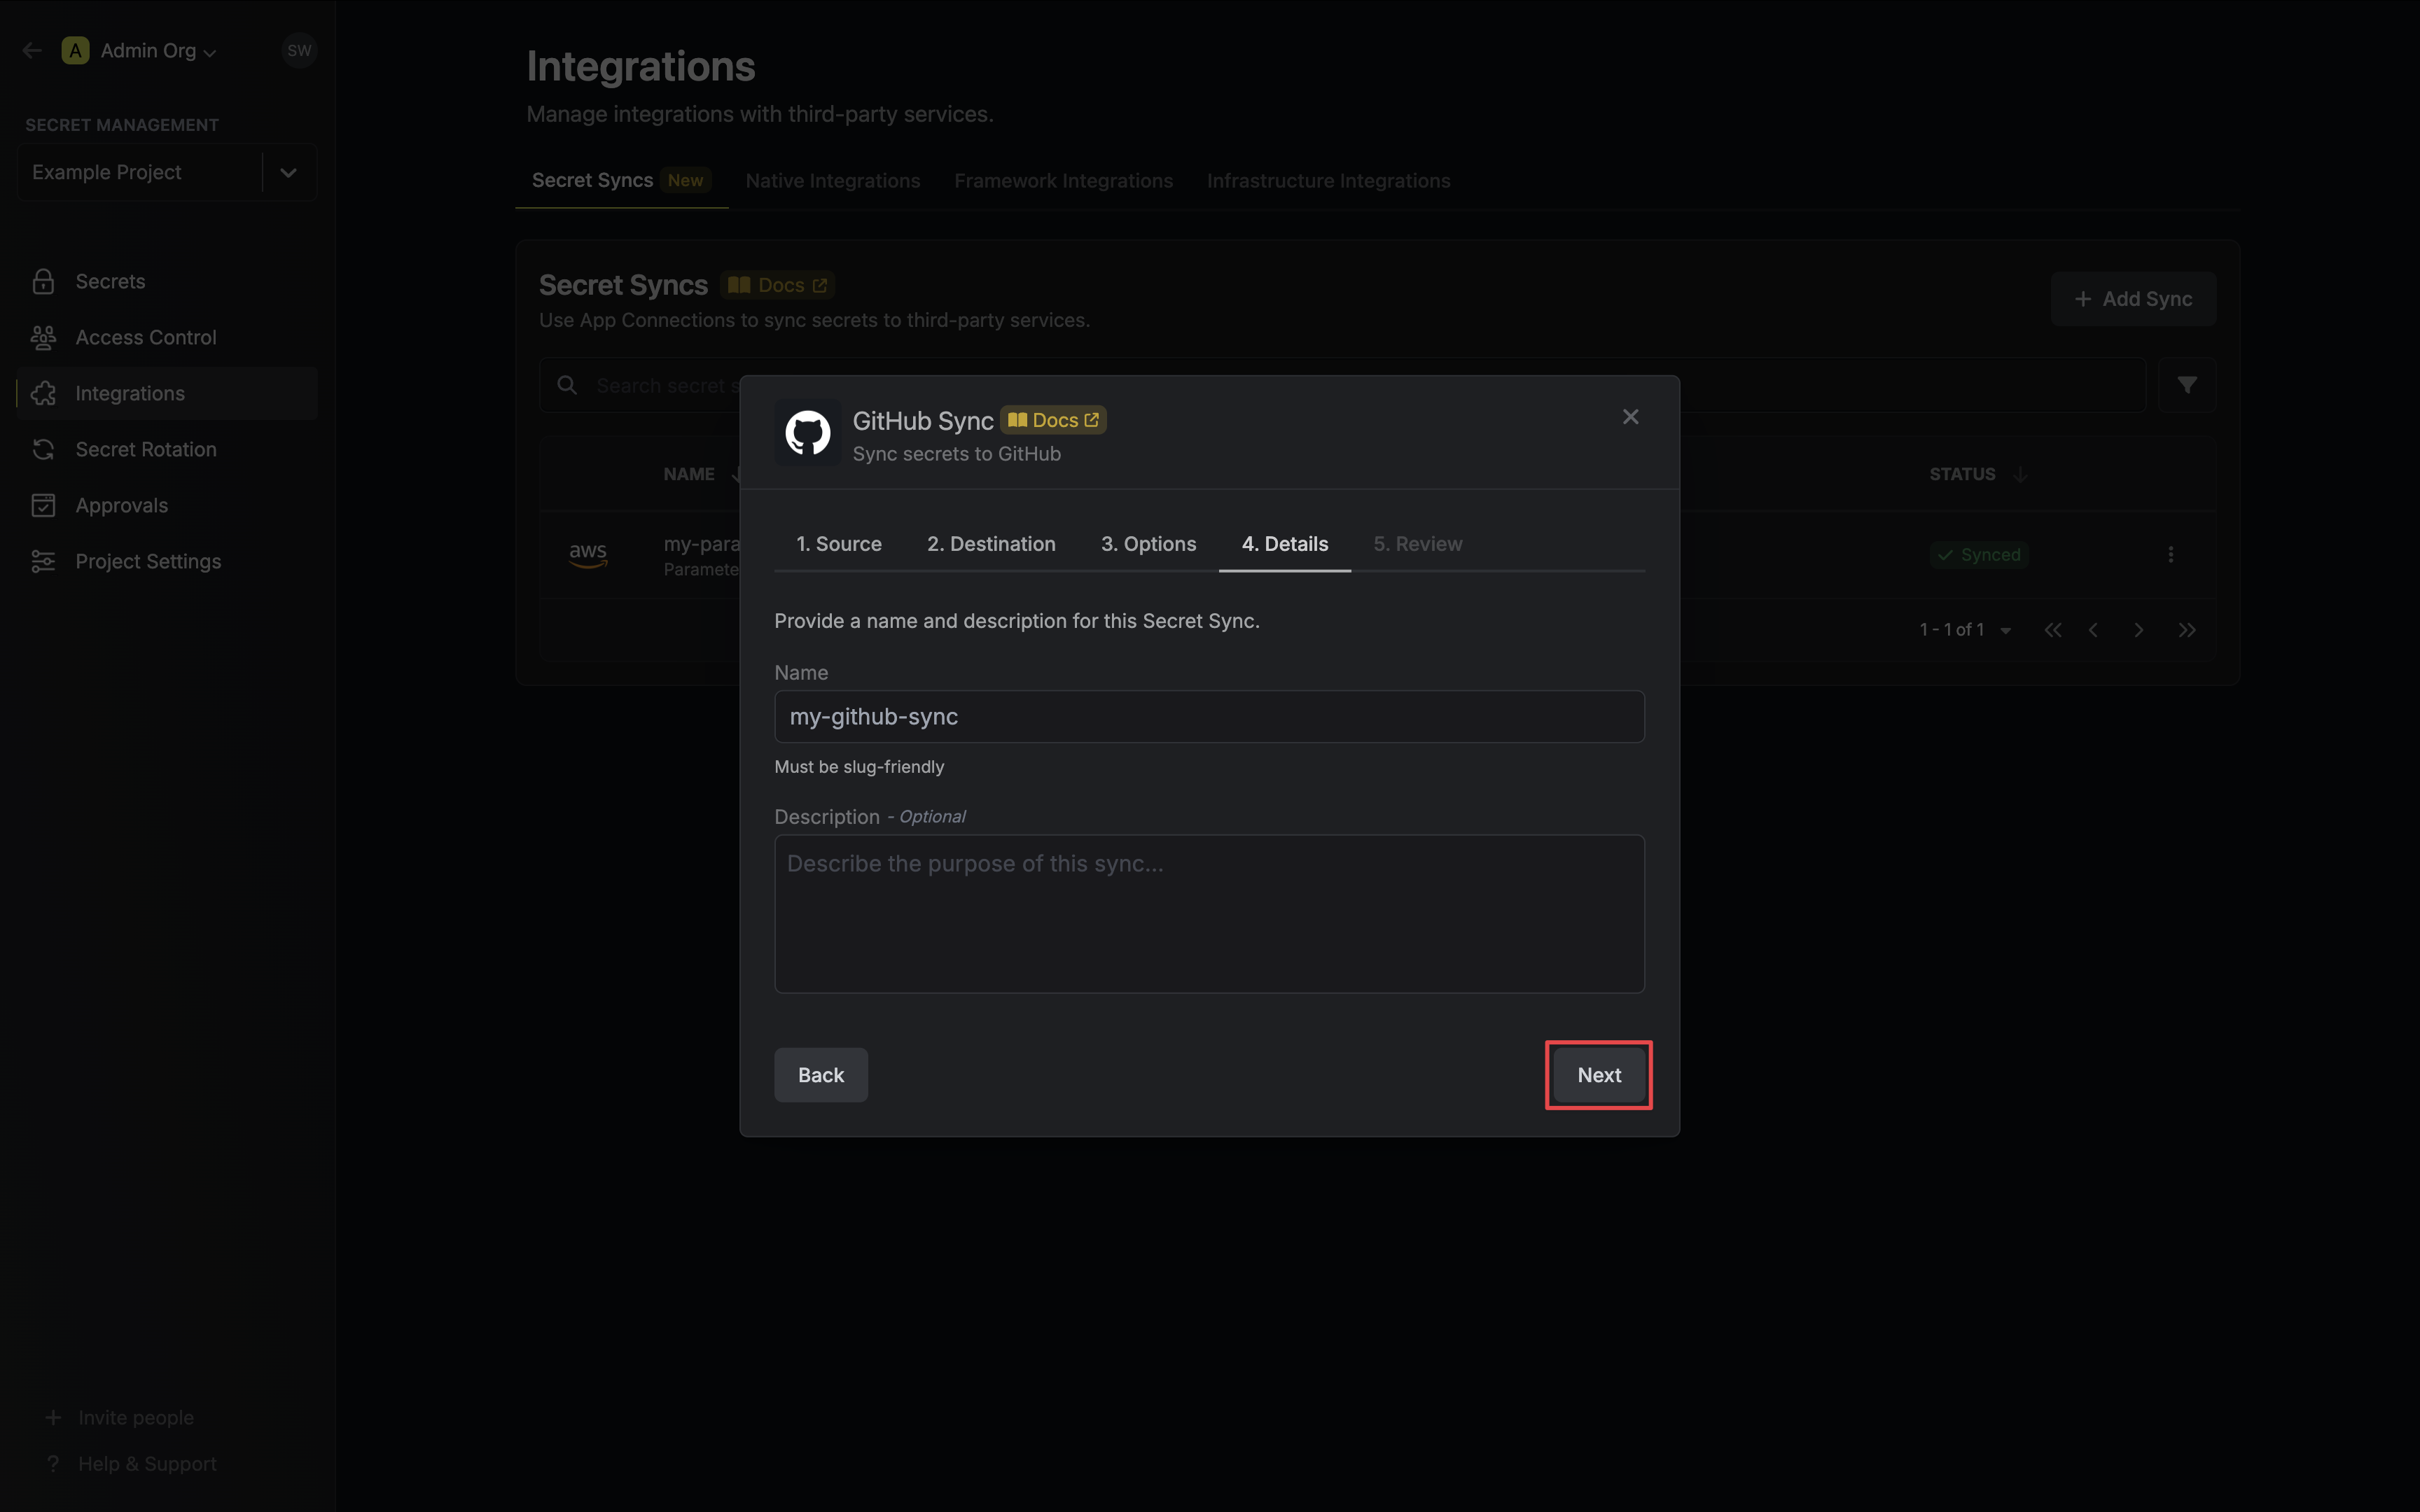
* **Name**: The name of your sync. Must be slug-friendly.
* **Description**: An optional description for your sync.
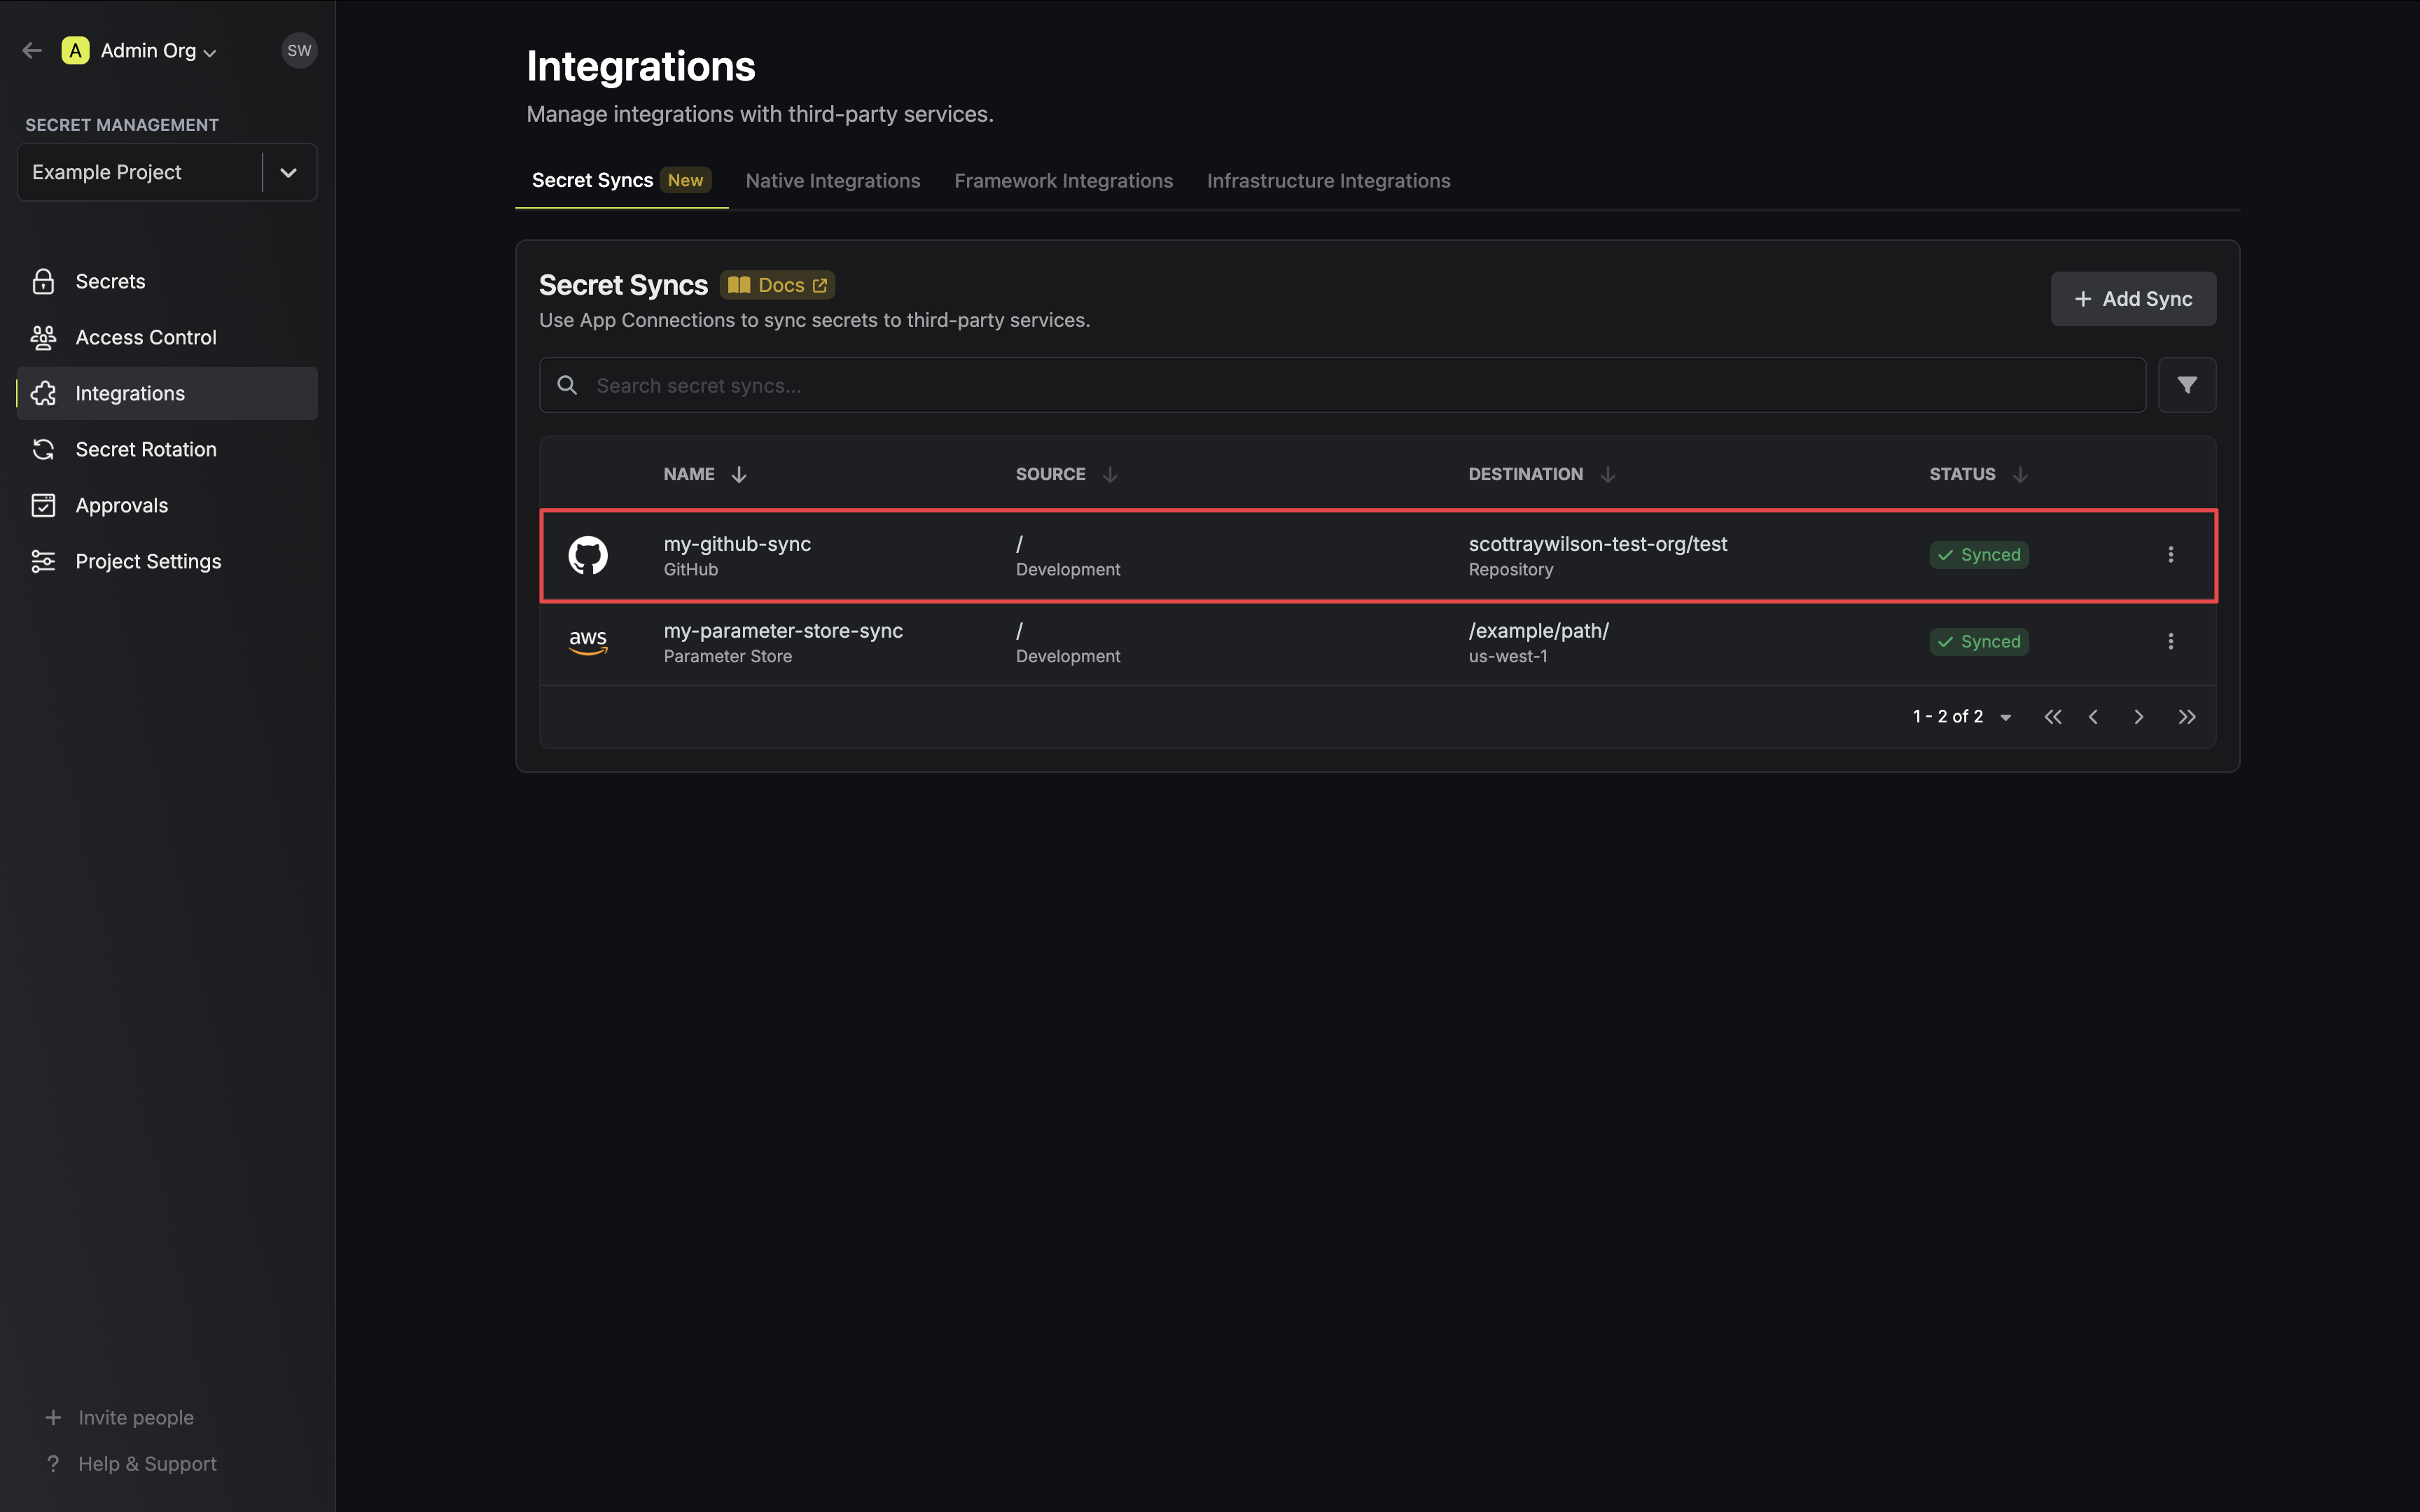
7. Review your GitHub Sync configuration, then click **Create Sync**.

8. If enabled, your GitHub Sync will begin syncing your secrets to the destination endpoint.
To create an **GitHub Sync**, make an API request to the [Create GitHub Sync](/api-reference/endpoints/secret-syncs/github/create) API endpoint.
### Sample request
```bash Request
curl --request POST \
--url https://app.infisical.com/api/v1/secret-syncs/github \
--header 'Content-Type: application/json' \
--data '{
"name": "my-github-sync",
"projectId": "3c90c3cc-0d44-4b50-8888-8dd25736052a",
"description": "an example sync",
"connectionId": "3c90c3cc-0d44-4b50-8888-8dd25736052a",
"environment": "dev",
"secretPath": "/my-secrets",
"isEnabled": true,
"syncOptions": {
"initialSyncBehavior": "overwrite-destination"
},
"destinationConfig": {
"scope": "repository",
"owner": "my-github",
"repo": "my-repository"
}
}'
```
### Sample response
```bash Response
{
"secretSync": {
"id": "3c90c3cc-0d44-4b50-8888-8dd25736052a",
"name": "my-github-sync",
"description": "an example sync",
"isEnabled": true,
"version": 1,
"folderId": "3c90c3cc-0d44-4b50-8888-8dd25736052a",
"connectionId": "3c90c3cc-0d44-4b50-8888-8dd25736052a",
"createdAt": "2023-11-07T05:31:56Z",
"updatedAt": "2023-11-07T05:31:56Z",
"syncStatus": "succeeded",
"lastSyncJobId": "123",
"lastSyncMessage": null,
"lastSyncedAt": "2023-11-07T05:31:56Z",
"importStatus": null,
"lastImportJobId": null,
"lastImportMessage": null,
"lastImportedAt": null,
"removeStatus": null,
"lastRemoveJobId": null,
"lastRemoveMessage": null,
"lastRemovedAt": null,
"syncOptions": {
"initialSyncBehavior": "overwrite-destination"
},
"projectId": "3c90c3cc-0d44-4b50-8888-8dd25736052a",
"connection": {
"app": "github",
"name": "my-github-connection",
"id": "3c90c3cc-0d44-4b50-8888-8dd25736052a"
},
"environment": {
"slug": "dev",
"name": "Development",
"id": "3c90c3cc-0d44-4b50-8888-8dd25736052a"
},
"folder": {
"id": "3c90c3cc-0d44-4b50-8888-8dd25736052a",
"path": "/my-secrets"
},
"destination": "github",
"destinationConfig": {
"scope": "repository",
"owner": "my-github",
"repo": "my-repository"
}
}
}
```
# null
Source: https://infisical.com/docs/integrations/secret-syncs/overview
Learn how to sync secrets to third-party services with Infisical.
Secret Syncs enable you to sync secrets from Infisical to third-party services using [App Connections](/integrations/app-connections/overview).
Secret Syncs will gradually replace Native Integrations as they become available. Native Integrations will be deprecated in the future, so opt for configuring a Secret Sync when available.
## Concept
Secret Syncs are a project-level resource used to sync secrets, via an [App Connection](/integrations/app-connections/overview), from a particular project environment and folder path (source)
to a third-party service (destination). Changes to the source will automatically be propagated to the destination, ensuring
your secrets are always up-to-date.
```mermaid
%%{init: {'flowchart': {'curve': 'linear'} } }%%
graph LR
A[App Connection]
B[Secret Sync]
C[Secret 1]
D[Secret 2]
E[Secret 3]
F[Third-Party Service]
G[Secret 1]
H[Secret 2]
I[Secret 3]
J[Project Source]
B --> A
C --> J
D --> J
E --> J
A --> F
F --> G
F --> H
F --> I
J --> B
classDef default fill:#ffffff,stroke:#666,stroke-width:2px,rx:10px,color:black
classDef connection fill:#FFF2B2,stroke:#E6C34A,stroke-width:2px,color:black,rx:15px
classDef secret fill:#E6F4FF,stroke:#0096D6,stroke-width:2px,color:black,rx:15px
classDef sync fill:#F4FFE6,stroke:#96D600,stroke-width:2px,color:black,rx:15px
classDef service fill:#E6E6FF,stroke:#6B4E96,stroke-width:2px,color:black,rx:15px
classDef project fill:#FFE6E6,stroke:#D63F3F,stroke-width:2px,color:black,rx:15px
class A connection
class B sync
class C,D,E,G,H,I secret
class F project
class J service
```
## Workflow
Configuring a Secret Sync requires three components: a source location to retrieve secrets from,
a destination endpoint to deploy secrets to, and configuration options to determine how your secrets
should be synced. Follow these steps to start syncing:
For step-by-step guides on syncing to a particular third-party service, refer to the Secret Syncs section in the Navigation Bar.
1. Create App Connection: If you have not already done so, create an [App Connection](/integrations/app-connections/overview)
via the UI or API for the third-party service you intend to sync secrets to.
2. Create Secret Sync: Configure a Secret Sync in the desired project by specifying the following parameters via the UI or API:
* Source: The project environment and folder path you wish to retrieve secrets from.
* Destination: The App Connection to utilize and the destination endpoint to deploy secrets to. These can vary between services.
* Options: Customize how secrets should be synced. Examples include adding a suffix or prefix to your secrets, or importing secrets from the destination on the initial sync.
Some third-party services do not support importing secrets.
3. Utilize Sync: Any changes to the source location will now automatically be propagated to the destination endpoint.
Infisical is continuously expanding it's Secret Sync third-party service support. If the service you need isn't available,
you can still use our Native Integrations in the interim, or contact us at [team@infisical.com](mailto:team@infisical.com) to make a request .
# Components
Source: https://infisical.com/docs/internals/components
Understand Infisical's core architectural components and how they work together.
## Overview
Infisical is architected around several key components that work in concert to provide a secure and streamlined secret management experience. These components span the client, API, and storage layers, ensuring that secrets are protected at every stage of their lifecycle.
## 1. API (Backend)
Infisical exposes a well-documented [REST API](https://infisical.com/docs/api-reference/overview/introduction) that enables programmatic interaction with the platform, enabling a wide range of use cases.
## 2. Storage Backend
Infisical relies on a robust storage backend to durably store secrets, users, and other platform data. Infisical's storage backend is [PostgreSQL](https://www.postgresql.org/).
## 3. Caching Layer
Infisical uses [Redis](https://redis.com) to enable more complex workflows including a queuing system to manage long-running asynchronous tasks, cron jobs, as well as reliable cache for frequently used resources.
## 4. Clients
Clients are interfaces through which users and applications interact with the Infisical API:
* **Web UI**: A browser-based portal providing a user-friendly interface for managing secrets, configurations, and performing administrative tasks.
* [**CLI**](https://infisical.com/docs/cli): A terminal-based tool for interacting with the Infisical API, enabling automation, scripting, and integration into CI/CD pipelines.
* **SDKs (Software Development Kits)**: Platform-specific libraries with method abstractions for working with secrets. Supported languages include [Node.js](https://infisical.com/docs/sdks/languages/node), [Python](https://infisical.com/docs/sdks/languages/python), [Java](https://infisical.com/docs/sdks/languages/java), [Golang](https://infisical.com/docs/sdks/languages/go), [Ruby](https://infisical.com/docs/sdks/languages/ruby) and [.NET](https://infisical.com/docs/sdks/languages/csharp).
* [**Kubernetes Operator**](https://infisical.com/docs/integrations/platforms/kubernetes): A Kubernetes-native component that facilitates the secure retrieval and management of secrets within a Kubernetes cluster. The operator supports multiple custom resource definitions (CRDs) for syncing secrets.
* [**Infisical Agent**](https://infisical.com/docs/integrations/platforms/infisical-agent): Daemon that automatically fetches and manages access tokens and secrets to be used in various client resources.
# Overview
Source: https://infisical.com/docs/internals/overview
Read how Infisical works under the hood.
This section covers the internals of Infisical including its technical underpinnings, architecture, and security properties.
Knowledge of this section is recommended but not required to use Infisical.
However, if you're operating Infisical, we recommend understanding the
internals.
## Learn More
Learn about the fundamental parts of Infisical.
Read about most common security-related topics and questions.
Learn best practices for utilizing Infisical service tokens. Please note
that service tokens are now deprecated and will be removed entirely in the
future.
# Permissions
Source: https://infisical.com/docs/internals/permissions
Infisical's permissions system provides granular access control.
## Overview
The Infisical permissions system is based on a role-based access control (RBAC) model. The system allows you to define roles and assign them to users and machines. Each role has a set of permissions that define what actions a user can perform.
Permissions are built on a subject-action-object model. The subject is the resource the permission is being applied to, the action is what the permission allows.
An example of a subject/action combination would be `secrets/read`. This permission allows the subject to read secrets.
Refer to the table below for a list of subjects and the actions they support.
## Subjects and Actions
Not all actions are applicable to all subjects. As an example, the
`secrets-rollback` subject only supports `read`, and `create` as actions.
While `secrets` support `read`, `create`, `edit`, `delete`.
| Subject | Actions |
| ------------------------- | ----------------------------------------------------------------------------------------------------------- |
| `role` | `read`, `create`, `edit`, `delete` |
| `member` | `read`, `create`, `edit`, `delete` |
| `groups` | `read`, `create`, `edit`, `delete` |
| `settings` | `read`, `create`, `edit`, `delete` |
| `integrations` | `read`, `create`, `edit`, `delete` |
| `webhooks` | `read`, `create`, `edit`, `delete` |
| `service-tokens` | `read`, `create`, `edit`, `delete` |
| `environments` | `read`, `create`, `edit`, `delete` |
| `tags` | `read`, `create`, `edit`, `delete` |
| `audit-logs` | `read`, `create`, `edit`, `delete` |
| `ip-allowlist` | `read`, `create`, `edit`, `delete` |
| `workspace` | `edit`, `delete` |
| `secrets` | `read`, `create`, `edit`, `delete` |
| `secret-folders` | `read`, `create`, `edit`, `delete` |
| `secret-imports` | `read`, `create`, `edit`, `delete` |
| `dynamic-secrets` | `read-root-credential`, `create-root-credential`, `edit-root-credential`, `delete-root-credential`, `lease` |
| `secret-rollback` | `read`, `create` |
| `secret-approval` | `read`, `create`, `edit`, `delete` |
| `secret-rotation` | `read`, `create`, `edit`, `delete` |
| `identity` | `read`, `create`, `edit`, `delete` |
| `certificate-authorities` | `read`, `create`, `edit`, `delete` |
| `certificates` | `read`, `create`, `edit`, `delete` |
| `certificate-templates` | `read`, `create`, `edit`, `delete` |
| `pki-alerts` | `read`, `create`, `edit`, `delete` |
| `pki-collections` | `read`, `create`, `edit`, `delete` |
| `kms` | `edit` |
| `cmek` | `read`, `create`, `edit`, `delete`, `encrypt`, `decrypt` |
| `secret-syncs` | `read`, `create`, `edit`, `delete`, `sync-secrets`, `import-secrets`, `remove-secrets` |
Not all actions are applicable to all subjects. As an example, the `workspace`
subject only supports `read`, and `create` as actions. While `member` support
`read`, `create`, `edit`, `delete`.
| Subject | Actions |
| ------------------- | --------------------------------------------- |
| `workspace` | `read`, `create` |
| `role` | `read`, `create`, `edit`, `delete` |
| `member` | `read`, `create`, `edit`, `delete` |
| `secret-scanning` | `read`, `create`, `edit`, `delete` |
| `settings` | `read`, `create`, `edit`, `delete` |
| `incident-account` | `read`, `create`, `edit`, `delete` |
| `sso` | `read`, `create`, `edit`, `delete` |
| `scim` | `read`, `create`, `edit`, `delete` |
| `ldap` | `read`, `create`, `edit`, `delete` |
| `groups` | `read`, `create`, `edit`, `delete` |
| `billing` | `read`, `create`, `edit`, `delete` |
| `identity` | `read`, `create`, `edit`, `delete` |
| `project-templates` | `read`, `create`, `edit`, `delete` |
| `app-connections` | `read`, `create`, `edit`, `delete`, `connect` |
| `kms` | `read` |
## Inversion
Permission inversion allows you to explicitly deny actions instead of allowing them. This is supported for the following subjects:
* secrets
* secret-folders
* secret-imports
* dynamic-secrets
When a permission is inverted, it changes from an "allow" rule to a "deny" rule. For example:
```typescript
// Regular permission - allows reading secrets
{
subject: "secrets",
action: ["read"]
}
// Inverted permission - denies reading secrets
{
subject: "secrets",
action: ["read"],
inverted: true
}
```
## Conditions
Conditions allow you to create more granular permissions by specifying criteria that must be met for the permission to apply. This is supported for the following subjects:
* secrets
* secret-folders
* secret-imports
* dynamic-secrets
### Properties
Conditions can be applied to the following properties:
* `environment`: Control access based on environment slugs
* `secretPath`: Control access based on secret paths
* `secretName`: Control access based on secret names
* `secretTags`: Control access based on tags (only supports \$in operator)
### Operators
The following operators are available for conditions:
| Operator | Description | Example |
| -------- | ---------------------------------- | ----------------------------------------------------- |
| `$eq` | Equal | `{ environment: { $eq: "production" } }` |
| `$ne` | Not equal | `{ environment: { $ne: "development" } }` |
| `$in` | Matches any value in array | `{ environment: { $in: ["staging", "production"] } }` |
| `$glob` | Pattern matching using glob syntax | `{ secretPath: { $glob: "/app/\*" } }` |
These details are especially useful if you're using the API to [create new project roles](../api-reference/endpoints/project-roles/create).
The rules outlined on this page, also apply when using our Terraform Provider to manage your Infisical project roles, or any other of our clients that manage project roles.
## Migrating from permission V1 to permission V2
When upgrading to V2 permissions (i.e. when moving from using the `permissions` to `permissions_v2` field in your Terraform configurations, or upgrading to the V2 permission API), you'll need to update your permission structure as follows:
Any permissions for `secrets` should be expanded to include equivalent permissions for:
* `secret-imports`
* `secret-folders` (except for read permissions)
* `dynamic-secrets`
For dynamic secrets, the actions need to be mapped differently:
* `read` → `read-root-credential`
* `create` → `create-root-credential`
* `edit` → `edit-root-credential` (also adds `lease` permission)
* `delete` → `delete-root-credential`
Example:
```hcl
# Old V1 configuration
resource "infisical_project_role" "example" {
name = "example"
permissions = [
{
subject = "secrets"
action = "read"
},
{
subject = "secrets"
action = "edit"
}
]
}
# New V2 configuration
resource "infisical_project_role" "example" {
name = "example"
permissions_v2 = [
# Original secrets permission
{
subject = "secrets"
action = ["read", "edit"]
inverted = false
},
# Add equivalent secret-imports permission
{
subject = "secret-imports"
action = ["read", "edit"]
inverted = false
},
# Add secret-folders permission (without read)
{
subject = "secret-folders"
action = ["edit"]
inverted = false
},
# Add dynamic-secrets permission with mapped actions
{
subject = "dynamic-secrets"
action = ["read-root-credential", "edit-root-credential", "lease"]
inverted = false
}
]
}
```
Note: When moving to V2 permissions, make sure to include all the necessary expanded permissions based on your original `secrets` permissions.
# Security
Source: https://infisical.com/docs/internals/security
Infisical's security model includes many considerations and initiatives.
As a security infrastructure platform dealing with highly-sensitive data, Infisical follows a robust security model with the goal of ensuring the security and integrity of all its managed data and associated components.
As part of the security model, data at rest and in transit must be secure from eavesdropping or tampering, clients must be authenticated and authorized to access data, and all operations in the platform are audited and can be traced back to their source.
This page documents security measures used by [Infisical](https://github.com/Infisical/infisical), the software, and [Infisical Cloud](https://infisical.com/), a separate managed service offering for the software.
## Threat model
Infisical’s (the software) threat model spans communication, storage, response mechanisms, and more.
* Eavesdropping on communications: Infisical secures client communication with the server and from the server to the storage backend.
* Tampering with data (at rest or in transit): Infisical implements data integrity checks to detect tampering. If inconsistencies are found, Infisical aborts transactions and raises alerts.
* Unauthorized access (lacking authentication/authorization): Infisical mandates rigorous authentication and authorization checks for all inbound requests; it also offers multi-factor authentication and role/attribute-based access controls.
* Actions without accountability: Infisical logs events, including policy updates, queries/mutations applied to secrets, certificates, and more. Every event is timestamped and information about actor, source (i.e. IP address, user-agent, etc.), and relevant metadata is included.
* Breach of data storage confidentiality: Infisical encrypts all stored secrets using proven cryptographic techniques for symmetric encryption.
* Unrecognized suspicious activities: Infisical monitors for any anomalous activities such as authentication attempts from previously unseen sources.
* Unidentified system vulnerabilities: Infisical undergoes penetration tests and vulnerability assessments twice a year; we act on findings to bolster the system’s defense mechanisms.
Infisical (the software) does not consider the following as part of its threat model:
* Uncontrolled access to the storage mechanism: An attacker with unfettered access to the storage system can manipulate data in unpredictable ways, including erasing or tampering with stored secrets. Furthermore, the attacker could potentially implement state rollbacks to favor their objectives.
* Disclosure of secret presence: If an adversary gains read access to the storage backend, they might discern the existence of certain secrets, even if the actual contents remain encrypted and concealed.
* Runtime memory intrusion: An attacker with capabilities to probe the memory state of a live instance of Infisical can potentially compromise data confidentiality.
* Vulnerabilities in affiliated systems: Some functionality may rely on third-party services and dependencies. Security lapses in these dependencies can indirectly jeopardize the confidentiality or integrity of the secrets.
* Breaches via compromised clients: If a system or application accessing Infisical is compromised, and its credentials to the platform are exposed, an attacker might gain access at the privilege level of that compromised entity.
* Configuration tampering by administrators: Any configuration data, whether supplied through admin interfaces or configuration files, needs scrutiny. If an attacker can manipulate these configurations, it poses risks to data confidentiality and integrity.
* Physical access to deployment infrastructure: An attacker with physical access to the servers or infrastructure where Infisical is deployed can potentially compromise the system in ways that are challenging to guard against, such as direct hardware tampering or booting from malicious media.
* Social engineering attacks on personnel: Attacks that target personnel, tricking them into divulging sensitive information or performing compromising actions, fall outside the platform’s direct defensive purview.
Note that while these points fall outside the Infisical’s threat model, they remain considerations in the broader platform architecture.
## External threat overview
Infisical’s architecture consists of various systems which together we refer to as the Infisical platform:
* Server: The Infisical API that serves requests.
* Clients: The Web UI and other applications that send requests to the server.
* Storage backend: PostgreSQL used by the server to persist data.
* Redis: Used by Infisical for caching, queueing and cron job scheduling.
The server requires clients to be authenticated and authorized for every inbound request. If using [Infisical Cloud](https://infisical.com/), all traffic is routed through [Cloudflare](https://www.cloudflare.com/) which enforces TLS and requires a minimum of TLS 1.2.
The server mandates that each request includes a valid token (issued for a user or machine identity) used to identify the client before performing any actions on the platform. Clients without a valid token can only access login endpoints with the exception of a few intentionally unauthenticated endpoints. For tokens issued for machine identities, Infisical provides significant configuration, including support for native authentication methods (e.g. [AWS](https://infisical.com/docs/documentation/platform/identities/aws-auth), [Azure](https://infisical.com/docs/documentation/platform/identities/azure-auth), [Kubernetes](https://infisical.com/docs/documentation/platform/identities/kubernetes-auth), etc.); custom TTLs to restrict token lifespan; IP restrictions to enforce network-based access controls; and usage caps to limit the maximum number of times that a token can be used.
When accessing Infisical via web browser, JWT tokens are stored in browser memory and appended to outbound requests requiring authentication; refresh tokens are stored in HttpOnly cookies and included in requests as part of token renewal. Note also that Infisical utilizes the latest HTTP security headers and employs a strict Content-Security-Policy to mitigate XSS.
To mitigate abuse and enhance system stability, the server enforces configurable rate limiting on read, write, and secrets operations. This prevents excessive API requests from impacting system performance while ensuring fair usage across clients.
Once traffic enters the server, any sensitive data (e.g. secrets, certificates entering the server), where applicable, is encrypted using a 256-bit [Advanced Encryption Standard (AES)](https://en.wikipedia.org/wiki/Advanced_Encryption_Standard) cipher in the [Galois Counter Mode (GCM)](https://en.wikipedia.org/wiki/Galois/Counter_Mode) with 96-bit nonces prior to being persisted in the storage backend. Encryption is an integral part of Infisical’s platform-wide cryptographic architecture, which also supports seal-wrapping with external KMS and HSMs. Before responding to a client request, the server securely retrieves and decrypts requested data from the storage backend. Each decryption operation includes integrity verification to ensure data has not been altered or tampered with.
## Internal threat overview
Within Infisical, an internal threat and critical security concern is an attacker gaining access to sensitive data that they are not permitted to, especially if they are able to authenticate with some degree of access to the system.
Before a client can perform any actions on the platform, it must authenticate with the server using a supported authentication method such as username-password, SAML, SSO, LDAP, AWS/GCP/Azure, OIDC, or Kubernetes authentication. A successful authentication results in the issuance of a client (JWT) token containing a reference to the user or machine identity bound to it.
When a client uses the token to make authenticated requests against the server, Infisical validates the token and maps the bound-identity to access control policies that exist at the organization and project level, both types of namespaces within the platform. The access control policies are configured by operators of Infisical ahead of time and may involve role-based, attribute-based, and one-off “additional privilege” resource constraints. Given the robustness of the access control system, we recommend reading the full documentation for it.
For example, an operator of Infisical may define the following constraints to restrict client access to particular resources:
* Read and write access to a secret resource via an additional privilege attached to the bound-identity.
* Read-only access to a secret resource via one or multiple roles attached to the bound-identity.
* Read-only access to a secret resource via a group membership for which the associated bound-identity is part of; the group itself is assigned one or multiple roles with access to the secret resource.
## Cryptography
All symmetric encryption operations, with the exception of those proxied through external KMS and HSM systems, in Infisical use a software-backed, 256-bit Advanced Encryption Standard (AES) cipher in the Galois Counter Mode (GCM) with 96-bit nonces — AES-256-GCM.
Infisical employs a multilayer approach to its encryption architecture with components that can be optionally linked to external KMS or HSM systems. At a high-level, a master key, backed by an operator-provided key, is used to encrypt (internal) “KMS” keys that are used to then encrypt data keys; the data keys are used to protect sensitive data stored in Infisical. The keys in the architecture are stored encrypted in the storage backend, retrieved, decrypted, and only then used as part of server operations when needed. Since server configuration is needed to decrypt any keys as part of the encryption architecture, accessing any sensitive data in Infisical requires access to both server configuration and data in the storage backend. Note that the platform’s encryption architecture has components that can be linked to external KMS and HSM systems; opting for these make the use of the software more FIPS aligned.
To be specific:
* The architecture starts with a 256-bit master key that can be secured by a root key which can either be a 128-bit key, passed into the server by an operator of Infisical as an environment variable, or an external key from an HSM module such as [Thales Luna HSM](https://cpl.thalesgroup.com/encryption/data-protection-on-demand/services/luna-cloud-hsm) or [AWS Cloud HSM](https://aws.amazon.com/cloudhsm/) linked via specified configuration parameters.
* The master key secures 256-bit keys in Infisical henceforth referred to as KMS keys.
* Each organization in Infisical has its own KMS key and a separate data key; the KMS key is used to secure the data key which encrypts organization-level data.
* Each project in Infisical has a designated KMS key and a separate data key; the KMS key is used to secure the data key which encrypts project-level data. Note that a project KMS key can be substituted for an external key from a KMS such as [AWS KMS](https://infisical.com/docs/documentation/platform/kms-configuration/aws-kms), [AWS Cloud HSM](https://infisical.com/docs/documentation/platform/kms-configuration/aws-hsm), and [GCP KMS](https://infisical.com/docs/documentation/platform/kms-configuration/gcp-kms). We recommend reading the fuller [documentation](https://infisical.com/docs/documentation/platform/kms-configuration/overview) or integrating with an external KMS
## Infrastructure & High availability (Infisical Cloud)
Infisical Cloud uses a number of strategies to keep services running smoothly and ensure data stays available, even during failures; we document these strategies below:
* Multi-AZ AWS RDS: Infisical Cloud runs AWS Relational Database Service (RDS) with Multi-AZ deployments to improve availability and durability. This setup keeps a standby replica in a different Availability Zone (AZ) and automatically fails over if the primary instance goes down. Continuous backups and replication help protect data and minimize interruptions.
* Multi-AZ ElastiCache (Redis): For caching, Infisical Cloud runs Amazon ElastiCache (Redis) in a Multi-AZ setup. This means data is replicated across different AZs, so if one goes down, the system can automatically fail over to a healthy node. This helps keep response times low and ensures caching stays reliable.
* Multi-AZ ECS for Container Orchestration: Infisical Cloud runs on Amazon Elastic Container Service (ECS) across multiple availability zones, making sure containers stay available even if an AZ fails. If one zone has an issue, traffic automatically shifts to healthy instances in other zones, keeping downtime to a minimum.
Infisical Cloud utilizes several strategies to ensure high availability, leveraging AWS services to maintain continuous operation and data integrity.
## Cross-Region Replication for Disaster Recovery (Infisical Cloud)
To handle regional failures, Infisical Cloud keeps standby regions updated and ready to take over when needed.
* ElastiCache (Redis): Data is replicated across regions using AWS Global Datastore, keeping cached data consistent and available even if a primary region goes down.
* RDS (PostgreSQL): Cross-region read replicas ensure database data is available in multiple locations, allowing for failover in case of a regional outage.
With standby regions and automated failovers in place, Infisical Cloud faces minimal service disruptions even during large-scale outages.
## Penetration testing
Infisical hires external third parties to perform regular security assessment and penetration testing of the platform.
Most recently, Infisical commissioned cybersecurity firm [Oneleet](https://www.oneleet.com) to perform a full-coverage, gray box penetration test against the platform's entire attack surface to identify vulnerabilities according to industry standards (OWASP, ASVS, WSTG, TOP-10, etc.).
Please email [security@infisical.com](mailto:security@infisical.com) to request any reports including a letter of attestation for the conducted penetration test.
## Employee data access
Whether or not Infisical or your employees can access data in the Infisical instance and/or storage backend depends on many factors how you use Infisical:
* Infisical Self-Hosted: Self-hosting Infisical is common amongst organizations that prefer to keep data on their own infrastructure usually to adhere to strict regulatory and compliance requirements. In this option, organizations retain full control over their data and therefore govern the data access policy of their Infisical instance and storage backend.
* Infisical Cloud: Using Infisical's managed service, [Infisical Cloud](https://app.infisical.com) means delegating data oversight and management to Infisical. Under our policy controls, employees are only granted access to parts of infrastructure according to principle of least privilege; this is especially relevant to customer data can only be accessed currently by executive management of Infisical. Moreover, any changes to sensitive customer data is prohibited without explicit customer approval.
It should be noted that, even on Infisical Cloud, it is physically impossible for employees of Infisical to view the values of secrets if users have not explicitly granted Infisical access to their project (i.e. opted out of zero-knowledge).
Please email [security@infisical.com](mailto:security@infisical.com) if you have any specific inquiries about employee data and security policies.
## Get in touch
If you have any concerns about Infisical or believe you have uncovered a vulnerability, please get in touch via the e-mail address [security@infisical.com](mailto:security@infisical.com). In the message, try to provide a description of the issue and ideally a way of reproducing it. The security team will get back to you as soon as possible.
Note that this security address should be used for undisclosed vulnerabilities. Please report any security problems to us before disclosing it publicly.
# Service tokens
Source: https://infisical.com/docs/internals/service-tokens
Understanding service tokens and their best practices.
Many clients use service tokens to authenticate and read/write secrets from/to Infisical; they can be created in your project settings.
## Anatomy
A service token in Infisical consists of the token itself, a `string`, and a corresponding document in the storage backend containing its
properties and metadata.
### Database model
The storage backend model for a token contains the following information:
* ID: The token identifier.
* Expiration: The date at which point the token is invalid.
* Project: The project that the token is part of.
* Scopes: The project environments and paths that the token has access to.
* Encrypted project key: An encrypted copy of the project key.
### Token
A service token itself consist of two parts used for authentication and decryption, separated by the delimiter `.`.
Consider the token `st.abc.def.ghi`. Here, `st.abc.def` can be used to authenticate with the API, by including it in the `Authorization` header under `Bearer st.abc.def`, and retrieve (encrypted) secrets as well as a project key back. Meanwhile, `ghi`, a hex-string, can be used to decrypt the project key used to decrypt the secrets.
Note that when using service tokens via select client methods like SDK or CLI, cryptographic operations are abstracted for you that is the token is parsed and encryption/decryption operations are handled. If using service tokens with the REST API and end-to-end encryption enabled, then you will have to handle the encryption/decryption operations yourself.
## Recommendations
### Issuance
When creating a new service token, it’s important to consider the principle of least privilege(PoLP) when setting its scope and expiration date. For example, if the client using the token only requires access to a staging environment, then you should scope the token to that environment only; you can further scope tokens to path(s) within environment(s) if you happen to use path-based secret storage. Likewise, if the client does not intend to access secrets indefinitely, then you may consider setting a finite lifetime for the token such as 6 months or 1 year from now. Finally, you should consider carefully whether or not your client requires the ability to read and/or write secrets from/to Infisical.
### Network access
We recommend configuring the IP whitelist settings of each project to allow either single IP addresses or CIDR-notated range of addresses to read/write secrets to Infisical. With this feature, you can specify the IP range of your client servers to restrict access to your project in Infisical.
### Storage
Since service tokens grant access to your secrets, we recommend storing them securely across your development cycle whether it be in a .env file in local development or as an environment variable of your deployment platform.
### Rotation
We recommend periodically rotating the service token, even in the absence of compromise. Since service tokens are capable of decrypting project keys used to decrypt secrets, all of which use AES-256-GCM encryption, they should be rotated before approximately 2^32 encryptions have been performed; this follows the guidance set forth by [NIST publication 800-38D](https://csrc.nist.gov/pubs/sp/800/38/d/final).
Note that Infisical keeps track of the number of times that service tokens are used and will alert you when you have reached 90% of the recommended capacity.
# Infisical .NET SDK
Source: https://infisical.com/docs/sdks/languages/csharp
If you're working with C#, the official [Infisical C# SDK](https://github.com/Infisical/sdk/tree/main/languages/csharp) package is the easiest way to fetch and work with secrets for your application.
* [Nuget Package](https://www.nuget.org/packages/Infisical.Sdk)
* [Github Repository](https://github.com/Infisical/sdk/tree/main/languages/csharp)
## Basic Usage
```cs
using Infisical.Sdk;
namespace Example
{
class Program
{
static void Main(string[] args)
{
ClientSettings settings = new ClientSettings
{
Auth = new AuthenticationOptions
{
UniversalAuth = new UniversalAuthMethod
{
ClientId = "your-client-id",
ClientSecret = "your-client-secret"
}
}
};
var infisicalClient = new InfisicalClient(settings);
var getSecretOptions = new GetSecretOptions
{
SecretName = "TEST",
ProjectId = "PROJECT_ID",
Environment = "dev",
};
var secret = infisicalClient.GetSecret(getSecretOptions);
Console.WriteLine($"The value of secret '{secret.SecretKey}', is: {secret.SecretValue}");
}
}
}
```
This example demonstrates how to use the Infisical C# SDK in a C# application. The application retrieves a secret named `TEST` from the `dev` environment of the `PROJECT_ID` project.
We do not recommend hardcoding your [Machine Identity Tokens](/platform/identities/overview). Setting it as an environment variable would be best.
# Installation
```console
$ dotnet add package Infisical.Sdk
```
# Configuration
Import the SDK and create a client instance with your [Machine Identity](/platform/identities/universal-auth).
```cs
using Infisical.Sdk;
namespace Example
{
class Program
{
static void Main(string[] args)
{
ClientSettings settings = new ClientSettings
{
Auth = new AuthenticationOptions
{
UniversalAuth = new UniversalAuthMethod
{
ClientId = "your-client-id",
ClientSecret = "your-client-secret"
}
}
};
var infisicalClient = new InfisicalClient(settings); // <-- Your SDK client is now ready to use
}
}
}
```
### ClientSettings methods
Your machine identity client ID.
Your machine identity client secret.
An access token obtained from the machine identity login endpoint.
Time-to-live (in seconds) for refreshing cached secrets.
If manually set to 0, caching will be disabled, this is not recommended.
Your self-hosted absolute site URL including the protocol (e.g. `https://app.infisical.com`)
Optionally provide a path to a custom SSL certificate file. This can be substituted by setting the `INFISICAL_SSL_CERTIFICATE` environment variable to the contents of the certificate.
The authentication object to use for the client. This is required unless you're using environment variables.
### Authentication
The SDK supports a variety of authentication methods. The most common authentication method is Universal Auth, which uses a client ID and client secret to authenticate.
#### Universal Auth
**Using environment variables**
* `INFISICAL_UNIVERSAL_AUTH_CLIENT_ID` - Your machine identity client ID.
* `INFISICAL_UNIVERSAL_AUTH_CLIENT_SECRET` - Your machine identity client secret.
**Using the SDK directly**
```csharp
ClientSettings settings = new ClientSettings
{
Auth = new AuthenticationOptions
{
UniversalAuth = new UniversalAuthMethod
{
ClientId = "your-client-id",
ClientSecret = "your-client-secret"
}
}
};
var infisicalClient = new InfisicalClient(settings);
```
#### GCP ID Token Auth
Please note that this authentication method will only work if you're running your application on Google Cloud Platform.
Please [read more](/documentation/platform/identities/gcp-auth) about this authentication method.
**Using environment variables**
* `INFISICAL_GCP_AUTH_IDENTITY_ID` - Your Infisical Machine Identity ID.
**Using the SDK directly**
```csharp
ClientSettings settings = new ClientSettings
{
Auth = new AuthenticationOptions
{
GcpIdToken = new GcpIdTokenAuthMethod
{
IdentityId = "your-machine-identity-id",
}
}
};
var infisicalClient = new InfisicalClient(settings);
```
#### GCP IAM Auth
**Using environment variables**
* `INFISICAL_GCP_IAM_AUTH_IDENTITY_ID` - Your Infisical Machine Identity ID.
* `INFISICAL_GCP_IAM_SERVICE_ACCOUNT_KEY_FILE_PATH` - The path to your GCP service account key file.
**Using the SDK directly**
```csharp
ClientSettings settings = new ClientSettings
{
Auth = new AuthenticationOptions
{
GcpIam = new GcpIamAuthMethod
{
IdentityId = "your-machine-identity-id",
ServiceAccountKeyFilePath = "./path/to/your/service-account-key.json"
}
}
};
var infisicalClient = new InfisicalClient(settings);
```
#### AWS IAM Auth
Please note that this authentication method will only work if you're running your application on AWS.
Please [read more](/documentation/platform/identities/aws-auth) about this authentication method.
**Using environment variables**
* `INFISICAL_AWS_IAM_AUTH_IDENTITY_ID` - Your Infisical Machine Identity ID.
**Using the SDK directly**
```csharp
ClientSettings settings = new ClientSettings
{
Auth = new AuthenticationOptions
{
AwsIam = new AwsIamAuthMethod
{
IdentityId = "your-machine-identity-id",
}
}
};
var infisicalClient = new InfisicalClient(settings);
```
#### Azure Auth
Please note that this authentication method will only work if you're running your application on Azure.
Please [read more](/documentation/platform/identities/azure-auth) about this authentication method.
**Using environment variables**
* `INFISICAL_AZURE_AUTH_IDENTITY_ID` - Your Infisical Machine Identity ID.
**Using the SDK directly**
```csharp
ClientSettings settings = new ClientSettings
{
Auth = new AuthenticationOptions
{
Azure = new AzureAuthMethod
{
IdentityId = "YOUR_IDENTITY_ID",
}
}
};
var infisicalClient = new InfisicalClient(settings);
```
#### Kubernetes Auth
Please note that this authentication method will only work if you're running your application on Kubernetes.
Please [read more](/documentation/platform/identities/kubernetes-auth) about this authentication method.
**Using environment variables**
* `INFISICAL_KUBERNETES_IDENTITY_ID` - Your Infisical Machine Identity ID.
* `INFISICAL_KUBERNETES_SERVICE_ACCOUNT_TOKEN_PATH_ENV_NAME` - The environment variable name that contains the path to the service account token. This is optional and will default to `/var/run/secrets/kubernetes.io/serviceaccount/token`.
**Using the SDK directly**
```csharp
ClientSettings settings = new ClientSettings
{
Auth = new AuthenticationOptions
{
Kubernetes = new KubernetesAuthMethod
{
ServiceAccountTokenPath = "/var/run/secrets/kubernetes.io/serviceaccount/token", // Optional
IdentityId = "YOUR_IDENTITY_ID",
}
}
};
var infisicalClient = new InfisicalClient(settings);
```
### Caching
To reduce the number of API requests, the SDK temporarily stores secrets it retrieves. By default, a secret remains cached for 5 minutes after it's first fetched. Each time it's fetched again, this 5-minute timer resets. You can adjust this caching duration by setting the "cacheTTL" option when creating the client.
## Working with Secrets
### client.ListSecrets(options)
```cs
var options = new ListSecretsOptions
{
ProjectId = "PROJECT_ID",
Environment = "dev",
Path = "/foo/bar",
AttachToProcessEnv = false,
};
var secrets = infisical.ListSecrets(options);
```
Retrieve all secrets within the Infisical project and environment that client is connected to
#### Parameters
The slug name (dev, prod, etc) of the environment from where secrets should be fetched from.
The project ID where the secret lives in.
The path from where secrets should be fetched from.
Whether or not to set the fetched secrets to the process environment. If true, you can access the secrets like so `System.getenv("SECRET_NAME")`.
Whether or not to include imported secrets from the current path. Read about [secret import](/documentation/platform/secret-reference)
Whether or not to fetch secrets recursively from the specified path. Please note that there's a 20-depth limit for recursive fetching.
Whether or not to expand secret references in the fetched secrets. Read about [secret reference](/documentation/platform/secret-reference)
### client.GetSecret(options)
```cs
var options = new GetSecretOptions
{
SecretName = "AAAA",
ProjectId = "659c781eb2d4fe3e307b77bd",
Environment = "dev",
};
var secret = infisical.GetSecret(options);
```
Retrieve a secret from Infisical.
By default, `GetSecret()` fetches and returns a shared secret.
#### Parameters
The key of the secret to retrieve.
The project ID where the secret lives in.
The slug name (dev, prod, etc) of the environment from where secrets should be fetched from.
The path from where secret should be fetched from.
The type of the secret. Valid options are "shared" or "personal". If not specified, the default value is "shared".
Whether or not to include imported secrets from the current path. Read about [secret import](/documentation/platform/secret-reference)
Whether or not to expand secret references in the fetched secrets. Read about [secret reference](/documentation/platform/secret-reference)
### client.CreateSecret(options)
```cs
var options = new CreateSecretOptions {
Environment = "dev",
ProjectId = "PROJECT_ID",
SecretName = "NEW_SECRET",
SecretValue = "NEW_SECRET_VALUE",
SecretComment = "This is a new secret",
};
var newSecret = infisical.CreateSecret(options);
```
Create a new secret in Infisical.
#### Parameters
The key of the secret to create.
The value of the secret.
The project ID where the secret lives in.
The slug name (dev, prod, etc) of the environment from where secrets should be fetched from.
The path from where secret should be created.
The type of the secret. Valid options are "shared" or "personal". If not specified, the default value is "shared".
### client.UpdateSecret(options)
```cs
var options = new UpdateSecretOptions {
Environment = "dev",
ProjectId = "PROJECT_ID",
SecretName = "SECRET_TO_UPDATE",
SecretValue = "NEW VALUE"
};
var updatedSecret = infisical.UpdateSecret(options);
```
Update an existing secret in Infisical.
#### Parameters
The key of the secret to update.
The new value of the secret.
The project ID where the secret lives in.
The slug name (dev, prod, etc) of the environment from where secrets should be fetched from.
The path from where secret should be updated.
The type of the secret. Valid options are "shared" or "personal". If not specified, the default value is "shared".
### client.DeleteSecret(options)
```cs
var options = new DeleteSecretOptions
{
Environment = "dev",
ProjectId = "PROJECT_ID",
SecretName = "NEW_SECRET",
};
var deletedSecret = infisical.DeleteSecret(options);
```
Delete a secret in Infisical.
#### Parameters
The key of the secret to update.
The project ID where the secret lives in.
The slug name (dev, prod, etc) of the environment from where secrets should be fetched from.
The path from where secret should be deleted.
The type of the secret. Valid options are "shared" or "personal". If not specified, the default value is "shared".
## Cryptography
### Create a symmetric key
Create a base64-encoded, 256-bit symmetric key to be used for encryption/decryption.
```cs
var key = infisical.CreateSymmetricKey();
```
#### Returns (string)
`key` (string): A base64-encoded, 256-bit symmetric key, that can be used for encryption/decryption purposes.
### Encrypt symmetric
```cs
var options = new EncryptSymmetricOptions
{
Plaintext = "Infisical is awesome!",
Key = key,
};
var encryptedData = infisical.EncryptSymmetric(options);
```
#### Parameters
The plaintext you want to encrypt.
The symmetric key to use for encryption.
#### Returns (object)
`Tag` (string): A base64-encoded, 128-bit authentication tag.
`Iv` (string): A base64-encoded, 96-bit initialization vector.
`CipherText` (string): A base64-encoded, encrypted ciphertext.
### Decrypt symmetric
```cs
var decryptOptions = new DecryptSymmetricOptions
{
Key = key,
Ciphertext = encryptedData.Ciphertext,
Iv = encryptedData.Iv,
Tag = encryptedData.Tag,
};
var decryptedPlaintext = infisical.DecryptSymmetric(decryptOptions);
```
#### Parameters
The ciphertext you want to decrypt.
The symmetric key to use for encryption.
The initialization vector to use for decryption.
The authentication tag to use for decryption.
#### Returns (string)
`Plaintext` (string): The decrypted plaintext.
# Infisical Go SDK
Source: https://infisical.com/docs/sdks/languages/go
If you're working with Go Lang, the official [Infisical Go SDK](https://github.com/infisical/go-sdk) package is the easiest way to fetch and work with secrets for your application.
* [Package](https://pkg.go.dev/github.com/infisical/go-sdk)
* [Github Repository](https://github.com/infisical/go-sdk)
# Basic Usage
```go
package main
import (
"fmt"
"os"
"context"
infisical "github.com/infisical/go-sdk"
)
func main() {
client := infisical.NewInfisicalClient(context.Background(), infisical.Config{
SiteUrl: "https://app.infisical.com", // Optional, default is https://app.infisical.com
AutoTokenRefresh: true, // Wether or not to let the SDK handle the access token lifecycle. Defaults to true if not specified.
})
_, err = client.Auth().UniversalAuthLogin("YOUR_CLIENT_ID", "YOUR_CLIENT_SECRET")
if err != nil {
fmt.Printf("Authentication failed: %v", err)
os.Exit(1)
}
apiKeySecret, err := client.Secrets().Retrieve(infisical.RetrieveSecretOptions{
SecretKey: "API_KEY",
Environment: "dev",
ProjectID: "YOUR_PROJECT_ID",
SecretPath: "/",
})
if err != nil {
fmt.Printf("Error: %v", err)
os.Exit(1)
}
fmt.Printf("API Key Secret: %v", apiKeySecret)
}
```
This example demonstrates how to use the Infisical Go SDK in a simple Go application. The application retrieves a secret named `API_KEY` from the `dev` environment of the `YOUR_PROJECT_ID` project.
We do not recommend hardcoding your [Machine Identity Tokens](/platform/identities/overview). Setting it as an environment variable would be best.
# Installation
```console
$ go get github.com/infisical/go-sdk
```
# Configuration
Import the SDK and create a client instance.
```go
client := infisical.NewInfisicalClient(context.Background(), infisical.Config{
SiteUrl: "https://app.infisical.com", // Optional, default is https://api.infisical.com
})
```
### Configuration Options
The URL of the Infisical API..
Optionally set the user agent that will be used for HTTP requests. *(Not recommended)*
Whether or not to let the SDK handle the access token lifecycle. Defaults to true if not specified.
Whether or not to suppress logs such as warnings from the token refreshing process. Defaults to false if not specified.
# Automatic token refreshing
The Infisical Go SDK supports automatic token refreshing. After using one of the auth methods such as Universal Auth, the SDK will automatically renew and re-authenticate when needed.
This behavior is enabled by default, but you can opt-out by setting `AutoTokenRefresh` to `false` in the client settings.
```go
client := infisical.NewInfisicalClient(context.Background(), infisical.Config{
AutoTokenRefresh: false, // <- Disable automatic token refreshing
})
```
When using automatic token refreshing it's important to understand how your application uses the Infiiscal client. If you are instantiating new instances of the client often, it's important to cancel the context when the client is no longer needed to avoid the token refreshing process from running indefinitely.
```go
ctx, cancel := context.WithCancel(context.Background())
defer cancel() // Cancel the context when the client is no longer needed
client := infisical.NewInfisicalClient(ctx, infisical.Config{
AutoTokenRefresh: true,
})
// Use the client
```
This is only necessary if you are creating multiple instances of the client, and those instances are deleted or otherwise removed throughout the application lifecycle.
If you are only creating one instance of the client, and it will be used throughout the lifetime of your application, you don't need to worry about this.
# Authentication
The SDK supports a variety of authentication methods. The most common authentication method is Universal Auth, which uses a client ID and client secret to authenticate.
#### Universal Auth
**Using environment variables**
Call `.Auth().UniversalAuthLogin()` with empty arguments to use the following environment variables:
* `INFISICAL_UNIVERSAL_AUTH_CLIENT_ID` - Your machine identity client ID.
* `INFISICAL_UNIVERSAL_AUTH_CLIENT_SECRET` - Your machine identity client secret.
**Using the SDK directly**
```go
_, err := client.Auth().UniversalAuthLogin("CLIENT_ID", "CLIENT_SECRET")
if err != nil {
fmt.Println(err)
os.Exit(1)
}
```
#### GCP ID Token Auth
Please note that this authentication method will only work if you're running your application on Google Cloud Platform.
Please [read more](/documentation/platform/identities/gcp-auth) about this authentication method.
**Using environment variables**
Call `.Auth().GcpIdTokenAuthLogin()` with empty arguments to use the following environment variables:
* `INFISICAL_GCP_AUTH_IDENTITY_ID` - Your Infisical Machine Identity ID.
**Using the SDK directly**
```go
_, err := client.Auth().GcpIdTokenAuthLogin("YOUR_MACHINE_IDENTITY_ID")
if err != nil {
fmt.Println(err)
os.Exit(1)
}
```
#### GCP IAM Auth
**Using environment variables**
Call `.Auth().GcpIamAuthLogin()` with empty arguments to use the following environment variables:
* `INFISICAL_GCP_IAM_AUTH_IDENTITY_ID` - Your Infisical Machine Identity ID.
* `INFISICAL_GCP_IAM_SERVICE_ACCOUNT_KEY_FILE_PATH` - The path to your GCP service account key file.
**Using the SDK directly**
```go
_, err = client.Auth().GcpIamAuthLogin("MACHINE_IDENTITY_ID", "SERVICE_ACCOUNT_KEY_FILE_PATH")
if err != nil {
fmt.Println(err)
os.Exit(1)
}
```
#### AWS IAM Auth
Please note that this authentication method will only work if you're running your application on AWS.
Please [read more](/documentation/platform/identities/aws-auth) about this authentication method.
**Using environment variables**
Call `.Auth().AwsIamAuthLogin()` with empty arguments to use the following environment variables:
* `INFISICAL_AWS_IAM_AUTH_IDENTITY_ID` - Your Infisical Machine Identity ID.
**Using the SDK directly**
```go
_, err = client.Auth().AwsIamAuthLogin("MACHINE_IDENTITY_ID")
if err != nil {
fmt.Println(err)
os.Exit(1)
}
```
#### Azure Auth
Please note that this authentication method will only work if you're running your application on Azure.
Please [read more](/documentation/platform/identities/azure-auth) about this authentication method.
**Using environment variables**
Call `.Auth().AzureAuthLogin()` with empty arguments to use the following environment variables:
* `INFISICAL_AZURE_AUTH_IDENTITY_ID` - Your Infisical Machine Identity ID.
**Using the SDK directly**
```go
_, err = client.Auth().AzureAuthLogin("MACHINE_IDENTITY_ID")
if err != nil {
fmt.Println(err)
os.Exit(1)
}
```
#### Kubernetes Auth
Please note that this authentication method will only work if you're running your application on Kubernetes.
Please [read more](/documentation/platform/identities/kubernetes-auth) about this authentication method.
**Using environment variables**
Call `.Auth().KubernetesAuthLogin()` with empty arguments to use the following environment variables:
* `INFISICAL_KUBERNETES_IDENTITY_ID` - Your Infisical Machine Identity ID.
* `INFISICAL_KUBERNETES_SERVICE_ACCOUNT_TOKEN_PATH_ENV_NAME` - The environment variable name that contains the path to the service account token. This is optional and will default to `/var/run/secrets/kubernetes.io/serviceaccount/token`.
**Using the SDK directly**
```go
// Service account token path will default to /var/run/secrets/kubernetes.io/serviceaccount/token if empty value is passed
_, err = client.Auth().KubernetesAuthLogin("MACHINE_IDENTITY_ID", "SERVICE_ACCOUNT_TOKEN_PATH")
if err != nil {
fmt.Println(err)
os.Exit(1)
}
```
## Working With Secrets
### List Secrets
`client.Secrets().List(options)`
Retrieve all secrets within the Infisical project and environment that client is connected to.
```go
secrets, err := client.Secrets().List(infisical.ListSecretsOptions{
ProjectID: "PROJECT_ID",
Environment: "dev",
SecretPath: "/foo/bar",
AttachToProcessEnv: false,
})
```
### Parameters
The slug name (dev, prod, etc) of the environment from where secrets should be fetched from.
The project ID where the secret lives in.
The path from where secrets should be fetched from.
Whether or not to set the fetched secrets to the process environment. If true, you can access the secrets like so `System.getenv("SECRET_NAME")`.
Whether or not to include imported secrets from the current path. Read about [secret import](/documentation/platform/secret-reference)
Whether or not to fetch secrets recursively from the specified path. Please note that there's a 20-depth limit for recursive fetching.
Whether or not to expand secret references in the fetched secrets. Read about [secret reference](/documentation/platform/secret-reference)
###
### Retrieve Secret
`client.Secrets().Retrieve(options)`
Retrieve a secret from Infisical. By default `Secrets().Retrieve()` fetches and returns a shared secret.
```go
secret, err := client.Secrets().Retrieve(infisical.RetrieveSecretOptions{
SecretKey: "API_KEY",
ProjectID: "PROJECT_ID",
Environment: "dev",
})
```
### Parameters
The key of the secret to retrieve.
The project ID where the secret lives in.
The slug name (dev, prod, etc) of the environment from where secrets should be fetched from.
The path from where secret should be fetched from.
The type of the secret. Valid options are "shared" or "personal". If not specified, the default value is "shared".
###
### Create Secret
`client.Secrets().Create(options)`
Create a new secret in Infisical.
```go
secret, err := client.Secrets().Create(infisical.CreateSecretOptions{
ProjectID: "PROJECT_ID",
Environment: "dev",
SecretKey: "NEW_SECRET_KEY",
SecretValue: "NEW_SECRET_VALUE",
SecretComment: "This is a new secret",
})
```
### Parameters
The key of the secret to create.
The value of the secret.
A comment for the secret.
The project ID where the secret lives in.
The slug name (dev, prod, etc) of the environment from where secrets should be fetched from.
The path from where secret should be created.
The type of the secret. Valid options are "shared" or "personal". If not specified, the default value is "shared".
###
### Update Secret
`client.Secrets().Update(options)`
Update an existing secret in Infisical.
```go
secret, err := client.Secrets().Update(infisical.UpdateSecretOptions{
ProjectID: "PROJECT_ID",
Environment: "dev",
SecretKey: "NEW_SECRET_KEY",
NewSecretValue: "NEW_SECRET_VALUE",
NewSkipMultilineEncoding: false,
})
```
### Parameters
The key of the secret to update.
The new value of the secret.
Whether or not to skip multiline encoding for the new secret value.
The project ID where the secret lives in.
The slug name (dev, prod, etc) of the environment from where secrets should be fetched from.
The path from where secret should be updated.
The type of the secret. Valid options are "shared" or "personal". If not specified, the default value is "shared".
###
### Delete Secret
`client.Secrets().Delete(options)`
Delete a secret in Infisical.
```go
secret, err := client.Secrets().Delete(infisical.DeleteSecretOptions{
ProjectID: "PROJECT_ID",
Environment: "dev",
SecretKey: "SECRET_KEY",
})
```
### Parameters
The key of the secret to update.
The project ID where the secret lives in.
The slug name (dev, prod, etc) of the environment from where secrets should be fetched from.
The path from where secret should be deleted.
The type of the secret. Valid options are "shared" or "personal". If not specified, the default value is "shared".
## Working With folders
###
### List Folders
`client.Folders().List(options)`
Retrieve all within the Infisical project and environment that client is connected to.
```go
folders, err := client.Folders().List(infisical.ListFoldersOptions{
ProjectID: "PROJECT_ID",
Environment: "dev",
Path: "/",
})
```
### Parameters
The slug name (dev, prod, etc) of the environment from where folders should be fetched from.
The project ID where the folder lives in.
The path from where folders should be fetched from.
###
### Create Folder
`client.Folders().Create(options)`
Create a new folder in Infisical.
```go
folder, err := client.Folders().Create(infisical.CreateFolderOptions{
ProjectID: "PROJECT_ID",
Name: "new=folder-name",
Environment: "dev",
Path: "/",
})
```
### Parameters
The ID of the project where the folder will be created.
The slug name (dev, prod, etc) of the environment where the folder will be created.
The path to create the folder in. The root path is `/`.
The name of the folder to create.
###
### Update Folder
`client.Folders().Update(options)`
Update an existing folder in Infisical.
```go
folder, err := client.Folders().Update(infisical.UpdateFolderOptions{
ProjectID: "PROJECT_ID",
Environment: "dev",
Path: "/",
FolderID: "FOLDER_ID_TO_UPDATE",
NewName: "new-folder-name",
})
```
### Parameters
The ID of the project where the folder will be updated.
The slug name (dev, prod, etc) of the environment from where the folder lives in.
The path from where the folder should be updated.
The ID of the folder to update.
The new name of the folder.
###
### Delete Folder
`client.Folders().Delete(options)`
Delete a folder in Infisical.
```go
deletedFolder, err := client.Folders().Delete(infisical.DeleteFolderOptions{
// Either folder ID or folder name is required.
FolderName: "name-of-folder-to-delete",
FolderID: "folder-id-to-delete",
ProjectID: "PROJECT_ID",
Environment: "dev",
Path: "/",
})
```
### Parameters
The name of the folder to delete. Note that either `FolderName` or `FolderID` is required.
The ID of the folder to delete. Note that either `FolderName` or `FolderID` is required.
The ID of the project where the folder lives in.
The slug name (dev, prod, etc) of the environment from where the folder lives in.
The path from where the folder should be deleted.
# Infisical Java SDK
Source: https://infisical.com/docs/sdks/languages/java
{
/*
If you're working with Java, the official [Infisical Java SDK](https://github.com/Infisical/sdk/tree/main/languages/java) package is the easiest way to fetch and work with secrets for your application.
- [Maven Package](https://github.com/Infisical/sdk/packages/2019741)
- [Github Repository](https://github.com/Infisical/sdk/tree/main/languages/java)
## Basic Usage
```java
package com.example.app;
import com.infisical.sdk.InfisicalClient;
import com.infisical.sdk.schema.*;
public class Example {
public static void main(String[] args) {
// Create the authentication settings for the client
ClientSettings settings = new ClientSettings();
AuthenticationOptions authOptions = new AuthenticationOptions();
UniversalAuthMethod authMethod = new UniversalAuthMethod();
authMethod.setClientID("YOUR_IDENTITY_ID");
authMethod.setClientSecret("YOUR_CLIENT_SECRET");
authOptions.setUniversalAuth(authMethod);
settings.setAuth(authOptions);
// Create a new Infisical Client
InfisicalClient client = new InfisicalClient(settings);
// Create the options for fetching the secret
GetSecretOptions options = new GetSecretOptions();
options.setSecretName("TEST");
options.setEnvironment("dev");
options.setProjectID("PROJECT_ID");
// Fetch the sercret with the provided options
GetSecretResponseSecret secret = client.getSecret(options);
// Print the value
System.out.println(secret.getSecretValue());
// Important to avoid memory leaks!
// If you intend to use the client throughout your entire application, you can omit this line.
client.close();
}
}
```
This example demonstrates how to use the Infisical Java SDK in a Java application. The application retrieves a secret named `TEST` from the `dev` environment of the `PROJECT_ID` project.
We do not recommend hardcoding your [Machine Identity Tokens](/platform/identities/overview). Setting it as an environment variable would be best.
# Installation
The Infisical Java SDK is hosted on the GitHub Packages Apache Maven registry. Because of this you need to configure your environment properly so it's able to pull dependencies from the GitHub registry. Please check [this guide from GitHub](https://docs.github.com/en/packages/working-with-a-github-packages-registry/working-with-the-apache-maven-registry) on how to achieve this.
Our package is [located here](https://github.com/Infisical/sdk/packages/2019741). Please follow the installation guide on the page.
# Configuration
Import the SDK and create a client instance with your [Machine Identity](/platform/identities/universal-auth).
```java
import com.infisical.sdk.InfisicalClient;
import com.infisical.sdk.schema.*;
public class App {
public static void main(String[] args) {
// Create the authentication settings for the client
ClientSettings settings = new ClientSettings();
AuthenticationOptions authOptions = new AuthenticationOptions();
UniversalAuthMethod authMethod = new UniversalAuthMethod();
authMethod.setClientID("YOUR_IDENTITY_ID");
authMethod.setClientSecret("YOUR_CLIENT_SECRET");
authOptions.setUniversalAuth(authMethod);
settings.setAuth(authOptions);
// Create a new Infisical Client
InfisicalClient client = new InfisicalClient(settings); // Your client!
}
}
```
### ClientSettings methods
Your machine identity client ID.
**This field is deprecated and will be removed in future versions.** Please use the `setAuth()` method on the client settings instead.
Your machine identity client secret.
**This field is deprecated and will be removed in future versions.** Please use the `setAuth()` method on the client settings instead.
An access token obtained from the machine identity login endpoint.
**This field is deprecated and will be removed in future versions.** Please use the `setAuth()` method on the client settings instead.
Time-to-live (in seconds) for refreshing cached secrets.
If manually set to 0, caching will be disabled, this is not recommended.
Your self-hosted absolute site URL including the protocol (e.g. `https://app.infisical.com`)
Optionally provide a path to a custom SSL certificate file. This can be substituted by setting the `INFISICAL_SSL_CERTIFICATE` environment variable to the contents of the certificate.
The authentication object to use for the client. This is required unless you're using environment variables.
### Authentication
The SDK supports a variety of authentication methods. The most common authentication method is Universal Auth, which uses a client ID and client secret to authenticate.
#### Universal Auth
**Using environment variables**
- `INFISICAL_UNIVERSAL_AUTH_CLIENT_ID` - Your machine identity client ID.
- `INFISICAL_UNIVERSAL_AUTH_CLIENT_SECRET` - Your machine identity client secret.
**Using the SDK directly**
```java
ClientSettings settings = new ClientSettings();
AuthenticationOptions authOptions = new AuthenticationOptions();
UniversalAuthMethod authMethod = new UniversalAuthMethod();
authMethod.setClientID("YOUR_IDENTITY_ID");
authMethod.setClientSecret("YOUR_CLIENT_SECRET");
authOptions.setUniversalAuth(authMethod);
settings.setAuth(authOptions);
InfisicalClient client = new InfisicalClient(settings);
```
#### GCP ID Token Auth
Please note that this authentication method will only work if you're running your application on Google Cloud Platform.
Please [read more](/documentation/platform/identities/gcp-auth) about this authentication method.
**Using environment variables**
- `INFISICAL_GCP_AUTH_IDENTITY_ID` - Your Infisical Machine Identity ID.
**Using the SDK directly**
```java
ClientSettings settings = new ClientSettings();
AuthenticationOptions authOptions = new AuthenticationOptions();
GCPIDTokenAuthMethod authMethod = new GCPIDTokenAuthMethod();
authMethod.setIdentityID("YOUR_MACHINE_IDENTITY_ID");
authOptions.setGcpIDToken(authMethod);
settings.setAuth(authOptions);
InfisicalClient client = new InfisicalClient(settings);
```
#### GCP IAM Auth
**Using environment variables**
- `INFISICAL_GCP_IAM_AUTH_IDENTITY_ID` - Your Infisical Machine Identity ID.
- `INFISICAL_GCP_IAM_SERVICE_ACCOUNT_KEY_FILE_PATH` - The path to your GCP service account key file.
**Using the SDK directly**
```java
ClientSettings settings = new ClientSettings();
AuthenticationOptions authOptions = new AuthenticationOptions();
GCPIamAuthMethod authMethod = new GCPIamAuthMethod();
authMethod.setIdentityID("YOUR_MACHINE_IDENTITY_ID");
authMethod.setServiceAccountKeyFilePath("./path/to/your/service-account-key.json");
authOptions.setGcpIam(authMethod);
settings.setAuth(authOptions);
InfisicalClient client = new InfisicalClient(settings);
```
#### AWS IAM Auth
Please note that this authentication method will only work if you're running your application on AWS.
Please [read more](/documentation/platform/identities/aws-auth) about this authentication method.
**Using environment variables**
- `INFISICAL_AWS_IAM_AUTH_IDENTITY_ID` - Your Infisical Machine Identity ID.
**Using the SDK directly**
```java
ClientSettings settings = new ClientSettings();
AuthenticationOptions authOptions = new AuthenticationOptions();
AWSIamAuthMethod authMethod = new AWSIamAuthMethod();
authMethod.setIdentityID("YOUR_MACHINE_IDENTITY_ID");
authOptions.setAwsIam(authMethod);
settings.setAuth(authOptions);
InfisicalClient client = new InfisicalClient(settings);
```
#### Azure Auth
Please note that this authentication method will only work if you're running your application on Azure.
Please [read more](/documentation/platform/identities/azure-auth) about this authentication method.
**Using environment variables**
- `INFISICAL_AZURE_AUTH_IDENTITY_ID` - Your Infisical Machine Identity ID.
**Using the SDK directly**
```java
ClientSettings settings = new ClientSettings();
AuthenticationOptions authOptions = new AuthenticationOptions();
AzureAuthMethod authMethod = new AzureAuthMethod();
authMethod.setIdentityID("YOUR_IDENTITY_ID");
authOptions.setAzure(authMethod);
settings.setAuth(authOptions);
InfisicalClient client = new InfisicalClient(settings);
```
#### Kubernetes Auth
Please note that this authentication method will only work if you're running your application on Kubernetes.
Please [read more](/documentation/platform/identities/kubernetes-auth) about this authentication method.
**Using environment variables**
- `INFISICAL_KUBERNETES_IDENTITY_ID` - Your Infisical Machine Identity ID.
- `INFISICAL_KUBERNETES_SERVICE_ACCOUNT_TOKEN_PATH_ENV_NAME` - The environment variable name that contains the path to the service account token. This is optional and will default to `/var/run/secrets/kubernetes.io/serviceaccount/token`.
**Using the SDK directly**
```java
ClientSettings settings = new ClientSettings();
AuthenticationOptions authOptions = new AuthenticationOptions();
KubernetesAuthMethod authMethod = new KubernetesAuthMethod();
authMethod.setIdentityID("YOUR_IDENTITY_ID");
authMethod.setServiceAccountTokenPath("/var/run/secrets/kubernetes.io/serviceaccount/token"); // Optional
authOptions.setKubernetes(authMethod);
settings.setAuth(authOptions);
InfisicalClient client = new InfisicalClient(settings);
```
### Caching
To reduce the number of API requests, the SDK temporarily stores secrets it retrieves. By default, a secret remains cached for 5 minutes after it's first fetched. Each time it's fetched again, this 5-minute timer resets. You can adjust this caching duration by setting the "cacheTTL" option when creating the client.
## Working with Secrets
### client.listSecrets(options)
```java
ListSecretsOptions options = new ListSecretsOptions();
options.setEnvironment("dev");
options.setProjectID("PROJECT_ID");
options.setPath("/foo/bar");
options.setIncludeImports(false);
options.setRecursive(false);
options.setExpandSecretReferences(true);
SecretElement[] secrets = client.listSecrets(options);
```
Retrieve all secrets within the Infisical project and environment that client is connected to
#### Methods
The slug name (dev, prod, etc) of the environment from where secrets should be fetched from.
The project ID where the secret lives in.
The path from where secrets should be fetched from.
Whether or not to set the fetched secrets to the process environment. If true, you can access the secrets like so `System.getenv("SECRET_NAME")`.
Whether or not to include imported secrets from the current path. Read about [secret import](/documentation/platform/secret-reference)
Whether or not to fetch secrets recursively from the specified path. Please note that there's a 20-depth limit for recursive fetching.
Whether or not to expand secret references in the fetched secrets. Read about [secret reference](/documentation/platform/secret-reference)
### client.getSecret(options)
```java
GetSecretOptions options = new GetSecretOptions();
options.setSecretName("TEST");
options.setEnvironment("dev");
options.setProjectID("PROJECT_ID");
GetSecretResponseSecret secret = client.getSecret(options);
String secretValue = secret.getSecretValue();
```
Retrieve a secret from Infisical.
By default, `getSecret()` fetches and returns a shared secret.
#### Methods
The key of the secret to retrieve.
The project ID where the secret lives in.
The slug name (dev, prod, etc) of the environment from where secrets should be fetched from.
The path from where secret should be fetched from.
The type of the secret. Valid options are "shared" or "personal". If not specified, the default value is "shared".
Whether or not to include imported secrets from the current path. Read about [secret import](/documentation/platform/secret-reference)
Whether or not to expand secret references in the fetched secrets. Read about [secret reference](/documentation/platform/secret-reference)
### client.createSecret(options)
```java
CreateSecretOptions createOptions = new CreateSecretOptions();
createOptions.setSecretName("NEW_SECRET");
createOptions.setEnvironment("dev");
createOptions.setProjectID("PROJECT_ID");
createOptions.setSecretValue("SOME SECRET VALUE");
createOptions.setPath("/"); // Default
createOptions.setType("shared"); // Default
CreateSecretResponseSecret newSecret = client.createSecret(createOptions);
```
Create a new secret in Infisical.
#### Methods
The key of the secret to create.
The value of the secret.
The project ID where the secret lives in.
The slug name (dev, prod, etc) of the environment from where secrets should be fetched from.
The path from where secret should be created.
The type of the secret. Valid options are "shared" or "personal". If not specified, the default value is "shared".
### client.updateSecret(options)
```java
UpdateSecretOptions options = new UpdateSecretOptions();
options.setSecretName("SECRET_TO_UPDATE");
options.setSecretValue("NEW SECRET VALUE");
options.setEnvironment("dev");
options.setProjectID("PROJECT_ID");
options.setPath("/"); // Default
options.setType("shared"); // Default
UpdateSecretResponseSecret updatedSecret = client.updateSecret(options);
```
Update an existing secret in Infisical.
#### Methods
The key of the secret to update.
The new value of the secret.
The project ID where the secret lives in.
The slug name (dev, prod, etc) of the environment from where secrets should be fetched from.
The path from where secret should be updated.
The type of the secret. Valid options are "shared" or "personal". If not specified, the default value is "shared".
### client.deleteSecret(options)
```java
DeleteSecretOptions options = new DeleteSecretOptions();
options.setSecretName("SECRET_TO_DELETE");
options.setEnvironment("dev");
options.setProjectID("PROJECT_ID");
options.setPath("/"); // Default
options.setType("shared"); // Default
DeleteSecretResponseSecret deletedSecret = client.deleteSecret(options);
```
Delete a secret in Infisical.
#### Methods
The key of the secret to update.
The project ID where the secret lives in.
The slug name (dev, prod, etc) of the environment from where secrets should be fetched from.
The path from where secret should be deleted.
The type of the secret. Valid options are "shared" or "personal". If not specified, the default value is "shared".
## Cryptography
### Create a symmetric key
Create a base64-encoded, 256-bit symmetric key to be used for encryption/decryption.
```java
String key = client.createSymmetricKey();
```
#### Returns (string)
`key` (string): A base64-encoded, 256-bit symmetric key, that can be used for encryption/decryption purposes.
### Encrypt symmetric
```java
EncryptSymmetricOptions options = new EncryptSymmetricOptions();
options.setKey(key);
options.setPlaintext("Infisical is awesome!");
EncryptSymmetricResponse encryptedData = client.encryptSymmetric(options);
```
#### Methods
The plaintext you want to encrypt.
The symmetric key to use for encryption.
#### Returns (object)
`tag (getTag())` (string): A base64-encoded, 128-bit authentication tag.
`iv (getIv())` (string): A base64-encoded, 96-bit initialization vector.
`ciphertext (getCipherText())` (string): A base64-encoded, encrypted ciphertext.
### Decrypt symmetric
```java
DecryptSymmetricOptions decryptOptions = new DecryptSymmetricOptions();
decryptOptions.setKey(key);
decryptOptions.setCiphertext(encryptedData.getCiphertext());
decryptOptions.setIv(encryptedData.getIv());
decryptOptions.setTag(encryptedData.getTag());
String decryptedString = client.decryptSymmetric(decryptOptions);
```
#### Methods
The ciphertext you want to decrypt.
The symmetric key to use for encryption.
The initialization vector to use for decryption.
The authentication tag to use for decryption.
#### Returns (string)
`Plaintext` (string): The decrypted plaintext.
*/}
# Infisical Node.js SDK
Source: https://infisical.com/docs/sdks/languages/node
{/*
If you're working with Node.js, the official [Infisical Node SDK](https://github.com/Infisical/sdk/tree/main/languages/node) package is the easiest way to fetch and work with secrets for your application.
- [NPM Package](https://www.npmjs.com/package/@infisical/sdk)
- [Github Repository](https://github.com/Infisical/sdk/tree/main/languages/node)
## Basic Usage
```js
import express from "express";
import { InfisicalClient } from "@infisical/sdk";
const app = express();
const PORT = 3000;
const client = new InfisicalClient({
siteUrl: "https://app.infisical.com", // Optional, defaults to https://app.infisical.com
auth: {
universalAuth: {
clientId: "YOUR_CLIENT_ID",
clientSecret: "YOUR_CLIENT_SECRET"
}
}
});
app.get("/", async (req, res) => {
// Access the secret
const name = await client.getSecret({
environment: "dev",
projectId: "PROJECT_ID",
path: "/",
type: "shared",
secretName: "NAME"
});
res.send(`Hello! My name is: ${name.secretValue}`);
});
app.listen(PORT, async () => {
// initialize client
console.log(`App listening on port ${PORT}`);
});
```
This example demonstrates how to use the Infisical Node SDK with an Express application. The application retrieves a secret named "NAME" and responds to requests with a greeting that includes the secret value.
We do not recommend hardcoding your [Machine Identity Tokens](/documentation/platform/identities/overview). Setting it as an environment variable
would be best.
## Installation
Run `npm` to add `@infisical/sdk` to your project.
```console
$ npm install @infisical/sdk
```
## Configuration
Import the SDK and create a client instance with your [Machine Identity](/documentation/platform/identities/overview).
```js
import { InfisicalClient, LogLevel } from "@infisical/sdk";
const client = new InfisicalClient({
auth: {
universalAuth: {
clientId: "YOUR_CLIENT_ID",
clientSecret: "YOUR_CLIENT_SECRET"
}
},
logLevel: LogLevel.Error
});
```
```js
const { InfisicalClient } = require("@infisical/sdk");
const client = new InfisicalClient({
auth: {
universalAuth: {
clientId: "YOUR_CLIENT_ID",
clientSecret: "YOUR_CLIENT_SECRET"
}
},
});
```
### Parameters
Your machine identity client ID.
**This field is deprecated and will be removed in future versions.** Please use the `auth.universalAuth.clientId` field instead.
Your machine identity client secret.
**This field is deprecated and will be removed in future versions.** Please use the `auth.universalAuth.clientSecret` field instead.
An access token obtained from the machine identity login endpoint.
**This field is deprecated and will be removed in future versions.** Please use the `auth.accessToken` field instead.
Time-to-live (in seconds) for refreshing cached secrets.
If manually set to 0, caching will be disabled, this is not recommended.
Your self-hosted absolute site URL including the protocol (e.g. `https://app.infisical.com`)
The level of logs you wish to log The logs are derived from Rust, as we have written our base SDK in Rust.
Optionally provide a path to a custom SSL certificate file. This can be substituted by setting the `INFISICAL_SSL_CERTIFICATE` environment variable to the contents of the certificate.
The authentication object to use for the client. This is required unless you're using environment variables.
### Authentication
The SDK supports a variety of authentication methods. The most common authentication method is Universal Auth, which uses a client ID and client secret to authenticate.
#### Universal Auth
**Using environment variables**
- `INFISICAL_UNIVERSAL_AUTH_CLIENT_ID` - Your machine identity client ID.
- `INFISICAL_UNIVERSAL_AUTH_CLIENT_SECRET` - Your machine identity client secret.
**Using the SDK directly**
```js
const client = new InfisicalClient({
auth: {
universalAuth: {
clientId: "YOUR_CLIENT_ID",
clientSecret: "YOUR_CLIENT_SECRET"
}
}
});
```
#### GCP ID Token Auth
Please note that this authentication method will only work if you're running your application on Google Cloud Platform.
Please [read more](/documentation/platform/identities/gcp-auth) about this authentication method.
**Using environment variables**
- `INFISICAL_GCP_AUTH_IDENTITY_ID` - Your Infisical Machine Identity ID.
**Using the SDK directly**
```js
const client = new InfisicalClient({
auth: {
gcpIdToken: {
identityId: "YOUR_IDENTITY_ID"
}
}
});
```
#### GCP IAM Auth
**Using environment variables**
- `INFISICAL_GCP_IAM_AUTH_IDENTITY_ID` - Your Infisical Machine Identity ID.
- `INFISICAL_GCP_IAM_SERVICE_ACCOUNT_KEY_FILE_PATH` - The path to your GCP service account key file.
**Using the SDK directly**
```js
const client = new InfisicalClient({
auth: {
gcpIam: {
identityId: "YOUR_IDENTITY_ID",
serviceAccountKeyFilePath: "./path/to/your/service-account-key.json"
}
}
});
```
#### AWS IAM Auth
Please note that this authentication method will only work if you're running your application on AWS.
Please [read more](/documentation/platform/identities/aws-auth) about this authentication method.
**Using environment variables**
- `INFISICAL_AWS_IAM_AUTH_IDENTITY_ID` - Your Infisical Machine Identity ID.
**Using the SDK directly**
```js
const client = new InfisicalClient({
auth: {
awsIam: {
identityId: "YOUR_IDENTITY_ID"
}
}
});
```
#### Azure Auth
Please note that this authentication method will only work if you're running your application on Azure.
Please [read more](/documentation/platform/identities/azure-auth) about this authentication method.
**Using environment variables**
- `INFISICAL_AZURE_AUTH_IDENTITY_ID` - Your Infisical Machine Identity ID.
**Using the SDK directly**
```js
const client = new InfisicalClient({
auth: {
azure: {
identityId: "YOUR_IDENTITY_ID"
}
}
});
```
#### Kubernetes Auth
Please note that this authentication method will only work if you're running your application on Kubernetes.
Please [read more](/documentation/platform/identities/kubernetes-auth) about this authentication method.
**Using environment variables**
- `INFISICAL_KUBERNETES_IDENTITY_ID` - Your Infisical Machine Identity ID.
- `INFISICAL_KUBERNETES_SERVICE_ACCOUNT_TOKEN_PATH_ENV_NAME` - The environment variable name that contains the path to the service account token. This is optional and will default to `/var/run/secrets/kubernetes.io/serviceaccount/token`.
**Using the SDK directly**
```js
const client = new InfisicalClient({
auth: {
kubernetes: {
identityId: "YOUR_IDENTITY_ID",
serviceAccountTokenPathEnvName: "/var/run/secrets/kubernetes.io/serviceaccount/token" // Optional
}
}
});
```
### Caching
To reduce the number of API requests, the SDK temporarily stores secrets it retrieves. By default, a secret remains cached for 5 minutes after it's first fetched. Each time it's fetched again, this 5-minute timer resets. You can adjust this caching duration by setting the "cacheTtl" option when creating the client.
## Working with Secrets
### client.listSecrets(options)
```js
const secrets = await client.listSecrets({
environment: "dev",
projectId: "PROJECT_ID",
path: "/foo/bar/",
includeImports: false
});
```
Retrieve all secrets within the Infisical project and environment that client is connected to
#### Parameters
The slug name (dev, prod, etc) of the environment from where secrets should be fetched from.
The project ID where the secret lives in.
The path from where secrets should be fetched from.
Whether or not to set the fetched secrets to the process environment. If true, you can access the secrets like so `process.env["SECRET_NAME"]`.
Whether or not to fetch secrets recursively from the specified path. Please note that there's a 20-depth limit for recursive fetching.
Whether or not to expand secret references in the fetched secrets. Read about [secret reference](/documentation/platform/secret-reference)
Whether or not to include imported secrets from the current path. Read about [secret import](/documentation/platform/secret-reference)
### client.getSecret(options)
```js
const secret = await client.getSecret({
environment: "dev",
projectId: "PROJECT_ID",
secretName: "API_KEY",
path: "/",
type: "shared"
});
```
Retrieve a secret from Infisical.
By default, `getSecret()` fetches and returns a shared secret.
#### Parameters
The key of the secret to retrieve.
The project ID where the secret lives in.
The slug name (dev, prod, etc) of the environment from where secrets should be fetched from.
The path from where secret should be fetched from.
The type of the secret. Valid options are "shared" or "personal". If not specified, the default value is "shared".
Whether or not to include imported secrets from the current path. Read about [secret import](/documentation/platform/secret-reference)
Whether or not to expand secret references in the fetched secrets. Read about [secret reference](/documentation/platform/secret-reference)
### client.createSecret(options)
```js
const newApiKey = await client.createSecret({
projectId: "PROJECT_ID",
environment: "dev",
secretName: "API_KEY",
secretValue: "SECRET VALUE",
path: "/",
type: "shared"
});
```
Create a new secret in Infisical.
The key of the secret to create.
The value of the secret.
The project ID where the secret lives in.
The slug name (dev, prod, etc) of the environment from where secrets should be fetched from.
The path from where secret should be created.
The type of the secret. Valid options are "shared" or "personal". If not specified, the default value is "shared".
### client.updateSecret(options)
```js
const updatedApiKey = await client.updateSecret({
secretName: "API_KEY",
secretValue: "NEW SECRET VALUE",
projectId: "PROJECT_ID",
environment: "dev",
path: "/",
type: "shared"
});
```
Update an existing secret in Infisical.
#### Parameters
The key of the secret to update.
The new value of the secret.
The project ID where the secret lives in.
The slug name (dev, prod, etc) of the environment from where secrets should be fetched from.
The path from where secret should be updated.
The type of the secret. Valid options are "shared" or "personal". If not specified, the default value is "shared".
### client.deleteSecret(options)
```js
const deletedSecret = await client.deleteSecret({
secretName: "API_KEY",
environment: "dev",
projectId: "PROJECT_ID",
path: "/",
type: "shared"
});
```
Delete a secret in Infisical.
The key of the secret to update.
The project ID where the secret lives in.
The slug name (dev, prod, etc) of the environment from where secrets should be fetched from.
The path from where secret should be deleted.
The type of the secret. Valid options are "shared" or "personal". If not specified, the default value is "shared".
## Cryptography
### Create a symmetric key
Create a base64-encoded, 256-bit symmetric key to be used for encryption/decryption.
```js
const key = client.createSymmetricKey();
```
#### Returns (string)
`key` (string): A base64-encoded, 256-bit symmetric key, that can be used for encryption/decryption purposes.
### Encrypt symmetric
```js
const { iv, tag, ciphertext } = await client.encryptSymmetric({
key: key,
plaintext: "Infisical is awesome!",
})
```
#### Parameters
The plaintext you want to encrypt.
The symmetric key to use for encryption.
#### Returns (object)
`tag` (string): A base64-encoded, 128-bit authentication tag.
`iv` (string): A base64-encoded, 96-bit initialization vector.
`ciphertext` (string): A base64-encoded, encrypted ciphertext.
### Decrypt symmetric
```js
const decryptedString = await client.decryptSymmetric({
key: key,
iv: iv,
tag: tag,
ciphertext: ciphertext,
});
```
#### Parameters
The ciphertext you want to decrypt.
The symmetric key to use for encryption.
The initialization vector to use for decryption.
The authentication tag to use for decryption.
#### Returns (string)
`plaintext` (string): The decrypted plaintext.
*/}
# Infisical Python SDK
Source: https://infisical.com/docs/sdks/languages/python
{/* If you're working with Python, the official [infisical-python](https://github.com/Infisical/sdk/edit/main/crates/infisical-py) package is the easiest way to fetch and work with secrets for your application.
- [PyPi Package](https://pypi.org/project/infisical-python/)
- [Github Repository](https://github.com/Infisical/sdk/edit/main/crates/infisical-py)
## Basic Usage
```py
from flask import Flask
from infisical_client import ClientSettings, InfisicalClient, GetSecretOptions, AuthenticationOptions, UniversalAuthMethod
app = Flask(__name__)
client = InfisicalClient(ClientSettings(
auth=AuthenticationOptions(
universal_auth=UniversalAuthMethod(
client_id="CLIENT_ID",
client_secret="CLIENT_SECRET",
)
)
))
@app.route("/")
def hello_world():
# access value
name = client.getSecret(options=GetSecretOptions(
environment="dev",
project_id="PROJECT_ID",
secret_name="NAME"
))
return f"Hello! My name is: {name.secret_value}"
```
This example demonstrates how to use the Infisical Python SDK with a Flask application. The application retrieves a secret named "NAME" and responds to requests with a greeting that includes the secret value.
We do not recommend hardcoding your [Machine Identity Tokens](/platform/identities/overview). Setting it as an environment variable would be best.
## Installation
Run `pip` to add `infisical-python` to your project
```console
$ pip install infisical-python
```
Note: You need Python 3.7+.
## Configuration
Import the SDK and create a client instance with your [Machine Identity](/api-reference/overview/authentication).
```py
from infisical_client import ClientSettings, InfisicalClient, AuthenticationOptions, UniversalAuthMethod
client = InfisicalClient(ClientSettings(
auth=AuthenticationOptions(
universal_auth=UniversalAuthMethod(
client_id="CLIENT_ID",
client_secret="CLIENT_SECRET",
)
)
))
```
#### Parameters
Your Infisical Client ID.
**This field is deprecated and will be removed in future versions.** Please use the `auth` field instead.
Your Infisical Client Secret.
**This field is deprecated and will be removed in future versions.** Please use the `auth` field instead.
If you want to directly pass an access token obtained from the authentication endpoints, you can do so.
**This field is deprecated and will be removed in future versions.** Please use the `auth` field instead.
Time-to-live (in seconds) for refreshing cached secrets.
If manually set to 0, caching will be disabled, this is not recommended.
Your self-hosted absolute site URL including the protocol (e.g. `https://app.infisical.com`)
Optionally provide a path to a custom SSL certificate file. This can be substituted by setting the `INFISICAL_SSL_CERTIFICATE` environment variable to the contents of the certificate.
The authentication object to use for the client. This is required unless you're using environment variables.
### Authentication
The SDK supports a variety of authentication methods. The most common authentication method is Universal Auth, which uses a client ID and client secret to authenticate.
#### Universal Auth
**Using environment variables**
- `INFISICAL_UNIVERSAL_AUTH_CLIENT_ID` - Your machine identity client ID.
- `INFISICAL_UNIVERSAL_AUTH_CLIENT_SECRET` - Your machine identity client secret.
**Using the SDK directly**
```python3
from infisical_client import ClientSettings, InfisicalClient, AuthenticationOptions, UniversalAuthMethod
client = InfisicalClient(ClientSettings(
auth=AuthenticationOptions(
universal_auth=UniversalAuthMethod(
client_id="CLIENT_ID",
client_secret="CLIENT_SECRET",
)
)
))
```
#### GCP ID Token Auth
Please note that this authentication method will only work if you're running your application on Google Cloud Platform.
Please [read more](/documentation/platform/identities/gcp-auth) about this authentication method.
**Using environment variables**
- `INFISICAL_GCP_AUTH_IDENTITY_ID` - Your Infisical Machine Identity ID.
**Using the SDK directly**
```py
from infisical_client import ClientSettings, InfisicalClient, AuthenticationOptions, GCPIDTokenAuthMethod
client = InfisicalClient(ClientSettings(
auth=AuthenticationOptions(
gcp_id_token=GCPIDTokenAuthMethod(
identity_id="MACHINE_IDENTITY_ID",
)
)
))
```
#### GCP IAM Auth
**Using environment variables**
- `INFISICAL_GCP_IAM_AUTH_IDENTITY_ID` - Your Infisical Machine Identity ID.
- `INFISICAL_GCP_IAM_SERVICE_ACCOUNT_KEY_FILE_PATH` - The path to your GCP service account key file.
**Using the SDK directly**
```py
from infisical_client import ClientSettings, InfisicalClient, AuthenticationOptions, GCPIamAuthMethod
client = InfisicalClient(ClientSettings(
auth=AuthenticationOptions(
gcp_iam=GCPIamAuthMethod(
identity_id="MACHINE_IDENTITY_ID",
service_account_key_file_path="./path/to/service_account_key.json"
)
)
))
```
#### AWS IAM Auth
Please note that this authentication method will only work if you're running your application on AWS.
Please [read more](/documentation/platform/identities/aws-auth) about this authentication method.
**Using environment variables**
- `INFISICAL_AWS_IAM_AUTH_IDENTITY_ID` - Your Infisical Machine Identity ID.
**Using the SDK directly**
```py
from infisical_client import ClientSettings, InfisicalClient, AuthenticationOptions, AWSIamAuthMethod
client = InfisicalClient(ClientSettings(
auth=AuthenticationOptions(
aws_iam=AWSIamAuthMethod(identity_id="MACHINE_IDENTITY_ID")
)
))
```
#### Azure Auth
Please note that this authentication method will only work if you're running your application on Azure.
Please [read more](/documentation/platform/identities/azure-auth) about this authentication method.
**Using environment variables**
- `INFISICAL_AZURE_AUTH_IDENTITY_ID` - Your Infisical Machine Identity ID.
**Using the SDK directly**
```python
from infisical_client import InfisicalClient, ClientSettings, AuthenticationOptions, AzureAuthMethod
kubernetes_client = InfisicalClient(ClientSettings(
auth=AuthenticationOptions(
azure=AzureAuthMethod(
identity_id="YOUR_IDENTITY_ID",
)
)
))
```
#### Kubernetes Auth
Please note that this authentication method will only work if you're running your application on Kubernetes.
Please [read more](/documentation/platform/identities/kubernetes-auth) about this authentication method.
**Using environment variables**
- `INFISICAL_KUBERNETES_IDENTITY_ID` - Your Infisical Machine Identity ID.
- `INFISICAL_KUBERNETES_SERVICE_ACCOUNT_TOKEN_PATH_ENV_NAME` - The environment variable name that contains the path to the service account token. This is optional and will default to `/var/run/secrets/kubernetes.io/serviceaccount/token`.
**Using the SDK directly**
```python
from infisical_client import InfisicalClient, ClientSettings, AuthenticationOptions, KubernetesAuthMethod
kubernetes_client = InfisicalClient(ClientSettings(
auth=AuthenticationOptions(
kubernetes=KubernetesAuthMethod(
identity_id="YOUR_IDENTITY_ID",
service_account_token_path="/var/run/secrets/kubernetes.io/serviceaccount/token" # Optional
)
)
))
```
### Caching
To reduce the number of API requests, the SDK temporarily stores secrets it retrieves. By default, a secret remains cached for 5 minutes after it's first fetched. Each time it's fetched again, this 5-minute timer resets. You can adjust this caching duration by setting the "cache_ttl" option when creating the client.
## Working with Secrets
### client.listSecrets(options)
```py
client.listSecrets(options=ListSecretsOptions(
environment="dev",
project_id="PROJECT_ID"
))
```
Retrieve all secrets within the Infisical project and environment that client is connected to
#### Parameters
The slug name (dev, prod, etc) of the environment from where secrets should be fetched from.
The project ID where the secret lives in.
The path from where secrets should be fetched from.
Whether or not to set the fetched secrets to the process environment. If true, you can access the secrets like so `process.env["SECRET_NAME"]`.
Whether or not to fetch secrets recursively from the specified path. Please note that there's a 20-depth limit for recursive fetching.
Whether or not to expand secret references in the fetched secrets. Read about [secret reference](/documentation/platform/secret-reference)
Whether or not to include imported secrets from the current path. Read about [secret import](/documentation/platform/secret-reference)
### client.getSecret(options)
```py
secret = client.getSecret(options=GetSecretOptions(
environment="dev",
project_id="PROJECT_ID",
secret_name="API_KEY"
))
value = secret.secret_value # get its value
```
By default, `getSecret()` fetches and returns a shared secret. If not found, it returns a personal secret.
#### Parameters
The key of the secret to retrieve
Whether or not to include imported secrets from the current path. Read about [secret import](/documentation/platform/secret-reference)
The slug name (dev, prod, etc) of the environment from where secrets should be fetched from.
The project ID where the secret lives in.
The path from where secret should be fetched from.
The type of the secret. Valid options are "shared" or "personal". If not specified, the default value is "personal".
Whether or not to include imported secrets from the current path. Read about [secret import](/documentation/platform/secret-reference)
Whether or not to expand secret references in the fetched secrets. Read about [secret reference](/documentation/platform/secret-reference)
### client.createSecret(options)
```py
api_key = client.createSecret(options=CreateSecretOptions(
secret_name="API_KEY",
secret_value="Some API Key",
environment="dev",
project_id="PROJECT_ID"
))
```
Create a new secret in Infisical.
#### Parameters
The key of the secret to create.
The value of the secret.
The project ID where the secret lives in.
The slug name (dev, prod, etc) of the environment from where secrets should be fetched from.
The path from where secret should be created.
The type of the secret. Valid options are "shared" or "personal". If not specified, the default value is "shared".
### client.updateSecret(options)
```py
client.updateSecret(options=UpdateSecretOptions(
secret_name="API_KEY",
secret_value="NEW_VALUE",
environment="dev",
project_id="PROJECT_ID"
))
```
Update an existing secret in Infisical.
#### Parameters
The key of the secret to update.
The new value of the secret.
The project ID where the secret lives in.
The slug name (dev, prod, etc) of the environment from where secrets should be fetched from.
The path from where secret should be updated.
The type of the secret. Valid options are "shared" or "personal". If not specified, the default value is "shared".
### client.deleteSecret(options)
```py
client.deleteSecret(options=DeleteSecretOptions(
environment="dev",
project_id="PROJECT_ID",
secret_name="API_KEY"
))
```
Delete a secret in Infisical.
#### Parameters
The key of the secret to update.
The project ID where the secret lives in.
The slug name (dev, prod, etc) of the environment from where secrets should be fetched from.
The path from where secret should be deleted.
The type of the secret. Valid options are "shared" or "personal". If not specified, the default value is "shared".
## Cryptography
### Create a symmetric key
Create a base64-encoded, 256-bit symmetric key to be used for encryption/decryption.
```py
key = client.createSymmetricKey()
```
#### Returns (string)
`key` (string): A base64-encoded, 256-bit symmetric key, that can be used for encryption/decryption purposes.
### Encrypt symmetric
```py
encryptOptions = EncryptSymmetricOptions(
key=key,
plaintext="Infisical is awesome!"
)
encryptedData = client.encryptSymmetric(encryptOptions)
```
#### Parameters
The plaintext you want to encrypt.
The symmetric key to use for encryption.
#### Returns (object)
`tag` (string): A base64-encoded, 128-bit authentication tag. `iv` (string): A base64-encoded, 96-bit initialization vector. `ciphertext` (string): A base64-encoded, encrypted ciphertext.
### Decrypt symmetric
```py
decryptOptions = DecryptSymmetricOptions(
ciphertext=encryptedData.ciphertext,
iv=encryptedData.iv,
tag=encryptedData.tag,
key=key
)
decryptedString = client.decryptSymmetric(decryptOptions)
```
#### Parameters
The ciphertext you want to decrypt.
The symmetric key to use for encryption.
The initialization vector to use for decryption.
The authentication tag to use for decryption.
#### Returns (string)
`plaintext` (string): The decrypted plaintext. */}
# Infisical Ruby SDK
Source: https://infisical.com/docs/sdks/languages/ruby
If you're working with Ruby , the official [Infisical Ruby SDK](https://github.com/infisical/sdk) package is the easiest way to fetch and work with secrets for your application.
* [Ruby Package](https://rubygems.org/gems/infisical-sdk)
* [Github Repository](https://github.com/infisical/sdk)
## Basic Usage
```ruby
require 'infisical-sdk'
# 1. Create the Infisical client
infisical = InfisicalSDK::InfisicalClient.new('https://app.infisical.com')
infisical.auth.universal_auth(client_id: 'YOUR_CLIENT_ID', client_secret: 'YOUR_CLIENT_SECRET')
test_secret = infisical.secrets.get(
secret_name: 'API_KEY',
project_id: 'project-id',
environment: 'dev'
)
puts "Secret: #{single_test_secret}"
```
This example demonstrates how to use the Infisical Ruby SDK in a simple Ruby application. The application retrieves a secret named `API_KEY` from the `dev` environment of the `YOUR_PROJECT_ID` project.
We do not recommend hardcoding your [Machine Identity Tokens](/platform/identities/overview). Setting it as an environment variable would be best.
# Installation
```console
$ gem install infisical-sdk
```
# Configuration
Import the SDK and create a client instance.
```ruby
infisical = InfisicalSDK::InfisicalClient.new('https://app.infisical.com') # Optional parameter, default is https://api.infisical.com
```
### Client parameters
The URL of the Infisical API. Default is `https://api.infisical.com`.
How long the client should cache secrets for. Default is 5 minutes. Disable by setting to 0.
### Authentication
The SDK supports a variety of authentication methods. The most common authentication method is Universal Auth, which uses a client ID and client secret to authenticate.
#### Universal Auth
**Using environment variables**
Call `auth.universal_auth()` with empty arguments to use the following environment variables:
* `INFISICAL_UNIVERSAL_AUTH_CLIENT_ID` - Your machine identity client ID.
* `INFISICAL_UNIVERSAL_AUTH_CLIENT_SECRET` - Your machine identity client secret.
**Using the SDK directly**
```ruby
infisical.auth.universal_auth(client_id: 'your-client-id', client_secret: 'your-client-secret')
```
#### GCP ID Token Auth
Please note that this authentication method will only work if you're running your application on Google Cloud Platform.
Please [read more](/documentation/platform/identities/gcp-auth) about this authentication method.
**Using environment variables**
Call `.auth.gcp_id_token_auth()` with empty arguments to use the following environment variables:
* `INFISICAL_GCP_AUTH_IDENTITY_ID` - Your Infisical Machine Identity ID.
**Using the SDK directly**
```ruby
infisical.auth.gcp_id_token_auth(identity_id: 'MACHINE_IDENTITY_ID')
```
#### GCP IAM Auth
**Using environment variables**
Call `.auth.gcp_iam_auth()` with empty arguments to use the following environment variables:
* `INFISICAL_GCP_IAM_AUTH_IDENTITY_ID` - Your Infisical Machine Identity ID.
* `INFISICAL_GCP_IAM_SERVICE_ACCOUNT_KEY_FILE_PATH` - The path to your GCP service account key file.
**Using the SDK directly**
```ruby
infisical.auth.gcp_iam_auth(identity_id: 'MACHINE_IDENTITY_ID', service_account_key_file_path: 'SERVICE_ACCOUNT_KEY_FILE_PATH')
```
#### AWS IAM Auth
Please note that this authentication method will only work if you're running your application on AWS.
Please [read more](/documentation/platform/identities/aws-auth) about this authentication method.
**Using environment variables**
Call `.auth.aws_iam_auth()` with empty arguments to use the following environment variables:
* `INFISICAL_AWS_IAM_AUTH_IDENTITY_ID` - Your Infisical Machine Identity ID.
**Using the SDK directly**
```ruby
infisical.auth.aws_iam_auth(identity_id: 'MACHINE_IDENTITY_ID')
```
#### Azure Auth
Please note that this authentication method will only work if you're running your application on Azure.
Please [read more](/documentation/platform/identities/azure-auth) about this authentication method.
**Using environment variables**
Call `.auth.azure_auth()` with empty arguments to use the following environment variables:
* `INFISICAL_AZURE_AUTH_IDENTITY_ID` - Your Infisical Machine Identity ID.
**Using the SDK directly**
```ruby
infisical.auth.azure_auth(identity_id: 'MACHINE_IDENTITY_ID')
```
#### Kubernetes Auth
Please note that this authentication method will only work if you're running your application on Kubernetes.
Please [read more](/documentation/platform/identities/kubernetes-auth) about this authentication method.
**Using environment variables**
Call `.auth.kubernetes_auth()` with empty arguments to use the following environment variables:
* `INFISICAL_KUBERNETES_IDENTITY_ID` - Your Infisical Machine Identity ID.
* `INFISICAL_KUBERNETES_SERVICE_ACCOUNT_TOKEN_PATH_ENV_NAME` - The environment variable name that contains the path to the service account token. This is optional and will default to `/var/run/secrets/kubernetes.io/serviceaccount/token`.
**Using the SDK directly**
```ruby
# Service account token path will default to /var/run/secrets/kubernetes.io/serviceaccount/token if empty value is passed
infisical.auth.kubernetes_auth(identity_id: 'MACHINE_IDENTITY_ID', service_account_token_path: nil)
```
## Working with Secrets
### client.secrets.list(options)
```ruby
secrets = infisical.secrets.list(
project_id: 'PROJECT_ID',
environment: 'dev',
path: '/foo/bar',
)
```
Retrieve all secrets within the Infisical project and environment that client is connected to
#### Parameters
The slug name (dev, prod, etc) of the environment from where secrets should be fetched from.
The project ID where the secret lives in.
The path from where secrets should be fetched from.
Whether or not to set the fetched secrets to the process environment. If true, you can access the secrets like so `System.getenv("SECRET_NAME")`.
Whether or not to include imported secrets from the current path. Read about [secret import](/documentation/platform/secret-reference)
Whether or not to fetch secrets recursively from the specified path. Please note that there's a 20-depth limit for recursive fetching.
Whether or not to expand secret references in the fetched secrets. Read about [secret reference](/documentation/platform/secret-reference)
### client.secrets.get(options)
```ruby
secret = infisical.secrets.get(
secret_name: 'API_KEY',
project_id: project_id,
environment: env_slug
)
```
Retrieve a secret from Infisical.
By default, `Secrets().Retrieve()` fetches and returns a shared secret.
#### Parameters
The key of the secret to retrieve.
The project ID where the secret lives in.
The slug name (dev, prod, etc) of the environment from where secrets should be fetched from.
The path from where secret should be fetched from.
The type of the secret. Valid options are "shared" or "personal". If not specified, the default value is "shared".
### client.secrets.create(options)
```ruby
new_secret = infisical.secrets.create(
secret_name: 'NEW_SECRET',
secret_value: 'SECRET_VALUE',
project_id: 'PROJECT_ID',
environment: 'dev',
)
```
Create a new secret in Infisical.
#### Parameters
The key of the secret to create.
The value of the secret.
A comment for the secret.
The project ID where the secret lives in.
The slug name (dev, prod, etc) of the environment from where secrets should be fetched from.
The path from where secret should be created.
The type of the secret. Valid options are "shared" or "personal". If not specified, the default value is "shared".
### client.secrets.update(options)
```ruby
updated_secret = infisical.secrets.update(
secret_name: 'SECRET_KEY_TO_UPDATE',
secret_value: 'NEW_SECRET_VALUE',
project_id: 'PROJECT_ID',
environment: 'dev',
)
```
Update an existing secret in Infisical.
#### Parameters
The key of the secret to update.
The new value of the secret.
Whether or not to skip multiline encoding for the new secret value.
The project ID where the secret lives in.
The slug name (dev, prod, etc) of the environment from where secrets should be fetched from.
The path from where secret should be updated.
The type of the secret. Valid options are "shared" or "personal". If not specified, the default value is "shared".
### client.secrets.delete(options)
```ruby
deleted_secret = infisical.secrets.delete(
secret_name: 'SECRET_TO_DELETE',
project_id: 'PROJECT_ID',
environment: 'dev',
)
```
Delete a secret in Infisical.
#### Parameters
The key of the secret to update.
The project ID where the secret lives in.
The slug name (dev, prod, etc) of the environment from where secrets should be fetched from.
The path from where secret should be deleted.
The type of the secret. Valid options are "shared" or "personal". If not specified, the default value is "shared".
## Cryptography
### Create a symmetric key
Create a base64-encoded, 256-bit symmetric key to be used for encryption/decryption.
```ruby
key = infisical.cryptography.create_symmetric_key
```
#### Returns (string)
`key` (string): A base64-encoded, 256-bit symmetric key, that can be used for encryption/decryption purposes.
### Encrypt symmetric
```ruby
encrypted_data = infisical.cryptography.encrypt_symmetric(data: "Hello World!", key: key)
```
#### Parameters
The plaintext you want to encrypt.
The symmetric key to use for encryption.
#### Returns (object)
`tag` (string): A base64-encoded, 128-bit authentication tag.
`iv` (string): A base64-encoded, 96-bit initialization vector.
`ciphertext` (string): A base64-encoded, encrypted ciphertext.
### Decrypt symmetric
```ruby
decrypted_data = infisical.cryptography.decrypt_symmetric(
ciphertext: encrypted_data['ciphertext'],
iv: encrypted_data['iv'],
tag: encrypted_data['tag'],
key: key
)
```
#### Parameters
The ciphertext you want to decrypt.
The symmetric key to use for encryption.
The initialization vector to use for decryption.
The authentication tag to use for decryption.
#### Returns (string)
`Plaintext` (string): The decrypted plaintext.
# SDKs
Source: https://infisical.com/docs/sdks/overview
From local development to production, Infisical SDKs provide the easiest way for your app to fetch back secrets from Infisical on demand.
* Install and initialize a language-specific client SDK into your application
* Provision the client scoped-access to a project and environment in Infisical
* Fetch secrets on demand
Manage secrets for your Node application on demand
Manage secrets for your Python application on demand
Manage secrets for your Java application on demand
Manage secrets for your Go application on demand
Manage secrets for your C#/.NET application on demand
Manage secrets for your Ruby application on demand
## FAQ
The SDK caches every secret and falls back to the cached value if a request fails. If no cached
value ever-existed, the SDK falls back to whatever value is on the process environment.
Yes you can! The client SDK provides a method to attach the secrets to your process environment. When using the `listSecrets()` method, you
can pass a `attachToProcessEnv` parameter, which tells the SDK to attach all the found secrets to your process environment.
Note: The exact parameter name may differ depending on the language.
# Configurations
Source: https://infisical.com/docs/self-hosting/configuration/envars
Read how to configure environment variables for self-hosted Infisical.
Infisical accepts all configurations via environment variables. For a minimal self-hosted instance, at least `ENCRYPTION_KEY`, `AUTH_SECRET`, `DB_CONNECTION_URI` and `REDIS_URL` must be defined.
However, you can configure additional settings to activate more features as needed.
## General platform
Used to configure platform-specific security and operational settings
Must be a random 16 byte hex string. Can be generated with `openssl rand -hex
16`
Must be a random 32 byte base64 string. Can be generated with `openssl rand
-base64 32`
Must be an absolute URL including the protocol (e.g.
[https://app.infisical.com](https://app.infisical.com)).
Specifies the internal port on which the application listens.
Telemetry helps us improve Infisical but if you want to disable it you may set
this to `false`.
## CORS
Cross-Origin Resource Sharing (CORS) is a security feature that allows web applications running on one domain to access resources from another domain.
The following environment variables can be used to configure the Infisical Rest API to allow or restrict access to resources from different origins.
Specify a list of origins that are allowed to access the Infisical API.
An example value would be `CORS_ALLOWED_ORIGINS=["https://example.com"]`.
Defaults to the same value as your `SITE_URL` environment variable.
Array of HTTP methods allowed for CORS requests.
Defaults to reflecting the headers specified in the request's Access-Control-Request-Headers header.
## Data Layer
The platform utilizes Postgres to persist all of its data and Redis for caching and backgroud tasks
Postgres database connection string.
Configure the SSL certificate for securing a Postgres connection by first encoding it in base64.
Use the command below to encode your certificate:
`echo "" | base64`
Redis connection string.
Postgres database read replica connection strings. It accepts a JSON string.
```
DB_READ_REPLICAS=[{"DB_CONNECTION_URI":""}]
```
Postgres read replica connection string.
Configure the SSL certificate for securing a Postgres replica connection by first encoding it in base64.
Use the command below to encode your certificate:
`echo "" | base64`
If not provided it will use master SSL certificate.
## Email Service
Without email configuration, Infisical's core functions like sign-up/login and secret operations work, but this disables multi-factor authentication, email invites for projects, alerts for suspicious logins, and all other email-dependent features.
Hostname to connect to for establishing SMTP connections
Port to connect to for establishing SMTP connections
Credential to connect to host (e.g. [team@infisical.com](mailto:team@infisical.com))
Credential to connect to host
Email address to be used for sending emails
Name label to be used in From field (e.g. Team)
If this is `true` and `SMTP_PORT` is not 465 then TLS is not used even if the
server supports STARTTLS extension.
If this is `true` and `SMTP_PORT` is not 465 then Infisical tries to use
STARTTLS even if the server does not advertise support for it. If the
connection can not be encrypted then message is not sent.
If this is `true`, Infisical will validate the server's SSL/TLS certificate and reject the connection if the certificate is invalid or not trusted. If set to `false`, the client will accept the server's certificate regardless of its validity, which can be useful in development or testing environments but is not recommended for production use.
1. Create an account and configure [SendGrid](https://sendgrid.com) to send emails.
2. Create a SendGrid API Key under Settings > [API Keys](https://app.sendgrid.com/settings/api_keys)
3. Set a name for your API Key, we recommend using "Infisical," and select the "Restricted Key" option. You will need to enable the "Mail Send" permission as shown below:
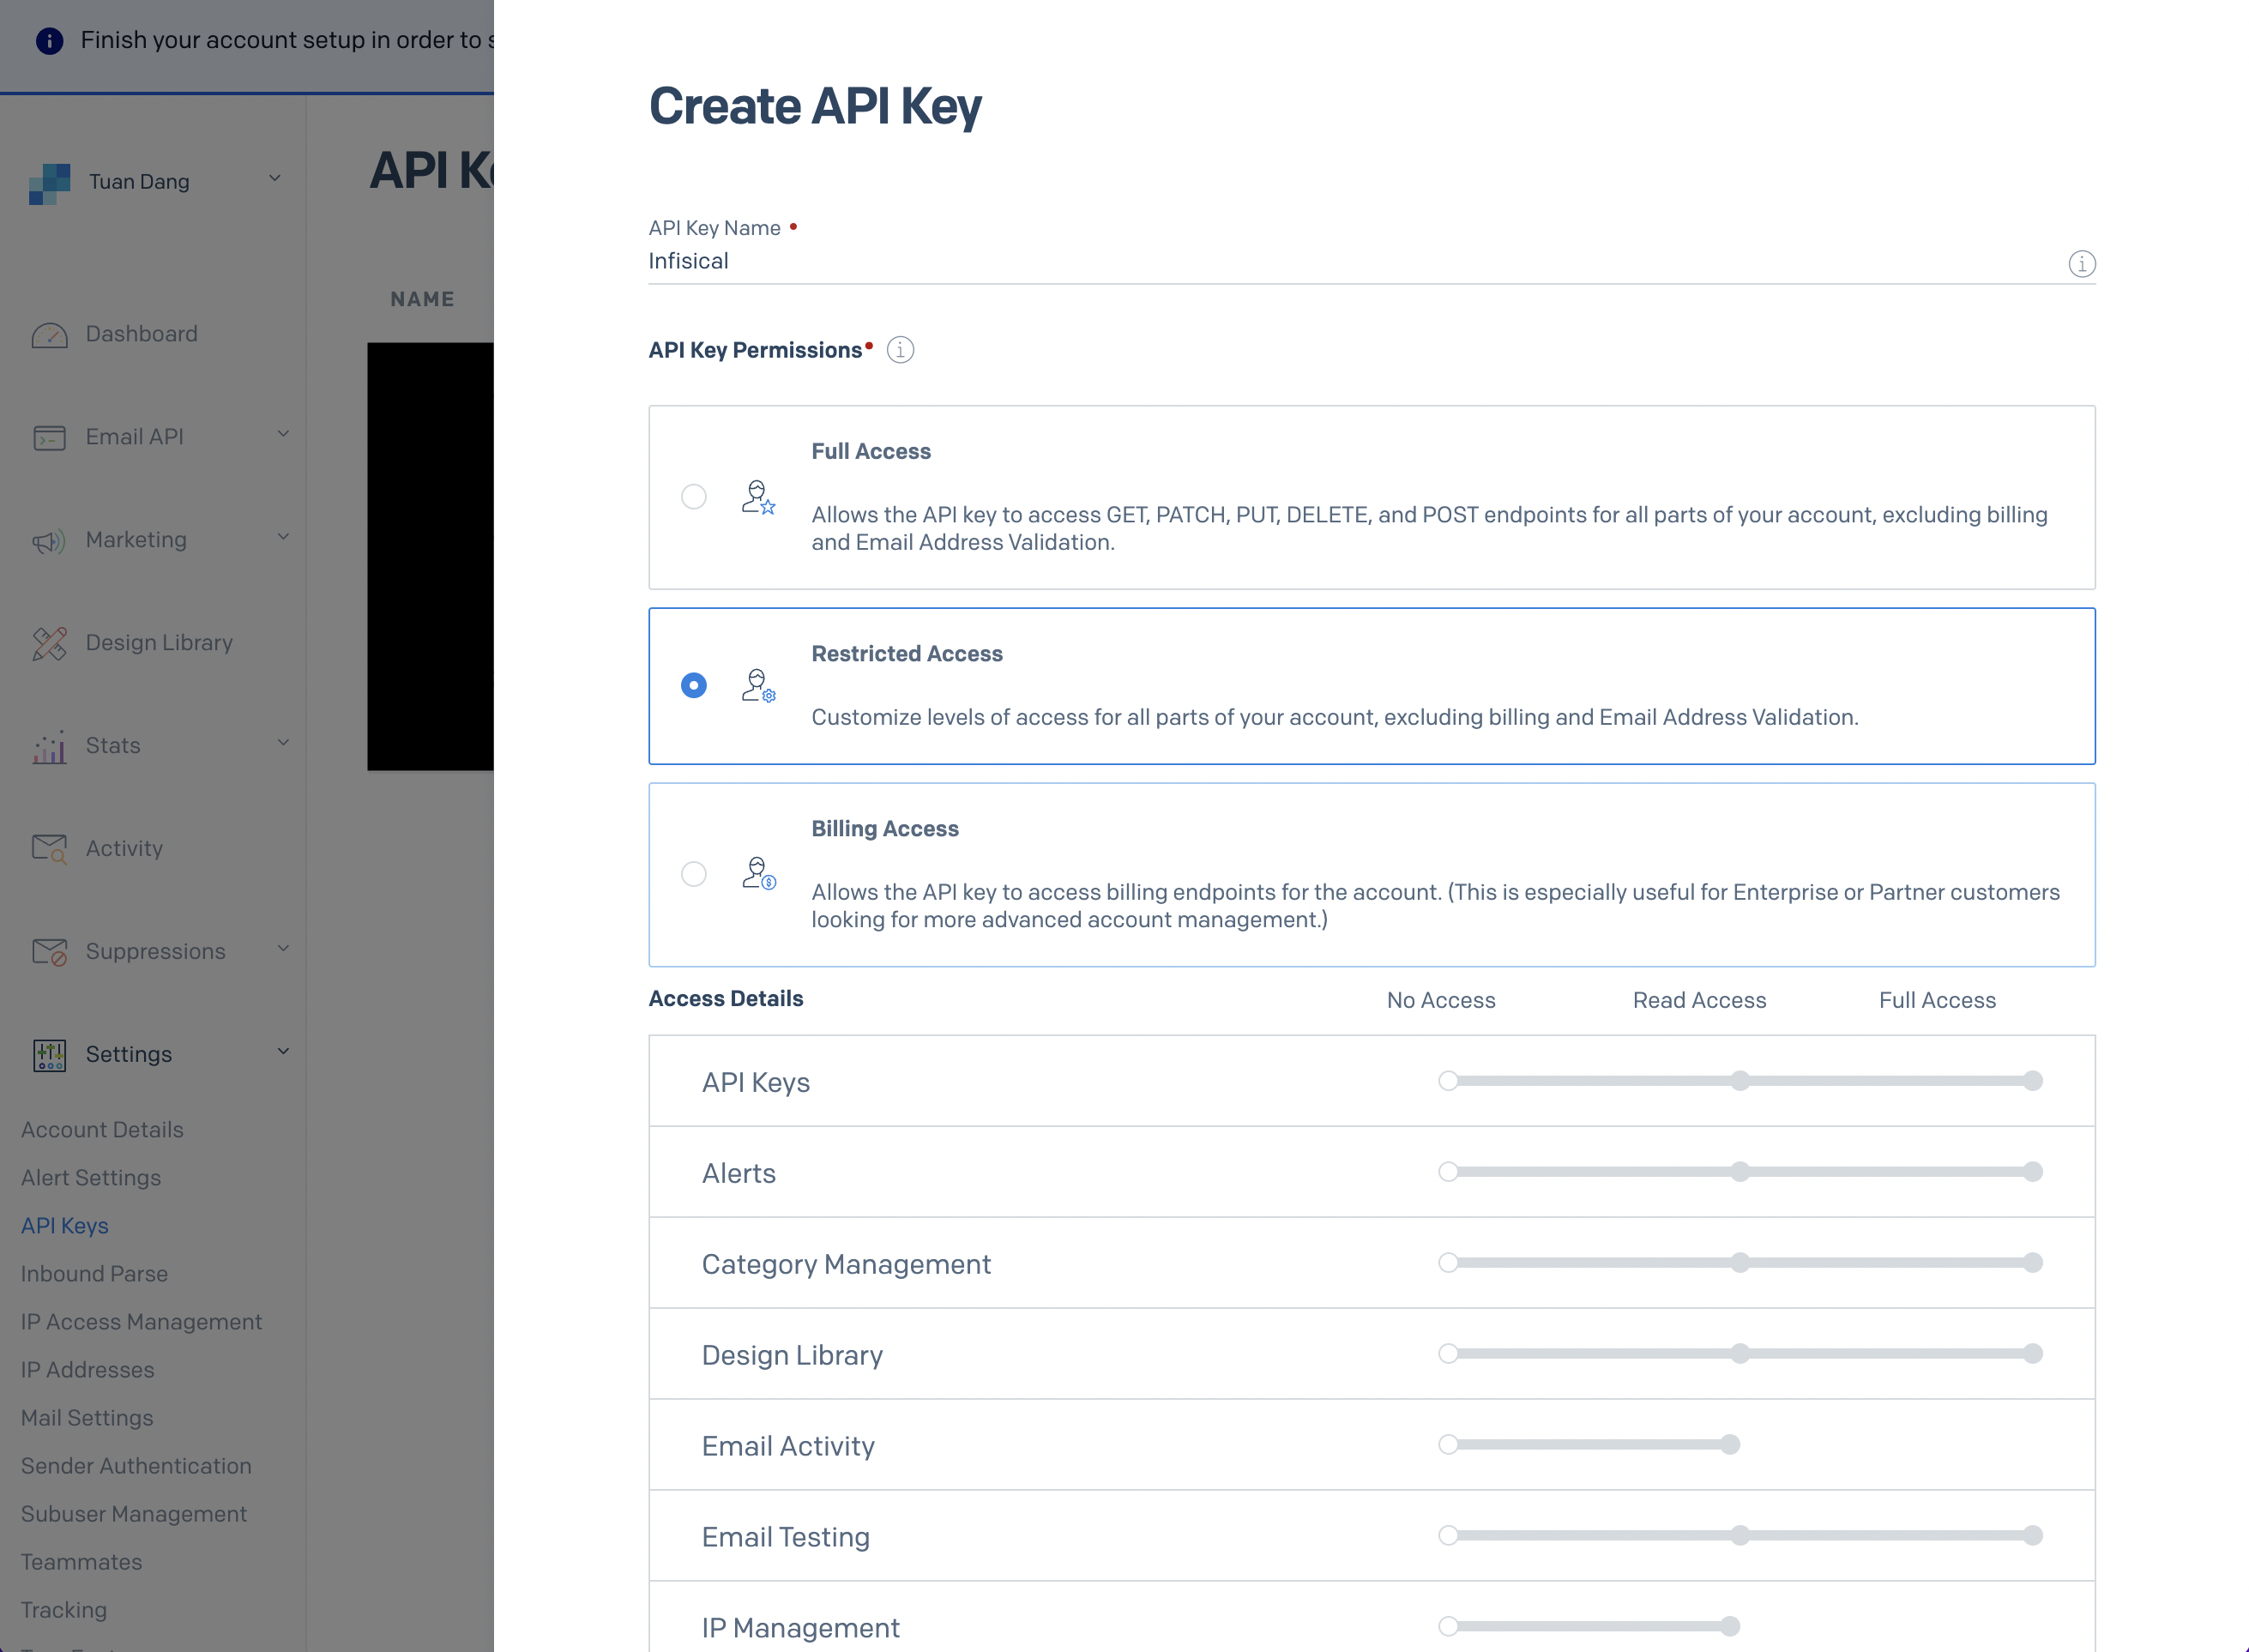
4. With the API Key, you can now set your SMTP environment variables:
```
SMTP_HOST=smtp.sendgrid.net
SMTP_USERNAME=apikey
SMTP_PASSWORD=SG.rqFsfjxYPiqE1lqZTgD_lz7x8IVLx # your SendGrid API Key from step above
SMTP_PORT=587
SMTP_FROM_ADDRESS=hey@example.com # your email address being used to send out emails
SMTP_FROM_NAME=Infisical
```
Remember that you will need to restart Infisical for this to work properly.
1. Create an account and configure [Mailgun](https://www.mailgun.com) to send emails.
2. Obtain your Mailgun credentials in Sending > Overview > SMTP
3. With your Mailgun credentials, you can now set up your SMTP environment variables:
```
SMTP_HOST=smtp.mailgun.org # obtained from credentials page
SMTP_USERNAME=postmaster@example.mailgun.org # obtained from credentials page
SMTP_PASSWORD=password # obtained from credentials page
SMTP_PORT=587
SMTP_FROM_ADDRESS=hey@example.com # your email address being used to send out emails
SMTP_FROM_NAME=Infisical
```
This will be used to verify the email you are sending from.

If you AWS SES is under sandbox mode, you will only be able to send emails to verified identies.
Create an IAM user for SMTP authentication and obtain SMTP credentials in SMTP settings > Create SMTP credentials
With your AWS SES SMTP credentials, you can now set up your SMTP environment variables for your Infisical instance.
```
SMTP_HOST=email-smtp.ap-northeast-1.amazonaws.com # SMTP endpoint obtained from SMTP settings
SMTP_USERNAME=xxx # your SMTP username
SMTP_PASSWORD=xxx # your SMTP password
SMTP_PORT=465
SMTP_FROM_ADDRESS=hey@example.com # your email address being used to send out emails
SMTP_FROM_NAME=Infisical
```
Remember that you will need to restart Infisical for this to work properly.
1. Create an account and configure [SocketLabs](https://www.socketlabs.com/) to send emails.
2. From the dashboard, navigate to SMTP Credentials > SMTP & APIs > SMTP Credentials to obtain your SocketLabs SMTP credentials.
3. With your SocketLabs SMTP credentials, you can now set up your SMTP environment variables:
```
SMTP_HOST=smtp.socketlabs.com
SMTP_USERNAME=username # obtained from your credentials
SMTP_PASSWORD=password # obtained from your credentials
SMTP_PORT=587
SMTP_FROM_ADDRESS=hey@example.com # your email address being used to send out emails
SMTP_FROM_NAME=Infisical
```
{" "}
The `SMTP_FROM_ADDRESS` environment variable should be an email for an
authenticated domain under Configuration > Domain Management in SocketLabs.
For example, if you're using SocketLabs in sandbox mode, then you may use an
email like `team@sandbox.socketlabs.dev`.
Remember that you will need to restart Infisical for this to work properly.
1. Create an account on [Resend](https://resend.com).
2. Add a [Domain](https://resend.com/domains).
3. Create an [API Key](https://resend.com/api-keys).
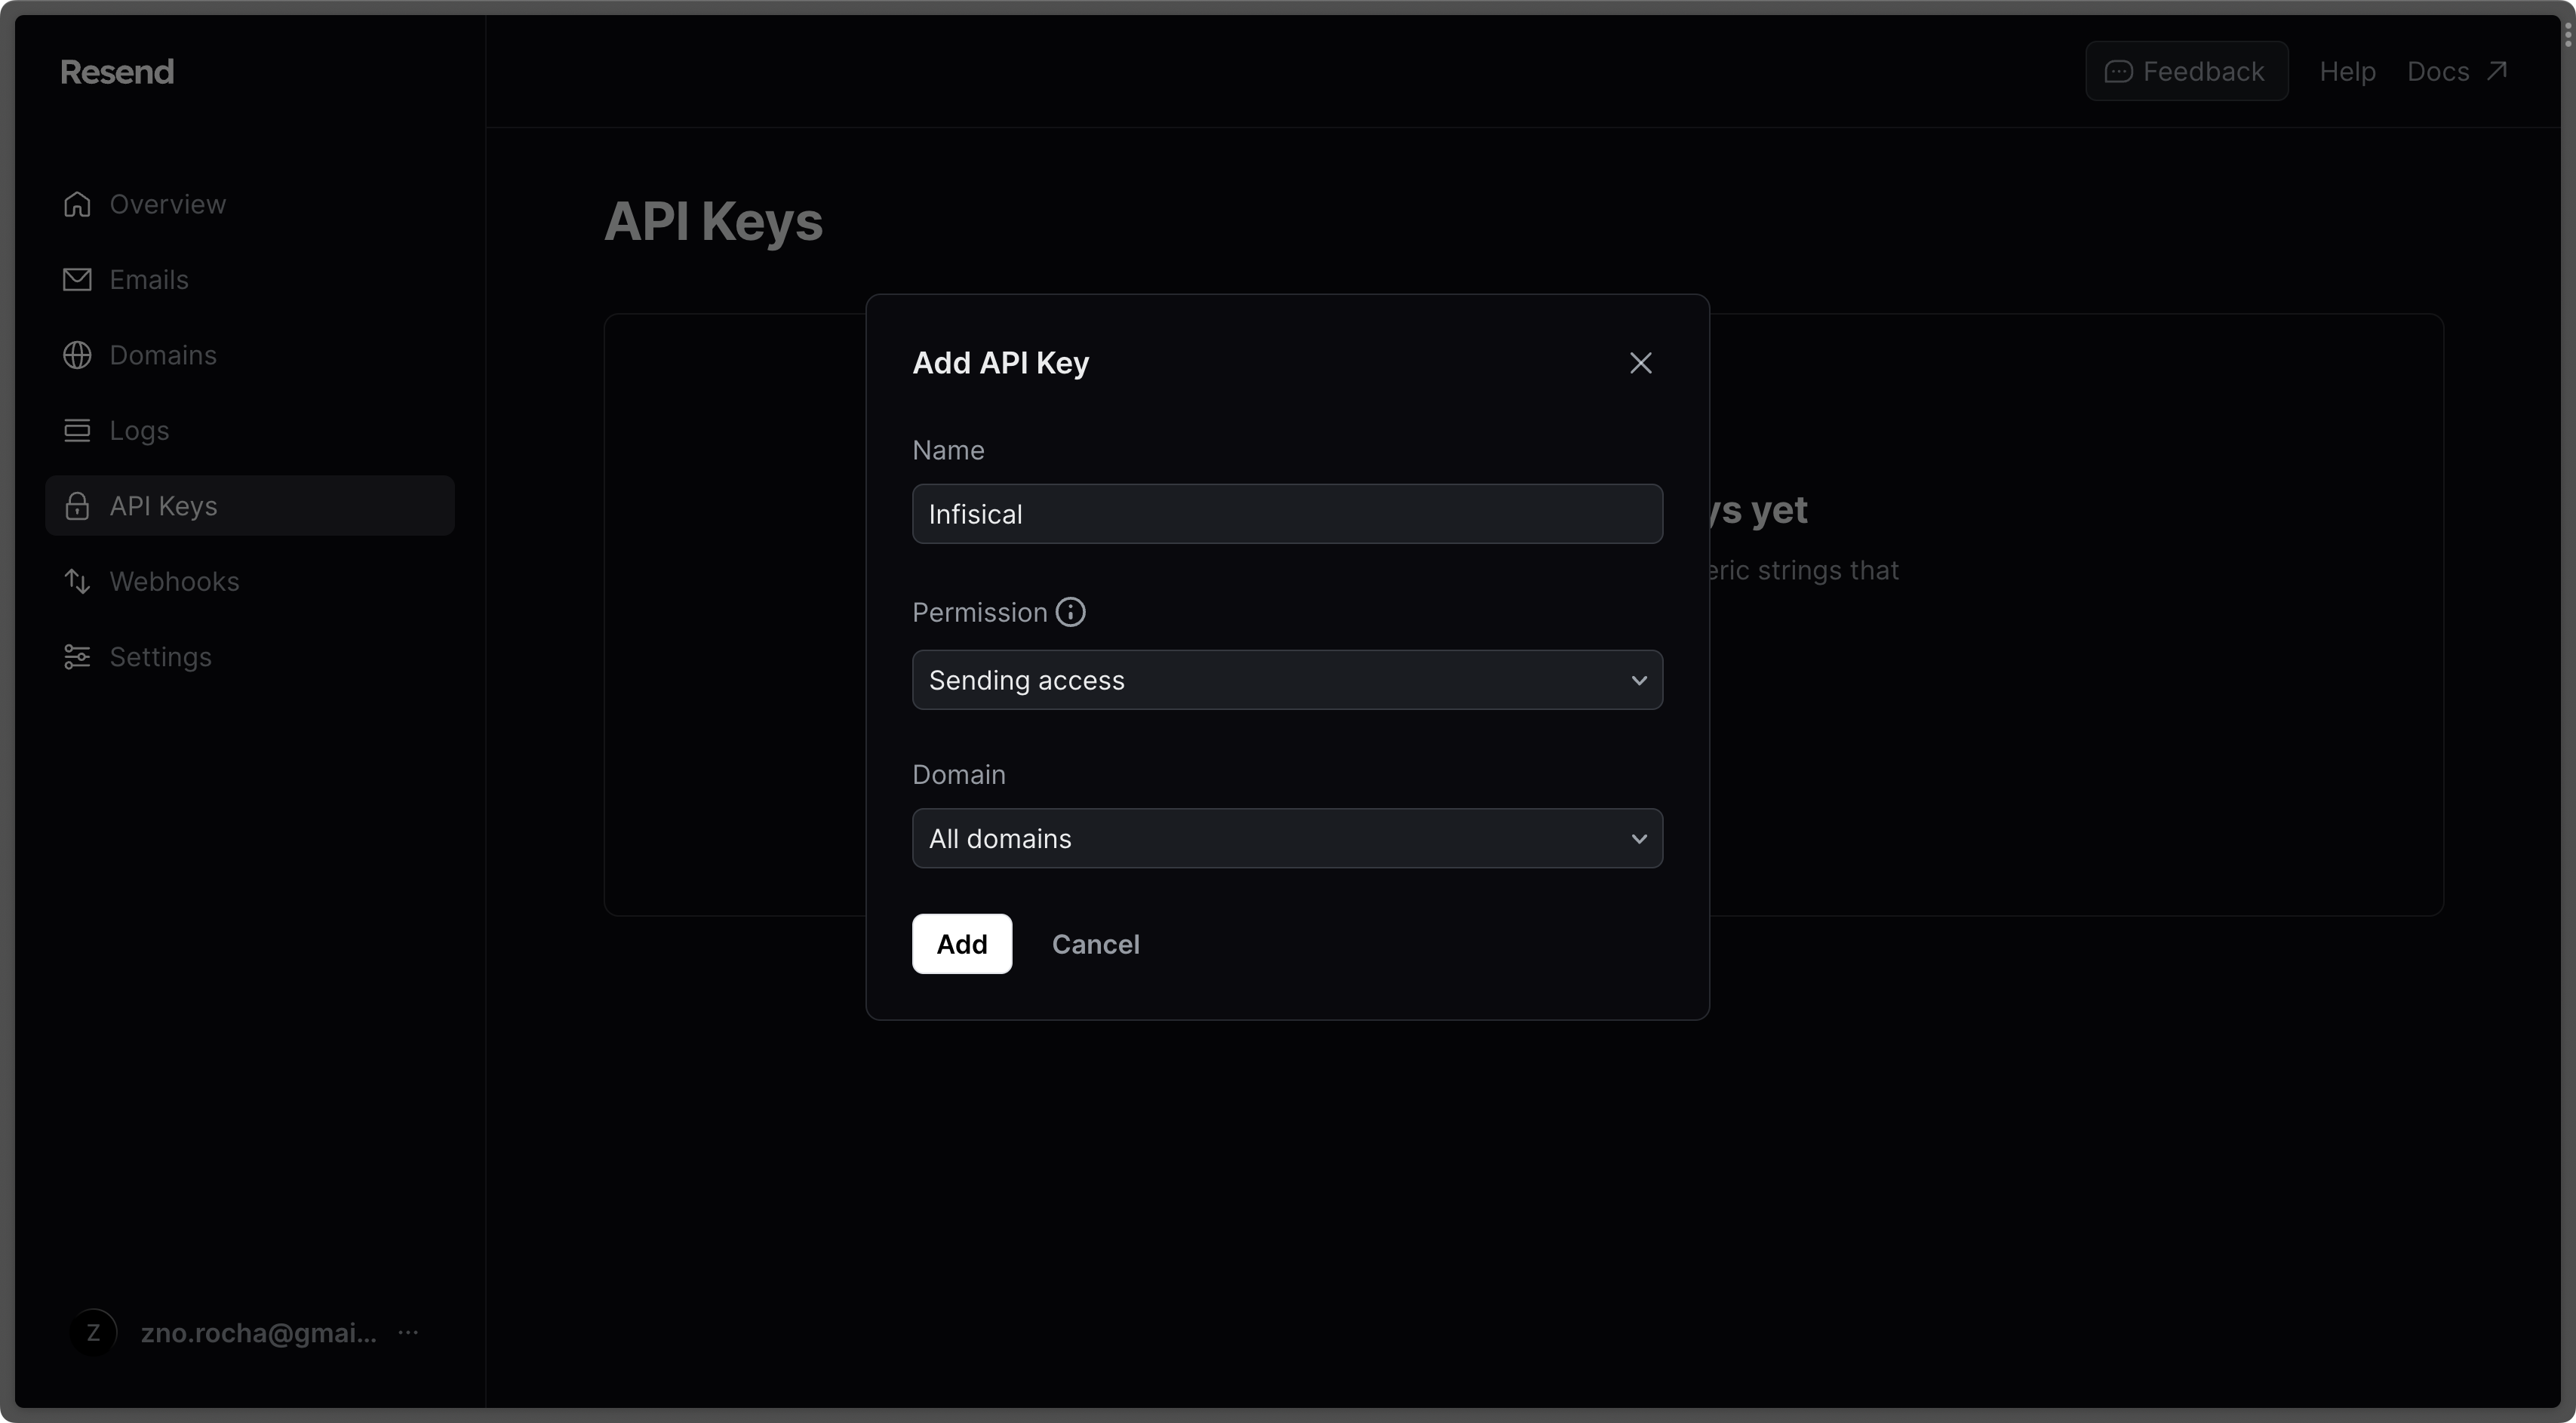
4. Go to the [SMTP page](https://resend.com/settings/smtp) and copy the values.
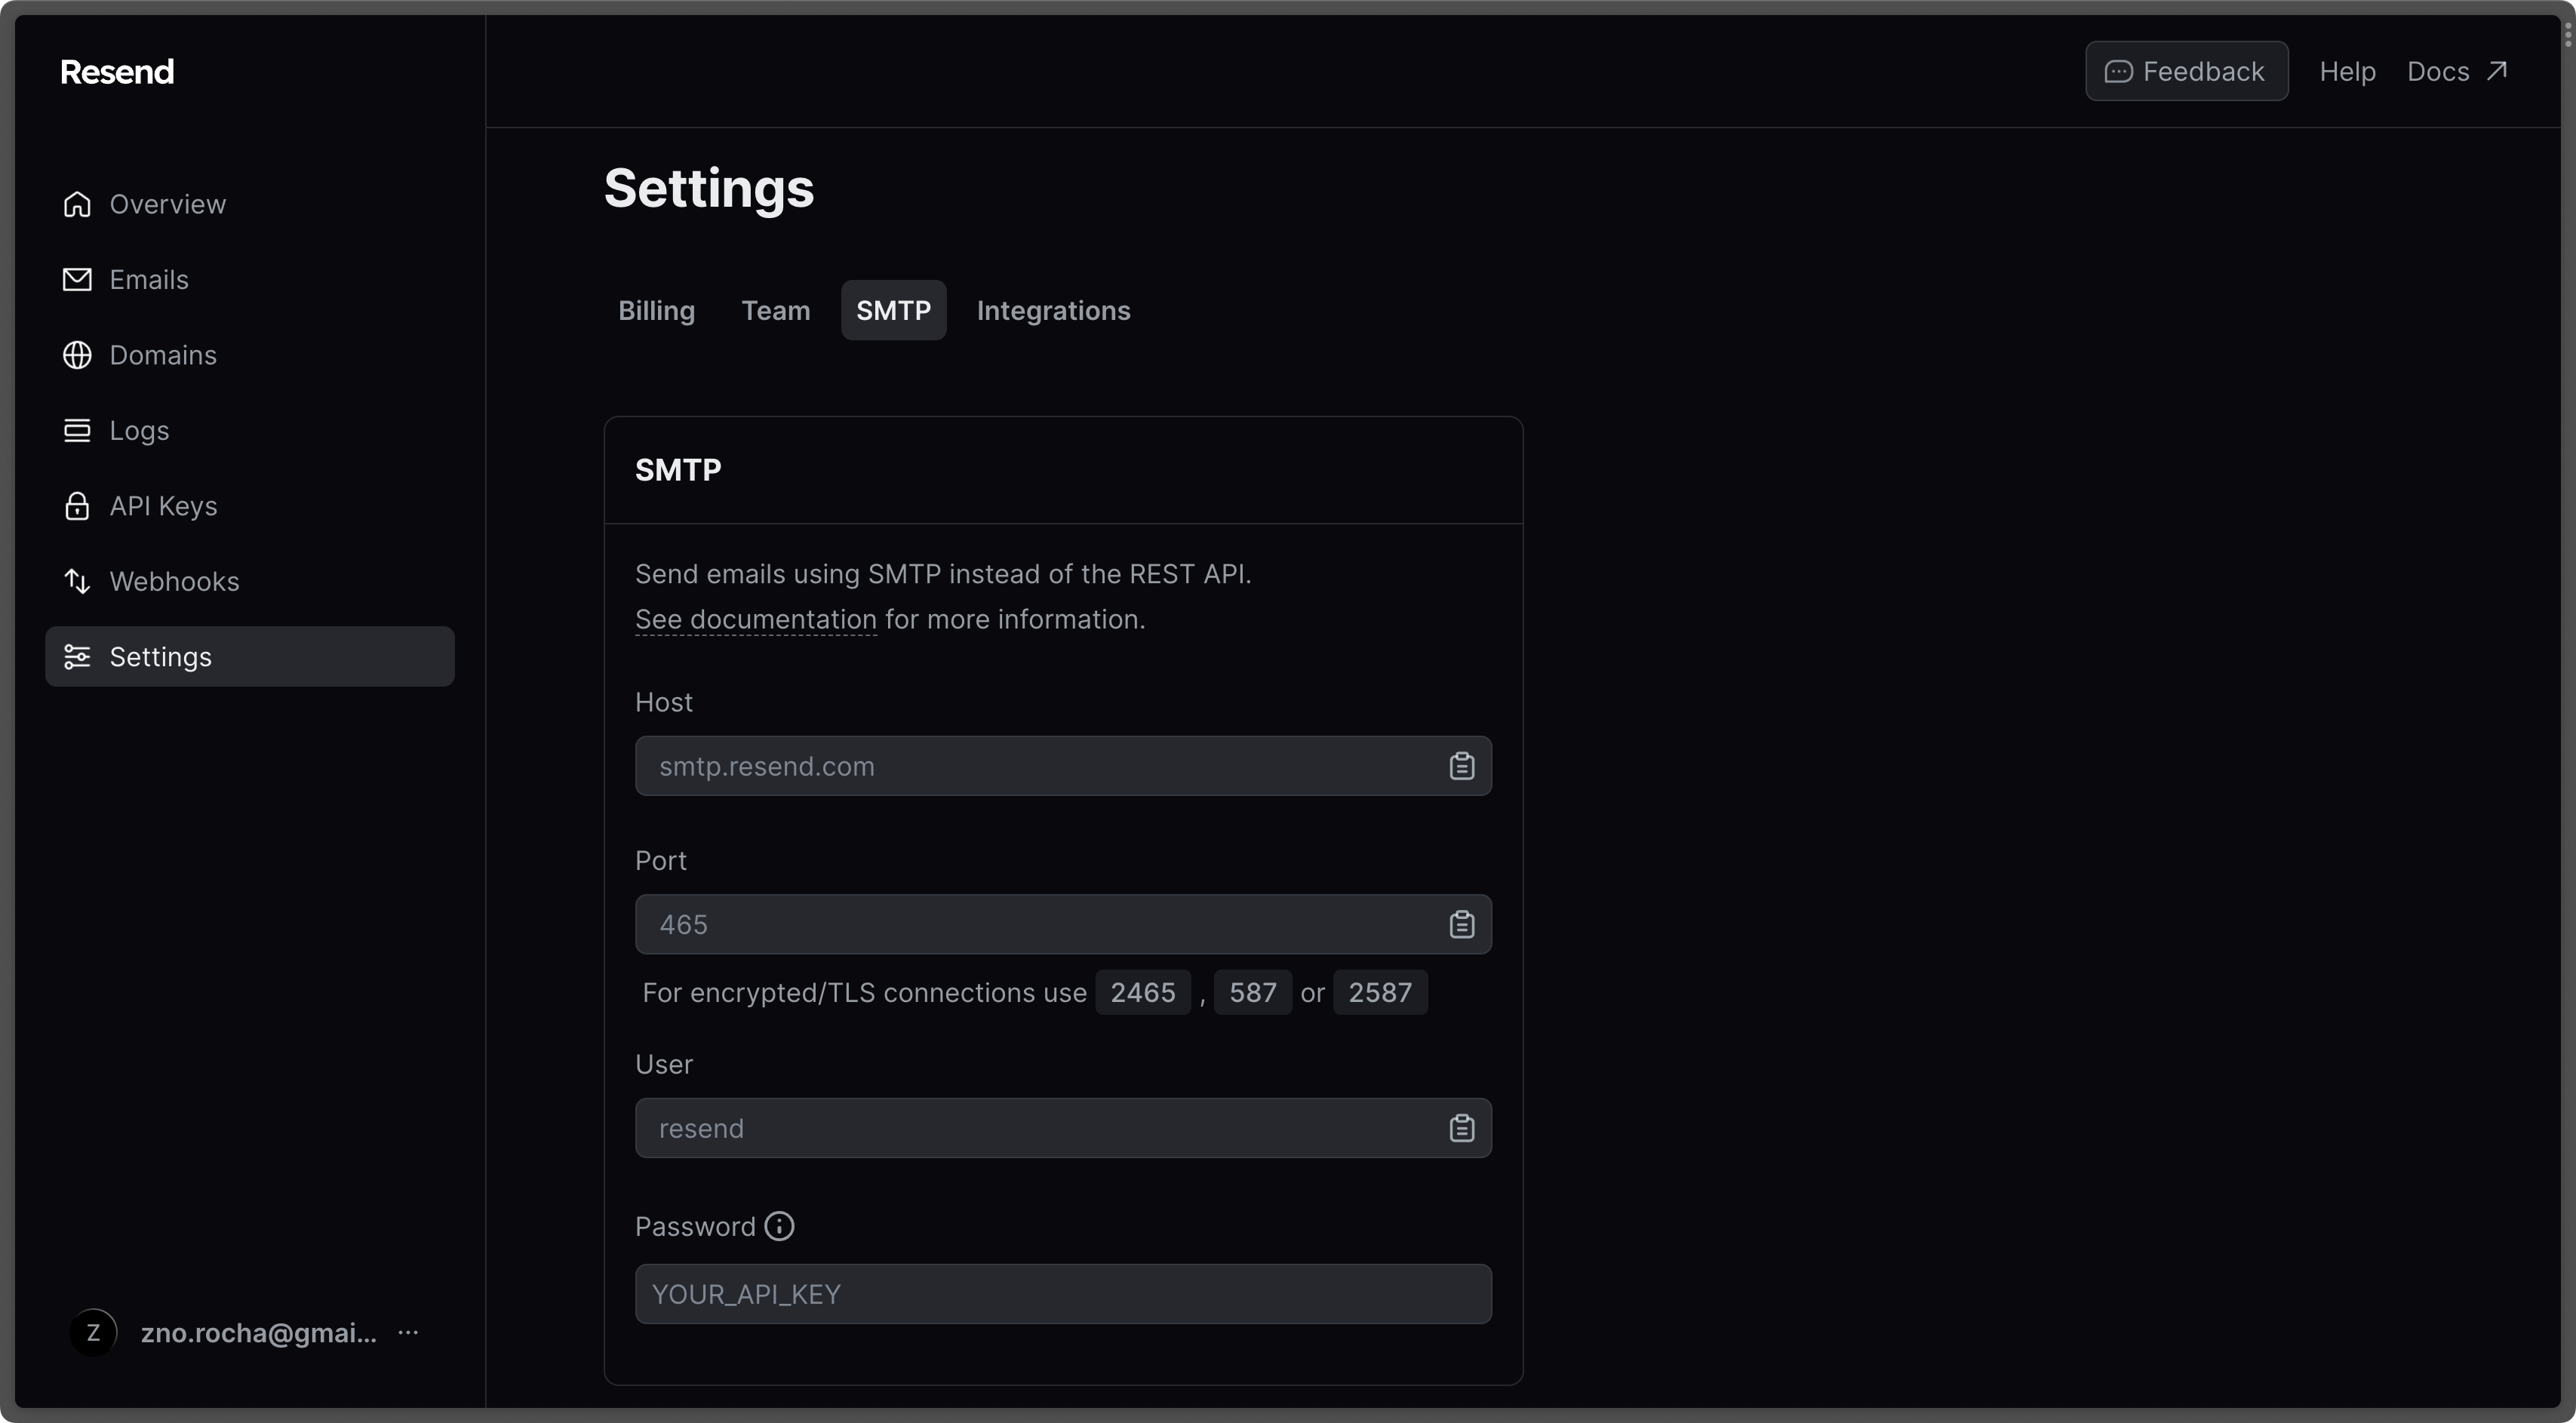
5. With the API Key, you can now set your SMTP environment variables variables:
```
SMTP_HOST=smtp.resend.com
SMTP_USERNAME=resend
SMTP_PASSWORD=YOUR_API_KEY
SMTP_PORT=587
SMTP_FROM_ADDRESS=hey@example.com # your email address being used to send out emails
SMTP_FROM_NAME=Infisical
```
Remember that you will need to restart Infisical for this to work properly.
Create an account and enable "less secure app access" in Gmail Account Settings > Security. This will allow
applications like Infisical to authenticate with Gmail via your username and password.
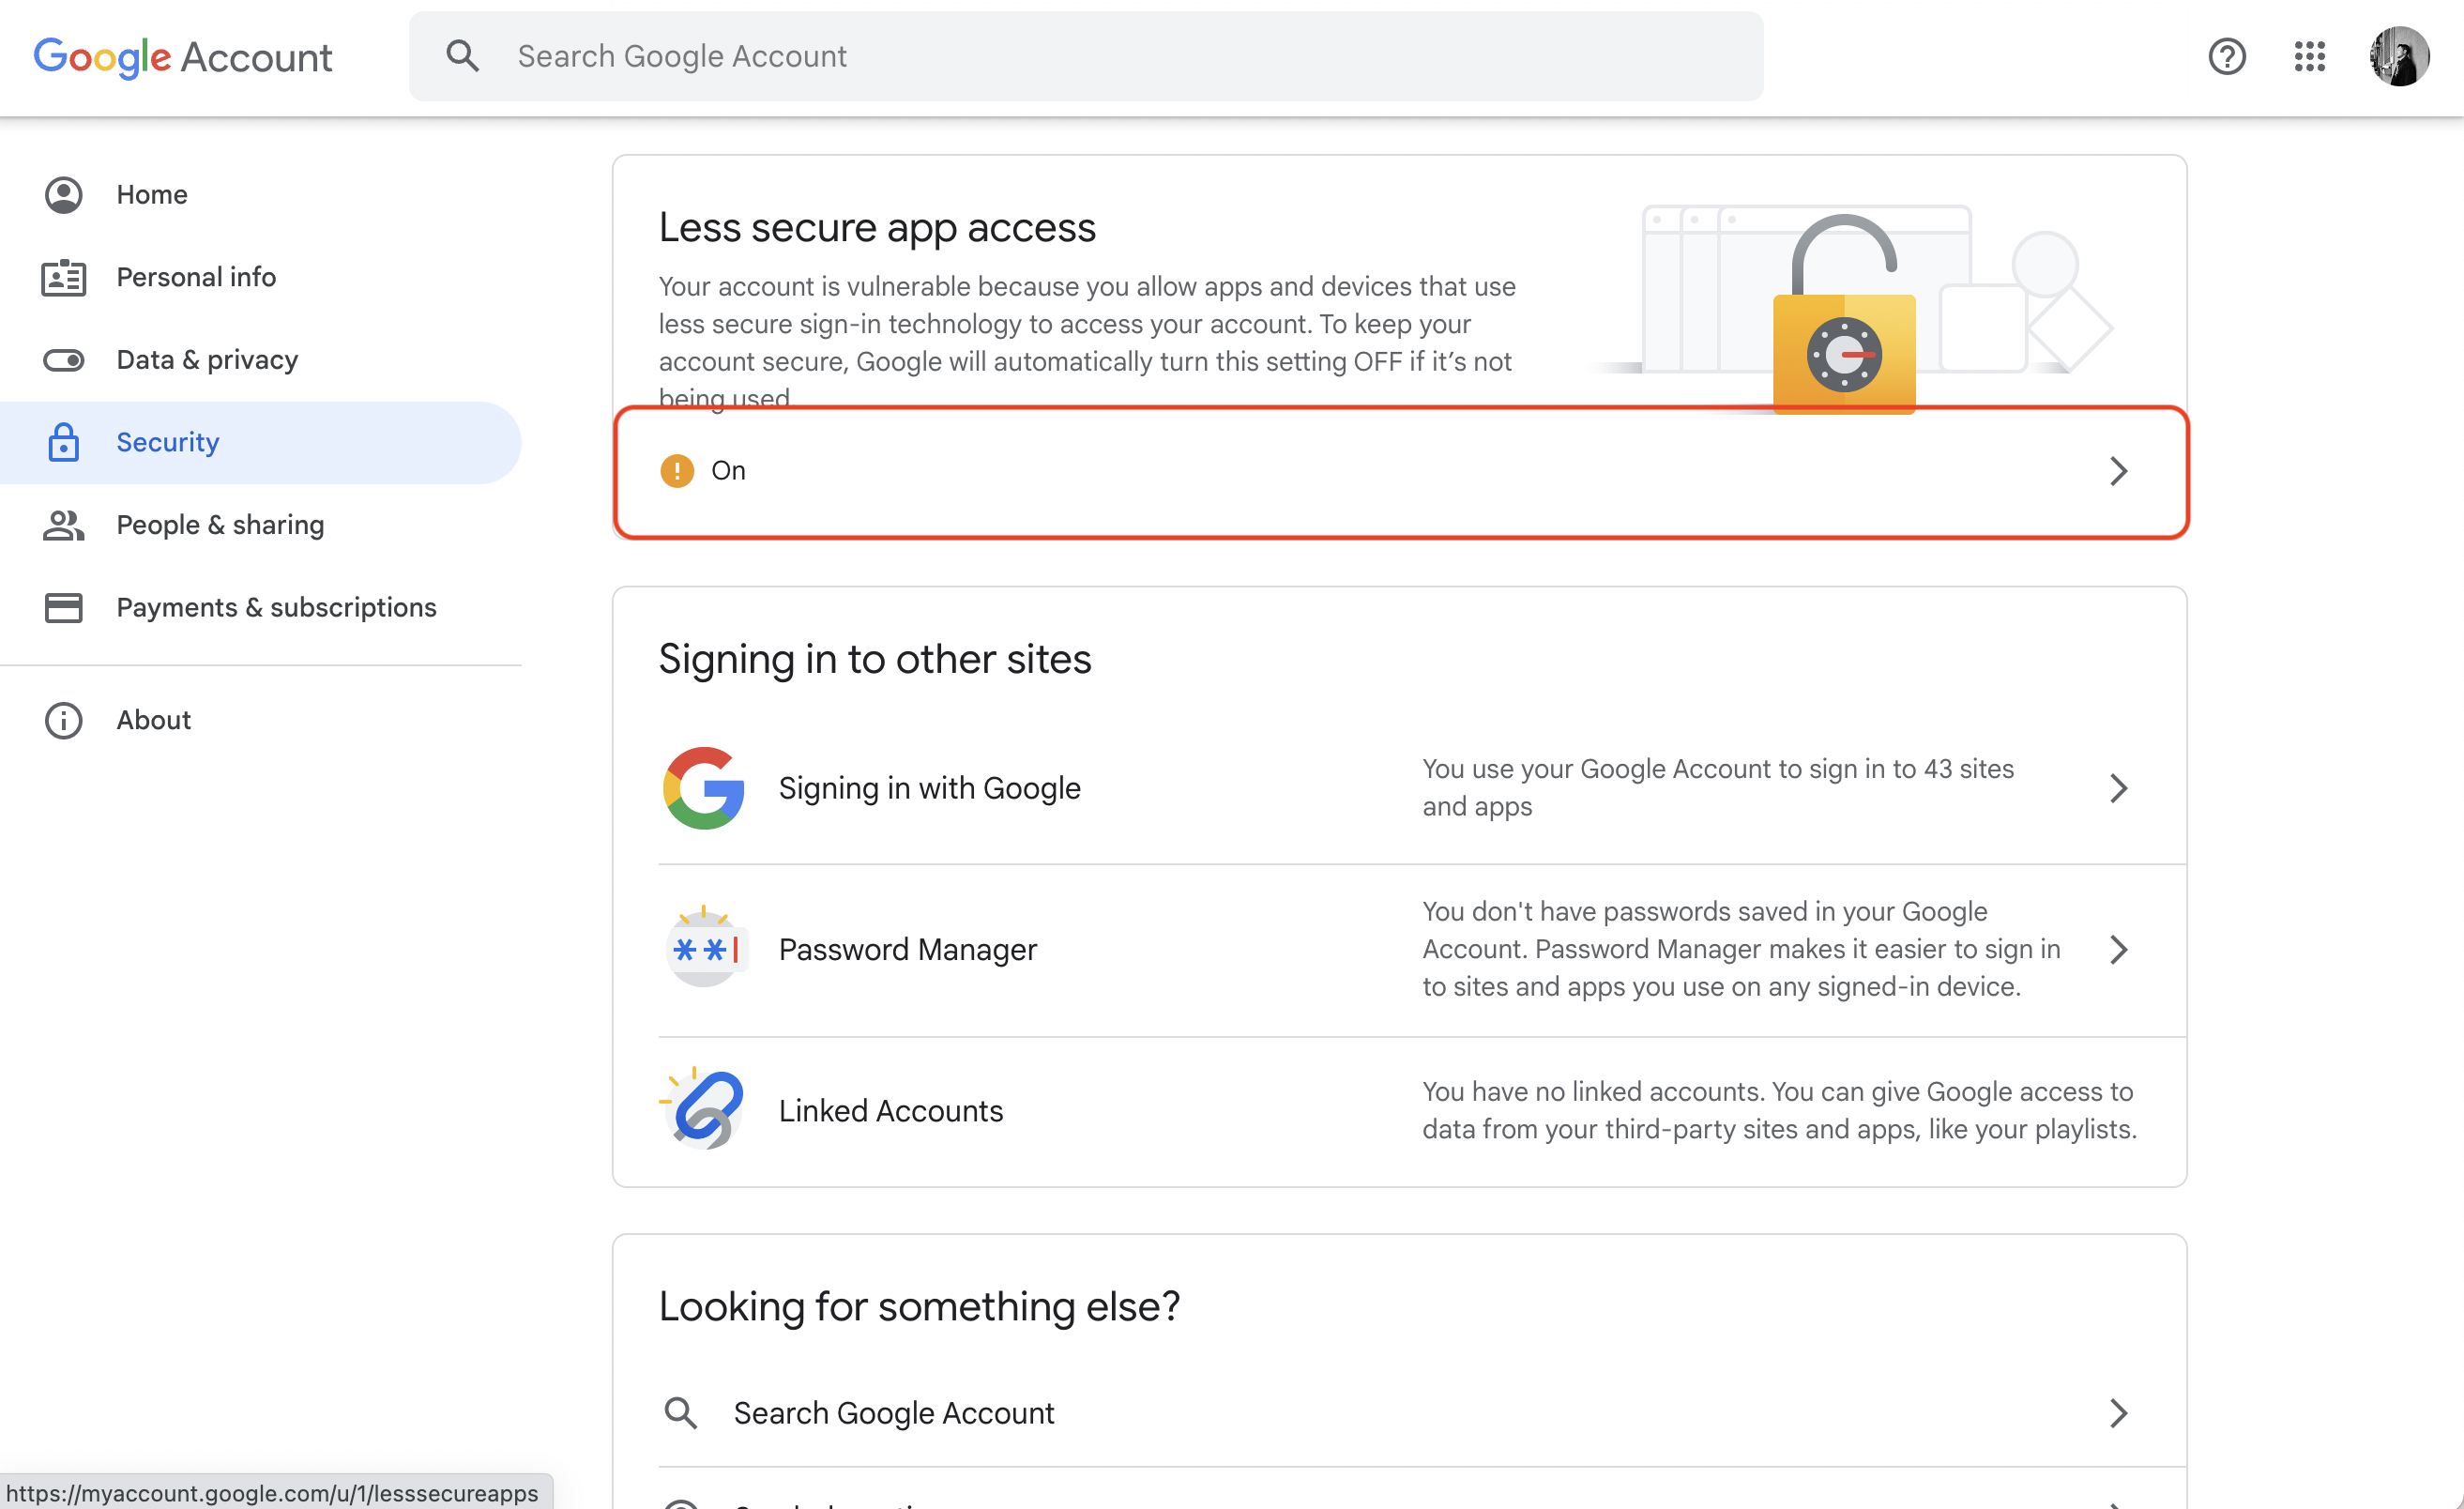
With your Gmail username and password, you can set your SMTP environment variables:
```
SMTP_HOST=smtp.gmail.com
SMTP_USERNAME=hey@gmail.com # your email
SMTP_PASSWORD=password # your password
SMTP_PORT=587
SMTP_FROM_ADDRESS=hey@gmail.com
SMTP_FROM_NAME=Infisical
```
As per the [notice](https://support.google.com/accounts/answer/6010255?hl=en) by Google, you should note that using Gmail credentials for SMTP configuration
will only work for Google Workspace or Google Cloud Identity customers as of May 30, 2022.
Put differently, the SMTP configuration is only possible with business (not personal) Gmail credentials.
1. Create an account and configure [Office365](https://www.office.com/) to send emails.
2. With your login credentials, you can now set up your SMTP environment variables:
```
SMTP_HOST=smtp.office365.com
SMTP_USERNAME=username@yourdomain.com # your username
SMTP_PASSWORD=password # your password
SMTP_PORT=587
SMTP_FROM_ADDRESS=username@yourdomain.com
SMTP_FROM_NAME=Infisical
```
1. Create an account and configure [Zoho Mail](https://www.zoho.com/mail/) to send emails.
2. With your email credentials, you can now set up your SMTP environment variables:
```
SMTP_HOST=smtp.zoho.com
SMTP_USERNAME=username # your email
SMTP_PASSWORD=password # your password
SMTP_PORT=587
SMTP_FROM_ADDRESS=hey@example.com # your personal Zoho email or domain-based email linked to Zoho Mail
SMTP_FROM_NAME=Infisical
```
{" "}
You can use either your personal Zoho email address like `you@zohomail.com` or
a domain-based email address like `you@yourdomain.com`. If using a
domain-based email address, then please make sure that you've configured and
verified it with Zoho Mail.
Remember that you will need to restart Infisical for this to work properly.
1. Create an account and configure [SMTP2Go](https://www.smtp2go.com/) to send emails.
2. Turn on SMTP authentication
```
SMTP_HOST=mail.smtp2go.com
SMTP_PORT=You can use one of the following ports: 2525, 80, 25, 8025, or 587
SMTP_USERNAME=username #Your SMTP2GO account's SMTP username
SMTP_PASSWORD=password #Your SMTP2GO account's SMTP password
SMTP_FROM_ADDRESS=hey@example.com # your email address being used to send out emails
SMTP_FROM_NAME=Infisical
```
{" "}
Optional (for TLS/SSL):
TLS: Available on the same ports (2525, 80, 25, 8025, or 587)
SSL: Available on ports 465, 8465, and 443
## Authentication
By default, users can only login via email/password based login method.
To login into Infisical with OAuth providers such as Google, configure the associated variables.
When set, all visits to the Infisical login page will automatically redirect users of your Infisical instance to the SAML identity provider associated with the specified organization slug.
Follow detailed guide to configure [Google SSO](/documentation/platform/sso/google)
OAuth2 client ID for Google login
OAuth2 client secret for Google login
Follow detailed guide to configure [GitHub SSO](/documentation/platform/sso/github)
OAuth2 client ID for GitHub login
OAuth2 client secret for GitHub login
Follow detailed guide to configure [GitLab SSO](/documentation/platform/sso/gitlab)
OAuth2 client ID for GitLab login
OAuth2 client secret for GitLab login
URL of your self-hosted instance of GitLab where the OAuth application is registered
Requires enterprise license. Please contact [team@infisical.com](mailto:team@infisical.com) to get more
information.
Requires enterprise license. Please contact [team@infisical.com](mailto:team@infisical.com) to get more
information.
Requires enterprise license. Please contact [team@infisical.com](mailto:team@infisical.com) to get more
information.
## App Connections
You can configure third-party app connections for re-use across Infisical Projects.
The AWS IAM User access key ID for assuming roles
The AWS IAM User secret key for assuming roles
The ID of the GitHub App
The slug of the GitHub App
The client ID for the GitHub App
The client secret for the GitHub App
The private key for the GitHub App
The OAuth2 client ID for GitHub OAuth Connection
The OAuth2 client secret for GitHub OAuth Connection
## Native Secret Integrations
To help you sync secrets from Infisical to services such as Github and Gitlab, Infisical provides native integrations out of the box.
OAuth2 client ID for Heroku integration
OAuth2 client secret for Heroku integration
OAuth2 client ID for Vercel integration
{" "}
OAuth2 client secret for Vercel integration
OAuth2 slug for Vercel integration
OAuth2 client ID for Netlify integration
OAuth2 client secret for Netlify integration
OAuth2 client ID for GitHub integration
OAuth2 client secret for GitHub integration
OAuth2 client ID for BitBucket integration
OAuth2 client secret for BitBucket integration
OAuth2 client id for GCP secrets manager integration
OAuth2 client secret for GCP secrets manager integration
The AWS IAM User access key for assuming roles.
The AWS IAM User secret key for assuming roles.
OAuth2 client id for Azure integration
OAuth2 client secret for Azure integration
OAuth2 client id for Gitlab integration
OAuth2 client secret for Gitlab integration
## Observability
You can configure Infisical to collect and expose telemetry data for analytics and monitoring.
Whether or not to collect and expose telemetry data.
Supported types are `prometheus` and `otlp`.
If export type is set to `prometheus`, metric data will be exposed in port 9464 in the `/metrics` path.
If export type is set to `otlp`, you will have to configure a value for `OTEL_EXPORT_OTLP_ENDPOINT`.
Where telemetry data would be pushed to for collection. This is only
applicable when `OTEL_EXPORT_TYPE` is set to `otlp`.
The username for authenticating with the telemetry collector.
The password for authenticating with the telemetry collector.
# Hardware requirements
Source: https://infisical.com/docs/self-hosting/configuration/requirements
Find out the minimal requirements for operating Infisical.
This page details the minimum requirements necessary for installing and using Infisical.
The actual resource requirements will vary in direct proportion to the operations performed by Infisical and the level of utilization by the end users.
## Deployment Sizes
**Small** suitable for most initial production setups, as well as development and testing scenarios.
**Large** suitable for high-demand production environments, characterized by either a high volume of transactions, large number of secrets, or both.
## Hardware Requirements
### Storage
Infisical doesn’t require file storage as all persisted data is saved in the database.
However, its logs and metrics are saved to disk for later viewing. As a result, we recommend provisioning 1-2 GB of storage.
### CPU and Memory (Per Container/Instance)
Infisical is stateless and scales horizontally by running across multiple containers/instances. Each instance typically does **not** need more than **2–4 CPU cores** and **4–8 GB** of memory.
If you need additional capacity, simply increase the **number** of containers/instances running in parallel.
| **Deployment Size** | **CPU (Cores, per container)** | **Memory (GB, per container)** | **Recommended Number of Containers** |
| ------------------- | ------------------------------ | ------------------------------ | ------------------------------------ |
| **Small** | 2 | 4 | 2+ |
| **Medium** | 2–4 | 4–8 | 5+ |
| **Large** | 2–4 | 4–8 | 10+ |
> **Note:**
>
> * Adding more containers (horizontal scaling) is generally the best way to handle spikes in secret operations.
> * If you prefer, you can increase CPU/memory on a single container (vertical scaling), but horizontal scaling is more flexible and resilient.
## Database & caching layer
### Postgres
PostgreSQL is the only database supported by Infisical. Infisical has been extensively tested with Postgres version 16. We recommend using versions 14 and up for optimal compatibility.
The compute required for Postgres is largely dependent on the number of secret operations (reads and writes) you expect. The more frequently you read and write secrets, the more compute you will need.
You'll notice that storage requirements are high and this is because audit logs are by default stored in the database.
Recommended resource allocation based on deployment size. You may require more resources if you have a large number of secrets or high transaction volume:
* **small:** 2 vCPU / 8 GB RAM / 100 GB Disk
* **medium:** 4vCPU / 16 GB RAM / 200 GB Disk
* **large:** 8vCPU / 32 GB RAM / 500 GB Disk
### Redis
Redis is utilized for session management and background tasks in Infisical.
Redis requirements:
* Use Redis versions 6.x or 7.x. We advise upgrading to at least Redis 6.2.
* Redis Cluster mode is currently not supported; use Redis Standalone, with or without High Availability (HA).
* Redis storage needs are minimal: a setup with 2 vCPU, 4 GB RAM, and 30GB SSD will be sufficient for small deployments.
* Set cache eviction policy to `noeviction`.
## Supported Web Browsers
Infisical supports a range of web browsers. However, features such as browser-based CLI login only work on Google Chrome and Firefox at the moment.
* [Mozilla Firefox](https://www.mozilla.org/en-US/firefox/new/)
* [Google Chrome](https://www.google.com/chrome/)
* [Chromium](https://www.chromium.org/getting-involved/dev-channel/)
* [Apple Safari](https://www.apple.com/safari/)
* [Microsoft Edge](https://www.microsoft.com/en-us/edge?form=MA13FJ)
# Docker Compose
Source: https://infisical.com/docs/self-hosting/deployment-options/docker-compose
Read how to run Infisical with Docker Compose template.
This self-hosting guide will walk you through the steps to self-host Infisical using Docker Compose.
## Prerequisites
* [Docker](https://docs.docker.com/engine/install/)
* [Docker compose](https://docs.docker.com/compose/install/)
This Docker Compose configuration is not designed for high-availability production scenarios.
It includes just the essential components needed to set up an Infisical proof of concept (POC).
To run Infisical in a highly available manner, give the [Docker Swarm guide](/self-hosting/deployment-options/docker-swarm).
## Verify prerequisites
To verify that Docker compose and Docker are installed on the machine where you plan to install Infisical, run the following commands.
Check for docker installation
```bash
docker
```
Check for docker compose installation
```bash
docker-compose
```
## Download docker compose file
You can obtain the Infisical docker compose file by using a command-line downloader such as `wget` or `curl`.
If your system doesn't have either of these, you can use a equivalent command that works with your machine.
```bash
curl -o docker-compose.prod.yml https://raw.githubusercontent.com/Infisical/infisical/main/docker-compose.prod.yml
```
```bash
wget -O docker-compose.prod.yml https://raw.githubusercontent.com/Infisical/infisical/main/docker-compose.prod.yml
```
## Configure instance credentials
Infisical requires a set of credentials used for connecting to dependent services such as Postgres, Redis, etc.
The default credentials can be downloaded using the one of the commands listed below.
```bash
curl -o .env https://raw.githubusercontent.com/Infisical/infisical/main/.env.example
```
```bash
wget -O .env https://raw.githubusercontent.com/Infisical/infisical/main/.env.example
```
Once downloaded, the credentials file will be saved to your working directly as `.env` file.
View all available configurations [here](/self-hosting/configuration/envars).
The default .env file contains credentials that are intended solely for testing purposes.
Please generate a new `ENCRYPTION_KEY` and `AUTH_SECRET` for use outside of testing.
Instructions to do so, can be found [here](/self-hosting/configuration/envars).
## Start Infisical
Run the command below to start Infisical and all related services.
```bash
docker-compose -f docker-compose.prod.yml up
```
Your Infisical instance should now be running on port `80`. To access your instance, visit `http://localhost:80`.
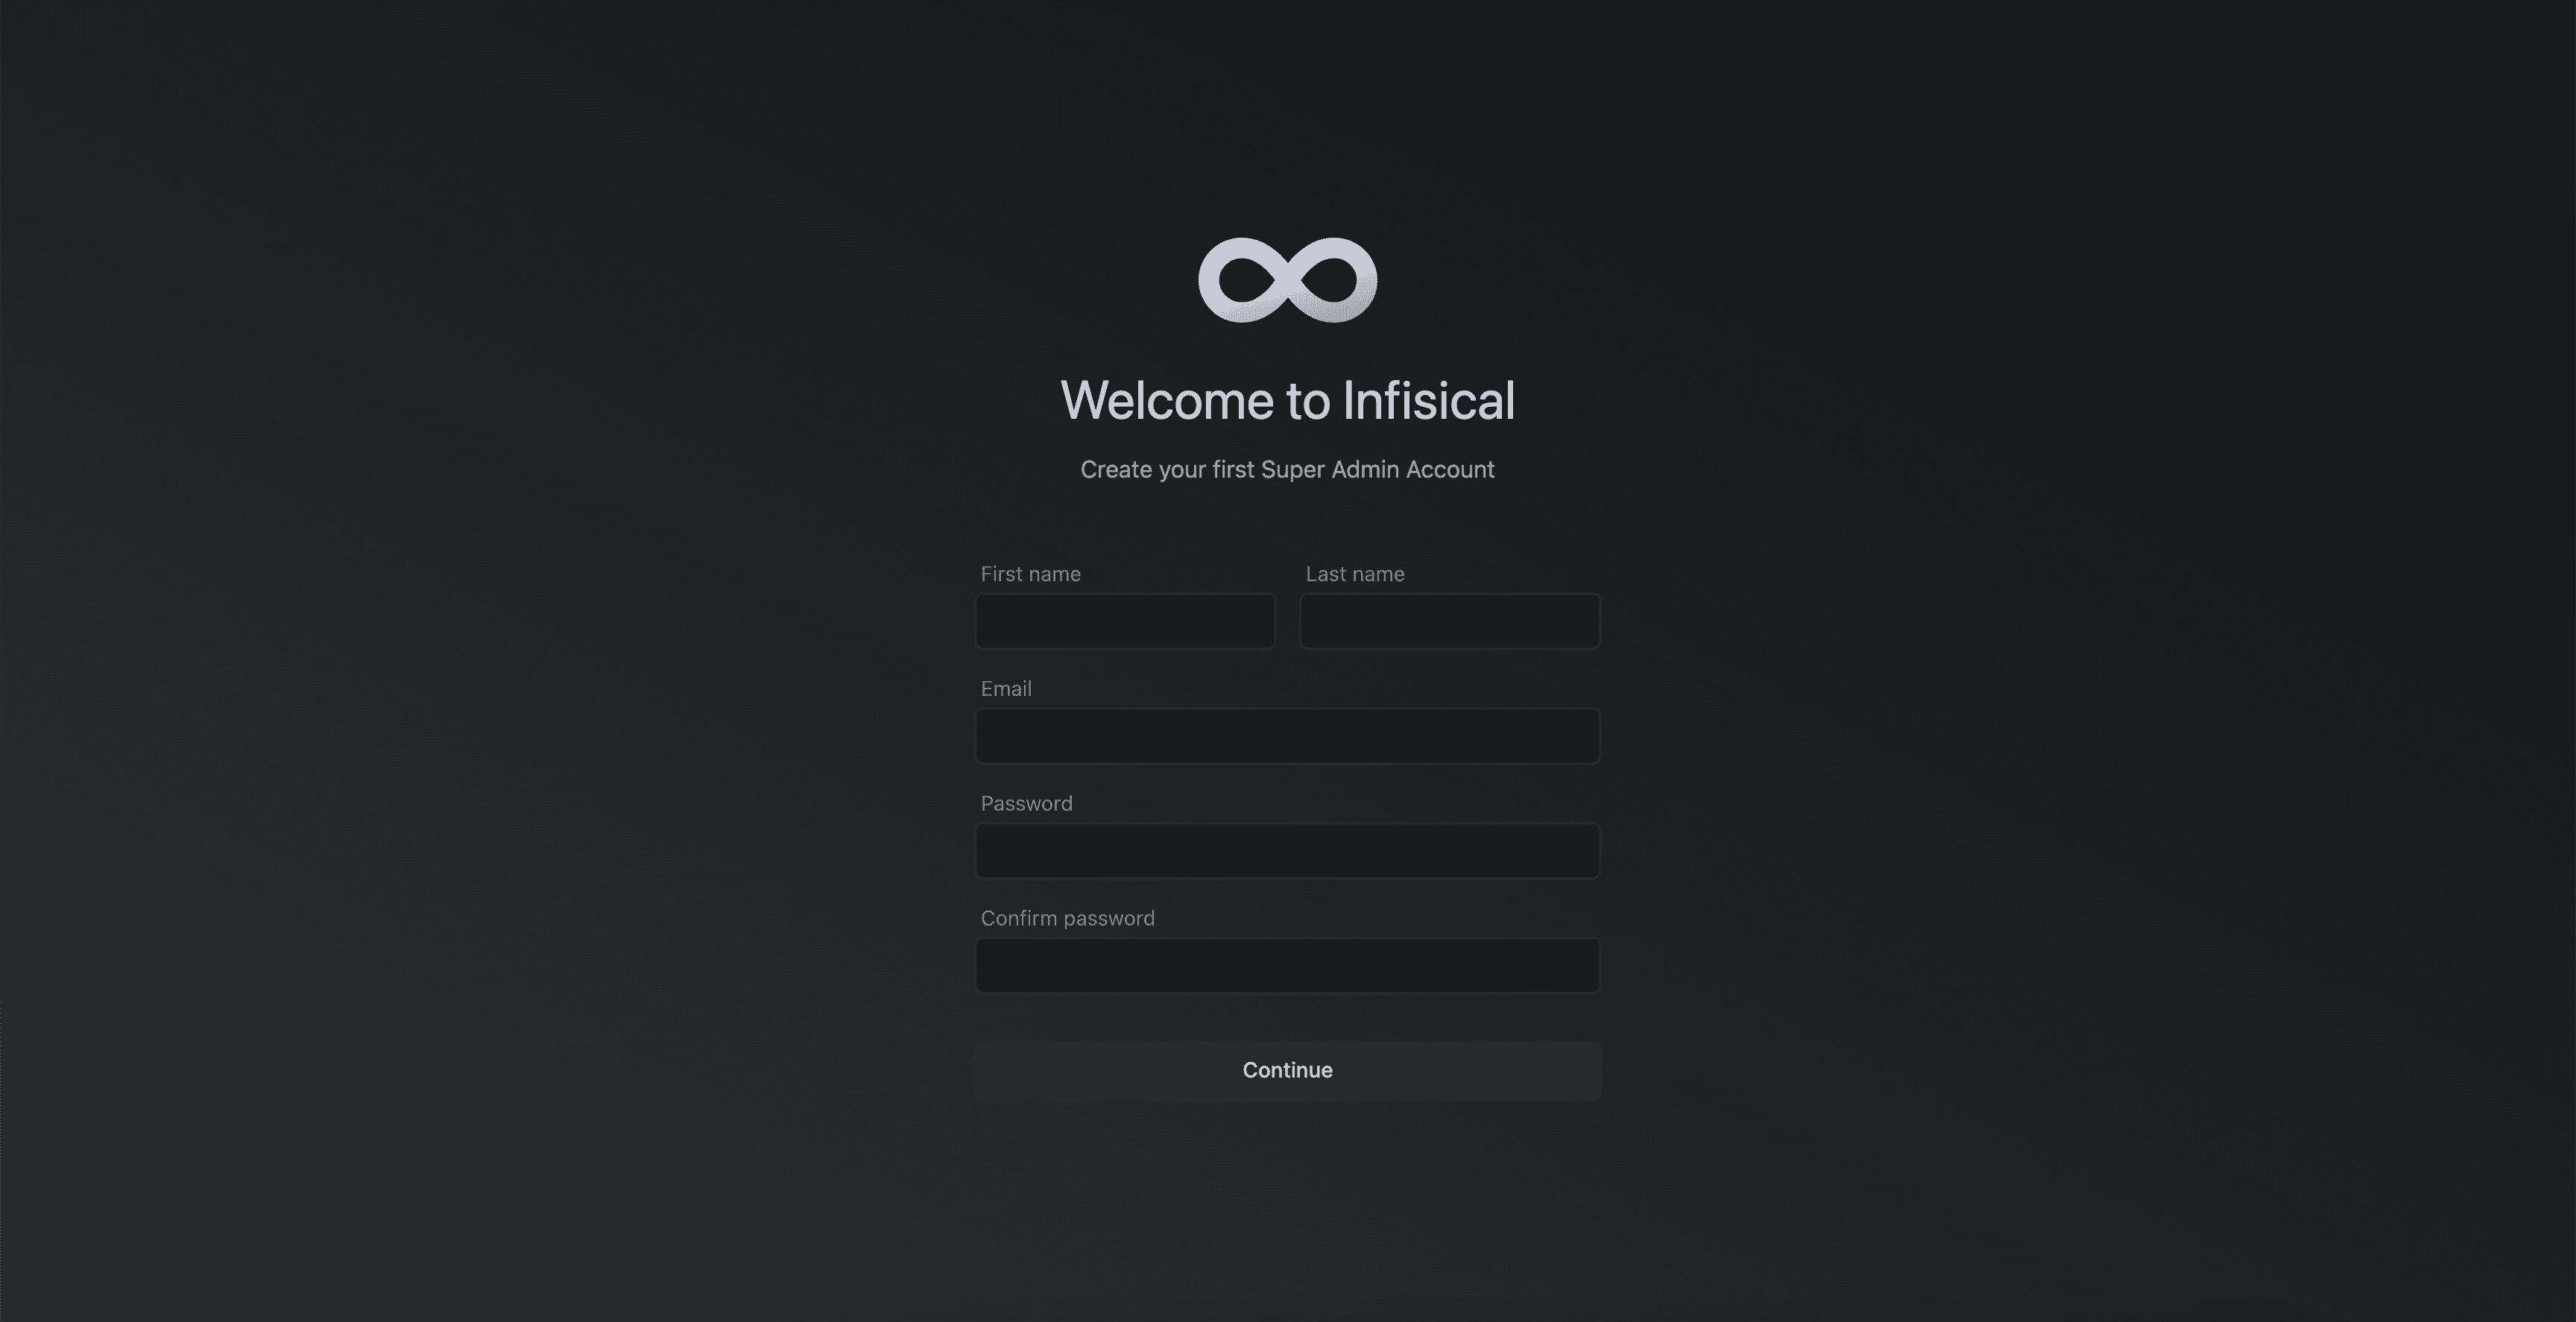
# Docker Swarm
Source: https://infisical.com/docs/self-hosting/deployment-options/docker-swarm
How to self-host Infisical with Docker Swarm (HA).
# Self-Hosting Infisical with Docker Swarm
This guide will provide step-by-step instructions on how to self-host Infisical using Docker Swarm. This is particularly helpful for those wanting to self-host Infisical on premise while still maintaining high availability (HA) for the core Infisical components.
The guide will demonstrate a setup with three nodes, ensuring that the cluster can tolerate the failure of one node while remaining fully operational.
## Docker Swarm
[Docker Swarm](https://docs.docker.com/engine/swarm/) is a native clustering and orchestration solution for Docker containers.
It simplifies the deployment and management of containerized applications across multiple nodes, making it a great choice for self-hosting Infisical.
Unlike Kubernetes, which requires a deep understanding of the Kubernetes ecosystem, if you're accustomed to Docker and Docker Compose, you're already familiar with most of Docker Swarm.
For this reason, we suggest teams use Docker Swarm to deploy Infisical in a highly available and fault tolerant manner.
## Prerequisites
* Understanding of Docker Swarm
* Bare/Virtual Machines with Docker installed on each VM.
* Docker Swarm initialized on the VMs.
## Core Components for High Availability
The provided Docker stack includes the following core components to achieve high availability:
1. **Spilo**: [Spilo](https://github.com/zalando/spilo) is used to run PostgreSQL with [Patroni](https://github.com/zalando/patroni) for HA and automatic failover. It utilizes etcd for leader election of the PostgreSQL instances.
2. **Redis**: Redis is used for caching and is set up with Redis Sentinel for HA.
The stack includes three Redis replicas and three Redis Sentinel instances for monitoring and failover.
3. **Infisical**: Infisical is stateless, allowing for easy scaling and replication across multiple nodes.
4. **HAProxy**: HAProxy is used as a load balancer to distribute traffic to the PostgreSQL and Redis instances.
It is configured to perform health checks and route requests to the appropriate backend services.
## Node Failure Tolerance
To ensure Infisical is highly available and fault tolerant, it's important to choose the number of nodes in the cluster.
The following table shows the relationship between the number of nodes and the maximum number of nodes that can be down while the cluster continues to function:
| Total Nodes | Max Nodes Down | Min Nodes Required |
| ----------- | -------------- | ------------------ |
| 1 | 0 | 1 |
| 2 | 0 | 2 |
| 3 | 1 | 2 |
| 4 | 1 | 3 |
| 5 | 2 | 3 |
| 6 | 2 | 4 |
| 7 | 3 | 4 |
The formula for calculating the minimum number of nodes required is: `floor(n/2) + 1`, where `n` is the total number of nodes.
This guide will demonstrate a setup with three nodes, which allows for one node to be down while the cluster remains operational. This fault tolerance applies to the following components:
* Redis Sentinel: With three Sentinel instances, one instance can be down, and the remaining two can still form a quorum to make decisions.
* Redis: With three Redis instances (one master and two replicas), one instance can be down, and the remaining two can continue to provide caching services.
* PostgreSQL: With three PostgreSQL instances managed by Patroni and etcd, one instance can be down, and the remaining two can maintain data consistency and availability.
* Manager Nodes: In a Docker Swarm cluster with three manager nodes, one manager node can be down, and the remaining two can continue to manage the cluster.
For the sake of simplicity, the example in this guide only contains one manager node.
It's important to note that while the cluster can tolerate the failure of one node in a three-node setup, it's recommended to have a minimum of three nodes to ensure high availability.
With two nodes, the failure of a single node can result in a loss of quorum and potential downtime.
## Docker Deployment Stack Overview
The [Docker stack file](https://github.com/Infisical/infisical/tree/main/docker-swarm) used in this guide defines the services and their configurations for deploying Infisical in a highly available manner. The main components of this stack are as follows.
1. **HAProxy**: The HAProxy service is configured to expose ports for accessing PostgreSQL (5433 for the master, 5434 for replicas), Redis master (6379), and the Infisical backend (8080). It uses a config file (`haproxy.cfg`) to define the load balancing and health check rules.
2. **Infisical**: The Infisical backend service is deployed with the latest PostgreSQL-compatible image. It is connected to the `infisical` network and uses secrets for environment variables.
3. **etcd**: Three etcd instances (etcd1, etcd2, etcd3) are deployed, one on each node, to provide distributed key-value storage for leader election and configuration management.
4. **Spilo**: Three Spilo instances (spolo1, spolo2, spolo3) are deployed, one on each node, to run PostgreSQL with Patroni for high availability. They are connected to the `infisical` network and use persistent volumes for data storage.
5. **Redis**: Three Redis instances (redis\_replica0, redis\_replica1, redis\_replica2) are deployed, one on each node, with redis\_replica0 acting as the master. They are connected to the `infisical` network.
6. **Redis Sentinel**: Three Redis Sentinel instances (redis\_sentinel1, redis\_sentinel2, redis\_sentinel3) are deployed, one on each node, to monitor and manage the Redis instances. They are connected to the `infisical` network.
## Deployment instructions
Run the following on each node to install the Docker engine.
```
curl -fsSL https://get.docker.com -o get-docker.sh && sh get-docker.sh
```
```
docker swarm init
```
Replace `` with the IP address of the VM that will serve as the manager node. Remember to copy the join token returned by the this init command.
For the sake of simplicity, we only use one manager node in this example deployment. However, in production settings, we recommended you have at least 3 manager nodes.
```
docker swarm join --token :2377
```
Replace `` with the token provided by the manager node during initialization.
Labels on nodes will help us select where stateful components such as Postgres and Redis are deployed on. To label nodes, follow the steps below.
```
docker node update --label-add name=node1
docker node update --label-add name=node2
docker node update --label-add name=node3
```
Replace ``, ``, and `` with the respective node IDs.
To view the list of nodes and their ids, run the following on the manager node `docker node ls`.
Copy the Docker stack YAML file, HAProxy configuration file and example `.env` file to the manager node. Ensure that all 3 files are placed in the same file directory.
* [Docker stack file](https://github.com/Infisical/infisical/blob/main/docker-swarm/stack.yaml) (rename to infisical-stack.yaml)
* [HA configuration file](https://github.com/Infisical/infisical/blob/main/docker-swarm/haproxy.cfg) (rename to haproxy.cfg)
* [Example .env file](https://github.com/Infisical/infisical/blob/main/docker-swarm/.env-example) (rename to .env)
```
docker stack deploy -c infisical-stack.yaml infisical
```
```plain
$ docker service ls
ID NAME MODE REPLICAS IMAGE PORTS
4kzq3ub8qgn9 infisical_etcd1 replicated 1/1 ghcr.io/zalando/spilo-16:3.2-p2
tqx9t82bn8d9 infisical_etcd2 replicated 1/1 ghcr.io/zalando/spilo-16:3.2-p2
t8vbkrasy8fz infisical_etcd3 replicated 1/1 ghcr.io/zalando/spilo-16:3.2-p2
77iei42fcf6q infisical_haproxy global 4/4 haproxy:latest *:5002-5003->5433-5434/tcp, *:6379->6379/tcp, *:7001->7000/tcp, *:8080->8080/tcp
jaewzqy8md56 infisical_infisical replicated 5/5 infisical/infisical:v0.60.1-postgres
58w4zablfbtb infisical_redis_replica0 replicated 1/1 bitnami/redis:6.2.10
w4yag2whq0un infisical_redis_replica1 replicated 1/1 bitnami/redis:6.2.10
w03mriy0jave infisical_redis_replica2 replicated 1/1 bitnami/redis:6.2.10
ppo6rk47hc9t infisical_redis_sentinel1 replicated 1/1 bitnami/redis-sentinel:6.2.10
ub29vd0lnq7f infisical_redis_sentinel2 replicated 1/1 bitnami/redis-sentinel:6.2.10
szg3yky7yji2 infisical_redis_sentinel3 replicated 1/1 bitnami/redis-sentinel:6.2.10
eqtocpf5tiy0 infisical_spolo1 replicated 1/1 ghcr.io/zalando/spilo-16:3.2-p2
3lznscvk7k5t infisical_spolo2 replicated 1/1 ghcr.io/zalando/spilo-16:3.2-p2
v04ml7rz2j5q infisical_spolo3 replicated 1/1 ghcr.io/zalando/spilo-16:3.2-p2
```

To view the health of services in your Infisical cluster, visit port `:7001` of any node in your Docker swarm.
This port will expose the HA Proxy stats.
Run the following command to view the IPs of the nodes in your docker swarm.
```plain
$ docker node ls
ID HOSTNAME STATUS AVAILABILITY MANAGER STATUS ENGINE VERSION
0jnegl4gpo235l66nglcwc07t localhost Ready Active 26.0.2
no1a7zwj88057k73m196ulkq6 * localhost Ready Active Leader 26.0.2
wcb2x27w3tq7ht4v1h7ke49qk localhost Ready Active 26.0.2
zov5q7uop7wpxc2ndz712v9oa localhost Ready Active 26.0.2
```
The stats page may take 1-2 minutes to become accessible.

Once all expected services are up and running, visit `:8080` of any node in the swarm. This will take you to the Infisical configuration page.
## FAQ
To further scale and make the system more resilient, you can add more nodes to the Docker Swarm and update the stack configuration accordingly:
1. Add new VMs and join them to the Docker Swarm as worker nodes.
2. Update the Docker stack YAML file to include the new nodes in the `deploy` section of the relevant services, specifying the appropriate `node.labels.name` constraints.
3. Update the HAProxy configuration file (`haproxy.cfg`) to include the new nodes in the backend sections for PostgreSQL and Redis.
4. Redeploy the updated stack using the `docker stack deploy` command.
Note that the database containers (PostgreSQL) are stateful and cannot be simply replicated. Instead, one database instance is deployed per node to ensure data consistency and avoid conflicts.
Native tooling for scheduled backups of Postgres and Redis is currently in development.
In the meantime, we recommend using a variety of open-source tools available for this purpose.
For Postgres, [Spilo](https://github.com/zalando/spilo) provides built-in support for scheduled data dumps.
You can explore other third party tools for managing db backups, one such tool is [docker-db-backup](https://github.com/tiredofit/docker-db-backup).
# Kubernetes via Helm Chart
Source: https://infisical.com/docs/self-hosting/deployment-options/kubernetes-helm
Learn how to use Helm chart to install Infisical on your Kubernetes cluster.
**Prerequisites**
* You have extensive understanding of [Kubernetes](https://kubernetes.io/)
* Installed [Helm package manager](https://helm.sh/) version v3.11.3 or greater
* You have [kubectl](https://kubernetes.io/docs/reference/kubectl/kubectl/) installed and connected to your kubernetes cluster
```bash
helm repo add infisical-helm-charts 'https://dl.cloudsmith.io/public/infisical/helm-charts/helm/charts/'
```
```
helm repo update
```
Create a `values.yaml` file. This will be used to configure settings for the Infisical Helm chart.
To explore all configurable properties for your values file, [visit this page](https://raw.githubusercontent.com/Infisical/infisical/main/helm-charts/infisical-standalone-postgres/values.yaml).
By default, the Infisical version set in your helm chart will likely be outdated.
Choose the latest Infisical docker image tag from [here](https://hub.docker.com/r/infisical/infisical/tags).
```yaml values.yaml
infisical:
image:
repository: infisical/infisical
tag: "v0.46.2-postgres" #<-- update
pullPolicy: IfNotPresent
```
Do not use the latest docker image tag in production deployments as they can introduce unexpected changes
To deploy this Helm chart, a Kubernetes secret named `infisical-secrets` must be present in the same namespace where the chart is being deployed.
For a minimal installation of Infisical, you need to configure `ENCRYPTION_KEY`, `AUTH_SECRET`, `DB_CONNECTION_URI`, `SITE_URL`, and `REDIS_URL`. [Learn more about configuration settings](/self-hosting/configuration/envars).
For test or proof-of-concept purposes, you may omit `DB_CONNECTION_URI` and `REDIS_URL` from `infisical-secrets`. This is because the Helm chart will automatically provision and connect to the in-cluster instances of Postgres and Redis by default.
```yaml simple-values-example.yaml
apiVersion: v1
kind: Secret
metadata:
name: infisical-secrets
type: Opaque
stringData:
AUTH_SECRET: <>
ENCRYPTION_KEY: <>
SITE_URL: <>
```
For production environments, we recommend using Cloud-based Platform as a Service (PaaS) solutions for PostgreSQL and Redis to ensure high availability. In on-premise setups, it's recommended to configure Redis and Postgres for high availability, either by using Bitnami charts or a custom configuration.
```yaml simple-values-example.yaml
apiVersion: v1
kind: Secret
metadata:
name: infisical-secrets
type: Opaque
stringData:
AUTH_SECRET: <>
ENCRYPTION_KEY: <>
REDIS_URL: <>
DB_CONNECTION_URI: <>
SITE_URL: <>
```
By default, this chart uses Nginx as its Ingress controller to direct traffic to Infisical services.
```yaml values.yaml
ingress:
nginx:
enabled: true
```
Once you are done configuring your `values.yaml` file, run the command below.
```bash
helm upgrade --install infisical infisical-helm-charts/infisical-standalone --values /path/to/values.yaml
```
```yaml values.yaml
nameOverride: "infisical"
fullnameOverride: "infisical"
infisical:
enabled: true
name: infisical
autoDatabaseSchemaMigration: true
fullnameOverride: ""
podAnnotations: {}
deploymentAnnotations: {}
replicaCount: 6
image:
repository: infisical/infisical
tag: "v0.46.2-postgres"
pullPolicy: IfNotPresent
affinity: {}
kubeSecretRef: "infisical-secrets"
service:
annotations: {}
type: ClusterIP
nodePort: ""
resources:
limits:
memory: 210Mi
requests:
cpu: 200m
ingress:
enabled: true
hostName: ""
ingressClassName: nginx
nginx:
enabled: true
annotations: {}
tls: []
postgresql:
enabled: true
name: "postgresql"
fullnameOverride: "postgresql"
auth:
username: infisical
password: root
database: infisicalDB
redis:
enabled: true
name: "redis"
fullnameOverride: "redis"
cluster:
enabled: false
usePassword: true
auth:
password: "mysecretpassword"
architecture: standalone
```
After deployment, please wait for 2-5 minutes for all pods to reach a running state. Once a significant number of pods are operational, access the IP address revealed through Ingress by your load balancer.
You can find the IP address/hostname by executing the command `kubectl get ingress`.

To upgrade your instance of Infisical simply update the docker image tag in your Helm values and rerun the command below.
```bash
helm upgrade --install infisical infisical-helm-charts/infisical-standalone --values /path/to/values.yaml
```
Always back up your database before each upgrade, especially in a production environment.
# Docker
Source: https://infisical.com/docs/self-hosting/deployment-options/standalone-infisical
Learn how to run Infisical with Docker.
Prerequisites:
* Basic knowledge of [Docker](https://www.docker.com/)
* Have Docker installed on your system. If not, follow the installation guide [here](https://docs.docker.com/get-docker/).
Infisical is available as a single Docker image to ease deployment.
This Docker image only includes the application code, meaning you must supply a connection to a Postgres database and a Redis instance.
The following guide provides a detailed step-by-step walkthrough on how you can deploy Infisical with Docker.
Visit [Docker Hub](https://hub.docker.com/r/infisical/infisical/tags) and select a version of Infisical image you would like to deploy.
Then run the following command in your terminal to pull the specific Infisical Docker image.
```
docker pull infisical/infisical:
```
Remember to replace `` with the docker image tag of your choice.
For a minimal installation of Infisical, you must configure `ENCRYPTION_KEY`, `AUTH_SECRET`, `DB_CONNECTION_URI`, `SITE_URL`, and `REDIS_URL`. [View all available configurations](/self-hosting/configuration/envars).
We recommend using Cloud-based Platform as a Service (PaaS) solutions for PostgreSQL and Redis to ensure high availability.
Once you have added the required environment variables to your docker run command, execute it in your terminal to get Infisical up and running.
For example:
```bash
docker run -p 80:8080 \
-e ENCRYPTION_KEY=f40c9178624764ad85a6830b37ce239a \
-e AUTH_SECRET="q6LRi7c717a3DQ8JUxlWYkZpMhG4+RHLoFUVt3Bvo2U=" \
-e DB_CONNECTION_URI="<>" \
-e REDIS_URL="<>" \
-e SITE_URL="<>" \
infisical/infisical:
```
The above environment variable values are only to be used as an example and should not be used in production
Once the container is running, verify the installation by opening your web browser and navigating to `http://localhost:80`.

### Additional discussion
It's important to note that the above is a basic example of deploying Infisical using Docker.
In practice, for production deployments, you may want to use container orchestration platforms such as AWS ECS, Google Cloud Run, or Kubernetes.
These platforms offer additional features like scalability, load balancing, and automated deployment, making them suitable for handling production-level traffic and providing high availability.
# Infisical Enterprise
Source: https://infisical.com/docs/self-hosting/ee
Find out how to activate Infisical Enterprise edition (EE) features.
While most features in Infisical are free to use, others are paid and require purchasing an enterprise license to use them.
This guide walks through how you can use these paid features on a self-hosted instance of Infisical.
Start by either signing up for a free demo [here](https://infisical.com/schedule-demo) or contacting [sales@infisical.com](mailto:sales@infisical.com) to purchase a license.
Once purchased, you will be issued a license key.
Depending on whether or not the environment where Infisical is deployed has internet access, you may be issued a regular license or an offline license.
* Assign the issued license key to the `LICENSE_KEY` environment variable in your Infisical instance.
* Your Infisical instance will need to communicate with the Infisical license server to validate the license key.
If you want to limit outgoing connections only to the Infisical license server, you can use the following IP addresses: `13.248.249.247` and `35.71.190.59`
Ensure that your firewall or network settings allow outbound connections to these IP addresses to avoid any issues with license validation.
* Assign the issued license key to the `LICENSE_KEY_OFFLINE` environment variable in your Infisical instance.
How you set the environment variable will depend on the deployment method you used. Please refer to the documentation of your deployment method for specific instructions.
Once your instance starts up, the license key will be validated and you’ll be able to use the paid features.
However, when the license expires, Infisical will continue to run, but EE features will be disabled until the license is renewed or a new one is purchased.
# FAQ
Source: https://infisical.com/docs/self-hosting/faq
Frequently Asked Questions about self-hosting Infisical.
Frequently asked questions about self-hosted instance of Infisical can be found on this page.
If you can't find the answer you are looking for, please create an issue on our [GitHub repository](https://github.com/Infisical/infisical) or join our [Slack community](https://infisical.com/slack) for additional support.
This issue is typically seen when you haven't set up SSL for your self-hosted instance of Infisical. When SSL is not enabled, you can't receive secure cookies, preventing the session data to not be saved.
To fix this, we highly recommend that you set up SSL for your instance.
However, in the event you choose to use Infisical without SSL, you can do so by setting the `HTTPS_ENABLED` environment variable to `"false"` for the backend application.
[Learn more about secure cookies](https://really-simple-ssl.com/definition/what-are-secure-cookies/)
Follow the step by step guide [here](self-hosting/guides/mongo-to-postgres) to learn how.
# Adding Custom Certificates
Source: https://infisical.com/docs/self-hosting/guides/custom-certificates
Learn how to configure Infisical with custom certificates
By default, the Infisical Docker image includes certificates from well-known public certificate authorities.
However, some integrations with Infisical may need to communicate with your internal services that use private certificate authorities.
To configure trust for custom certificates, follow these steps. This is particularly useful for connecting Infisical with self-hosted services like GitLab.
## Prerequisites
* Docker
* Standalone [Infisical image](https://hub.docker.com/r/infisical/infisical)
* Certificate public key `.pem` files
## Setup
1. Place all your public key `.pem` files into a single directory.
2. Mount the directory containing the `.pem` files to the `usr/local/share/ca-certificates/` path in the Infisical container.
3. Set the following environment variable on your Infisical container:
```
NODE_EXTRA_CA_CERTS=/etc/ssl/certs/ca-certificates.crt
```
4. Start the Infisical container.
By following these steps, your Infisical container will trust the specified certificates, allowing you to securely connect Infisical to your internal services.
# Migrate Mongo to Postgres
Source: https://infisical.com/docs/self-hosting/guides/mongo-to-postgres
Learn how to migrate Infisical from MongoDB to PostgreSQL.
This guide will provide step by step instructions on migrating your Infisical instance running on MongoDB to the newly released PostgreSQL version of Infisical.
The newly released Postgres version of Infisical is the only version of Infisical that will receive feature updates and patches going forward.
If you have a small set of secrets, we recommend you to download the secrets and upload them to your new instance of Infisical instead of running the migration script.
## Prerequisites
Before starting the migration, ensure you have the following command line tools installed:
* [git](https://git-scm.com/book/en/v2/Getting-Started-Installing-Git)
* [pg\_dump](https://www.postgresql.org/docs/current/app-pgrestore.html)
* [pg\_restore](https://www.postgresql.org/docs/current/app-pgdump.html)
* [mongodump](https://www.mongodb.com/docs/database-tools/mongodump/)
* [mongorestore](https://www.mongodb.com/docs/database-tools/mongorestore/)
* [Docker](https://docs.docker.com/engine/install/)
## Prepare for migration
While the migration script will not mutate any MongoDB production data, we recommend you to take a backup of your MongoDB instance if possible.
To prevent new data entries during the migration, set your Infisical instance to migration mode by setting the environment variable `MIGRATION_MODE=true` and redeploying your instance.
This mode will block all write operations, only allowing GET requests. It also disables user logins and sets up a migration page to prevent UI interactions.
Start local instances of MongoDB and Postgres. This will be used in later steps to process and transform the data locally.
To start local instances of the two databases, create a file called `docker-compose.yaml` as shown below.
```yaml docker-compose.yaml
version: '3.1'
services:
mongodb:
image: mongo
restart: always
environment:
MONGO_INITDB_ROOT_USERNAME: root
MONGO_INITDB_ROOT_PASSWORD: example
ports:
- "27017:27017"
volumes:
- mongodb_data:/data/db
postgres:
image: postgres
restart: always
environment:
POSTGRES_PASSWORD: example
ports:
- "5432:5432"
volumes:
- postgres_data:/var/lib/postgresql/data
volumes:
mongodb_data:
postgres_data:
```
Next, run the command below in the same working directory where the `docker-compose.yaml` file resides to start both services.
```
docker-compose up
```
## Dump MongoDB
To speed up the data transformation process, the first step involves transferring the production data from Infisical's MongoDB to a local machine.
This is achieved by creating a dump of the production database and then uploading this dumped data into a local Mongo instance.
By having a running local instance of the production database, we will significantly reduce the time it takes to run the migration script.
```
mongodump --uri= --archive="mongodump-db" --db= --excludeCollection=auditlogs
```
```
mongorestore --uri=mongodb://root:example@localhost:27017/ --archive="mongodump-db"
```
## Start the migration
Once started, the migration script will transform MongoDB data into an equivalent PostgreSQL format.
Clone the Infisical MongoDB repository.
```
git clone -b infisical/v0.46.11-postgres https://github.com/Infisical/infisical.git
```
```
cd backend
```
```
npm install
```
```
cd pg-migrator
```
```
npm install
```
```
npm run migration
```
When executing the above command, you'll be asked to provide the MongoDB connection string for the database containing your production Infisical data. Since our production Mongo data is transferred to a local Mongo instance, you should input the connection string for this local instance.
```
mongodb://root:example@localhost:27017/?authSource=admin
```
Remember to replace `` with the name of the MongoDB database. If you are not sure the name, you can use [Compass](https://www.mongodb.com/products/tools/compass) to view the available databases.
Next, you will be asked to enter the Postgres connection string for the database where the transformed data should be stored.
Input the connection string of the local Postgres instance that was set up earlier in the guide.
```
postgres://infisical:infisical@localhost/infisical?sslmode=disable
```
Once the script has completed, you will notice a new folder has been created called `db` in the `pg-migrator` folder.
This folder contains meta data for schema mapping and can be helpful when debugging migration related issues.
We highly recommend you to make a copy of this folder in case you need assistance from the Infisical team during your migration process.
The `db` folder does not contain any sensitive data
## Finalizing Migration
At this stage, the data from the Mongo instance of Infisical should have been successfully converted into its Postgres equivalent.
The remaining step involves transferring the local Postgres database, which now contains all the migrated data, to your chosen production Postgres environment.
Rather than transferring the data row-by-row from your local machine to the production Postgres database, we will first create a dump file from the local Postgres and then upload this file to your production Postgres instance.
```
pg_dump -h localhost -U infisical -Fc -b -v -f dumpfilelocation.sql -d infisical
```
```
pg_restore --clean -v -h -U -d -j 2 dumpfilelocation.sql
```
Remember to replace ``, ``, `` with the corresponding details of your production Postgres database.
Use a tool like Beekeeper Studio to confirm that the data has been successfully transferred to your production Postgres DB.
## Post-Migration Steps
Once the data migration to PostgreSQL is complete, you're ready to deploy Infisical using the deployment method of your choice.
For guidance on deployment options, please visit the [self-hosting documentation](/self-hosting/overview).
Remember to transfer the necessary [environment variables](/self-hosting/configuration/envars) from the MongoDB version of Infisical to the new Postgres based Infisical; rest assured, they are fully compatible.
The first deployment of Postgres based Infisical must be deployed with Docker image tag `v0.46.11-postgres`.
After deploying this version, you can proceed to update to any subsequent versions.
## Additional discussion
* When you visit Infisical's [docker hub](https://hub.docker.com/r/infisical/infisical) page, you will notice that image tags end with `-postgres`.
This is to indicate that this version of Infisical runs on the new Postgres backend. Any image tag that does not end in `postgres` runs on MongoDB.
# Upgrade Infisical Instance
Source: https://infisical.com/docs/self-hosting/guides/upgrading-infisical
How to upgrade Infisical self-hosted instance
Keeping your Infisical instance up to date is key to making sure you receive the latest performance improvements, security patches, and feature updates.
We release updates approximately once a week, which may include new features, bug fixes, performance enhancements, and critical security patches.
Since secrets management is a critical component of your infrastructure, we aim to avoid disruptive changes that will impact fetching secrets in downstream clients.
If a release requires specific attention, a note will be attached to the corresponding [release](https://github.com/Infisical/infisical/releases) version.
During an upgrade, two key components are updated:
* **Infisical Application:** The core application code is updated.
* **PostgreSQL Database Schema:** Schema migrations run automatically to ensure your database remains in sync with the updated application.
> **Before You Upgrade:**\
> **Always back up your database.** While our automated migration system is robust, having a backup ensures you can recover quickly in the event of an issue.
## Automated Schema Migrations
In previous versions (prior to `v0.111.0-postgres`), schema migrations had to be executed manually before starting the application.
Now, migrations run automatically during boot-up. This improvement streamlines the upgrade process, reduces manual steps, and minimizes the risk of inconsistencies between your database schema and application code.
### Benefits of Automated Migrations
* **Seamless Integration:**\
Migrations are now part of the boot-up process, removing the need for manual intervention.
* **Synchronous Upgrades:**\
In multi-instance deployments, one instance acquires a lock and performs the migration while the others wait. This ensures that if a migration fails, the rollout is halted to prevent inconsistencies.
* **Reduced Room for Error:**\
Automatic migrations help ensure that your database schema always remains in sync with your application code.
## Upgrade Steps
1. **Back Up Your Data:**
* Ensure you have a complete backup of your Postgres database.
* Verify that your backup is current and accessible.
2. **Select the Upgrade Version:**
* Visit the [Infisical releases page](https://github.com/Infisical/infisical/releases) for a list of available versions.
* Look for releases with the prefix `infisical/` as there are other releases that are not related to the Infisical instance.
3. **Start the Upgrade Process:**
* Launch the new version of Infisical. During startup, the application will automatically compare the current database schema with the updated schema in the code.
* If any differences are detected, Infisical will apply the necessary migrations automatically.
4. **Multi-Instance Coordination:**
* In environments with multiple instances, one instance will acquire a lock and perform the migration while the other instances wait.
* Once the migration is complete, all instances will operate with the updated schema.
5. **Verify the Upgrade:**
* Review the logs for any migration errors or warnings.
#
Source: https://infisical.com/docs/self-hosting/overview
Learn how to self-host Infisical on your own infrastructure.
Self-hosting Infisical lets you retain data on your own infrastructure and network.
Choose from a number of deployment options listed below to get started.
Use the fully packaged docker image to deploy Infisical anywhere.
Install Infisical using our Docker Compose template.
Use our Helm chart to Install Infisical on your Kubernetes cluster.
{/*
Install Infisical on your Debian-based system without containers using our standalone binary.
Install Infisical on your Debian-based instances without containers using our standalone binary with high availability out of the box.
*/}
# AWS ECS (HA)
Source: https://infisical.com/docs/self-hosting/reference-architectures/aws-ecs
Reference architecture for self-hosting Infisical on AWS ECS
This guide will provide high-level architecture design for deploying the Infisical on AWS ECS and give insights into the core components, high availability strategies, and secure credential management for Infisical's root secrets.
## Overview
In this guide, we'll focus on running Infisical on AWS Elastic Container Service (ECS) across multiple Availability Zones (AZs), ensuring high availability and resilience.
The architecture utilizes Amazon Relational Database Service (RDS) for persistent storage, ElastiCache for Redis as an in-memory data store for caching, and Amazon Simple Email Service (SES) to handle email based communications from Infisical.
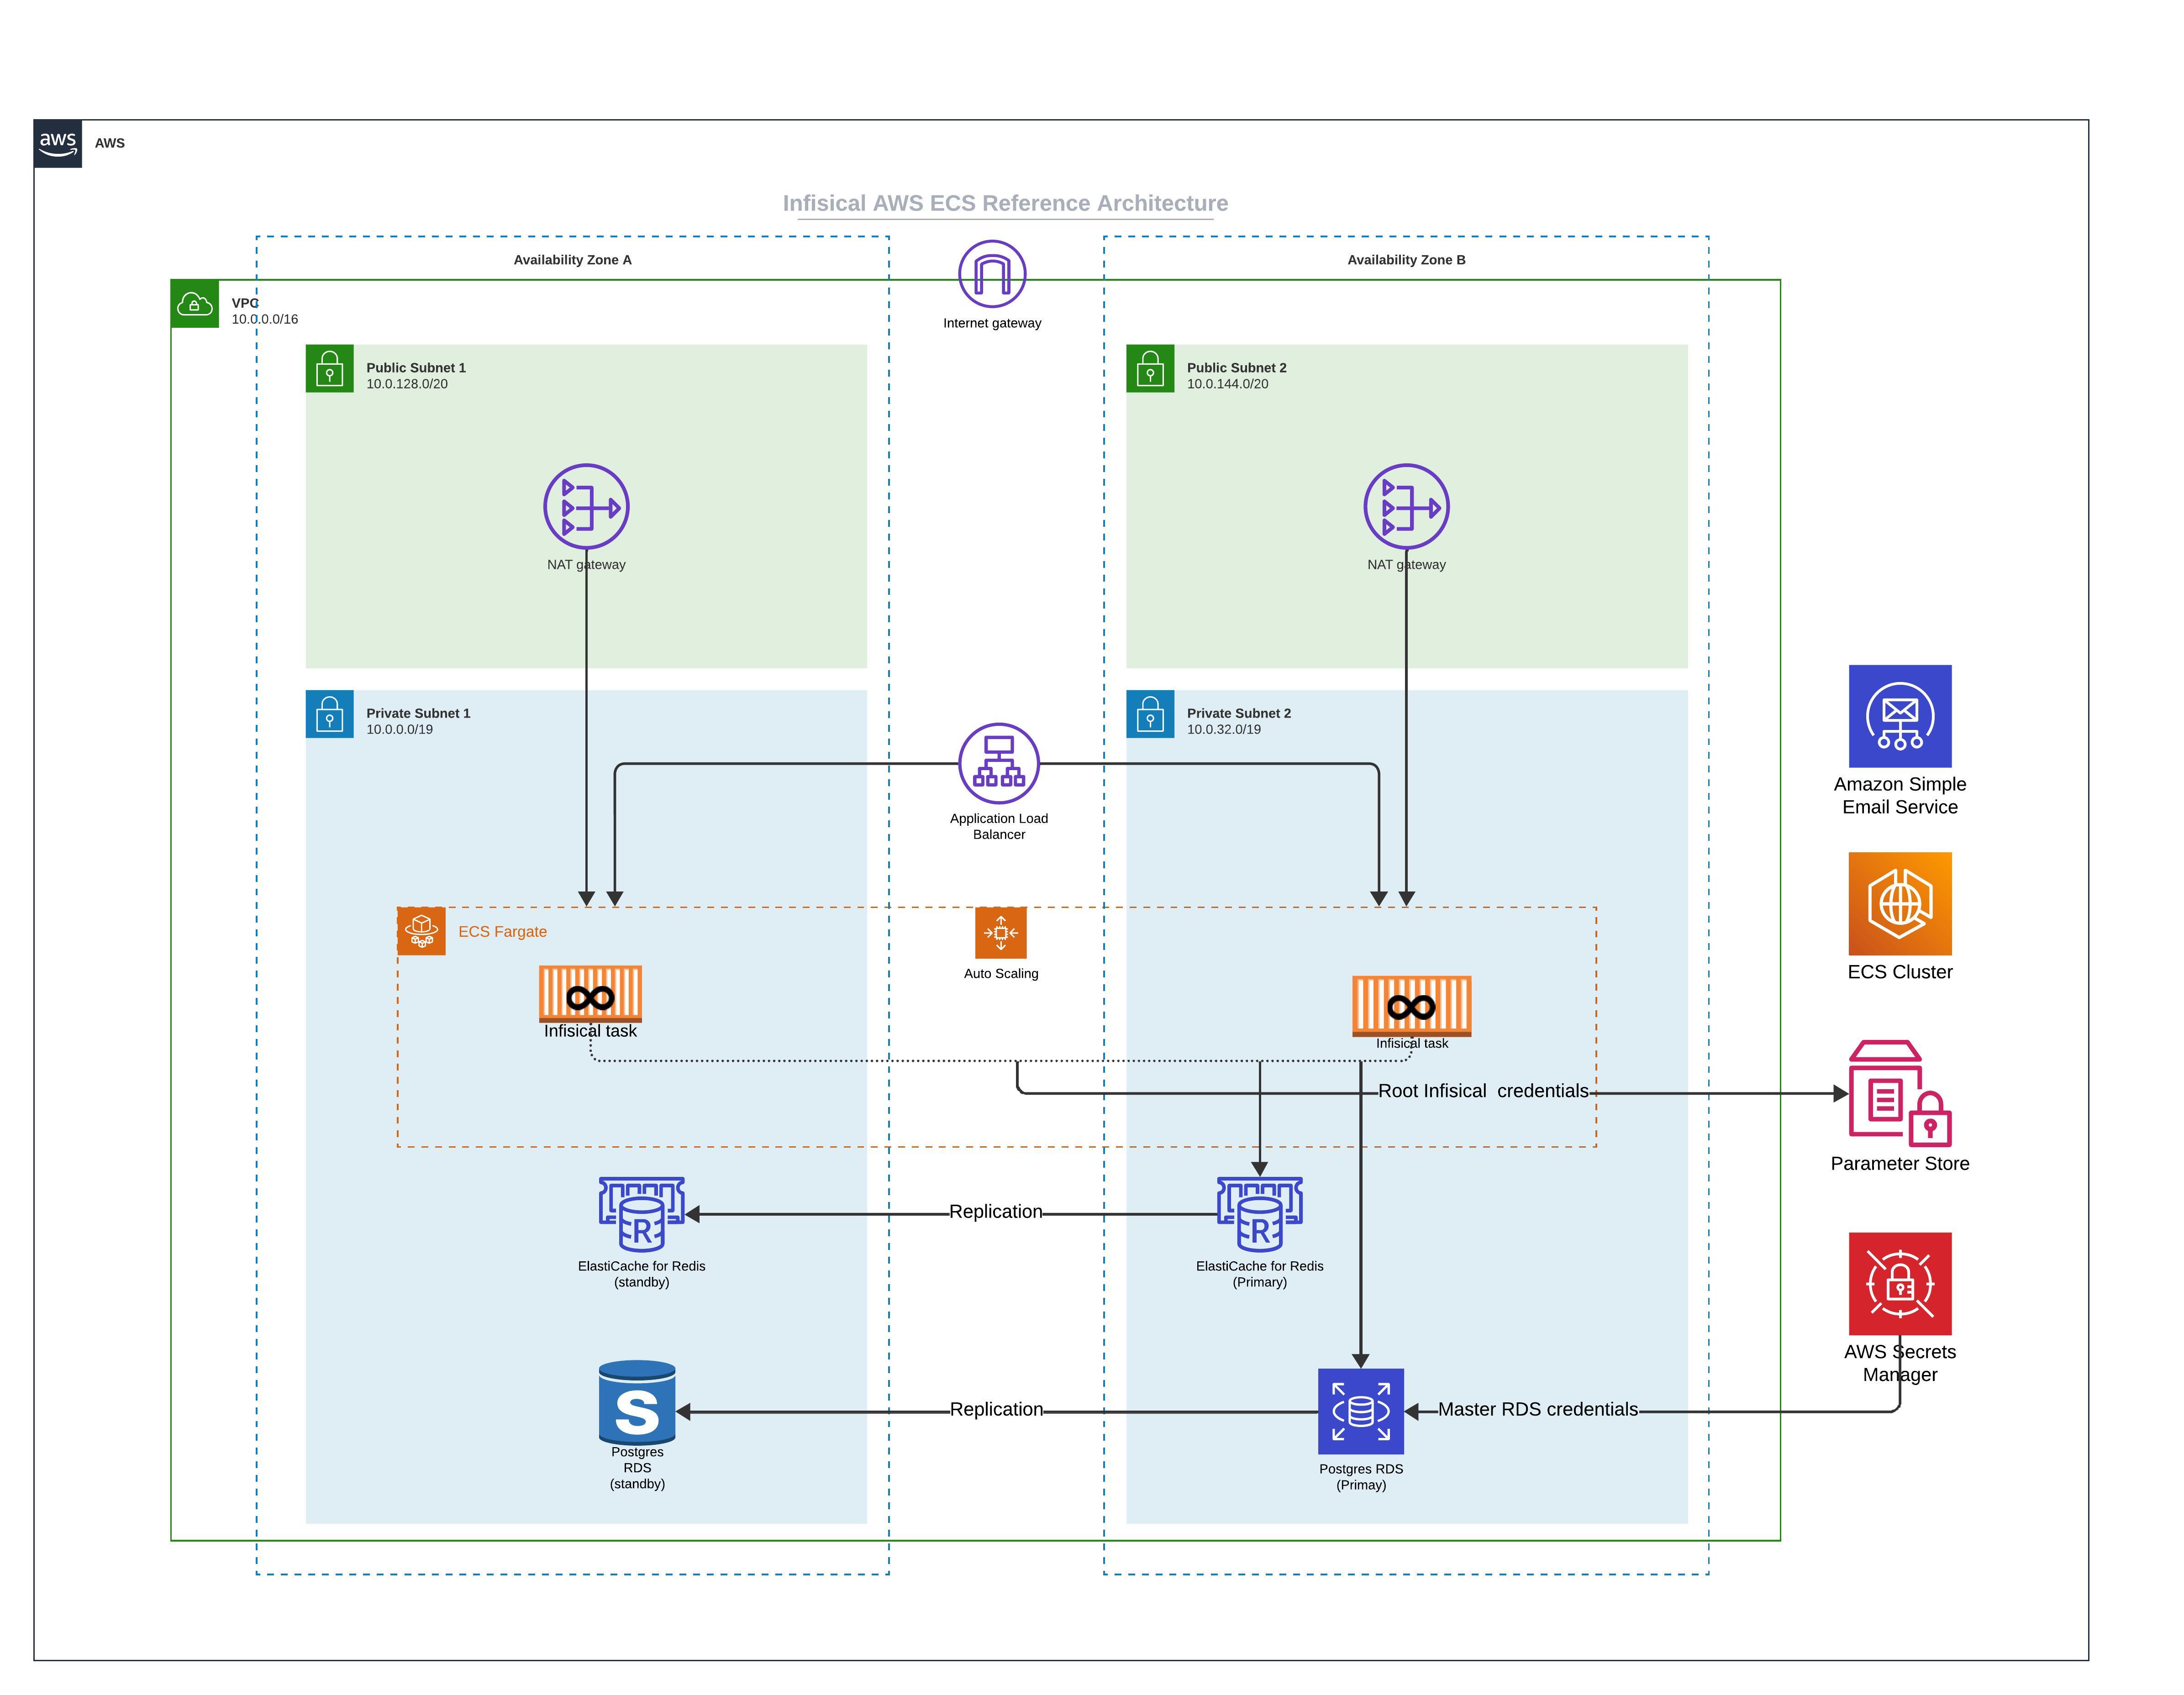
### Core Components
* **ECS Fargate:** In this architecture, Infisical is deployed on ECS using Fargate launch type. The ECS services are deployed across multiple Availability Zones to ensure high availability.
* **Amazon RDS:** Infisical uses Postgres as it's persistent layer. As such, RDS for PostgreSQL is used as the database engine. The setup includes a primary instance in one AZ and a read replica in another AZ.
This ensures that if there is a failure in one availability zone, the working replica will become the primary and continue processing workloads.
* **Amazon ElastiCache for Redis:** To enhance performance, Infisical requires Redis. In this architecture, Redis is set up with a primary and standby replication group across two AZs to increase availability.
* **Amazon Simple Email Service (SES):** Infisical requires email service to facilitate outbound communication. AWS SES is integrated into the architecture to handle such communication.
### Network Setup
* **Public Subnets:** Each Availability Zone contains a public subnet. There are two main reasons you might need internet access. First, if you intend to use Infisical to communicate with external secrets managers not located within your virtual private network, enabling internet access is necessary. Second, downloading the Docker image from Docker Hub requires internet access, though this can be avoided by utilizing AWS ECR with VPC Endpoints through AWS Private Link.
* **NAT Gateway:** This is used to route outbound requests from Infisical to the internet and is only used to communicate with external secrets manager and or downloading container images.
### Securing Infisical's root credential
* **Parameter Store:** To secure Infisical's root credentials (database connection string, encryption key, etc), we highly recommend that you use AWS Parameter Store and only allow the tasks running Infisical to access them.
* **AWS Secrets Manager:** We strongly advise securing the master credentials for RDS by utilizing the latest AWS RDS integration with AWS Secrets Manager. This integration automatically stores the master database user's credentials in AWS Secrets Manager, thereby reducing the risk of misplacing the root RDS credential.
### High Availability (HA) and Scalability
* **Multi-AZ Deployment:** By spreading resources across multiple Availability Zones, we ensure that if one AZ experiences issues, traffic can be redirected to the remaining healthy AZ without service interruption.
* **Auto Scaling:** AWS Auto Scaling is in place to adjust capacity to maintain steady and predictable performance at the lowest possible cost.
* **Cross-Region Deployment:** For even greater high availability, you may deploy Infisical across multiple regions. This extends the HA capabilities of the architecture and protects against regional service disruptions.
### Frequently asked questions
Yes, Infisical can function in an air-gapped environment. To do so, update your ECS task to use the publicly available AWS Elastic Container Registry (ECR) image instead of the default Docker Hub image. Additionally, it's necessary to configure VPC endpoints, which allows your system to access AWS ECR via a private network route instead of the internet, ensuring all connectivity remains within the secure, private network.
# Linux (HA)
Source: https://infisical.com/docs/self-hosting/reference-architectures/linux-deployment-ha
Infisical High Availability Deployment architecture for Linux
This guide describes how to achieve a highly available deployment of Infisical on Linux machines without containerization. The architecture provided serves as a foundation for minimum high availability, which you can scale based on your specific requirements.
## Architecture Overview
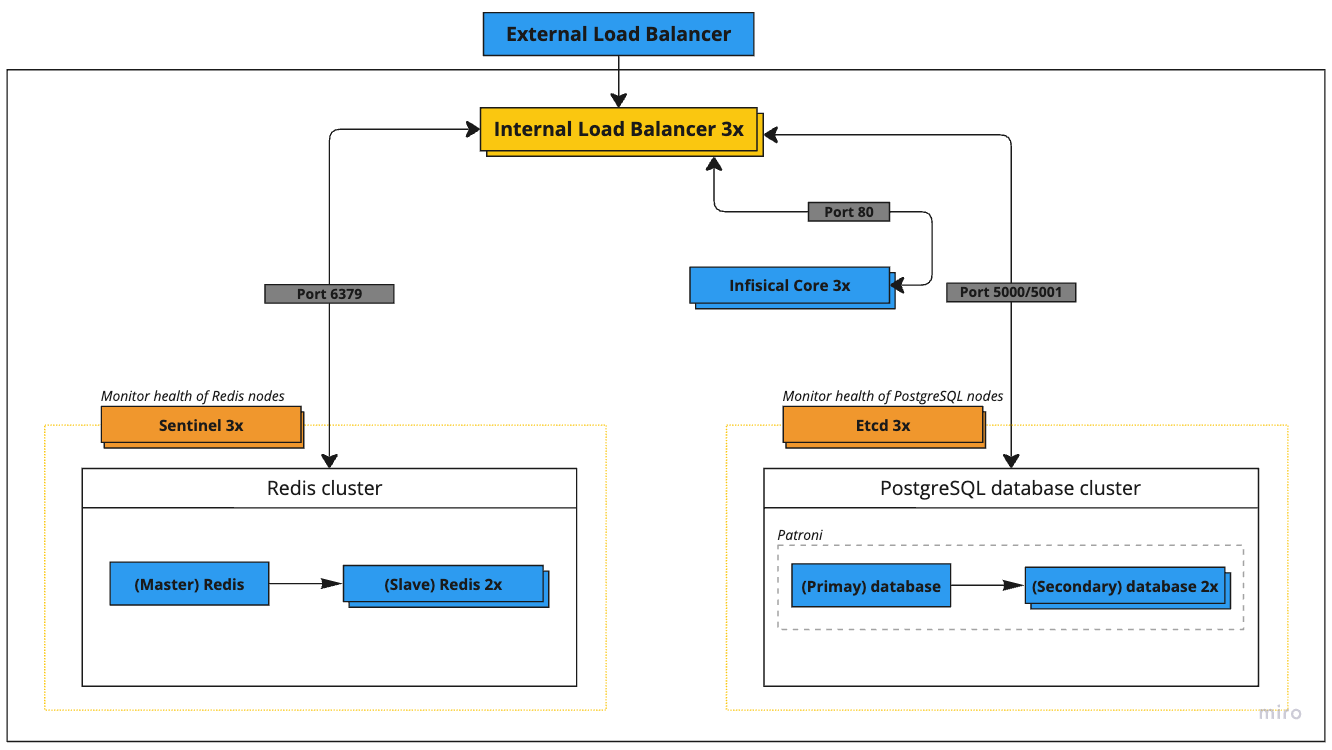
The deployment consists of the following key components:
| Service | Nodes | Recommended Specs | GCP Instance | AWS Instance |
| ---------------------- | ----- | ------------------- | ------------- | ------------ |
| External Load Balancer | 1 | 4 vCPU, 4 GB memory | n1-highcpu-4 | c5n.xlarge |
| Internal Load Balancer | 1 | 4 vCPU, 4 GB memory | n1-highcpu-4 | c5n.xlarge |
| Etcd Cluster | 3 | 4 vCPU, 4 GB memory | n1-highcpu-4 | c5n.xlarge |
| PostgreSQL Cluster | 3 | 2 vCPU, 8 GB memory | n1-standard-2 | m5.large |
| Redis + Sentinel | 3+3 | 2 vCPU, 8 GB memory | n1-standard-2 | m5.large |
| Infisical Core | 3 | 2 vCPU, 4 GB memory | n1-highcpu-2 | c5.large |
### Network Architecture
All servers operate within the 52.1.0.0/24 private network range with the following IP assignments:
| Service | IP Address |
| ---------------------- | ---------- |
| External Load Balancer | 52.1.0.1 |
| Internal Load Balancer | 52.1.0.2 |
| Etcd Node 1 | 52.1.0.3 |
| Etcd Node 2 | 52.1.0.4 |
| Etcd Node 3 | 52.1.0.5 |
| PostgreSQL Node 1 | 52.1.0.6 |
| PostgreSQL Node 2 | 52.1.0.7 |
| PostgreSQL Node 3 | 52.1.0.8 |
| Redis Node 1 | 52.1.0.9 |
| Redis Node 2 | 52.1.0.10 |
| Redis Node 3 | 52.1.0.11 |
| Sentinel Node 1 | 52.1.0.12 |
| Sentinel Node 2 | 52.1.0.13 |
| Sentinel Node 3 | 52.1.0.14 |
| Infisical Core 1 | 52.1.0.15 |
| Infisical Core 2 | 52.1.0.16 |
| Infisical Core 3 | 52.1.0.17 |
## Component Setup Guide
### 1. Configure Etcd Cluster
The Etcd cluster is needed for leader election in the PostgreSQL HA setup. Skip this step if using managed PostgreSQL.
1. Install Etcd on each node:
```bash
sudo apt update
sudo apt install etcd
```
2. Configure each node with unique identifiers and cluster membership. Example configuration for Node 1 (`/etc/etcd/etcd.conf`):
```yaml
name: etcd1
data-dir: /var/lib/etcd
initial-cluster-state: new
initial-cluster-token: etcd-cluster-1
initial-cluster: etcd1=http://52.1.0.3:2380,etcd2=http://52.1.0.4:2380,etcd3=http://52.1.0.5:2380
initial-advertise-peer-urls: http://52.1.0.3:2380
listen-peer-urls: http://52.1.0.3:2380
listen-client-urls: http://52.1.0.3:2379,http://127.0.0.1:2379
advertise-client-urls: http://52.1.0.3:2379
```
### 2. Configure PostgreSQL
For production deployments, you have two options for highly available PostgreSQL:
#### Option A: Managed PostgreSQL Service (Recommended for Most Users)
Use cloud provider managed services:
* AWS: Amazon RDS for PostgreSQL with Multi-AZ
* GCP: Cloud SQL for PostgreSQL with HA configuration
* Azure: Azure Database for PostgreSQL with zone redundant HA
These services handle replication, failover, and maintenance automatically.
#### Option B: Self-Managed PostgreSQL Cluster
Full HA installation guide of PostgreSQL is beyond the scope of this document. However, we have provided an overview of resources and code snippets below to guide your deployment.
1. Required Components:
* PostgreSQL 14+ on each node
* Patroni for cluster management
* Etcd for distributed consensus
2. Documentation we recommend you read:
* [Complete Patroni Setup Guide](https://patroni.readthedocs.io/en/latest/README.html)
* [PostgreSQL Replication Documentation](https://www.postgresql.org/docs/current/high-availability.html)
3. Key Steps Overview:
```bash
# 1. Install requirements on each PostgreSQL node
sudo apt update
sudo apt install -y postgresql-14 postgresql-contrib-14 python3-pip
pip3 install patroni[etcd] psycopg2-binary
# 2. Create Patroni config directory
sudo mkdir /etc/patroni
sudo chown postgres:postgres /etc/patroni
# 3. Create Patroni configuration (example for first node)
# /etc/patroni/config.yml - REQUIRES CAREFUL CUSTOMIZATION
```
```yaml
scope: infisical-cluster
namespace: /db/
name: postgresql1
restapi:
listen: 52.1.0.6:8008
connect_address: 52.1.0.6:8008
etcd:
hosts: 52.1.0.3:2379,52.1.0.4:2379,52.1.0.5:2379
bootstrap:
dcs:
ttl: 30
loop_wait: 10
retry_timeout: 10
maximum_lag_on_failover: 1048576
postgresql:
use_pg_rewind: true
parameters:
max_connections: 1000
shared_buffers: 2GB
work_mem: 8MB
max_worker_processes: 8
max_parallel_workers_per_gather: 4
max_parallel_workers: 8
wal_level: replica
hot_standby: "on"
max_wal_senders: 10
max_replication_slots: 10
hot_standby_feedback: "on"
```
4. Important considerations:
* Proper disk configuration for WAL and data directories
* Network latency between nodes
* Backup strategy and point-in-time recovery
* Monitoring and alerting setup
* Connection pooling configuration
* Security and network access controls
5. Recommended readings:
* [PostgreSQL Backup and Recovery](https://www.postgresql.org/docs/current/backup.html)
* [PostgreSQL Monitoring](https://www.postgresql.org/docs/current/monitoring.html)
### 3. Configure Redis and Sentinel
Similar to PostgreSQL, a full HA Redis setup guide is beyond the scope of this document. Below are the key resources and considerations for your deployment.
#### Option A: Managed Redis Service (Recommended for Most Users)
Use cloud provider managed Redis services:
* AWS: ElastiCache for Redis with Multi-AZ
* GCP: Memorystore for Redis with HA
* Azure: Azure Cache for Redis with zone redundancy
Follow your cloud provider's documentation:
* [AWS ElastiCache Documentation](https://docs.aws.amazon.com/AmazonElastiCache/latest/red-ug/WhatIs.html)
* [GCP Memorystore Documentation](https://cloud.google.com/memorystore/docs/redis)
* [Azure Redis Cache Documentation](https://learn.microsoft.com/en-us/azure/azure-cache-for-redis/)
#### Option B: Self-Managed Redis Cluster
Setting up a production Redis HA cluster requires understanding several components. Refer to these linked resources:
1. Required Reading:
* [Redis Sentinel Documentation](https://redis.io/docs/management/sentinel/)
* [Redis Replication Guide](https://redis.io/topics/replication)
* [Redis Security Guide](https://redis.io/topics/security)
2. Key Steps Overview:
```bash
# 1. Install Redis on all nodes
sudo apt update
sudo apt install redis-server
# 2. Configure master node (52.1.0.9)
# /etc/redis/redis.conf
```
```conf
bind 52.1.0.9
port 6379
dir /var/lib/redis
maxmemory 3gb
maxmemory-policy noeviction
requirepass "your_redis_password"
masterauth "your_redis_password"
```
3. Configure replica nodes (`52.1.0.10`, `52.1.0.11`):
```conf
bind 52.1.0.10 # Change for each replica
port 6379
dir /var/lib/redis
replicaof 52.1.0.9 6379
masterauth "your_redis_password"
requirepass "your_redis_password"
```
4. Configure Sentinel nodes (`52.1.0.12`, `52.1.0.13`, `52.1.0.14`):
```conf
port 26379
sentinel monitor mymaster 52.1.0.9 6379 2
sentinel auth-pass mymaster "your_redis_password"
sentinel down-after-milliseconds mymaster 5000
sentinel failover-timeout mymaster 60000
sentinel parallel-syncs mymaster 1
```
5. Recommended Additional Reading:
* [Redis High Availability Tools](https://redis.io/topics/high-availability)
* [Redis Sentinel Client Implementation](https://redis.io/topics/sentinel-clients)
### 4. Configure HAProxy Load Balancer
Install and configure HAProxy for internal load balancing:
```conf ha-proxy-config
global
maxconn 10000
log stdout format raw local0
defaults
log global
mode tcp
retries 3
timeout client 30m
timeout connect 10s
timeout server 30m
timeout check 5s
listen stats
mode http
bind *:7000
stats enable
stats uri /
resolvers hostdns
nameserver dns 127.0.0.11:53
resolve_retries 3
timeout resolve 1s
timeout retry 1s
hold valid 5s
frontend postgres_master
bind *:5000
default_backend postgres_master_backend
frontend postgres_replicas
bind *:5001
default_backend postgres_replica_backend
backend postgres_master_backend
option httpchk GET /master
http-check expect status 200
default-server inter 3s fall 3 rise 2 on-marked-down shutdown-sessions
server postgres-1 52.1.0.6:5432 check port 8008
server postgres-2 52.1.0.7:5432 check port 8008
server postgres-3 52.1.0.8:5432 check port 8008
backend postgres_replica_backend
option httpchk GET /replica
http-check expect status 200
default-server inter 3s fall 3 rise 2 on-marked-down shutdown-sessions
server postgres-1 52.1.0.6:5432 check port 8008
server postgres-2 52.1.0.7:5432 check port 8008
server postgres-3 52.1.0.8:5432 check port 8008
frontend redis_master_frontend
bind *:6379
default_backend redis_master_backend
backend redis_master_backend
option tcp-check
tcp-check send AUTH\ 123456\r\n
tcp-check expect string +OK
tcp-check send PING\r\n
tcp-check expect string +PONG
tcp-check send info\ replication\r\n
tcp-check expect string role:master
tcp-check send QUIT\r\n
tcp-check expect string +OK
server redis-1 52.1.0.9:6379 check inter 1s
server redis-2 52.1.0.10:6379 check inter 1s
server redis-3 52.1.0.11:6379 check inter 1s
frontend infisical_frontend
bind *:80
default_backend infisical_backend
backend infisical_backend
option httpchk GET /api/status
http-check expect status 200
server infisical-1 52.1.0.15:8080 check inter 1s
server infisical-2 52.1.0.16:8080 check inter 1s
server infisical-3 52.1.0.17:8080 check inter 1s
```
### 5. Deploy Infisical Core
First, add the Infisical repository:
```bash
curl -1sLf \
'https://dl.cloudsmith.io/public/infisical/infisical-core/setup.deb.sh' \
| sudo -E bash
```
Then install Infisical:
```bash
sudo apt-get update && sudo apt-get install -y infisical-core
```
For production environments, we strongly recommend installing a specific version of the package to maintain consistency across reinstalls. View available versions at [Infisical Package Versions](https://cloudsmith.io/~infisical/repos/infisical-core/packages/).
First, add the Infisical repository:
```bash
curl -1sLf \
'https://dl.cloudsmith.io/public/infisical/infisical-core/setup.rpm.sh' \
| sudo -E bash
```
Then install Infisical:
```bash
sudo yum install infisical-core
```
For production environments, we strongly recommend installing a specific version of the package to maintain consistency across reinstalls. View available versions at [Infisical Package Versions](https://cloudsmith.io/~infisical/repos/infisical-core/packages/).
Next, create configuration file `/etc/infisical/infisical.rb` with the following:
```ruby
infisical_core['ENCRYPTION_KEY'] = 'your-secure-encryption-key'
infisical_core['AUTH_SECRET'] = 'your-secure-auth-secret'
infisical_core['DB_CONNECTION_URI'] = 'postgres://user:pass@52.1.0.2:5000/infisical'
infisical_core['REDIS_URL'] = 'redis://52.1.0.2:6379'
infisical_core['PORT'] = 8080
```
To generate `ENCRYPTION_KEY` and `AUTH_SECRET` view the [following configurations documentation here](/self-hosting/configuration/envars).
If you are using managed services for either Postgres or Redis, please replace the values of the secrets accordingly.
Lastly, start and verify each node running infisical-core:
```bash
sudo infisical-ctl reconfigure
sudo infisical-ctl status
```
## Monitoring and Maintenance
1. Monitor HAProxy stats: `http://52.1.0.2:7000/haproxy?stats`
2. Monitor Infisical logs: `sudo infisical-ctl tail`
3. Check cluster health:
* Etcd: `etcdctl cluster-health`
* PostgreSQL: `patronictl list`
* Redis: `redis-cli info replication`
# Kubernetes (HA)
Source: https://infisical.com/docs/self-hosting/reference-architectures/on-prem-k8s-ha
Reference architecture for self-hosting Infisical on Kubernetes (HA)
Deploying Infisical on-premise with high availability requires expertise in networking, container orchestration, and database management.
This guide serves as a reference architecture and a starting point. Actual deployments may vary depending on your organization's existing infrastructure and capabilities.
## Architecture Overview
{/*  */}
```mermaid
flowchart TB
subgraph GLB["Global LB (HAProxy/NGINX)"]
end
subgraph OS["Object Storage"]
direction LR
store["S3/MinIO/Enterprise Storage"]
subgraph store_contents["Storage Contents"]
wal["PostgreSQL WAL"]
pgbackup["PostgreSQL Backups"]
redisbackup["Redis Backups"]
end
end
subgraph DC1["Active Data Center"]
direction TB
subgraph k8s1["Kubernetes Cluster"]
ing1["Ingress Controller"]
app1["Infisical Deployment"]
subgraph db1["CloudNativePG"]
pg1p["PostgreSQL Primary"]
pg1r["PostgreSQL Replicas"]
end
subgraph red1["Redis (Bitnami)"]
rp1["Redis Primary"]
end
end
end
subgraph DC2["Passive Data Center"]
direction TB
subgraph k8s2["Kubernetes Cluster"]
ing2["Ingress Controller"]
app2["Infisical Deployment"]
subgraph db2["CloudNativePG"]
pg2["PostgreSQL Replicas"]
end
subgraph red2["Redis (Bitnami)"]
r2["Redis Standby"]
end
end
end
%% Connections
GLB --> ing1
GLB -.-> ing2
%% Database connections
pg1p --> store
store --> pg2
%% Redis backup flow
rp1 --> store
store -.-> r2
%% Intra-DC connections
ing1 --> app1
app1 --> db1
app1 --> red1
ing2 --> app2
app2 --> db2
app2 --> red2
classDef primary fill:#f96,stroke:#333
classDef replica fill:#69f,stroke:#333
classDef storage fill:#9c6,stroke:#333
classDef lb fill:#c9f,stroke:#333
class pg1p,rp1 primary
class pg1r,pg2,r2 replica
class store,wal,pgbackup,redisbackup storage
class GLB,ing1,ing2 lb
```
The architecture above makes use of Kubernetes for orchestrating both stateless and stateful components.
The architecture spans multiple data centers for increased redundancy, availability and disaster recovery capabilities using an active-passive configuration.
### Stateful vs stateless workloads
While managing databases within Kubernetes has typically been complex, modern operators like [CloudNativePG](https://cloudnative-pg.io/) simplify this process by handling storage provisioning, persistent volume management, and backup/recovery processes.
However, if you lack deep expertise in Kubernetes operators or database management, we recommend a hybrid approach where the database is on a managed service for production deployments.
Managing stateful components like databases can be challenging without deep expertise or a dedicated in-house database management team.
To simplify operations and reduce complexity, we recommend offloading databases to managed services from AWS/GCP.
These managed services automatically handle provisioning, scaling, failover, backups and rollbacks.
## Core Components
### Kubernetes Cluster
Infisical is deployed on a Kubernetes cluster, which allows for container management, auto-scaling, and self-healing capabilities.
A load balancer sits in front of the Kubernetes cluster, directing traffic and making sure there is an even load distribution across the application nodes.
This is the entry point where all other services will interact with Infisical.
### Object Storage
The architecture requires S3-compatible object storage for database backups and cross-datacenter replication. This can be provided by:
* Existing enterprise object storage solution
* Dedicated MinIO deployment
* In-cluster MinIO deployment if neither option above is available
The object storage must be accessible from all Kubernetes clusters and provides:
* Storage for PostgreSQL WAL archiving and backups
* Storage for Redis backups
### CloudNativePG for High Availability PostgreSQL
The database layer is powered by PostgreSQL, managed by CloudNativePG operator for high availability:
* **Redundancy:** CloudNativePG manages a primary-replica setup where the primary handles write operations and replicas handle read operations
* **Failover:** The operator automatically handles failover within a cluster by promoting a replica to primary when needed
* **Backup and Recovery:** Built-in support for backup to S3-compatible storage with point-in-time recovery capabilities
### Redis High Availability
Redis is deployed using the [Bitnami Helm chart](https://github.com/bitnami/charts/tree/main/bitnami/redis) in a simple primary configuration:
* Single Redis instance per cluster without streaming replication
* Regular backups to object storage
* Restore from backup during failover
Infisical does not support Redis cluster mode, and since this is an active-passive setup, we use a simple Redis deployment with backup/restore for failover.
#### PostgreSQL Backup and Restore
PostgreSQL is the single source of truth for nearly all application data on Infisical.
CloudNativePG provides well defined backup and restore capabilities:
* **Continuous Backup:** The operator continuously archives WAL files to object storage
* **Point-in-Time Recovery:** Supports restoring to any point in time using WAL archiving
* **Regular Testing:** Periodically test backup restoration to exercise the full lifecycle of this process
#### Redis Backup and Restore
Each Redis instance is backed up through a Kubernetes CronJob that:
1. Executes the Redis `SAVE` command
2. Copies the resulting `dump.rdb` to object storage
3. Manages backup retention
```yaml
apiVersion: batch/v1
kind: CronJob
metadata:
name: redis-backup
spec:
schedule: "0 * * * *" # Every hour
jobTemplate:
spec:
template:
spec:
containers:
- name: redis-backup
image: bitnami/redis
command:
- /bin/sh
- -c
- |
redis-cli -a $REDIS_PASSWORD save
mc cp /data/dump.rdb object-store/redis-backups/
volumes:
- name: redis-data
persistentVolumeClaim:
claimName: redis-data
```
During failover, the latest Redis backup is restored from object storage to the passive data center. This process is manual and requires operator intervention.
## Multi Data Center Deployment
Infisical can be deployed across multiple data centers in an active-passive configuration for disaster recovery. In this setup, one data center serves as the active site while others remain as passive standbys.
### Active Data Center
The active data center contains:
* The primary PostgreSQL cluster managed by CloudNativePG handling all write operations
* The active Redis instance handling all traffic
* The active Infisical deployment serving all user traffic
### Passive Data Centers
Passive data centers act as disaster recovery sites. Each contains:
* A replica PostgreSQL cluster that replicates from the active site's primary cluster
* A standby Redis instance (not receiving traffic)
* A standby Infisical deployment (not receiving traffic)
### Traffic Management and Failover
Traffic routing between data centers requires:
1. A global load balancer for traffic management. For on-premises deployments, this can be implemented using:
* HAProxy or NGINX configured as a global load balancer
* Any enterprise network routing solutions you may already have in place
2. Each data center should have its own ingress or load balancer
The global load balancer should be deployed in a highly available configuration across multiple locations to avoid it becoming a single point of failure.
During normal operation:
* The global load balancer routes all traffic to the active data center
* Replica PostgreSQL clusters continuously replicate from the primary cluster
* Redis backups are regularly created and stored in object storage
During failover:
* A human operator must initiate the failover process
* The operator promotes a replica PostgreSQL cluster in the target passive data center to become primary using CloudNativePG's promotion process
* The latest Redis backup is restored from object storage to the passive data center's Redis instance
* Once database failover is complete, the global load balancer is updated to direct traffic to the new active data center
This is an active-passive setup where failover must be initiated manually by an operator. Automatic failover between data centers is not recommended as it can lead to split-brain scenarios. The operator should verify the state of both data centers before initiating failover.
## Data Replication Across Data Centers
### PostgreSQL Replication
CloudNativePG manages replication across data centers:
* **Replica Clusters:** Each data center runs a replica cluster that replicates from the primary cluster
* **WAL Shipping:** Changes are replicated via WAL shipping to object storage
* **Failover:** The operator can promote a replica cluster to primary during planned switchovers or failures
### Object Storage Configuration
If using MinIO for object storage, ensure:
* High availability deployment if running dedicated MinIO cluster
* Proper access controls and encryption for data at rest
* Regular monitoring of storage capacity and performance
* Backup of object storage data itself if running your own MinIO deployment
 ### Rust knowledge
Contributing to the SDK requires intermediate to advanced knowledge of Rust concepts such as lifetimes, traits, generics, and async/await *(futures)*, and more.
### Rust setup
The base SDK is written in rust. Therefore you must have rustc and cargo installed. You can install rustc and cargo by following the instructions [here](https://www.rust-lang.org/tools/install).
You shouldn't have to use the rust cross compilation toolchain, as all compilation is done through a collection of Github Actions. However. If you need to test cross compilation, please do so with Github Actions.
### Tests
If you add new functionality or modify existing functionality, please write tests thats properly cover the new functionality. You can run tests locally by running `cargo test` from the root directory.
### Language-specific crates
The language-specific crates should ideally never have to be modified, as they are simply a wrapper for the `infisical-json` crate, which executes "commands" from the base SDK. If you need to create a new target-language specific crate, please try to create native bindings for the target language. Some languages don't have direct support for native bindings (Java as an example). In those cases we can use the C bindings (`crates/infisical-c`) in the target language.
## Generate types
Having almost seemless type safety from the base SDK to the target language is critical, as writing types for each language has a lot of drawbacks such as duplicated code, and lots of overhead trying to keep the types up-to-date and in sync across a large collection of languages. Therefore we decided to use [QuickType](https://quicktype.io/) and [Serde](https://serde.rs/) to help us generate types for each language. In our Rust base SDK (`crates/infisical`), we define all the inputs/outputs.
If you are interested in reading about QuickType works under the hood, you can [read more here](http://blog.quicktype.io/under-the-hood/).
This is an example of a type defined in Rust (both input and output). For this to become a generated type, you'll need to add it to our schema generator. More on that further down.
```rust
use schemars::JsonSchema;
use serde::{Deserialize, Serialize};
#[derive(Serialize, Deserialize, Debug, JsonSchema)]
#[serde(rename_all = "camelCase")]
// Input:
pub struct CreateSecretOptions {
pub environment: String, // environment
pub secret_comment: Option
### Rust knowledge
Contributing to the SDK requires intermediate to advanced knowledge of Rust concepts such as lifetimes, traits, generics, and async/await *(futures)*, and more.
### Rust setup
The base SDK is written in rust. Therefore you must have rustc and cargo installed. You can install rustc and cargo by following the instructions [here](https://www.rust-lang.org/tools/install).
You shouldn't have to use the rust cross compilation toolchain, as all compilation is done through a collection of Github Actions. However. If you need to test cross compilation, please do so with Github Actions.
### Tests
If you add new functionality or modify existing functionality, please write tests thats properly cover the new functionality. You can run tests locally by running `cargo test` from the root directory.
### Language-specific crates
The language-specific crates should ideally never have to be modified, as they are simply a wrapper for the `infisical-json` crate, which executes "commands" from the base SDK. If you need to create a new target-language specific crate, please try to create native bindings for the target language. Some languages don't have direct support for native bindings (Java as an example). In those cases we can use the C bindings (`crates/infisical-c`) in the target language.
## Generate types
Having almost seemless type safety from the base SDK to the target language is critical, as writing types for each language has a lot of drawbacks such as duplicated code, and lots of overhead trying to keep the types up-to-date and in sync across a large collection of languages. Therefore we decided to use [QuickType](https://quicktype.io/) and [Serde](https://serde.rs/) to help us generate types for each language. In our Rust base SDK (`crates/infisical`), we define all the inputs/outputs.
If you are interested in reading about QuickType works under the hood, you can [read more here](http://blog.quicktype.io/under-the-hood/).
This is an example of a type defined in Rust (both input and output). For this to become a generated type, you'll need to add it to our schema generator. More on that further down.
```rust
use schemars::JsonSchema;
use serde::{Deserialize, Serialize};
#[derive(Serialize, Deserialize, Debug, JsonSchema)]
#[serde(rename_all = "camelCase")]
// Input:
pub struct CreateSecretOptions {
pub environment: String, // environment
pub secret_comment: Option


 ABAC policies make use of identity metadata to define dynamic permissions. Each attribute must start and end with double curly-brackets `{{
  **Step 2:** Click the plus icon
 **Step 3:** Select Shell Script
 **Step 4:** Choose Script Text and then paste in the command below.
 ```
infisical run -- ./mvnw spring-boot:run -Dspring-boot.run.jvmArguments="-Xdebug -Xrunjdwp:transport=dt_socket,server=y,suspend=n,address=*:5005"
```
**Step 5:** When you need to run a block of code in debug mode, select the Infisical script
```
infisical run -- ./mvnw spring-boot:run -Dspring-boot.run.jvmArguments="-Xdebug -Xrunjdwp:transport=dt_socket,server=y,suspend=n,address=*:5005"
```
**Step 5:** When you need to run a block of code in debug mode, select the Infisical script
 # SvelteKit
Source: https://infisical.com/docs/integrations/frameworks/sveltekit
How to use Infisical to inject environment variables and secrets into a SvelteKit app.
Prerequisites:
* Set up and add envars to [Infisical Cloud](https://app.infisical.com)
* [Install the CLI](/cli/overview)
## Initialize Infisical for your [SvelteKit](https://kit.svelte.dev) app
```bash
# navigate to the root of your of your project
cd /path/to/project
# then initialize infisical
infisical init
```
## Start your application as usual but with Infisical
```bash
infisical run --
# SvelteKit
Source: https://infisical.com/docs/integrations/frameworks/sveltekit
How to use Infisical to inject environment variables and secrets into a SvelteKit app.
Prerequisites:
* Set up and add envars to [Infisical Cloud](https://app.infisical.com)
* [Install the CLI](/cli/overview)
## Initialize Infisical for your [SvelteKit](https://kit.svelte.dev) app
```bash
# navigate to the root of your of your project
cd /path/to/project
# then initialize infisical
infisical init
```
## Start your application as usual but with Infisical
```bash
infisical run --