> ## Documentation Index
> Fetch the complete documentation index at: https://infisical.com/docs/llms.txt
> Use this file to discover all available pages before exploring further.
# Using the InfisicalSecret CRD
> Learn how to use the InfisicalSecret CRD to fetch secrets from Infisical and store them as native Kubernetes secret resource
The `InfisicalSecret` CRD is deprecated and will be removed in a future release.
For new installations, use [InfisicalStaticSecret](/integrations/platforms/kubernetes/infisical-static-secret-crd) (v1beta1) instead.
See the [migration guide](/integrations/platforms/kubernetes/overview#migrating-from-v1alpha1-to-v1beta1) for further details.
Once you have installed the operator to your cluster, you'll need to create a `InfisicalSecret` custom resource definition (CRD).
In this CRD, you'll define the authentication method to use, the secrets to fetch, and the target location to store the secrets within your cluster.
```yaml example-infisical-secret-crd.yaml theme={"dark"}
apiVersion: secrets.infisical.com/v1alpha1
kind: InfisicalSecret
metadata:
name: infisicalsecret-sample
labels:
label-to-be-passed-to-managed-secret: sample-value
annotations:
example.com/annotation-to-be-passed-to-managed-secret: "sample-value"
spec:
hostAPI: https://app.infisical.com/api
syncConfig:
resyncInterval: 10s
instantUpdates: false
authentication:
kubernetesAuth:
identityId:
serviceAccountRef:
name:
namespace:
secretsScope:
projectSlug:
envSlug: # "dev", "staging", "prod", etc..
secretsPath: "" # Root is "/"
recursive: true # Whether or not to use recursive mode (fetches all secrets in an environment from a given secret path, and all folders inside the path) / defaults to false
managedKubeSecretReferences:
- secretName: managed-secret
secretNamespace: default
creationPolicy: "Orphan"
template:
includeAllSecrets: true
data:
NEW_KEY_NAME: "{{ .KEY.SecretPath }} {{ .KEY.Value }}"
KEY_WITH_BINARY_VALUE: "{{ .KEY.SecretPath }} {{ .KEY.Value }}"
```
## CRD properties
### Generic
The following properties help define what instance of Infisical the operator will interact with, the interval it will sync secrets and any CA certificates that may be required to connect.
If you are fetching secrets from a self-hosted instance of Infisical set the value of `hostAPI` to
` https://your-self-hosted-instace.com/api`
When `hostAPI` is not defined the operator fetches secrets from Infisical Cloud.
If you have installed your Infisical instance within the same cluster as the Infisical operator, you can optionally access the Infisical backend's service directly without having to route through the public internet.
To achieve this, use the following address for the hostAPI field:
```bash theme={"dark"}
http://..svc.cluster.local:4000/api
```
Make sure to replace `` and `` with the appropriate values for your backend service and namespace.
This block defines the synchronization configuration for the operator to fetch secrets from Infisical.
The `resyncInterval` is a string-formatted duration that defines the time between each resync. The field is optional, and will default to 60 seconds if not defined.
The format of the field is `[duration][unit]` where `duration` is a number and `unit` is a string representing the unit of time.
The following units are supported:
* `s` for seconds *(must be at least 5 seconds)*
* `m` for minutes
* `h` for hours
* `d` for days
* `w` for weeks
The default value is `1m` *(1 minute)* when `instantUpdates` is set to `false`, and `1h` *(1 hour)* when `instantUpdates` is set to `true`.
Valid expressions for the `resyncInterval` field:
```yaml theme={"dark"}
resyncInterval: 60s # 60 seconds
resyncInterval: 5m # 5 minutes
resyncInterval: 2h # 2 hours
resyncInterval: 3d # 3 days
resyncInterval: 4w # 4 weeks
```
This property enables instant updates from Infisical. When set to true,
changes made to secrets in Infisical will be immediately pushed to the
operator, triggering a configuration update. This reduces the need for
periodic re-syncs.
Instant updates leverages [Event Subscriptions](/documentation/platform/event-subscriptions) to receive real-time updates when secret changes occur within Infisical.
**Instant Updates is a paid feature**
Instant Updates is available under the Enterprise Tier.
Please contact [sales@infisical.com](mailto:sales@infisical.com) for more information.
This block defines the TLS settings to use for connecting to the Infisical
instance.
This block defines the reference to the CA certificate to use for connecting
to the Infisical instance with SSL/TLS.
The name of the Kubernetes secret containing the CA certificate to use for
connecting to the Infisical instance with SSL/TLS.
The namespace of the Kubernetes secret containing the CA certificate to use
for connecting to the Infisical instance with SSL/TLS.
The name of the key in the Kubernetes secret which contains the value of the
CA certificate to use for connecting to the Infisical instance with SSL/TLS.
### Authentication Methods
To retrieve the requested secrets, the operator must first authenticate with Infisical.
The list of available authentication methods are shown below.
This block defines the authentication credentials and secrets scope to be used when fetching secrets from Infisical.
The universal machine identity authentication method is used to authenticate with Infisical. The client ID and client secret needs to be stored in a Kubernetes secret. This block defines the reference to the name and namespace of secret that stores these credentials.
You need to create a machine identity, and give it access to the project(s) you want to interact with. You can [read more about machine identities here](/documentation/platform/identities/universal-auth).
Once you have created your machine identity and added it to your project(s), you will need to create a Kubernetes secret containing the identity credentials.
To quickly create a Kubernetes secret containing the identity credentials, you can run the command below.
Make sure you replace `` with the identity client ID and `` with the identity client secret.
```bash theme={"dark"}
kubectl create secret generic universal-auth-credentials --from-literal=clientId="" --from-literal=clientSecret=""
```
Once the secret is created, add the `secretName` and `secretNamespace` of the secret that was just created under `authentication.universalAuth.credentialsRef` field in the InfisicalSecret resource.
Make sure to also populate the `secretsScope` field with the project slug
*`projectSlug`*, environment slug *`envSlug`*, and secrets path
*`secretsPath`* that you want to fetch secrets from. Please see the example
below.
## Example
```yaml theme={"dark"}
apiVersion: secrets.infisical.com/v1alpha1
kind: InfisicalSecret
metadata:
name: infisicalsecret-sample-crd
spec:
authentication:
universalAuth:
secretsScope:
# either projectSlug or projectId is required
projectSlug: # <-- project slug
projectId: # <-- project id
secretName: # OPTIONAL: If you want to fetch a single Infisical secret, you can specify the secret name here. If not specified, all secrets in the specified scope will be fetched.
envSlug: # "dev", "staging", "prod", etc..
secretsPath: "" # Root is "/"
credentialsRef:
secretName: universal-auth-credentials # <-- name of the Kubernetes secret that stores our machine identity credentials
secretNamespace: default # <-- namespace of the Kubernetes secret that stores our machine identity credentials
...
```
The Kubernetes machine identity authentication method is used to authenticate with Infisical. The identity ID is stored in a field in the InfisicalSecret resource. This authentication method can only be used within a Kubernetes environment.
To create an identity, head to your Organization Settings > Access Control > Identities and press **Create identity**.
 When creating an identity, you specify an organization level [role](/documentation/platform/access-controls/role-based-access-controls) for it to assume; you can configure roles in Organization Settings > Access Control > Organization Roles.
 Now input a few details for your new identity. Here's some guidance for each field:
* Name (required): A friendly name for the identity.
* Role (required): A role from the **Organization Roles** tab for the identity to assume. The organization role assigned will determine what organization level resources this identity can have access to.
Once you've created an identity, you'll be prompted to configure the authentication method for it. Here, select **Kubernetes Auth**.
To learn more about each field of the Kubernetes native authentication method, see step 2 of [guide](/documentation/platform/identities/kubernetes-auth#guide).
Now input a few details for your new identity. Here's some guidance for each field:
* Name (required): A friendly name for the identity.
* Role (required): A role from the **Organization Roles** tab for the identity to assume. The organization role assigned will determine what organization level resources this identity can have access to.
Once you've created an identity, you'll be prompted to configure the authentication method for it. Here, select **Kubernetes Auth**.
To learn more about each field of the Kubernetes native authentication method, see step 2 of [guide](/documentation/platform/identities/kubernetes-auth#guide).
 To allow the operator to use the given identity to access secrets, you will need to add the identity to project(s) that you would like to grant it access to.
To do this, head over to the project you want to add the identity to and go to Project Settings > Access Control > Machine Identities and press **Add identity**.
Next, select the identity you want to add to the project and the project level role you want to allow it to assume. The project role assigned will determine what project level resources this identity can have access to.
To allow the operator to use the given identity to access secrets, you will need to add the identity to project(s) that you would like to grant it access to.
To do this, head over to the project you want to add the identity to and go to Project Settings > Access Control > Machine Identities and press **Add identity**.
Next, select the identity you want to add to the project and the project level role you want to allow it to assume. The project role assigned will determine what project level resources this identity can have access to.

 Create a reviewer service account in your Kubernetes cluster. Infisical uses this account to authenticate with the Kubernetes API Server through the TokenReview API.
```yaml infisical-service-account.yaml theme={"dark"}
apiVersion: v1
kind: ServiceAccount
metadata:
name: infisical-service-account
namespace: default
```
```bash theme={"dark"}
kubectl apply -f infisical-service-account.yaml
```
Bind the service account to the `system:auth-delegator` cluster role. This allows Infisical to perform delegated authentication checks against the TokenReview API.
```yaml infisical-cluster-role-binding.yaml theme={"dark"}
apiVersion: rbac.authorization.k8s.io/v1
kind: ClusterRoleBinding
metadata:
name: infisical-service-account-role-binding
namespace: default
roleRef:
apiGroup: rbac.authorization.k8s.io
kind: ClusterRole
name: system:auth-delegator
subjects:
- kind: ServiceAccount
name: infisical-service-account
namespace: default
```
```bash theme={"dark"}
kubectl apply -f infisical-cluster-role-binding.yaml
```
Manual long-lived service account tokens are created as Kubernetes secrets and remain valid until deleted or rotated. In most cases, use short-lived service account tokens instead because they are easier to operate and reduce the lifetime of exposed credentials.
Create a reviewer service account in your Kubernetes cluster. Infisical uses this account to authenticate with the Kubernetes API Server through the TokenReview API.
```yaml infisical-reviewer-service-account.yaml theme={"dark"}
apiVersion: v1
kind: ServiceAccount
metadata:
name: infisical-token-reviewer
namespace: default
```
```bash theme={"dark"}
kubectl apply -f infisical-reviewer-service-account.yaml
```
Bind the reviewer service account to the `system:auth-delegator` cluster role. This allows Infisical to perform delegated authentication checks against the TokenReview API.
```yaml infisical-reviewer-cluster-role-binding.yaml theme={"dark"}
apiVersion: rbac.authorization.k8s.io/v1
kind: ClusterRoleBinding
metadata:
name: infisical-token-reviewer-role-binding
namespace: default
roleRef:
apiGroup: rbac.authorization.k8s.io
kind: ClusterRole
name: system:auth-delegator
subjects:
- kind: ServiceAccount
name: infisical-token-reviewer
namespace: default
```
```bash theme={"dark"}
kubectl apply -f infisical-reviewer-cluster-role-binding.yaml
```
Create a service account token secret for the reviewer service account:
```yaml service-account-reviewer-token.yaml theme={"dark"}
apiVersion: v1
kind: Secret
type: kubernetes.io/service-account-token
metadata:
name: infisical-token-reviewer-token
annotations:
kubernetes.io/service-account.name: "infisical-token-reviewer"
```
```bash theme={"dark"}
kubectl apply -f service-account-reviewer-token.yaml
```
Link the secret to the reviewer service account:
```bash theme={"dark"}
kubectl patch serviceaccount infisical-token-reviewer \
-p '{'{'}"secrets": [{'{'}"name": "infisical-token-reviewer-token"{'}'}]{'}'}' \
-n default
```
Retrieve the token reviewer JWT:
```bash theme={"dark"}
kubectl get secret infisical-token-reviewer-token \
-n default \
-o=jsonpath='{'{'}.data.token{'}'}' | base64 --decode
```
Keep this JWT token handy. You will need it for the **Token Reviewer JWT** field when configuring Kubernetes Auth on the machine identity in Infisical.
To create an identity, head to your Organization Settings {'>'} Access Control {'>'} Identities and press **Create identity**.
When creating an identity, you specify an organization level [role](/documentation/platform/access-controls/role-based-access-controls) for it to assume; you can configure roles in Organization Settings {'>'} Access Control {'>'} Organization Roles.
Now input a few details for your new identity. Here's some guidance for each field:
* Name (required): A friendly name for the identity.
* Role (required): A role from the **Organization Roles** tab for the identity to assume. The organization role assigned will determine what organization level resources this identity can have access to.
Once you've created an identity, you'll be prompted to configure the authentication method for it. Here, select **Kubernetes Auth**.
Use the token reviewer JWT from the previous step when filling the **Token Reviewer JWT** field.
To learn more about each field of the Kubernetes native authentication method, see step 2 of [guide](/documentation/platform/identities/kubernetes-auth#guide).
To allow the operator to use the given identity to access secrets, you will need to add the identity to project(s) that you would like to grant it access to.
To do this, head over to the project you want to add the identity to and go to Project Settings {'>'} Access Control {'>'} Machine Identities and press **Add identity**.
Next, select the identity you want to add to the project and the project level role you want to allow it to assume. The project role assigned will determine what project level resources this identity can have access to.
Create the Kubernetes service account that the operator will use to authenticate with Infisical.
```yaml infisical-service-account.yaml theme={"dark"}
apiVersion: v1
kind: ServiceAccount
metadata:
name: infisical-service-account
namespace: default
```
```bash theme={"dark"}
kubectl apply -f infisical-service-account.yaml
```
Create a service account token secret for the service account used to authenticate with Infisical:
```yaml infisical-service-account-token.yaml theme={"dark"}
apiVersion: v1
kind: Secret
type: kubernetes.io/service-account-token
metadata:
name: infisical-service-account-token
namespace: default
annotations:
kubernetes.io/service-account.name: "infisical-service-account"
```
```bash theme={"dark"}
kubectl apply -f infisical-service-account-token.yaml
```
Patch the service account with the newly created service account token:
```bash theme={"dark"}
kubectl patch serviceaccount infisical-service-account \
-p '{'{'}"secrets": [{'{'}"name": "infisical-service-account-token"{'}'}]{'}'}' \
-n default
```
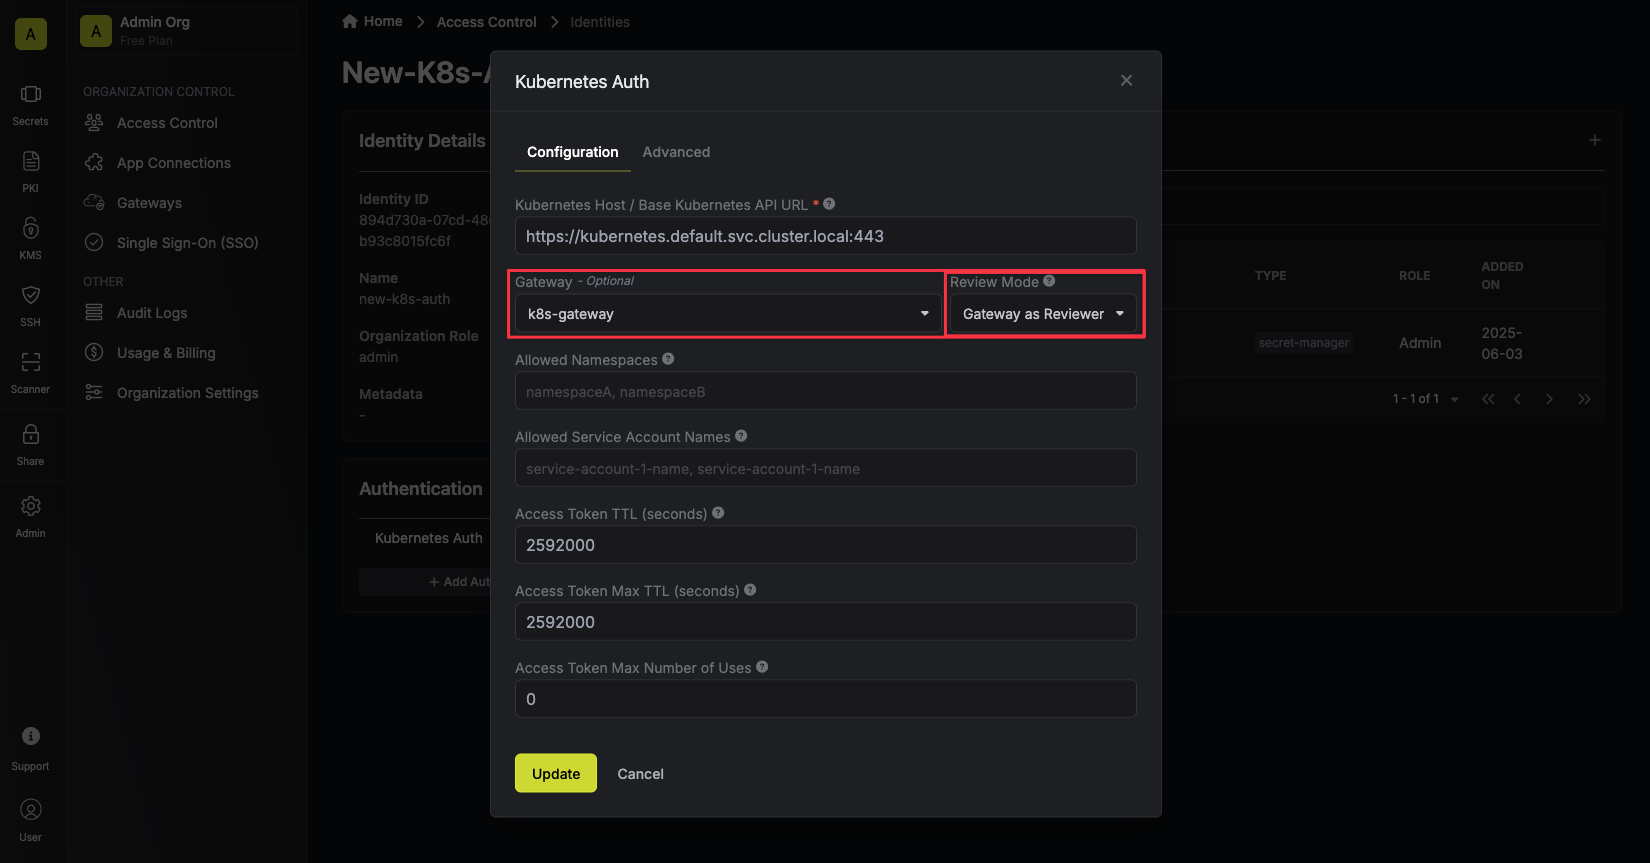
**When to use this option**: Choose this approach when you have a gateway deployed in your Kubernetes Cluster and wish to eliminate long-lived tokens. This approach simplifies Infisical Kubernetes Auth configuration, and only one service account will need to have the elevated `system:auth-delegator` ClusterRole binding.
**Note:** Gateway is a paid feature. - **Infisical Cloud users:** Gateway is
available under the **Enterprise Tier**. - **Self-Hosted Infisical:** Please
contact [sales@infisical.com](mailto:sales@infisical.com) to purchase an
enterprise license.
To deploy a gateway in your Kubernetes cluster, follow our [Gateway deployment guide using Helm](/documentation/platform/gateways/gateway-deployment).
To configure your Kubernetes Auth method to use the gateway as the token reviewer, set the `Review Method` to "Gateway as Reviewer", and select the gateway you want to use as the token reviewer.
You can select either an individual gateway or a **Gateway Pool** for automatic failover. When a pool is selected, the platform routes through a healthy gateway at request time. See [Gateway Pools](/documentation/platform/gateways/gateway-pools) for more details.
Create a reviewer service account in your Kubernetes cluster. Infisical uses this account to authenticate with the Kubernetes API Server through the TokenReview API.
```yaml infisical-service-account.yaml theme={"dark"}
apiVersion: v1
kind: ServiceAccount
metadata:
name: infisical-service-account
namespace: default
```
```bash theme={"dark"}
kubectl apply -f infisical-service-account.yaml
```
Bind the service account to the `system:auth-delegator` cluster role. This allows Infisical to perform delegated authentication checks against the TokenReview API.
```yaml infisical-cluster-role-binding.yaml theme={"dark"}
apiVersion: rbac.authorization.k8s.io/v1
kind: ClusterRoleBinding
metadata:
name: infisical-service-account-role-binding
namespace: default
roleRef:
apiGroup: rbac.authorization.k8s.io
kind: ClusterRole
name: system:auth-delegator
subjects:
- kind: ServiceAccount
name: infisical-service-account
namespace: default
```
```bash theme={"dark"}
kubectl apply -f infisical-cluster-role-binding.yaml
```
Manual long-lived service account tokens are created as Kubernetes secrets and remain valid until deleted or rotated. In most cases, use short-lived service account tokens instead because they are easier to operate and reduce the lifetime of exposed credentials.
Create a reviewer service account in your Kubernetes cluster. Infisical uses this account to authenticate with the Kubernetes API Server through the TokenReview API.
```yaml infisical-reviewer-service-account.yaml theme={"dark"}
apiVersion: v1
kind: ServiceAccount
metadata:
name: infisical-token-reviewer
namespace: default
```
```bash theme={"dark"}
kubectl apply -f infisical-reviewer-service-account.yaml
```
Bind the reviewer service account to the `system:auth-delegator` cluster role. This allows Infisical to perform delegated authentication checks against the TokenReview API.
```yaml infisical-reviewer-cluster-role-binding.yaml theme={"dark"}
apiVersion: rbac.authorization.k8s.io/v1
kind: ClusterRoleBinding
metadata:
name: infisical-token-reviewer-role-binding
namespace: default
roleRef:
apiGroup: rbac.authorization.k8s.io
kind: ClusterRole
name: system:auth-delegator
subjects:
- kind: ServiceAccount
name: infisical-token-reviewer
namespace: default
```
```bash theme={"dark"}
kubectl apply -f infisical-reviewer-cluster-role-binding.yaml
```
Create a service account token secret for the reviewer service account:
```yaml service-account-reviewer-token.yaml theme={"dark"}
apiVersion: v1
kind: Secret
type: kubernetes.io/service-account-token
metadata:
name: infisical-token-reviewer-token
annotations:
kubernetes.io/service-account.name: "infisical-token-reviewer"
```
```bash theme={"dark"}
kubectl apply -f service-account-reviewer-token.yaml
```
Link the secret to the reviewer service account:
```bash theme={"dark"}
kubectl patch serviceaccount infisical-token-reviewer \
-p '{'{'}"secrets": [{'{'}"name": "infisical-token-reviewer-token"{'}'}]{'}'}' \
-n default
```
Retrieve the token reviewer JWT:
```bash theme={"dark"}
kubectl get secret infisical-token-reviewer-token \
-n default \
-o=jsonpath='{'{'}.data.token{'}'}' | base64 --decode
```
Keep this JWT token handy. You will need it for the **Token Reviewer JWT** field when configuring Kubernetes Auth on the machine identity in Infisical.
To create an identity, head to your Organization Settings {'>'} Access Control {'>'} Identities and press **Create identity**.
When creating an identity, you specify an organization level [role](/documentation/platform/access-controls/role-based-access-controls) for it to assume; you can configure roles in Organization Settings {'>'} Access Control {'>'} Organization Roles.
Now input a few details for your new identity. Here's some guidance for each field:
* Name (required): A friendly name for the identity.
* Role (required): A role from the **Organization Roles** tab for the identity to assume. The organization role assigned will determine what organization level resources this identity can have access to.
Once you've created an identity, you'll be prompted to configure the authentication method for it. Here, select **Kubernetes Auth**.
Use the token reviewer JWT from the previous step when filling the **Token Reviewer JWT** field.
To learn more about each field of the Kubernetes native authentication method, see step 2 of [guide](/documentation/platform/identities/kubernetes-auth#guide).
To allow the operator to use the given identity to access secrets, you will need to add the identity to project(s) that you would like to grant it access to.
To do this, head over to the project you want to add the identity to and go to Project Settings {'>'} Access Control {'>'} Machine Identities and press **Add identity**.
Next, select the identity you want to add to the project and the project level role you want to allow it to assume. The project role assigned will determine what project level resources this identity can have access to.
Create the Kubernetes service account that the operator will use to authenticate with Infisical.
```yaml infisical-service-account.yaml theme={"dark"}
apiVersion: v1
kind: ServiceAccount
metadata:
name: infisical-service-account
namespace: default
```
```bash theme={"dark"}
kubectl apply -f infisical-service-account.yaml
```
Create a service account token secret for the service account used to authenticate with Infisical:
```yaml infisical-service-account-token.yaml theme={"dark"}
apiVersion: v1
kind: Secret
type: kubernetes.io/service-account-token
metadata:
name: infisical-service-account-token
namespace: default
annotations:
kubernetes.io/service-account.name: "infisical-service-account"
```
```bash theme={"dark"}
kubectl apply -f infisical-service-account-token.yaml
```
Patch the service account with the newly created service account token:
```bash theme={"dark"}
kubectl patch serviceaccount infisical-service-account \
-p '{'{'}"secrets": [{'{'}"name": "infisical-service-account-token"{'}'}]{'}'}' \
-n default
```
**When to use this option**: Choose this approach when you have a gateway deployed in your Kubernetes Cluster and wish to eliminate long-lived tokens. This approach simplifies Infisical Kubernetes Auth configuration, and only one service account will need to have the elevated `system:auth-delegator` ClusterRole binding.
**Note:** Gateway is a paid feature. - **Infisical Cloud users:** Gateway is
available under the **Enterprise Tier**. - **Self-Hosted Infisical:** Please
contact [sales@infisical.com](mailto:sales@infisical.com) to purchase an
enterprise license.
To deploy a gateway in your Kubernetes cluster, follow our [Gateway deployment guide using Helm](/documentation/platform/gateways/gateway-deployment).
To configure your Kubernetes Auth method to use the gateway as the token reviewer, set the `Review Method` to "Gateway as Reviewer", and select the gateway you want to use as the token reviewer.
You can select either an individual gateway or a **Gateway Pool** for automatic failover. When a pool is selected, the platform routes through a healthy gateway at request time. See [Gateway Pools](/documentation/platform/gateways/gateway-pools) for more details.
 Once you have set up the Kubernetes Auth prerequisites above, add the identity ID and service account details to your InfisicalSecret resource.
In the `authentication.kubernetesAuth.identityId` field, add the identity ID of the machine identity you created.
Under `authentication.kubernetesAuth.serviceAccountRef`, enter the name and namespace of the service account.
If using short-lived tokens, set `authentication.kubernetesAuth.autoCreateServiceAccountToken` to `true`.
Make sure to also populate the `secretsScope` field with the project slug
*`projectSlug`*, or project ID *`projectId`*, environment slug *`envSlug`*, and secrets path
*`secretsPath`* that you want to fetch secrets from. Please see the examples
below.
Please note that you can only use either `projectSlug` or `projectId` in the `secretsScope` field.
```yaml example-kubernetes-auth.yaml theme={"dark"}
apiVersion: secrets.infisical.com/v1alpha1
kind: InfisicalSecret
metadata:
name: infisicalsecret-sample-crd
spec:
authentication:
kubernetesAuth:
identityId:
autoCreateServiceAccountToken: true # Automatically creates short-lived service account tokens for the service account.
serviceAccountTokenAudiences:
- # Optionally specify audience for the service account token. No audience is specified by default.
serviceAccountRef:
name: infisical-service-account # The service account we just created in the previous step.
namespace:
# secretsScope is identical to the secrets scope in the universalAuth field in this sample.
secretsScope:
projectSlug: your-project-slug
envSlug: prod
secretsPath: "/path"
secretName: # OPTIONAL: If you want to fetch a single Infisical secret, you can specify the secret name here. If not specified, all secrets in the specified scope will be fetched.
recursive: true
...
```
```yaml example-kubernetes-auth.yaml theme={"dark"}
apiVersion: secrets.infisical.com/v1alpha1
kind: InfisicalSecret
metadata:
name: infisicalsecret-sample-crd
spec:
authentication:
kubernetesAuth:
identityId:
serviceAccountRef:
name: infisical-service-account # The service account we just created in the previous step. (*not* the reviewer service account)
namespace:
# secretsScope is identical to the secrets scope in the universalAuth field in this sample.
secretsScope:
projectSlug: your-project-slug
envSlug: prod
secretsPath: "/path"
secretName: # OPTIONAL: If you want to fetch a single Infisical secret, you can specify the secret name here. If not specified, all secrets in the specified scope will be fetched.
recursive: true
...
```
The AWS IAM machine identity authentication method is used to authenticate with Infisical. The identity ID is stored in a field in the InfisicalSecret resource. This authentication method can only be used within an AWS environment like an EC2 or a Lambda function.
You need to create a machine identity, and give it access to the project(s) you want to interact with. You can [read more about AWS machine identities here](/documentation/platform/identities/aws-auth).
Once you have created your machine identity and added it to your project(s), you will need to add the identity ID to your InfisicalSecret resource. In the `authentication.awsIamAuth.identityId` field, add the identity ID of the machine identity you created. See the example below for more details.
Make sure to also populate the `secretsScope` field with the project slug
*`projectSlug`*, or project ID *`projectId`*, environment slug *`envSlug`*, and secrets path
*`secretsPath`* that you want to fetch secrets from. Please see the example
below.
Please note that you can only use either `projectSlug` or `projectId` in the `secretsScope` field.
## Example
```yaml example-aws-iam-auth.yaml theme={"dark"}
apiVersion: secrets.infisical.com/v1alpha1
kind: InfisicalSecret
metadata:
name: infisicalsecret-sample-crd
spec:
authentication:
awsIamAuth:
identityId:
# secretsScope is identical to the secrets scope in the universalAuth field in this sample.
secretsScope:
projectSlug: your-project-slug
envSlug: prod
secretsPath: "/path"
secretName: # OPTIONAL: If you want to fetch a single Infisical secret, you can specify the secret name here. If not specified, all secrets in the specified scope will be fetched.
recursive: true
...
```
The Azure machine identity authentication method is used to authenticate with Infisical. The identity ID is stored in a field in the InfisicalSecret resource. This authentication method can only be used within an Azure environment.
You need to create a machine identity, and give it access to the project(s) you want to interact with. You can [read more about Azure machine identities here](/documentation/platform/identities/azure-auth).
Once you have created your machine identity and added it to your project(s), you will need to add the identity ID to your InfisicalSecret resource. In the `authentication.azureAuth.identityId` field, add the identity ID of the machine identity you created. See the example below for more details.
Make sure to also populate the `secretsScope` field with the project slug
*`projectSlug`*, or project ID *`projectId`*, environment slug *`envSlug`*, and secrets path
*`secretsPath`* that you want to fetch secrets from. Please see the example
below.
Please note that you can only use either `projectSlug` or `projectId` in the `secretsScope` field.
## Example
```yaml example-azure-auth.yaml theme={"dark"}
apiVersion: secrets.infisical.com/v1alpha1
kind: InfisicalSecret
metadata:
name: infisicalsecret-sample-crd
spec:
authentication:
azureAuth:
identityId:
azureManagedIdentityClientId: # This is optional, and only required if you are using a user-assigned managed Azure identity.
# secretsScope is identical to the secrets scope in the universalAuth field in this sample.
secretsScope:
projectSlug: your-project-slug
envSlug: prod
secretsPath: "/path"
secretName: # OPTIONAL: If you want to fetch a single Infisical secret, you can specify the secret name here. If not specified, all secrets in the specified scope will be fetched.
recursive: true
...
```
The GCP ID Token machine identity authentication method is used to authenticate with Infisical. The identity ID is stored in a field in the InfisicalSecret resource. This authentication method can only be used within GCP environments.
You need to create a machine identity, and give it access to the project(s) you want to interact with. You can [read more about GCP machine identities here](/documentation/platform/identities/gcp-auth).
Once you have created your machine identity and added it to your project(s), you will need to add the identity ID to your InfisicalSecret resource. In the `authentication.gcpIdTokenAuth.identityId` field, add the identity ID of the machine identity you created. See the example below for more details.
Make sure to also populate the `secretsScope` field with the project slug
*`projectSlug`*, or project ID *`projectId`*, environment slug *`envSlug`*, and secrets path
*`secretsPath`* that you want to fetch secrets from. Please see the example
below.
Please note that you can only use either `projectSlug` or `projectId` in the `secretsScope` field.
## Example
```yaml example-gcp-id-token-auth.yaml theme={"dark"}
apiVersion: secrets.infisical.com/v1alpha1
kind: InfisicalSecret
metadata:
name: infisicalsecret-sample-crd
spec:
authentication:
gcpIdTokenAuth:
identityId:
# secretsScope is identical to the secrets scope in the universalAuth field in this sample.
secretsScope:
projectSlug: your-project-slug
envSlug: prod
secretsPath: "/path"
secretName: # OPTIONAL: If you want to fetch a single Infisical secret, you can specify the secret name here. If not specified, all secrets in the specified scope will be fetched.
recursive: true
...
```
The GCP IAM machine identity authentication method is used to authenticate with Infisical. The identity ID is stored in a field in the InfisicalSecret resource. This authentication method can only be used both within and outside GCP environments.
You need to create a machine identity, and give it access to the project(s) you want to interact with. You can [read more about GCP machine identities here](/documentation/platform/identities/gcp-auth).
Once you have created your machine identity and added it to your project(s), you will need to add the identity ID to your InfisicalSecret resource. In the `authentication.gcpIamAuth.identityId` field, add the identity ID of the machine identity you created.
You'll also need to add the service account key file path to your InfisicalSecret resource. In the `authentication.gcpIamAuth.serviceAccountKeyFilePath` field, add the path to your service account key file path. Please see the example below for more details.
Make sure to also populate the `secretsScope` field with the project slug
*`projectSlug`*, or project ID *`projectId`*, environment slug *`envSlug`*, and secrets path
*`secretsPath`* that you want to fetch secrets from. Please see the example
below.
Please note that you can only use either `projectSlug` or `projectId` in the `secretsScope` field.
## Example
```yaml example-gcp-id-token-auth.yaml theme={"dark"}
apiVersion: secrets.infisical.com/v1alpha1
kind: InfisicalSecret
metadata:
name: infisicalsecret-sample-crd
spec:
authentication:
gcpIamAuth:
identityId:
serviceAccountKeyFilePath: "/path/to-service-account-key-file-path.json"
# secretsScope is identical to the secrets scope in the universalAuth field in this sample.
secretsScope:
projectSlug: your-project-slug
envSlug: prod
secretsPath: "/path"
secretName: # OPTIONAL: If you want to fetch a single Infisical secret, you can specify the secret name here. If not specified, all secrets in the specified scope will be fetched.
recursive: true
...
```
The LDAP machine identity authentication method is used to authenticate with Infisical using the configured LDAP directory. The username and password needs to be stored in a Kubernetes secret. This block defines the reference to the name and namespace of secret that stores these credentials.
You need to create a machine identity, and give it access to the project(s) you want to interact with. You can [read more about machine identities here](/documentation/platform/identities/universal-auth).
Once you have created your machine identity and added it to your project(s), you will need to create a Kubernetes secret containing the identity credentials.
To quickly create a Kubernetes secret containing the identity credentials, you can run the command below.
Make sure you replace `` with the identity LDAP username and `` with the identity LDAP password.
```bash theme={"dark"}
kubectl create secret generic ldap-auth-credentials --from-literal=username="" --from-literal=password=""
```
Once the secret is created, add the `secretName` and `secretNamespace` of the secret that was just created under `authentication.ldapAuth.credentialsRef` field in the InfisicalSecret resource.
Make sure to also populate the `secretsScope` field with the project slug
*`projectSlug`*, or project ID *`projectId`*, environment slug *`envSlug`*, and secrets path
*`secretsPath`* that you want to fetch secrets from. Please see the example
below.
Please note that you can only use either `projectSlug` or `projectId` in the `secretsScope` field.
## Example
```yaml theme={"dark"}
apiVersion: secrets.infisical.com/v1alpha1
kind: InfisicalSecret
metadata:
name: infisicalsecret-sample-crd
spec:
authentication:
ldapAuth:
secretsScope:
projectSlug: # <-- project slug
envSlug: # "dev", "staging", "prod", etc..
secretsPath: "" # Root is "/"
secretName: # OPTIONAL: If you want to fetch a single Infisical secret, you can specify the secret name here. If not specified, all secrets in the specified scope will be fetched.
identityId:
credentialsRef:
secretName: ldap-auth-credentials # <-- name of the Kubernetes secret that stores our machine identity credentials
secretNamespace: default # <-- namespace of the Kubernetes secret that stores our machine identity credentials
```
The service token required to authenticate with Infisical needs to be stored in a Kubernetes secret. This block defines the reference to the name and namespace of secret that stores this service token.
Follow the instructions below to create and store the service token in a Kubernetes secrets and reference it in your CRD.
#### 1. Generate service token
You can generate a [service token](/documentation/platform/token) for an Infisical project by heading over to the Infisical dashboard then to Project Settings.
#### 2. Create Kubernetes secret containing service token
Once you have generated the service token, you will need to create a Kubernetes secret containing the service token you generated.
To quickly create a Kubernetes secret containing the generated service token, you can run the command below. Make sure you replace `` with your service token.
```bash theme={"dark"}
kubectl create secret generic service-token --from-literal=infisicalToken=""
```
#### 3. Add reference for the Kubernetes secret containing service token
Once the secret is created, add the name and namespace of the secret that was just created under `authentication.serviceToken.serviceTokenSecretReference` field in the InfisicalSecret resource.
{" "}
Make sure to also populate the `secretsScope` field with the, environment slug
*`envSlug`*, and secrets path *`secretsPath`* that you want to fetch secrets
from. Please see the example below.
## Example
```yaml theme={"dark"}
apiVersion: secrets.infisical.com/v1alpha1
kind: InfisicalSecret
metadata:
name: infisicalsecret-sample-crd
spec:
authentication:
serviceToken:
serviceTokenSecretReference:
secretName: service-token # <-- name of the Kubernetes secret that stores our service token
secretNamespace: option # <-- namespace of the Kubernetes secret that stores our service token
secretsScope:
envSlug: # "dev", "staging", "prod", etc..
secretsPath: # Root is "/"
...
```
### Operator Managed Secrets
The managed secret properties specify where to store the secrets retrieved from your Infisical project.
This includes defining the name and namespace of the Kubernetes secret that will hold these secrets.
The Infisical operator will automatically create the Kubernetes secret in the specified name/namespace and ensure it stays up-to-date.
The `managedSecretReference` field is deprecated and will be removed in a future release.
Replace it with `managedKubeSecretReferences`, which now accepts an array of references to support multiple managed secrets in a single InfisicalSecret CRD.
Example:
```yaml theme={"dark"}
managedKubeSecretReferences:
- secretName: managed-secret
secretNamespace: default
creationPolicy: "Orphan"
```
The name of the managed Kubernetes secret to be created
The namespace of the managed Kubernetes secret to be created.
Override the default Opaque type for managed secrets with this field. Useful for creating kubernetes.io/dockerconfigjson secrets.
Creation policies allow you to control whether or not owner references should be added to the managed Kubernetes secret that is generated by the Infisical operator.
This is useful for tools such as ArgoCD, where every resource requires an owner reference; otherwise, it will be pruned automatically.
#### Available options
* `Orphan` (default)
* `Owner`
When creation policy is set to `Owner`, the `InfisicalSecret` CRD must be in
the same namespace as where the managed kubernetes secret.
#### Managed Secret Templating
Fetching secrets from Infisical as is via the operator may not be enough. This is where templating functionality may be helpful.
Using Go templates, you can format, combine, and create new key-value pairs from secrets fetched from Infisical before storing them as Kubernetes Secrets.
This property controls what secrets are included in your managed secret when using templates.
When set to `true`, all secrets fetched from your Infisical project will be added into your managed Kubernetes secret resource.
**Use this option when you would like to sync all secrets from Infisical to Kubernetes but want to template a subset of them.**
When set to `false`, only secrets defined in the `managedKubeSecretReferences[].template.data` field of the template will be included in the managed secret.
Use this option when you would like to sync **only** a subset of secrets from Infisical to Kubernetes.
Define secret keys and their corresponding templates.
Each data value uses a Golang template with access to all secrets retrieved from the specified scope.
Secrets are structured as follows:
```golang theme={"dark"}
type TemplateSecret struct {
Value string `json:"value"`
SecretPath string `json:"secretPath"`
}
```
#### Example template configuration:
```yaml theme={"dark"}
managedKubeSecretReferences:
- secretName: managed-secret
secretNamespace: default
template:
includeAllSecrets: true
data:
# Create new secret key that doesn't exist in your Infisical project using values of other secrets
NEW_KEY: "{{ .DB_PASSWORD.Value }}"
# Override an existing secret key in Infisical project with a new value using values of other secrets
API_URL: "https://api.{{.COMPANY_NAME.Value}}.{{.REGION.Value}}.com"
```
For this example, let's assume the following secrets exist in your Infisical project:
```
DB_PASSWORD = "secret123"
COMPANY_NAME = "acme"
REGION = "us-east-1"
API_URL = "old-url" # This will be overridden
```
The resulting managed Kubernetes secret will then contain:
```
# Original secrets (from includeAllSecrets: true)
DB_PASSWORD = "secret123"
COMPANY_NAME = "acme"
REGION = "us-east-1"
# New and overridden templated secrets
NEW_KEY = "secret123" # New secret created from template
API_URL = "https://api.acme.us-east-1.com" # Existing secret overridden by template
```
To help transform your secrets further, the operator provides a set of built-in functions that you can use in your templates.
### Available helper functions
The Infisical Secrets Operator exposes a wide range of helper functions to make it easier to work with secrets in Kubernetes.
Encodes a string to a base64-encoded string (e.g. `hello world` becomes `aGVsbG8gd29ybGQ=`).
**Signature**
```go theme={"dark"}
encodeBase64(plainString string) string
```
**Template usage**
```yaml theme={"dark"}
template:
data:
ENCODED_SECRET: "{{ .MY_SECRET.Value | encodeBase64 }}"
```
Decodes a base64-encoded string back to its original value (e.g. `aGVsbG8gd29ybGQ=` becomes `hello world`).
**Signature**
```go theme={"dark"}
decodeBase64ToBytes(encodedString string) string
```
**Template usage**
```yaml theme={"dark"}
template:
data:
DECODED_SECRET: "{{ .MY_BASE64_SECRET.Value | decodeBase64ToBytes }}"
```
Extracts all private keys from a PKCS#12 archive and returns them as PKCS#8 PEM-encoded blocks (`-----BEGIN PRIVATE KEY-----...`).
The archive must not be password-protected — use `pkcs12keyPass` for password-protected archives.
**Signature**
```go theme={"dark"}
pkcs12key(input string) string
```
**Template usage**
```yaml theme={"dark"}
template:
data:
tls.key: "{{ .TLS_CERT_PKCS12.Value | pkcs12key }}"
```
Same as `pkcs12key`, but uses the provided password to decrypt the PKCS#12 archive.
**Signature**
```go theme={"dark"}
pkcs12keyPass(password string, input string) string
```
**Template usage**
```yaml theme={"dark"}
template:
data:
tls.key: '{{ pkcs12keyPass "my-password" .TLS_CERT_PKCS12.Value }}'
```
Extracts all certificates from a PKCS#12 archive and returns them as an ordered PEM chain (`-----BEGIN CERTIFICATE-----...`).
Sort order: **leaf → intermediate(s) → root**. If disjunct or multiple leaf certs are provided, they are returned as-is.
The archive must not be password-protected — use `pkcs12certPass` for password-protected archives.
**Signature**
```go theme={"dark"}
pkcs12cert(input string) string
```
**Template usage**
```yaml theme={"dark"}
template:
data:
tls.crt: "{{ .TLS_CERT_PKCS12.Value | pkcs12cert }}"
```
Same as `pkcs12cert`, but uses the provided password to decrypt the PKCS#12 archive.
**Signature**
```go theme={"dark"}
pkcs12certPass(password string, input string) string
```
**Template usage**
```yaml theme={"dark"}
template:
data:
tls.crt: '{{ pkcs12certPass "my-password" .TLS_CERT_PKCS12.Value }}'
```
Takes a PEM-encoded certificate and private key and creates a base64-encoded PKCS#12 archive.
The output is not password-protected — use `pemToPkcs12Pass` to set a password.
**Signature**
```go theme={"dark"}
pemToPkcs12(cert string, key string) string
```
**Template usage**
```yaml theme={"dark"}
template:
data:
keystore.p12: '{{ pemToPkcs12 .TLS_CERT.Value .TLS_KEY.Value }}'
```
Same as `pemToPkcs12`, but encrypts the PKCS#12 archive with the provided password.
**Signature**
```go theme={"dark"}
pemToPkcs12Pass(cert string, key string, password string) string
```
**Template usage**
```yaml theme={"dark"}
template:
data:
keystore.p12: '{{ pemToPkcs12Pass .TLS_CERT.Value .TLS_KEY.Value "my-password" }}'
```
Takes a full PEM-encoded certificate chain (leaf + intermediates + root) and a private key, and creates a base64-encoded PKCS#12 archive that includes the entire chain.
The output is not password-protected — use `fullPemToPkcs12Pass` to set a password.
**Signature**
```go theme={"dark"}
fullPemToPkcs12(cert string, key string) string
```
**Template usage**
```yaml theme={"dark"}
template:
data:
keystore.p12: '{{ fullPemToPkcs12 .TLS_FULL_CHAIN.Value .TLS_KEY.Value }}'
```
Same as `fullPemToPkcs12`, but encrypts the PKCS#12 archive with the provided password.
**Signature**
```go theme={"dark"}
fullPemToPkcs12Pass(cert string, key string, password string) string
```
**Template usage**
```yaml theme={"dark"}
template:
data:
keystore.p12: '{{ fullPemToPkcs12Pass .TLS_FULL_CHAIN.Value .TLS_KEY.Value "my-password" }}'
```
Filters PEM blocks by type from a bundle containing multiple PEM blocks (e.g. extract only `CERTIFICATE` or `PRIVATE KEY` blocks).
Common PEM types: `CERTIFICATE`, `PRIVATE KEY`, `PUBLIC KEY`, `RSA PRIVATE KEY`.
**Signature**
```go theme={"dark"}
filterPEM(pemType string, input string) string
```
**Template usage**
```yaml theme={"dark"}
template:
data:
ca.crt: '{{ filterPEM "CERTIFICATE" .TLS_BUNDLE.Value }}'
tls.key: '{{ filterPEM "PRIVATE KEY" .TLS_BUNDLE.Value }}'
```
Filters PEM certificates by their position in a certificate chain. The chain is automatically ordered before filtering.
Accepted types: `leaf` (end-entity certificate), `intermediate` (all intermediate CA certificates), `root` (root CA certificate).
Returns an empty string if the requested type is not present in the chain.
**Signature**
```go theme={"dark"}
filterCertChain(certType string, input string) string
```
**Template usage**
```yaml theme={"dark"}
template:
data:
tls.crt: '{{ filterCertChain "leaf" .TLS_CHAIN.Value }}'
ca.crt: '{{ filterCertChain "root" .TLS_CHAIN.Value }}'
intermediate.crt: '{{ filterCertChain "intermediate" .TLS_CHAIN.Value }}'
```
Takes a JSON-serialized JWK and returns a PEM block of type `PUBLIC KEY` containing the public key.
Uses [`x509.MarshalPKIXPublicKey`](https://pkg.go.dev/crypto/x509#MarshalPKIXPublicKey) internally.
**Signature**
```go theme={"dark"}
jwkPublicKeyPem(jwkJson string) string
```
**Template usage**
```yaml theme={"dark"}
template:
data:
public.pem: "{{ .MY_JWK.Value | jwkPublicKeyPem }}"
```
Takes a JSON-serialized JWK and returns a PEM block of type `PRIVATE KEY` containing the private key.
Uses [`x509.MarshalPKCS8PrivateKey`](https://pkg.go.dev/crypto/x509#MarshalPKCS8PrivateKey) internally.
**Signature**
```go theme={"dark"}
jwkPrivateKeyPem(jwkJson string) string
```
**Template usage**
```yaml theme={"dark"}
template:
data:
private.pem: "{{ .MY_JWK.Value | jwkPrivateKeyPem }}"
```
Marshals a value to a YAML string. Returns an empty string on marshal error.
**Signature**
```go theme={"dark"}
toYaml(v any) string
```
**Template usage**
```yaml theme={"dark"}
template:
data:
config.yaml: "{{ .APP_CONFIG.Value | fromYaml | toYaml }}"
```
Parses a YAML string into a `map[string]any`, useful for extracting individual fields from a YAML-formatted secret (e.g. `(fromYaml .DB_CONFIG.Value).host` returns the `host` field).
**Signature**
```go theme={"dark"}
fromYaml(str string) map[string]any
```
**Template usage**
```yaml theme={"dark"}
template:
data:
DB_HOST: '{{ (fromYaml .DB_CONFIG.Value).host }}'
DB_PORT: '{{ (fromYaml .DB_CONFIG.Value).port }}'
```
This function is only available in `v1beta1` resources (e.g. `InfisicalStaticSecret`).
Resolves a secret from a specific folder path within the Infisical project. Takes a path and a secret name as parameters, and returns the secret's value by default. You can optionally use `.Value` or `.SecretPath` accessors on the result -- if omitted, `.Value` is used.
This is especially useful when multiple secrets share the same key, either from recursive fetches across different paths or from multiple sources. In both cases, the merge strategy only keeps the first occurrence (read more [here](/integrations/platforms/kubernetes/infisical-static-secret-crd#sources)), so `secretFrom` lets you explicitly select the one you need by its full path.
If multiple sources contain a secret with the same name and path, the secret from the first source listed in the `sources` array will be used.
**Signature**
```go theme={"dark"}
secretFrom(path string, secretName string) string
```
**Template usage**
```yaml theme={"dark"}
template:
data:
# .Value is implicit when no accessor is specified
DB_PASSWORD: '{{ secretFrom "/databases/postgres" "DB_PASSWORD" }}'
# Explicit .Value accessor (same result as above)
STRIPE_API_KEY: '{{ (secretFrom "/services/payments" "API_KEY").Value }}'
# Using .SecretPath to get the folder path instead of the value
DATADOG_API_KEY: '{{ (secretFrom "/services/observability" "API_KEY").Value }}'
DATADOG_API_KEY_PATH: '{{ (secretFrom "/services/observability" "API_KEY").SecretPath }}'
```
### Sprig functions
The Infisical Secrets Operator integrates with the [Sprig library](https://github.com/Masterminds/sprig) to provide additional helper functions.
We've removed `expandEnv` and `env` from the supported functions for security reasons.
Define custom labels and annotations for the managed Kubernetes secret. This allows you to specify metadata that should be applied to the managed secret separately from the InfisicalSecret itself.
For detailed information on how metadata propagation works and examples, see the [Propagating Labels & Annotations](#propagating-labels-&-annotations) section.
### Operator Managed ConfigMaps
The managed config map properties specify where to store the secrets retrieved from your Infisical project. Config maps can be used to store **non-sensitive** data, such as application configuration variables.
The properties includes defining the name and namespace of the Kubernetes config map that will hold the data retrieved from your Infisical project.
The Infisical operator will automatically create the Kubernetes config map in the specified name/namespace and ensure it stays up-to-date. If a config map already exists in the specified namespace, the operator will update the existing config map with the new data.
The usage of config maps is only intended for storing non-sensitive data. If
you are looking to store sensitive data, please use the [managed
secret](#operator-managed-secrets) property instead.
The name of the managed Kubernetes config map that your Infisical data will be stored in.
The namespace of the managed Kubernetes config map that your Infisical data will be stored in.
Creation policies allow you to control whether or not owner references should be added to the managed Kubernetes config map that is generated by the Infisical operator.
This is useful for tools such as ArgoCD, where every resource requires an owner reference; otherwise, it will be pruned automatically.
#### Available options
* `Orphan` (default)
* `Owner`
When creation policy is set to `Owner`, the `InfisicalSecret` CRD must be in
the same namespace as where the managed kubernetes config map.
#### Managed ConfigMap Templating
Fetching secrets from Infisical as is via the operator may not be enough. This is where templating functionality may be helpful.
Using Go templates, you can format, combine, and create new key-value pairs from secrets fetched from Infisical before storing them as Kubernetes Config Maps.
This property controls what secrets are included in your managed config map when using templates.
When set to `true`, all secrets fetched from your Infisical project will be added into your managed Kubernetes config map resource.
**Use this option when you would like to sync all secrets from Infisical to Kubernetes but want to template a subset of them.**
When set to `false`, only secrets defined in the `managedKubeConfigMapReferences[].template.data` field of the template will be included in the managed config map.
Use this option when you would like to sync **only** a subset of secrets from Infisical to Kubernetes.
Define secret keys and their corresponding templates.
Each data value uses a Golang template with access to all secrets retrieved from the specified scope.
Secrets are structured as follows:
```golang theme={"dark"}
type TemplateSecret struct {
Value string `json:"value"`
SecretPath string `json:"secretPath"`
}
```
#### Example template configuration:
```yaml theme={"dark"}
managedKubeConfigMapReferences:
- configMapName: managed-configmap
configMapNamespace: default
template:
includeAllSecrets: true
data:
# Create new key that doesn't exist in your Infisical project using values of other secrets
SITE_URL: "{{ .SITE_URL.Value }}"
# Override an existing key in Infisical project with a new value using values of other secrets
API_URL: "https://api.{{.SITE_URL.Value}}.{{.REGION.Value}}.com"
```
For this example, let's assume the following secrets exist in your Infisical project:
```
SITE_URL = "https://example.com"
REGION = "us-east-1"
API_URL = "old-url" # This will be overridden
```
The resulting managed Kubernetes config map will then contain:
```
# Original config map data (from includeAllSecrets: true)
SITE_URL = "https://example.com"
REGION = "us-east-1"
# New and overridden config map data
SITE_URL = "https://example.com"
API_URL = "https://api.example.com.us-east-1.com" # Existing secret overridden by template
```
To help transform your config map data further, the operator provides a set of built-in functions that you can use in your templates.
### Available helper functions
The Infisical Secrets Operator exposes a wide range of helper functions to make it easier to work with secrets in Kubernetes.
Encodes a string to a base64-encoded string (e.g. `hello world` becomes `aGVsbG8gd29ybGQ=`).
**Signature**
```go theme={"dark"}
encodeBase64(plainString string) string
```
**Template usage**
```yaml theme={"dark"}
template:
data:
ENCODED_SECRET: "{{ .MY_SECRET.Value | encodeBase64 }}"
```
Decodes a base64-encoded string back to its original value (e.g. `aGVsbG8gd29ybGQ=` becomes `hello world`).
**Signature**
```go theme={"dark"}
decodeBase64ToBytes(encodedString string) string
```
**Template usage**
```yaml theme={"dark"}
template:
data:
DECODED_SECRET: "{{ .MY_BASE64_SECRET.Value | decodeBase64ToBytes }}"
```
Extracts all private keys from a PKCS#12 archive and returns them as PKCS#8 PEM-encoded blocks (`-----BEGIN PRIVATE KEY-----...`).
The archive must not be password-protected — use `pkcs12keyPass` for password-protected archives.
**Signature**
```go theme={"dark"}
pkcs12key(input string) string
```
**Template usage**
```yaml theme={"dark"}
template:
data:
tls.key: "{{ .TLS_CERT_PKCS12.Value | pkcs12key }}"
```
Same as `pkcs12key`, but uses the provided password to decrypt the PKCS#12 archive.
**Signature**
```go theme={"dark"}
pkcs12keyPass(password string, input string) string
```
**Template usage**
```yaml theme={"dark"}
template:
data:
tls.key: '{{ pkcs12keyPass "my-password" .TLS_CERT_PKCS12.Value }}'
```
Extracts all certificates from a PKCS#12 archive and returns them as an ordered PEM chain (`-----BEGIN CERTIFICATE-----...`).
Sort order: **leaf → intermediate(s) → root**. If disjunct or multiple leaf certs are provided, they are returned as-is.
The archive must not be password-protected — use `pkcs12certPass` for password-protected archives.
**Signature**
```go theme={"dark"}
pkcs12cert(input string) string
```
**Template usage**
```yaml theme={"dark"}
template:
data:
tls.crt: "{{ .TLS_CERT_PKCS12.Value | pkcs12cert }}"
```
Same as `pkcs12cert`, but uses the provided password to decrypt the PKCS#12 archive.
**Signature**
```go theme={"dark"}
pkcs12certPass(password string, input string) string
```
**Template usage**
```yaml theme={"dark"}
template:
data:
tls.crt: '{{ pkcs12certPass "my-password" .TLS_CERT_PKCS12.Value }}'
```
Takes a PEM-encoded certificate and private key and creates a base64-encoded PKCS#12 archive.
The output is not password-protected — use `pemToPkcs12Pass` to set a password.
**Signature**
```go theme={"dark"}
pemToPkcs12(cert string, key string) string
```
**Template usage**
```yaml theme={"dark"}
template:
data:
keystore.p12: '{{ pemToPkcs12 .TLS_CERT.Value .TLS_KEY.Value }}'
```
Same as `pemToPkcs12`, but encrypts the PKCS#12 archive with the provided password.
**Signature**
```go theme={"dark"}
pemToPkcs12Pass(cert string, key string, password string) string
```
**Template usage**
```yaml theme={"dark"}
template:
data:
keystore.p12: '{{ pemToPkcs12Pass .TLS_CERT.Value .TLS_KEY.Value "my-password" }}'
```
Takes a full PEM-encoded certificate chain (leaf + intermediates + root) and a private key, and creates a base64-encoded PKCS#12 archive that includes the entire chain.
The output is not password-protected — use `fullPemToPkcs12Pass` to set a password.
**Signature**
```go theme={"dark"}
fullPemToPkcs12(cert string, key string) string
```
**Template usage**
```yaml theme={"dark"}
template:
data:
keystore.p12: '{{ fullPemToPkcs12 .TLS_FULL_CHAIN.Value .TLS_KEY.Value }}'
```
Same as `fullPemToPkcs12`, but encrypts the PKCS#12 archive with the provided password.
**Signature**
```go theme={"dark"}
fullPemToPkcs12Pass(cert string, key string, password string) string
```
**Template usage**
```yaml theme={"dark"}
template:
data:
keystore.p12: '{{ fullPemToPkcs12Pass .TLS_FULL_CHAIN.Value .TLS_KEY.Value "my-password" }}'
```
Filters PEM blocks by type from a bundle containing multiple PEM blocks (e.g. extract only `CERTIFICATE` or `PRIVATE KEY` blocks).
Common PEM types: `CERTIFICATE`, `PRIVATE KEY`, `PUBLIC KEY`, `RSA PRIVATE KEY`.
**Signature**
```go theme={"dark"}
filterPEM(pemType string, input string) string
```
**Template usage**
```yaml theme={"dark"}
template:
data:
ca.crt: '{{ filterPEM "CERTIFICATE" .TLS_BUNDLE.Value }}'
tls.key: '{{ filterPEM "PRIVATE KEY" .TLS_BUNDLE.Value }}'
```
Filters PEM certificates by their position in a certificate chain. The chain is automatically ordered before filtering.
Accepted types: `leaf` (end-entity certificate), `intermediate` (all intermediate CA certificates), `root` (root CA certificate).
Returns an empty string if the requested type is not present in the chain.
**Signature**
```go theme={"dark"}
filterCertChain(certType string, input string) string
```
**Template usage**
```yaml theme={"dark"}
template:
data:
tls.crt: '{{ filterCertChain "leaf" .TLS_CHAIN.Value }}'
ca.crt: '{{ filterCertChain "root" .TLS_CHAIN.Value }}'
intermediate.crt: '{{ filterCertChain "intermediate" .TLS_CHAIN.Value }}'
```
Takes a JSON-serialized JWK and returns a PEM block of type `PUBLIC KEY` containing the public key.
Uses [`x509.MarshalPKIXPublicKey`](https://pkg.go.dev/crypto/x509#MarshalPKIXPublicKey) internally.
**Signature**
```go theme={"dark"}
jwkPublicKeyPem(jwkJson string) string
```
**Template usage**
```yaml theme={"dark"}
template:
data:
public.pem: "{{ .MY_JWK.Value | jwkPublicKeyPem }}"
```
Takes a JSON-serialized JWK and returns a PEM block of type `PRIVATE KEY` containing the private key.
Uses [`x509.MarshalPKCS8PrivateKey`](https://pkg.go.dev/crypto/x509#MarshalPKCS8PrivateKey) internally.
**Signature**
```go theme={"dark"}
jwkPrivateKeyPem(jwkJson string) string
```
**Template usage**
```yaml theme={"dark"}
template:
data:
private.pem: "{{ .MY_JWK.Value | jwkPrivateKeyPem }}"
```
Marshals a value to a YAML string. Returns an empty string on marshal error.
**Signature**
```go theme={"dark"}
toYaml(v any) string
```
**Template usage**
```yaml theme={"dark"}
template:
data:
config.yaml: "{{ .APP_CONFIG.Value | fromYaml | toYaml }}"
```
Parses a YAML string into a `map[string]any`, useful for extracting individual fields from a YAML-formatted secret (e.g. `(fromYaml .DB_CONFIG.Value).host` returns the `host` field).
**Signature**
```go theme={"dark"}
fromYaml(str string) map[string]any
```
**Template usage**
```yaml theme={"dark"}
template:
data:
DB_HOST: '{{ (fromYaml .DB_CONFIG.Value).host }}'
DB_PORT: '{{ (fromYaml .DB_CONFIG.Value).port }}'
```
This function is only available in `v1beta1` resources (e.g. `InfisicalStaticSecret`).
Resolves a secret from a specific folder path within the Infisical project. Takes a path and a secret name as parameters, and returns the secret's value by default. You can optionally use `.Value` or `.SecretPath` accessors on the result -- if omitted, `.Value` is used.
This is especially useful when multiple secrets share the same key, either from recursive fetches across different paths or from multiple sources. In both cases, the merge strategy only keeps the first occurrence (read more [here](/integrations/platforms/kubernetes/infisical-static-secret-crd#sources)), so `secretFrom` lets you explicitly select the one you need by its full path.
If multiple sources contain a secret with the same name and path, the secret from the first source listed in the `sources` array will be used.
**Signature**
```go theme={"dark"}
secretFrom(path string, secretName string) string
```
**Template usage**
```yaml theme={"dark"}
template:
data:
# .Value is implicit when no accessor is specified
DB_PASSWORD: '{{ secretFrom "/databases/postgres" "DB_PASSWORD" }}'
# Explicit .Value accessor (same result as above)
STRIPE_API_KEY: '{{ (secretFrom "/services/payments" "API_KEY").Value }}'
# Using .SecretPath to get the folder path instead of the value
DATADOG_API_KEY: '{{ (secretFrom "/services/observability" "API_KEY").Value }}'
DATADOG_API_KEY_PATH: '{{ (secretFrom "/services/observability" "API_KEY").SecretPath }}'
```
### Sprig functions
The Infisical Secrets Operator integrates with the [Sprig library](https://github.com/Masterminds/sprig) to provide additional helper functions.
We've removed `expandEnv` and `env` from the supported functions for security reasons.
Define custom labels and annotations for the managed Kubernetes ConfigMap. This allows you to specify metadata that should be applied to the managed ConfigMap separately from the InfisicalSecret itself.
This field works the same way as `template.metadata` for managed secrets. For detailed information on how metadata propagation works and examples, see the [Propagating Labels & Annotations](#propagating-labels-&-annotations) section.
## Applying CRD
Once you have configured the InfisicalSecret CRD with the required fields, you can apply it to your cluster.
After applying, you should notice that the managed secret has been created in the desired namespace your specified.
```
kubectl apply -f example-infisical-secret-crd.yaml
```
To verify that the operator has successfully created the managed secret, you can check the secrets in the namespace that was specified.
```bash theme={"dark"}
# Verify managed secret is created
kubectl get secrets -n
```
The Infisical secrets will be synced and stored into the managed secret every
1 minute unless configured otherwise.
```bash theme={"dark"}
# Verify managed config map is created
kubectl get configmaps -n
```
The Infisical config map data will be synced and stored into the managed config map every
1 minute unless configured otherwise.
## Using Managed Secret In Your Deployment
To make use of the managed secret created by the operator into your deployment can be achieved through several methods.
Here, we will highlight three of the most common ways to utilize it. Learn more about Kubernetes secrets [here](https://kubernetes.io/docs/concepts/configuration/secret/)
This will take all the secrets from your managed secret and expose them to your container
````yaml theme={"dark"}
envFrom:
- secretRef:
name: managed-secret # managed secret name
```
Example usage in a deployment
```yaml
apiVersion: apps/v1
kind: Deployment
metadata:
name: nginx-deployment
labels:
app: nginx
spec:
replicas: 1
selector:
matchLabels:
app: nginx
template:
metadata:
labels:
app: nginx
spec:
containers:
- name: nginx
image: nginx:1.14.2
envFrom:
- secretRef:
name: managed-secret # <- name of managed secret
ports:
- containerPort: 80
````
This will allow you to select individual secrets by key name from your managed secret and expose them to your container
```yaml theme={"dark"}
env:
- name: SECRET_NAME # The environment variable's name which is made available in the container
valueFrom:
secretKeyRef:
name: managed-secret # managed secret name
key: SOME_SECRET_KEY # The name of the key which exists in the managed secret
```
Example usage in a deployment
```yaml theme={"dark"}
apiVersion: apps/v1
kind: Deployment
metadata:
name: nginx-deployment
labels:
app: nginx
spec:
replicas: 1
selector:
matchLabels:
app: nginx
template:
metadata:
labels:
app: nginx
spec:
containers:
- name: nginx
image: nginx:1.14.2
env:
- name: STRIPE_API_SECRET
valueFrom:
secretKeyRef:
name: managed-secret # <- name of managed secret
key: STRIPE_API_SECRET
ports:
- containerPort: 80
```
This will allow you to create a volume on your container which comprises of files holding the secrets in your managed kubernetes secret
```yaml theme={"dark"}
volumes:
- name: secrets-volume-name # The name of the volume under which secrets will be stored
secret:
secretName: managed-secret # managed secret name
```
You can then mount this volume to the container's filesystem so that your deployment can access the files containing the managed secrets
```yaml theme={"dark"}
volumeMounts:
- name: secrets-volume-name
mountPath: /etc/secrets
readOnly: true
```
Example usage in a deployment
```yaml theme={"dark"}
apiVersion: apps/v1
kind: Deployment
metadata:
name: nginx-deployment
labels:
app: nginx
spec:
replicas: 1
selector:
matchLabels:
app: nginx
template:
metadata:
labels:
app: nginx
spec:
containers:
- name: nginx
image: nginx:1.14.2
volumeMounts:
- name: secrets-volume-name
mountPath: /etc/secrets
readOnly: true
ports:
- containerPort: 80
volumes:
- name: secrets-volume-name
secret:
secretName: managed-secret # <- managed secrets
```
The definition file of the Kubernetes secret for the CA certificate can be structured like the following:
```yaml theme={"dark"}
apiVersion: v1
kind: Secret
metadata:
name: custom-ca-certificate
type: Opaque
stringData:
ca.crt: |
-----BEGIN CERTIFICATE-----
MIIEZzCCA0+gAwIBAgIUDk9+HZcMHppiNy0TvoBg8/aMEqIwDQYJKoZIhvcNAQEL
...
BQAwDTELMAkGA1UEChMCUEgwHhcNMjQxMDI1MTU0MjAzWhcNMjUxMDI1MjE0MjAz
-----END CERTIFICATE-----
```
### Automatic Redeployment
Deployments using managed secrets don't reload automatically on updates, so they may use outdated secrets unless manually redeployed.
To address this, we added functionality to automatically redeploy your deployment when its managed secret updates.
#### Enabling Automatic Redeployment
To enable auto redeployment you simply have to add the following annotation to the Deployment, StatefulSet, or DaemonSet that consumes a managed secret.
```yaml theme={"dark"}
secrets.infisical.com/auto-reload: "true"
```
```yaml theme={"dark"}
apiVersion: apps/v1
kind: Deployment
metadata:
name: nginx-deployment
labels:
app: nginx
annotations:
secrets.infisical.com/auto-reload: "true" # <- redeployment annotation
spec:
replicas: 1
selector:
matchLabels:
app: nginx
template:
metadata:
labels:
app: nginx
spec:
containers:
- name: nginx
image: nginx:1.14.2
envFrom:
- secretRef:
name: managed-secret
ports:
- containerPort: 80
```
```yaml theme={"dark"}
apiVersion: apps/v1
kind: DaemonSet
metadata:
name: log-agent
labels:
app: log-agent
annotations:
secrets.infisical.com/auto-reload: "true" # <- redeployment annotation
spec:
selector:
matchLabels:
app: log-agent
template:
metadata:
labels:
app: log-agent
spec:
containers:
- name: log-agent
image: mycompany/log-agent:latest
envFrom:
- secretRef:
name: managed-secret # <- name of the managed secret
volumeMounts:
- name: config-volume
mountPath: /etc/config
readOnly: true
volumes:
- name: config-volume
secret:
secretName: managed-secret
```
```yaml theme={"dark"}
apiVersion: apps/v1
kind: StatefulSet
metadata:
name: db-worker
labels:
app: db-worker
annotations:
secrets.infisical.com/auto-reload: "true" # <- redeployment annotation
spec:
selector:
matchLabels:
app: db-worker
serviceName: "db-worker"
replicas: 2
template:
metadata:
labels:
app: db-worker
spec:
containers:
- name: db-worker
image: mycompany/db-worker:stable
env:
- name: DATABASE_PASSWORD
valueFrom:
secretKeyRef:
name: managed-secret
key: DB_PASSWORD
ports:
- containerPort: 5432
```
#### How it works When a managed secret is updated, the operator checks for
any Deployments, DaemonSets, or StatefulSets that consume the updated secret
and have the annotation `secrets.infisical.com/auto-reload: "true"`. For each
matching workload, the operator triggers a rolling restart to ensure it picks
up the latest secret values.
## Using Managed ConfigMap In Your Deployment
To make use of the managed ConfigMap created by the operator into your deployment can be achieved through several methods.
Here, we will highlight three of the most common ways to utilize it. Learn more about Kubernetes ConfigMaps [here](https://kubernetes.io/docs/concepts/configuration/configmap/)
Automatic redeployment of deployments using managed ConfigMaps is not yet
supported.
This will take all the secrets from your managed ConfigMap and expose them to your container
````yaml theme={"dark"}
envFrom:
- configMapRef:
name: managed-configmap # managed configmap name
```
Example usage in a deployment
```yaml
apiVersion: apps/v1
kind: Deployment
metadata:
name: nginx-deployment
labels:
app: nginx
spec:
replicas: 1
selector:
matchLabels:
app: nginx
template:
metadata:
labels:
app: nginx
spec:
containers:
- name: nginx
image: nginx:1.14.2
envFrom:
- configMapRef:
name: managed-configmap # <- name of managed configmap
ports:
- containerPort: 80
````
This will allow you to select individual secrets by key name from your managed ConfigMap and expose them to your container
```yaml theme={"dark"}
env:
- name: CONFIG_NAME # The environment variable's name which is made available in the container
valueFrom:
configMapKeyRef:
name: managed-configmap # managed configmap name
key: SOME_CONFIG_KEY # The name of the key which exists in the managed configmap
```
Example usage in a deployment
```yaml theme={"dark"}
apiVersion: apps/v1
kind: Deployment
metadata:
name: nginx-deployment
labels:
app: nginx
spec:
replicas: 1
selector:
matchLabels:
app: nginx
template:
metadata:
labels:
app: nginx
spec:
containers:
- name: nginx
image: nginx:1.14.2
env:
- name: STRIPE_API_SECRET
valueFrom:
configMapKeyRef:
name: managed-configmap # <- name of managed configmap
key: STRIPE_API_SECRET
ports:
- containerPort: 80
```
This will allow you to create a volume on your container which comprises of files holding the secrets in your managed kubernetes secret
```yaml theme={"dark"}
volumes:
- name: configmaps-volume-name # The name of the volume under which configmaps will be stored
configMap:
name: managed-configmap # managed configmap name
```
You can then mount this volume to the container's filesystem so that your deployment can access the files containing the managed secrets
```yaml theme={"dark"}
volumeMounts:
- name: configmaps-volume-name
mountPath: /etc/config
readOnly: true
```
Example usage in a deployment
```yaml theme={"dark"}
apiVersion: apps/v1
kind: Deployment
metadata:
name: nginx-deployment
labels:
app: nginx
spec:
replicas: 1
selector:
matchLabels:
app: nginx
template:
metadata:
labels:
app: nginx
spec:
containers:
- name: nginx
image: nginx:1.14.2
volumeMounts:
- name: configmaps-volume-name
mountPath: /etc/config
readOnly: true
ports:
- containerPort: 80
volumes:
- name: configmaps-volume-name
configMap:
name: managed-configmap # <- managed configmap
```
The definition file of the Kubernetes secret for the CA certificate can be structured like the following:
```yaml theme={"dark"}
apiVersion: v1
kind: Secret
metadata:
name: custom-ca-certificate
type: Opaque
stringData:
ca.crt: |
-----BEGIN CERTIFICATE-----
MIIEZzCCA0+gAwIBAgIUDk9+HZcMHppiNy0TvoBg8/aMEqIwDQYJKoZIhvcNAQEL
...
BQAwDTELMAkGA1UEChMCUEgwHhcNMjQxMDI1MTU0MjAzWhcNMjUxMDI1MjE0MjAz
-----END CERTIFICATE-----
```
## Propagating Labels & Annotations
The operator provides flexible options for managing labels and annotations on managed Kubernetes secrets.
By default, the operator will transfer all labels & annotations present on the `InfisicalSecret` to the managed Kubernetes secret to be created.
### Example
```yaml theme={"dark"}
apiVersion: secrets.infisical.com/v1alpha1
kind: InfisicalSecret
metadata:
name: infisicalsecret-sample
labels:
label-to-be-passed-to-managed-secret: sample-value
annotations:
example.com/annotation-to-be-passed-to-managed-secret: "sample-value"
spec:
authentication:
# ... auth config ...
managedKubeSecretReferences:
- secretName: managed-token
secretNamespace: default
```
This would result in the following managed secret to be created:
```yaml theme={"dark"}
apiVersion: v1
data: ...
kind: Secret
metadata:
annotations:
example.com/annotation-to-be-passed-to-managed-secret: sample-value
secrets.infisical.com/version: W/"3f1-ZyOSsrCLGSkAhhCkY2USPu2ivRw"
labels:
label-to-be-passed-to-managed-secret: sample-value
name: managed-token
namespace: default
type: Opaque
```
When you specify `template.metadata` in your template configuration, you have full control over which labels and annotations are applied to the managed secret:
* Labels and annotations from `template.metadata` are used exclusively on the managed secret
* InfisicalSecret labels and annotations are NOT propagated to the managed secret
* This allows you to keep InfisicalSecret-specific metadata separate from the managed secret metadata
To prevent any propagation while using `template.metadata`, pass empty objects for labels and/or annotations.
This will ensure no labels or annotations are propagated to the managed secret, even from the InfisicalSecret CRD's own labels/annotations:
```yaml theme={"dark"}
template:
metadata:
labels: {}
annotations: {}
```
### Example
```yaml theme={"dark"}
apiVersion: secrets.infisical.com/v1alpha1
kind: InfisicalSecret
metadata:
name: infisicalsecret-with-template-metadata
labels:
managed-by: infisical-operator
annotations:
example.com/cr-specific: "metadata"
spec:
authentication:
# ... auth config ...
managedKubeSecretReferences:
- secretName: managed-secret-with-custom-metadata
secretNamespace: default
template:
includeAllSecrets: true
metadata:
labels:
app: my-application
environment: production
tier: backend
annotations:
secret.example.com/description: "Production database credentials"
secret.example.com/owner: "platform-team"
```
This would result in the following managed secret to be created:
```yaml theme={"dark"}
apiVersion: v1
data: ...
kind: Secret
metadata:
annotations:
secret.example.com/description: "Production database credentials"
secret.example.com/owner: "platform-team"
labels:
app: my-application
environment: production
tier: backend
name: managed-secret-with-custom-metadata
namespace: default
type: Opaque
```
Once you have set up the Kubernetes Auth prerequisites above, add the identity ID and service account details to your InfisicalSecret resource.
In the `authentication.kubernetesAuth.identityId` field, add the identity ID of the machine identity you created.
Under `authentication.kubernetesAuth.serviceAccountRef`, enter the name and namespace of the service account.
If using short-lived tokens, set `authentication.kubernetesAuth.autoCreateServiceAccountToken` to `true`.
Make sure to also populate the `secretsScope` field with the project slug
*`projectSlug`*, or project ID *`projectId`*, environment slug *`envSlug`*, and secrets path
*`secretsPath`* that you want to fetch secrets from. Please see the examples
below.
Please note that you can only use either `projectSlug` or `projectId` in the `secretsScope` field.
```yaml example-kubernetes-auth.yaml theme={"dark"}
apiVersion: secrets.infisical.com/v1alpha1
kind: InfisicalSecret
metadata:
name: infisicalsecret-sample-crd
spec:
authentication:
kubernetesAuth:
identityId:
autoCreateServiceAccountToken: true # Automatically creates short-lived service account tokens for the service account.
serviceAccountTokenAudiences:
- # Optionally specify audience for the service account token. No audience is specified by default.
serviceAccountRef:
name: infisical-service-account # The service account we just created in the previous step.
namespace:
# secretsScope is identical to the secrets scope in the universalAuth field in this sample.
secretsScope:
projectSlug: your-project-slug
envSlug: prod
secretsPath: "/path"
secretName: # OPTIONAL: If you want to fetch a single Infisical secret, you can specify the secret name here. If not specified, all secrets in the specified scope will be fetched.
recursive: true
...
```
```yaml example-kubernetes-auth.yaml theme={"dark"}
apiVersion: secrets.infisical.com/v1alpha1
kind: InfisicalSecret
metadata:
name: infisicalsecret-sample-crd
spec:
authentication:
kubernetesAuth:
identityId:
serviceAccountRef:
name: infisical-service-account # The service account we just created in the previous step. (*not* the reviewer service account)
namespace:
# secretsScope is identical to the secrets scope in the universalAuth field in this sample.
secretsScope:
projectSlug: your-project-slug
envSlug: prod
secretsPath: "/path"
secretName: # OPTIONAL: If you want to fetch a single Infisical secret, you can specify the secret name here. If not specified, all secrets in the specified scope will be fetched.
recursive: true
...
```
The AWS IAM machine identity authentication method is used to authenticate with Infisical. The identity ID is stored in a field in the InfisicalSecret resource. This authentication method can only be used within an AWS environment like an EC2 or a Lambda function.
You need to create a machine identity, and give it access to the project(s) you want to interact with. You can [read more about AWS machine identities here](/documentation/platform/identities/aws-auth).
Once you have created your machine identity and added it to your project(s), you will need to add the identity ID to your InfisicalSecret resource. In the `authentication.awsIamAuth.identityId` field, add the identity ID of the machine identity you created. See the example below for more details.
Make sure to also populate the `secretsScope` field with the project slug
*`projectSlug`*, or project ID *`projectId`*, environment slug *`envSlug`*, and secrets path
*`secretsPath`* that you want to fetch secrets from. Please see the example
below.
Please note that you can only use either `projectSlug` or `projectId` in the `secretsScope` field.
## Example
```yaml example-aws-iam-auth.yaml theme={"dark"}
apiVersion: secrets.infisical.com/v1alpha1
kind: InfisicalSecret
metadata:
name: infisicalsecret-sample-crd
spec:
authentication:
awsIamAuth:
identityId:
# secretsScope is identical to the secrets scope in the universalAuth field in this sample.
secretsScope:
projectSlug: your-project-slug
envSlug: prod
secretsPath: "/path"
secretName: # OPTIONAL: If you want to fetch a single Infisical secret, you can specify the secret name here. If not specified, all secrets in the specified scope will be fetched.
recursive: true
...
```
The Azure machine identity authentication method is used to authenticate with Infisical. The identity ID is stored in a field in the InfisicalSecret resource. This authentication method can only be used within an Azure environment.
You need to create a machine identity, and give it access to the project(s) you want to interact with. You can [read more about Azure machine identities here](/documentation/platform/identities/azure-auth).
Once you have created your machine identity and added it to your project(s), you will need to add the identity ID to your InfisicalSecret resource. In the `authentication.azureAuth.identityId` field, add the identity ID of the machine identity you created. See the example below for more details.
Make sure to also populate the `secretsScope` field with the project slug
*`projectSlug`*, or project ID *`projectId`*, environment slug *`envSlug`*, and secrets path
*`secretsPath`* that you want to fetch secrets from. Please see the example
below.
Please note that you can only use either `projectSlug` or `projectId` in the `secretsScope` field.
## Example
```yaml example-azure-auth.yaml theme={"dark"}
apiVersion: secrets.infisical.com/v1alpha1
kind: InfisicalSecret
metadata:
name: infisicalsecret-sample-crd
spec:
authentication:
azureAuth:
identityId:
azureManagedIdentityClientId: # This is optional, and only required if you are using a user-assigned managed Azure identity.
# secretsScope is identical to the secrets scope in the universalAuth field in this sample.
secretsScope:
projectSlug: your-project-slug
envSlug: prod
secretsPath: "/path"
secretName: # OPTIONAL: If you want to fetch a single Infisical secret, you can specify the secret name here. If not specified, all secrets in the specified scope will be fetched.
recursive: true
...
```
The GCP ID Token machine identity authentication method is used to authenticate with Infisical. The identity ID is stored in a field in the InfisicalSecret resource. This authentication method can only be used within GCP environments.
You need to create a machine identity, and give it access to the project(s) you want to interact with. You can [read more about GCP machine identities here](/documentation/platform/identities/gcp-auth).
Once you have created your machine identity and added it to your project(s), you will need to add the identity ID to your InfisicalSecret resource. In the `authentication.gcpIdTokenAuth.identityId` field, add the identity ID of the machine identity you created. See the example below for more details.
Make sure to also populate the `secretsScope` field with the project slug
*`projectSlug`*, or project ID *`projectId`*, environment slug *`envSlug`*, and secrets path
*`secretsPath`* that you want to fetch secrets from. Please see the example
below.
Please note that you can only use either `projectSlug` or `projectId` in the `secretsScope` field.
## Example
```yaml example-gcp-id-token-auth.yaml theme={"dark"}
apiVersion: secrets.infisical.com/v1alpha1
kind: InfisicalSecret
metadata:
name: infisicalsecret-sample-crd
spec:
authentication:
gcpIdTokenAuth:
identityId:
# secretsScope is identical to the secrets scope in the universalAuth field in this sample.
secretsScope:
projectSlug: your-project-slug
envSlug: prod
secretsPath: "/path"
secretName: # OPTIONAL: If you want to fetch a single Infisical secret, you can specify the secret name here. If not specified, all secrets in the specified scope will be fetched.
recursive: true
...
```
The GCP IAM machine identity authentication method is used to authenticate with Infisical. The identity ID is stored in a field in the InfisicalSecret resource. This authentication method can only be used both within and outside GCP environments.
You need to create a machine identity, and give it access to the project(s) you want to interact with. You can [read more about GCP machine identities here](/documentation/platform/identities/gcp-auth).
Once you have created your machine identity and added it to your project(s), you will need to add the identity ID to your InfisicalSecret resource. In the `authentication.gcpIamAuth.identityId` field, add the identity ID of the machine identity you created.
You'll also need to add the service account key file path to your InfisicalSecret resource. In the `authentication.gcpIamAuth.serviceAccountKeyFilePath` field, add the path to your service account key file path. Please see the example below for more details.
Make sure to also populate the `secretsScope` field with the project slug
*`projectSlug`*, or project ID *`projectId`*, environment slug *`envSlug`*, and secrets path
*`secretsPath`* that you want to fetch secrets from. Please see the example
below.
Please note that you can only use either `projectSlug` or `projectId` in the `secretsScope` field.
## Example
```yaml example-gcp-id-token-auth.yaml theme={"dark"}
apiVersion: secrets.infisical.com/v1alpha1
kind: InfisicalSecret
metadata:
name: infisicalsecret-sample-crd
spec:
authentication:
gcpIamAuth:
identityId:
serviceAccountKeyFilePath: "/path/to-service-account-key-file-path.json"
# secretsScope is identical to the secrets scope in the universalAuth field in this sample.
secretsScope:
projectSlug: your-project-slug
envSlug: prod
secretsPath: "/path"
secretName: # OPTIONAL: If you want to fetch a single Infisical secret, you can specify the secret name here. If not specified, all secrets in the specified scope will be fetched.
recursive: true
...
```
The LDAP machine identity authentication method is used to authenticate with Infisical using the configured LDAP directory. The username and password needs to be stored in a Kubernetes secret. This block defines the reference to the name and namespace of secret that stores these credentials.
You need to create a machine identity, and give it access to the project(s) you want to interact with. You can [read more about machine identities here](/documentation/platform/identities/universal-auth).
Once you have created your machine identity and added it to your project(s), you will need to create a Kubernetes secret containing the identity credentials.
To quickly create a Kubernetes secret containing the identity credentials, you can run the command below.
Make sure you replace `` with the identity LDAP username and `` with the identity LDAP password.
```bash theme={"dark"}
kubectl create secret generic ldap-auth-credentials --from-literal=username="" --from-literal=password=""
```
Once the secret is created, add the `secretName` and `secretNamespace` of the secret that was just created under `authentication.ldapAuth.credentialsRef` field in the InfisicalSecret resource.
Make sure to also populate the `secretsScope` field with the project slug
*`projectSlug`*, or project ID *`projectId`*, environment slug *`envSlug`*, and secrets path
*`secretsPath`* that you want to fetch secrets from. Please see the example
below.
Please note that you can only use either `projectSlug` or `projectId` in the `secretsScope` field.
## Example
```yaml theme={"dark"}
apiVersion: secrets.infisical.com/v1alpha1
kind: InfisicalSecret
metadata:
name: infisicalsecret-sample-crd
spec:
authentication:
ldapAuth:
secretsScope:
projectSlug: # <-- project slug
envSlug: # "dev", "staging", "prod", etc..
secretsPath: "" # Root is "/"
secretName: # OPTIONAL: If you want to fetch a single Infisical secret, you can specify the secret name here. If not specified, all secrets in the specified scope will be fetched.
identityId:
credentialsRef:
secretName: ldap-auth-credentials # <-- name of the Kubernetes secret that stores our machine identity credentials
secretNamespace: default # <-- namespace of the Kubernetes secret that stores our machine identity credentials
```
The service token required to authenticate with Infisical needs to be stored in a Kubernetes secret. This block defines the reference to the name and namespace of secret that stores this service token.
Follow the instructions below to create and store the service token in a Kubernetes secrets and reference it in your CRD.
#### 1. Generate service token
You can generate a [service token](/documentation/platform/token) for an Infisical project by heading over to the Infisical dashboard then to Project Settings.
#### 2. Create Kubernetes secret containing service token
Once you have generated the service token, you will need to create a Kubernetes secret containing the service token you generated.
To quickly create a Kubernetes secret containing the generated service token, you can run the command below. Make sure you replace `` with your service token.
```bash theme={"dark"}
kubectl create secret generic service-token --from-literal=infisicalToken=""
```
#### 3. Add reference for the Kubernetes secret containing service token
Once the secret is created, add the name and namespace of the secret that was just created under `authentication.serviceToken.serviceTokenSecretReference` field in the InfisicalSecret resource.
{" "}
Make sure to also populate the `secretsScope` field with the, environment slug
*`envSlug`*, and secrets path *`secretsPath`* that you want to fetch secrets
from. Please see the example below.
## Example
```yaml theme={"dark"}
apiVersion: secrets.infisical.com/v1alpha1
kind: InfisicalSecret
metadata:
name: infisicalsecret-sample-crd
spec:
authentication:
serviceToken:
serviceTokenSecretReference:
secretName: service-token # <-- name of the Kubernetes secret that stores our service token
secretNamespace: option # <-- namespace of the Kubernetes secret that stores our service token
secretsScope:
envSlug: # "dev", "staging", "prod", etc..
secretsPath: # Root is "/"
...
```
### Operator Managed Secrets
The managed secret properties specify where to store the secrets retrieved from your Infisical project.
This includes defining the name and namespace of the Kubernetes secret that will hold these secrets.
The Infisical operator will automatically create the Kubernetes secret in the specified name/namespace and ensure it stays up-to-date.
The `managedSecretReference` field is deprecated and will be removed in a future release.
Replace it with `managedKubeSecretReferences`, which now accepts an array of references to support multiple managed secrets in a single InfisicalSecret CRD.
Example:
```yaml theme={"dark"}
managedKubeSecretReferences:
- secretName: managed-secret
secretNamespace: default
creationPolicy: "Orphan"
```
The name of the managed Kubernetes secret to be created
The namespace of the managed Kubernetes secret to be created.
Override the default Opaque type for managed secrets with this field. Useful for creating kubernetes.io/dockerconfigjson secrets.
Creation policies allow you to control whether or not owner references should be added to the managed Kubernetes secret that is generated by the Infisical operator.
This is useful for tools such as ArgoCD, where every resource requires an owner reference; otherwise, it will be pruned automatically.
#### Available options
* `Orphan` (default)
* `Owner`
When creation policy is set to `Owner`, the `InfisicalSecret` CRD must be in
the same namespace as where the managed kubernetes secret.
#### Managed Secret Templating
Fetching secrets from Infisical as is via the operator may not be enough. This is where templating functionality may be helpful.
Using Go templates, you can format, combine, and create new key-value pairs from secrets fetched from Infisical before storing them as Kubernetes Secrets.
This property controls what secrets are included in your managed secret when using templates.
When set to `true`, all secrets fetched from your Infisical project will be added into your managed Kubernetes secret resource.
**Use this option when you would like to sync all secrets from Infisical to Kubernetes but want to template a subset of them.**
When set to `false`, only secrets defined in the `managedKubeSecretReferences[].template.data` field of the template will be included in the managed secret.
Use this option when you would like to sync **only** a subset of secrets from Infisical to Kubernetes.
Define secret keys and their corresponding templates.
Each data value uses a Golang template with access to all secrets retrieved from the specified scope.
Secrets are structured as follows:
```golang theme={"dark"}
type TemplateSecret struct {
Value string `json:"value"`
SecretPath string `json:"secretPath"`
}
```
#### Example template configuration:
```yaml theme={"dark"}
managedKubeSecretReferences:
- secretName: managed-secret
secretNamespace: default
template:
includeAllSecrets: true
data:
# Create new secret key that doesn't exist in your Infisical project using values of other secrets
NEW_KEY: "{{ .DB_PASSWORD.Value }}"
# Override an existing secret key in Infisical project with a new value using values of other secrets
API_URL: "https://api.{{.COMPANY_NAME.Value}}.{{.REGION.Value}}.com"
```
For this example, let's assume the following secrets exist in your Infisical project:
```
DB_PASSWORD = "secret123"
COMPANY_NAME = "acme"
REGION = "us-east-1"
API_URL = "old-url" # This will be overridden
```
The resulting managed Kubernetes secret will then contain:
```
# Original secrets (from includeAllSecrets: true)
DB_PASSWORD = "secret123"
COMPANY_NAME = "acme"
REGION = "us-east-1"
# New and overridden templated secrets
NEW_KEY = "secret123" # New secret created from template
API_URL = "https://api.acme.us-east-1.com" # Existing secret overridden by template
```
To help transform your secrets further, the operator provides a set of built-in functions that you can use in your templates.
### Available helper functions
The Infisical Secrets Operator exposes a wide range of helper functions to make it easier to work with secrets in Kubernetes.
Encodes a string to a base64-encoded string (e.g. `hello world` becomes `aGVsbG8gd29ybGQ=`).
**Signature**
```go theme={"dark"}
encodeBase64(plainString string) string
```
**Template usage**
```yaml theme={"dark"}
template:
data:
ENCODED_SECRET: "{{ .MY_SECRET.Value | encodeBase64 }}"
```
Decodes a base64-encoded string back to its original value (e.g. `aGVsbG8gd29ybGQ=` becomes `hello world`).
**Signature**
```go theme={"dark"}
decodeBase64ToBytes(encodedString string) string
```
**Template usage**
```yaml theme={"dark"}
template:
data:
DECODED_SECRET: "{{ .MY_BASE64_SECRET.Value | decodeBase64ToBytes }}"
```
Extracts all private keys from a PKCS#12 archive and returns them as PKCS#8 PEM-encoded blocks (`-----BEGIN PRIVATE KEY-----...`).
The archive must not be password-protected — use `pkcs12keyPass` for password-protected archives.
**Signature**
```go theme={"dark"}
pkcs12key(input string) string
```
**Template usage**
```yaml theme={"dark"}
template:
data:
tls.key: "{{ .TLS_CERT_PKCS12.Value | pkcs12key }}"
```
Same as `pkcs12key`, but uses the provided password to decrypt the PKCS#12 archive.
**Signature**
```go theme={"dark"}
pkcs12keyPass(password string, input string) string
```
**Template usage**
```yaml theme={"dark"}
template:
data:
tls.key: '{{ pkcs12keyPass "my-password" .TLS_CERT_PKCS12.Value }}'
```
Extracts all certificates from a PKCS#12 archive and returns them as an ordered PEM chain (`-----BEGIN CERTIFICATE-----...`).
Sort order: **leaf → intermediate(s) → root**. If disjunct or multiple leaf certs are provided, they are returned as-is.
The archive must not be password-protected — use `pkcs12certPass` for password-protected archives.
**Signature**
```go theme={"dark"}
pkcs12cert(input string) string
```
**Template usage**
```yaml theme={"dark"}
template:
data:
tls.crt: "{{ .TLS_CERT_PKCS12.Value | pkcs12cert }}"
```
Same as `pkcs12cert`, but uses the provided password to decrypt the PKCS#12 archive.
**Signature**
```go theme={"dark"}
pkcs12certPass(password string, input string) string
```
**Template usage**
```yaml theme={"dark"}
template:
data:
tls.crt: '{{ pkcs12certPass "my-password" .TLS_CERT_PKCS12.Value }}'
```
Takes a PEM-encoded certificate and private key and creates a base64-encoded PKCS#12 archive.
The output is not password-protected — use `pemToPkcs12Pass` to set a password.
**Signature**
```go theme={"dark"}
pemToPkcs12(cert string, key string) string
```
**Template usage**
```yaml theme={"dark"}
template:
data:
keystore.p12: '{{ pemToPkcs12 .TLS_CERT.Value .TLS_KEY.Value }}'
```
Same as `pemToPkcs12`, but encrypts the PKCS#12 archive with the provided password.
**Signature**
```go theme={"dark"}
pemToPkcs12Pass(cert string, key string, password string) string
```
**Template usage**
```yaml theme={"dark"}
template:
data:
keystore.p12: '{{ pemToPkcs12Pass .TLS_CERT.Value .TLS_KEY.Value "my-password" }}'
```
Takes a full PEM-encoded certificate chain (leaf + intermediates + root) and a private key, and creates a base64-encoded PKCS#12 archive that includes the entire chain.
The output is not password-protected — use `fullPemToPkcs12Pass` to set a password.
**Signature**
```go theme={"dark"}
fullPemToPkcs12(cert string, key string) string
```
**Template usage**
```yaml theme={"dark"}
template:
data:
keystore.p12: '{{ fullPemToPkcs12 .TLS_FULL_CHAIN.Value .TLS_KEY.Value }}'
```
Same as `fullPemToPkcs12`, but encrypts the PKCS#12 archive with the provided password.
**Signature**
```go theme={"dark"}
fullPemToPkcs12Pass(cert string, key string, password string) string
```
**Template usage**
```yaml theme={"dark"}
template:
data:
keystore.p12: '{{ fullPemToPkcs12Pass .TLS_FULL_CHAIN.Value .TLS_KEY.Value "my-password" }}'
```
Filters PEM blocks by type from a bundle containing multiple PEM blocks (e.g. extract only `CERTIFICATE` or `PRIVATE KEY` blocks).
Common PEM types: `CERTIFICATE`, `PRIVATE KEY`, `PUBLIC KEY`, `RSA PRIVATE KEY`.
**Signature**
```go theme={"dark"}
filterPEM(pemType string, input string) string
```
**Template usage**
```yaml theme={"dark"}
template:
data:
ca.crt: '{{ filterPEM "CERTIFICATE" .TLS_BUNDLE.Value }}'
tls.key: '{{ filterPEM "PRIVATE KEY" .TLS_BUNDLE.Value }}'
```
Filters PEM certificates by their position in a certificate chain. The chain is automatically ordered before filtering.
Accepted types: `leaf` (end-entity certificate), `intermediate` (all intermediate CA certificates), `root` (root CA certificate).
Returns an empty string if the requested type is not present in the chain.
**Signature**
```go theme={"dark"}
filterCertChain(certType string, input string) string
```
**Template usage**
```yaml theme={"dark"}
template:
data:
tls.crt: '{{ filterCertChain "leaf" .TLS_CHAIN.Value }}'
ca.crt: '{{ filterCertChain "root" .TLS_CHAIN.Value }}'
intermediate.crt: '{{ filterCertChain "intermediate" .TLS_CHAIN.Value }}'
```
Takes a JSON-serialized JWK and returns a PEM block of type `PUBLIC KEY` containing the public key.
Uses [`x509.MarshalPKIXPublicKey`](https://pkg.go.dev/crypto/x509#MarshalPKIXPublicKey) internally.
**Signature**
```go theme={"dark"}
jwkPublicKeyPem(jwkJson string) string
```
**Template usage**
```yaml theme={"dark"}
template:
data:
public.pem: "{{ .MY_JWK.Value | jwkPublicKeyPem }}"
```
Takes a JSON-serialized JWK and returns a PEM block of type `PRIVATE KEY` containing the private key.
Uses [`x509.MarshalPKCS8PrivateKey`](https://pkg.go.dev/crypto/x509#MarshalPKCS8PrivateKey) internally.
**Signature**
```go theme={"dark"}
jwkPrivateKeyPem(jwkJson string) string
```
**Template usage**
```yaml theme={"dark"}
template:
data:
private.pem: "{{ .MY_JWK.Value | jwkPrivateKeyPem }}"
```
Marshals a value to a YAML string. Returns an empty string on marshal error.
**Signature**
```go theme={"dark"}
toYaml(v any) string
```
**Template usage**
```yaml theme={"dark"}
template:
data:
config.yaml: "{{ .APP_CONFIG.Value | fromYaml | toYaml }}"
```
Parses a YAML string into a `map[string]any`, useful for extracting individual fields from a YAML-formatted secret (e.g. `(fromYaml .DB_CONFIG.Value).host` returns the `host` field).
**Signature**
```go theme={"dark"}
fromYaml(str string) map[string]any
```
**Template usage**
```yaml theme={"dark"}
template:
data:
DB_HOST: '{{ (fromYaml .DB_CONFIG.Value).host }}'
DB_PORT: '{{ (fromYaml .DB_CONFIG.Value).port }}'
```
This function is only available in `v1beta1` resources (e.g. `InfisicalStaticSecret`).
Resolves a secret from a specific folder path within the Infisical project. Takes a path and a secret name as parameters, and returns the secret's value by default. You can optionally use `.Value` or `.SecretPath` accessors on the result -- if omitted, `.Value` is used.
This is especially useful when multiple secrets share the same key, either from recursive fetches across different paths or from multiple sources. In both cases, the merge strategy only keeps the first occurrence (read more [here](/integrations/platforms/kubernetes/infisical-static-secret-crd#sources)), so `secretFrom` lets you explicitly select the one you need by its full path.
If multiple sources contain a secret with the same name and path, the secret from the first source listed in the `sources` array will be used.
**Signature**
```go theme={"dark"}
secretFrom(path string, secretName string) string
```
**Template usage**
```yaml theme={"dark"}
template:
data:
# .Value is implicit when no accessor is specified
DB_PASSWORD: '{{ secretFrom "/databases/postgres" "DB_PASSWORD" }}'
# Explicit .Value accessor (same result as above)
STRIPE_API_KEY: '{{ (secretFrom "/services/payments" "API_KEY").Value }}'
# Using .SecretPath to get the folder path instead of the value
DATADOG_API_KEY: '{{ (secretFrom "/services/observability" "API_KEY").Value }}'
DATADOG_API_KEY_PATH: '{{ (secretFrom "/services/observability" "API_KEY").SecretPath }}'
```
### Sprig functions
The Infisical Secrets Operator integrates with the [Sprig library](https://github.com/Masterminds/sprig) to provide additional helper functions.
We've removed `expandEnv` and `env` from the supported functions for security reasons.
Define custom labels and annotations for the managed Kubernetes secret. This allows you to specify metadata that should be applied to the managed secret separately from the InfisicalSecret itself.
For detailed information on how metadata propagation works and examples, see the [Propagating Labels & Annotations](#propagating-labels-&-annotations) section.
### Operator Managed ConfigMaps
The managed config map properties specify where to store the secrets retrieved from your Infisical project. Config maps can be used to store **non-sensitive** data, such as application configuration variables.
The properties includes defining the name and namespace of the Kubernetes config map that will hold the data retrieved from your Infisical project.
The Infisical operator will automatically create the Kubernetes config map in the specified name/namespace and ensure it stays up-to-date. If a config map already exists in the specified namespace, the operator will update the existing config map with the new data.
The usage of config maps is only intended for storing non-sensitive data. If
you are looking to store sensitive data, please use the [managed
secret](#operator-managed-secrets) property instead.
The name of the managed Kubernetes config map that your Infisical data will be stored in.
The namespace of the managed Kubernetes config map that your Infisical data will be stored in.
Creation policies allow you to control whether or not owner references should be added to the managed Kubernetes config map that is generated by the Infisical operator.
This is useful for tools such as ArgoCD, where every resource requires an owner reference; otherwise, it will be pruned automatically.
#### Available options
* `Orphan` (default)
* `Owner`
When creation policy is set to `Owner`, the `InfisicalSecret` CRD must be in
the same namespace as where the managed kubernetes config map.
#### Managed ConfigMap Templating
Fetching secrets from Infisical as is via the operator may not be enough. This is where templating functionality may be helpful.
Using Go templates, you can format, combine, and create new key-value pairs from secrets fetched from Infisical before storing them as Kubernetes Config Maps.
This property controls what secrets are included in your managed config map when using templates.
When set to `true`, all secrets fetched from your Infisical project will be added into your managed Kubernetes config map resource.
**Use this option when you would like to sync all secrets from Infisical to Kubernetes but want to template a subset of them.**
When set to `false`, only secrets defined in the `managedKubeConfigMapReferences[].template.data` field of the template will be included in the managed config map.
Use this option when you would like to sync **only** a subset of secrets from Infisical to Kubernetes.
Define secret keys and their corresponding templates.
Each data value uses a Golang template with access to all secrets retrieved from the specified scope.
Secrets are structured as follows:
```golang theme={"dark"}
type TemplateSecret struct {
Value string `json:"value"`
SecretPath string `json:"secretPath"`
}
```
#### Example template configuration:
```yaml theme={"dark"}
managedKubeConfigMapReferences:
- configMapName: managed-configmap
configMapNamespace: default
template:
includeAllSecrets: true
data:
# Create new key that doesn't exist in your Infisical project using values of other secrets
SITE_URL: "{{ .SITE_URL.Value }}"
# Override an existing key in Infisical project with a new value using values of other secrets
API_URL: "https://api.{{.SITE_URL.Value}}.{{.REGION.Value}}.com"
```
For this example, let's assume the following secrets exist in your Infisical project:
```
SITE_URL = "https://example.com"
REGION = "us-east-1"
API_URL = "old-url" # This will be overridden
```
The resulting managed Kubernetes config map will then contain:
```
# Original config map data (from includeAllSecrets: true)
SITE_URL = "https://example.com"
REGION = "us-east-1"
# New and overridden config map data
SITE_URL = "https://example.com"
API_URL = "https://api.example.com.us-east-1.com" # Existing secret overridden by template
```
To help transform your config map data further, the operator provides a set of built-in functions that you can use in your templates.
### Available helper functions
The Infisical Secrets Operator exposes a wide range of helper functions to make it easier to work with secrets in Kubernetes.
Encodes a string to a base64-encoded string (e.g. `hello world` becomes `aGVsbG8gd29ybGQ=`).
**Signature**
```go theme={"dark"}
encodeBase64(plainString string) string
```
**Template usage**
```yaml theme={"dark"}
template:
data:
ENCODED_SECRET: "{{ .MY_SECRET.Value | encodeBase64 }}"
```
Decodes a base64-encoded string back to its original value (e.g. `aGVsbG8gd29ybGQ=` becomes `hello world`).
**Signature**
```go theme={"dark"}
decodeBase64ToBytes(encodedString string) string
```
**Template usage**
```yaml theme={"dark"}
template:
data:
DECODED_SECRET: "{{ .MY_BASE64_SECRET.Value | decodeBase64ToBytes }}"
```
Extracts all private keys from a PKCS#12 archive and returns them as PKCS#8 PEM-encoded blocks (`-----BEGIN PRIVATE KEY-----...`).
The archive must not be password-protected — use `pkcs12keyPass` for password-protected archives.
**Signature**
```go theme={"dark"}
pkcs12key(input string) string
```
**Template usage**
```yaml theme={"dark"}
template:
data:
tls.key: "{{ .TLS_CERT_PKCS12.Value | pkcs12key }}"
```
Same as `pkcs12key`, but uses the provided password to decrypt the PKCS#12 archive.
**Signature**
```go theme={"dark"}
pkcs12keyPass(password string, input string) string
```
**Template usage**
```yaml theme={"dark"}
template:
data:
tls.key: '{{ pkcs12keyPass "my-password" .TLS_CERT_PKCS12.Value }}'
```
Extracts all certificates from a PKCS#12 archive and returns them as an ordered PEM chain (`-----BEGIN CERTIFICATE-----...`).
Sort order: **leaf → intermediate(s) → root**. If disjunct or multiple leaf certs are provided, they are returned as-is.
The archive must not be password-protected — use `pkcs12certPass` for password-protected archives.
**Signature**
```go theme={"dark"}
pkcs12cert(input string) string
```
**Template usage**
```yaml theme={"dark"}
template:
data:
tls.crt: "{{ .TLS_CERT_PKCS12.Value | pkcs12cert }}"
```
Same as `pkcs12cert`, but uses the provided password to decrypt the PKCS#12 archive.
**Signature**
```go theme={"dark"}
pkcs12certPass(password string, input string) string
```
**Template usage**
```yaml theme={"dark"}
template:
data:
tls.crt: '{{ pkcs12certPass "my-password" .TLS_CERT_PKCS12.Value }}'
```
Takes a PEM-encoded certificate and private key and creates a base64-encoded PKCS#12 archive.
The output is not password-protected — use `pemToPkcs12Pass` to set a password.
**Signature**
```go theme={"dark"}
pemToPkcs12(cert string, key string) string
```
**Template usage**
```yaml theme={"dark"}
template:
data:
keystore.p12: '{{ pemToPkcs12 .TLS_CERT.Value .TLS_KEY.Value }}'
```
Same as `pemToPkcs12`, but encrypts the PKCS#12 archive with the provided password.
**Signature**
```go theme={"dark"}
pemToPkcs12Pass(cert string, key string, password string) string
```
**Template usage**
```yaml theme={"dark"}
template:
data:
keystore.p12: '{{ pemToPkcs12Pass .TLS_CERT.Value .TLS_KEY.Value "my-password" }}'
```
Takes a full PEM-encoded certificate chain (leaf + intermediates + root) and a private key, and creates a base64-encoded PKCS#12 archive that includes the entire chain.
The output is not password-protected — use `fullPemToPkcs12Pass` to set a password.
**Signature**
```go theme={"dark"}
fullPemToPkcs12(cert string, key string) string
```
**Template usage**
```yaml theme={"dark"}
template:
data:
keystore.p12: '{{ fullPemToPkcs12 .TLS_FULL_CHAIN.Value .TLS_KEY.Value }}'
```
Same as `fullPemToPkcs12`, but encrypts the PKCS#12 archive with the provided password.
**Signature**
```go theme={"dark"}
fullPemToPkcs12Pass(cert string, key string, password string) string
```
**Template usage**
```yaml theme={"dark"}
template:
data:
keystore.p12: '{{ fullPemToPkcs12Pass .TLS_FULL_CHAIN.Value .TLS_KEY.Value "my-password" }}'
```
Filters PEM blocks by type from a bundle containing multiple PEM blocks (e.g. extract only `CERTIFICATE` or `PRIVATE KEY` blocks).
Common PEM types: `CERTIFICATE`, `PRIVATE KEY`, `PUBLIC KEY`, `RSA PRIVATE KEY`.
**Signature**
```go theme={"dark"}
filterPEM(pemType string, input string) string
```
**Template usage**
```yaml theme={"dark"}
template:
data:
ca.crt: '{{ filterPEM "CERTIFICATE" .TLS_BUNDLE.Value }}'
tls.key: '{{ filterPEM "PRIVATE KEY" .TLS_BUNDLE.Value }}'
```
Filters PEM certificates by their position in a certificate chain. The chain is automatically ordered before filtering.
Accepted types: `leaf` (end-entity certificate), `intermediate` (all intermediate CA certificates), `root` (root CA certificate).
Returns an empty string if the requested type is not present in the chain.
**Signature**
```go theme={"dark"}
filterCertChain(certType string, input string) string
```
**Template usage**
```yaml theme={"dark"}
template:
data:
tls.crt: '{{ filterCertChain "leaf" .TLS_CHAIN.Value }}'
ca.crt: '{{ filterCertChain "root" .TLS_CHAIN.Value }}'
intermediate.crt: '{{ filterCertChain "intermediate" .TLS_CHAIN.Value }}'
```
Takes a JSON-serialized JWK and returns a PEM block of type `PUBLIC KEY` containing the public key.
Uses [`x509.MarshalPKIXPublicKey`](https://pkg.go.dev/crypto/x509#MarshalPKIXPublicKey) internally.
**Signature**
```go theme={"dark"}
jwkPublicKeyPem(jwkJson string) string
```
**Template usage**
```yaml theme={"dark"}
template:
data:
public.pem: "{{ .MY_JWK.Value | jwkPublicKeyPem }}"
```
Takes a JSON-serialized JWK and returns a PEM block of type `PRIVATE KEY` containing the private key.
Uses [`x509.MarshalPKCS8PrivateKey`](https://pkg.go.dev/crypto/x509#MarshalPKCS8PrivateKey) internally.
**Signature**
```go theme={"dark"}
jwkPrivateKeyPem(jwkJson string) string
```
**Template usage**
```yaml theme={"dark"}
template:
data:
private.pem: "{{ .MY_JWK.Value | jwkPrivateKeyPem }}"
```
Marshals a value to a YAML string. Returns an empty string on marshal error.
**Signature**
```go theme={"dark"}
toYaml(v any) string
```
**Template usage**
```yaml theme={"dark"}
template:
data:
config.yaml: "{{ .APP_CONFIG.Value | fromYaml | toYaml }}"
```
Parses a YAML string into a `map[string]any`, useful for extracting individual fields from a YAML-formatted secret (e.g. `(fromYaml .DB_CONFIG.Value).host` returns the `host` field).
**Signature**
```go theme={"dark"}
fromYaml(str string) map[string]any
```
**Template usage**
```yaml theme={"dark"}
template:
data:
DB_HOST: '{{ (fromYaml .DB_CONFIG.Value).host }}'
DB_PORT: '{{ (fromYaml .DB_CONFIG.Value).port }}'
```
This function is only available in `v1beta1` resources (e.g. `InfisicalStaticSecret`).
Resolves a secret from a specific folder path within the Infisical project. Takes a path and a secret name as parameters, and returns the secret's value by default. You can optionally use `.Value` or `.SecretPath` accessors on the result -- if omitted, `.Value` is used.
This is especially useful when multiple secrets share the same key, either from recursive fetches across different paths or from multiple sources. In both cases, the merge strategy only keeps the first occurrence (read more [here](/integrations/platforms/kubernetes/infisical-static-secret-crd#sources)), so `secretFrom` lets you explicitly select the one you need by its full path.
If multiple sources contain a secret with the same name and path, the secret from the first source listed in the `sources` array will be used.
**Signature**
```go theme={"dark"}
secretFrom(path string, secretName string) string
```
**Template usage**
```yaml theme={"dark"}
template:
data:
# .Value is implicit when no accessor is specified
DB_PASSWORD: '{{ secretFrom "/databases/postgres" "DB_PASSWORD" }}'
# Explicit .Value accessor (same result as above)
STRIPE_API_KEY: '{{ (secretFrom "/services/payments" "API_KEY").Value }}'
# Using .SecretPath to get the folder path instead of the value
DATADOG_API_KEY: '{{ (secretFrom "/services/observability" "API_KEY").Value }}'
DATADOG_API_KEY_PATH: '{{ (secretFrom "/services/observability" "API_KEY").SecretPath }}'
```
### Sprig functions
The Infisical Secrets Operator integrates with the [Sprig library](https://github.com/Masterminds/sprig) to provide additional helper functions.
We've removed `expandEnv` and `env` from the supported functions for security reasons.
Define custom labels and annotations for the managed Kubernetes ConfigMap. This allows you to specify metadata that should be applied to the managed ConfigMap separately from the InfisicalSecret itself.
This field works the same way as `template.metadata` for managed secrets. For detailed information on how metadata propagation works and examples, see the [Propagating Labels & Annotations](#propagating-labels-&-annotations) section.
## Applying CRD
Once you have configured the InfisicalSecret CRD with the required fields, you can apply it to your cluster.
After applying, you should notice that the managed secret has been created in the desired namespace your specified.
```
kubectl apply -f example-infisical-secret-crd.yaml
```
To verify that the operator has successfully created the managed secret, you can check the secrets in the namespace that was specified.
```bash theme={"dark"}
# Verify managed secret is created
kubectl get secrets -n
```
The Infisical secrets will be synced and stored into the managed secret every
1 minute unless configured otherwise.
```bash theme={"dark"}
# Verify managed config map is created
kubectl get configmaps -n
```
The Infisical config map data will be synced and stored into the managed config map every
1 minute unless configured otherwise.
## Using Managed Secret In Your Deployment
To make use of the managed secret created by the operator into your deployment can be achieved through several methods.
Here, we will highlight three of the most common ways to utilize it. Learn more about Kubernetes secrets [here](https://kubernetes.io/docs/concepts/configuration/secret/)
This will take all the secrets from your managed secret and expose them to your container
````yaml theme={"dark"}
envFrom:
- secretRef:
name: managed-secret # managed secret name
```
Example usage in a deployment
```yaml
apiVersion: apps/v1
kind: Deployment
metadata:
name: nginx-deployment
labels:
app: nginx
spec:
replicas: 1
selector:
matchLabels:
app: nginx
template:
metadata:
labels:
app: nginx
spec:
containers:
- name: nginx
image: nginx:1.14.2
envFrom:
- secretRef:
name: managed-secret # <- name of managed secret
ports:
- containerPort: 80
````
This will allow you to select individual secrets by key name from your managed secret and expose them to your container
```yaml theme={"dark"}
env:
- name: SECRET_NAME # The environment variable's name which is made available in the container
valueFrom:
secretKeyRef:
name: managed-secret # managed secret name
key: SOME_SECRET_KEY # The name of the key which exists in the managed secret
```
Example usage in a deployment
```yaml theme={"dark"}
apiVersion: apps/v1
kind: Deployment
metadata:
name: nginx-deployment
labels:
app: nginx
spec:
replicas: 1
selector:
matchLabels:
app: nginx
template:
metadata:
labels:
app: nginx
spec:
containers:
- name: nginx
image: nginx:1.14.2
env:
- name: STRIPE_API_SECRET
valueFrom:
secretKeyRef:
name: managed-secret # <- name of managed secret
key: STRIPE_API_SECRET
ports:
- containerPort: 80
```
This will allow you to create a volume on your container which comprises of files holding the secrets in your managed kubernetes secret
```yaml theme={"dark"}
volumes:
- name: secrets-volume-name # The name of the volume under which secrets will be stored
secret:
secretName: managed-secret # managed secret name
```
You can then mount this volume to the container's filesystem so that your deployment can access the files containing the managed secrets
```yaml theme={"dark"}
volumeMounts:
- name: secrets-volume-name
mountPath: /etc/secrets
readOnly: true
```
Example usage in a deployment
```yaml theme={"dark"}
apiVersion: apps/v1
kind: Deployment
metadata:
name: nginx-deployment
labels:
app: nginx
spec:
replicas: 1
selector:
matchLabels:
app: nginx
template:
metadata:
labels:
app: nginx
spec:
containers:
- name: nginx
image: nginx:1.14.2
volumeMounts:
- name: secrets-volume-name
mountPath: /etc/secrets
readOnly: true
ports:
- containerPort: 80
volumes:
- name: secrets-volume-name
secret:
secretName: managed-secret # <- managed secrets
```
The definition file of the Kubernetes secret for the CA certificate can be structured like the following:
```yaml theme={"dark"}
apiVersion: v1
kind: Secret
metadata:
name: custom-ca-certificate
type: Opaque
stringData:
ca.crt: |
-----BEGIN CERTIFICATE-----
MIIEZzCCA0+gAwIBAgIUDk9+HZcMHppiNy0TvoBg8/aMEqIwDQYJKoZIhvcNAQEL
...
BQAwDTELMAkGA1UEChMCUEgwHhcNMjQxMDI1MTU0MjAzWhcNMjUxMDI1MjE0MjAz
-----END CERTIFICATE-----
```
### Automatic Redeployment
Deployments using managed secrets don't reload automatically on updates, so they may use outdated secrets unless manually redeployed.
To address this, we added functionality to automatically redeploy your deployment when its managed secret updates.
#### Enabling Automatic Redeployment
To enable auto redeployment you simply have to add the following annotation to the Deployment, StatefulSet, or DaemonSet that consumes a managed secret.
```yaml theme={"dark"}
secrets.infisical.com/auto-reload: "true"
```
```yaml theme={"dark"}
apiVersion: apps/v1
kind: Deployment
metadata:
name: nginx-deployment
labels:
app: nginx
annotations:
secrets.infisical.com/auto-reload: "true" # <- redeployment annotation
spec:
replicas: 1
selector:
matchLabels:
app: nginx
template:
metadata:
labels:
app: nginx
spec:
containers:
- name: nginx
image: nginx:1.14.2
envFrom:
- secretRef:
name: managed-secret
ports:
- containerPort: 80
```
```yaml theme={"dark"}
apiVersion: apps/v1
kind: DaemonSet
metadata:
name: log-agent
labels:
app: log-agent
annotations:
secrets.infisical.com/auto-reload: "true" # <- redeployment annotation
spec:
selector:
matchLabels:
app: log-agent
template:
metadata:
labels:
app: log-agent
spec:
containers:
- name: log-agent
image: mycompany/log-agent:latest
envFrom:
- secretRef:
name: managed-secret # <- name of the managed secret
volumeMounts:
- name: config-volume
mountPath: /etc/config
readOnly: true
volumes:
- name: config-volume
secret:
secretName: managed-secret
```
```yaml theme={"dark"}
apiVersion: apps/v1
kind: StatefulSet
metadata:
name: db-worker
labels:
app: db-worker
annotations:
secrets.infisical.com/auto-reload: "true" # <- redeployment annotation
spec:
selector:
matchLabels:
app: db-worker
serviceName: "db-worker"
replicas: 2
template:
metadata:
labels:
app: db-worker
spec:
containers:
- name: db-worker
image: mycompany/db-worker:stable
env:
- name: DATABASE_PASSWORD
valueFrom:
secretKeyRef:
name: managed-secret
key: DB_PASSWORD
ports:
- containerPort: 5432
```
#### How it works When a managed secret is updated, the operator checks for
any Deployments, DaemonSets, or StatefulSets that consume the updated secret
and have the annotation `secrets.infisical.com/auto-reload: "true"`. For each
matching workload, the operator triggers a rolling restart to ensure it picks
up the latest secret values.
## Using Managed ConfigMap In Your Deployment
To make use of the managed ConfigMap created by the operator into your deployment can be achieved through several methods.
Here, we will highlight three of the most common ways to utilize it. Learn more about Kubernetes ConfigMaps [here](https://kubernetes.io/docs/concepts/configuration/configmap/)
Automatic redeployment of deployments using managed ConfigMaps is not yet
supported.
This will take all the secrets from your managed ConfigMap and expose them to your container
````yaml theme={"dark"}
envFrom:
- configMapRef:
name: managed-configmap # managed configmap name
```
Example usage in a deployment
```yaml
apiVersion: apps/v1
kind: Deployment
metadata:
name: nginx-deployment
labels:
app: nginx
spec:
replicas: 1
selector:
matchLabels:
app: nginx
template:
metadata:
labels:
app: nginx
spec:
containers:
- name: nginx
image: nginx:1.14.2
envFrom:
- configMapRef:
name: managed-configmap # <- name of managed configmap
ports:
- containerPort: 80
````
This will allow you to select individual secrets by key name from your managed ConfigMap and expose them to your container
```yaml theme={"dark"}
env:
- name: CONFIG_NAME # The environment variable's name which is made available in the container
valueFrom:
configMapKeyRef:
name: managed-configmap # managed configmap name
key: SOME_CONFIG_KEY # The name of the key which exists in the managed configmap
```
Example usage in a deployment
```yaml theme={"dark"}
apiVersion: apps/v1
kind: Deployment
metadata:
name: nginx-deployment
labels:
app: nginx
spec:
replicas: 1
selector:
matchLabels:
app: nginx
template:
metadata:
labels:
app: nginx
spec:
containers:
- name: nginx
image: nginx:1.14.2
env:
- name: STRIPE_API_SECRET
valueFrom:
configMapKeyRef:
name: managed-configmap # <- name of managed configmap
key: STRIPE_API_SECRET
ports:
- containerPort: 80
```
This will allow you to create a volume on your container which comprises of files holding the secrets in your managed kubernetes secret
```yaml theme={"dark"}
volumes:
- name: configmaps-volume-name # The name of the volume under which configmaps will be stored
configMap:
name: managed-configmap # managed configmap name
```
You can then mount this volume to the container's filesystem so that your deployment can access the files containing the managed secrets
```yaml theme={"dark"}
volumeMounts:
- name: configmaps-volume-name
mountPath: /etc/config
readOnly: true
```
Example usage in a deployment
```yaml theme={"dark"}
apiVersion: apps/v1
kind: Deployment
metadata:
name: nginx-deployment
labels:
app: nginx
spec:
replicas: 1
selector:
matchLabels:
app: nginx
template:
metadata:
labels:
app: nginx
spec:
containers:
- name: nginx
image: nginx:1.14.2
volumeMounts:
- name: configmaps-volume-name
mountPath: /etc/config
readOnly: true
ports:
- containerPort: 80
volumes:
- name: configmaps-volume-name
configMap:
name: managed-configmap # <- managed configmap
```
The definition file of the Kubernetes secret for the CA certificate can be structured like the following:
```yaml theme={"dark"}
apiVersion: v1
kind: Secret
metadata:
name: custom-ca-certificate
type: Opaque
stringData:
ca.crt: |
-----BEGIN CERTIFICATE-----
MIIEZzCCA0+gAwIBAgIUDk9+HZcMHppiNy0TvoBg8/aMEqIwDQYJKoZIhvcNAQEL
...
BQAwDTELMAkGA1UEChMCUEgwHhcNMjQxMDI1MTU0MjAzWhcNMjUxMDI1MjE0MjAz
-----END CERTIFICATE-----
```
## Propagating Labels & Annotations
The operator provides flexible options for managing labels and annotations on managed Kubernetes secrets.
By default, the operator will transfer all labels & annotations present on the `InfisicalSecret` to the managed Kubernetes secret to be created.
### Example
```yaml theme={"dark"}
apiVersion: secrets.infisical.com/v1alpha1
kind: InfisicalSecret
metadata:
name: infisicalsecret-sample
labels:
label-to-be-passed-to-managed-secret: sample-value
annotations:
example.com/annotation-to-be-passed-to-managed-secret: "sample-value"
spec:
authentication:
# ... auth config ...
managedKubeSecretReferences:
- secretName: managed-token
secretNamespace: default
```
This would result in the following managed secret to be created:
```yaml theme={"dark"}
apiVersion: v1
data: ...
kind: Secret
metadata:
annotations:
example.com/annotation-to-be-passed-to-managed-secret: sample-value
secrets.infisical.com/version: W/"3f1-ZyOSsrCLGSkAhhCkY2USPu2ivRw"
labels:
label-to-be-passed-to-managed-secret: sample-value
name: managed-token
namespace: default
type: Opaque
```
When you specify `template.metadata` in your template configuration, you have full control over which labels and annotations are applied to the managed secret:
* Labels and annotations from `template.metadata` are used exclusively on the managed secret
* InfisicalSecret labels and annotations are NOT propagated to the managed secret
* This allows you to keep InfisicalSecret-specific metadata separate from the managed secret metadata
To prevent any propagation while using `template.metadata`, pass empty objects for labels and/or annotations.
This will ensure no labels or annotations are propagated to the managed secret, even from the InfisicalSecret CRD's own labels/annotations:
```yaml theme={"dark"}
template:
metadata:
labels: {}
annotations: {}
```
### Example
```yaml theme={"dark"}
apiVersion: secrets.infisical.com/v1alpha1
kind: InfisicalSecret
metadata:
name: infisicalsecret-with-template-metadata
labels:
managed-by: infisical-operator
annotations:
example.com/cr-specific: "metadata"
spec:
authentication:
# ... auth config ...
managedKubeSecretReferences:
- secretName: managed-secret-with-custom-metadata
secretNamespace: default
template:
includeAllSecrets: true
metadata:
labels:
app: my-application
environment: production
tier: backend
annotations:
secret.example.com/description: "Production database credentials"
secret.example.com/owner: "platform-team"
```
This would result in the following managed secret to be created:
```yaml theme={"dark"}
apiVersion: v1
data: ...
kind: Secret
metadata:
annotations:
secret.example.com/description: "Production database credentials"
secret.example.com/owner: "platform-team"
labels:
app: my-application
environment: production
tier: backend
name: managed-secret-with-custom-metadata
namespace: default
type: Opaque
```